1
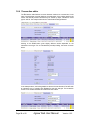
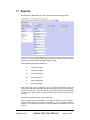
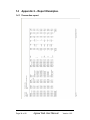
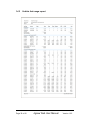
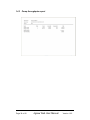
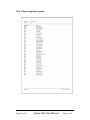
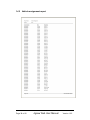
Web Site
User Manual
V1.63
Page 1 of 40
Jigsaw Web User Manual
Version 1.63
Contents.
System Overview ............................................................................................................ 3
1
Before Using The Website …................................................................................... 4
1.1
Fleet information.................................................................................................... 4
1.2
Vehicle groups....................................................................................................... 4
2
Logging In ............................................................................................................... 5
3
Selection Tabs ........................................................................................................ 6
4
QuickView Screen ................................................................................................... 7
5
Depots Screen ........................................................................................................ 8
5.1
The fuelling and fuel stock records audit trail.......................................................... 9
5.2
Fuel storage tanks............................................................................................... 10
5.3
How to enter a fuel stock delivery onto the system ............................................... 11
5.4
How to adjust the volume of fuel stored in a tank ................................................. 12
5.5
How to enter a manual fuelling record onto the system ........................................ 13
5.6
Pumps................................................................................................................. 14
6
Vehicle Groups Screen.......................................................................................... 15
7
Vehicles Screen .................................................................................................... 16
7.1
Sorting................................................................................................................. 16
7.2
Filtering ............................................................................................................... 16
7.3
Viewing or editing the details of an existing vehicle .............................................. 17
7.4
Assigning a new vehicle onto the system ............................................................. 18
7.5
Configurable vehicle details ................................................................................. 18
7.6
Offsite fuel entry .................................................................................................. 20
8
User Groups.......................................................................................................... 21
9
Users Screen ........................................................................................................ 22
9.1
Sorting................................................................................................................. 22
9.2
Filtering ............................................................................................................... 22
9.3
Viewing or editing the details of an existing user .................................................. 23
9.4
Assigning a new user onto the system ................................................................. 24
9.5
Configurable user details ..................................................................................... 24
10 Administration Screen ........................................................................................... 25
10.1 Security ............................................................................................................... 25
10.2 Fuelling data import ............................................................................................. 25
10.3 Fuelling data export ............................................................................................. 27
10.4 Transaction editor................................................................................................ 28
11 Reports. ................................................................................................................ 29
11.1 How to print a report or export into Excel ............................................................. 30
12 Frequently Asked Questions - FAQ’s ..................................................................... 31
12.1 Why do pumps become disabled ......................................................................... 31
12.2 Why has a vehicle been automatically locked out ?.............................................. 31
12.3 There is a discrepancy between the actual tank stock and the system book
stock – what can cause this ? .............................................................................. 32
12.4 How do I correct a discrepancy between the actual tank stock and the system
book stock ? ........................................................................................................ 32
12.5 How do I tell the system about fuel deliveries ? .................................................... 32
12.6 I’ve lost an ID tag and need to stop it being used – how do I do this ? .................. 32
12.7 How do I transfer an existing vehicle to a new ID Tag ? ....................................... 32
13 Appendix 1. ........................................................................................................... 33
13.1 Fleet data gathering form..................................................................................... 33
14 Appendix 2 – Report Examples.............................................................................. 34
14.1 Transaction report ............................................................................................... 34
14.2 Vehicle fuel usage report ..................................................................................... 35
14.3 Pump throughputs report ..................................................................................... 36
14.4 Driver assignment report...................................................................................... 37
14.5 Vehicle assignment report ................................................................................... 38
14.6 Group fuel usage report ....................................................................................... 39
15 Appendix 3 ............................................................................................................ 40
15.1 Transaction alarm codes...................................................................................... 40
Page 2 of 40
Jigsaw Web User Manual
Version 1.63
System Overview
The Jigsaw Online Fuel Management System is made up of just two major
components, the fuel island controller on your fuel island, and the Jigsaw web site.
The fuel island controller manages all of the on-site control functions in response to
information fed directly to it, in real time, from the web site.
The system makes full use of communication and Internet technology which is now
taken for granted in most walks of life. Data is passed to and from the fuel island
using the same technology as is used in mobile phones, so that there is no
requirement for expensive cabling, and yard disruption. The Mobile Network links
directly to the Internet so that data leaving the fuel island is reliably routed to the
Jigsaw Website as it happens on site.
Page 3 of 40
Jigsaw Web User Manual
Version 1.63
1
Before Using The Website …
Before using the web site, it’s important to gather the information on your fleet. Also,
you need to decide what kind of reports you are going to need, and how the data
gathered is going to be passed to the people who need it.
1.1
Fleet information
First, you need a list of all the vehicles you wish to be able to use the fuel island. In
some fleets, the vehicle will only have a registration number, in some, just an
allocated fleet number, some may have both. This primary identification will form the
basis of your fleet listing. In addition to vehicles, you may have plant equipment which
also requires fuel. To account for every drop of fuel running through your system,
make sure that you include equipment such as lawn mowers, chain saws, tractors even fuel cans.
Appendix 1 gives a typical layout for a data gathering sheet for your fleet. Fill in as
many of the fields as possible.
1.2
Vehicle groups.
Once you have a current fleet listing, you need to decide on how reports on the fleet
will be structured. Your fleet will have natural divisions in it such as make, type, use or
department. You can define up to four divisions or groups for your fleet, each with
unlimited entries. As an example, you may define one group as vehicle make, with
categories such as Volvo, Scania, Leyland, Ford, the next as Vehicle Model, the next
as Vehicle Type (eg Van, Tractor, Artic, Rigid, Plant). Even after this, there is still one
spare !
Once you have decided on the vehicle groupings, add these to the vehicle list you
created earlier.
Page 4 of 40
Jigsaw Web User Manual
Version 1.63
2
Logging In
The Jigsaw Web Site is accessed through a standard web browser such as Windows
Internet Explorer™. Enter www.jigsawm2m.com into the browser address bar and
then launch the browser.
A screen similar to the following will be displayed :
Enter your User Name and Password and then click the “Log In” button. If you have
not been issued with a user name and password, get in touch with your supplier as
soon as possible, as you can’t access the site without one.
Make a note of your User Name and Password here if security permits.
User Name
Password
Page 5 of 40
Jigsaw Web User Manual
Version 1.63
3
Selection Tabs
Across the top of all screens there is a tab bar containing the following selectable
options :
On your system, any unused tabs will be “greyed out” as shown above on the Users
and User groups tabs.
The “QuickView” tab is the default system page.
The “Depots” tab allows you to view the latest information regarding the fuelling
depots being monitored. If your system monitors more than one fuelling depot then a
pull down selection box allows you to switch views between depots.
The “Vehicles” tab is where you will input and maintain all vehicle details. This tab
also gives access to the latest fuelling transactions for each vehicle.
The “Vehicle Groups” tab is where you set up the reporting groups for the vehicles.
The Vehicle Groups should be decided on and set up before adding your fleet to the
system.
The “Users” tab is where driver information is input on to the system.
The “User Groups” tab is where drivers can be grouped for reporting purposes.
The “Administration” tab is where passwords are set up, and maintained. Third party
fuelling information is also entered into the system here.
Finally, the “Reports” tab is where you can generate and print out various reports on
your fleet.
Note
The function of each of these tabbed pages is described further in the following
pages.
Page 6 of 40
Jigsaw Web User Manual
Version 1.63
4
QuickView Screen
Once you have logged in to the web site, you will be directed to the following screen :
This is the QuickView screen. This screen will give you a brief overview of the current
status of your system including any issues requiring immediate attention, such as low
fuel stocks or pumps out of service.
You will notice that the main body of the screen consists of several status reports.
The first is a list of any fuel tanks which have fallen below their pre-assigned critical
low stock level.
The second is a list of any fuel tanks which have fallen below their pre-assigned reorder level.
The third is a list of all pumps currently registered as being out of service.
The fourth is a list of all fuelling locations at which fuelling has not been registered
within the previous 24 hours. This may indicate an issue with the communications
link.
Note : If you are using the system to manage more than one site, then issues on all
sites will be listed enabling you to manage many fuelling sites as simply as one.
Finally, there is a system activity log report. This may include stock deliveries,
attempted use of locked out tags, unauthorised fuellings etc. This report may be
filtered by both site and alarm priority. The report defaults to all sites and high priority
alarms only.
Page 7 of 40
Jigsaw Web User Manual
Version 1.63
5
Depots Screen
The Depots screen is split into two sections. The top section (shown below) gives a
current status view of the site whilst the lower section provides an audit trail of fuelling
and fuel stock records.
This screen provides the depot details and also the current status of the fuel tanks
and pumps. On a system monitoring multiple fuelling depots, the required depot is
selected from the drop down list at the top left of the screen.
Use the paging buttons (shown below) to view the individual tank and pump details.
Page 8 of 40
Jigsaw Web User Manual
Version 1.63
5.1
The fuelling and fuel stock records audit trail
By default, the last 100 fuelling records for the selected depot are displayed as in the
example below. The records may be filtered for individual pumps by selecting from
the drop down list.
The final column of the fuelling records list (marked by ‘!’) may contain a 2 character
alarm code to denote a record other than a standard fuelling record. A list of these
codes may be found in appendix 3.
Clicking the Switch view button toggles the fuelling and fuel stock records. A typical
fuel stock audit trail is shown below. The records may be filtered for an individual tank
by selecting from the drop down list.
Page 9 of 40
Jigsaw Web User Manual
Version 1.63
5.2
Fuel storage tanks
The information displayed is as follows :
Tank
Description
Fuel Grade
Capacity
Re-Order
Low Level
Current Level
T/Gauge Level
Unit Price
Updated
The fuel tank number
A meaningful description of the fuel storage tank.
The fuel type stored
The maximum storage capacity.
The volume below which a re-order alarm is triggered (See
QuickView screen)
The volume below which a low stock alarm is triggered (See
QuickView screen)
The current volume of fuel in the tank
The volume of fuel monitored by a remote tank gauge (If
fitted)
The unit price (pence per litre) of the last fuel delivery
entered into the tank
The time at which the data was refreshed
Note : The Re-Order, Low Level and Current Level fields will be displayed in red if
the current level falls below the configured alarm levels.
The Edit button allows you to modify the basic details of the tank as shown below.
Click the Update button to save your changes or the Cancel button to discard them.
Page 10 of 40
Jigsaw Web User Manual
Version 1.63
5.3
How to enter a fuel stock delivery onto the system
Clicking on the Stock delivery button will give you a screen similar to the one below.
This screen allows you to enter the stock delivery onto the system and also gives an
audit trail of the most recent stock delivery records for the selected tank.
The information required is as follows :
Tank number
Reference
Notes
Fuel volume
Unit price (ppl)
Selectable from the dropdown list.
Typically the delivery note or order number.
Any other information regarding the delivery.
The volume of fuel delivered.
The price per litre in pence. For example if the fuel was
priced at £1.03 per litre, then you would enter 103.00 here. In
the above example, gasoil has been entered at 60.50 pence
per litre.
Click the Confirm button to verify and save your fuel stock delivery details or the
Cancel button to discard them.
Page 11 of 40
Jigsaw Web User Manual
Version 1.63
5.4
How to adjust the volume of fuel stored in a tank
Clicking on the Stock adjustment button will give you a screen similar to the one
below. This screen allows you to adjust the volume of fuel stored in a tank and also
gives an audit trail of the most recent stock adjustment records for the selected tank.
The information required is as follows :
Tank number
Notes
New level
Selectable from the dropdown list.
Any information regarding the stock adjustment.
The measured volume of fuel in the tank. This volume may
be obtained from either a tank gauge or by manually dipping
the tank.
Click the Confirm button to verify and save your fuel stock adjustment details or the
Cancel button to discard them.
Page 12 of 40
Jigsaw Web User Manual
Version 1.63
5.5
How to enter a manual fuelling record onto the system
Clicking on the Manual fuel entry button will give you a screen similar to the one
below. This screen allows you to enter fuelling details from sites configured on you
system which do not have an active fuel monitoring system.
The information required is as follows :
Date/time of fuelling
Fuelling location
Vehicle
Pump
Fuel quantity
Odometer reading
Selectable from the calendar / dropdown lists.
The depot at which the fuelling occurred.
Selectable by reg., fleet or number.
Selectable.
The amount of fuel drawn.
The odometer reading (if known)
Click the Update button to save the entered details. The screen will reset to await the
next entry. When completed, click the Return button to return to the Depots screen.
Page 13 of 40
Jigsaw Web User Manual
Version 1.63
5.6
Pumps
The information displayed is as follows :
Pump
Hose
Fuel Grade
Lifetime Total
Period Total
Period Start
Updated
The pump number.
The hose number (Will always be 1 for mechanical pumps).
The type of fuel dispensed.
Lifetime fuel throughput.
Period fuel throughput.
The start date/time for the period fuel throughput.
The time at which the data was refreshed
The Edit button allows you to modify the pump totaliser values as shown below. The
lifetime total may be modified to agree with the value displayed on you pump. The
period total can only be reset by clicking the Reset Period Total button. Click the
Update button to save your changes or the Cancel button to discard them.
Page 14 of 40
Jigsaw Web User Manual
Version 1.63
6
Vehicle Groups Screen
On selecting the “Vehicle Groups” tab at the top of the web page, a screen similar to
the on below will be displayed :
On a new system, none of the groups will be assigned. First decide how many groups
you need to use. Select the top “Edit” button and enable as many groups as are
needed by checking the boxes under the Group1, Group 2, Group3 and/or Group4
Headings. If only two are required, then just select groups 1 and 2, always work from
the left.
Enter the Group names in the white boxes under each group heading being used,
then press “Update”
If you decide to change the names of the groups later, simply edit the relevant name
later using the same screen.
With the Groups identified, you will see that, for each grouping defined, there is a
button with the group name on it now in the lower horizontal section. Select the first
group and then click the “Add” button. You can now enter as many members of this
grouping as you need. Repeat this for each grouping.
If you make a mistake, or need to change a group member, simply select the relevant
group, then the offending group member, and click the “Edit” button.
Page 15 of 40
Jigsaw Web User Manual
Version 1.63
7
Vehicles Screen
The Vehicles screen allows you to assign, modify and view your vehicle fleet details.
The exact layout of this screen will vary according to your specific system
configuration but a general example is shown below.
7.1
Sorting
By default, the list is ordered by vehicle number. However, this is selectable and may
be by registration or fleet number.
7.2
Filtering
The list of vehicles can be filtered using the dropdown boxes on the left hand side of
the screen. This can restrict the vehicles displayed by depot, by any of the enabled
groups, or by the lockout status.
The ‘Vehicle like’ filter allows a partial filter of the fleet and registration fields. For
example, to view all vehicles with KR51 in the registration field, type ‘KR51’ in the box
and click the button. Note. This filter acts on both the fleet and registration fields so if
a vehicle had KR51 as part of its fleet identifier, then it would also appear in the list.
Page 16 of 40
Jigsaw Web User Manual
Version 1.63
7.3
Viewing or editing the details of an existing vehicle
To view or edit the details of a particular vehicle, simply click on the “View” button on
the right hand side adjacent to the required vehicle.
If you are having difficulty finding the vehicle or, if your fleet is large, use the “Search”
facility at the top left of the screen. The search can be made on tag number, vehicle
registration or fleet number.
Note. By moving the mouse cursor over a particular vehicle, you can quickly see the
details of that vehicle without resorting to the full screen “View” option. The details are
displayed in a temporary “hint” box.
By selecting the “View” button, or after a successful search, the following screen is
displayed :
This screen shows all the current details of the selected vehicle as well as the latest
fuelling transactions. To change any details, click the “Edit” button. To leave the
screen, click the “Return” button. To remove this vehicle from the system, click the
“Delete” button.
Note. Deleting a vehicle will permanently remove it from the system and the details
will not be retrievable.
Page 17 of 40
Jigsaw Web User Manual
Version 1.63
7.4
Assigning a new vehicle onto the system
To assign a vehicle to the system, Click the “New” button at the upper left of the
screen. The following screen will appear:
Once the vehicle details have been entered, click the “Update” button to save or
“Cancel” to discard the changes.
7.5
Configurable vehicle details
The information stored against each vehicle is as follows :
i)
Vehicle Number. This is the number of the tag or card used to identify the
vehicle or equipment to the fleet. This number will be found on the tag or card
when issued.
ii)
Vehicle Reg. Enter the vehicle registration number.
iii)
Vehicle Fleet. Enter the vehicle fleet number if one is allocated.
iv)
Home Depot. Use the pull down box to select the home depot of this vehicle.
If there is only one depot, then this will automatically be selected. For multisite systems, the home depot can be used as a further grouping for vehicles
when generating reports.
v)
Latest Odometer. As vehicles are added, it is best to leave this entry blank
as it indicates that the first entry at the fuel island should be accepted even if
range checking is switched on. Later, if the vehicle odometer needs resetting
(eg for a tacho change), then the new value may be edited in later.
vi)
Groups. There will be up to four boxes displayed here, depending on how
many vehicle groups have been set up under the “Vehicle Groups” tab.
Select the appropriate entry for each group.
Page 18 of 40
Jigsaw Web User Manual
Version 1.63
vii)
PIN Entry. There are three options here :
a. None – No PIN will be requested.
b. PTRP – Not yet available
c.
viii)
P’Vend – This uses an algorithm to generate a PIN number from the
details of the tag or card presented. The user must enter this PIN
correctly to start fuelling.
Odometer Entry. There are four options here :
a. None. No Input will be required by the user
b. Miles. User will be prompted to enter the odometer reading in Miles.
c.
Kilometres. User will be prompted to enter the odometer reading in
kilometres.
d. Hours. User will be prompted to enter the hours run reading for the
vehicle or plant equipment.
ix)
Odometer Check. Three Options here :
a. None. Any odometer entered will be accepted
b. UnderCheck. So long as the number entered is less than the last
recorded odometer, the number will be accepted.
c.
x)
Full. The number entered must be greater than the last recorded
odometer, but must be less than that number plus the “Distance Limit”
value input below.
On Invalid Entry. Two Options here :
a. Continue. After three entries of the same “bad” odometer, the system will
accept the value as correct and continue to fuel. This may be used in a
situation such as when a tachometer has been changed, or a vehicle has
been away from the site for some time.
b. Lockout. After three attempts of a bad odometer, the vehicle will be
locked out. The assumption is that the tag has been found by an
unauthorised user who doesn’t have the vehicle to hand to get the latest
mileage and is trying to steal fuel. This method of operation also
educates drivers to enter the correct mileage as it is easier than ringing
the office to get the vehicle enabled again.
xi)
Distance Limit. If full range checking on entered odometer is required, then
the value input here is used to set the range in which the entered mileage
must fall. The entered mileage must be greater than the last recorded
mileage, but no greater than that figure plus the value entered here.
xii)
Data Entry 1 and 2. When the fuel island terminal is configured, two data
prompts are programmed. These may be “Please Enter Your Mileage”,
“Enter Job Number”, “Please Enter Police Collar Number”, Have you
Checked Your Oil Today ? (Y/N)” or anything else required by your business.
None, either, or both of these prompts can be enabled so that the user is
asked the associated question at the time of fuelling. Check whichever boxes
are appropriate.
Page 19 of 40
Jigsaw Web User Manual
Version 1.63
xiii)
Driver Access. Two Options here :
a. None. The user will not be prompted to identify himself.
b. Enabled. The user will be prompted to enter a driver PIN number or to
use a driver tag to identify him/herself to the system. The method of
identity is set when the fuel island terminal is configured.
7.6
xiv)
Fuel Limit. This limit can be set as an individual fill, daily, weekly or monthly
total. To reduce the possibility of theft, it is prudent to set this limit to the
approximate capacity of the fuel tank on the vehicle. At the fuel island, the
pump will be turned off when this limit is reached.
xv)
Fuel Grades Allowed. Dependant on the number of grades of fuel managed
by the fuel island terminal on this site, a number of checkboxes will be
presented. Select the grades of fuel which this vehicle will need to draw. This
is useful to stop diesel being drawn by petrol vehicles, or white diesel being
used by plant equipment.
xvi)
Lockout Checkbox. This checkbox is used to enable the vehicle to fuel. If
the box is checked, then fuelling will not be allowed. It is usual to leave this
box unchecked so that fuelling can commence on presentation of the tag at
the fuel island.
xvii)
Notes. Any special notes or information regarding this vehicle.
Offsite fuel entry
If your system has been configured to allow the input of offsite fuelling details, then
clicking the ‘Offsite fuel entry’ button on the vehicle listing screen will give access to
the following screen. This facility allows the input of fuelling data from ‘offsite’ sources
(eg service stations etc) to be incorporated into the system to produce accurate fuel
consumption data etc.
Page 20 of 40
Jigsaw Web User Manual
Version 1.63
8
User Groups
On selecting the “User Groups” tab at the top of the web page, a screen similar to the
following will be displayed ;
On a new system, none of the groups will be assigned. First decide how many groups
you need to use. Select the top “Edit” button and enable as many groups as are
needed by checking the boxes under the Group1 and Group 2 headings. As with the
vehicle groups, always work from the left.
Enter the Group names in the white boxes under each group heading being used,
then press “Update”
If you decide to change the names of the groups later, simply edit the relevant name
later using the same screen.
With the Groups identified, you will see that, for each grouping defined, there is a
button with the group name on it now in the lower horizontal section. Select the first
group and then click the “Add” button. You can now enter as many members of this
grouping as you need. Repeat this for each grouping.
If you make a mistake, or need to change a group member, simply select the relevant
group, then the offending group member, and click the “Edit” button.
Page 21 of 40
Jigsaw Web User Manual
Version 1.63
9
Users Screen
The Users screen allows you to assign, modify and view your driver / fueller details.
You will only have access to this screen if your system has been configured to accept
driver or fueller access.
The exact layout of this screen will vary according to your specific system
configuration but a general example is shown below.
9.1
Sorting
By default, the list is ordered by user number. However, this is selectable and may be
by user number or user ID.
9.2
Filtering
The list of vehicles can be filtered using the dropdown boxes on the left hand side of
the screen. This can restrict the users displayed either by depot or by any of the
enabled groups.
The ‘User ID like’ filter allows a partial filter of the user ID field. For example, to view
all users with a surname of TAYLOR, type ‘TAYLOR’ in the box and click the button.
Page 22 of 40
Jigsaw Web User Manual
Version 1.63
9.3
Viewing or editing the details of an existing user
To view or edit the details of a particular user, simply click on the “View” button on the
right hand side adjacent to the required user.
If you are having difficulty finding the user or, if your driver/fueller is large, use the
“Search” facility at the top left of the screen. The search can be made on user number
or user ID.
Note. By moving the mouse cursor over a particular user, you can quickly see the
details of that user without resorting to the full screen “View” option. The details are
displayed in a temporary “hint” box.
By selecting the “View” button, or after a successful search, the following screen is
displayed :
This screen shows all the current details of the selected user as well as the latest
fuelling transactions. To change any details, click the “Edit” button. To leave the
screen, click the “Return” button. To remove this user from the system, click the
“Delete” button.
Note. Deleting a user will permanently remove it from the system and the details will
not be retrievable.
Page 23 of 40
Jigsaw Web User Manual
Version 1.63
9.4
Assigning a new user onto the system
To assign a new user to the system, Click the “New” button at the upper left of the
screen. The following screen will appear:
Once the vehicle details have been entered, click the “Update” button to save or
“Cancel” to discard the changes.
9.5
Configurable user details
The information stored against each user is as follows :
i)
User Number. The user number is either an issued number to be typed into
the system, or the number of the tag issued to that driver.
ii)
User ID. This is the name of the driver associated with this User Number
iii)
Home Depot. A list of all fuelling sites controlled by this web site is available.
The home site for this user should be chosen.
iv)
Groupings. There will be up to two boxes displayed here, depending on how
many user groups have been set up under the “User Groups” tab. Select the
appropriate entry for each group.
v)
Notes. Any special notes or information regarding this user.
Page 24 of 40
Jigsaw Web User Manual
Version 1.63
10
Administration Screen
The “Administration” screen gives access to password, data import/export and
transaction editing functions.
10.1 Security
On clicking the “Security” option, the user is presented with the following screen :
To change the password, simply enter your current and required new password
where indicated. Click the “Change Password” button to confirm.
10.2 Fuelling data import
rd
The “Fuelling data import” option facilitates the input of 3 party fuelling information
(for example fuelcards).
To upload a file to the server for processing, select “Upload fuelling data file” which
will give a screen similar to the one below:
The import site reference and file format are preconfigured and will not require
changing unless you are importing files from more than one supplier. Click the
“Browse” button to navigate to and select the file to be imported. When you have
selected the correct file, click the “Upload” button to upload the file to the server for
processing.
Page 25 of 40
Jigsaw Web User Manual
Version 1.63
Once the file has been uploaded to the server, the “List files” screen will appear as
below:
The status of the file is set to Pending which means that the file has been copied to
the server but has not yet been processed. Click the “Convert” button to convert and
process the data.
If the system is unable to process any of the records, the unprocessed records will be
listed as below:
Either select “Edit” to modify the details or “Ignore” to mark the record as not for
processing. Click the “Re-process” button to reprocess any modified records.
The “List files” option gives a record of the files imported into the system. In the
example below, the two most recent files have been successfully processed whilst the
file uploaded on 23/02/2009 contains some unprocessed records.
Page 26 of 40
Jigsaw Web User Manual
Version 1.63
10.3 Fuelling data export
Clicking the “Create new export file” option will create a new file on the server
containing the latest unprocessed fuelling data. To view and save the exported
fuelling data, select “List files” to list the saved files as below:
This will open the standard browser download window as below:
Select “Open” to view the file or “Save” to save it to your PC.
Page 27 of 40
Jigsaw Web User Manual
Version 1.63
10.4 Transaction editor
The “Transaction editor” allows incorrect odometer entries to be corrected and, in the
case of unauthorised (override) fuellings, the assignment of the fuelling details to the
vehicle that actually fuelled. Records may be viewed by depot, transaction record
type or vehicle. The example below shows unauthorised fuellings selected.
Clicking on the “Edit” button gives slightly different results dependant on the
transaction record type. For an unauthorised (override) fuelling, the screen is shown
below:
In the example above, the fuelling details are about to be transferred to F99 WFV with
an odometer entry of 191259. Click “Update” to save the changes. The transaction
record is now marked with ‘!’ to show that it has been edited.
Page 28 of 40
Jigsaw Web User Manual
Version 1.63
11 Reports.
On selecting the “Reports” tab, the user is presented with the following screen :
This initial screen will change depending on the type of report required. The screen
shown is for the Transaction Listing type report, but by selecting a different report
type from the available list, the selectable options change.
The pre-defined report types available are :
i)
Transaction Listing.
ii)
Vehicle Fuel Usage.
iii)
Pump Throughputs.
iv)
Driver Assignment.
v)
Vehicle Assignment.
vi)
Group Fuel Usage.
Each report type can be configured to suit your specific requirements using the
various Sorts and Filters selectable through the web page before running the report.
All reports can be set to cover any date and time range using the calendar boxes.
You may either type the date or click the calendar icon to select from the pop-up
calendar.
Examples of typical reports are given in Appendix 2.
Once the report has been generated, it can either be viewed on screen, saved in
Acrobat (.PDF) format to be printed or e-mailed, or, if more specific analysis is
required, can be exported as an Excel format spreadsheet as detailed in the next
section.
Page 29 of 40
Jigsaw Web User Manual
Version 1.63
11.1 How to print a report or export into Excel
Once you have generated your report, it may be exported into either Adobe Acrobat
or Excel for viewing, printing or further data manipulation. This is done using the
‘Export’ option as shown below:
Select either “Excel” or “Acrobat (PDF) file” and then click “Export”. This will open the
standard browser download window as shown below:
Select “Open” to view the file in its specified format or “Save” to save it to your PC.
NOTE : If you do not currently have Adobe Acrobat installed on your PC, the free
reader software may be downloaded from http://www.adobe.com/downloads/
To return, to the reports selection screen, click the ‘Continue’ button.
Page 30 of 40
Jigsaw Web User Manual
Version 1.63
12
Frequently Asked Questions - FAQ’s
12.1 Why do pumps become disabled
There are two ways in which the system will deny use of a particular pump :
A/ By a site manager setting the pump to disabled either through the web site or at
the fuel island terminal.
A Site manager may lock out a pump because of contaminated fuel, or to
keep stocks in reserve, or for security at certain times of the day.
B/ The system will automatically lock out a pump if a fuelling transaction is repeatedly
being started, but no delivery volume is detected.
On initial Fuel Island Terminal set up, the system is given settings for each
pump which include a start time, an end time, and a null delivery cut off. The start
time sets the number of seconds to wait after the pump has been turned on before
turning it off again if no fuel has been delivered. The end time sets the number of
seconds to wait before terminating a delivery after the fuel has stopped flowing. The
null delivery cut off sets the number of consecutive start fuelling attempts which have
resulted in no fuel delivery before the pump is disabled.
There are two main causes for null deliveries :
i.
The start time is to short and the fueller can’t start the delivery in the time
allowed. This can be remedied by extending the start time. The default setting
is usually 45 seconds.
ii.
The pulser in the pump is broken so that although fuel is flowing, it is not
detected by the system. This can only be remedied by repairing the pump.
12.2 Why has a vehicle been automatically locked out ?
Whilst a vehicle can be barred from fuelling any time by setting the “Lockout” flag on
the vehicles details screen on the web site, it can also be automatically blocked from
fuelling through bad mileage entry.
To ensure drivers are encouraged to input the correct mileage at the time of fuelling,
the system can perform range checks on the input mileage before fuelling is allowed
to commence. This range check can be just that the input mileage is greater than the
last mileage entered, or it can be a window check where the mileage must be greater
than the last known mileage, but not greater than the last known mileage and a figure
set for that vehicle. If a bad mileage is entered three times the same, then the system
can be configured to either accept the new mileage, or to lock out the vehicle. The
vehicle would then have to be re-enabled through the web site.
Page 31 of 40
Jigsaw Web User Manual
Version 1.63
12.3 There is a discrepancy between the actual tank stock
and the system book stock – what can cause this ?
There are several reasons that this may happen, here are a few :
i)
The fuel quantity put in to the tank was not what was on the delivery
note.
Resolution : Dip tank before and after delivery.
ii)
The fuel has leaked or has been stolen from the tank.
Resolution : Check tank bund for signs of leakage. Secure access to
the tank.
iii)
Your pump is delivering a different amount of fuel to what is being
sensed by the fuel island controller.
Resolution : Have Pump Calibrated. Check wiring between pump and
Fuel Island Terminal. Check Pulses per Litre setting for pump.
12.4 How do I correct a discrepancy between the actual tank
stock and the system book stock ?
On the Depot Screen, click the “Stock Adjustments” button. Select the tank you wish
to adjust and input the correct amount of fuel. There is a small field to allow the input
of the reason for the adjustment. A record of the adjustment will be kept in the
deliveries adjustment log accessed by clicking the “Switch View” Button.
12.5 How do I tell the system about fuel deliveries ?
On the Depot Screen, click the “Stock Delivery” button. Select the tank you wish to
add stock to and input the correct amount of fuel. There is a field available for the
delivery note number so that you can check against records on invoices later. A
record of the delivery will be kept in the deliveries adjustment log accessed by clicking
the “Switch View” Button.
12.6 I’ve lost an ID tag and need to stop it being used – how
do I do this ?
On the web site select the “Vehicles” tab and use the search facility to find the vehicle
to be Locked Out. The search can be against the ID Tag number, the vehicles
Registration Number or its Fleet Number. Once the vehicle has been found, set the
“Lockout” Checkbox. The tag will not now be usable on any site across the network.
The vehicle in question will have to be issued with a new tag to fuel. (See next FAQ).
12.7 How do I transfer an existing vehicle to a new ID Tag ?
This is very simple. On the web site find the vehicle associated with the lost tag using
the search facility which can find the vehicle using registration number, fleet number
or the lost tag number. Once found, select the “Edit” button and feed the details of the
new ID Tag or card for that vehicle in to the “Vehicle Number” box. All transactions
associated with the new ID Tag or Card will be allocated to that vehicle and the ones
using the old tag will also remain for reporting purposes.
Page 32 of 40
Jigsaw Web User Manual
Version 1.63
13
Appendix 1.
13.1 Fleet data gathering form.
Page 33 of 40
Jigsaw Web User Manual
Version 1.63
14
Appendix 2 – Report Examples.
14.1 Transaction report
Page 34 of 40
Jigsaw Web User Manual
Version 1.63
14.2
Vehicle fuel usage report
Page 35 of 40
Jigsaw Web User Manual
Version 1.63
14.3 Pump throughputs report
Page 36 of 40
Jigsaw Web User Manual
Version 1.63
14.4 Driver assignment report
Page 37 of 40
Jigsaw Web User Manual
Version 1.63
14.5 Vehicle assignment report
Page 38 of 40
Jigsaw Web User Manual
Version 1.63
14.6 Group fuel usage report
Page 39 of 40
Jigsaw Web User Manual
Version 1.63
15 Appendix 3
15.1 Transaction alarm codes
Fuelling Records
Unauthorised (override) fuelling
Odometer override
Null delivery
Power failed while fuelling
Null delivery cutoff
UF
OO
ND
PF
NC
Engineer/Manger Events
Stock entry
Tank dip
Pump enabled
Pump disabled
Vehicle locked locally
User locked locally
Vehicle unlocked locally
User unlocked locally
Powerfail at FMU (when idle)
Pump flow test
SE
TD
PE
PD
VL
UL
VU
UU
PF
FT
Fueller logon
Fueller logoff
F1
F2
Server declined vehicle or driver access
Access denied
AD
Invalid Vehicle/User ID
Attempted use of locked out user id
Attempted use of locked out vehicle id
Vehicle card has expired
User card has expired
Fuel limit exceeded
Invalid vehicle
Invalid user
Invalid manager
Invalid engineer
Unknown vehicle fuelled
Unknown driver fuelled
LU
LV
XV
XU
FX
IV
IU
IM
IE
UV
UD
PC Functions
Manual fuel entry
Imported from file
Offsite fuel entry
MF
FI
OF
Transaction Editor
Modified using transaction editor
xx!
(Where xx is one of the above codes or blank for a standard fuelling record. When a
record has been modified using the transaction edit facility, this is indicated by addin ‘!’
to the existing alarm code. For example, a modified override fuelling record would be
‘UF!’ A modified standard fuelling record would simply be ‘!’)
Page 40 of 40
Jigsaw Web User Manual
Version 1.63