1
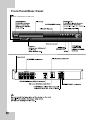
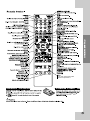
USB Plus (Go to page 8) DVD/CD RECEIVER OWNER’S MANUAL XTS & XTS Pro (Go to page 15) Model : HT302SD, HT302SD-A8 SH32SD-SZ, SH32SD-WZ Virtual Sound (Go to page 15) FM & AM Tuner Function (Go to page 19) USB plus Before connecting, operating or adjusting this product, please read this instruction booklet carefully and completely. P/No. : MFL62665902(00) Dear Customer Thank You for Purchasing the LG DVD Player. After going through the instruction manual , you will be able to enjoy all the features and functions of the Product . CAUTION RISK OF ELECTRIC SHOCK DO NOT OPEN CAUTION : TO REDUCE THE RISK OF ELECTRIC SHOCK DO NOT REMOVECOVER (OR BACK) NO USER-SERVICEABLE PARTS INSIDE REFER SERVICING TO QUALIFIED SERVICE PERSONNEL. This lightning flash with arrowhead symbol within an equilateral triangle is intended to alert the user to the presence of uninsulated dangerous voltage within the product’s enclosure that may be of sufficient magnitude to constitute a risk of electric shock to persons. The exclamation point within an equilateral triangle is intended to alert the user to the presence of important operating and maintenance (servicing) instructions in the literature accompanying the product. WARNING : TO PREVENT FIRE OR ELECTRIC SHOCK HAZARD, DO NOT EXPOSE THIS PRODUCT TO RAIN OR MOISTURE. WARNING : Do not install this equipment in a confined space such as a book case or similar unit. CAUTION: Do not block any ventilation openings. Install in accordance with the manufacturer's instructions. Slots and openings in the cabinet are provided for ventilation and to ensure reliable operation of the product and to protect it from over heating. The openings should be never be blocked by placing the product on a bed, sofa, rug or other similar surface. This product should not be placed in a built-in installation such as a bookcase or rack unless proper ventilation is provided or the manufacturer's instruction has been adhered to. CAUTION : This product employs a Laser System. To ensure proper use of this product, please read this owner’s manual carefully and retain it for future reference. Shall the unit require maintenance, contact an authorized service center. Use of controls, adjustments or the performance of procedures other than those specified herein may result in hazardous radiation exposure. To prevent direct exposure to laser beam, do not try to open the enclosure. Visible laser radiation when open. DO NOT STARE INTO BEAM. CAUTION : The apparatus shall not be exposed to water (dripping or splashing) and no objects filled with liquids, such as vases, shall be placed on the apparatus. CAUTION : concerning the Power Cord Most appliances recommend they be placed upon a dedicated circuit ; That is, a single outlet circuit which powers only that appliance and has no additional outlets or branch circuits. Check the specification page of this owner's manual to becertain. Do not overload wall outlets. Overloaded wall outlets, loose or damaged wall outlets, extension cords, frayed power cords, or damaged or cracked wire insulation are dangerous. Any of these conditions could result in electric shock or fire. Periodically examine the cord of your appliance, and if its appearance indicates damage or deterioration, unplug it, discontinue use of the appliance, and have the cord replaced with an exact replacement part by an authorized service center. Protect the power cord from physical or mechanical abuse, such as being twisted, kinked, pinched, closed in a door, or walked upon. Pay particular attention to plugs, wall outlets, and the point where the cord exits the appliance. To disconnect power from the mains, pull out the mains cord plug. When installing the product, ensure that the plug is easily accessible. Note: The marking of product shall be on the exterior of the apparatus. 3 Welcome to your new DVD Receiver Contents Introduction ................................................................................. 5 Maintenance & Service ............................................................... 5 Main Unit ..................................................................................... 6 Remote Control ........................................................................... 7 Hooking up the Unit (Audio & Video) .......................................... 8 USB Equipment Connection ....................................................... 8 Antenna Connection ................................................................... 9 5.1 Channel Speaker System Configuration .............................. 9 Initial Settings .............................................................................10 Language ................................................................................... 10 Display ....................................................................................... 10 Audio ......................................................................................... 11 Lock (Parental Control) ............................................................. 11 Others ....................................................................................... 14 Displaying Disc Information ....................................................... 12 Operations ................................................................................. 13 Equalizer Effect ......................................................................... 15 XTS/XTS Pro ............................................................................. 15 Virtual Sound ............................................................................ 15 Sound Mode ............................................................................. 15 Other Operations ...................................................................... 15 Playing a Disc or File ................................................................ 16 Playing a DivX Movie File ......................................................... 17 Programmed Playback .............................................................. 18 Viewing a JPEG File ................................................................. 18 Listening to Music from External Device ................................... 19 Presetting the Radio Stations ................................................... 19 Listening to the Radio .............................................................. 19 Using an USB Device ............................................................... 20 Types of Playable Discs ........................................................... 21 Troubleshooting .................................................................. 12~13 Language Codes ...................................................................... 22 Area Codes ............................................................................... 22 Specifications ........................................................................... 22 4 Before Use It is recommended to remove any disc from the player while moving the set CD-G CD-G Discs /CD Receiver " Always keep a disc inside the Receiver to prevent optical lens damage due to dust " 5 Front Panel/Rear Panel Connect a microphone to MIC Port. 6 EQ EQ You Can Choose 8 Fixed Sound Impressions. 7 Hooking up the unit Audio In connection Connect jacks on the unit and your TV (DVD player or Digital Device etc.) using the cables. INPUT AUX IN L Check the jacks of your TV, and choose the , or connection. Picture quality improves to . in order from R The unit’s Audio jacks are colour coded (red for right audio and white for left audio). If your TV has only one output for audio (mono), connect it to the left (white) ?white audio jack on the unit. (B) AM FM connection INPU T AUX IN FM L Pb Pr R FM AM ANTE NNA INPUT (A) AUX IN FM L AM R FM ANTENN A AM - Connect the AM loop aerial to the DVD receiver. FM - Connect the FM aerial. The reception will be its best when the two loose ends of the aerial are in a straight and horizontal line. USB Equipment Connection OUTPUT AUDIO OUT Connect the USB port of a USB Memory (or MP3 player, etc.) to the USB port on the front of the unit. B A C Removing the USB Device from the unit Video Out connection Connect the VIDEO OUTPUT(MONITOR) jack on the unit to the corresponding input jack on your TV using a Video cable. Component Video connection Connect the COMPONENT VIDEO (PROGRESSIVE SCAN) OUTPUT jacks on the unit to the corresponding input jacks on your TV using a Y PB PR cable. 8 1. Choose a different function mode or press STOP(■ ) twice in a row. 2. Remove the USB device from the unit. Notes: • Don’t extract the USB device while operating. • Music files (MP3/WMA), image files (JPEG) and Video files (.avi) can be played. • This unit can not use a USB HUB. Antenna Connection Function Selection Connect the supplied FM/AM antenna for listening to the radio. You can select the different functions by pressing the different function keys in the remote as follows: Band (for FM & AM), DVD/CD, AUX, USB) • Connect the AM Loop aerial to the AM aerial connector. • Connect the FM Wire aerial to the FM aerial connector. Notes: • To prevent noise pickup, keep the AM Loop aerial away from the DVD/CD Receiver and other components. • Be sure to fully extend the FM wire aerial. • After connecting the FM Wire aerial, keep it as horizontal as possible. AM Loop Antenna (Supplied) Speaker System Connection Connect the speaker cords to the speaker terminals. To obtain the best possible surround sound, adjust the speaker parameters (volume, distance, etc.). • Be sure to match the speaker cable to the appropriate terminal on the components: + to + and– to –. If the cables are reversed, the sound will be distorted and will lack base. • If you use front speakers with low maximum input rating, adjust the volume carefully to avoid excessive output on the speakers. FM Wire Antenna (Supplied) INPUT AUX IN L R 5.1 Channel Speaker System Configuration Assuming you are centered in the middle of your couch, facing your TV display and center-channel speaker at 0 degree, then your left and right main front speakers should be within a 22 to 30 degree angle to each side, viewed from your seat. The main left and right surrounds should be to the respective sides of the listening area, above ear level if possible (ideally 2 feet or more) at an angle of 90 to 110 degrees from the front center. Be careful of the following Be careful to make sure children do not put their hands or any objects into the *speaker duct. *Speaker duct: A hall for plentiful bass sound on speaker cabinet(enclosure). Use the rear speaker at least 30 CM away from either TV screen or PC monitor. 9 Initial Settings AUDIO 5.1 Speaker Setup DRC Vocal Select On On AUDIO 5.1 Speaker Setup DRC Vocal Select On On AUDIO Speaker Front L Small Size Volume Move Distance Select First Level Prev. o dB o m(ft) off Test Enter Select Second Level Move Return Third Level Initial Settings b 9 to 15. 23 -Refer to the turn ON/OFFsubtitle. DISPLAY D I S P L AY TV Aspect Display Mode 16 : 9 Widescreen Progressive Scan Off Move c b Select a LANGUAGE OSD English Disc Audio Disc Subtitle Disc Menu Spanish a French German Italian Dutch Prev. Move b Enter LANGUAGE black LANGUAGE OSD Disc Audio Disc Subtitle Disc Menu English Orignal Off Original c Move b a a 10 OSD Progressive Scan Select Progressive Scan Video provides the highest quality pictures with less flickering. If you are using the COMPONENT VIDEO OUT jacks, but are connecting the receiver to a standard (analog) television, set Progressive Scan to Off. If you are using the Component Video jacks for connection to a TV or monitor that is compatible with a progressive scan signal, set Progressive Scan to On. To Turn ON progressive scan: Connect component out of the DVD/CD Receiver to the input of your monitor / television, set your television or monitor to Component Input. 1. Select “Progressive Scan” on the DISPLAY menu then press . / buttons. 2. Select “On” using the 3. Pressing ENTER will set the player to Progressive scan mode. Caution: Once the setting for progressive scan output is entered, an image will only be visible on a progressive scan compatible TV or monitor. If you set Progressive Scan to On in error, you must reset the unit. First, remove the disc in the DVD/CD Receiver. Next, press STOP on the remote control(¢ ) and hold it for five seconds before releasing it. The video output will be restored to the standard setting, and a picture will once again be visible on a conventional analog TV or monitor AUDIO a b Note: Certain speaker settings are prohibited by the DolbyDigital licensing agreement. Size Since the speaker settings are fixed, you cannot change the settings. Volume Press / to adjust the output level of the selected speaker. (-5dB ~ 5dB) Distance If you connected speakers to your DVD/CD Receiver, setting the Distance lets the speakers know how far the sound has to travel to reach your set listening point. This allows the sound from each speaker to reach the listener at the same time. Press / to adjust the Distance of the selected speaker.(You can’t adjust front /Woofer speakers) Test Press / to test the signals of each speaker. Adjust the volume to match the volume of test signals memorized in the system. Front Left (L) b 1 With the DVD* format, you can hear a program’s sound track in the most accurate and realistic presentation, thanks to digital audio technology. However, you may wish to compress the dynamic range of the audio output (the difference between the loudest sounds and the quietest ones). Then, you may listen to a movie at a lower volume without losing clarity of sound. Set DRC to On for this effect. *1:Dolby Digital only c AUDIO 5.1 Speaker Setup DRC Vocal Select On On LOCK(Parental Control) a LOCK Move Select Rating Password Area Code c a Unlock IN 5.1 Speaker Setup Make the following settings for the built-in 5.1 channel surround decoder. 1. Press ENTER and 5.1 Speaker Setup menu appears. 2. Use / to select the desired speaker. 3. Adjust options using / / / buttons. 4. Press ENTER to confirm your selection. Returns to the previous menu. Move Select c b a Speaker Selection Speaker selection Select a speaker that you want to adjust. [Front speaker (Front L), Front speaker (Front R), Center Speaker (Center), Subwoofer (SubWoofer), Rear speaker (Rear L), Rear speaker (Rear R)] Continued on page No. 15 11 Displaying Disc Information on-screen Displaying Disc Information more you can do You can select an item by pressing Symptom No power The power is on, but the DVD/CD Receiver does not work. No Picture There is no sound or only a very low level sound is heard. The Playback picture is poor. The DVD/CD Receiver does not start playback. Loud hum or noise is heard. Radio Stations cannot be tuned in. The Remote control does not work properly The front panel display is too dim. 12 Cause The power cord is disconnected. No disc is inserted. The TV is not set to receive DVD signal output. The vidio cable is not connected securely. The connected TV power is turned off. The equipment connected with the audio cable is not set to receive DVD signal output The audio cables are not connected securely. The Power of the equipment connected with the audio cable is turned off. The audio connecting cable is damaged. The disc is dirty. No disc is inserted. An unplayable disc is inserted. The disc is placed unside down. The disc is not Placed within the guide. The disc is dirty. A menu is on the TV screen. The Rating level is set. The disc is dirty. The speakers and components are connected poorly. The DVD/CD Receiver is located too close to the TV. The antenna is positioned or connected poorly. The signal strength of the stations is too weak (when tuning in with automatic tuning). No stations have been preset or preset stations have been cleared (when tuning by scanning preset stations). The remote control is not pointed at the remote sensor of the DVD/CD Receiver. The remote control is too far from the DVD/CD Receiver. There is an obstacle in the path of the remote control and the DVD/CD Receiver. The batteries in the remote control are flat. Nothing is displayed on the front panel display. General features DVD, Divx disc: 6 steps, Video CD: 5 steps, MP3, WMA, Audio CD, 3 steps RETURN ( ) Press to move backwards in the menu or exit the menu. REPEAT A-B During playback, press REPEAT A-B to select a point A and a point B and repeats a sequence from point A(Starting point) to point B (End point). SLOW In the pause mode, press SLOW (7 or 8 ) to select required speed. DVD : (1/2, 1/4, 1/8, 1/16) or (1/2,1/4,1/8,1/16) Video CD : (1/2, 1/4, 1/8, 1/16) Correction Plug the power cord securely into the wall outlet. Insert a disc. (Cleck that the DVD or, audio CD Indicator in the DVD display is lit.) Connect the video cables securely to both the TV and DVD Receiver. Select the appropriate video input mode on the TV so the picture from the DVD/CD Receiver appears on the TV Screen. Connect the video cable into the jacks securely. Turn on the TV. Select the Correct input mode of the audio receiver so you can hear the sound from the DVD/CD Receiver. Connect the audio cable into the jacks securely. Turn on the equipment connected with the audio cable. Replace it with new one. Clean the Disc. Insert a disc. (Check that the DVD, or audio CD indicator in the DVD display is lit.) Insert a playable disc. (Check the disc type, colour system and Regional code.) Place the disc with the playback side down. Place the disc on the disc tray correctly inside the guide. Clean the disc. Press the SETUP button to turn off the menu screen. Cancel the Rating function or change the rating level. Clean the disc. Connect the Speakers and components securely. Move your TV away from the audio components. Connect the antenna securely Adjust the antennas and connect an external antenna if necessary. Tune in the station manually. Preset the stations (page 19). Point the remote control at the remote sensor of the DVD/CD Receiver. Use the remote control within about 23 ft (7 m). Remove the obstacle. Replace the batteries with new ones. Press DIMMER on the remote control. 13 a PBC Set Playback Control (PBC) to On or Off. On: Video CDs with PBC are played according to the PBC. Off: Video CDs with PBC are played in the same way as Audio CDs. b b four digit c 23 on page No 10 OTHERS a OTHERS PBC On DivX(R) Registration Select Semi Karoake On Move c 14 b Select c Semi Karoake When a chapter/ title / track is fully finished , this function shows the score in the screen with a fanfare sound. Semi Karaoke on : - Turn the “Semi Karaoke” function on. When you finished singing a score will appear on the screen. Semi Karaoke off : - Turn the “Semi Karaoke” function off. Fanfare and score do not appears on the screen Available discs for the Semi Karaoke function: • DVD discs • DVD Karaoke Discs • VCD discs with more than 2 tracks Notes : • This function operate on the DVD/CD mode. • The Semi Karaoke function is available only when a micro phone is connected. • Watching movies, “off ” the Semi Karaoke or enjoy it without connecting the MIC at the SETUP menu if the fanfare or score appears during changing a chapter. EQUALIZER EFFECT You can choose 8 fixed sound impressions and adjust the Bass, MIDDLE and TREBLE. - You can select a desired sound mode by using EQ button on the remote control. When you want to change a sound mode press the EQ button repeatedly with in 3 seconds. Each time you press the button the setting changes in the display window as shown below. NORMAL (NORMAL) à India (INDIA) à USr EQ (User EQ) à POP (POP) à CLASS (CLASSIC) à ROCK (ROCK) à DRAMA (DRAMA) à JAZZ (JAZZ) à NORMAL (NORMAL)... - You can set the BASS, Middle and TREBLE on the USER EQ mode. 1. Select the USER EQ moby using EQ button."USr EQ (USER EQ)" will be displayed in the display window. 2. Press the ENTER button on the remote control when "USr EQ (USER EQ )" is displayed in the display window. "U_B0 (BASS 0 )" will be displayed in the display window. 3. Select the BASS, MIDDLE OR TREBLE on you want by pressing the TUN. (-/+) buttons on the remote control. 4. Press the PRESET (-/+) button on th remote control to set the sound level you want. (-5~+ 5, MAX steps) 5- Repeat the 3-4 steps as above. 6- When the sound level is completed, press the ENTER button on the remote control. Other operations Sleep Timer Setting You can set the DVD/CD Receiver to turn off automatically at a specified time. 1. Press SLEEP to set the desired sleep time. The SL indicator and the sleep time appears in the display window. 2. Each time you press SLEEP the setting SL180 DIMMER This function will change the brightness of the display window on the front panel during in power-on status. Press the DIMMER repeatedly. Screen Saver The screen saver appears when you leave the unit in Stop mode for about five minutes. System Select You must select an appropriate system mode for your TV system. If NO DISC appears in the display window, press and hold P./STEPon the front panel or remote control for more than 5 seconds to be able to select a system (PAL, NTSC or AUTO). • When the selected system is not compatible with the system of your TV, normal colour picture may not be displayed. NTSC : Select when DVD/CD Receiver is connected with NTSC-TV. PAL : Select when DVD/CD Receiver is connected with PAL-TV. AUTO : Select when DVD/CD Receiver is connected with Multi system TV. 15 Press REPEAT key repeatedly, and the current title, chapter or all tracks will be played back repeatedly. To return to normal playback, press REPEAT repeatedly. Selecting a subtitle language During playback, press SUBTITLE ( ) repeatedly to select a desired subtitle language. Slow down the playing speed While playback is paused, press SCAN 1.5 speed playback VCD MP3 You can quickly enjoy a music and movie. The 1.5 speed allows you to watch the pictures and listen to the sound quicker than playing at a normal speed on the disc. 1. Press the PLAY button during the normal play back. The screen will appear at 1.5 speed with sound . 2. To return to the normal PLAY, press PLAY. Note : This receiver does not memorize the scene of a disc if youswitch off the receiver before commencing to play the disc. 16 When playing a mixed disc or USB Flash Drive containing with DivX, MP3/ WMA and JPEG files together, you can select menu of files which you would like to play by pressing Title key. If "This file has the non-supported type on the Player" pops up, then press Enter key to come back 17 18 19 Using an USB device 1 Connect the USB device to the USB port of the unit. 2. Select the USB function 3 Select a file you want to play USB BAND / DVD / AUX Compatible USB Devices • MP3 Player : Flash type MP3 player. • USB Flash Drive : Devices that support USB2.0 or USB1.1. • The USB function of this unit does not support all USB devices. USB device requirement • Devices which require additional program installation when you have connected it to a computer, are not supported. Look out for the follows. • • • • • • • • Do not extract the USB device while in operation. For a large capacity USB, it may take longer than a few minute to be searched To prevent data loss, back up all data. If you use a USB extension cable or USB hub, the USB device is not recognized. Using NTFS file system is not supported. (Only FAT(16/32) file system is supported. This unit is not supported when the total number of files is 1000 or more. External HDD, Card readers, Locked devices, or hard type usb devices are not supported. USB port of the unit cannot be connected to PC. The unit can not be used as a storage device. • Digital Cameras & Mobile Phones are not supported. 20 About the Symbol Display Introduction ‘ ’ may appear on your TV display during operation and indicates that the function explained in this owner’s manual is not available on that specific DVD video disc. Do not attach any seal or label to either side (the labeled side or the recorded side) of a disc. Do not use irregularly shaped CDs (e.g., heart-shapedor octagonal). It may result in malfunctions. Regional Codes This unit has a regional code printed on the rear of the unit. This unit can play only DVD discs labeled same as the rear of the unit or “ALL”. • Most DVD discs have a globe with one or more numbers in it clearly visible on the cover. This number must match your unit’s regional code or the disc cannot play. • If you try to play a DVD with a different regional code from your player, the message “Check Regional Code” appears on the TV screen. Manufactured under license from Dolby Laboratories.“Dolby”, “Pro Logic”, and the double-D symbol are trade marks of Dolby Laboratories. Confidential Unpublished works. Copyright 1992-1997 Dolby Laboratories. All rights reserved. Manufactured under license from Digital Theater Systems,Inc. U.S. Pat. No’s. 5,451,942; 5,956,674; 5,974,380;5,978,762; 6,226,616; 6,487,535 and other U.S. and world-wide patents issued and pending. "DTS" and "DTS DigitalSurround” are registered trademarks of Digital TheaterSystems, Inc. Copyright 1996, 2003 Digital TheaterSystems, Inc. All Rights Reserved." Note: This player does not support all MP4 formats. 21 Power Supply Power consumption External dimensions (W x H x D) Net Weight (Approx.) Operating temperature: Operating humidity Refer to main label Refer to main lable 360 x 63 x 307 mm 2.4 kg 5 °C to 35 °C, Operation status: Horizontal 5 % to 85 % Tuner FM FM Tuning Range FM Intermediate Frequency AM Tuning Range AM Intermediate Frequency 87.5 - 108.0 MHz or 65.0 - 74.0 MHz, 87.5 - 108.0 MHz 10.7 MHz 522 - 1,620 kHz or 520 - 1,720 kHz 450 kHz Amplifier Stereo mode Surround mode Center* Surround* 45W + 45W (Rated Output Power 30W, 4? at 1 kHz, THD 10 %) Front: 45W + 45W (Rated Output Power 30W, THD 10 %) 45W 45W + 45W (Rated Output Power 30W, 4? at 1 kHz, THD 10 %) Speaker (SH32SD-SZ) Frequency Response Sound Pressure Level 160 - 20, 000 Hz 82 dB/W (1m) 45 W 90 W 98 x 101 x 105mm 0.52kg * Designs and specifications are subject to change without prior notice. 22 (SH32SD-WZ) 8 65 - 1, 500 Hz 80 dB/W (1m) 75 W 150 W 181 x 351 x 278mm 3.4kg