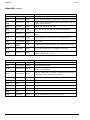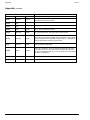
1
960L. Digital Effects System
Owner’s Manual
Important Safety Instructions
Save these instructions for later use.
Follow all instructions and warnings marked on the unit.
Always use with the correct line voltage. Refer to the manufacturer's operating instructions for power requirements. Be
advised that different operating voltages may require the use of a different line cord and/or attachment plug.
Do no install the unit in an unventilated rack, or directly above heat producing equipment such as power amplifiers. Observe
the maximum ambient operating temperature listed in the product specification.
Slots and openings on the case are provided for ventilation; to ensure reliable operation and prevent it from overheating,
these openings must not be blocked or covered. Never push objects of any kind through any of the ventilation slots. Never
spill a liquid of any kind on the unit.
This product is equipped with a 3-wire grounding type plug. This is a safety feature and should not be defeated.
Never attach audio power amplifier outputs directly to any of the units connectors.
To prevent shock or fire hazard, do not expose the unit to rain or moisture, or operate it where it will be exposed to water.
Do not attempt to operate the unit if it has been dropped, damaged, exposed to liquid, or if it exhibits a distinct change in
performance indicating the need for service.
This unit should only be opened by qualified service personnel. Removing covers will expose you to hazardous voltages.
Notice
This equipment generates and uses radio frequency energy and if not installed and used properly, that is, in strict
accordance with the manufacturer's instructions, may cause interference to radio and television reception. It has been type
tested and found to comply with the limits for a Class A computing device in accordance with the specification in Part 15 of
FCC Rules, which are designated to provide reasonable protection against such interference in a residential installation.
However, there is no guarantee that interference will not occur in a particular installation. If this equipment does cause
interference to radio or television reception, which can be determined by turning the equipment OFF and ON, the user is
encouraged to try to correct the interference by one or more of the following measures:
Reorient the receiving antenna
Relocate the units with respect to the receiver
Move the units away from the receiver
Plug the unit into a different outlet so that the unit and receiver are on different branch circuits.
If necessary, the user should consult the dealer or an experienced radio/television technician for additional suggestions. The
user may find the following booklet prepared by the Federal Communications Commission helpful:
"How to identify and Resolve Radio/TV interference Problems"
This booklet is available from the U.S. Government Printing Office, Washington, DC 20402, Stock No. 004-000-00345-4.
This triangle alerts you to important
operating and maintenance
instructions in this
accompanying
literature
CAUTION
RISK OF ELECTRIC SHOCK
DO NOT OPEN
This triangle, which appears on your component,
alerts you to the presence of uninsulated,
dangerous voltage inside the enclosure;
voltage that may be sufficient to
constitute a risk of shock.
"Dolby", "Dolby Surround", "Pro Logic", and "Dolby Digital" are trademarks of Dolby Laboratories.
"Super Audio CD" and "SACD" are trademarks of Sony Electronics, Inc. "THX" and "Home THX Cinema"
are trademarks of Lucasfilm, Ltd.
"Logic7", "LexiconLogic", and "3DPM" are trademarks of Lexicon, Inc.
Copyright © 2000
All Rights Reserved.
Lexicon Part No. 070-14353
Lexicon Inc.
3 Oak Park
Bedford, MA 01730 USA
Telephone 781-280-0300
Fax 781-280-0490
960L Owner’s Maunal
Table Of Contents
Table Of Contents
Chapter 1
DESCRIPTION
About the 960L
Unpacking the 960L
THE REAR PANEL
I/O Clock Card
Option Plates
Analog Input Card
Analog Output Card
AES I/O Card
Mains Power Switch.
Mains Voltage Selector
IEC Power Connector
THE FRONT PANEL
Floppy Drive
Thumbscrews
Standby Switch and Indicator
BEHIND THE FRONT PANEL
DSP-Card Slots
CPU Card
INSTALLATION
Mounting
Ventilation
Location
IEC Power Connector
Mains Voltage Selector
Analog Audio Connections
Digital Audio Connections
MIDI Connections
WordClock Connections
1-1
1-1
1-1
1-1
1-2
1-2
1-2
1-2
1-2
1-2
1-2
1-2
1-3
1-3
1-3
1-3
1-4
1-4
1-4
1-5
1-5
1-5
1-5
1-5
1-5
1-5
1-6
1-6
1-6
Chapter 2
THE LARC2
About the LARC2
Unpacking The LARC2
LARC2 CONTROL SURFACE
GETTING WHAT YOU WANT
LARC2 CONNECTIONS
Control Port
Aux Port
External-Power Connector
NAVIGATING TYPICAL DISPLAY SCREENS
ABOUT THE FADERS AND JOYSTICK
AUDIO INDICATORS
FINE ADJUST
THE LEXICON BUTTON
2-1
2-1
2-1
2-2
2-3
2-3
2-3
2-3
2-3
2-4
2-5
2-6
2-6
2-6
Chapter 3
AN OVERVIEW OF THE CONTROLS
A QUICK GUIDE TO OPERATION
(1) Setup (Control Mode)
(2) Machine Selection
(3) Program Loading
(4) Editing a Program or Register
(5) Storing Your Edits
Chapter 4
LOADING PROGRAMS AND REGISTERS
Loading Programs
Loading Registers
CONTROL MODE: CLOCKS, CONFIGURATION,
AND SYSTEM SCREENS
Wordclock
Input, Output, and Machine Configuration
System Screen
EDITING
Editing Algorithms
Editing With the Faders
Fine Adjust
Editing with the Joystick
Quick Comparisons via the Lexicon Button
Editing Inputs and Outputs
Input Panning
Output Panning
The 960L Surround Panning Rules
Setting Levels
Avoiding Overload
Assigning New Parameters
to Faders or the Joystick
The V-Page and Parameter Reassignment
Using the Edit Algorithm Screen
STORING AND LABELING YOUR EDITS
Storing
Naming and Annotating
ORGANIZING YOUR REGISTERS
Edit Tools for Registers
Using the Floppy Drive
THE CD-ROM
MACHINE MODE
3-1
3-2
3-2
3-5
3-5
3-6
3-6
4-1
4-1
4-2
4-3
4-3
4-4
4-8
4-9
4-9
4-9
4-9
4-10
4-10
4-11
4-11
4-12
4-13
4-13
4-13
4-13
4-14
4-14
4-16
4-16
4-16
4-17
4-18
4-18
4-18
4-18
Table Of Contents
Lexicon
Table Of Contents, continued
Chapter 5
REVERBERATION AND REALITY
SOUND IN SPACE: A SHORT HISTORY
OF STEREO AND SURROUND
ALGORITHMS
Random Hall
Surround Hall
Chamber
Plate & Surround Plate
Ambience & Surround Ambience
Ambient Chamber
Reverse & Surround Reverse
Inverse
PARAMETERS USED
IN THE 960L ALGORITHMS
5-1
5-5
5-6
5-6
5-7
5-7
5-7
5-7
5-8
5-8
5-8
5-9
Chapter 6
MIDI
Nomenclature
MIDI Channel Allocation
Program Loading
Bank and Program Mapping
Card Configuration
Continuous Controllers
MIDI SYSEX
MIDI IMPLEMENTATION CHART
SPECIFICATION
Mainframe
LARC2
APPENDIX
6-1
6-1
6-1
6-2
6-2
6-2
6-2
6-3
6-4
960L Owner’s Maunal
Introduction
Title of Section
Introduction
The Model 960L is a multi-channel reverb processor for
audio professionals. It brings to surround all the virtues
and facilities of the Model 480L— and then some. Like
the 480L, it is a multiple-machine system — hardware
and software expandable. The 960L’s DSP card can
support up to four stereo reverbs or two multi-channel
surround reverbs at 48 Hz, or two stereo reverbs at 96
kHz. The 960L provides eight balanced inputs and
outputs, eight channels of AES/EBU digital input and
output, external word clock in/out, and MIDI
In/Out/Thru.
The 960L is controlled by a new, dedicated remote, the
LARC2. Its user interface is fashioned after the original
LARC controller, so 480L users can get up to speed
quickly, but it was also designed for fast, intuitive
operation by those who have never used the 480L.
Extensive visual feedback and a wide variety of input
devices (hard and soft buttons, motorized faders, and a
joystick) provide access to everything you need to
control.
The 960L and LARC2 were designed for maximum
flexibility and control. The 960L’s reverberation
algorithms, based on Lexicon’s 3DPM™ (for 3Dimensional Perceptual Modeling) technology, embody
the accumulated knowledge of more than 20 years of
research and study into how humans perceive spaces.
With the 960L, engineers working in surround can
create convincing 5.1-channel spaces — even spaces
that sound better than real ones — from a reverb
designed for the purpose, rather than an unconvincing
assemblage of multiple stereo and mono reverbs. The
3DPM™ algorithms Lexicon developed for the 960L
take the principles of physics and psycho-acoustics
into account.
1
The Mainframe
DESCRIPTION ............................................................1-1
About the 960L ....................................................1-1
Unpacking the 960L ..............................................1-1
THE REAR PANEL......................................................1-1
I/O Clock Card ......................................................1-2
Option Plates ........................................................1-2
Analog Input Card ................................................1-2
Analog Output Card ..............................................1-2
AES I/O Card ........................................................1-2
Mains Power Switch. ............................................1-2
Mains Voltage Selector ........................................1-2
IEC Power Connector ..........................................1-2
THE FRONT PANEL ..................................................1-3
Floppy Drive..........................................................1-3
Thumbscrews........................................................1-3
Standby Switch and Indicator ..............................1-3
BEHIND THE FRONT PANEL ....................................1-4
DSP-Card Slots ....................................................1-4
CPU Card..............................................................1-4
INSTALLATION............................................................1-5
Mounting ..............................................................1-5
Ventilation ............................................................1-5
Location ................................................................1-5
IEC Power Connector ..........................................1-5
Mains Voltage Selector ........................................1-5
Analog Audio Connections....................................1-5
Digital Audio Connections ....................................1-6
MIDI Connections ................................................1-6
WordClock Connections ......................................1-6
960L Owner’s Maunal
The Mainframe
Description
About the 960L
Unpacking the 960L
The 960L system consists of two components: a rackmounted Mainframe designed for remote mounting in
machine rooms or elsewhere, and a dedicated
controller, the LARC2.
The 960L system is shipped in two cartons, one
containing the 960L mainframe, the other containing
the LARC 2 dedicated controller. After unpacking, save
all packing materials in case you ever need to ship the
unit. Thoroughly inspect the 960L system and packing
materials for signs of damage. Report any shipment
damage to the carrier at once. The following
accessories are packed with the 960L Mainframe (for
the LARC2 carton, see Chapter 2):
• Lexicon 960L Mainframe, with cards installed
• IEC power cord
• CD-ROM, 960L Software
• This User Guide
• Warranty and Registration Cards
• CE compliance certificate
• License Agreement
• Bumper feet (4)
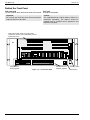
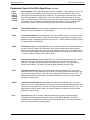
The Rear Panel
The 960L mainframe’s rear panel holds four I/O cards,
together with power connections, the mains power
switch, mains voltage selector switch and option plates.
The I/O cards can be removed for service and/or
upgrades without removing the chassis from the rack.
I/O Option plate
Analog in
(balanced XLR)
Analog out
(balanced XLR)
MIDI
(in, out, thru)
AES in
(XLR, channel pairs)
Wordclock
(input loop,
out)
The proper ordering (top to bottom) of the cards is I/O
Clock Card, I/O Option Plate, AES I/O Card, Analog In
Card and Analog Out Card. Cards should be kept in
this order.
Remotes
(Connect LARC2
to port 1)
AES out
(XLR, channel pairs)
Option plate
Mains
voltage
selector
Mains
power
switch
IEC power
connector
Figure 1-1 — 960L Rear Panel
1-1
The Mainframe
Lexicon, Inc.
The Rear Panel, continued
I/O Clock Card
MIDI Connectors (Five-pin DIN female)
• MIDI In
Accepts MIDI data from other MIDI-equipped
devices.
• MIDI Thru
Retransmits, unchanged, MIDI data received
at the MIDI In connector.
• Midi Out
Transmits MIDI data generated or modified
by the 960L.
TTL WordClock (BNC)
• Input Loop
Allows the 960L to be synchronized to other
studio equipment.
• Output.
Allows studio equipment to be synchronized to
the 960L.
Note: The 960L can also derive wordclock from
AES input 1-2, or generate it internally.
Remote-Control Connectors
The LARC2 must be connected to the Remote 1 9-pin
D-connector. The 960L Remote connectors are for use
only with the LARC2 controller.
Important:
Never connect either Mainframe remote port to
anything other than LARC2. Doing so may damage
your equipment.
Analog Input Card
The 960L’s analog audio input card has eight female
XLR connectors, all electronically balanced. For
impedances and signal levels, see the Specifications
Section near the end of this manual.
Analog Output Card
The 960L’s analog audio output card has eight male
XLR connectors, all electronically balanced. For
impedances and signal levels, see the Specifications
Section near the end of this manual.
AES I/O Card
The 960L’s digital audio inputs and outputs are
combined on one card holding four XLR two-channel
female connectors for AES input and four XLR twochannel male connectors for AES output.
Mains Power Switch
This switch turns the power in the 960L completely
off or on.
Mains Voltage Selector
Before connecting the 960L Mainframe to power mains,
make sure the setting matches your local mains voltage.
Refer to the Installation section of this chapter for more
information.
IEC Power Connector
Option Plates
Reserved for future use.
1-2
Accepts IEC power cords with mains plugs specific to
your country.
960L Owner’s Maunal
The Mainframe
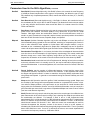
The Front Panel
Floppy Drive
Thumbscrews
This is a 3.5", High Density, IBM Format compatible,
floppy drive. This is primarily used for saving user
Registers.
To gain access into the front section of the chassis,
unscrew both thumbscrews and lower the hinged panel.
960L DIGITAL EFFECTS SYSTEM
Figure 1-2 — Front panel, closed.
Standby Switch and Indicator
This switches the 960L between on and standby; the
indicator LED lights when the unit is on.
When your 960L is in standby, the power to most
circuitry is removed. To completely disconnect power
from the 960L, either turn off the power by using the
switch located on the rear panel of the 960L or unplug
the power cable from the wall outlets.
1-3
The Mainframe
Lexicon, Inc.
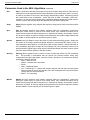
Behind the Front Panel
DSP-Card Slots
Top slot occupied, others reserved for future Lexicon cards.
Important:
Do not plug any cards into these slots except those
made by Lexicon for the 960L.
CPU Card
NLX-type montherboard.
Caution:
The motherboard has a lithium battery. Lithium is a
hazardous substance. The battery should be
replaced only by qualified service personnel, and
disposed of properly.
Card slots for DSP cards. The cards can be
removed for service, when instructed by Lexicon
Customer Service.
CD-ROM drive for
software upgrades
Floppy drive for
saving registers
Figure 1-3 — Front Panel, Open
1-4
Standby switch
Reset Switch
960L Owner’s Maunal
The Mainframe
Installation
Mounting
The 960L mounts in stationary racks with four screws.
Make sure the 960L Mainframe is securely screwed into
the rack. For moving and in roadcases, be sure that
support is provided for the rear of the chassis to avoid
possible damage.
Ventilation
Provide adequate ventilation if the 960L is mounted in a
closed rack with heat-producing equipment such as
synthesizer modules, effects units, or power amplifiers.
Avoid mounting the 960L Mainframe directly above
power amplifiers.
Use a flat screwdriver to move the switch to the desired
voltage.
Analog Audio Connections
For best results, the 960L should be connected to your
console’s Aux sends/returns, with wet/dry mixing and
most input settings performed at the console. However,
controls are provided within the 960L for situations
where this is not possible or convenient.
For optimal performance, maintain balanced
connections, and use high-quality, low-capacitance,
shielded, twisted-pair cables, such as Belden 8412
(microphone cable with braided shield) or Belden 9461
(foil shield).
Location
It may be desirable to place the 960L Mainframe in a
location remote from the listening environment. The
mainframe can be located up to 1,000 feet from the
LARC2 controller with a remote power pack. See
Chapter 2 for more information.
IEC Power Connector
The 960L is equipped with a 3-pin IEC power connector
and detachable cord, providing chassis grounding to
the AC mains line. Plug the female end of the power
cord into the 960L mainframe and the male end into a
wall outlet.
Mains Voltage Selector
Before connecting the 960L Mainframe to power
mains, make sure the setting matches your local
mains voltage.
All connections should be Pin 2 high. For unbalanced
operation, Pins 1 and 3 should be grounded. For mono
inputs in a stereo configuration, connect the left and
right input channels in parallel. Be careful to keep inputs
and outputs of all channels wired consistently. Out-ofphase wiring can produce audible effects.
For I/O panning and level control, see Chapter 4,
Operations in Detail. All signals sent to the analog
outputs are also sent to the digital outputs.
Important:
Analog I/O connectors must be wired consistently
(we recommend Pin 2 high), or channels will be out
of phase.
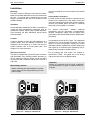
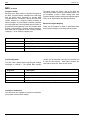
115
230
Figure 1-4 — Setting for 100-120 V AC
Figure 1-5— Setting for 220-240 V AC
1-5
960L Owner’s Maunal
The Mainframe
Installation, continued
2 High
3 Low
1 Ground
1 Ground
3 Low
2 High
Following AES conventions, the odd-numbered
channels are on the left channel of each AES stereo
pair, the even-numbered channels on the right. The
word length is 24 bits, at sample rates of 44.1, 48, 88.2,
or 96 kHz. To use the digital inputs, the 960L can be
synchronized to AES input 1-2 or to the TTL Wordclock
input. Note that all digital inputs must be synchronized
to the same master clock for operation without artifacts.
For routing and panning, see Chapter 4, Operations in
Detail. All signals sent to the digital outputs are also
sent to the analog outputs.
MIDI Connections
Use standard, 5-pin DIN MIDI cable assemblies,
available from your local dealer. Chapter 6, MIDI
describes the 960L MIDI functionality.
Digital Audio Connections
The AES interface requires balanced connections,
using high-quality, low-loss, controlled-impedance,
shielded, twisted-pair cables designed for data
communications, such as Belden 9860 (braided shield)
or Belden 9271 (foil shield). The use of ordinary
microphone cable can cause digital interfaces to
work unreliably. Remember that the maximum
recommended length for AES cabling is 100 feet (30
meters).
1-6
Wordclock Connections
Use standard, 75 ohm BNC cables, available from your
local dealer. The self-terminating loop-thru TTL input
facilitates daisy-chained clock distribution. The 960L
will refer its internal wordclock to the falling edge of the
input square wave. The 960L output is a TTLcompatible square wave with the falling edge aligned
with the start of the 960L sample period.
2
The LARC2 Remote
THE LARC2 ................................................................2-1
About the LARC2 ..................................................2-1
Unpacking The LARC2 ..........................................2-1
LARC2 CONTROL SURFACE ....................................2-2
GETTING WHAT YOU WANT ......................................2-3
LARC2 CONNECTIONS..............................................2-3
Control Port ............................................................2-3
Aux Port ................................................................2-3
External-Power Connector ....................................2-3
NAVIGATING TYPICAL DISPLAY SCREENS ............2-4
ABOUT THE FADERS AND JOYSTICK ......................2-5
AUDIO INDICATORS ..................................................2-6
FINE ADJUST..............................................................2-6
THE LEXICON BUTTON ............................................2-6
960L Owner’s Maunal
The LARC2 Remote
The LARC2 Remote
About the LARC2
Unpacking the LARC
The 960L system is shipped in two cartons, one
containing the 960L Mainframe, the other containing
the LARC2 dedicated controller. After unpacking, save
all packing materials in case you ever need to ship the
unit. Thoroughly inspect the 960L system and packing
materials for signs of damage. Report any shipment
damage to the carrier at once. The following
accessories are packed with the LARC2 (for the 960L
mainframe carton, see Chapter 1):
The 960L is controlled from the LARC2. While the
LARC2 is a completely new remote, its operation will
seem familiar to users of the LARC remote used with
the Lexicon 224XL and 480L. Like the original LARC,
the LARC2 is compact enough to rest on or near the
center of the console, while keeping the 960L
Mainframe out of the way -- hundreds of feet away in
the machine room, if necessary.
The 960L’s user interface and the LARC2 were
designed to be helpful to new users and fast for
experienced 480L users. The LARC2’s joystick and
eight touch-sensitive motorized faders are always
connected to and controlling audio parameters. The
assignment of audio parameters to each of these
controls has been individually optimized for each of the
more than 200 factory Programs that ship with the
960L. Further, you can easily customize these
assignments to put the parameters you use the most at
your fingertips.
• LARC2 remote console
• 50-foot cable for connection to 960L Mainframe
• Warranty & registration cards
• CE compliance certificates
Note: You will find the LARC2 to be a robust and
reliable product. It does contain complex electronic and
electro-mechanical assemblies. We suggest handling it
with the same care you would apply to the use of a
laptop or notebook computer.
System status (input levels, machine configuration,
clock source and lock status, mute state, etc.) is always
visible on LARC2 through an LED meter bridge and a
dedicated region of the color LCD display. Dedicated
function keys, a numeric keypad, screen navigation
arrows and eight soft buttons allow easy and quick
navigation through the rest of the user interface.
Important:
• Never connect a LARC2 to anything but the
960L Mainframe.
• Never connect either Mainframe Remote Port to
anything but the LARC2. Doing so may damage your
equiptment.
Each screen has space for explanatory notes. Some of
these notes are help messages, while others can be
customized by the user, using either the LARC2’s own text
entry interface or a user-supplied PS/2 computer keyboard.
Contrast Knob
For adjusting
LCD contrast.
Aux Port
For user-supplied PS/2 Keyboard.
Note: “Hot plugging" the keyboard is
not recommended. The keyboard
should be connected before power is
applied to the 960L.
CONTRAST
AUX
Host Port
For connection to
960L Mainframe.
HOST
External Power Connector
For use when cable run to 960L
mainframe exceeds 100 feet.
EXT. POWER
RESET
LARC2
LEXICON, INC.
SERIAL NO.
Strain Relief
For the External Power
Supply cable, if used.
Reset Button
LARC2 hard reset switch.
It is recessed to avoid
accidental activation.
Figure 2-1 — LARC 2 rear panel
2-1
960L Owner’s Manual
The LARC2 Remote
LARC2 Control Surface
Signal present, -6dB
and overload
indicators
Color LCD
Display
Soft buttons
Navigation arrows
Numeric keypad
Joystick
Mode keys
Increment/
decrement
buttons (+/- key)
Mute Machine
Joystick key
Mute All
Fine adjust key
“Lexicon” key
(compare)
Touch-sensitive
motorized faders
Figure 2-2 — The LARC2 Control Surface
2-2
960L Owner’s Maunal
The LARC2 Remote
Getting What You Want
LARC2 Connections
In general, the LARC2’s faders and joystick are used to
control audio parameters of your choice, while all other
buttons select operations and parameters. That means
you have several fast ways to operate the 960L.
Host Port
• Mode Buttons give you direct access to the most
frequently used control actions. These buttons are:
PROGRAM, REGISTER, BANK, STORE, EDIT,
CONTROL, and MACHINE. The functions of some
buttons are implied by their names, and all are
explained below. When selected, each button
glows red.
• ENTER is used to complete an action.
• The Numeric Keypad lets you quickly select any
numbered option on the display.
• Navigation Arrows let you move up, down, or
sideways within the display to select the action you
want.
• Increment and Decrement (+/-) Buttons can be
used to select items from lists or to make fine
adjustments to parameters.
• Soft Buttons are context sensitive. Their labels
therefore change dynamically and appear at the
bottom of the LCD display, just above each button.
This port connects LARC2 to the 960L Mainframe. For
distances of 100 feet or less, use Lexicon No. 02214400 50-foot cables. One 50-foot cable is supplied
with LARC2. For longer distances (up to 1,000 feet) use
computer-grade cable with shielded twisted-pairs, for
example Belden 9860 or 9271. Do not use microphone
or other audio cable. The cable pin assignment is
shown in figure 2.3.
For distances over 100 feet,
LARC2 requires an external power supply, as described
below.
5 4 3 2 1
9 8 7 6
Pin
1.
2.
3.
4.
5.
Assignment
Chassis/Shield Ground
Receive Data
Transmit Data
Transmit Common
Power Supply (+)*
Pin
6.
7.
8.
9.
Assignment
Receive Common
Receive Data
Transmit Data
Power Supply
Ground*
* Not connected if external power supply is used.
Figure 2-3 — LARC2-connector Pin Assignments
Additional LARC2 controls include:
• Joystick, primarily for input and output panning, but
assignable to any desired parameters.
• JOYSTICK Button activates and deactivates
the joystick.
• FINE ADJ Button toggles faders to and from
fine-adjustment mode.
• Lexicon Button temporarily returns operation to the
most recently loaded Program or Register for quick
sonic comparison.
• Faders are touch-sensitive and motorized. Their
positions are automatically updated (auto-nulling)
to reflect the current values of their assigned
parameters. The parameters controlled by each
fader and their current settings are shown on the
display, just above the soft-button labels. Touching
any fader highlights its parameter and setting on
the display.
• MUTE MACH and MUTE ALL buttons (flanking the
numeric keypad’s "0") mute the output
of the currently selected machine or the outputs of
all machines.
Aux Port
You can connect a standard PS/2 computer keyboard to
LARC2 via this port. This will allow faster text entry in
NAME and INFO fields (see Chapter 4, Operations in
Detail).
"Hot plugging" the keyboard is not
recommended. The keyboard should be connected
before power is applied to the 960L.
External Power Connector
The LARC2 must be powered by an external power
supply when located greater than 100 feet from the
960L. The power supply should deliver 12VDC at 2 A
and should have a 5.5 mm O.D., 2.5 mm I.D. concentric
(female barrel) connector, with the positive voltage on
the inner contact. See the Lexicon web page
(www.lexicon.com) for a current list of external power
supplies and vendors.
12VDC, 2A
2-3
960L Owner’s Manual
The LARC2 Remote
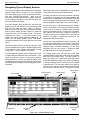
Navigating Typical Display Screens
The use and navigation of the display will be illustrated
with the screen shown in Figure 2-4, from Algorithm
Edit Mode. Bring up this screen by pressing the EDIT
and then ALGORITHM buttons.
Note that the
parameters currently assigned to the faders, and their
current settings, are shown on the Scribble Strip, just
above the Soft Button Labels.
The Action Display, which occupies the left half of the
display’s top line, will show the current operating mode
when you first enter that mode. When you touch a
fader, it will show the name of the attached parameter
and its current setting, and will continue to show that
information until you touch another fader. The action
indications are “sticky,” in that they remain on the
display until another action indication is displayed. In
Figure 2-4, the Action Display shows "Edit Mode"
because pressing the EDIT button was the most recent
action.
The Effect Display, which occupies the right half of the
top line, identifies the Program or Register loaded in the
active machine. Here, it shows that the 960L is using
"Large Hall +", which is Register 1 in Bank 1.
The Main Operating Display, which changes from mode
to mode, always occupies the same area shown, i.e. the
center and left of the screen. In this screen, used for
editing algorithms, it shows four algorithm pages, each
consisting of parameters and their settings. The currently
selected page has its page number highlighted, with a
red outline.
Touching any fader will select the parameter controlled
by that fader. At that point, the selected parameter and
its setting will be highlighted on the Scribble Strip and
also on any page of settings visible in this display. It will
also be displayed in larger type on the Action Display.
You can also scroll to any desired parameter, whether
on the current page or not, with the Navigation Arrows.
If you scroll up or down to a different page, that page
and all its parameters will be "connected" to the faders.
Note that you can also select a page by pressing its
number on the Numeric Keypad. Once a new page is
selected, the faders automatically position to the
appropriate value (auto-nulled).
You can move as many faders at a time as you like. All
the connected parameters will be affected. If you touch
several faders, the last fader you release will then be
displayed as the "selected" parameter. In this mode
(Algorithm Edit) you can use the +/- Buttons to make
fine adjustments on the selected parameter.
The Paging Arrow along the right side of the Main
Operating Display shows that more items are available
than will fit the current listing. The total number of
pages, 8 in Figure 2-4, is listed in the lower right corner
of the Main Operating Display. This arrow is greyed out
at the top, indicating that no further items are available
in that direction. The rows wrap. After you key down to
the last row, the next press of the Down Arrow will bring
up the first row, and vice versa if you use the Up Arrow.
Main Operatng
Display
Action Display
Scribble Strip
Parameters in the rows not highlighted are not assigned
to the faders and are set to the values shown.
System Status
Display
Joystick Status
Display
Soft Button
Labels
Figure 2-4 — A typical display screen
2-4
Effect Display
960L Owner’s Maunal
The LARC2 Remote
Navigating Typical Display Screens, Continued
Shortcut: Any numbered item available in the
current mode, visible or not, can be brought up by
entering its number with the Numeric Keypad on the
LARC2 control surface.
Soft-Button Labels identify the currently available soft
buttons. The currently active button is highlighted with a
red outline. Buttons with grey backgrounds will cause a
context change; those with yellow backgrounds cause
an immediate action. Buttons with blank legends do
nothing.
The System Status Display is present in all screens. In
Figure 2-4, it shows that the current sample rate is
48kHz, that the wordclock source is internally
generated, and that the 960L is locked to that clock
source. On the line below, we see that the 960L is
configured as two machines, and that Machine 1 is
currently selected for editing. If a machine is muted, the
machine number is overlaid with a red flashing "M". If
all available machines are muted, the machine bar is
overlaid with a red flashing "ALL MUTED" message. If
the word clock was external (via either the AES input
1-2 or the BNC Wordclock input), the padlock symbol
would show the state of wordclock lock. If lock was lost,
the padlock box would flash red and the 960L outputs
would automatically mute.
The Joystick Status Display is also present in all
screens. In Figure 2-4, it gives the joystick position and
the resulting Shape and Spread values.
The
parameters currently assigned to the joystick and their
settings are listed in two boxes to the left of the Joystick
Map. The small colored dot at the center of the map
shows those parameter settings graphically. The dot is
red if the joystick is not active and green if it is. The
cursor shows the Joystick’s current position. Pressing
the JOYSTICK Button on the LARC2 control surface
sets the parameters to the joystick’s current position
and activates the joystick.
The V-Page legend in the Joystick Status Display
indicates that the joystick is set to a V-page, or virtual
page, a Program- or Register-specific collection of
parameters and settings assigned to the faders and
joystick. (See Chapter 3, Basic Operation and Chapter
4, Operations in Detail.)
Fader labels are in the Scribble Strip just above the Soft
Button Labels. These display the parameters currently
assigned to each fader, and their settings. When a fader
is touched, the associated parameter is highlighted in
yellow.
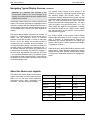
About the Faders and Joystick
The faders and joystick always control some
aspect of the audio, no matter what mode the
960L is in. It is the active control mode that
determines which audio parameters are
controlled. This table shows the mapping.
MODE
FADERS
JOYSTICK
Program
V-Page
V-Page
Register
V-Page
V-Page
Machine
V-Page
V-Page
Control
V-Page
V-Page
Edit -- Algorithm
Algorithm Parameters
V-Page
Edit -- Inputs
Input Levels
Input Panner
Edit -- Outputs
Output Levels
Output Panner
Edit -- V-Page
V-Page
V-Page
2-5
The LARC2 Remote
Lexicon, Inc.
Audio Indicators
Fine Adjust
A simple meter bridge above the display holds three
LEDs per channel. The lowest LED indicates that a
signal is present, defined as a level of –60 dBFS or
more. When levels exceed –6 dBFS, the middle LED
lights as a warning of reduced headroom. Above –0.5
dBFS, the top LED lights to indicate imminent overload.
It is difficult to set parameters with large value ranges to
precise values with the faders. For example, the fader
range for some delays must allow for the fact that
delays of 1,000 milliseconds are not uncommon, yet the
value often needs to be set within a few milliseconds or
even samples.
If all eight overload LEDs are illuminated, an overflow
has occurred in the DSP accumulator. This can happen
even with modest signal levels if the delay/reverb
feedback coefficients (which are set by the algorithm
parameters) combine to create some path with a gain
greater than unity. Generally, you should mute the
outputs (MUTE MACH or MUTE ALL), and then find
and correct the offending parameter settings. This
should not occur with factory Programs, unless they
have been edited.
To make such fine adjustments, set the faders to the
approximate values you want, then press the FINE ADJ
Button. When this button is pressed, the faders all move
to the center of their travel, but their settings do not
change. The faders then operate in a vernier mode, with
a limited adjustment range and far fewer steps per inch
of travel. This makes it easy to set the parameter to the
exact value you want.
The Lexicon Button
The Lexicon button is used for quick A/B comparisons
between the current version of a Program or Register,
including your edits, and the effect as originally loaded.
When the button is held down, the original, stored
Program or Register will be loaded and the display will
show a red banner that says "LISTENING TO
ORIGINAL PRESET". When the button is released,
your last Edit state will be reloaded and the red banner
will disappear.
2-6
Pressing FINE ADJ a second time returns the system
to normal operation and the faders return to their
appropriate full-range positions. The display warns
when the system is in fine adjust mode, but the
centering of all faders is a more obvious tip-off.
For fine adjustments of a single parameter while in Edit
Algorithm mode, simply touch the appropriate fader,
then use the Increment/Decrement (+/-) Buttons to get
the setting you want. Each press of these buttons
changes the parameter by its smallest possible
increment.
3
Basic Operation
AN OVERVIEW OF THE CONTROLS ........................3-1
A QUICK GUIDE TO OPERATION ..............................3-2
(1) Setup (Control Mode) ......................................3-2
(2) Machine Selection ............................................3-5
(3) Program Loading ..............................................3-5
(4) Editing a Program or Register ..........................3-6
(5) Storing Your Edits ............................................3-6
960L Owner’s Maunal
Basic Operations
Basic Operation
An Overview of the Controls
This chapter provides a quick description of how to
operate the 960L. Chapter 4, Operations in Detail,
provides a more complete description of all available
functionality.
Figure 3-1 is a general map to the LARC2’s control keys
and the ways they take you through the 960L’s user
interface.
PROGRAM
EDIT
REGISTER
STORE
BANK
EDIT
CONTROL
MACHINE
EDIT (IF
REGISTER)
EDIT
ALGRITHM
WORDCLK
ALL**
FLOPPY
PROGRAMS**
REGISTER
REGISTER
PROGRAM
OR
REGISTER
SELECT
(ALG)
CONFIG
V-PAGE
EDIT
EDIT
NAME
EDIT
NAME
EDIT (IF
REGISTER)
NAME (IF
REGISTER)
J-STICK
SYSTEM
INPUT
J-STICK
INFO
INFO
INFO (IF
REGISTER)
OUTPUT
CLEAR ALL
DELETE
J-STICK
CANCEL
V-PAGE
INSERT/
WRT OVR
HOME
END
SAVE (IF
BANK)
Figure 3-1 — Overview of 960L control system.
Dedicated control keys shown with square corners, soft buttons with rounded corners,
and Option soft buttons with dashed outlines. Controls with ** in their labels initiate no action.
3-1
Basic Operations
Lexicon, Inc.
A Quick Guide to Operation
Basically, using the 960L involves only the following:
1)
2)
3)
4)
Setting up the system for the job.
Selecting a machine.
Loading the Programs and Registers you want.
Editing the Program or Register parameters with
the faders and joystick.
5) Storing your edits for quick recall at any time.
To make this overview as clear as possible, only one
screen will be shown per operation. In practice, you may
see slightly different screens depending on the
selections you make. These are discussed further in
Chapter 4, Operations in Detail.
tell that Source Selection is the active control because
its name (SOURCE) has a blue background. The name
of the inactive control, (RATE) has a yellow background.
If the RATE control was active, pressing the Left
Navigation Arrow would activate SOURCE.
•
•
•
Press the number on Numeric Keypad for the
clock source you want. (Refer to Chapter 4,
Operations in Detail, to find out more about clock
sources.)
Use the Right Navigation Arrow to move to the
RATE display.
Press the number corresponding to the sample
rate you want.
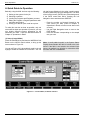
(1) Setup (Control Mode)
Press the CONTROL key and then the WORDCLK Soft
Button on the LARC2 control surface, to bring up the
screen shown in Figure 3-2.
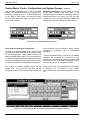
You can tell Figure 3-2 is in wordclock mode by the red
highlight around the WORDCLK soft button. You can
Note: A small padlock symbol in the System Status
Display shows whether the 960L is locked to the clock
source. If the 960L is not locked to the selected clock
source, the padlock box will blink in red and the 960L
will mute until lock is established.
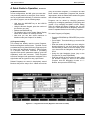
Figure 3-2 — Control Mode, wordclock selection.
3-2
960L Owner’s Maunal
Basic Operations
A Quick Guide to Operation, Continued
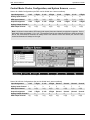
Next, press the CONFIG soft button to select the
input/output configuration.
Depending on the sample rate and input/output
configuration you select, the 960L can be configured as
up to four virtual machines, each of which can be
programmed individually. In the configuration screens,
each machine is shown as a separate, numbered
rectangle in the Main Operating Display. The number of
machines in the current configuration can be read from
the Machine Strip in the System Status Display at the
upper right of the screen.
If you selected a clock rate of 44.1 or 48 kHz, you’ll get
a screen like Fig. 3-3, which gives you a choice of four
processing configurations:
1) Stereo in and out, using up to four machines.
2) One machine with five channels in and five out,
and another with two channels in and five out.
3) Two machines, each with two channels in and
five out.
4) A single 8-in/8-out machine, with a pass-through
algorithm, which performs no processing, but is
useful for wiring checkout and diagnostics.
Figure 3-3 — Configuration screen for 44.1/48 kHz clock rate (2 in/5 out selected, two machines available).
3-3
Basic Operations
Lexicon, Inc.
A Quick Guide to Operation, Continued
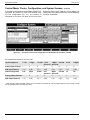
If you selected a clock rate of 88.2 or 96 kHz, you’ll get
a screen like Fig. 3-4, which gives you a choice of two
processing configurations:
1) Stereo in and out, using one or two machines
2) One machine, with 5 channels in and 5 channels out.
3) One machine, with 2 channels in and 5 channels out.
4) A single 8-in/8-out machine, with a pass-through
algorithm, which performs no processing, but is useful
for wiring checkout and diagnostics.
To select a configuration, enter its number with the
Numeric Keypad (or scroll to it with the Navigation
Arrows and press ENTER).
To select analog or digital input, first use the Navigation
Arrows to position yourself on any of the Input Selection
Boxes. Then, use the Increment/Decrement (-/+) keys
to toggle back and forth between Analog and AES
inputs. In Figs. 3-3 and 3-4, all inputs are analog ("AN1"
on the INPUTS strip of the Main Operating Display).
Pressing either the Increment or Decrement key will
switch all inputs to digital ("AES" on the INPUTS strip).
All inputs will be set alike.
The Analog and Digital Outputs receive the same
signals at all times, mapped channel for channel, as
noted by the "A & D" on the OUTPUTS strip.
Figure 3-4 — Configuration screen for 88.2/96 kHz clock rate (stereo in/out selected, two machines available).
3-4
960L Owner’s Maunal
Basic Operations
A Quick Guide to Operation, Continued
(2) Machine Selection
In most configurations, the 960L gives you more than
one processing machine to work with, each of which
can be programmed individually. To select the machine
you wish to program, use the following steps:
•
•
•
•
•
Hold down the MACHINE key on the LARC2’s
control surface.
Using the Numeric Keypad, press the number of
the machine you want.
Release the MACHINE key
The Machine Strip in the System Status Display
shows which machine is currently selected
Note that you can also select machines in
Machine mode (see Chapter 4 for details)
many as ten similar Programs. For example, the Halls
Bank contains reverberation Programs that simulate
large spaces, while the Plates Bank contains Programs
that simulate studio plate reverbs.
Programs can be edited by changing parameter
settings, by re-assigning parameters to the faders and
joystick, or by modifying the NAME or INFO. Editing
does not change the factory Programs, but you can
store up to 1000 edited effects as Registers, which are
stored in separate Banks from the factory Programs.
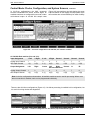
To Load a Program (or Register):
•
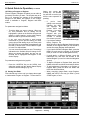
(3) Program Loading
•
This manual has already used the terms Programs,
Banks and Registers several times. The 960L comes
pre-loaded with more than 200 factory Programs (such
as "Large Hall" and "Bright Chamber"). Each Program
is a complete effect that combines a processing
algorithm with specific parameters settings, plus brief
explanatory notes and comments. These Programs
have been designed with parameters assigned to the
eight faders and the joystick for easy, rapid control.
•
Related Programs are stored in descriptively named
Banks so they will be easy to find. A Bank can hold as
•
•
Press the PROGRAM (or REGISTER) key on the
LARC2
Press BANK. That should bring up a screen like
Figure 3-5:
Enter the number of the Bank you want, using the
Numeric Keypad. If you don’t know the number
and the Bank you want is not on the display, scroll
up or down with the Navigation Arrows until you
find it.
Using the right Navigation Arrow, jump to the
Program list (or press PROGRAM).
Enter the number of the Program you want, using
the Numeric Keypad (or scroll to the desired
Program with the Navigation Arrows or +/Buttons, then press the ENTER key).
Figure 3-5 — Program Load screen (Register Load screen is similar)
3-5
Basic Operations
Lexicon, Inc.
A Quick Guide to Operation, Continued
(4) Editing a Program or Register
Once a Program or Register is loaded, you can edit it to
get exactly the effect you want. The simplest way to do
this is by changing the settings of the parameters
assigned to the faders and joystick on the V-Page,
which is available in Program, Register and Bank
modes.
future use, press the
STORE key. The STORE
key will blink to remind you
that the store operation is
pending.
•
For parameters assigned to faders:
•
•
•
Touch the fader you want to change. When you
do, that parameter and its setting will be
highlighted in yellow on the Scribble Strip and will
appear, in larger lettering, on the Action Display.
Move the fader to get the desired setting.
If you can’t move the fader in small enough
increments to get the precise setting you need,
get as close to that setting as you can, then press
the FINE ADJ key and adjust the parameter with
the fader in vernier mode. Press FINE ADJ again
to leave Fine Adjust Mode.
You can move several faders at once. The settings
indicated on the Scribble Strip will change for all.
When you release the faders, the last one you
touched will be highlighted and appear on the
Action Display.
•
•
•
For parameters assigned to the joystick:
•
•
Press the JOYSTICK Key on the LARC2, then
adjust the joystick until the Joystick Status Display
shows the desired settings (Fig. 3-6).
(5) Storing Your Edits
•
•
Your edits will stay in force until you change them again
or load another Program or Register. To save them for
If
you’ve
been
editing a user-created
Register, the 960L
will highlight the
current Bank and
Register. If you wish
to
replace
that
Register with your
edited version, press
STORE a second
Figure 3-6 —
time to save your edit.
JOYSTICK STATUS Display
If you've been editing a
factory Program, the
960L will look for the first Register Bank with space
available or the Register Bank you last stored to,
and the first empty Register within that bank.
If you’d prefer a different Register Bank, press the
BANK key and enter the number of the desired
bank (or scroll to it with the Navigation Arrows).
If you'd prefer a different Register, press the
REGISTER key and enter the number of the
desired Register (or scroll to it with the Navigation
Arrows).
To Name a Register or Register Bank, press the
NAME soft button and follow the directions below.
To add explanatory information to a Register or
Register Bank, press the INFO soft button and
follow the directions below.
When everything (target Bank, target Register,
NAME and INFO) is the way you want it, press
STORE again, to save.
Figure 3-7 — Storing
3-6
960L Owner’s Maunal
Basic Operations
A Quick Guide to Operation, Continued
To enter Name or Information:
•
•
Using the LARC2, use the Increment/Decrement
(+/-) keys to scroll between character positions in
the Name or Information display and the
Navigation Arrows to select the desired character
from the matrix below, then press the ENTER key
to finalize your selection.
Remove
All Text
Go to the
Delete the
beginning
character to
of the text
the left of the
cursor
Toggle between INSERT (put
in the selected character,
moving the text to make room)
and WRT OVR (replace the
character under the cursor
with the selected character)
If you have a PS/2 keyboard connected to the
AUX port on the LARC2’s rear panel, you can type
in names and info. It is recommended that you
connect the keyboard before power is applied to
the 960L.
Names of Registers and Register Banks can be up to
16 characters long. Information displays for Registers
can hold 150 characters and Information displays for
Banks can hold 100 characters.
Go to the end
of the text
Go back to the
basic Register
Info page
Figure 3-8 — Name screen; Info screens are similar.
3-7
4
Operations in Detail
LOADING PROGRAMS AND REGISTERS ..................................4-1
Loading Programs ..................................................................4-1
Loading Registers ..................................................................4-2
CONTROL MODE: CLOCKS, CONFIGURATION,
AND SYSTEM SCREENS ............................................................4-3
Wordclock................................................................................4-3
Input, Output, and Machine Configuration ..............................4-4
System Screen........................................................................4-8
EDITING ........................................................................................4-9
Editing Algorithms ..................................................................4-9
Editing With the Faders ..........................................................4-9
Fine Adjust ..............................................................................4-9
Editing with the Joystick ........................................................4-10
Quick Comparisons via the Lexicon Button ..........................4-10
Editing Inputs and Outputs....................................................4-11
Input Panning ........................................................................4-11
Output Panning ....................................................................4-12
The 960L Surround Panning Rules ......................................4-13
Setting Levels........................................................................4-13
Avoiding Overload ................................................................4-13
Assigning New Parameters to Faders or the Joystick ..........4-13
The V-Page and Parameter Reassignment ..........................4-14
Using the Edit Algorithm Screen ..........................................4-14
STORING AND LABELING YOUR EDITS ..................................4-16
Storing ..................................................................................4-16
Naming and Annotating ........................................................4-16
ORGANIZING YOUR REGISTERS ............................................4-17
Edit Tools for Registers ........................................................4-18
Using the Floppy Drive..........................................................4-18
THE CD-ROM..............................................................................4-18
MACHINE MODE ........................................................................4-18
960L Owner’s Maunal
Operations in Detail
Loading Programs and Registers
With more than 200 factory Programs to choose from,
plus up to 1,000 Registers of your own creation, you’ll
probably spend most of your time with the 960L
loading the effects you want.
To simplify the selection of an appropriate effect, the
960L programs are organized as 24 Banks of up to ten
related effects (see the Appendix for Program
Descriptions). There are 100 Banks available for
Registers and 10 Banks for Floppy storage and
retrieval.
Loading Programs
When you first install the 960L, it will contain only
factory Programs. There are several ways to select
and load Programs. The simplest is designed to be
familiar to users who know the Lexicon 480L:
Press the PROGRAM key, then the BANK key, to bring
up a list of Program Banks (Fig. 4-1)
• Press the Program key to get to the list of
Programs
• Select the desired Program by entering its
number on the Numeric Keypad (or by scrolling
to it with the Navigation Arrow keys and
pressing the Enter key).
Note: When you change Programs, the display will
change and the motorized faders will move to the
positions corresponding to that Program’s parameter
settings.
If you already know the location of the Program you
want, you can do all this in just a few keystrokes:
• PROGRAM Key (Skip this step if going to the
last Bank used.)
• BANK Key
• Bank Number
• PROGRAM Key
• Scan the list of Banks to find one you want
(e.g., "Halls")
• Select that Bank by entering its number on the
Numeric Keypad (or by scrolling to it with the
Navigation Arrow keys).
Yellow shows that this
menus is not “in focus”
Selected Bank and
Program are highlighted
• Program Number
If you don’t know the location of the Program you want,
the procedure is similar, except that you can scroll up
and down through the list of Banks to find the one you
want.
Blue shows that this
menu is “in focus”
Fader Labels in Scribble Strip are
from the currently loaded program.
Figure 4-1 — Program Load screen
4-1
Operations in Detail
Lexicon, Inc.
Loading Programs and Registers, continued
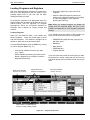
Loading Registers
Loading Registers is similar to loading Programs. Press
the REGISTER Key instead of the PROGRAM Key.
This will bring up a similar screen (Fig. 4-2) The only
differences are the use of the word "Register" instead of
"Program" and the addition of two soft buttons for
labeling. Note also that the last two Registers are
unnamed and greyed out on the display, indicating that
they’re empty. Any selection that is greyed out, on any
screen, is unavailable. Programs and Registers can be
unavailable if they are empty or if they are designed for
sample rates and configurations that are not currently
selected.
Shortcut: You can instantly load any Program or
Register in the current Bank by pressing the
corresponding key on the Numeric Keypad.
Figure 4-2 — Register Load screen
Alternative Loading Techniques
• You can use the Left/Right Navigation Arrows to move between Banks
and Programs (or Banks and Registers).
• You can use the +/- Buttons or the Up/Down Navigation Arrows to scroll
through Banks.
• You can use the +/- Buttons or the Up/Down Navigation Arrows to scroll
though Programs and Registers. Press the ENTER key to load the
Program.
• You can repeatedly press BANK, PROGRAM or REGISTER to scroll
through the Banks, Programs and Registers.
Programming Machines
Depending on the configuration (see below),
the 960L can be used as one, two, or four
processing machines. The number of machines
available in the current configuration is shown
on the Machine Strip in the System Status
Display. The machine whose settings you are
4-2
currently altering is highlighted. Machines that
are muted have a blinking red "M" superimposed on their machine number.
You must program each machine individually.
To switch to a different machine, press and hold
the MACHINE key, then enter the desired
machine number on the Numeric Keypad.
960L Owner’s Maunal
Operations in Detail
Control Mode: Clocks, Configuration, and System Screens
The LARC2’s CONTROL key provides access to the
960L’s wordclock, input/output configuration, and
system information. Note that only three soft buttons
operate in this mode. The faders and joystick remain
assigned to whatever audio parameters are on the
V-Page.
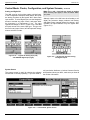
Figure 4-3 — Control Mode Wordclock Screen
Wordclock
From the Control Mode screen, press the WORDCLK
soft button, then the number of the source you want:
1 Internal
Crystal-controlled. Use only with
analog inputs, or if your digital inputs
are from sources that are locked to
the 960L.
2 BNC
For locking to your studio’s
master clock. Used with
analog or digital input.
3 AES
Clocked from AES input 1-2. Used
with analog or digital input. Note that
if you are using AES as both the
clock and audio source, and
disconnect AES input 1-2 (the clock
source) while other inputs remain
active, you will hear artifacts on the
non-clock channels, while the system
detects the disconnect.
Entering the clock source number will select that
source. You can also select a source with the Up/Down
Navigation Arrows or the Increment/Decrement (+/-)
keys.
Note: Use of the internal wordclock with digital inputs
can introduce audible artifacts due to sample slip, even
if the nominal sample rates are the same. When the
960L detects slipped samples in the AES input stream,
the audio outputs are muted. To avoid this, do one of
the following:
• Slave both the digital source and the 960L (BNC or
AES) to a common wordclock.
• Allow the 960L to slave (BNC or AES) to the digital
source's wordclock.
• Slave the digital source to the 960L, using the
960L AES or BNC output.
4-3
Operations in Detail
Lexicon, Inc.
Control Mode: Clocks, Configuration, and System Screens, continued
Use the Right Navigation Arrow to get to the Rate
display. For internal wordclock, you must select the
exact rate, as shown in Fig. 4-3. For external wordclock
via the BNC or AES inputs, you need only select
44.1/48 kHz or 88.2/96 kHz range. The 960L will then
lock onto your source.
Wordclock Lock Status: A small padlock icon in the
System Status Display shows lock status. If the
wordclock becomes unlocked from the signal, the icon’s
background flashes red (Figure 4-4) and the 960L
outputs are muted. This lock indicator is visible in the
System Status Display during all operating modes.
Locked
Unlocked
Figure 4-4 — Locked and unlocked wordclock.
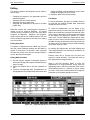
Input, Output, and Machine Configuration
The 960L is an 8-input/8-output device. Input sources
can be either analog or AES digital, and all inputs must
be the same input type. Each output is sent to both
analog and AES digital outputs. For any configuration,
the mapping of physical channels to algorithm channels
is fixed. The CONFIG soft button brings up the screens
for selecting the 960L’s I/O and machine configuration.
The number of machines available varies with the
sample rate. At 44.1/48 kHz, the 960L can be
configured as up to four machines. At 88.2/96 kHz, up
to two machines can be configured. Where multiple
machines are available, each is programmed
separately.
In stereo configurations (Figs. 4-5 and 4-6), all available
machines are connected as two-channel in, twochannel out. Note that each machine is numbered and
each machine’s I/O configuration is displayed in red at
the lower right corner of its diagrammed block.
When you switch to a new Configuration, no Programs
or Registers are yet loaded, so the Scribble
Strip is blank and the Joystick Status Display is greyed
out.
Figure 4-5 — Stereo configuration for 44.1/48 kHz sample rate; four machines available.
4-4
960L Owner’s Maunal
Operations in Detail
Control Mode: Clocks, Configuration, and System Screens, continued
Stereo 44.1/48kHz Configurations (the DSP card is divided into 4 stereo machines).
Input Assignment
1 Left
1 Right
2 Left
2 Right
3 Left
3 Right
4 Left
4 Right
Analog Input Channel
1
2
3
4
5
6
7
8
AES Input Channel
1 (L)
2 (R)
3 (L)
4 (R)
5 (L)
6 (R)
7 (L)
8 (R)
Output Assignment
1 Left
1 Right
2 Left
2 Right
3 Left
3 Right
4 Left
4 Right
Analog Output Channel 1
2
3
4
5
6
7
8
AES Output Channel
2 (R)
3 (L)
4 (R)
5 (L)
6 (R)
7 (L)
8 (R)
1 (L)
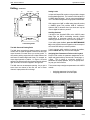
Note: As shown in these tables, AES inputs (and outputs) have two channels per physical connection. On the
back panel, these are labeled 1-2, 3-4, etc. The assignment of the two channels conforms to AES conventions,
that is, the odd-numbered channels will always be the left channel of that AES stereo pair, and the evennumbered channels will always be the right.
Figure 4-6 — Stereo configuration for 88.2/96 kHz sample rate; two machines available
Stereo 88.2/96 kHz Configurations (the card is divided into 2 stereo machines)
Input Assignment
1 Left
1 Right
2 Left
2 Right
Unused
Unused
Unused
Unused
Analog Input Channel
1
2
3
4
5
6
7
8
AES Input Channel
1 (L)
2 (R)
3 (L)
4 (R)
5 (L)
6 (R)
7 (L)
8 (R)
Output Assignment
1 Left
1 Right
2 Left
2 Right
Unused
Unused
Unused
Unused
Analog Output Channel 1
2
3
4
5
6
7
8
AES Output Channel
2 (R)
3 (L)
4 (R)
5 (L)
6 (R)
7 (L)
8 (R)
1 (L)
4-5
Operations in Detail
Lexicon, Inc.
Control Mode: Clocks, Configuration, and System Screens, continued
In 5-Channel configurations, all available machines are
configured for surround or other multi-channel uses.
For one configuration (Fig. 4-7), one machine is
configured as 5-in/5-out, the other as 2-in/5-out, both
sharing the same output channels. On the display, the
output paths of the two machines are colored differently
for easier visualization.
Figure 4-7 — 5-in/5-out and 2-in/5-out configuration for 44.1/48 kHz; two machines available
44.1/48kHz Dual machines (5-in and 2-in):
Input Assignment
1 Left
1 Right
1 Center 1 Left
1 Right Unused
Surround Surround
2 Left
2 Right
Analog Input Channel
1
2
3
4
5
6
7
8
AES Input Channel
1 (L)
2 (R)
3 (L)
4 (R)
5 (L)
6 (R)
7 (L)
8 (R)
Output Assignment
Left
Right
Center
Left
Right
Unused
Surround Surround
Lt*
Rt*
Analog Output Channel 1
2
3
4
5
6
7
8
AES Output Channel
2 (R)
3 (L)
4 (R)
5 (L)
6 (R)
7 (L)
8 (R)
1 (L)
* Lt/Rt denotes a matrix-encoded version of the 5-channel surround effects. This is implemented as a LexiconLogic encode
and is compatible with most matrix encoding.
4-6
960L Owner’s Maunal
Operations in Detail
Control Mode: Clocks, Configuration, and System Screens, continued
In 2-in/5-out configurations the 960L generates
surround soundfields from stereo sources. Again, all
available machines are configured for surround or other
multi-channel output. At 44.1/48 kHz sample rates
(Figure 4-8) two machines are both sharing the same
output channels. On the display, the output paths of the
two machines are colored differently for easier visibility.
Figure 4-8 — 2-in/5-out configuration at 44.1/48 kHz; two machines available
44.1/48 kHz Dual machine (2-in and 2-in):
Input Assignment
1 Left
1 Right
2 Left
2 Right
Unused
Unused
Unused
Unused
Analog Input Channel
1
2
3
4
5
6
7
8
AES Input Channel
1 (L)
2 (R)
3 (L)
4 (R)
5 (L)
6 (R)
7 (L)
8 (R)
Output Assignment
Left
Right
Center
Left
Right
Unused
Surround Surround
Lt
Rt
Analog Output Channel
1
2
3
4
5
6
7
8
AES Output Channel
1 (L)
2 (R)
3 (L)
4 (R)
5 (L)
6 (R)
7 (L)
8 (R)
Note: In the four configurations shown above, all available machines can be used for processing. Where more
than one machine is available, each can be programmed individually.
There are also 8-in/8-out configurations (Figure 4-9). No effects processing is available in this configuration, but
it is useful for wiring checks and diagnostics.
Figure 4-9 — 8-in/8-out configuration for 44.1/48 kHz (left) and 88.2/96 kHz (right).
4-7
Operations in Detail
Lexicon, Inc.
Control Mode: Clocks, Configuration, and System Screens, continued
Analog and Digital I/O
The 960L may be set for either analog or digital input.
In the Configuration examples shown above, the inputs
are analog, as shown by the legend "AN1" above each
input number. To select digital input, use the Navigation
arrows to activate any Input Control, and press either
the Increment (+) or Decrement (–) key. The input
legends will change to "AES 1" (Figure 4-10). Note that
all inputs are set to the same input type. The type can
be set from any Input Control, and all inputs will change
when a selection is made.
Figure 4-10 — Legends for Analog input (left)
and AES/EBU Digital input (right)
Note: The + and – keys both act simply as toggles
when selecting input types; it does not matter which
you press.
Although inputs to the 960 must be all analog or all
digital, the processor always produces both analog
and digital output, mapped channel for channel. As a
reminder, all output channels carry the legend A&D
(Figure 4-11).
Figure 4-11 — All channels feed both analog
and digital outputs.
System Screen
The system screen is useful for showing the software
revision that is currently operating. If you ever need to
call your dealer, distributor or Lexicon Customer Service
with questions about your 960L, make sure you know all
the revision information.
Figure 4-12 — Control Mode, System Screen
4-8
960L Owner’s Maunal
Operations in Detail
Editing
The 960L’s Programs and Registers can be edited in
several ways:
•
•
•
•
Changing the settings of the parameters with the
faders and joystick
Adjusting input and output panning
Adjusting input and output levels
Assigning new parameters to any fader or to either
joystick axis
Edits stay in effect until a new Program or Register is
loaded, or can be saved as Registers. You cannot
overwrite factory Programs, but you can save edited
Programs as Registers. Registers, like Programs,
reside on disk and can be recalled anytime. They can
also be saved on floppy disk, for archiving or for copying
to a second 960L.
Editing Algorithms
setting will appear in large characters on the Action
Display at the upper left of the screen.
4) Adjust the fader to the desired setting.
Fine Adjust
For some parameters, the range of possible values is
so large that the smallest possible fader movements
change the value too much.
To make fine adjustments, set the faders to the
approximate values you want, then press the FINE ADJ
Button. When this button is pressed, the faders all move
to the center of their travel, but their parameter settings
do not change. The faders then operate in a vernier
mode, with a limited adjustment range and far fewer
steps per inch of travel, so that full-range movement of
the fader will alter the parameter value only a little from
its coarse value. This makes it easy to tweak the setting
to the exact value you want.
A Program or Register becomes edited any time you
alter the current parameter settings with the faders or
joystick. To save these—or any other—edits, just press
the Store key, check to be sure the storage location is
correct, then press Store again.
On entering fine adjust mode, the Action Display says
"Fine Adjust Enabled". The centering of all faders is an
additional indication.
Editing With the Faders
Pressing FINE ADJ a second time will return the
system to normal operation. The faders will return to
their appropriate full-range positions.
1) Use the Numeric Keypad or Navigation Arrows to
select the Edit page that contains the parameter you
want to change.
2) Check the Scribble Strip to find the parameter to
edit.
3) Touch the corresponding fader. That parameter will
be highlighted on the Scribble Strip and its name and
When in the Edit Algorithm Mode, to make fine
adjustments of a single parameter, simply touch the
appropriate fader to select the parameter, then use the
Increment/Decrement (+/–) buttons to get the setting
you want. Each press of these buttons will change the
parameter by its smallest possible increment.
Figure 4-13 — Algorithm Edit Screen with one fader parameter selected
4-9
Operations in Detail
Lexicon, Inc.
Editing, Continued
Editing with the Joystick
Check the Joystick Status Display to see what
parameters are currently assigned to the joystick and
what their current settings are.
Note whether the JOYSTICK Key on the LARC2 control
surface is illuminated or not.
If the key is illuminated, the joystick is locked to the
current parameter, and moving it will change the current
settings. The setting dot is green and the joystick cursor
will be superimposed on the Joystick Map section of the
display, as shown on the right in Figure 4-14.
•
•
Move the joystick. This immediately changes the
parameter settings.
The new settings can be read from the left half
of the Joystick Status Display.
If the key is not illuminated, the joystick is not locked,
and moving it will not affect parameter settings. The red
setting dot and joystick cursor will normally be
separated on the Joystick Map (as shown on the left in
figure 4-14).
•
•
Maneuver the joystick so its cursor lies near the
red setting dot.
Press the JOYSTICK Key on the LARC2 control
surface, to capture the parameter. The setting
dot will turn green and the JOYSTICK key will
light. If the joystick cursor is not near the current
values, the values will jump to the joystick
position.
Figure 4 -14 — Joystick Status Screen with
joystick not locked (left) and locked (right).
Note: As it is possible for the joystick cursor to
overlay the setting dot when the joystick is not locked,
check that the JOYSTICK Key is illuminated or that
the setting dot is green to confirm that the joystick is
locked.
Quick Comparisons via the Lexicon Button
The Lexicon button provides a quick way to switch
between the EDITs you have made on an Program or
Register and the effect as originally loaded. When the
Lexicon button is pressed, the original Program or
Register will load and a red banner will be displayed at
the bottom of the screen, saying "LISTENING TO
ORIGINAL PRESET" (Figure 4-15). When the button
is released, your last EDIT state will be reloaded and
the red banner will disappear.
Figure 4-15 — Comparing edited with original Program or Register
4-10
960L Owner’s Maunal
Operations in Detail
Editing, Continued
Editing Inputs and Outputs
The LARC2’s joystick can be used to place any input or
output signals anywhere in the soundfield. Input and
output levels can also be set, using the faders. Input
panning and level adjustments are not "Global"; they
affect only the current Program or Register.
Input Panning
To edit inputs, press the EDIT key, then the INPUTS
soft button, to bring up the screen shown in figure 4-16.
You can see from the System Status Display at the
upper right that two machines are in use and you are
editing the inputs for Machine 1. The Main Operating
Display shows that the current machine has five inputs
and where each input signal is positioned in the
soundfield.
In figure 4-16, the Left Surround input, channel 4, is
currently selected, so its header is highlighted and its
pan position is indicated on the Joystick Map. The
JOYSTICK key is off, so the joystick has not captured
the parameter – note the separate positions of the
cursor and the setting dot.
Input currently mapped to joystick
Joystick position
Input levels, now controlled by faders
Parameter currently controlled by joystick
(not captured — JOYSTICK key off)
Figure 4-16 — Editing screen for input panning and levels, with joystick key off.
Note new position of selected input
Joystick has captured parameter
Figure 4-17 — Editing screen for input panning, and levels after panning with joystick.
4-11
Operations in Detail
Lexicon, Inc.
Editing, Continued
When you press the JOYSTICK key, the input position
jumps to the joystick position, and the setting dot turns
from red to green, highlighting the joystick cursor (as
shown on the Joystick Map and on the smaller map of
the selected input). The legend "Joystick Locked"
appears in the Action Display. Moving the joystick pans
the selected input.
To pan a different channel, choose its number with the
Numeric Keypad or shift to it with the Navigation Arrows
and press the JOYSTICK key to lock.
Output Panning
To edit outputs, press the EDIT key, then the OUTPUTS
soft button, to bring up the screen shown in Figure 4-18.
You can see from the System Status Display at the
upper right that two machines are in use and that you
are working on settings for Machine 1. The Main
Operating Display shows that five outputs are in use
and where each output signal is positioned in the
soundfield.
In Figure 4-18, the Left output, channel 1, is selected,
so its header is highlighted and its pan position is
indicated on the Joystick Map. The Joystick has not
captured the parameter, indicating that the JOYSTICK
key is off.
Note: If you pan an output, keep the joystick moving!
Panning an output signal permanently between
channels causes a loss of spaciousness. (Due to the
Haas effect, such signals will collapse into the speaker
whose output reaches the listener first.) You can pan
and position input signals at will – but don’t pan output
signals unless you keep them moving or finally place
them in one speaker.
Figure 4-18 — Editing screen for output panning and levels, with joystick key off.
4-12
960L Owner’s Maunal
Operations in Detail
Editing, Continued
Left
Center Center
Center-Right Pan
Front
Left-Center Pan
Right
Surround
Front-Surround Pan
In Input and Output Edit modes, moving any fader changes
its associated signal level. The maximum level indication is
0.0 dBFS (digital full scale). You can move several faders at
once.The channel assignments are grouped to facilitate this.
With outputs set to “0dB,” a +4dBu analog input will produce
a -20dBFS signal. This provides 20dB of “headroom.”
Optimum S/N is achieved when input levels are kept as
close to digital full scale as practical.
Apparent
Source
Location
LS
Setting Levels
RS
LS-RS Pan
Avoiding Overload
If all eight of the “Overload” LEDs on the LARC2’s meter
bridge light, the DSP is overloading internally. (Certain
combinations of parameter settings can cause this.)
Reducing input levels may or may not cure the problems.
If your edits create feedback, press the MUTE MACHINE
key on the LARC2’s Numeric Keypad to mute the output of
the current DSP while you solve the problem.
4-19 Panning Rules
The 960L Surround Panning Rules
The 960L does not produce a phantom center in surround
modes, and no signal will appear in both the left and right
output channels, no matter where you set the joystick. In
other words, panning across the front is either between Left
and Center or between Right and Center. For example, an
output signal panned to position 1 in Figure 4-19 would
appear in the left and center front channels and the left and
right surrounds, but would not appear in the right front.
The 960L has true constant-power panning. As you pan a
sound from one channel to the next, the sum of those
channels’ output powers will not change.
If you’re not sure which machine is causing the problem,
press the MUTE ALL key on the Numeric Keypad.
Assigning New Parameters to Faders or the Joystick
Except in Edit modes, the parameter assignments of the
faders and joystick make up what we call a virtual page, or
V-Page. This is simply a convenient grouping of
parameters to simplify operation, but you can group them
any way you find convenient.
There are two ways to assign new parameters to the LARC2
controls:
•
•
Assigning parameters from the V-Page
Assigning parameters as an Edit option.
Figure 4-20 — Editing the V-Page
4-13
Operations in Detail
Lexicon, Inc.
Editing, Continued
The V-Page and Parameter Reassignment
•
•
•
•
•
Press the EDIT key on the LARC2 control surface.
Press the V-PAGE soft button. The screen (Figure
4-20) shows the assignments for each of the eight
faders and the joystick’s X and Y-axes.
Use the Navigation Arrows to highlight the Type or
Parameter to change. (You can also select a fader or
joystick axis with the Numeric Keypad, but you still
have to navigate to the Type or Parameter.)
Make your selection by cycling through the available
Types or Parameters with the +/– keys or touch the
fader of the desired parameter. The types are:
"None", "Algorithm", "Input", and "Output". Some
algorithms can have more than 50 parameters.
The fader or joystick axis is now assigned to
whatever parameter you’ve selected.
Using the Edit Algorithm Screen
This alternate method is a useful shortcut: If you’re in
the midst of editing algorithms, inputs or outputs, it
enables you to quickly pick a parameter and assign it to
a fader or the joystick.
•
Push the EDIT key, then the ALGORITHM soft
button, which brings up the Algorithm Edit
screen. This holds all the parameters for the
current algorithm, in up to ten "pages" of up to
eight parameters apiece. (The highlighted downarrow to the right of these pages shows that
there are more pages below the screen; these
pages can be reached by scrolling with the
Navigation Arrow keys – or, if you know the
•
•
number of the page you want, entering that
number on the Numeric Keypad.)
Pick the parameter you need from this menu by
navigating to it , which will highlight it.
Press the Options soft button. This changes the
soft buttons to "SELECT" (used for selecting
algorithms), "V-PAGE" (for assigning parameters
to faders), and "J-STICK" (for assigning
parameters to the joystick.), and the soft-button
background will change to yellow. See Figure
4-21.
Note: In Edit mode, the parameters and settings on
the Scribble Strip are not a V-Page. They are the
selected algorithm edit page, i.e., the row whose
number is highlighted, in larger characters for easier
reading.
On the Main Operating Display, parameters assigned
to the V-Page appear in blue; all others are in black.
From the Edit (Algorithm, Inputs, Outputs) Options
screen:
•
Pressing the V-PAGE soft button pops up a
numbered list of the eight faders and their
assigned parameters (Figure 4-21). To assign
your newly selected parameter to a fader, type
the fader’s number on the Numeric Keypad, or
touch the desired fader.
Note: You must already have selected a
parameter before you get to this screen.
Figure 4-21 — Edit V-Page screen; programming faders.
4-14
960L Owner’s Maunal
Operations in Detail
Editing, Continued
•
Pressing the J-STICK soft button pops up a
numbered list of the two joystick axes and their
assigned parameters (Figure 4-22). To assign
your selected parameter to a joystick axis, type
the axis number on the Numeric Keypad.
Note: You must already have selected a parameter
before you get to this screen.
Figure 4-22 — Edit V-Page screen; programming the joystick
•
Pressing the SELECT soft button pops up a
numbered list of the algorithms applicable to
your current configuration (Figure 4-23). If you
select an algorithm here(by typing its number on
the Numeric Keypad), a default Program will be
loaded that is "typical" for that algorithm.
Note: This is a regular Program load and will destroy
any parameter edits or V-Page creation you've done, if
you haven't previously saved your work.
Figure 4-23 — Select Algorithm screen
4-15
Operations in Detail
Lexicon, Inc.
Storing and Labeling Your Edits
When you’ve edited a Program or Register until it just
meets your needs, you can store it as a Register and
label it for future use.
•
•
Storing
•
•
•
•
Press the STORE key on the LARC2 Control
Surface.
If you've edited a Program, the 960L will select
the next empty Bank (or the Register Bank you
last stored to) and Register.
If you’ve edited a Register, the 960L will offer to
overwrite the original version. To accept, press
the STORE key again.
To change the storage location, press the BANK
key and enter the number of the desired
Register Bank, or scroll to it with the Navigation
Arrows. Then press REGISTER and select the
desired Register in that Bank. Pressing STORE
again will store your edits to that location. The
Register you select can be an empty one, or you
can choose to overwrite an existing Register.
•
•
•
•
•
•
Naming and Annotating
Registers and Register Banks can be given any desired
name of up to 16 characters and can be annotated with
up to 150 characters per Register and 100 characters
per Bank.
•
Press REGISTER to bring up the Register Load
screen (Figure 4-2).
Press BANK to name or add info to a Register
Bank. Otherwise you will be working with the
selected Register.
Press the INFO soft button to brings up the annotation
screen (Figure 4-24), which shows the information for
the currently selected Bank or Register. (Pressing
NAME brings up a similar screen.)
The currently selected character will be outlined
in red on the name line and in the character
matrix below.
Characters on the name line are selected with
the increment and decrement keys (hence the
"-" and "+" flanking the name line).
Characters within the matrix below that line are
selected with the navigation arrows.
For faster text entry, a PS/2 keyboard can be
plugged into the AUX jack on the back of the
LARC2. The keyboard should be connected
before power is applied to the 960L Mainframe.
Just below the character matrix is a line that
shows whether the system is in Insert or
Overwrite mode.
When editing the Information display, the screen
will show the relevant name, Bank number, and
Register number (if applicable) at the upper left.
When finished editing, either press the SAVE soft
button or the ENTER key if you’ve annotated a Bank, or
store the Register if you’ve annotated a Register.
Figure 4-24 — Register Info Edit
4-16
960L Owner’s Maunal
Operations in Detail
Organizing Your Registers
The 960L provides tools to help you organize the registers you make. To access the tools, press the REGISTER
key and then the OPTION soft button. Two soft buttons are displayed, EDIT and FLOPPY.
Figure 4-25 (a) — Register Info Options Enabled
Figure 4-25 (b) — Edit Tools For Registers
Figure 4-25 (c) — Floppy Tools For Registers
4-17
Operations in Detail
Lexicon, Inc.
Edit Tools for Registers
The CD-ROM
Pressing the EDIT soft button accesses three tools:
1) Copy Bank -- When 1 is pressed on the Numeric
Keypad, the contents of the currently selected
Program or Register Bank are copied to an internal
scratchpad.
2) Clear Register Bank – When 2 is pressed, the
contents of the currently selected Register Bank are
cleared. The Bank is made empty. For safety, the
user is prompted before the clear is executed.
Program Banks cannot be cleared.
3) Paste Register Bank – When 3 is pressed, the
contents of the scratchpad are copied to the
currently selected Register Bank. For safety, the
user is prompted before the copy is executed.
Program Banks cannot be pasted to.
Software updates will be made available on CD-ROM.
Instructions on how to load from CD-ROM will be
provided with each disk.
Using the Floppy Drive
Pressing the FLOPPY soft button accesses four tools:
1) Load From Floppy – When 1 is pressed, the
contents of the floppy disk are loaded into Register
Banks 101-110. For safety, the user is prompted
before the load is executed.
2) Store to Floppy – When 2 is pressed, the contents
of Register Banks 101-110 are written to the floppy
disk. For safety, the user is prompted before the
load is executed.
3) Format Floppy – When 3 is pressed, the floppy is
formatted in IBM 2HD format. For safety, the user is
prompted before the format is executed.
4) Clear Floppy Banks – When 4 is pressed, Register
Banks 101-110 are cleared. For safety, the user is
prompted before the clear is executed.
The files written to the floppy disk can be read and
archived on any PC running Windows 95, 98, or NT.
Machine Mode
If the 960L is configured as multiple machines, which
can be seen from the bottom line of the System Status
Display, pressing the MACHINE key on the LARC2’s
control surface will show you which Program or
Register each machine is running (Figure 4-26).
The currently selected machine will be highlighted in
the list in the Main Operating Display and in the System
Status Display. To switch to a different machine, enter
its number on the Numeric Keypad (or scan up or down
to it with the Numeric Arrow keys and press the ENTER
key).
The fader and joystick assignments on the V-Page will
then change to those for the machine you’ve selected.
Machine Shortcuts:
1) If you know the number of the machine you want to
access, simply press and hold the Machine key on
the LARC2 and enter the number – you needn’t
wait for the Machine Mode screen.
2) Hold down the MUTE MACHINE button and, on the
numeric keypad, press the number of the machine
you wish to mute or unmute.
3) Hold down PROGRAM or REGISTER and, on the
numeric keypad, press the number of the machine
you want, and you will be in PROGRAM or
REGISTER mode for that machine.
4) Hold down STORE and press the number of the
machine you want and you will be storing the edits
currently on that machine.
Figure 4-26 — Machine Mode
4-18
5
Using the Reverb Programs
REVERBERATION AND REALITY ............................5-1
SOUND IN SPACE: A SHORT HISTORY
OF STEREO AND SURROUND ..........................5-5
ALGORITHMS ............................................................5-6
Random Hall ........................................................5-6
Surround Hall ........................................................5-7
Chamber ..............................................................5-7
Plate & Surround Plate ........................................5-7
Ambience & Surround Ambience..........................5-7
Ambient Chamber ................................................5-8
Reverse & Surround Reverse ..............................5-8
Inverse ..................................................................5-8
PARAMETERS USED
IN THE 960L ALGORITHMS ..............................5-9
960L Owner’s Maunal
Using The Reverb Program
Using the Reverb Programs
Music recorded in a typical studio sounds dull. In a
performance space the music is enhanced by
reverberation, but even in an ideal space capturing that
reverberation can be chancy. Lexicon reverberators
solve this problem by enabling you to generate exactly
the reverberance that your recordings call for, even with
multitrack originals made in imperfect spaces. You can
make your listeners feel they are sitting in a real concert
hall, even though they are in a small room with hard, flat
walls. The object of the 960L is to create, in the studio,
the acoustics of any real or conceivable space, and to
reproduce these acoustics using the full directional
capabilities of a modern surround system.
Reverberation and Reality
Our solution has been to study the physics and the
neurology of human hearing, to discover the
mechanisms by which reflected energy patterns create
the useful perceptions of distance and envelopment,
and to discover how to recreate these perceptions
without compromising clarity. Using a knowledge of
these mechanisms we can create reverberation devices
that can give the desired acoustic impressions – rooms
that sound plausibly real, but that give the recording
engineer complete control over the sense of distance
and the sense of envelopment. These rooms seem
real, but they are not. They are designed and adjusted
by the engineer to the specific needs of the recording,
and they create their magic uniformly over a wide
listening area.
The acoustics of a given space are defined by its
reflected energy – that is, the way sound is reflected
and re-reflected from each surface. This is affected by
the dimensions of the space, the complexity or flatness
of the surfaces, the frequency characteristics of each
surface’s energy absorption, and the distance and
direction of each surface to the listener. In addition, in
large spaces there is a high-frequency rolloff caused by
the sound’s passage through air.
To see how this works, consider a concert space – a
large hall. In this space we hear a sonic event as a
whole package of sounds, consisting of direct sound,
various early reflections, and finally the reverberant tail.
The sound that reaches us directly from the performer
tells us the horizontal (and possibly the vertical)
direction of the sound source; the reflections that follow
give us cues for determining the distance to the source,
and give us some information about the space.
It is in principle possible to model the reflected energy
pattern in a specific space, either real or imagined, and
to reproduce this pattern as closely as possible through
a five-loudspeaker array. Alternately, one could
measure the reflection pattern from a specific source
point in a real space to a specific receiver position, and
reproduce this pattern through five loudspeakers. One
might expect this technique would yield the most
accurate sonic representations of halls and rooms.
Yet describing acoustics through the concepts of direct
sound, early reflections, and reverberation is
misleading from the point of view of human perception.
Direct sound, early reflections and reverberation are
only meaningful when the sound source is a very short
impulse, like a pistol shot. Real sound sources produce
sound events of finite duration (notes). The duration of
a note is typically longer than the time between the
direct sound and the early reflections. The length of
time a note is held dramatically changes the acoustics
we perceive, as short notes excite primarily early
reflections, and long notes excite the later
reverberation.
Alas, the illusion of reality is not so easily achieved.
First, real spaces are themselves a compromise. Small
rooms (and stage houses) tend to provide a sense of
blend and distance to music, but provide little warmth
and envelopment, and often can make the sound
colored or muddy.
Large rooms can provide
envelopment, but often the sound can be too clear and
present, with the instruments seemingly stuck in
loudspeakers.
To make matters worse, in a real space every musician
will have a completely different reflection pattern from
every other musician, and every listener will have a
different pattern from every other listener. In addition,
reproduction of a given sound field through a
loudspeaker array is only possible if the listener
occupies a single, known position. If our goal is to
create a believable room impression over a wide
listening area – and this should be our goal – then we
better do something else.
For example, in real rooms the direct sound is primarily
perceived at the onsets of sound events (notes.) When
a sound starts abruptly there is a brief instant where we
can hear the direct sound all alone, before it is
corrupted by or overwhelmed by reflected energy. In
this brief interval we can detect the direction, and
sometimes the elevation of the source. The so-called
"early reflections" are only audible after a note starts.
They are sometimes audible as a change in localization
or timbre while a note is held, but in general they affect
perception most strongly only after a note ends. These
reflections are heard in the space between notes – and
then often only as a tendency to make the notes sound
longer than they actually are. Reverberation also is
nearly always heard after the ends of notes, either in
the space between notes, or at the end of whole
5-1
Using The Reverb Program
Lexicon, Inc.
Reverberation and Reality, Continued
phrases. Reflections alter our sense of direction,
distance, and hall shape in ways that depend on the
duration and complexity of the notes, and on the
properties of the spaces between notes.
But human perception is more complex than just
direction, distance, and room shape. We are reacting to
the music on quite a different plane. Directional
localization is not an object in itself – it is a tool that
helps us separate one musical line from another, and
thus helps us grasp the intellectual and emotional
content of the music. The sense of space is also not
particularly interesting in itself. It is the emotional effect
of the space that makes the perception worth the
trouble. It is hard to separate the awe inspired by the
sound of a Gothic cathedral from Gregorian chant –
chant was developed to work alongside this awe, and to
enhance it. Listen to the cellos and basses play a
pizzicato bass line in a dead opera house, and feel how
each note falls lifeless.
Add an enveloping
reverberation and each note takes a life of its own –
swirling around us as the notes decay and pull on our
heart with sadness or joy. Are we aware of these
effects? A trained listener can be, but most listeners
can only describe the emotional impact. This impact
can be very real.
The sense of distance has a similar emotional effect.
When the direct sound is too strong voices and
instruments seem to be stuck to the speaker – up front
and in-your-face. This perception is particularly strong
when a engineer tries a 5.1 mix for the first time. Put
the vocals in the center speaker and Bam! they whack
you in the face. The up-front perception is
psychologically important. But you want to use it with
great caution. Sometimes it is just the effect you want,
but after a sustained period the listener can tire, and
psychologically back away. This is probably one of the
reasons many engineers raised on two channel stereo
prefer a phantom center to a hard center. The phantom
may be just as up-front, but there is no speaker in that
position, so it seems more acceptable.
There is another solution. Humans perceive distance in
large part through the strength and time behavior of
reflected sound. In a typical room the direct sound
arrives uncorrupted by reflections. If the sound has a
fast rise-time the ear is able to determine the direction
of the sound by using the interaural time delay and the
interaural level differences as cues. After 10ms or more
reflections start to arrive – contaminating the time and
level differences and making localization difficult. Our
brains are able to use this reduction in localizability of
the sound as a distance cue – the degree to which
5-2
precise localization is reduced after the onset of a note
is a cue to both the size and the furnishings in a room.
Reflections from almost any direction EXCEPT the
direction of the sound source can create this sense of
distance, and they can come at a great variety of times
after the direct sound. However, there are optimal
directions and optimal times. The optimal direction is
frequency dependent. For frequencies below 700Hz
the optimal direction is from the side (90 degrees from
the front). At about 1500Hz the optimal direction
is +/- 30 degrees from the front (the standard front
speaker angle.) Reflections that arrive earlier than
about 15ms from the direct sound begin to interfere with
localization, and can cause comb filtering and timber
alteration. Reflections that arrive more than 50ms after
the direct sound can be heard as separate sound
events, and can cause serious problems with
intelligibility.
Thus if we add reflections to the left and right front
speakers and the left and right rear speakers, and
adjust the time delay so these reflections occur
between 15ms and 50ms, we can move the vocals out
of our center speaker. The vocals are pushed back into
a space behind the front speaker array. It seems
magical – we are increasing the perceived distance to a
source in the center speaker by adding reflections to all
the other speakers EXCEPT the center speaker – yet
this is the result of some very simple psychophysics.
Remember that we are not perceiving the individual
reflections separately – we are only perceiving their
ability to mess up the localization of the direct sound.
Because there is no actual perception of the reflections
themselves the distance perception (perhaps the
"room" perception would be a better description) is
bound to the direction of the direct sound. If the direct
sound comes from the center speaker, the "room"
impression seems concentrated in the front of the
listening space, even though the reflections that
produce it are coming equally from the front and the
rear. Switch the direct sound to the left rear, and the
"room" impression also switches to the left rear, even
without altering the reflection patterns at all.
Thus for producing the perception of "room" or "depth"
it is not necessary to have reflection patterns that mimic
a particular source position in a particular room. It is
only necessary that the reflections be primarily in
loudspeakers NOT in the same direction as the sound
source, and that the time delays of the reflections in
each loudspeaker should be different. This makes our
life much simpler – we can use a two channel echo
960L Owner’s Maunal
Using The Reverb Program
Reverberation and Reality, Continued
send if we wish, and control the distance or depth of
each sound source by controlling the amplitude of this
source in the echo send.
But distance is not the only perception we need. We
need the envelopment that makes notes come alive.
How can we produce envelopment with a 5.1 system?
Once again the key is the way reflections affect
horizontal localization. Our brains have an exquisitely
sensitive detector for differences in sound arrival times
between our two ears. These time differences are
converted into perceived horizontal angles, or azimuth.
In the presence of reflected energy – particularly
reflections not in the direction of the source – the time
differences are not constant. As reflections come and
go the time differences (and level differences) fluctuate,
with the amount of fluctuation depending on the
direction and strength of the reflections.
When the sound source is continuous – like legato
strings, or pink noise – we perceive these fluctuations
as an enveloping room impression. The time delay of
the reflections does not matter very much, as long as
they are longer than about 10ms. (Below 10ms there
are severe combing effects we will try to avoid in this
discussion.) But most musical sounds (and all speech
sounds) are not continuous.
To understand what happens with speech or music we
must learn how the brain separates sounds into
streams. Streams are the perceptual equivalent of
musical lines. Sentences from a single talker form a
stream. A stream has in general a specific source and
a single continuous semantic content. However the
streams themselves are not continuous at all – in music
the streams are composed of notes, in speech streams
are composed of phones – little bursts of sound roughly
equivalent to syllables. When we hear a string of
phones, our speech apparatus goes into high gear.
First we must separate the phones one from another,
then we must use frequency and time information to
assign an identity to each phone – at which point the
phone becomes a phoneme, the basic building block of
speech. From phonemes to words, from words to
sentences, from sentences to meaning – all seemingly
effortless and automatic – our brains decode the
spoken word.
The perception of envelopment is a useful by-product of
stream formation. To form a foreground stream the
brain must separate the sound events related to a
single source from the total sonic input. To do this we
must be able to detect when a single phone starts, and
when it stops. Detecting the start of sound events is
easy – we just look for a rapid increase in level. How do
we know when one phone stops and another starts?
There are only two ways possible – we can detect the
stop of a phone, or we can assume it has stopped when
we detect the start of another. Naturally, we do both.
But if we are to hear background sounds at all, we must
detect the stop of phones before a new phone starts.
How do you know if a phone has stopped? We can do
an experiment – about a 2dB drop in level in a 20ms
time period seems sufficient. What if the level drops
more slowly? Experiment shows that even with a slow
drop a 6dB change is sufficient. What if the sound
drops in level by 2dB, and then within 30ms comes back
up again? (This drop could be caused by a low-level
reflection.) Its turns out the level rise – if it occurs within
50ms of the first drop in level – tends to cancel the
effect of the first level drop. The brain assumes the
phone is continuing.
In general, to find the ends of phones the brain looks for
a level drop, and waits for 50ms to be sure the level
stays down. If it does, the sound event – the phone – is
assumed to have ended. Now imagine another simple
experiment. You are listening to someone talk in a noisy
room. You can easily understand the person, but you
are aware of the noise in the room - which is perceived
as continuous. How can this be? It is clear that during
the phones of the person who is talking you are unable
to hear the room – the phones are masking the
background. Yet you perceive the background as
continuous.
The brain is clearly separating the sound of the room
into a separate stream – the background stream. The
neurology that detects the background stream works in
the spaces between phones. Thus it cannot work
without the participation of the mechanism that
determines the ends of phones. Again we can
experiment. It turns out that the background detection
is inhibited during phones, as we would expect, and is
still inhibited for the first 50ms after the end of each
phone. After this time the inhibition is gradually
released, so the background detector has full sensitivity
within 150ms after the end of each phone. The
loudness of the background is then perceived through a
standard loudness integration, taking about 200ms for
full loudness to develop.
It is the background perception of reverberation that
gives us the sense of envelopment. Clearly it is the
reflection level 150ms and more after the end of sound
events that matters. Note that the relevant time is after
the END of sound events. We are conditioned by years
of looking at impulse responses to think about
reflections as always coming from hand-claps or pistol
shots. In speech and music it is the behavior of
reflected energy at the ends of sound bursts of finite
5-3
Using The Reverb Program
Lexicon, Inc.
Reverberation and Reality, Continued
length that is perceived, and the behavior of the
reflections can be quite different when the sound event
is short compared to when the sound event is long.
Notes which are shorter than the time constant of the
reverberation, ~RT/7, will excite the reverberation less
strongly than longer notes.
There is another peculiarity of background
envelopment. It depends on the absolute level of the
reverberation, and not the direct/reverberant ratio. If we
play the music louder the reverberation will be louder,
and the sound will be more enveloping. Thus when we
mix for envelopment we must be very careful about our
monitor levels, and aware of how loud the critical
customer will play our mix.
The perception of background envelopment depends
on the same fluctuations in interaural time delay that
cause the sense of distance. But the background is
only detected when the direct sound has ceased, and
only reflections are hitting the ears. Thus if the
reflections come from all around us the fluctuations,
and the sense of envelopment will be maximum. If
reflections come only from the front we will not get
much envelopment at all.
The perception of envelopment requires that the
interaural time delay and level differences should be
fluctuating. In a small relatively dead room the only way
these differences can fluctuate is if you have at least
two sound sources, and the relative phase between
these sources is fluctuating. (Ideally these sound
sources should be reproducing decorrelated
reverberation.) The optimum direction for these two
sound sources (loudspeakers) depends on frequency.
Once again below 700Hz the optimum direction is from
the side, and as the frequency goes up the optimum
angle moves toward the medial plane – closer to the
front, or closer to the rear.
Although envelopment can be perceived at all
frequencies, psychologically the low frequencies are
particularly important. For example, even in a dead
room a standard two channel loudspeaker system
(+/-30 degrees from the front) can produce
envelopment if the sound source is decorrelated and
contains primarily frequencies above 1000Hz – such as
strings or applause. But low frequency envelopment,
the life blood of lower strings and basses, is missing.
Add low frequency uncorrelated reverberation to
loudspeakers at the sides, and the life magically
returns. (For a more thorough overview of this
subject, see David Griesinger's web page at
www.lexicon.com/links.)
Initial Phone
Perceived
as Part of
Phone
Risk of Reduced
Intellgibility
Time =
5-4
0 msec
50 msec
Reverberance
150 msec
960L Owner’s Maunal
Using The Reverb Program
Sound in Space: A Short History of Stereo and Surround
The earliest efforts to improve sound reproduction
concentrated on broadening frequency response and
reducing distortion and noise. But even by the late
1930s, it was obvious that eliminating those barriers
to sonic realism weren’t enough. The spatial element
was missing.
The first attempt to restore this missing element was
stereophonic sound, introduced to the American public
via the Walt Disney film Fantasia, in 1941. Its threechannel process could simulate surround directionality
by steering signals to speakers around the theater, but
was not true surround. Progress in stereo stalled during
World War II, but in the early ‘50s, stereo reappeared
with the advent of CinemaScope and similar
widescreen processes. Shortly thereafter, stereo
became available for home listening, first via tape, then
phonograph records, and finally, via FM radio.
Stereo added directionality and ambience. The
directionality was useful in movies and opera, but
otherwise of minimal concern to listeners. Room
ambience proved to be stereo’s real selling point for
music, helping create the illusion that the listener was in
a better acoustic venue than his living room. Some of
that illusion had been created in mono days by the
inclusion of reverb in the final mix, largely produced in
echo chambers (small, hard-surfaced rooms containing
speakers to reproduce the original sound and
microphones to pick up the added echoes). But in
mono, reverb levels had to be limited to avoid muddying
the sound. With stereo, the listener could more readily
pick out specifically positioned performers from the
general ambient background, enabling the amount of
reverb to be increased.
At the same time, music was being recorded more and
more with close-miked multi-track techniques that did
not capture the original ambience, and in studios where
there was little or no ambience to capture. This
accounts in large measure for the popularity of reverb
processors such as the Lexicon 480L.
Even with stereo, some spatial elements were missing.
In real life, we hear sounds and ambience from all
around us, not from just the front of the room. Adding
additional channels at the sides or rear of the room
seemed the answer, and surround sound made its
appearance in movies and in the home in the 1970s. In
films, where it served a dramatic purpose and where a
three-channel front speaker arrangement was
standardized, it succeeded.
For several reasons, surround sound flopped in the
home. There was a confusing array of recording
formats, each requiring slightly different playback gear.
The few quadraphonic recordings available were split
among these formats, reducing the choice still further
for listeners who were not equipped for every format.
Record producers could not decide whether to use the
extra channels to encircle the listener with performers
or to provide a front soundstage with surrounding
ambience. Most surround setups placed the extra
speakers in the rear corners of the room despite the
ear’s low sensitivity to lateral directional cues from
behind. And many consumers balked at the idea of
placing two more full-sized speakers in their rooms. A
major reason for the failure of home surround was the
recommended four channel format. Without a center
channel, Quad sound did not improve the listening area
over two channel stereo. To hear a recording one had
to be in the "sweet spot", a requirement that was greatly
reduced in cinema surround.
Surround’s salvation came from the movies and the
development of stereo VCRs. The widescreen films of
the 1950s carried multi-track sound on magnetic
stripes, but rear speakers mainly carried effects and
were often shut off between effects to reduce noise
from the narrow, hissy, mag stripes. With the advent of
70mm film, which had more room for soundtracks,
mixers began using offscreen channels to carry lowlevel effects on a continuous basis, adding to the films’
sonic realism.
But most theaters were equipped only for standard
35mm films. In 1976 Dolby Labs introduced Dolby
Stereo, a matrix process that encoded surround sound
into two-channel optical soundtracks that were
compatible with standard cinema projectors. This
enabled a single release print to be used in theaters
with mono, stereo, or surround sound systems. When
these films were released on stereo videocassettes in
the early 1980s, the surround information encoded in
their two-channel soundtracks was carried over to the
home. With the addition of a low-cost matrix decoder
and additional amplifier and speaker channels, a
consumer could now have surround when watching
movies at home via tape and, eventually, via broadcast.
Even some made-for-TV programs incorporated
surround.
At least for home video, there was now a substantial
body of software with a common surround format. There
was also general agreement on where speakers should
be placed: three in front instead of two, and a pair of
surround speakers on the side walls. Home theater
began to take off, aided by the arrival of comparatively
5-5
Using The Reverb Program
Lexicon, Inc.
Sound in Space: A Short History of Stereo and Surround, Continued
affordable large-screen TVs, Dolby Pro Logic, which
added logic steering to the basic matrix decoder, and
Home THX cinema, which imposed common standards
on home surround equipment. Pure audio recordings
with matrix surround encoding began to appear,
although when reproduced with Pro-Logic or THX
matrix decoders these recordings could be
disappointing.
In the early 1990s Dolby Digital, DTS, and MPEG
surround arrived. These systems provided discrete
digital signals for each channel and a separate LowFrequency Effects (LFE) that provided very low
frequency sound effects. Squeezing 5.1 discrete digital
channels into a recording involved some data reduction,
but the reduction schemes used psychoacoustical
principles to make the resulting artifacts less audible.
Dolby Digital soundtracks were the first to make the
transition from movie theaters to the home, via laser
disc. With the advent of DVD, whose popularity rapidly
eclipsed laser discs, Dolby Digital and DTS tracks
became more widely available for home theater.
The discrete digital technologies require specialized
hardware for playback, and the original source material
cannot be recorded on home tape recorders, VCRs, or
broadcast over conventional broadcast equipment.
More importantly more and more consumers were
installing surround sound systems in their homes, and
there was a great need for a technology that would
allow standard two channel recordings to be
reproduced in a surround system. Not with Dolby Pro
Logic, which narrowed the front image and provides a
monaural surround signal, but with a system that
offered a wide front image over a large listening area,
and the listener envelopment present in the original
recording location.
To solve both problems Lexicon developed LOGIC7
matrix technology, which provides a method for
releasing surround recordings on standard stereo
compatible CDs. More importantly, LOGIC7 and
LexiconLogic provide a method of playing the millions of
standard two channel music recordings with all the
advantages of discrete surround.
LOGIC7 also allows Dolby surround films to be played
with a wide frontal image and full rear envelopment.
LOGIC7 encoded recordings can be broadcast or
played on any currently available reproduction
equipment, and yet they provide full five channel
surround on a device with a LOGIC7 decoder, and
decent four channel surround when played with Dolby
Pro Logic. LOGIC7 uses matrix technology to
compress the spatial aspects of a recording so it can be
delivered on a two channel format. There is no data
5-6
reduction of the sound waveforms themselves, so the
sound quality can be very high.
Competing with LOGIC7 and the current data-reduced
discrete technologies are two audio disc formats based
on DVD technology, DVD-Audio and SACD. These
promise to deliver discrete 5.1-channel surround
without data reduction. These encoding technologies
promise higher fidelity than CD, thanks to 96-kHz/24-bit
recording—a signal format for which the 960L is already
prepared. The eight-channel design and modular
construction of the 960L make it ready for future
surround advances, whatever they may be.
Algorithms
Random Hall
Random Hall is a hall effect with gradual build-up, well
suited to complex sounds like orchestral music. Its
reverberators change over time in controlled random
ways to avoid the buildup of tinny, grainy, metallic, or
other colorations.
The early reflections are user adjustable in amplitude
and delay. Some skill is needed to set useful reflection
patterns. Since the reflections are adjustable, they are
not randomized. Once set, the reflection pattern is
fixed. The pattern can be expanded or contracted in
time using the "Delay Master" control, and the overall
level of the pattern can be set with the "Early Level"
control.
The most important user parameters for Random Hall
are the level controls – the "Early Level" and "Reverb
Level". Early Level is a master control for all the early
reflections. Lowering the control to zero eliminates the
reflections, and their associated sense of distance from
the sound source. The "Reverb Level" control is a
master control for the late reverberation. With this
control you can set the exact amount of reverberance
and envelopment.
The apparent size of the space supplied by the late
reverberation is set with the Shape, Spread, and Size
controls. Of these controls the Shape and Spread are
the most natural. As Shape is raised from zero to about
30% the onset of the late reverberation goes from
abrupt to gradual. The effect on the apparent size of the
space is quite dramatic. Spread has little or no effect
until Shape is at about a quarter of its range, at which
point Spread affects the length of both the buildup and
sustain. At this point, the sustain will be approximately
the time value indicated by the Spread display, in
milliseconds. At still higher settings of Shape, a
secondary sustain appears in the envelope at a lower
960L Owner’s Maunal
Using The Reverb Program
Algorithms, Continued
level; this simulates a very diffused reflection off the
back wall of the hall, helping to create a sense of size
and space. This reflection becomes stronger and
stronger, reaching optimal loudness when Shape is at
about 2/3 of its range. The highest Shape settings are
typically used for effects. Near the top of the scale, the
rear hall energy buildup becomes stronger than the
earlier part of the envelope, an effect used to create an
inverse sound (see Reverse).
To avoid colorations, the signal is randomized by the
Spin and Wander parameters. The randomizers
controlled by the Spin and Wander parameters
principally affect the perceived acoustics of the space.
High settings can be used to break up small-room
modes, as when recording a voice-over in an announce
booth, but extreme settings can have pitch effects.
Surround Hall
Surround Hall is a surround version of Random Hall
having 16 delay voices, one for each possible channel
pairing (LF to C, C to LF, LF to LS, etc.). It may be
useful for Foley work by giving a more precise sense of
a space’s size.
Chamber
Chamber is a complex miniature-space effect
resembling an echo chamber at its smaller settings and,
at its larger ones, a small performance space with a
more rapid build-up of reflection density than Random
Hall. Reverberant tails are randomized.
Plate & Surround Plate
The Plate programs mimic the sounds of metal plates,
with high initial diffusion and a relatively bright, colored
sound. For this reason, they are good choices for
percussion. They are designed to be heard as part of
the music, mellowing and thickening the initial sound
itself. The Plate sound is what most people associate
with the word reverb, and it is useful for all popular
music.
Ambience & Surround Ambience
Ambience generates the strong reflections that appear
in the first few hundred milliseconds of the reverberation
process. These early reflections become part of the
direct sound without coloring it, giving it better blend
and a definite position in space and conveying the
impression of a hall surrounding you while the music is
playing. It lends warmth, spaciousness and depth to a
performance.
generates early reflections first in the front left and right
output channels. If the FSLevel control is set to
maximum, reflections are then generated in the left rear
and right rear output channels. FSLevel and FSRolloff
control the relative level and frequency response
between the front early reflections and rear early
reflections. In a large room the rear early reflections
could be perhaps 3dB less in total level, and somewhat
more rolled-off in frequency response. (However, it is
unlikely that these differences are audible in practice.)
When a signal is supplied to a rear input, for example
the the Left Surround input, the primary early
reflections will come from the left surround and right
surround outputs, and FSLevel and FSRolloff control
the level and frequency response of the early
reflections that come from the front. Thus with surround
ambience the amplitude and frequency characteristics
of a large room can be generated.
The Ambience algorithm is very useful for adding a
room sound to recorded music or speech, making it
easy to match a studio recording of dialog to a typical
room environment. At delay settings of roughly 100 to
500 milliseconds, it can be used to simulate the
ambience of very small rooms without the colorations
often found in actual spaces of that size. When set to
deal with the first 50 msec of the signal, the range
perceived as being part of the initial phone, it can be
used to realistically add distance to a close-miked
signal without diminishing clarity. If an ensemble has
been recorded with close miking and pan pots,
Ambience can provide the missing blend and depth,
increasing apparent distance while preserving the
apparent positions of the instruments. It is also useful
in matching a closely miked accent microphone to the
overall ambience of the recording; this allows a soloist’s
level to be increased without changing the apparent
distance.
The Ambience algorithm does not include extensive
provisions for modifying the characteristics of the late
reverberation; the Shape, Spread, and Bass
characteristics are fixed. However the apparent size of
the late reverberation is adjustable with the size control.
High settings of the Size control can be very effective at
generating the sound of a large space with high clarity.
The lack of the BassMult control can be compensated
by adding a low frequency shelving boost of 2 to 6dB
below 200Hz to the reverberation sends or returns.
This type of boost is often very useful when working
with music that includes both vocals and instruments.
When a signal is supplied to a single input of Surround
Ambience – for example the left front – the program
5-7
Using The Reverb Program
Lexicon, Inc.
Algorithms, Continued
Ambient Chamber
Ambient Chamber is a hybrid of the stereo Ambience
and Chamber algorithms. It applies front left, center,
and right signals to the ambience algorithm and front
LCR plus rear signals to the chamber algorithm. This
can be used to change the apparent microphone
distance of the front signals or to provide different
acoustics for the front and rear (e.g., a stage house in
front and a more reverberant auditorium behind it) that
join into one integrated reverberant field.
The advantage of Ambient Chamber over the Ambient
Surround is that there is more control over the late
reverberation, with the inclusion of the Shape, Spread,
and BassMult controls. However the early reflections
generated by Ambient Chamber are more limited.
There are no early reflection generators for signals
coming into the rear inputs of the Surround version of
this program, and the early reflections generated by the
ambience section of the program are directed only to
the front three loudspeakers. Later reverberation is
provided to all the loudspeakers, and all inputs will
generate appropriate late reverberation. Ambient
Chamber is particularly useful in two channel mode,
and whenever a surround program is being designed to
play back primarily in a two-channel matrix form.
Reverse & Surround Reverse
Reverse is a new algorithm that is somewhat different
from the effect other processors call "Inverse." Unlike
traditional Inverse, which is a gated reverb whose
reflection density increases until a cut-off time is
reached, Reverse’s reflection density decreases over
time, while its reflection level increases over time, as if
5-8
you had recorded a signal through a reverb device, then
played the recording backwards. This is the exact
reverse of normal reverberant behavior, exactly like the
time-honored effect of reversing a tape. The effect
begins with a quiet, dense reverb and gradually
becomes louder and thins out to reveal the original
signal.
It's important to remember that in Reverse all the
parameters work backwards. For example, if RtHicut
(see parameter listing below) is low, the reverb will
become brighter as it develops.
Reflections play an important part in this effect. They
should be adjusted so that they occur at or near the end
of the reverb. In other words, they play the role of the
original signal, so they come last.
For Reverse to work as designed, the Mix parameter
must be set 100% wet, both at the 960L and at the
mixer!
Inverse
The traditional inverse effect can also be achieved, if
desired, by using any of the Hall, Chamber, or Plate
effects and doing as follows:
• Select a very large room Size.
• Bring Midrt all the way down.
• Set the Contour parameter to
a high value (like 10).
• Control the overall shape and
density using Shape, Spread and Size.
960L Owner’s Maunal
Using The Reverb Program
Parameters Used in the 960L Algorithms
Parameter
Name
Parameter Description
AmbPreD
Ambience PreDelay (Ambience only) controls the time of a predelay that precedes the early
reflection (ambience) component of Stereo Ambience. In the same algorithm, RvbDly controls
the predelay that precedes the reverberation component.
AmbSize
Ambience Size scales all the delay elements of the early reflection and early energy
components of Ambience and Ambient Chamber algorithms. To keep the early reflection
energy within the 15ms-50ms window, this control should be set no higher than about 6 or 7.
AmbLvl
Ambience Level sets the overall level of the early reflection and early energy components of
Ambience and Ambient Chamber algorithms.
BassMult
Bass Multiply controls the low frequency reverberation time relative to MidRT. If, for
example, Bass Multiply is set to 2X and MidRT is set to 2 seconds, the effective low
frequency RT is 4 seconds. For natural sounding results, use settings of 1.5X or less. Note
that values less than 1.0X produce a low frequency RT that is shorter than MidRT.
BassXOV
Bass Crossover sets the frequency at which the transition between MidRT and Bass
Multiply takes place. Except for special effects, there is seldom a need for this parameter to
exceed 500 Hz.
Contour
Contour controls the profile of the energy decay in the reverberation tail. At a value of zero,
this decay will be smooth and featureless. Large positive and negative values will add
noticeable bumpiness of the decay. Use non-zero values with great caution.
CtrRvb
Center Reverb Level controls the reverberation level of the Center output in surround
algorithms. This allows the Center Reverb Level to be set relative to both early reflection
levels and the Front and Rear Reverb Levels. We recommend that the center reverb level be
set about 4.5dB lower than the Front Reverb Level and the Rear Reverb Level. RvbLvl is a
master control for CtrRvb, FrRvb and RearRvb.
Definition
Definition is found only in the Chamber and Reverse algorithms. It models the irregularity
of reflecting surfaces in the space.
In Chamber, turning Definition up makes reflections more discrete, making the reflecting
surfaces seem less diffuse. Except for special effects, it is recommended that this be set to
zero.
In Reverse, Definition controls density buildup; lower values produce more density.
Diffus
Diffusion models the effect of irregular wall surfaces in a room by changing echo density.
Very low values produce sharp, discrete early reflections. Higher values produce groups of
reflections that are smoother but less articulated. Except for special effects, it is
recommended that this control be set to a high value.
5-9
Using The Reverb Program
Lexicon, Inc.
Parameters Used in the 960L Algorithms, Continued
dL>L,
dR>R,
dL>R,
dR>L,
dLF>LF,
dLF>LS,
dLF>RF,
dLF>RS,
dLS>LF,
dLS>LS,
dLS>RF,
dLS>RS,
dRF>LF,
dRF>LS,
dRF>RF,
dRF>RS,
dRS>LF,
dRS>LS,
dRS>RF,
dRS>RS
Early or Reflection Delays. In many real spaces, distinct reflections and echoes are an
important part of the sound, so many of the 960L's reverbs have reflection delay and echo
paths with appropriate controls.
EchoL,
EchoR,
EchoLF,
EchoLS,
EchoRF,
EchoRS
Echo Duration. Some reflection delays have echo capabilities. These appear as part of the
input path; echoes are passed to the reverberators as well as the reflection outputs. Also,
echo signal is fed back through the input diffusors. This means that each echo will be more
diffuse and spread than its predecessor. The control EchoLS sets the duration of an echo
(that is, a feedback path) on the Left Surround Input and FbckLS sets the amount of feedback
for that path. Any echo pattern set with EchoLS and FbckLS will be heard in the surround
reverb field and also in any reflection delay whose source is the Left Surround Input.
EchoMST
Echo Master Delay multiplies all echo delays by a percentage. This allows this single control
to scale a complicated echo pattern.
EDlyMST
Early Master Delay multiplies all reflection delays by a percentage. For example, if Left
Surround Delay is set to 24 msec and EDlyMST is at 50%, the actual Left Surround Delay
time will be 12 msec and that figure will appear on the display. This allows this single control
to scale a complicated reflection pattern.
ErlLvl
Early Level Master Control Multiplies all individually selected early reflection levels by a
percentage. This allows this single control to set the overall level of a complicated reflection
pattern.
ErlRoll
Early Rolloff controls the cutoff frequency of a 6dB per octave low pass filter on the output of
the early reflections.
5-10
The Early or Reflection Delays set the delay time. For example, dLF>RS is the delay time in
a path from the Left Front Input, through the diffusor, through a delay of dLF>RS duration,
and finally to the Right Surround Output.
Each of these delay paths has its own level control. The level of the example delay path is set
by the related control LvLF>RS.
960L Owner’s Maunal
Using The Reverb Program
Parameters Used in the 960L Algorithms, Continued
FbckL,
FbckR,
FbckLF,
FbckLS,
FbckRF,
FbckRS
Echo Feedback. Some reflection delays have echo capabilities. These appear as part of the
input path; echoes are passed to the reverberators as well as the reflection outputs. Also,
echo signal is fed back through the input diffusors. This means that each echo will be more
diffuse and spread than its predecessor. The control EchoLS sets the duration of an echo
(that is, a feedback path) on the Left Surround Input and FbckLS sets the amount of feedback
for that path. Any echo pattern set with EchoLS and FbckLS will be heard in the surround
reverb field and also in any reflection delay whose source is the Left Surround Input.
FbkMST
Echo Feedback Master scales all the echo feedbacks by a single percentage, allowing this one
parameter to set the feedback of a complex pattern.
FrRoll
Front-channel Rolloff (surround algorithms only). Like Rolloff in stereo, it controls the cutoff
frequency of a 6dB per octave low-pass filter at the output of all processing. In the Surround
algorithms, there are separate controls for the front (LF, C, and RF) channels (FrRoll) and rear
(LS and RS) channels (RearRoll).
FrRvb
Front Reverb Level (Surround algorithms only) controls the level of the reverberant tail, but to
just the LF and RF outputs. This allows their levels to be set relative to the early reflection
levels and the other reverb tails. We recommend setting the Front Reverb Level and the Rear
Reverb Level approximately equal, with the Center Reverb Level less by about 4.5dB. RvbLvl
is a master control for CtrRvb, FrRvb and RearRvb.
FSDly
Front-to-Surround Delay (Ambient Chamber only) In surround ambiences, there is a signal
path from front inputs to rear early reflections and also from rear inputs to front early
reflections. The level of this path (in both directions) is set by FSLvl. The high frequency
rolloff is set by FSRoll. The delay in the path (in both directions) is set by FSDly.
FSLvl
Front-to-Surround Level (Surround Ambience and Ambient Chamber only) In surround
ambiences, there is a signal path from front inputs to rear early reflections and also from rear
inputs to front early reflections. The level of this path (in both directions) is set by FSLvl. The
high frequency rolloff is set by FSRoll. In Ambient Chamber, the delay in the path (in both
directions) is set by FSDly.
FSRoll
Front-to-Surround Rolloff (Surround Ambience and Ambient Chamber only) In surround
ambiences, there is a signal path from front inputs to rear early reflections and also from rear
inputs to front early reflections. The level of this path (in both directions) is set by FSLvl. The
high frequency rolloff is set by FSRoll. In Ambient Chamber, the delay in the path (in both
directions) is set by FSDly.
InLvl
Input Level sets level for all input channels simultaneously. Used to prevent processor
overload by counteracting gain increases caused by high RTMid, BassMult, and Delay
feedback levels. Unless extreme values of these controls are used, we recommend that you
leave InLvl set at the factory preset position.
5-11
Using The Reverb Program
Lexicon, Inc.
Parameters Used in the 960L Algorithms, Continued
LvL>L,
LvR>R,
LvL>R,
LvR>L,
LvLF>LF,
LvLF>LS,
LvLF>RF,
LvLF>RS,
LvLS>LF,
LvLS>LS,
LvLS>RF,
LvLS>RS,
LvRF>LF,
LvRF>LS,
LvRF>RF,
LvRF>RS,
LvRS>LF,
LvRS>LS,
LvRS>RF,
LvRS>RS
Reflection Levels. In many real spaces, distinct reflections and echoes are an important part
of the sound, so many of the 960L's reverbs have reflection delay and echo paths with
appropriate controls.
MidRT
Midrange Reverberation Time. The basic control for setting the duration in seconds of the
reverberant tail. This is the control that is most like the physical RT60 parameter. The perceived
time will also be affected by RtHicut and Bass. Generally, MidRT should be set to a value of
about 1.2 seconds for small rooms and up to 2.4 seconds or so for halls.
Mix
Wet/Dry Mix. Each of Lexicon's factory programs are typically shipped at 100% Wet, and we
recommend controlling the mix at the console, rather than on the LARC2. Where a console is not
available this control can be used to adjust the wet/dry ratio. When a console is being used to
adjust the mix of the reverberation returns, be sure the wet/dry Mix control is set at 100%.
Otherwise the direct path through the 960L will interfere with the direct path through the console
and severe combing will occur.
RefDly
Reflection Delay (Reverse algorithm only) operates very much like the reflection delays in other
reverbs. In Reverse, it has a particular role, which is to supply the "dry" sound at the end of the
apparently reversed tape. The Reflection Delay is connected to Size. Changes in Size will scale
this delay. See also Reflection Level.
RefLvl
Reflection Level (Reverse algorithm only) operates very much like the levels for reflection delays
in other reverbs. In Reverse, it has a particular role, which is to supply the "dry" sound at the end
of the apparently reversed tape. See also Reflection Delay.
Rolloff
Rolloff (Stereo algorithms only) sets the cutoff frequency of a 6dB per octave low-pass filter at the
output of all reverberation processing. Rolling off high frequencies with this filter can result in more
natural-sounding characteristic. For a shelving characteristic, use Shelf. Rolloff does not affect the
frequency response of the early reflections. See RefHicut.
RPreD
Rear PreDelay (Surround algorithms only) is an additional predelay that can be added to rear
input path to recreate the effect of the space’s rear wall being farther from the listener than the
front. The total rear-channel predelay is the sum of RvbPreD and RPreD, so the latter’s values are
always preceded by a "+" on the display. E.g., with RPred of +20 and RvbPreD of 100, the onset
of reverberation from the rear will occur 120 msec after the initial acoustical event. For best results
we recommend that the RPreD control be set to values less than 20ms. Greater values tend to
make the reverberation from the rear separately audible from the front reverberation, and the room
seems less natural.
5-12
The Reflection Delays set the delay time. For example, dLF>RS is the delay time in a path from
the Left Front Input, through the diffusor, through a delay of dLF>RS duration, and finally to the
Right Surround Output.
Each of these delay paths has its own level control as well as a master control for all of the
(ErlLvl). The level of the example delay path is set by the related control LvLF>RS.
960L Owner’s Maunal
Using The Reverb Program
Parameters Used in the 960L Algorithms, Continued
RearRoll
Rear Rolloff (Surround algorithms only). Like Rolloff in Stereo, this controls the cutoff frequency
of a 6dB per octave low-pass filter at the output of all processing, but affects the rear (LS and
RS) channels only. A separate parameter, FrRoll, controls the rolloff for the front (LF, C, and RF)
channels.
RearRvb
Rear Reverb Level (Surround algorithms only.). Like RvbLvl in Stereo, this controls the level of
the reverberant tail, but only for the LS and RS outputs. This allows their levels to be set relative
to the early reflection levels and the other reverb tails. RvbLvl is a master control for CtrRvb,
FrRvb and RearRvb.
RShape
Rear Shape (Ambient Chamber algorithm only) sets the contour of the initial reverberant-energy
growth for the rear channels. Low values produce a very rapid onset, as you’d find in a small
chamber. With larger values, the reverberation "blooms" over a few hundred msec, much as it
would in a good, Romantic-era concert hall, and the listener’s perceived position moves farther
back into the hall. See also Contour, Rspread, Shape, and Spread.
RSpread
Rear Spread (Ambient Chamber algorithm only) works with RShape to control the profile of
initial reverberant-energy growth for the rear channels, stretching or compressing this contour in
time to make reflections closer together or further apart. With complex material, it may be
advisable to use a moderately high value for Shape and a moderately low one for Spread to
create a bit of space around the original signal. See also Contour, RShape, Shape, and Spread.
RtHicut
Reverberation Time High Cut. In real rooms, the timbre of the reverberant tail becomes darker
over time due to the air’s absorption of high-frequency sound energy. This control models that
behavior, though over a much wider frequency range. When you set the cutoff to very low
frequencies, the duration of the reverb will be much shorter than the value shown by MidRT.
RvbLvl
Reverberation Level controls the level of the Reverberant tail, allowing its level to be set relative
to the early reflection levels. It is normally set to Full, but may be reduced for effects where preechoes should dominate. In surround algorithms, this is a master control for CtrRvb, FrRvb and
RearRvb.
RvbPreD
Reverb PreDelay sets the number of milliseconds between a sound and the onset of the
reverberations it excites, equivalent to the time of first reflection. In the algorithms that include
the Shape and Spread controls it is better to extend the time period before reverberant decay
using Shape and Spread. In general we recommend leaving the Reverb PreDelay set at the
preset value.
Shape
Shape works with Spread to control the profile of initial reverberant-energy growth. Shape sets
the envelope of the energy build-up and Spread stretches or compresses this contour in time.
Low values of Shape produce a very rapid onset, as you would find in a small chamber. With
larger values, the reverberation "blooms" over a few hundred milliseconds, much as it would in a
good, Romantic-era concert hall. Large values of Spread and Shape can create "inverse" effects
(see note under Reverse algorithm).
Shelf
Shelf (Random Hall only) controls a shelving low-pass on the reverb output. It modifies the lowpass characteristic of the rolloff control, turning it into a shelving filter. Both the pre-echoes and
the reverberation are affected. For example, if Shelf is set to –6 dB, frequencies below
approximately Roll / 2 will be boosted by 3.5 dB, while above approximately Roll / 2 response will
be flat. For realistic musical acoustics, Shelf should be set between +12 and –6 dB and Roll
should be set between 700 Hz and 1.5 kHz. While this control can occasionally be useful to
increase the apparent low frequency content of the returns, it does so at the expense of
eliminating the overall rolloff characteristic that typically begins around 2kHz. Thus it is probably
best to leave Shelf set to zero. If more LF is desired in the returns, use console equalization to
increase the low frequency content by ~3dB below 200Hz.
5-13
Using The Reverb Program
Lexicon, Inc.
Parameters Used in the 960L Algorithms, Continued
Size
Size is a scale factor that alters the length of most of the reverb’s delay elements. This control is
calibrated in units that approximate the longest dimension of the reverberant "space" in meters.
In practice, perception of room size is also strongly determined by Shape. Size strongly affects
the overall timbre of the reverberation. Values less than 25 have a noticeable "small room"
coloration. For the most neutral sound with the programs that have Shape and Spread controls,
set Size to about 30M, and the adjust the apparent size with Shape and Spread.
Slope
Slope (Reverse algorithm only) multiplies low-frequency energy and is similar in its effect to Bass
Multiply.
Spin
Spin and Wander introduce small random variations within the reverberation, continuously
altering the reverb timbre to create a more natural sound. Spin controls the relative rate of
motion and the speed with which changes occur, expressed in arbitrary units. Wander controls
the amount of change. At extreme settings, these parameters can introduce slight wobbles that
are audible in critical material such as classical guitar or piano.
Spread
Spread works with Shape to control the profile of initial reverberant-energy growth. Shape sets
the contour of the energy growth and Spread stretches or compresses this contour in time to
make reflections closer together or further apart. With complex material, it may be advisable to
use a moderately high value for shape and a moderately low one for spread to create a bit of
space around the original signal. Large values of Spread and Shape can create "inverse" effects
(see note under Reverse algorithm). See also Contour.
Steering
Steering (Stereo algorithms only) controls a matrix encoder that affects only the reverberant
tails. This provides a reverberation that will decode into surround without strong early
components that might trigger phase correction devices. Steering is not continuously variable,
but offers the following choices:
• Mono -- Mono sum tail.
• Narrow -- between mono and stereo.
• Stereo
• Wide -- Expanded Stereo.
• Lex -- LexiconLogic™, a matrix that includes separate left and right surround signals
when used with a Lexicon Logic decoder, but is also compatible other commercial matrix
codings and with stereo and mono.
• Matrix -- 4-2-4 encoding.
Wander
Wander and Spin introduce small random variations within the reverberation, continuously
altering the reverb timbre to create a more natural sound. Spin controls the relative rate of
motion and the speed with which changes occur, expressed in arbitrary units. Wander controls
the amount of change. At extreme settings, these parameters can introduce slight pitch wobbles
that are audible in critical material such as classical guitar or piano.
5-14
6
MIDI
MIDI ..........................................................................6-1
Nomenclature........................................................6-1
MIDI Channel Allocation ......................................6-1
Program Loading ..................................................6-2
Bank and Program Mapping ................................6-2
Card Configuration................................................6-2
Continuous Controllers ........................................6-2
MIDI SYSEX ..............................................................6-3
MIDI IMPLEMENTATION CHART ..............................6-4
960L Owner’s Maunal
MIDI
MIDI
The MIDI implementation for the Rev 1 960L is very
basic. Since the implementation is fixed, there is no
user interface for modifying it.
MIDI controller's lowest channel number is 1 (rather
than 0), you should add one to the values found in
channel table below.
Nomenclature
MIDI Channel Allocation
Numbering in MIDI, i.e. channel number, program
numbers, etc., can be confusing, since some sources
start counting from zero and others start from one. This
description will start from zero. If, for example, your
The 960L uses a fixed channel allocation. All channels
are used or reserved, which means that 960L should
be the only device on its MIDI cable.
Channel
Usage
Description
0
Global Channel
Not currently in use
1
DSP Card
Configuration of card.
2
Unused
Reserved for Future Use
3
Unused
Reserved for Future Use
4
Machine 1
Program change for machine 1
5
Machine 2
Program change for machine 2, if present in current configuration
6
Machine 3
Program change for machine 3, if present in current configuration
7
Machine 4
Program change for machine 4, if present in current configuration
8
Unused
Reserved for Future Use
9
Unused
Reserved for Future Use
10
Unused
Reserved for Future Use
11
Unused
Reserved for Future Use
12
Unused
Reserved for Future Use
13
Unused
Reserved for Future Use
14
Unused
Reserved for Future Use
15
Unused
Reserved for Future Use
6-1
MIDI
Lexicon, Inc.
MIDI, Continued
Program Loading
Because of the large number of potential Programs in
the 960L, Program Change messages are used along
with the Bank Select extension to provide MIDI
Program selection. Controllers 0 and 32 are sent to the
system, followed by a Program Change message to
select a program. In this method, Controller 0 provides
the most-significant 7 bits of the Bank and Controller 32
provides the least-significant 7 bits. The Program within
a Bank is selected with a Program Change message.
Each Bank has 10 programs or less, so only Program
Changes 0 – 9 will cause a program load.
The Bank values are "sticky", that is, the 960L will
remember the Bank values for each MIDI channel. It is
not necessary to send a Bank change with each
Program Change unless the Bank has indeed changed.
This is in full conformance the MIDI specification.
Bank and Program Mapping
There are 10 Programs or fewer in each Bank. Bank
and Program Changes out of range will be ignored.
Bank
Description
0-19
Factory Preset (Controller 0 = 0; Controller 32 = 0-19)
2048-2147
User Registers (Controller 0 = 16; Controller 32 = 0-99)
8192
Floppy Disk (Controller 0 = 64; Controller 32 = 0-9)
16383 (highest Bank)
Card configuration. For Channel 1 (DSP card) only.
Card Configuration
The DSP card is partitioned through Program Change
messages on channel 1. The highest Bank number
(16383, 0x7f on Controller 0 and 0x7f on Controller 32)
is used for this purpose. Other Bank numbers are
reserved for future use. Here are the values:
Program #
Description
0
Stereo (4 stereo machines at 48K. 2 at 96K)
1
Surround (5-in/5-out plus 2-in/5-out at 48K. 5-in/5-out at 96K)
2
Surround (dual 2-in/5-out at 48K. Single 2-in/5-out at 96K)
63
8-channel. Useful for wiring checks and diagnostics.
Continuous Controllers
The 960L does not respond to continuous controllers,
except those used for Bank change.
6-2
960L Owner’s Maunal
MIDI
MIDI Sysex
The only Sysex message supported by the 960L is the
"Inquiry Message". The 960L will respond with the
standard descriptor, as defined in the "MIDI 1.0 Detailed
Specification", published by The MIDI Manufacturers
Association (MMA)
Incoming Inquiry:
MIDI Byte
Description
F0
Sysex header
7E
Non-realtime header
XX
Device ID. The 960L will always respond to its own ID (0) or to 7F.
06
General Information
01
Device Inquiry
F7
EOX
960L's response:
MIDI Byte
Description
F0
Sysex header
7E
Non-realtime header
XX
Device ID. Always 0 in 960L Software V1.0
06
General Information
02
Device ID message
06
Lexicon ID
0C
960L Sysex ID (Device Family Code LSB)
00
Reserved (Device Family Code MSB)
00
Reserved (Device Family Member Code LSB)
00
Reserved (Device Family Member Code MSB)
XX
Major Software Revision
XX
Minor Software Revision
XX
Revision type. 'A' Alpha, 'B' Beta, 'R' Release
00
Unused Revision information
F7
EOX
6-3
MIDI
Lexicon, Inc.
MIDI Implementation Chart
Lexicon 960L
Function
Basic
Channel
Date: 20 April, 2000
Version 1.0
Default
Changed
Transmitted
X
X
Recognized
1-16
X
Default
Messages
Altered
X
X
X
Mode 1
X
X
True Voice
X
X
Velocity
Note ON
Note OFF
X
X
X
X
After
Touch
Keys
Channel
X
X
X
X
X
X
1-119
X
OX
Bank Change Only
X
X
0-9, 0-63
Channel 1 uses 0-63
Bank Select
Device ID
Device Inquiry
Device ID
X
X
X
X
X
X
System
Clock
Real Time Commands
X
X
X
X
Aux
Local ON/OFF
Messages All Notes OFF
Active Sensing
System Reset
X
X
X
X
X
X
X
X
Mode
Note
Number
Pitch Bend
Control
Change
Program
Change
System
Exclusive
System
Common
Song Position
Song Select
Tune Request
Remarks
Notes
Mode 1: OMNI ON, POLY
Mode 3: OMNI OFF, POLY
6-4
Mode 2: OMNI ON, MONO
Mode 4: OMNI OFF, MONO
O : Yes
X : No
OX : Selectable
Specifications
Lexicon
Specifications
Specifications
960L Mainframe
Analog Input
Connectors
Impedance
Level (for 0 dbFS)
Freq Response @48K
Freq Response @96K
A/D Conversion
A/D Dyn Range
THD
CMRR
Crosstalk @ 1Khz
Group Delays (milliseconds)
Eight, Female XLR
50Kohm, balanced
+24dBu
20Hz-20KHz, ±1db
20Hz-40KHz, ±1db
24 bits
128x oversampled
>110 dB (20-20kHz)
<.002%
>50db
< -100dB
44.1 kHz
48 kHz
88.2 kHz
96 kHz
A/D
1.44
1.33
0.81
.0.74
A/A
2.42
2.23
1.80
1.66
D/A
1.59
1.42
1.35
1.25
D/D
0.54
0.50
0.36
0.33
Synchronization
TTL Word Clock Input *
75 Ohm, BNC
self-terminating loopthru
TTL Word Clock Output*
Low Z, BNC
(*Falling edge marks start of frame)
Analog Output
Connectors
Eight, Male XLR
Impedance
50 Ohm, balanced
Level (at 0 dBFS)
+24dBu
Freq Response @48K
20Hz-20Khz, ±1dB
Freq Response @96K
20Hz-40Khz, ±1dB
D/A Conversion
24 bits
8x oversampled @ 44.1/48Khz
4x oversampled @ 88.2/96Khz
D/A Dyn Range
THD
Crosstalk @ 1kHz
>110 dB (20-20kHz)
<.002%
< -100dB
A/A Performance
Freq Response @48K
Freq Response @96K
Dyn Range
THD
20Hz-20Khz, ±1dB
20Hz-40Khz, ±1dB
>107 dB (20-20kHz)
<.002%
Digital Audio IO
Connectors
Format
Word Size
Four Male XLR Outputs
Four Female XLR Inputs
AES/EBU
24 bits
Sample Rates
Internal
Accuracy
44.1/48/88.2/96kHz
within ±10ppm
External
Lock Range
44.1/48/88.2/96kHz
±1%
Clock Jitter
Intrinsic
Jitter Gain
Exceeds AES3 Amendment 1
Exceeds AES3 Amendment 1
Control Interfaces
LARC2 Ports
MIDI **
2
In/Out/Thru
(**supports program change)
Algorithms
Ambience
(48K
Chamber
(48K
Plate
(48K
Reverse
(48K
Random Hall
(48/96K
Ambient Chamber
Stereo &
Stereo &
Stereo &
Stereo &
Stereo &
(48K
Standard Hardware Configuration
DSP/CPU Card Compartment
One System CPU Card
One Reverb DSP Card
Two Spare DSP card slots
One MIDI Card
IO Card Compartment
One Analog Input Card
One Analog Output Card
One AES/EBU Digital IO Card
One IO/Clock Card
One Spare IO Card slot
Storage Media
Hard Disk
3.5" Floppy Disk Drive
CD-ROM Drive
Surround)
Surround)
Surround)
Surround)
Surround)
Surround)
Specifications
960L Owner’s Maunal
Specifications, continued
Reverb Card Configurations
48K
Stereo Machines
2in x 5out Machines
5in x 5out Machines
96K
Stereo Machines
2in x 5out Machines
5in x 5out Machines
Four
Two
Two
Weight
Two
One
One
Internal Hard Disk Storage
Factory Programs
User Registers
240
1000
Removable 3.5" Floppy Disk Storage
User Registers
100
Power
Requirements***
100-120 / 220-240 VAC
50-60Hz, 300W max
(***switch selectable)
Connector
Dimensions
Rack Units
Size
3-pin IEC
Regulatory Approvals
FCC
CE
UL
cUL
TUV
Environment
Operating
Storage
Humidity
4U
19.0" W x 7.0" H x 17.4" L
(483mm x 178mm x 442mm)
35 lbs
Class A
EN55103-1, EN55103-2
UL1419
C22.2
EN60065
10 to 40 °C
-30 to 70 °C
95% max, non-condensing
Lexicon
Specifications
LARC2 User Interface
Display
Type
Resolution
Colors
Backlight
Contrast
Brightness
LED Meter Bridge
Configuration
Levels
Operating Distance
With power from 960L
With Ext. Power
Passive Matrix LCD
640x240
256
Fluorescent
HW controlled (rear panel)
SW controlled
8 channels x 3 levels
-60dBFS (Signal)
-6dBFS
-0.5dBFS (Overload)
Control Surface
Faders
8
60mm throw, motorized, touch sensitive
Joystick
Two axis
Dedicated Function Keys
29 (12 backlit)
Soft Buttons
8
Connectors
960L
Aux. PS/2 Keyboard
Ext. Power
9-pin D-sub
6-pin Mini-DIN
concentric, 2.5mm
Power
Requirements
Dimensions
Size
Weight
Regulatory Approvals
FCC
CE
TUV
Environment
Operating
Storage
Humidity
up to100 feet
up to1000 feet
12 VDC, 2 A (max)
12.7" L x 8.25" W x 5.0" H
(323mm x 210mm x 127mm)
4 lbs
Class A
EN55103-1, EN55103-2
EN60065
5 to 40 °C
-30 to 70 °C
95% max, non-condensing
Appendix
Appendix
Lexicon
Appendix: Program Descriptions
Surround
Banks
Surround Program Names
1
2
3
4
5
6
7
8
9
0
1*Halls 1
Large Hall
Medium
Hall
Small Hall
Med Large
Hall
Key Hall
Acoustic
Fill
Long, Brite
Space
Jazz Hall
Large
Church
Small
Church
2*Halls 2
Large
Choir Hall
Med Choir
Hall
Med Vox
Hall
Echo Hall
Big Reflex
Small Brite
Hall
Short &
Deep
Taj Mahal
Deep6
Beefy Hall
Bottom
Heavy
3Lg Stage + Med Stage Sm Stage + Brite Stage
Hall
+ Hall
Hall
+ Hall
*Stage + Hall
Small MT
Stage
Verb
Behind
You
Front Row
Bright
Stage
Big Stage
On
4*Chambers
5*Stage +
Chamber
6*Rooms
Round
Chamber
Bright
Chamber
Small
Chamber
Short
Chamber
Tight
Chamber
Gately
Chamber
Slap
Chamber
Buck'N
Chamber
Large +
Chamber
Med +
Chamber
Small +
Chamber
Big Empty
Church
Med Vocal
Church
Bright
Front
Bright Rear
Pulpit
Vocal
Breeze
Snare
Strainer
Studio C
Rock'n
Room
Woomy
Room
Gated
Room
Small
Room #2
Tiny Room
Ambience
4 Horns
Rock'n
Echoes
Lulu's
Room
Ziggy's
Place
7*Plates 1
Large Plate
Medium
Plate
Dessert
Plate
Wavey
Plate
8*Plates 2
A Plate
Snare
Plate
Thin Plate
Fat Plate
Echo Plate
9*Ambience
Very Large
Amb
Large
Ambience
Medium
Ambience
Small
Ambience
Strong
Ambience
Heavy
Ambience
Ambient
Hall
Announcer
Closet
Gated
Ambience
10Brick Wall
*Wild Spaces
Walls and
Slaps
Back Up
Big Back
Up
Ekoz All
'RoundR
Ekoz All
'RoundL
Giant
Cricket
Silica
Beads
Long
Shadow
Ricochet
Big Living
Room
Living
Room
Parlor
Poolroom
Poolhall
Bathroom
Big
Bathroom
Lobby
College
Lecture
Bat Cave
Warehouse
Coffin
Small Plate Drum Plate
11*Post 1
Large
Closet
Medium
Closet
Small
Closet
12*Post 2
Oil Tank
Hospital
Hallway
Yacht Club
Law Offices Street Echo
of:
Slap
Off the Back
Hotel Foyer
Wall
Percussion
Long Brite
Vocal Plate
Plated Gate
Plate
Space
A-1
Appendix
Lexicon
Appendix, continued
Stereo
Banks
Stereo Program Names
1
2
3
1Halls 1
Large Hall
Medium
Hall
Small Hall
2Halls 2
Large
Choir Hall
Med Choir
Hall
Med Vox
Hall
3Stage + Hall
4Chambers
5Stage +
Chamber
6Rooms
4
Echo Hall
5
7
8
9
0
Acoustic
Fill
Auto Park
Jazz Hall
Large
Church
Small
Church
LG Dark
Chamber
LG Vocal
Chamber
Huge
Chamber
Slap
Chamber
Large Brite Small Brite
Hall
Hall
Lg Stage + Med Stage Sm Stage +
Hall
+ Hall
Hall
Medium
Chamber
Snare
Chamber
Mini
Chamber
Large +
Chamber
Med +
Chamber
Small +
Chamber
Large
Room
Medium
Room
Small
Room
7Plates 1
Large Plate
Medium
Plate
8Plates 2
A Plate
Snare
Plate
Thin Plate
Fat Plate
Echo Plate
9Ambience
Very Large
Amb
Large
Ambience
Medium
Ambience
Small
Ambience
Strong
Ambience
10Wild Spaces
Brick Wall
Buckram
Big Bottom
10W-40
20W-50
11Post 1
Large
Closet
Medium
Closet
Small
Closet
Big Living
Room
12Post 2
Car Interior
Kitchen
A-2
6
SM Brite
Chamber
Soft
Chamber
LG Brite
Chamber
Snare
Strainer
Very Small
Large
Wood
Room
Small
Wood
Room
Small Plate Drum Plate
Dessert
Plate
Wavey
Plate
Lg Brite
Room
Med Brite
Room
Small &
Bright
Music Club
Percussion
Long, Brite
Vocal Plate
Plated Gate
Plate
Space
Heavy
Ambience
Ambient
Hall
Announcer
Closet
Gated
Ambience
Living
Room
Parlor
Poolroom
Poolhall
Bathroom
Big
Bathroom
Kellar's
Cell
Small
Foley
Reverb Tail
Airhead
Warehouse
960L Owner’s Maunal
Appendix
Appendix, continued
Surround Bank 1: *Halls 1
*Surround-Halls
Number
Name
Algorithm
Description
B1 P1
Large Hall
Surround Hall
A large sized random hall with the musicians placed in the middle and a relatively
long MidRT.
B1 P2
Medium Hall
Surround Hall
A little smaller than Large Hall. Use for real acoustic instruments to add a gentle
soft space.
B1 P3
Small Hall
Surround Hall
Obviously small, with some added reflections in the front and rear channels.
B1 P4
Med-Large Hall
Surround Hall
Medium sized with some added reflections at a lower level.
B1 P5
Key Hall
Surround Hall
For keyboards, short rev time and medium size, and for real acoustic instruments to
add a gentle soft space.
B1 P6
Acoustic Fill
B1 P7
Surround
Chamber
Surround
Long, Brite Space
Chamber
B1 P8
Jazz Hall
Surround Hall
Relatively small space with hard, bright walls and a short MidRT
B1 P9
Large Church
Surround Hall
A big space with musicians centrally located and a long MidRT.
B1 P0
Small Church
Surround Hall
A smaller version of Large Church.
Surround Bank 2: *Halls 2
Number
Name
Algorithm
*Surround-Halls
Description
B2 P1
Large Choir Hall
Surround Hall
Graduated surround delays widen the image of choirs and backing vocals. Large
Hall gives space. Use Joystick to control the delay image.
B2 P2
Med Choir Hall
Surround Hall
Graduated surround delays widen the image of choirs and backing vocals.
Medium-sized Hall gives space. Use Joystick to control the delay image.
B2 P3
Medium Vox Hall
Surround
Chamber
Medium density, short reverb time. Solo or background vocals sound great in here.
B2 P4
Echo Hall
Surround Hall
Use Joystick to regulate the echo component.
B2 P5
Big Reflex
B2 P6
Small Brite Hall
B2 P7
Short and Deep
Surround Hall
Strong bottom end – Use Spread to control the event . . .
B2 P8
Taj Majal Deep6
Surround Hall
Long MidRT and large Size with long echoes at a low level. Useful for single
sources and dramatic accent effects.
B2 P9
Beefy Hall
Surround Hall
Large size, relatively short MidRT, and BassRT setting of 2.5 give this room some
bottom. Good for drums.
B2 P0
Bottom Heavy
Surround Hall
Large Size and short MidRT. Adds bottom to thin source material. Good for drums.
Surround
Chamber
Surround
Chamber
Use on just about everything, mix as needed.
Use with caution: useful for single sources or staccato hit – long tails with lots of
movement.
Use in small amounts – short sounding.
Bright space with about 1 second MidRT
A-3
Appendix
Lexicon
Appendix, continued
Surround Bank 3: *Stage+Hall
Number
Name
Algorithm
*Surround-Halls+Ambience
Description
B3 P1
Lg Stage + Hall
Surround
Ambience
A stage in the front and hall around you. This one is about a 33 meter stage and a
38 meter hall.
B3 P2
Med Stage + Hall
Surround
Ambience
A stage in the front and hall around you. This one is about a 14 meter stage and a
25 meter hall.
B3 P3
Small Stage + Hall
Surround
Ambience
Surround
Brite Stage + Hall
Ambience
Surround
Small MT Stage
Chamber
A stage in the front and hall around you. This one is about a ten meter stage and a
15 meter hall.
B3 P4
B3 P5
Medium-sized, bright stage and a fairly large hall.
Empty performance space with an empty stage.
B3 P6
Verb Behind You
Surround
Chamber
Strong reverb sent to the rear channels keeps front dry and focused, while large
space envelops the listener and gives great distance behind.
B3 P7
Front Row
Surround
Ambience
Adjust reverb and ambience levels to bring yourself closer to or farther from the
stage.
B3 P8
Bright Stage
Surround
Ambience
Fairly bright stage with a darker large hall.
B3 P9
Big Stage
Surround
Ambience
Early reflections mimic a very large stage area and reverb supplies the large hall
around it.
B3 P0
On Stage
Surround
Ambience
With outputs panned to the sides and reverb levels adjusted accordingly, this
emulates the sound of being on a stage, with the reverb decaying in front.
Algorithm
*Surround-Chambers
Description
Surround
Chamber
Big empty space with strong bottom end. Consider using this on anything from
dialog to Tom-Toms.
Surround
Chamber
Surround
Chamber
Surround
Chamber
Medium-sized, fairly bright space with about a one second MidRT. Good all
around chamber.
Surround Bank 4: *Chambers
Number
Name
B4 P1
Round Chamber
B4 P2
Bright Chamber
B4 P3
Small Chamber
B4 P4
Short Chamber
B4 P5
Tight Chamber
Surround
Chamber
Very small bright space. Shortened MidRT lends a more abrupt release. Good for
when you want the reverb short, but don’t want to use a gated effect.
B4 P6
Gately Chamber
Surround
Chamber
Extremely short MidRT setting gives a very abrupt cutoff, but is still more "natural"
than a full gate.
B4 P7
Slap Chamber
B4 P8
Buck’N Chamber
B4 P9
Off the Back Wall
B4 P0
Hotel Foyer
A-4
Surround
Chamber
Surround
Chamber
Ambient
Chamber
Ambient
Chamber
Small bright space. About half-second MidRT. Great on drums.
Fairly small room Size and MidRT of around 0.7 seconds. Good multi-purpose
utility chamber.
Nice for adding strength. Slap delays are up front. Use Joystick to change effect.
This is a gate-type effect. Hold on!
Much movement from front to back. This program is useful for live concert
ambiences as well as dramatic singular effects.
This airy space is like the medium-sized, reflective lobby in many hotels.
960L Owner’s Maunal
Appendix
Appendix, continued
Surround Bank 5: *Stage + Chamber
Number
Name
Algorithm
*Surround - Chamber + Ambience
Description
B5 P1
Large + Chamber
Ambient
Chamber
A Large recital hall with a stage.
B5 P2
Med + Chamber
Ambient
Chamber
Medium-sized Ambience up front with about a 1.75 second MidRT setting, make
this like a 40-80 seat recital hall.
B5 P3
Small + Chamber
Ambient
Chamber
Small-sized ambient reflections coupled with a chamber reverb give this Program
an intimate feel. Good for individual acoustic instruments.
B5 P4
Big Empty Church
Ambient
Chamber
Large ambience up front, with long MidRT settings emulate a high-ceilinged altar
and large reverberant seating area.
B5 P5
Med Vocal
Church
Ambient
Chamber
Large ambience in front spreads out early reflections. Lends a nice "doubling"
effect to fatten up sources. Great for choirs and back-up vocals.
B5 P6
Bright Front
Ambient
Chamber
Smaller bright ambience in front with dark reverb space. Keeps attention focused
forward.
B5 P7
Bright Rear
Ambient
Chamber
The opposite of Bright Front, this has the outputs panned so the bright ambience is
in the rear and the dark reverb is in the front.
B5 P8
Pulpit
Ambient
Chamber
Very small ambient reflections give the immediate sound of being under the
canopy of a pulpit, with the reverberant space of the church around you.
B5 P9
Vocal Breeze
Ambient
Chamber
Strong, large ambience with reverb gives an airy quality to vocals. Use sparingly
for natural effect.
B5 P0
Snare Strainer
Ambient
Chamber
Useful for adding more strainer to a snare that is all "attack."
Surround Bank 6: *Rooms
Number
Name
Algorithm
Surround
Chamber
*Surround - Rooms
Description
B6 P1
Studio C
B6 P2
Rock’N Room
B6 P3
Woomy Room
B6 P4
Gated Room
B6 P5
Small Room #2
B6 P6
Tiny Room
B6 P7
Ambience 4
Horns
Ambient
Chamber
Trumpets, Sax, Tubas – any type of brass instruments work well with this Program –
especially multiple horns in sections.
B6 P8
Rock’n Echoes
Surround
Chamber
Multiple echoes make this program good for dramatic effects. Also ideal for
screamin’ lead guitar solos.
B6 P9
Lulu’s Room
Surround
Ambience
Medium-sized room with heavy early reflections. Good for Leslie cabinets. Reverb
adds body while ambient reflections keep source changes distinct.
B6 P0
Ziggy’s Place
Surround
Chamber
Open living space, with lots of fine Italian tile and not much carpeting.
Surround
Chamber
Surround
Chamber
Surround
Chamber
Surround
Chamber
Ambient
Chamber
Small room, with thin carpeting on the floor and irregular, reflective surfaces.
A medium-sized, highly reflective space.
Broad and diffuse, a good chunky sound for the band.
Extreme setting of MidRT gives an abrupt cutoff of reverb. Use Size, Shape and
Spread to vary the duration and texture of the gate.
Small, like a bedroom with bright characteristics.
Very small space with boosted ambient reflections
A-5
Appendix
Lexicon
Appendix, continued
Surround Bank 7: *Plates 1
Number
Name
Algorithm
*Surround - Plates
Description
B7 P1
Large Plate
Surround Plate
A standard large plate. Plenty of sizzle. This program is great on pop vocals and
guitars.
B7 P2
B7 P3
Medium Plate
Small Plate
Surround Plate
Surround Plate
Larger version of Small Plate. Useful on most sources.
Very small and short. Useful on just about any source.
B7 P4
Drum Plate
Surround Plate
Very bright, this medium-sized reverb accentuates high-end attack transients.
B7 P5
B7 P6
B7 P7
B7 P8
Dessert Plate
Wavey Plate
Percussion Plate
Vocal Plate
Surround Plate
Surround Plate
Surround Plate
Surround Plate
Short and sweet. This one's good for just about anything.
Medium to large Size with a modest MidRT setting.
Good all-around percussion plate.
Large and bright. Good pop vocal plate.
B7 P9
Long, Brite Space
Surround
Chamber
Cavelike; good for dramatic accents or screams. Long reverb with lots of motion.
B7 P0
Plated Gate
Surround Plate
Shortened MidRT gives this preset an abrupt cutoff. Useful for drums, when you
want that "gated" sound, but this is a little more natural sounding.
Surround Bank 8: *Plates 2
Number
Name
Algorithm
*Surround - Plates
Description
B8 P1
A Plate
Surround Plate
Basic plate program with a clear sound. Useful for everything from vocals to
percussion.
B8 P2
Snare Plate
Surround Plate
A rapid buildup of high frequencies make this program a favorite on snare drums.
B8 P3
Thin Plate
Surround Plate
Another variation on the plate theme, this Program keeps out unwanted low
frequencies.
B8 P4
B8 P5
Fat Plate
Echo Plate
Surround Plate
Surround Plate
Produces the sound of a large, highly colored plate.
Like Fat Plate, but with echoes.
A-6
960L Owner’s Maunal
Appendix
Appendix, continued
Surround Bank 9: *Ambience
Number
Name
Algorithm
*Surround - Halls + Ambience
Description
B9 P1
Very Large Amb
Surround
Ambience
Resembles a very large ambient space that has more "clutter" than a concert hall
or performance space. Lowering the Rvb levels reduces the clutter.
B9 P2
Large Ambience
Surround
Ambience
Similar to Very Large Ambience, but less spacious. Provides the ambience of a
large symmetrical room.
B9 P3
Medium
Ambience
Surround
Ambience
Similar to Large Ambience, but smaller. Like a large courtroom, or a lecture room.
B9 P4
Small Ambience
Surround
Ambience
Similar to Medium Ambience, but smaller – typical lobby, or small lounge.
B9 P5
Strong Ambience
Surround
Reverse
The room size is larger than Medium Ambience, but the Rvb levels are reduced to
provide a strong "wash" of ambience with a relatively short decay.
B9 P6
Heavy Ambience
Surround
Ambience
Resembles a large rectangular space with performers in the middle. Microphone
proximity can be simulated by adjusting the wet/dry mix.
B9 P7
Ambient Hall
Surround Hall
Fast, dense ambient attack. Reverberant characteristics of Large Hall.
B9 P8
Announcer
B9 P9
Closet
B9 P0
Gated Ambience
Surround
Ambience
Surround
Ambience
Surround
Ambience
Surround Bank 10: *Wild Spaces
Number
Name
Algorithm
Adds a very useful ambient spaciousness to a dry announcer’s dialog track.
Just as you would imagine – it even feels cramped.
Very strong ambience with fast decay – just add your favorite snare drum.
*Surround - Unnatural and Special Effect Spaces
Description
B10 P1
Brick Wall
Surround
Ambience
Best described as a subtle gated inverse room. Its usefulness extends beyond just
drum sounds.
B10 P2
Walls and Slaps
Surround
Chamber
Delays and echoes with not much reverb. Use joystick to control delay time and
feedback.
B10 P3
Back Up
Surround
Reverse
A Reverse reverb with an abrupt release. Good for special effects or if you need a
really long gated sound.
B10 P4
Big Back-up
Surround
Reverse
Big Reverse Program that originates in the rear and decays to the front. Useful for
special effects.
B10 P5
Ekoz all’RoundR
Surround Plate
Set to send individual delays consecutively to each output. This one starts a FL and
goes around to RS. Use Joystick to control delay gain and time.
B10 P6
Ekoz all ‘RoundL
Surround Plate
Same as Ekoz all ‘RoundR, but this one starts at FR and goes around to RS. Use
Joystick to control delay gain and time.
B10 P7
Giant Cricket
Surround
Ambience
Large ambience setting spaces out early reflections. Use on short-duration
transient material and these reflections are heard as closely spaced echoes.
B10 P8
Silica Beads
Surround
Chamber
This one rides the line between a reverse reverb, a plate, and widely spaced
ambient reflections.
B10 P9
Long Shadow
Surround
Chamber
Provides phantom-like reiteration of source and smoothes it out with reverb.
Ghostly on vocals.
B10 P0
Ricochet
Surround
Chamber
Ricochet emulates a fairly large space with a dangerous slapback echo
A-7
Appendix
Lexicon
Appendix, continued
Surround Bank 11: *Post 1
Number
Name
Algorithm
*Surround - Stylized Spaces for Post-Production Environments
Description
B11 P1
Large Closet
Surround
Chamber
Big walk-in. Use Rolloff, RtHicut, and MidRT to fill it up or empty it out.
B11 P2
Medium Closet
Surround
Chamber
Medium-sized closet. Use Rolloff, RtHicut, and MidRT to fill it up or empty it out.
B11 P3
Small Closet
Surround
Chamber
Small closet. User Rolloff, RtHicut, and MidRT to fill it up or empty it out.
B11 P4
Big Living Room
B11 P5
Living Room
B11 P6
Parlor
B11 P7
Poolroom
B11 P8
Poolhall
B11 P9
Bathroom
B11 P0
Large Bathroom
Surround
Ambience
Surround
Ambience
Surround
Ambience
Surround
Ambience
Surround
Ambience
Surround
Ambience
Surround
Chamber
Large, fairly bright living room with hard floors and lots of tile. Use Rolloff, RtHicut,
and MidRT to add draperies and carpeting.
Like Big Living Room, only smaller
A small parlor, with heavy carpeting and draperies.
A wood-paneled room with a high ceiling and enough space for one regulationsized table.
A fairly large space with wood floors, low ceiling and about 10 tables.
Medium-sized (for a bathroom) and bright, with tiled walls.
Same as Bathroom, only larger.
Surround Bank 12: *Post 2
Number
Name
Algorithm
*Surround - Stylized Spaces for Post-Production Environments
Description
B12 P1
Oil Tank
Surround Hall
Use Size to vary the resonance; Careful with reverb time!
B12 P2
Hospital Hallway
Surround
Chamber
Just down the hall from the ER
B12 P3
Yacht Club
Surround Hall
A large empty space with many audible reflections
B12 P4
Law offices of:
B12 P5
Street Echo Slap
B12 P6
Lobby
B12 P7
College Lecture
B12 P8
Bat Cave
B12 P9
Warehouse
B12 P0
Coffin
A-8
Surround
Chamber
Ambient
Chamber
Surround
Chamber
Surround
Ambience
Ambient
Chamber
Ambient
Chamber
Surround
Ambience
Jacoby and Price
Famous police sound
Bright and airy, mix return level for perspective
Level of return really sets the feeling
Hello is anybody there?
Lower reverb time to fill up the warehouse
A standard, unlined wooden model
960L Owner’s Maunal
Appendix
Appendix, continued
Stereo Bank 1: Halls 1
Number
Name
Algorithm
B1 P1
Large Hall
Random Hall
Provides the sense of space and ambience of a Large concert hall with the source
placed in the center of the hall, away from nearby walls.
B1 P2
Medium Hall
Random Hall
Medium Hall is very similar to Large Hall, but smaller.
B1 P3
Small Hall
Random Hall
Small Hall is a smaller version of Medium Hall.
B1 P4
Empty
B1 P5
Empty
B1 P6
Acoustic Fill
Random Hall
Use on just about everything, mix as needed
B1 P7
Auto Park
Random Hall
Auto Park reproduces the sound of a concrete parking garage.
B1 P8
Jazz Hall
Random Hall
A relatively small space with hard, bright walls, a short MidRT and high diffusion. It
emulates a hall full of people, without the noise they make.
B1 P9
Large Church
Random Hall
Large Church is a big space with the source centrally placed and a comparatively
long MidRT.
B1 P0
Small Church
Random Hall
A smaller version of Large Church.
Algorithm
Stereo - Halls
Description
Stereo Bank 2: Halls 2
Number
Name
Stereo - Halls
Description
B2 P1
Large Choir Hall
Random Hall
Graduated delays widen the image of choirs and backing vocals. Large Hall gives
space. Use Joystick to control the delay image.
B2 P2
Med Choir Hall
Random Hall
Graduated delays widen the image of choirs and backing vocals. Medium-sized
Hall gives space. Use Joystick to control the delay image.
B2 P3
Medium Vox Hall
Random Hall
Medium density, short reverb time. Solo or background vocals sound great in here.
B2 P5
Echo Hall
Random Hall
Use Joystick to regulate the echo component.
B2 P6
Large Brite Hall
Random Hall
Bright space with about 2 second MidRT.
B2 P4
Small Brite Hall
Random Hall
Bright space with about 1 second MidRT.
Stereo Bank 3: Stage + Hall
Number
Name
Algorithm
Stereo - Halls W/Stage Reflections
Description
B1 P1
Lg Stage + Hall
Random Hall
Similar to Large Hall, except that the source is placed at one end of the hall and
several pre-echoes simulate the effects of a proscenium arch
B1 P2
Med Stage Hall
Random Hall
Medium+Stage is very similar to Large+Stage, but smaller.
B1 P3
Sm Stage + Hall
Random Hall
Small+Stage is a smaller version of Medium+Stage
A-9
Appendix
Lexicon
Appendix, continued
Stereo Bank 4: Chambers
Number
Name
Algorithm
Stereo - Chambers
Description
B4 P1
Medium Chamber Chamber
A medium-sized empty chamber with reflective walls and about one second MidRT.
B4 P2
Snare Chamber
Chamber
Smaller in size than Medium Chamber and about 1/2 second MidRT. As the name
suggests, useful for snare drums.
B4 P3
Mini Chamber
Chamber
Similar to Snare Chamber, but even smaller.
B4 P4
SM Brite Chamber Chamber
Medium-sized, but with a shortened MidRT and some added reflections.
B4 P5
Soft Chamber
Medium sized, about 1/2 second MidRT, and the highs rolled off to soften the
reverb.
B4 P6
LG Brite Chamber Chamber
Large size setting, about 1.5 second MidRT, and some added reflections.
B4 P7
LG Dark Chamber Chamber
Draw the curtains and put carpeting on the floor of LG Brite Chamber and it would
sound like this.
B4 P8
LG Vocal
Chamber
Chamber
Low diffusion setting with delays and echoes. Good starting point for a pop vocal.
B4 P9
Huge Chamber
Chamber
Size set at 40 meters with about 2.5 second MidRT. This one's huge
B4 P0
Slap Chamber
Chamber
Small, low diffusion, with delays and slight echoes, this one's slappy. Good starting
point for a "Rockabilly"-type vocal sound.
Chamber
Stereo Bank 5: Stage + Chamber
Number
Name
Algorithm
Stereo - Chamber + Stage Reflections
Description
B5 P1
Large + Chamber Ambience
A Large recital hall with a stage.
B5 P2
Med + Chamber
Medium-sized Ambience up front with about a 1.75 second MidRT setting, make
this like a 40-80 seat recital hall.
B5 P3
Small + Chamber Ambience
B5 P4
Empty
B5 P5
Empty
B5 P6
Empty
B5 P7
Empty
B5 P8
Empty
B5 P9
Empty
B5 P0
Snare Strainer
A-10
Ambience
Ambience
Small-sized ambient reflections coupled with a chamber reverb give this Program
an intimate feel. Good for individual acoustic instruments.
Useful for adding more strainer to a snare that is all "attack."
960L Owner’s Maunal
Appendix
Appendix, continued
Stereo Bank 6: Rooms
Number
Name
Algorithm
Stereo Rooms
Description
B6 P1
Large Room
Random Hall
Large Room resembles a good-sized lecture room. It is smaller than Music Club,
and more colored, with comb filtering and slap echoes.
B6 P2
Medium Room
Random Hall
Medium Room is a smaller version of Large Room.
B6 P3
Small Room
Random Hall
Small Room is much smaller and less reverberant than the Large and Medium
Rooms. It resembles a typical American living room.
B6 P4
Very Small
Random Hall
Very Small Room has the intimate, close feel of a bedroom or den.
B6 P5
Large Wood
Room
Random Hall
Large Wood Room is similar to Large Room, but has a lower Bass Multiply,
simulating a room with thin wooden paneling, or a cheaply made ware house or
auditorium.
B6 P6
Small Wood
Room
Random Hall
Small Wood Room is a smaller version of Large Wood Room.
B6 P7
Lg Brite Room
Random Hall
Simply large and bright.
B6 P8
Med Brite Room
Random Hall
A bit smaller than Lg Brite Room.
B6 P9
Small & Bright
Random Hall
Small and Bright adds presence to a sound without adding a lot of obvious
reverberation.
B6 P0
Music Club
Random Hall
Music Club is similar to Jazz Hall, but is smaller and less reverberant – especially at
high frequencies.
Stereo Bank 7: Plates 1
Number
Name
Algorithm
Stereo - Plates
Description
B7 P1
Large Plate
Plate
A standard large plate. Plenty of sizzle. This program is great on pop vocals and
guitars.
B7 P2
Medium Plate
Plate
Larger version of Small Plate. Useful on most sources.
B7 P3
Small Plate
Plate
Another plate variation. As its name implies, this program produces the sound of a
smaller plate.
B7 P4
Drum Plate
Plate
Very bright, this medium-sized reverb accentuates high-end attack transients.
B7 P5
Dessert Plate
Plate
Short and sweet. This one's good for just about anything.
B7 P6
Wavey Plate
Plate
Medium to large Size with a modest MidRT setting.
B7 P7
Percussion Plate
Plate
Good all-around percussion plate.
B7 P8
Vocal Plate
Plate
Large and bright. Good pop vocal plate.
B7 P9
Long, Brite Space Plate
Cavelike; good for dramatic accents or screams. Long reverb with lots of motion.
B7 P0
Plated Gate
Shortened MidRT gives this preset an abrupt cutoff. Useful for drums, when you
want that "gated" sound, but this is a little more natural sounding.
Plate
A-11
Appendix
Lexicon
Appendix, continued
Stereo Bank 8: Plates 2
Number
Name
Algorithm
Stereo - Plates
Description
B8 P1
A Plate
Plate
Basic plate Program with a clear sound. Useful for everything from vocals to
percussion.
B8 P2
Snare Plate
Plate
A rapid buildup of high frequencies make this program a favorite on snare drums.
B8 P3
Thin Plate
Plate
Another variation on the plate theme, this Program keeps out unwanted low
frequencies.
B8 P4
Fat Plate
Plate
Produces the sound of a large, highly colored plate.
B8 P5
Echo Plate
Plate
Like Flat Plate, but with echoes.
Algorithm
Stereo - Ambience
Description
Stereo Bank 9: Ambience
Number
Name
B9 P1
Very LG
Ambience
Plate
Resembles a very large ambient space (large shopping mall, parking garage,
warehouse) that has far more "clutter" than a concert hall or performance
environment. Lowering the RvbLvl reduces the clutter while maintaining the sense
of a very large ambient space.
B9 P2
Large Ambience
Ambience
Similar to Very LG Ambience, but less spacious. Provides the ambience of a large
symmetrical room.
B9 P3
Medium
Ambience
Ambience
Similar to Large Ambience, but smaller. Imagine a large courtroom, or a lecture
room – then load the program.
B9 P4
Small Ambience
Ambience
Similar to Medium Ambience, but smaller – typical lobby, or small lounge.
B9 P5
Strong Ambience Ambience
The room size is larger than Medium Ambience, but the RvbLvl has been reduced
to provide a strong "wash" of ambience with a relatively short decay time.
B9 P6
Heavy Ambience
Ambience
Resembles a large rectangular performance space with musicians or performers
positioned in the middle of the space. Microphone proximity to the musicians or
performers can be simulated by adjusting the Mix control. If the 960L is used with a
mixing console and interfaced with stereo sends and returns, the Mix control
should be 100% Wet and the level of the sends will determine the proximity effect.
B9 P7
Ambient Hall
Ambience
Fast, dense ambient attack. Reverberant characteristics of a Large Hall.
B9 P8
Announcer
Ambience
Add a very useful ambient spaciousness to a dry announcer's dialog track.
B9 P9
Closet
Ambience
Just as you would imagine, it even feels cramped!
B9 P0
Gated Ambience
Ambience
Very strong ambience with fast decay – just add your favorite snare drum!
A-12
960L Owner’s Maunal
Appendix
Appendix, continued
Stereo Bank 10: Wild Spaces
Number
Name
Algorithm
Stereo - Unnatural and Effect Spaces
Description
B10 P1
Brick Wall
Ambience
Brick Wall, as in running into, rather than sounding similar to. This program can
best be described as a subtle gated inverse room, but it's really much more. Unlike
most gated reverb effect, this one's usefulness extends well beyond drum sounds.
Try this on a wide variety of material.
B10 P2
Buckram
Ambience
Buckram is a variation of Brick Wall. The difference is that Buckram doesn't sound
as dense as the Brick Wall, and has a longer reverb tail.
B10 P3
Big Bottom
Chamber
Big Bottom has a relatively short MidRT and a much longer bass reverb time. This
produces a big boom from low-frequency material, while leaving the high end
more or less untouched. This is useful for adding a big bass and tom drum sound
to an existing mix, or to a drum machine with premixed stereo outputs.
B10 P4
10W-40
Chamber
10W-40 emulates the sound of an oil drum. If your facility lacks an oil drum wired
for sound, you will be please to discover that Lexicon has supplied one – before
you even knew you needed it.
B10 P5
20W-50
Ambience
A more aggressive oil drum.
Algorithm
Stereo-Stylized Spaces for Post-Production Environments
Description
Stereo Bank 11: Post 1
Number
Name
B11 P1
Large Closet
Chamber
Big walk-in. Use Rolloff, RtHicut, and MidRT to fill it up or empty it out.
B11 P2
Medium Closet
Chamber
Medium-sized closet. Use Rolloff, RtHicut, and MidRT to fill it up or empty it out.
B11 P3
Small Closet
Chamber
Small closet. User Rolloff, RtHicut, and MidRT to fill it up or empty it out.
B11 P4
Big Living Room
Ambience
Large, fairly bright living room with hard floors and lots of tile. Use Rolloff, RtHicut,
and MidRT to add draperies and carpeting.
B11 P5
Living Room
Ambience
Like Big Living Room, only smaller
B11 P6
Parlor
Ambience
A small parlor, with heavy carpeting and draperies.
B11 P7
Poolroom
Ambience
A wood-paneled room with a high ceiling and enough space for one regulationsized table.
B11 P8
Poolhall
Ambience
A fairly large space with wood floors, low ceiling and about 10 tables.
B11 P9
Bathroom
Chamber
Medium-sized (for a bathroom) and bright, with tiled walls.
B11 P0
Big Bathroom
Chamber
Same as Bathroom, only larger.
A-13
Appendix
Lexicon
Appendix, continued
Stereo Bank 12: Post 2
Number
Name
Algorithm
Stereo - Stylized Spaces for Post-Production Environment
Description
B12 P1
Car Interior
Ambience
It's a 4-door. Raise the value of Shape to make it a station wagon or SUV. Raise
the Ambience level to close the windows.
B12 P2
Empty
B12 P3
Empty
B12 P4
Kitchen
Chamber
Can you find your disposal sound effect?
B12 P5
Kellar’s Cell
Chamber
No. It's not the padded cell. Small, deep, and the surfaces are hard.
B12 P6
Small Foley
Chamber
The program uses the Ambience algorithm for Foley applications. Moving AmbSiz
from its 1.5M setting will cause the ambience bloom to "open up." Varying Mix from
100% Wet will present the dry delay into the audio path.
B12 P7
Reverb Tail
Chamber
Not infinite. A very war, very long reverberant wash that makes a great fade. Unlike
infinite, the inputs are always active.
B12 P8
Airhead
Ambience
Take a pair of headphones, remove the elements and replace them with diffusor
panels spaced 10" from your ears. Now, hold a diffusor panel above your head.
This program eliminates the need for you to look as though you are communicating
with aliens. Use aggressively!
B12 P9
Warehouse
Ambience
It's big – real big!
B12 P0
Empty
A-14