1
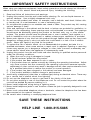
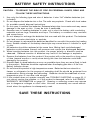
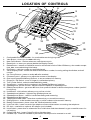
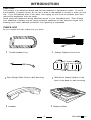
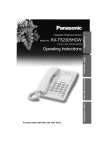
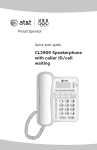
® 20 MEMORY CALLER ID SPEAKERPHONE WITH ELECTRONIC HOLD MODEL PH-550 OPERATING INSTRUCTIONS CALLER ID SHOWS YOU WHO IS CALLING 70 NAME & NUMBER CALLER ID MEMORY 20 ONE-TOUCH SPEED DIAL MEMORY BUTTONS TONE / PULSE SWITCHABLE DIALING AUTOMATIC TIME & DATE DISPLAY CALLERS NAME & NUMBER DISPLAY ONE-TOUCH CALLER ID CALL BACK WALL / DESK USABLE YOU MUST SUBSCRIBE TO CALLER ID SERVICE FROM YOUR TELEPHONE COMPANY TO USE THE CALLER ID FEATURE OF THIS PHONE. NOTE: READ AND FOLLOW THESE INSTRUCTIONS BEFORE USING YOUR TELEPHONE 550110998 E V.4 CONTENTS Important Safety Instructions Battery Safety Instructions Location of Controls Introduction What is Caller ID ? Telephone Installation Instructions ○ ○ ○ ○ ○ ○ ○ ○ ○ ○ ○ ○ ○ ○ ○ ○ ○ ○ ○ ○ ○ ○ ○ ○ ○ ○ ○ ○ ○ ○ ○ ○ ○ ○ ○ ○ ○ ○ ○ ○ ○ ○ ○ ○ ○ ○ ○ ○ ○ ○ ○ ○ ○ ○ ○ ○ ○ ○ ○ ○ ○ ○ ○ ○ ○ ○ ○ ○ ○ ○ ○ ○ ○ ○ ○ ○ ○ ○ ○ ○ ○ ○ ○ ○ ○ ○ ○ ○ ○ ○ ○ ○ ○ ○ ○ ○ ○ ○ ○ ○ ○ ○ ○ ○ ○ ○ ○ ○ ○ ○ ○ ○ ○ ○ ○ ○ ○ ○ ○ ○ ○ ○ ○ ○ ○ ○ ○ ○ ○ ○ ○ ○ ○ ○ ○ ○ ○ ○ ○ ○ ○ ○ ○ ○ ○ ○ ○ ○ ○ ○ ○ ○ ○ ○ ○ ○ ○ ○ ○ ○ ○ ○ ○ ○ ○ ○ ○ ○ ○ ○ ○ ○ ○ ○ ○ ○ ○ ○ ○ ○ ○ ○ ○ ○ ○ ○ ○ ○ ○ ○ ○ ○ ○ ○ ○ ○ ○ ○ ○ ○ ○ ○ ○ ○ ○ ○ ○ ○ ○ ○ ○ ○ ○ ○ ○ ○ ○ ○ ○ ○ ○ ○ ○ ○ ○ ○ ○ ○ ○ ○ ○ ○ ○ ○ ○ ○ ○ ○ ○ ○ ○ ○ ○ ○ ○ ○ ○ ○ ○ ○ ○ ○ ○ ○ ○ ○ ○ ○ ○ ○ ○ ○ ○ ○ ○ ○ ○ ○ ○ ○ ○ ○ ○ ○ ○ ○ ○ ○ ○ ○ ○ ○ ○ ○ ○ ○ ○ ○ ○ ○ ○ ○ ○ ○ ○ ○ ○ ○ ○ ○ ○ ○ ○ ○ ○ ○ ○ ○ ○ ○ ○ ○ ○ ○ What Your Caller ID Phone Displays and What the Buttons Do ? Using Your Caller ID Phone Error Messages Storing Numbers from the Caller ID Display Dialing Numbers from the Caller ID Memory Call Timer New Calls Using Message Waiting / Mailbox Manual Reset of the Message Waiting Indicator Using Chain Dialing Deleting an Individual Caller ID Record from Memory Deleting all Caller ID Records from Memory ○ ○ ○ ○ ○ ○ ○ ○ ○ ○ ○ ○ ○ ○ ○ ○ ○ ○ ○ ○ ○ ○ ○ ○ ○ ○ ○ ○ ○ ○ ○ ○ ○ ○ ○ ○ ○ ○ ○ ○ ○ ○ ○ ○ ○ ○ ○ ○ ○ ○ ○ ○ ○ ○ ○ ○ ○ ○ ○ ○ ○ ○ ○ ○ ○ ○ ○ ○ ○ ○ ○ ○ ○ ○ ○ ○ ○ ○ ○ ○ ○ ○ ○ ○ ○ ○ ○ ○ ○ ○ ○ ○ ○ ○ ○ ○ ○ ○ ○ ○ ○ ○ ○ ○ ○ ○ ○ ○ ○ ○ ○ ○ ○ ○ ○ ○ ○ ○ ○ ○ ○ ○ ○ ○ ○ ○ ○ ○ ○ ○ ○ ○ ○ ○ ○ ○ ○ ○ ○ ○ ○ ○ ○ ○ ○ ○ ○ ○ ○ ○ ○ ○ ○ ○ ○ ○ ○ ○ ○ ○ ○ ○ ○ ○ ○ ○ ○ ○ ○ ○ ○ ○ ○ ○ ○ ○ ○ ○ ○ ○ ○ ○ ○ ○ ○ ○ ○ ○ ○ ○ ○ ○ ○ ○ ○ ○ ○ ○ ○ ○ ○ ○ ○ ○ ○ ○ ○ ○ ○ ○ ○ ○ ○ ○ ○ ○ ○ ○ ○ ○ ○ ○ ○ ○ ○ ○ ○ ○ ○ ○ ○ ○ ○ ○ ○ ○ ○ ○ ○ ○ ○ ○ ○ ○ ○ ○ ○ ○ ○ ○ ○ ○ ○ ○ ○ ○ ○ ○ ○ ○ ○ ○ ○ ○ ○ ○ ○ ○ ○ ○ ○ ○ ○ ○ ○ ○ ○ ○ ○ ○ ○ ○ ○ ○ ○ ○ ○ ○ ○ ○ ○ ○ ○ ○ ○ ○ ○ ○ ○ ○ ○ ○ ○ ○ ○ ○ ○ ○ ○ ○ ○ ○ ○ ○ ○ ○ ○ ○ ○ ○ ○ ○ ○ ○ ○ ○ ○ ○ ○ ○ ○ ○ ○ ○ ○ ○ ○ ○ ○ ○ ○ ○ ○ ○ ○ ○ ○ ○ ○ ○ ○ ○ ○ ○ ○ ○ ○ ○ ○ ○ ○ ○ ○ ○ ○ ○ ○ ○ ○ ○ ○ ○ ○ ○ ○ ○ ○ ○ ○ ○ ○ ○ ○ ○ ○ ○ ○ ○ ○ ○ ○ ○ ○ ○ ○ ○ ○ ○ ○ ○ ○ ○ ○ ○ ○ ○ ○ ○ 1 2 3 4 6 7 7 7 8 8 8 8 9 9 10 11 12 15 15 15 15 15 15 16 16 16 16 16 18 18 18 19 19 20 20 20 ○ ○ ○ ○ ○ ○ ○ ○ ○ ○ ○ ○ ○ ○ ○ ○ ○ ○ ○ ○ ○ ○ ○ ○ ○ ○ ○ ○ ○ ○ ○ ○ ○ ○ ○ ○ ○ ○ ○ ○ ○ ○ ○ ○ ○ ○ ○ ○ ○ ○ ○ ○ ○ ○ ○ ○ ○ ○ ○ ○ ○ ○ ○ ○ ○ ○ ○ ○ ○ ○ ○ ○ ○ ○ ○ ○ ○ ○ ○ ○ ○ ○ ○ ○ ○ ○ ○ ○ ○ ○ ○ ○ ○ AC Power Adaptor Operation Care and Maintenance Trouble Shooting FCC Requirements Warranty Information ○ ○ ○ ○ ○ ○ ○ ○ ○ ○ ○ ○ ○ ○ ○ ○ ○ ○ ○ ○ ○ ○ ○ ○ ○ ○ ○ ○ ○ ○ ○ ○ ○ ○ ○ ○ ○ ○ ○ ○ ○ ○ ○ ○ ○ ○ ○ ○ ○ ○ ○ ○ ○ ○ ○ ○ ○ ○ ○ ○ ○ ○ ○ ○ ○ ○ ○ ○ ○ ○ ○ ○ ○ ○ ○ ○ ○ ○ ○ ○ ○ ○ ○ ○ ○ ○ ○ ○ ○ ○ ○ ○ ○ ○ ○ ○ ○ ○ ○ ○ ○ ○ ○ ○ ○ ○ ○ ○ Caller ID Operation ○ ○ ○ ○ ○ ○ ○ ○ ○ ○ ○ ○ ○ ○ ○ ○ ○ ○ ○ ○ ○ ○ ○ ○ ○ ○ ○ ○ ○ ○ ○ ○ ○ ○ ○ ○ ○ ○ ○ ○ ○ ○ ○ ○ ○ ○ ○ ○ ○ ○ ○ ○ ○ ○ ○ ○ ○ ○ ○ ○ ○ ○ ○ ○ ○ ○ ○ ○ ○ ○ ○ ○ ○ ○ ○ ○ ○ ○ ○ ○ ○ ○ ○ ○ ○ ○ ○ ○ ○ ○ ○ ○ ○ ○ ○ ○ ○ ○ ○ ○ ○ ○ ○ ○ ○ ○ ○ ○ ○ ○ ○ ○ ○ ○ ○ ○ ○ ○ ○ ○ ○ ○ ○ ○ ○ ○ ○ ○ ○ ○ ○ ○ ○ ○ ○ ○ ○ ○ Receiving Calls as a Normal Telephone Making Calls as a Normal Telephone Call Waiting Last Number Redial / Pause Hands-Free (Speakerphone) Operation Special Considerations for Hands-Free (Speakerphone) Operation Hold Button Temporary Tone Dialing Memory Dialing Storing Telephone Numbers into Memory (M1 to M20) Making Calls from the 20 One-Touch Memories ○ ○ ○ ○ ○ ○ ○ ○ ○ ○ ○ ○ ○ ○ ○ ○ ○ ○ ○ ○ ○ ○ ○ ○ ○ ○ ○ ○ ○ ○ ○ ○ ○ ○ ○ ○ ○ ○ ○ ○ ○ ○ ○ ○ ○ ○ ○ ○ ○ ○ ○ ○ ○ ○ Setting up Language, Area Code, Time and Date Quick Instructions to Set up Area Code Reset Your Phone ○ ○ ○ ○ ○ ○ ○ ○ ○ ○ ○ ○ ○ ○ ○ ○ ○ ○ ○ ○ ○ ○ ○ ○ ○ ○ ○ ○ ○ ○ ○ Caller ID Installation Instructions Wall Mounting Telephone Operation ○ ○ ○ ○ ○ ○ ○ ○ ○ ○ ○ ○ ○ ○ ○ ○ ○ ○ ○ ○ ○ ○ ○ ○ ○ ○ ○ ○ ○ ○ ○ ○ ○ ○ ○ ○ ○ ○ ○ ○ ○ ○ ○ ○ ○ ○ ○ ○ ○ ○ ○ ○ ○ ○ Getting Started Installing Batteries Connecting Phone Cords Connecting to an Answering Machine Ringer On / Off Switch Tone / Pulse Switch ○ ○ ○ ○ ○ ○ ○ ○ ○ ○ ○ ○ ○ 21 21 21 21 21 21 22 22 23 25 26 550110998 E V.4 IMPORTANT SAFETY INSTRUCTIONS When using your telephone equipment, basic safety precautions should always be followed to reduce the risk of fire, electric shock and personal injury, including the following: 1. Read and follow all instructions and warnings. 2. Unplug this product from the wall outlet before cleaning. Do not use liquid cleaners or aerosol cleaners. Use a slightly dampened cloth only. 3. Do not use this product near water, for example, near a bathtub, wash bowl, kitchen sink, or laundry tub, in a wet basement, or near a swimming pool. 4. Do not place this product on an unstable cart, stand or table. The product may fall, causing serious damage to itself. 5. Slots and openings in the cabinet and the back or bottom are provided for ventilation, to protect it from overheating, these openings must not be blocked or covered. The openings should never be blocked by placing the product on the bed, sofa, rug, or other similar surface. This product should never be placed near or over a radiator, heat register or a built-in installation such as a bookcase or cabinet unless proper ventilation is provided. 6. Never push objects of any kind into this product through cabinet slots as they may touch dangerous voltage points or short out parts that could result in a risk of fire or electric shock. Never spill liquid of any kind on the product. 7. To reduce the risk of electric shock, do not disassemble this product, but take it to a qualified serviceman, when some service or repair work is required. Opening or removing covers may expose you to dangerous voltages or other risks. Incorrect re-assembly can cause electric shock when the appliance is subsequently used. 8. Unplug this product from the wall outlet and refer servicing to qualified service personnel under the following conditions: A. When the cord or plug is damaged or frayed. B. If liquid has been spilled into the product. C. If the product has been exposed to rain or water. D. If the product does not operate normally by following the operating instructions. Adjust only those controls that are covered by the operating instructions because improper adjustment of other controls may result in damage and will often require extensive work by a qualified technician to restore the product to normal operation. E. If the product has been dropped or the cabinet has been damaged. F. If the product exhibits a distinct change in performance. 9. Avoid using a telephone (other than a cordless type) during an electrical storm. There may be a remote risk of electric shock from lightning. 1 0 . Do not use the telephone to report a gas leak in the vicinity of the leak. 11. Do not allow anything to rest on the telephone cord. Do not locate this product where the cord will be abused by persons walking on it. 1 2 . Never install telephone wiring during a lightning storm. 1 3 . Never install telephone jacks in wet locations unless the jack is specially designed for wet locations. 1 4 . Never touch uninsulated telephone wires or terminals, unless the telephone line has been disconnected at the network interface. 1 5 . Be careful when installing or modifying telephone lines. SAVE THESE INSTRUCTIONS HELP LINE 1-800-315-5885 1 550110998 E V.4 BATTERY SAFETY INSTRUCTIONS CAUTION : TO REDUCE THE RISK OF FIRE OR PERSONAL INJURY, READ AND FOLLOW THESE INSTRUCTIONS. 1. Use only the following type and size of batteries: 4 size AA alkaline batteries (not included). 2. Do not dispose the batteries into a fire. The cells may explode. Check with local codes for possible special disposal instructions. 3. Do not open or mutilate the batteries. Released electrolyte is corrosive and may cause damage to the eyes or skin. It may be toxic if swallowed. 4. Exercise care in handling batteries in order not to short the battery with conducting materials such as rings, bracelets and keys. The battery or conductor may overheat and cause burns. 5. Do not attempt to recharge the batteries that are used with this product. The batteries may leak corrosive electrolyte or explode. 6. Do not attempt to rejuvenate the batteries identified for use with this product by heating them. Sudden release of the battery electrolyte may cause burns or irritation to eyes or skin. 7. All batteries should be replaced at the same time. Mixing fresh and discharged batteries could increase internal cell pressure and rupture the discharged batteries. 8. When inserting batteries into this product, the proper polarity or direction must be observed. Reverse insertion of batteries may result in the leakage or explosion. 9. Remove the batteries from this product if the product will not be used for a long period of time (several months or more) since during this time the batteries could leak, damaging the product. 10. Discard weak or dead batteries as soon as possible since they are more likely to leak in the product. Batteries should be replaced when the display gets dim or if the Low Battery Indicator shows. 11. Do not store this product in high temperature areas. Batteries that are stored in a freezer or refrigerator for the purpose of extending shelf life should be protected from condensation during storage and defrosting. Batteries should be stabilized at room temperature prior to use after cold storage. 12. If this product does not operate normally, see TROUBLE SHOOTING on page 23. If you cannot resolve the problem, or if the product is damaged, refer to the LENOXX WARRANTY INFORMATION on page 26. Opening or removing covers may expose you to dangerous voltages or other risks. Incorrect re-assembly can cause electric shock when the appliance is subsequently used. SAVE THESE INSTRUCTIONS 2 550110998 E V.4 LOCATION OF CONTROLS 4 3 2 5 6 7 8 1 9 10 11 12 13 14 21 20 19 18 17 16 15 27 22 23 24 1. 2. 3. 4. 5. 6. 7. 8. 9. 10. 11. 12. 13. 14. 15. 16. 17. 18. 19. 20. 21. 22. 23. 24. 25. 26. 27. 26 25 Comfortable Rounded Handset - for comfortable use during long calls. View Button - shows you the new calls only. New Call Indicator - flashes when new calls have come in. Reset Hole - to reset your phone (behind the Display Panel). Delete Button - erases an individual record or all records from the Caller ID Memory, also used to accept time, date, area code during initial setup. Dial Button - calls the number currently displayed. Visual Display Panel - shows the callers name and/or number, incoming calling time & date, and call counter. Up / Down Buttons - press to review all calls received. Contrast Control - allows you to adjust the contrast of the display. One-touch Speed Dial Memory Buttons - to store numbers into memory. Ringer On / Off Switch - turns off ringer for undisturbed privacy. Tone / Pulse Switch - select the desired dialing mode. Store Button - used for storing numbers in the Speed Dial Memory locations. Speakerphone Volume Control - adjusts volume of speaker on Speakerphone. Redial (Pause) Button - get a new dial tone, then press this button to dial the last phone number (useful if line is busy). Hold Button - with indicator allows you to put line on hold. Speakerphone Indicator - lights during Speakerphone use. Speakerphone Button - uses for hands-free dialing and answering. Speakerphone Microphone Telephone Number Index - write down numbers that you stored into memory. Dialing Buttons - to dial numbers manually or to dial numbers to be stored in memory. Battery Compartment - place 4 size AA alkaline batteries inside. Line Cord Jack - insert one end of the telephone line cord here when connecting the telephone. DC Jack - used with an optional AC adaptor (not included). Hook Switch - press down to release the line, hold it down and then release it to get a new dial tone or for call waiting. Coiled Cord Jack - Insert Coiled Cord from Handset here. Handset Clip - holds the Handset in place when the telephone is mounted on a wall. 550110998 E V.4 3 INTRODUCTION Congratulations for purchasing a Lenoxx Sound telephone. Your new PH-550 Caller ID Speakerphone has all the features of a 20 memory telephone plus hands-free dialing and call answering. Your PH-550 is an advanced telephone and will give you years of great service, you only have to change the batteries when the display gets dim. The Caller ID section shows you who is calling before you answer the phone, allows you to screen calls or avoid harassing calls. It will also show you who called with the time and date even if you are not at home. Some of the features of your PH-550 are : SPEAKERPHONE - Allows you to make or answer phone calls hands-free, so that you can type and talk at the same time, or your whole family can take part in the conversation. 20 ONE-TOUCH SPEED DIAL BUTTONS - For quick dialing of frequently dialed numbers. 70 NAME & NUMBER CALLER ID DISPLAY WITH AUTOMATIC TIME & DATE DISPLAY SETTING (Caller ID service needs to be set up by your phone company) - see page 6 WHAT IS CALLER ID? CALLER ID CALL BACK - Calls back the phone number of a person who has called you on the telephone. HOLD BUTTON WITH LED INDICATOR - When a caller is placed on hold, your handset can be hung up without disconnecting the call. The call can be resumed later. The HOLD LED indicator lights steadily when a call is placed on hold. LAST NUMBER REDIAL - Useful if line is busy - just get a new dial tone and press the Redial button. DELETE BUTTON - Allows you to delete one or all Caller ID messages. Also used to enter Setup information. REVIEW UP & DOWN BUTTONS - Allows you to easily scroll through all the incoming calls - new calls or old calls. NEW CALL / MESSAGE WAITING LED - The LED will flash with new calls and will turn off once you have reviewed all your call records and waiting messages. CALLER ID MEMORY DIAL - Allows you to store and dial a phone number from Caller ID memory automatically. CLOCK DISPLAY - Current time and date of day will be displayed. The clock is automatically set and adjusted by the incoming calling data which is provided by your telephone company through subscription. Also you can set up the clock and date manually. WALL OR DESK USABLE - No special hardware needed, all cords and wall mount adaptor included. TONE/PULSE SWITCHABLE - Suitable for computerized call directing and phone-banking, also works on older Rotary phone systems. FULLY MODULAR JACKS - For easy plug-in installation. HANDSET CLIP - If you decide to have your phone placed in the wall mount position, the Handset Clip can be pulled out, turned around and reinserted so that it allows the Handset to hang into the base. VOLUME CONTROL - Controls the volume of the Speakerphone. HEARING AID COMPATIBLE - Lets you use the telephone with hearing aids that have a T (telephone) switch. MULTI-LANGUAGE - Allows you to select English, French or Spanish as desired. This set has been designed for easy, plug-in installation. However, household telephone wiring can vary considerably. We suggest you carefully read this instruction manual before operating this set. NOTE : FOR PROPER OPERATION, YOUR TELEPHONE REQUIRES 4 SIZE AA ALKALINE BATTERIES (NOT INCLUDED). YOUR SALES RECEIPT You will need your sales receipt should you ever need warranty service. You should also save the packing material if you want to move or ship this set. 4 550110998 E V.4 INTRODUCTION CAUTION : This product is an electrical device and can be hazardous if immersed in water. To avoid the possibility of electric shock, do not use it while in the bathtub or shower or when you are wet. If you accidentally drop it into water, first unplug its cord from the modular jack, then remove the equipment from the water. Avoid using this telephone during electrical storms in your immediate area. Even though your telephone company may be using protective measures to limit electrical surges from entering your home, absolute protection from lightning is impossible. CHECK LIST As you unpack this set, make sure you have: Coiled Handset Cord Short Straight Wall Cord for Wall Mounting Straight Telephone Line Cord Wall Mount Adaptor (Attach to the back of the base for wall mounting) Telephone Base Handset 5 550110998 E V.4