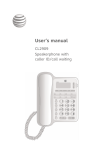
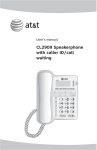
1
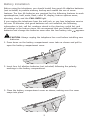
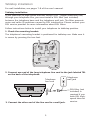
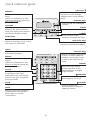
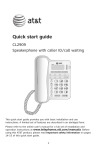
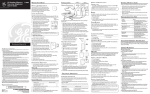
Quick start guide
CL2909 Speakerphone
with caller ID/call
waiting
LOWER
Make sure to install four
AA alkaline batteries
(not included).
STOP!
See page 2 for easy
instructions.
If you subscribe to high-speed Internet service (DSL - digital subscriber
line) through your telephone line, you must install a DSL filter between the
telephone line cord and the telephone wall jack (see page 3). The filter
prevents noise and caller ID problems caused by DSL interference. Please
contact your DSL service provider for more information about DSL filters.
Your product may be shipped with a protective sticker covering the telephone
base display - remove it before use.
For customer service or product information, visit our website at
www.telephones.att.com or call 1 (800) 222-3111. In Canada, dial
1 (866) 288-4268.
CAUTION: To reduce the risk of fire or injury to persons or damage to
the telephone, read and follow these instructions carefully:
. Use only four AA alkaline batteries (not included).
. Dispose of these batteries in a safe manner. Do not burn or puncture. Like
other batteries of this type, if burned or punctured, they could release
caustic material which could cause injury.
3. Do not open or mutilate the battery. Released electrolyte is corrosive and
may cause damage to the eyes or skin. It may be toxic if swallowed.
. Exercise care in handling batteries in order not to create a short circuit. Do
not allow conductive materials such as rings, bracelets, or keys to touch
the battery. The battery or conductor may overheat and cause harm.
. Use the battery identified for use with this product only in accordance with
the instructions and limitations specified in this manual.
6. Observe proper polarity orientation between the battery and metallic
contacts.
7. Do not disassemble your telephone. There are no serviceable parts inside.
Refer to qualified service personnel for servicing.
Battery installation
Before using the telephone, you should install four good AA alkaline batteries
(not included) to provide memory backup and enable the use of some
features. The four AA batteries are required for the following features to work:
speakerphone, hold, mute, flash, caller ID, display, feature options menu,
directory, clock, and the CALL INFO light.
If you unplug the telephone from the wall jack, or you lose telephone service
for over 10 minutes, and good batteries are not installed, the following
information is lost: call list, numbers stored in the directory, redial list, and
all settings in the feature menu. We recommend that you initially install new
batteries and change the batteries soon after the low battery icon
appears.
CAUTION: Always unplug the telephone line cord before installing new
batteries.
. Press down on the battery compartment cover tabs as shown and pull to
open the battery compartment cover.
. Insert four AA alkaline batteries (not included) following the polarity
markings in the battery compartment.
3. Close the battery compartment cover as shown, making sure the cover
snaps into place.
Tabletop installation
For wall installation, see pages 7-8 of the user’s manual.
Tabletop installation
If you subscribe to high-speed Internet service (DSL - digital subscriber line)
through your telephone line, you must install a DSL filter (not included)
between the telephone base and the telephone wall jack. The filter prevents
noise and caller ID problems caused by DSL interference. Please contact your
DSL service provider for more information about DSL filters.
Follow instructions below to install your telephone to tabletop position.
1. Check the mounting bracket.
The telephone’s mounting bracket is positioned for tabletop use. Make sure it
is secure by pressing the two feet.
2. Connect one end of the long telephone line cord to the jack labeled TEL
on the back of the telephone.
Telephone
Telephone
wall jack
line cord
TEL
DATA
3. Connect the other end of the line cord to a wall jack.
DSL filter (not
included) is
required if you
have DSL highspeed Internet
service.
Tabletop installation
4. Connect the handset to the telephone.
Plug the coiled handset cord into the handset jack on the left side of the
telephone base. Plug the other end of the coiled cord into the handset, then
return the handset to the base.
LOWER
5. Check for dial tone.
Lift the handset and listen for a dial tone. If you cannot hear a dial tone,
press VOLUME . If you still do not hear a dial tone, see the Troubleshooting
section on pages 30-32 of the user’s manual.
Your telephone will work immediately after installation using the default
feature settings (see default settings of the Feature summary on page 14 in
the user’s manual).
NOTE: If you subscribe to caller ID services from your local telephone
service provider, you must follow the instructions in Set home area code (see
page 11 of the user’s manual), for your telephone to properly recognize and
dial calls from the call history list. You may also need to check Set local area
code (see page 12 of the user’s manual) if you want the telephone to
recognize multiple area codes.
Quick reference guide
CALL LIST
REMOVE
Press to review call history
records or scroll through
options when in the feature
menu.
DISPLAY DIAL
Press to delete the displayed
entry.
When the telephone is idle,
press and hold to remove all
call history entries.
Press to dial the displayed
number.
OPTIONS
CLEAR
Press to display the menu.
When in the menu, press to
save your setting and advance
to the next feature setting.
Press to return to idle mode.
LOWER
LOWER
DIRECTORY
Press to enter the directory.
When in directory, press to exit
and return to idle mode.
Press to enter lower
locations of speed dial keys.
Speed dial keys
Press to display the numbers
stored in speed dial locations.
PROG
Dial pad keys
Press to save numbers in
speed dial locations.
REDIAL
Press to redial the last number
dialed.
When the telephone is idle,
press and hold to delete the
last number dialed.
LOWER
With the handset lifted, press
to dial a number. With the
handset on the base, press
to search the directory by
name.
RINGER
Slide the ringer switch
on the right side of the
telephone base to adjust
ringer volume.
FLASH
During a call, press to receive
an incoming call if you
subscribe to the call waiting
service from your telephone
service provider.
SPEAKER
Press to turn the base
speakerphone on or off.
HOLD
VOLUME
Press to place a call on hold.
Press to adjust the
speakerphone or handset
listening volume.
MUTE
Press to mute the handset or
speakerphone microphone;
press again to resume
conversation.
www.telephones.att.com
© 2009-2010 Advanced American Telephones. All Rights Reserved.
AT&T and the AT&T logo are trademarks of AT&T Intellectual Property licensed to
Advanced American Telephones, San Antonio, TX 78219.
Printed in China. Issue 5 AT&T 03/10.