1
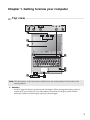
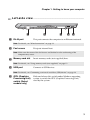
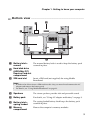
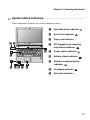
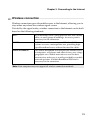
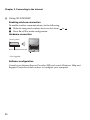
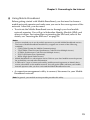
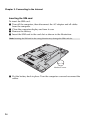
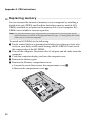
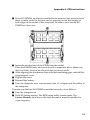
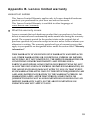
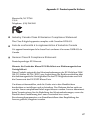
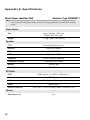
IdeaPad V360 User Guide V1.0 ©Lenovo China 2010 New World. New Thinking.TM www.lenovo.com P/N: 147003271 Printed in China Read the safety notices and important tips in the included manuals before using your computer. Notes • Before using the product, be sure to read Lenovo Safety and General Information Guide first. • Some instructions in this guide may assume that you are using Windows® 7. If you are using other Windows operating system, some operations may be slightly different. If you are using other operating systems, some operations may not apply to you, and thus shouldn't affect your use of this computer. • The features described in this guide are common to most models. Some features may not be available on your computer and/or your computer may include features that are not described in this user guide. If your product is not working correctly, DO NOT RETURN IT TO THE STORE. For technical assistance, contact a Lenovo support specialist 24 hours a day by calling toll free 1-877-4 LENOVO (1-877-453-6686). First Edition (March 2010) © Copyright Lenovo 2010. LENOVO products, data, computer software, and services have been developed exclusively at private expense and are sold to governmental entities as commercial items as defined by 48 C.F.R. 2.101 with limited and restricted rights to use, reproduction and disclosure. LIMITED AND RESTRICTED RIGHTS NOTICE: If products, data, computer software, or services are delivered pursuant a General Services Administration “GSA” contract, use, reproduction, or disclosure is subject to restrictions set forth in Contract No. GS-35F-05925. Additionally, you can find support information and updates on the Lenovo Web site located at http://consumersupport.lenovo.com. * Only for the users from the United States. Contents Chapter 1. Getting to know your computer................................... 1 Chapter 4. OneKey Rescue system.....................................26 Top view ..........................................1 Left-side view .................................3 Right-side view...............................4 Bottom view ....................................5 Appendix A. CRU instructions...28 Chapter 2. Learning the basics..... 6 First use............................................6 Using AC adapter and battery .....8 Using the touchpad......................10 Using the keyboard......................11 Connecting external devices.......13 Switching GPU (Select models only) ...............................................15 Special keys and buttons.............16 System status indicators..............17 Securing your computer..............18 Chapter 3. Connecting to the Internet.................................... 19 OneKey Rescue system ............... 26 Replacing the battery .................. 28 Replacing the hard disk drive.... 29 Replacing memory....................... 32 Appendix B. Lenovo limited warranty ..................................35 Warranty information ................. 41 Appendix C. Product specific Notices ....................................44 Energy star information.............. 44 Electronic emissions notices....... 46 Appendix D. Specifications ...50 Index ........................................51 Wired connection .........................19 Wireless connection .....................21 i Chapter 1. Getting to know your computer Top view --------------------------------------------------------------------------------------------------- d e f j k a b c i h g f Note: The illustrations in this manual may differ from the actual product. Please refer to the actual product. Attention: • Do NOT open the display panel beyond 130 degree. When closing the display panel, be careful NOT to leave pens or any other objects in between the display panel and the keyboard. Otherwise, the display panel may be damaged. 1 Chapter 1. Getting to know your computer a Integrated camera (Select models only) b Wireless module antennas Use the camera for video communication. The built-in antennas ensure optimal reception of wireless radio. c Computer display The LCD display with LED backlight provides brilliant visual output. d Power button Press this button to turn on the computer. e OneKey Rescue system button Press this button to open OneKey Rescue system (If OneKey Rescue system has been preinstalled) when the computer is powered off. Note: For details, see “OneKey Rescue system” on page 26. f System status indicators g Touchpad For details, see “System status indicators” on page 17. The touchpad functions as a conventional mouse. Note: For details, see “Using the touchpad” on page 10. h Fingerprint reader (Select models only) i Built-in microphone With the fingerprint reader you can register fingerprints and use them as passwords to secure your computer. j Volume buttons Use these buttons to adjust volume. k Lenovo Security Suite button Press this button to get access to the Security Suite. 2 The built-in microphone (with noise reduction) can be used for video conferencing, voice narration, or simple audio recordings. Chapter 1. Getting to know your computer Left-side view -------------------------------------------------------------------------------------- a a RJ-45 port b c d e This port connects the computer to an Ethernet network. Note: For details, see “Wired connection” on page 19. b Fan louvers Dissipate internal heat. Note: Make sure that none of the fan louvers are blocked or else overheating of the computer may occur. c Memory card slot Insert memory cards (not supplied) here. Note: For details, see “Using memory cards (not supplied)” on page 13 d USB port Connects to USB devices. Note: For details, see “Connecting a universal serial bus (USB) device” on page 14. e GPU (Graphics Processing Unit) switch (Select models only) Slide and release this switch under Windows operating system to switch the GPU (Graphics Processing Unit) used by the system. 3 Chapter 1. Getting to know your computer Right-side view ---------------------------------------------------------------------------------d a b c e f g h i Use this switch to turn on/off the wireless radio of all wireless devices on your computer. b Integrated wireless device switch Microphone jack c Headphone jack Connects to external headphones. a Connects to external microphones. Attention: • Listening to music at high volume over extended periods of time may damage your hearing. d USB ports Connects to USB devices. Note: For details, see “Connecting a universal serial bus (USB) device” on page 14. e eSATA/USB combo port Connects to eSATA or USB devices. Note: For details, see “Connecting a universal serial bus (USB) device” on page 14. f HDMI port Connects to devices with HDMI input such as a TV or a display. g VGA port Connects to external display devices. h AC power adapter Connect the AC adapter here. jack Note: For details, see “Using AC adapter and battery” on page 8. i Kensington slot Attach a security lock (not supplied) here. Note: For details, see “Attaching a security lock (not supplied)” on page 18. 4 Chapter 1. Getting to know your computer Bottom view -----------------------------------------------------------------------------------------c e a f b g d a Battery latch manual The manual battery latch is used to keep the battery pack secured in place. b Hard disk drive (HDD)/Mini PCI Express Card slot compartment Insert a SIM card (not supplied) for using Mobile c SIM card slot Broadband. Notes: • In order to be able to insert a SIM card into this slot, you must first disconnect the AC adapter and remove the battery pack. • For details, see “Using Mobile Broadband” on page 23. d Speakers The stereo speakers provide rich and powerful sound. e Battery pack For details, see “Using AC adapter and battery” on page 8. f Battery latch spring loaded The spring-loaded battery latch keeps the battery pack secured in place. g Memory compartment Houses the computer's memory modules. 5 Chapter 2. Learning the basics First use ------------------------------------------------------------------------------------------------------ Reading the manuals Read the supplied manuals before using your computer. Conncting to the power The supplied battery pack is not fully charged at purchase. To charge the battery and begin using your computer, insert the battery pack and connect the computer to an electrical outlet. The battery is automatically charged while the computer is running on AC power. Installing the battery pack Refer to the supplied Setup Poster to install the battery pack. Connecting the computer to an electrical outlet 1 Connect the power cord to the AC adapter. 2 Connect the AC adapter to the AC power adapter jack of the computer firmly. 3 Plug the power cord into an electrical outlet. Turning on the computer Press the power button to turn on the computer. Configuring the operating system You may need to configure the operating system when it is first used. The configuration process may include the procedures below. • Accepting the end user license agreement • Configuring the Internet connection • Registering the operating system • Creating a user account 6 Chapter 2. Learning the basics Putting your computer into sleep state or shutting it down When you finish working with your computer, you can put it into sleep state or shut it down. Putting your computer into sleep state If you will be away from your computer for only a short time, put the computer into sleep state. When the computer is in sleep state, you can quickly wake it to resume use, and bypass the startup process. To put the computer into sleep state, do one of the following. • Click and select Sleep from the Start menu. • Press Fn + F1. • Note: Wait until the power indicator light starts blinking (indicating that the computer is in sleep state) before you move your computer. Moving your computer while the hard disk is spinning can damage the hard disk, causing loss of data. To wake the computer, do one of the following. • Press the power button. • Press any key on the keyboard. Shutting down your computer If you are not going to use your computer for a day or two, shut it down. To shut down your computer, click and select Shut down from the Start menu. 7 Chapter 2. Learning the basics Using AC adapter and battery --------------------------------------------------------- Checking battery status You can determine the percentage of battery power remaining by checking the battery icon in the notification area. Note: As each computer user has different habits and needs, it is difficult to predict how long a battery charge will last. There are two main factors: • The amount of energy stored in the battery when you commence work. • The way you use your computer: for example, how often you access the hard disk drive and how bright you make the computer display. Charging the battery When you find that the battery power is low, you need to charge the battery or replace it with a fully charged one. You need to charge the battery in any of the following situations: • When you purchase a new battery • If the battery status indicator starts blinking • If the battery has not been used for a long time Notes: • You are advised to insert the battery pack when using your computer to prevent small particles from entering the inside of your computer. • To increase the life of the battery pack, the computer does not start recharging the battery immediately after it drops from fully charged. • Charge the battery at a temperature between 50 °F and 86 °F (10 °C-30 °C). • Full charge or discharge is not required. 8 Chapter 2. Learning the basics Removing the battery pack If you are not going to use the computer for an extended period of time, or if you need to send your computer to Lenovo for service, etc. remove the battery pack from the computer. Before removing the battery pack, make sure the computer has been shut down. Handling the battery If the rechargeable battery pack is replaced with an incorrect type, there may be danger of an explosion. The battery pack contains a small amount of harmful substances. To avoid possible injury and detriment to the environment, pay attention to the following points: • Replace only with a battery of the type recommended by Lenovo. • Keep the battery pack away from fire. • Do not expose the battery pack to water or rain. • Do not attempt to disassemble the battery pack. • Do not short-circuit the battery pack. • Keep the battery pack away from children. • Do not put the battery pack in trash that is disposed of in landfills. When disposing of the battery, comply with local ordinances or regulations and your company’s safety standards. 9 Chapter 2. Learning the basics Using the touchpad ------------------------------------------------------------------------------- a b c a Touchpad To move the cursor on the screen, slide your fingertip over the pad in the direction in which you want the cursor to move. b Left click button The function corresponds to that of the left mouse button on a conventional mouse. c Right click button The function corresponds to that of the right mouse button on a conventional mouse. Notes: • You can enable/disable the touchpad using Fn+F6. • When the touchapad indicator is lit, the touchpad is disabled. 10 Chapter 2. Learning the basics Using the keyboard ------------------------------------------------------------------------------Your computer has a numeric keypad and function keys incorporated in its standard keyboard. Numeric keypad The keyboard has keys that, when enabled, work as a 10-key numeric keypad. To enable or disable the numeric keypad, press Fn+F8 . Note: The NumLk indicator will light on if the numeric keypad is enabled. Function key combinations Through the use of the function keys, you can change operational features instantly. To use this function, press and hold Fn a ; then press one of the function keys b . b a 11 Chapter 2. Learning the basics The following describes the features of each function key. 12 Fn + Esc: Turn on/off the integrated camera. Fn + F1: Enter sleep mode. Fn + F2: Turn on/off the backlight of the LCD screen. Fn + F3: Open the interface for switching the display mode. Fn + F4: Open the interface for display resolution settings. Fn + F5: Open the interface for integrated wireless devices settings (On/Off). Fn + F6: Enable/Disable the touchpad. Fn + F8: Enable/Disable the numeric keypad. Fn + F9: Activate the pause function. Fn + F10: Activate the break function. Fn + F11: Enable/Disable the Scroll Lock. Fn + F12: Activate the insert function. Fn + PrtSc: Activate the System Request. Fn + ↑ / ↓: Increase/Decrease display brightness. Fn + → / ←: Increase/Decrease volume level. Chapter 2. Learning the basics Connecting external devices -----------------------------------------------------------Your computer has a wide range of built-in features and connection capabilities. Using memory cards (not supplied) Your computer supports the following types of memory cards: • Secure Digital (SD) card • MultiMediaCard (MMC) • xD-Picture Card (xD) • Memory Stick PRO (MS PRO) • Secure Digital Pro (SD PRO) Notes: • Insert ONLY one card in the slot at a time. • This card reader does not support SDIO devices (e.g., SDIO Bluetooth, etc.). Inserting a memory card 1 Push the dummy card until you hear a click. Gently pull the dummy card out of the memory card slot. Note: The dummy card is used for preventing dust and small particles from entering the inside of your computer when the memory card slot is not in use. Retain the dummy card for future use. 2 Slide the memory card in until it clicks into place. Removing a memory card 1 Push the memory card until you hear a click. 2 Gently pull the memory card out of the memory card slot. Note: Before removing the memory card, disable it via Windows safely remove hardware and eject media utility to avoid data corruption. 13 Chapter 2. Learning the basics Connecting a universal serial bus (USB) device Your computer comes with three USB ports and an eSATA/USB port compatible with USB devices. Note: When using a high power consumption USB device such as USB ODD, use the external device’s power adapter. Otherwise, the device may not be recognized, and system shut down may result. Connecting a Bluetooth device (Select models only) If your computer has an integrated Bluetooth adapter card, it can connect to and transfer data wirelessly to other Bluetooth enabled devices, such as notebook computers, PDAs and cell phones. You can transfer data between these devices without cables and up to 10 meters range in open space. Note: The actual maximum range may vary due to interference and transmission barriers. To get the best possible connection speed, place the device as near your computer as possible. Enabling Bluetooth communications 1 Slide the integrated wireless device switch from to . 2 Press Fn + F5 to make configuration. Notes: • When you do not need to use the Bluetooth function, turn it off to save battery power. • You need to pair the Bluetooth enabled device with your computer before you can transfer data between them. Read the documentation supplied with the Bluetooth enabled device for details on how to pair the device with your computer. 14 Chapter 2. Learning the basics Switching GPU (Select models only) ------------------------------------------Some IdeaPad models support Switchable Graphics. With this technology, you have the flexibility to switch between a dedicated Nvidia® GPU* (increased-performance GPU) and an integrated Intel GPU (power-saving GPU), without restarting the Windows operating system. *GPU is short for graphics processing unit. Note: The dedicated Nvidia GPU provides you with superior graphics performance while the energy-efficient integrated graphics provides longer operation with the battery. You can to switch to the high-performance GPU to gain the best graphics performance. However, when the computer is using battery power you are advised to switch to the power-saving GPU if you are not running graphics-intensive applications. To change the GPU, do the following: 1 Start your computer in the Windows operating system. If the computer is in sleep or hibernation mode, press the power button to wake it up. Note: Do not try to change the GPU when the computer is in sleep or hibernation mode. 2 Slide and release the GPU switch on the left side of your computer. A dialog box might appear to inform you of the change in the GPU. Note: During the switch, the computer display may appear differently for several seconds. 15 Chapter 2. Learning the basics Special keys and buttons ------------------------------------------------------------------- a b c d e OneKey Rescue system button ( a ) • When the computer is powered-off, press this button to enter the OneKey Rescue system if Lenovo OneKey Rescue system has been preinstalled. • In Windows operating system, press this button to start Lenovo OneKey Recovery. Note: For details, see “OneKey Rescue system” on page 26. Volume buttons ( b ~ d ) b Mute/Unmute c Volume down d Volume up Lenovo Security Suite button ( e ) Lenovo Security Suite can protect your computer from unauthorized access, which may otherwise lead to privacy leakage or data theft. 16 Chapter 2. Learning the basics System status indicators -------------------------------------------------------------------These indicators inform you of the computer status. a b i c a Hard disk drive indicator b Scroll lock indicator c Caps lock indicator d GPU (graphics processing unit) switch indicator e Power status indicator f Battery status indicator g Wireless communication indicator d e f g h h Touchpad indicator i Num lock indicator 17 Chapter 2. Learning the basics Securing your computer --------------------------------------------------------------------This section provides information about how to help protect your computer from theft and unauthorized use. Attaching a security lock (not supplied) You can attach a security lock to your computer to help prevent it from being removed without your permission. For details on installing the security lock, please refer to the instructions shipped with the security lock that you have purchased. Refer to the “Right-side view” on page 4 for the location of the Kensington slot. Notes: • Before purchasing any security product, verify that it is compatible with this type of security keyhole. • You are responsible for evaluating, selecting, and implementing the locking devices and security features. Lenovo offers no comment judgement or warranty regarding the function, quality or performance of locking devices and security features. Using passwords Using passwords helps prevent your computer from being used by others. Once you set a password and enable it, a prompt appears on the screen each time you power on the computer. Enter your password at the prompt. The computer cannot be used unless you enter the correct password. Note: This password can be from one to seven alphanumeric characters in any combination. For details about how to set the password, see the Help to the right of the screen in BIOS setup utility. Note: To enter BIOS setup utility, press F2 when the Lenovo logo appears on the screen while the computer is starting up. Fingerprint reader With the fingerprint reader, in addition to registering fingerprint information and using it as a password for Windows operating system or Web site logon, you can also launch applications quickly and encrypt private data with your fingerprint to secure your computer. For more details on fingerprint reader, see the Help file of your software. 18 Chapter 3. Connecting to the Internet As a global network, the Internet connects computers worldwide, providing services such as e-mailing, information searching, electronic commerce, Web browsing and entertainment. You can connect the computer to the Internet in the following ways: Wired connection: use physical wiring to connect. Wireless network technology: connect without wiring. Wired connection ----------------------------------------------------------------------------Wired connections are a reliable and safe way to connect the computer to the Internet. Cable Cable Internet services use a cable modem connected to the residential cable TV line. DSL DSL is a family of related technologies that bring highspeed network access to homes and small businesses over ordinary telephone lines. 19 Chapter 3. Connecting to the Internet Hardware connection: Cable DSL Telephone line TV cable Splitter * * Splitter * DSL modem * Cable modem * * * * * Not supplied. Note: The above diagrams are for reference only. Actual connection method may vary. Software configuration Consult your Internet Service Provider (ISP) for details on how to configure your computer. 20 Chapter 3. Connecting to the Internet Wireless connection---------------------------------------------------------------------------Wireless connections provide mobile access to the Internet, allowing you to stay online anywhere the wireless signal covers. Divided by the signal scales, wireless connection to the Internet can be built based on the following standards. Wi-Fi Wi-Fi networks cover a small physical area, like a home, office, or small group of buildings. An access point is necessary for the connection. WiMAX WiMAX networks connect several Wireless LAN systems to cover a metropolitan area, providing highspeed broadband access without the need for cables. Mobile Broadband The Mobile Broadband network provides Internet access to computers, cell phones and other devices over a large geographic area. Mobile networks are used for data transmission, and access is usually provided by a mobile network operator. A Mobile Broadband SIM card is necessary for the connection. Note: Your computer may not support all wireless connection methods. 21 Chapter 3. Connecting to the Internet Using Wi-Fi/WiMAX Enabling wireless connection To enable wireless communications, do the following: 1 Slide the integrated wireless device switch from 2 Press Fn + F5 to make configuration. to . Hardware connection Access point * Wi-Fi/WiMAX network * Not supplied Software configuration Consult your Internet Service Provider (ISP) and search Windows Help and Support Center for details on how to configure your computer. 22 Chapter 3. Connecting to the Internet Using Mobile Broadband Before getting started with Mobile Broadband, you first need to choose a mobile network operator and make sure you are in the coverage area of the network. After that, you also need: • To activate the Mobile Broadband service through your local mobile network operator. You will get a Subscriber Identity Module (SIM) card after activation. For instructions on inserting the SIM card, refer to For details, see “Inserting the SIM card” on page 24. Notes: • Various standards are in use by mobile operators to provide Mobile Broadband services. The Lenovo Mobile Broadband module may support one or more of the following standards: GSM (Global System for Mobile Communications) TD-SCDMA (Time Division-Synchronous Code Division Multiple Access) SCDMA (Synchronous Code Division Multiple Access) EV-DO (Evolution Data Optimized) HSPA (High Speed Packet Access) • Mobile Broadband is a subscription service. Refer to your local mobile network operator for availability, cost and other information. • A SIM card is a type of smart card used by mobile network operators to identify their service subscribers on the mobile network. You will get the SIM card from your mobile network operator after you have activated the Mobile Broadband service. • A connection management utility to connect/disconnect to your Mobile Broadband network. Note: In general, your mobile service provider provides this utility. 23 Chapter 3. Connecting to the Internet Inserting the SIM card To insert the SIM card: 1 Turn off the computer; then disconnect the AC adapter and all cables from the computer. 2 Close the computer display and turn it over. 3 Remove the battery. 4 Insert the SIM card in the card slot as shown in the illustration. Note: Inserting the SIM card in the wrong direction may damage the SIM card slot. Notched Corner 5 Put the battery back in place. Turn the computer over and reconnect the cables. 24 Chapter 3. Connecting to the Internet Removing the SIM card To remove the SIM card: 1 Turn off the computer, then disconnect the AC adapter and all cables from the computer. 2 Close the computer display and turn it over. 3 Remove the battery. 4 Push the SIM card in until you hear a click, and then pull the SIM card out. 5 Put the battery back in place. Turn the computer over and reconnect the cables. Note: Never insert or remove the SIM card while the computer is on. Doing so may cause permanent damage to the SIM card as well as the SIM card reader. 25 Chapter 4. OneKey Rescue system OneKey Rescue system --------------------------------------------------------------------- Introduction The Lenovo OneKey Rescue system is an easy-to-use application that can be used to back up the data on your system partition (C drive) for easy restore when required. You can run Lenovo OneKey Recovery under the Windows operating system, and the OneKey Rescue system without starting the Windows operating system. Attention: In order to utilize the features of the OneKey Rescue system, your hard disk already includes a hidden partition by default to store the system image file and OneKey Rescue system program files. This default partition is hidden for security reasons and is the reason the available disk space is less than it claims. The exact available hard disk space depends on the file size of the mirror image file (based on the size of operating system and preinstalled software). Using Lenovo OneKey Recovery (within Windows operating system) In Windows operating system, double click the OneKey Recovery system Icon on the desktop to launch Lenovo OneKey Recovery. Within the program, you can back up the system partition on the hard disk drive, other storage devices, or by creating recovery discs. Notes: • The backup process and creation of recovery discs may take some time, connect the AC adapter and battery pack to your computer. • After the recovery discs are burned, please number them so that you can use them in the correct order. • Computers without an integrated optical drive support the creation of recovery discs; however an appropriate external optical drive is needed to physically create the recovery discs. For more instructions, see the Help file of Lenovo OneKey Recovery. 26 Chapter 4. OneKey Rescue system Using Lenovo OneKey Rescue system (without Windows operating system) In the event that the operating system cannot be loaded, follow the steps below to access OneKey Rescue system. • Shut down your computer. • Press the key to launch OneKey Rescue system. Within the program, you can choose to restore your system partition to the original factory status, or to a previously generated backup. Note: The recovery process is irreversible. Make sure to back up any critical data before using the recovery feature. 27 Appendix A. CRU instructions Replacing the battery ------------------------------------------------------------------Note: Use only the battery provided by Lenovo. Any other battery could ignite or explode. To replace the battery, do the following: 1 Turn off the computer, or enter hibernation mode. Disconnect the AC adapter and all cables from the computer. 2 Close the computer display, and turn the computer over. 3 Unlock the manual battery latch a . Holding the spring-loaded battery latch in the unlocked position b , remove the battery pack in the direction shown by the arrow c . b 1 a c 4 Install a fully charged battery. 5 Slide the manual battery latch to the locked position. 6 Turn the computer over again. Connect the AC adapter and the cables to the computer again. 28 Appendix A. CRU instructions Replacing the hard disk drive ----------------------------------------------You can increase the storage capacity of your computer by replacing the hard disk drive with one of greater capacity. You can purchase a new hard disk drive from your reseller or Lenovo marketing representative. Notes: • Replace the hard disk drive only if you upgrade it or have it repaired. The connectors and bay of the hard disk drive were not designed for frequent changes, or drive swapping. • The preinstalled softwares are not included on an optional hard disk drive. Handling a hard disk drive • Do not drop the drive or subject it to physical shocks. Put the drive on a material, such as soft cloth, that absorbs the physical shock. • Do not apply pressure to the cover of the drive. • Do not touch the connector. The drive is very sensitive. Incorrect handling can cause damage and permanent loss of data on the hard disk. Before removing the hard disk drive, make a backup copy of all the information on the hard disk, and then turn the computer off. Never remove the drive while the system is operating, in sleep mode, or in hibernation mode. 29 Appendix A. CRU instructions To replace the hard disk drive, do the following: 1 Turn off the computer; then disconnect the AC adapter and all cables from the computer. 2 Close the computer display, and then turn the computer over. 3 Remove the battery pack. 4 Remove the Hard disk drive (HDD)/Mini PCI Express Card slot compartment cover. a.Loosen the screws that secure the compartment cover a . b.Remove the compartment cover b . a b 5 Remove the frame fixing screw c . c 30 Appendix A. CRU instructions 6 Pull the tab in the direction shown by arrow a . a 7 Take out the hard disk drive secured in a metal frame b . b 8 Remove the screws and detach the metal frame from the hard disk drive. 9 Attach the metal frame to a new hard disk drive and tighten the screws. 0 Put the hard disk drive gently into the hard disk drive bay with the tab facing upwards and the connectors facing each other; then push it firmly into space. A Reinstall the frame fixing screw. B After aligning the attachment clips with their matching gaps, reinstall the compartment cover. C Tighten the screws. D Reinstall the battery pack. E Turn the computer over again. Connect the AC adapter and the cables to the computer again. 31 Appendix A. CRU instructions Replacing memory -------------------------------------------------------------------------You can increase the amount of memory in your computer by installing a double data rate (DDR3) small outline dual inline memory module (SODIMM)-available as an option-in the memory slot of your computer. SODIMMs are available in various capacities. Note: Use only the memory types supported by your computer. If you incorrectly install optional memory, or install an unsupported memory type, a warning beep will sound when you try to start the computer. To install an SO-DIMM, do the following: 1 Touch a metal table or a grounded metal object to reduce any static electricity in your body, which could damage the SO-DIMM. Do not touch the contact edge of the SO-DIMM. 2 Turn off the computer. Disconnect the AC adapter and all cables from the computer. 3 Close the computer display, and turn the computer over. 4 Remove the battery again. 5 Remove the Memory compartment cover. a.Loosen the screw that secures the compartment cover a . b.Remove the compartment cover b . a b 32 Appendix A. CRU instructions 6 If two SO-DIMMs are already installed in the memory slot, remove one of them to make room for the new one by pressing out on the latches on both edges of the socket at the same time. Be sure to save the old SODIMM for future use. b 7 8 9 0 A a a a a b Insert the notched end of the DIMM into the socket. Press the DIMM firmly, and pivot it until it snaps into place. Make sure that it is firmly fixed in the slot and does not move easily. After aligning the attachment clips with their matching gaps, reinstall the compartment cover. Tighten the screw. Reinstall the battery. Turn the computer over, and reconnect the AC adapter and the cables to the computer. To make sure that the SO-DIMM is installed correctly, do as follows: 1 Turn the computer on. 2 Hold F2 during startup. The BIOS setup utility screen opens. The System Memory item shows the total amount of memory installed in your computer. 33 Appendix A. CRU instructions The following table provides a list of CRUs (Customer Replaceable Units) for your computer, and informs you of where to find replacement instructions. Setup Poster 34 AC adapter O Power cord for AC adapter O Battery O User Guide O Bottom access doors O Hard disk drive O Memory O Appendix B. Lenovo limited warranty L505-0010-01 04/2008 This Lenovo Limited Warranty applies only to Lenovo branded hardware products you purchased for your own use and not for resale. This Lenovo Limited Warranty is available in other languages at www.lenovo.com/warranty. What this warranty covers Lenovo warrants that each hardware product that you purchase is free from defects in materials and workmanship under normal use during the warranty period. The warranty period for the product starts on the original date of purchase specified on your sales receipt or invoice unless Lenovo informs you otherwise in writing. The warranty period and type of warranty service that apply to your product are designated below under the section titled “Warranty information”. THIS WARRANTY IS YOUR EXCLUSIVE WARRANTY AND REPLACES ALL OTHER WARRANTIES OR CONDITIONS, EXPRESS OR IMPLIED, INCLUDING, BUT NOT LIMITED TO, THE IMPLIED WARRANTIES OR CONDITIONS OF MERCHANTABILITY AND FITNESS FOR A PARTICULAR PURPOSE. SOME STATES OR JURISDICTIONS DO NOT ALLOW THE EXCLUSION OF EXPRESS OR IMPLIED WARRANTIES, SO THE ABOVE EXCLUSION MAY NOT APPLY TO YOU. IN THAT EVENT, SUCH WARRANTIES APPLY ONLY TO THE EXTENT REQUIRED BY LAW AND ARE LIMITED IN DURATION TO THE WARRANTY PERIOD. NO WARRANTIES APPLY AFTER THAT PERIOD. SOME STATES OR JURISDICTIONS DO NOT ALLOW LIMITATIONS ON HOW LONG AN IMPLIED WARRANTY LASTS, SO THE ABOVE LIMITATION ON DURATION MAY NOT APPLY TO YOU. 35 Appendix B. Lenovo limited warranty How to obtain warranty service If the product does not function as warranted during the warranty period, you may obtain warranty service by contacting Lenovo or an approved service provider. Each of them is referred to as a “Service Provider.” A list of Service Providers and their telephone numbers is available at www.lenovo.com/support/phone. Warranty service may not be available in all locations and may differ from location to location. Charges may apply outside a Service Provider’s normal service area. Contact a local Service Provider for location-specific information. What your service provider will do to correct problems When you contact a Service Provider, you must follow the problem determination and resolution procedures specified. Your Service Provider will attempt to diagnose and resolve your problem over the telephone, e-mail or through remote assistance. Your Service Provider may direct you to download and install designated software updates. Some problems can be resolved with a replacement part that you can install yourself called a “Customer Replaceable Unit” or “CRU.” If so, your Service Provider will ship the CRU to you to install. If your problem cannot be resolved over the telephone or remotely, through your application of software updates or the installation of a CRU by you, your Service Provider will arrange for service under the type of warranty service designated for the product under the section titled “Warranty information”. If your Service Provider determines that it is unable to repair your product, your Service Provider will replace it with one that is at least functionally equivalent. If your Service Provider determines that it is unable to either repair or replace your product, your sole remedy is to return the product to your place of purchase or to Lenovo for a refund of your purchase price. 36 Appendix B. Lenovo limited warranty Replacement of a product or part When the warranty service involves the replacement of a product or part, the replaced product or part becomes Lenovo’s property and the replacement product or part becomes your property. Only unaltered Lenovo products and parts are eligible for replacement. The replacement product or part provided by Lenovo may not be new, but it will be in good working order and at least functionally equivalent to the original product or part. The replacement product or part shall be warranted for the balance of the period remaining on the original product. Before your Service Provider replaces a product or part, you agree to: 1 remove all features, parts, options, alterations, and attachments not under warranty service; 2 ensure that the product or part is free of any legal obligations or restrictions that prevent its replacement; and 3 obtain authorization from the owner to have your Service Provider service a product or part if you do not own it. Your additional responsibilities Where applicable, before service is provided, you agree to: 1 follow the service request procedures that your Service Provider specifies; 2 backup or secure all programs and data contained in the product; 3 provide your Service Provider with all system keys or passwords and sufficient, free, and safe access to your facilities to perform service; and 4 ensure that all information about identified or identifiable individuals (“Personal Data”) is deleted from the product or that, with respect to any Personal Data that you did not delete, you are in compliance with all applicable laws. 37 Appendix B. Lenovo limited warranty Use of personal information If you obtain service under this warranty, Lenovo will store, use and process information about your warranty service and your contact information, including name, phone numbers, address, and e-mail address. Lenovo will use this information to perform service under this warranty and to improve our business relationship with you. We may contact you to inquire about your satisfaction regarding our warranty service or to notify you about any product recalls or safety issues. In accomplishing these purposes, we may transfer your information to any country where we do business and may provide it to entities acting on our behalf. We may also disclose it where required by law. What this warranty does not cover This warranty does not cover the following: • uninterrupted or error-free operation of a product; • loss of, or damage to, your data; • any software programs, whether provided with the product or installed subsequently; • failure or damage resulting from misuse, accident, modification, unsuitable physical or operating environment, natural disasters, power surges, or improper maintenance by you; • damage caused by a non-authorized service provider; • failure of, or damage caused by, any third party products, including those that Lenovo may provide or integrate into the Lenovo product at your request; and • any technical or other support, such as assistance with “how-to” questions and those regarding product set-up and installation. This warranty is voided by removal or alteration of identification labels on the product or its parts. 38 Appendix B. Lenovo limited warranty Limitation of liability Lenovo is responsible for loss or damage to your product only while it is: 1) in your Service Provider’s possession; or 2) in transit in those cases where the Service Provider is responsible for the transportation. Neither Lenovo nor your Service Provider is responsible for any of your data including confidential, proprietary, or personal data contained in a product. You should remove and/or backup all such information from the product prior to its service or return. Circumstances may arise where, because of a default on Lenovo’s part or other liability, you may be entitled to recover damages from Lenovo. In each such instance, regardless of the basis of your claim against Lenovo (including breach, negligence, misrepresentation, or other contract or tort claim), except and to the extent that liability cannot be waived or limited by applicable laws, Lenovo shall not be liable for more than the amount of actual direct damages suffered by you, up to the amount you paid for the product. This limit does not apply to damages for bodily injury (including death) and damage to real property or tangible personal property for which Lenovo is liable under law. This limit also applies to Lenovo’s suppliers, resellers, and your Service Provider. It is the maximum amount for which Lenovo, its suppliers, resellers, and your Service Provider are collectively responsible. UNDER NO CIRCUMSTANCES SHALL LENOVO, ITS SUPPLIERS, RESELLERS, OR SERVICE PROVIDERS BE LIABLE FOR ANY OF THE FOLLOWING EVEN IF INFORMED OF THEIR POSSIBILITY: 1) THIRD PARTY CLAIMS AGAINST YOU FOR DAMAGES; 2) LOSS OR DAMAGE TO YOUR DATA; OR 3) SPECIAL, INCIDENTAL, INDIRECT OR CONSEQUENTIAL DAMAGES, INCLUDING LOST PROFITS, BUSINESS REVENUE, GOODWILL OR ANTICIPATED SAVINGS. AS SOME STATES OR JURISDICTIONS DO NOT ALLOW THE EXCLUSION OR LIMITATION OF INCIDENTAL OR CONSEQUENTIAL DAMAGES, THE ABOVE LIMITATION OR EXCLUSION MAY NOT APPLY TO YOU. 39 Appendix B. Lenovo limited warranty Dispute resolution If you acquired the product in Cambodia, Indonesia, Philippines, Vietnam or Sri Lanka, disputes arising out of or in connection with this warranty shall be finally settled by arbitration held in Singapore and this warranty shall be governed, construed and enforced in accordance with the laws of Singapore, without regard to conflict of laws. If you acquired the product in India, disputes arising out of or in connection with this warranty shall be finally settled by arbitration held in Bangalore, India. Arbitration in Singapore shall be held in accordance with the Arbitration Rules of Singapore International Arbitration Center (“SIAC Rules”) then in effect. Arbitration in India shall be held in accordance with the laws of India then in effect. The arbitration award shall be final and binding on the parties without appeal. Any award shall be in writing and set forth the findings of fact and the conclusions of law. All arbitration proceedings, including all documents presented in such proceedings, shall be conducted in the English language, and the English language version of this warranty prevails over any other language version in such proceedings. Other rights THIS WARRANTY GIVES YOU SPECIFIC LEGAL RIGHTS AND YOU MAY HAVE OTHER RIGHTS WHICH VARY FROM STATE TO STATE OR JURISDICTION TO JURISDICTION. YOU MAY ALSO HAVE OTHER RIGHTS UNDER APPLICABLE LAW OR WRITTEN AGREEMENT WITH LENOVO. NOTHING IN THIS WARRANTY AFFECTS STATUTORY RIGHTS, INCLUDING RIGHTS OF CONSUMERS UNDER NATIONAL LEGISLATION GOVERNING THE SALE OF CONSUMER GOODS THAT CANNOT BE WAIVED OR LIMITED BY CONTRACT. European Economic Area (EEA) Customers in the EEA may contact Lenovo at the following address: EMEA Service Organisation, Lenovo (International) B.V., Floor 2, Einsteinova 21, 851 01, Bratislava, Slovakia. Service under this warranty for Lenovo hardware products purchased in EEA countries may be obtained in any EEA country in which the product has been announced and made available by Lenovo. 40 Appendix B. Lenovo limited warranty Warranty information -----------------------------------------------------------------------------------Product or machine type Country or region of purchase Warranty period Type of warranty service Taiwan, Korea 3, 4 Singapore 1, 3, 4 India, China (Hong Kong S.A.R.), China (Macau S.A.R.) notebook: 20058, 0911 Indonesia, Malaysia, Thailand, Philippines, Vietnam, South Africa, France, United states of America, Canada, Mexico, Argentina, Brazil, Austria, Belgium, Denmark, Finland, Germany, Israel, Ireland, Italy, Netherlands, Norway, Spain, Sweden, Switzerland, UK, Lithuania, Latvia, Croatia, Egypt, Greece, Romania, Saudi Arabia, UAE, Cyprus, Slovenia, Estonia, Luxembourg, Iceland, Colombia, Peru, Venezuela, Bolivia, Uruguay, Chile, Paraguay, Ecuador, BosniaHerzegovina, Macedonia, Serbia,Poland, Hungary, Slovakia, Bulgaria, Czech Republic parts and labor - 1 year battery pack - 1 year 1, 4 Australia, New Zealand, Japan 1, 3 Russia, Ukraine, the republic of Kazakhstan, Sri Lanka, Belarus 4 Turkey parts and labor - 2 years battery pack - 1 year 1, 4 If required, your Service Provider will provide repair or exchange service depending on the type of warranty service specified for your product and the available service. Scheduling of service will depend upon the time of your call, parts availability, and other factors. 41 Appendix B. Lenovo limited warranty Types of warranty service 1 Customer Replaceable Unit (“CRU”) Service Under CRU Service, your Service Provider will ship CRUs to you for installation by you. CRU information and replacement instructions are shipped with your product and are available from Lenovo at any time upon request. CRUs that are easily installed by you are called Self-service CRUs, while Optional-service CRUs may require some technical skill and tools. Installation of Self-service CRUs is your responsibility. You may request that a Service Provider install Optional-service CRUs under one of the other types of warranty service designated for your product. An optional service offering may be available for purchase from Lenovo to have Lenovo install Self-service CRUs for you. You may find a list of CRUs and their designation in the publication that ships with your product or at www.lenovo.com/CRUs. The requirement to return a defective CRU, if any, will be specified in the materials shipped with a replacement CRU. When return is required: 1) return instructions, a prepaid return shipping label, and a container will be included with the replacement CRU; and 2) you may be charged for the replacement CRU if your Service Provider does not receive the defective CRU within thirty (30) days of your receipt of the replacement. 2 On-site Service Under On-Site Service, your Service Provider will either repair or exchange the product at your location. You must provide a suitable working area to allow disassembly and reassembly of the Lenovo product. For some products, certain repairs may require your Service Provider to send the product to a designated service center. 3 Courier or Depot Service Under Courier or Depot Service, your product will be repaired or exchanged at a designated service center, with shipping arranged by your Service Provider. You are responsible for disconnecting the product. A shipping container will be provided to you for you to return your product to a designated service center. A courier will pick up your product and deliver it to the designated service center. Following its repair or exchange, the service center will arrange the return delivery of the product to you. 42 Appendix B. Lenovo limited warranty 4 Customer Carry-In or Mail-In Service Under Customer Carry-In or Mail-In Service, your product will be repaired or exchanged at a designated service center, with delivery or shipping arranged by you. You are responsible to deliver or mail, as your Service Provider specifies, (prepaid by you unless specified otherwise) the product, suitably packaged to a designated location. After the product has been repaired or exchanged, it will be made available for your collection. Failure to collect the product may result in your Service Provider disposing of the product as it sees fit. For Mail-in Service, the product will be returned to you at Lenovo’s expense, unless your Service Provider specifies otherwise. 5 Product Exchange Service Under Product Exchange Service, Lenovo will ship a replacement product to your location. You are responsible for its installation and verification of its operation. The replacement product becomes your property in exchange for the failed product, which becomes the property of Lenovo. You must pack the failed product in the shipping carton used to ship the replacement product and return it to Lenovo. Transportation charges, both ways, are paid by Lenovo. Failure to use the carton in which the replacement product was received may result in your responsibility for damage to the failed product during shipment. You may be charged for the replacement product if Lenovo does not receive the failed product within thirty (30) days of your receipt of the replacement product. 43 Appendix C. Product specific Notices The notices in this appendix are specific to the product with the given MT number. Notices that are common for most Lenovo products are included in “Appendix A. Notice” of the Lenovo Safety and General Information Guide. Energy star information ------------------------------------------------------------- ENERGY STAR® is a joint program of the U.S. Environmental Protection Agency and the U.S. Department of Energy aimed at saving money and protecting the environment through energy efficient products and practices. Lenovo® is proud to offer our customers products with an ENERGY STAR compliant designation. Lenovo computers of the following machine types, if the ENERGY STAR mark is affixed, have been designed and tested to conform to the ENERGY STAR 5.0 program requirements for computers. • 20058 • 0911 By using ENERGY STAR compliant products and taking advantage of the power-management features of your computer, you reduce the consumption of electricity. Reduced electrical consumption contributes to potential financial savings, a cleaner environment, and the reduction of greenhouse gas emissions. For more information about ENERGY STAR, visit http://www.energystar.gov. Lenovo encourages you to make efficient use of energy an integral part of your day-to-day operations. To help in this endeavor, Lenovo has preset the following power-management features to take effect when your computer has been inactive for a specified duration: 44 Appendix C. Product specific Notices Table 1. ENERGY STAR power-management features, by operating system Windows® 7 Power plan: Energy Star •Turn off the display: After 10 minutes •Put the computer to sleep: After 25 minutes •Advanced power settings: - Turn off hard disks: After 20 minutes - Hibernate: After 1 hour To awaken your computer from a sleep mode, press any key on your keyboard. For more information about these settings, refer to your Windows Help and Support information system. 45 Appendix C. Product specific Notices Electronic emissions notices -----------------------------------------------The following information refers to Lenovo IdeaPad V360, machine type 20058, 0911. Federal Communications Commission (FCC) Statement This equipment has been tested and found to comply with the limits for a Class B digital device, pursuant to Part 15 of the FCC Rules. These limits are designed to provide reasonable protection against harmful interference in a residential installation. This equipment generates, uses, and can radiate radio frequency energy and, if not installed and used in accordance with the instructions, may cause harmful interference to radio communications. However, there is no guarantee the interference will not occur in a particular installation. If this equipment does cause harmful interference to radio or television reception, which can be determined by turning the equipment off and on, the user is encouraged to try to correct the interference by one or more of the following measures: • Reorient or relocate the receiving antenna. • Increase the separation between the equipment and receiver. • Connect the equipment into an outlet on a circuit different from that to which the receiver is connected. • Consult an authorized dealer or service representative for help. Properly shielded and grounded cables and connectors must be used in order to meet FCC emission limits. Proper cables and connectors are available from Lenovo authorized dealers. Lenovo is not responsible for any radio or television interference caused by using other than recommended cables or connectors or by unauthorized changes or modifications to this equipment. Unauthorized changes or modifications could void the user’s authority to operate the equipment. This device complies with Part 15 of the FCC Rules. Operation is subject to the following two conditions: (1) this device may not cause harmful interference, and (2) this device must accept any interference received, including interference that may cause undesired operation. Responsible party: Lenovo (United States) Incorporated 1009 Think Place - Building One 46 Appendix C. Product specific Notices Morrisville, NC 27560 U.S.A. Telephone: (919) 294-5900 Industry Canada Class B Emission Compliance Statement This Class B digital apparatus complies with Canadian ICES-003. Avis de conformité à la réglementation d’Industrie Canada Cet appareil numérique de la classe B est conforme à la norme NMB-003 du Canada. German Class B Compliance Statement Deutschsprachiger EU Hinweis: Hinweis für Geräte der Klasse B EU-Richtlinie zur Elektromagnetischen Verträglichkeit Dieses Produkt entspricht den Schutzanforderungen der EU-Richtlinie 2004/ 108/EG (früher 89/336/EWG) zur Angleichung der Rechtsvorschriften über die elektromagnetische Verträglichkeit in den EU-Mitgliedsstaaten und hält die Grenzwerte der EN 55022 Klasse B ein. Um dieses sicherzustellen, sind die Geräte wie in den Handbüchern beschrieben zu installieren und zu betreiben. Des Weiteren dürfen auch nur von der Lenovo empfohlene Kabel angeschlossen werden. Lenovo übernimmt keine Verantwortung für die Einhaltung der Schutzanforderungen, wenn das Produkt ohne Zustimmung der Lenovo verändert bzw. wenn Erweiterungskomponenten von Fremdherstellern ohne Empfehlung der Lenovo gesteckt/eingebaut werden. 47 Appendix C. Product specific Notices Deutschland: Einhaltung des Gesetzes über die elektromagnetische Verträglichkeit von Betriebsmittein Dieses Produkt entspricht dem “Gesetz über die elektromagnetische Verträglichkeit von Betriebsmitteln” EMVG (früher “Gesetz über die elektromagnetische Verträglichkeit von Geräten”). Dies ist die Umsetzung der EU-Richtlinie 2004/108/EG (früher 89/336/EWG) in der Bundesrepublik Deutschland. Zulassungsbescheinigung laut dem Deutschen Gesetz über die elektromagnetische Verträglichkeit von Betriebsmitteln, EMVG vom 20. Juli 2007 (früher Gesetz über die elektromagnetische Verträglichkeit von Geräten), bzw. der EMV EG Richtlinie 2004/108/EC (früher 89/336/EWG), für Geräte der Klasse B. Dieses Gerät ist berechtigt, in Übereinstimmung mit dem Deutschen EMVG das EG-Konformitätszeichen - CE - zu führen. Verantwortlich für die Konformitätserklärung nach Paragraf 5 des EMVG ist die Lenovo (Deutschland) GmbH, Gropiusplatz 10, D-70563 Stuttgart. Informationen in Hinsicht EMVG Paragraf 4 Abs. (1) 4: Das Gerät erfüllt die Schutzanforderungen nach EN 55024 und EN 55022 Klasse B. 48 Appendix C. Product specific Notices European Union Compliance Statement Class B Compliance European Union - Compliance to the Electromagnetic Compatibility Directive This product is in conformity with the protection requirements of EU Council Directive 2004/108/EC on the approximation of the laws of the Member States relating to electromagnetic compatibility. Lenovo cannot accept responsibility for any failure to satisfy the protection requirements resulting from a nonrecommended modification of the product, including the installation of option cards from other manufacturers. This product has been tested and found to comply with the limits for Class B Information Technology Equipment according to European Standard EN 55022. The limits for Class B equipment were derived for typical residential environments to provide reasonable protection against interference with licensed communication devices. Properly shielded and grounded cables and connectors must be used in order to reduce the potential for causing interference to radio and TV communications and to other electrical or electronic equipment. Such cables and connectors are available from Lenovo authorized dealers. Lenovo cannot accept responsibility for any interference caused by using other than recommended cables and connectors. 49 Appendix D. Specifications Model Name: IdeaPad V360 Machine Type 20058/0911 Note: The following specifications may contain technical inaccuracies or typographical errors. Lenovo reserves the right to improve and/or change specifications at any time without notice. Form Factor Size Weight Appr. 326 mm × 224 mm Depth: 20.8~28.6 mm 1.75 kg (with 6 cell battery) System CPU Memory Intel Calpella Processor DDR3 SO-DIMM LCD 13.3" HD LED HDD 2.5", 9.5mm HDD Keyboard Integrated Camera Battery AC Adapter 6-row Lenovo Keyboard 1.3 mega pixel camera 6 cell 48 Wh 20 V 65 W I/O Ports USB Communication USB 2.0 port × 3, eSATA/USB port × 1 RJ-45 port Audio Headphone/Mic-in Jack Video HDMI port Memory card slot 5 in 1 slot × 1 (SD/SD PRO/MMC/MS PRO/xD) Others Kensington slot 50 Yes Index A AC adapter O OneKey Rescue System button .. 26 Using............................................................ 8 P B Password Battery Using ..........................................................18 Charging ..................................................... 8 Bluetooth Connecting .............................................. 14 C S Security ......................................................... 18 T Camera ......................................................2, 12 Card reader ................................................13 Touchpad .................................................... 10 F W Function key combinations ...........11 Warranty information ....................... 41 K Keyboard Using.......................................................... 11 L Lenovo Limited Warranty ..............35 M Microphone Built-in ........................................................ 2 N Notice Electronic emissions ....................... 44, 46 51 Notes • Before using the product, be sure to read Lenovo Safety and General Information Guide first. • Some instructions in this guide may assume that you are using Windows® 7. If you are using other Windows operating system, some operations may be slightly different. If you are using other operating systems, some operations may not apply to you, and thus shouldn't affect your use of this computer. • The features described in this guide are common to most models. Some features may not be available on your computer and/or your computer may include features that are not described in this user guide. If your product is not working correctly, DO NOT RETURN IT TO THE STORE. For technical assistance, contact a Lenovo support specialist 24 hours a day by calling toll free 1-877-4 LENOVO (1-877-453-6686). First Edition (March 2010) © Copyright Lenovo 2010. LENOVO products, data, computer software, and services have been developed exclusively at private expense and are sold to governmental entities as commercial items as defined by 48 C.F.R. 2.101 with limited and restricted rights to use, reproduction and disclosure. LIMITED AND RESTRICTED RIGHTS NOTICE: If products, data, computer software, or services are delivered pursuant a General Services Administration “GSA” contract, use, reproduction, or disclosure is subject to restrictions set forth in Contract No. GS-35F-05925. Additionally, you can find support information and updates on the Lenovo Web site located at http://consumersupport.lenovo.com. * Only for the users from the United States. IdeaPad V360 User Guide V1.0 ©Lenovo China 2010 New World. New Thinking.TM www.lenovo.com P/N: 147003271-1.1 Printed in China Read the safety notices and important tips in the included manuals before using your computer.