1
Lorem Ipsum
Leica ES2
Leica EZ4
Leica EZ4 HD
Manual
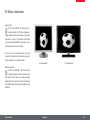
Congratulations!
You have just purchased a Leica E Series stereomicroscope - an excellent choice! The Leica E
series is perfectly suited for practical instruction in schools and universities as well as for
routine tasks in the laboratory and industrial
production and testing. Viewing entire objects
under magnification imparts perspectives and
discoveries that would not be possible with the
naked eye.
Leica E Series
In developing our stereomicroscopes, we have
placed great emphasis on simple, self-explanatory operation. However, please take the time
to read the instruction manual and the notes on
operating safety, to learn about all the features
and capabilities of your instrument so that
you can use it safely and to its best advantage.
Should you have any questions, please consult
your local Leica representative. We are gladly at
your service!
Manual
2
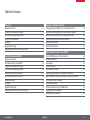
Chapter Overview
Safety and Use
6
Leica ES2
10
Leica EZ4 and Leica EZ4 HD
18
Eyepieces (only for Leica EZ4)
29
Photography Using the Leica EZ4 HD
37
The Camera Menu
51
Care and Transport
62
Specifications
64
Dimensions
67
Leica E Series
Manual
3
Table of Contents
Leica ES2
Overview: Leica ES2
Transport, Placement and Storage
The Correct Interpupillary Distance
Using the LED illuminator
Focusing
Magnification Display
Adjusting the Resistance of the Focus Drive
11
12
13
14
15
16
17
Eyepieces (only for Leica EZ4)
Changing Eyepieces (Only for Leica EZ4, Open Version)
Eyepieces and Eyecups (Only for Leica EZ4, Open Version)
Dioptric Correction (Only for Leica EZ4, Open Version)
Graticules (Only for Leica EZ4, Open Version)
Graticules: Preparation
Inserting the Graticules
30
31
32
34
35
36
Photography Using the Leica EZ4 HD
Leica EZ4 HD: Overview of the instrument
General Instructions
Introduction
Standard delivery
HD mode and PC mode
Capturing Images without a Computer in HD Mode
High-resolution Video Display without a Computer (HD mode)
PC Mode: Use with a Computer
PC Mode: Limitations
PC Mode: Additional Use of a HDMI Device
Configuring the White Balance
Restoring Factory Settings
38
39
40
41
42
43
45
46
47
48
49
50
Leica EZ4 and Leica EZ4 HD
Overview: Leica EZ4
Instrument variant: Leica EZ4 HD
Transport, Placement and Storage
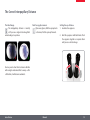
The Correct Interpupillary Distance
Switching on the LED Illuminator
Controlling the Automatic Shutoff
Illumination types
Focusing
Magnification Display
Adjusting the Resistance of the Focus Drive
19
20
21
22
23
24
25
26
27
28
Leica E Series
Manual
4
Contents (Continued)
The Camera Menu
Optional Remote Control
Viewing Images and Movies with the Optional Remote Control
Calling up the Camera Menu
COLOR (Automatic White Balance)
COLOR (Manual White Balance)
EXPOSURE
RESOLUTION
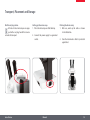
SETUP CAMERA (Camera Settings)
SETUP USER (User-defined Settings)
Predefined Illumination Scenarios
52
53
54
55
56
57
58
59
60
61
Care and Transport
Care and Transport
63
Specifications
Camera Module
65
Dimensions
Leica ES2
Leica EZ4 HD
Leica EZ4, 10× Eyepieces
Leica EZ4 without Eyepieces
68
70
72
74
Leica E Series
Manual
5
Safety and Use
Leica E Series
Manual
6
Safety Notes
Before installing, operating or using the
instrument, it is mandatory to read this
user manual. In particular, please observe all
safety instructions.
The "Safety Concept" brochure contains additional safety information regarding service work,
requirements and the handling of the microscope, accessories as well as general safety instructions.
You can combine individual system articles with
articles from external suppliers. Please read the
user manual and the safety requirements of the
supplier.
To maintain the unit in its original condition
and to ensure safe operation, the user must
follow the instructions and warnings contained
in these user manuals.
Leica E Series
Warning of a danger
This symbol indicates especially important information that is mandatory to
read and observe. Failure to follow these instructions may pose hazards to personnel, cause
instrument malfunctions or damage the instrument.
Hazardous electrical voltage
This symbol indicates especially important information that is mandatory to
read and observe. Failure to follow these instructions may pose hazards to personnel, cause
instrument malfunctions or damage the instrument.
EC Declaration of Conformity
Electrically operated accessories are constructed based on the state of the art of technology
and are provided with an EC Declaration of
Conformity.
Contact address
Leica Microsystems (Switzerland) Ltd.
Industry Division
Max Schmidheiny Strasse 201
CH-9435 Heerbrugg (Switzerland)
Important information
This symbol indicates additional information or explanations that intend to
provide clarity.
Manual
7
Instructions for Use
Intended use
The E Series microscopes are optical instruments for improving the visibility of objects
through magnification and illumination. It is
used for observing and documenting.
Interference
Avoid large temperature fluctuations, direct
sunlight and vibrations. These conditions
can distort measurements and micrographic
images.
Handling electrical components
Never install any other plug (NEMA
5-15P) or unscrew any mechanical
components unless expressly instructed to do
so in the instructions.
Place of use
Use
the
instrument
in
enclosed,
dust-free
rooms
at
+10 °C
to
+40 °C only. Protect it from oil, chemicals and
extreme humidity. It must be at least 10 cm
from the wall and away from flammable substances.
In warm and warm-damp climatic zones,
individual components require
special care in order to prevent the build-up of
fungus.
The microscope must be connected to a
grounded outlet.
Leica E Series
the
Use in clean rooms
Leica E Series microscopes can be used in clean
rooms without any problems.
Manual
Always position the microscope so that
you can disconnect it from the power
supply at any time. The power cable is provided
as the power disconnect device.
8
Instructions for Use (Continued)
Intervention from the user
The microscopes of the E Series contain
no components that can be maintained
or repaired by the user. Exceptions are mentioned specifically in this manual.
Unless otherwise specified in this
manual, repair and service work may
be carried out by authorized Leica technicians
only.
Unauthorized alterations to the instrument or noncompliant use shall void all
rights to any warranty claims.
Leica E Series
Maintenance
Leica E Series microscopes are basically
maintenance-free. To ensure that it
always operates safely and reliably, we recommend that you take the precaution of contac-
ting the responsible service organization. Here
you can arrange for periodic inspections and
conclude a maintenance contract (recommended).
Danger of infection
Direct contact with eyepieces is a potential transmission method for bacterial
and viral infections of the eye. The risk can be
kept to a minimum by using personal eyepieces
for each individual or detachable eyecups.
Accessories
Only those accessories may be used that are
listed in this user manual or for which safe use
has been confirmed by Leica Microsystems.
Manual
9
Leica ES2
Leica E Series
Manual
10
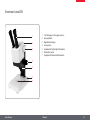
Overview: Leica ES2
1
2
3
1
2
3
4
5
6
7
10× fixed eyepieces for eyeglass wearers
Carrying handle
Two-level magnification changer 10× and 30×
Focusing drive
Integrated LED incident light illumination
Integrated LED transmitted illumination
Switch for incident and transmitted light
4
5
6
7
Leica E Series
Manual
11
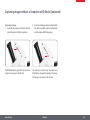
Transport, Placement and Storage
Built-in carrying device
All Leica E Series microscopes are equipped with a carrying handle for convenient and safe transport.
Leica E Series
Setting up the microscope
1. Place the microscope on a flat tabletop.
2. Connect the power supply to a grounded
socket.
Manual
Packing the device away
1. After use, wind up the cable as shown
in the illustration.
2. Store the instrument so that it is protected
against dust.
12
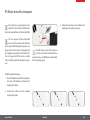
The Correct Interpupillary Distance
The Ideal Image
The interpupillary distance is correctly
set if you see a single circular image field
when looking at a specimen.
✗
Note for eyeglass wearers
If you wear glasses, fold the eyecups back
– otherwise, fold the eyecups forwards.
Setting the eye distance
1. Look into the eyepieces.
2. Hold the eyepieces with both hands. Push
the eyepieces together or separate them
until you see a circular image.
✓
You may need a short time to become familiar
with using the instrument. Not to worry—after
a little while, it will become automatic.
Leica E Series
Manual
13
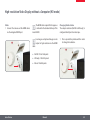
Using the LED illuminator
Iluminating the specimen
1. Position a specimen in the middle of the
baseplate.
Tips on use
ϘϘ Use incident light for plastic, opaque
objects.
2. Switch the two LED illuminators on or off as
desired.
ϘϘ
Use transmitted light for transmitted light
specimens or transparent objects.
ϘϘ
Use the combination of both LED illuminators for partially transparent objects.
After switching off, the LEDs remain lit for
about another 4 seconds.
Leica E Series
Manual
14
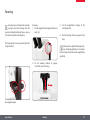
Focusing
Focusing raises and lowers the stereomi-
croscope using the focusing drive. The
specimen is brought into sharp focus as soon as
it is in the focal point of the objective.
Focusing
1. Set the magnification changer to the lowest
level (10).
3. Set the magnification changer to the
second level (30).
4. Use the focusing drive once again for fine
focus.
The focusing drive can be operated either leftor right-handed.
ness at high magnification, it is maintaiAfter you have adjusted the image sharp-
ned even if you switch to a lower magnification
(parfocal).
2. Set the working distance to approx.
100 mm for coarse focusing.
Focusing drive torque
Leica E Series
Manual
15
Magnification Display
tion on the right-hand rotary knob of the
You can read the configured magnifica-
Leica ES2. The additional magnification provided by the eyepieces is already incorporated in
the scale.
Leica E Series
Manual
16
Adjusting the Resistance of the Focus Drive
Adjusting the resistance
Is the focusing drive too easy or too difficult
to adjust? No problem - the resistance can be
adjusted individually depending on your personal preferences:
1. Grip the drive knobs with both hands and
turn them towards each other until the
desired resistance is reached during focusing.
Leica E Series
Manual
17
Leica EZ4 and Leica EZ4 HD
Leica E Series
Manual
18
Overview: Leica EZ4
1
2
3
1
2
3
4
5
6
7
10x fixed eyepieces for eyeglass wearers
Carrying handle
Magnification changer
Focusing drive
Integrated LED incident light illumination
Illumination control
Integrated LED transmitted illumination
4
5
6
7
Leica E Series
Manual
19
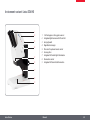
Instrument variant: Leica EZ4 HD
1
2
3
4
5
6
1
2
3
4
5
6
7
8
9
10x fixed eyepieces for eyeglass wearers
Integrated digital camera with SD card slot
Carrying handle
Magnification changer
IR receiver for optional remote control
Focusing drive
Integrated LED incident light illumination
Illumination control
Integrated LED transmitted illumination
7
8
9
Leica E Series
Manual
20
Transport, Placement and Storage
Built-in carrying device
All Leica E Series microscopes are equipped with a holder for convenient and
safe transport.
Leica E Series
Setting up the microscope
1. Place the microscope on a flat tabletop.
2. Connect the power supply to a grounded
socket.
Manual
Packing the device away
1. After use, wind up the cable as shown
in the illustration.
2. Store the instrument so that it is protected
against dust.
21
The Correct Interpupillary Distance
The Ideal Image
The interpupillary distance is correctly
set if you see a single circular image field
when looking at a specimen.
✗
Note for eyeglass wearers
If you wear glasses, fold the eyecups back
– otherwise, fold the eyecups forwards.
Setting the eye distance
1. Look into the eyepieces.
2. Hold the eyepieces with both hands. Push
the eyepieces together or separate them
until you see a circular image.
✓
You may need a short time to become familiar
with using the instrument. Not to worry—after
a little while, it will become automatic.
Leica E Series
Manual
22
Switching on the LED Illuminator
Automatic shutoff
If the illumination is not operated for 60
minutes, it switches off automatically.
The illumination can be reactivated by pressing
a button on the membrane keypad.
LED illumination
1. Position a specimen in the middle of the
baseplate.
Leica E Series
2. Switch the two LED illuminators on or off as
desired:
ϘϘ
Use incident light for plastic, opaque
objects
ϘϘ
Use transmitted light for transmitted light
specimens or transparent objects.
ϘϘ
Use the combination of both LED illuminators for partially transparent objects.
Manual
tor, refer to page 25.
For a detailed description of the illumina-
23
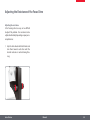
Controlling the Automatic Shutoff
Automatic shutoff
The factory settings of the EZ4 models
switch the instrument off automatically
after one hour without user interaction. This
automatic shutoff helps to conserve the lightemitting diodes and save energy.
Leica E Series
Disabling the automatic shutoff
To disable the automatic shutoff, follow these
steps:
1. Switch the microscope off.
Enabling the automatic shutoff
To re-enable the automatic shutoff, follow
these steps:
1. Switch the microscope off.
2. Press and hold the
and
buttons on
the light control unit simultaneously while
you switch on the microscope.
2. Press and hold the
and
buttons on
the light control unit simultaneously while
you switch on the microscope.
The LEDs flash twice slowly and then remain
switched on. The automatic shutoff is now disabled.
The LEDs flash three times slowly and then
remain switched on. The automatic shutoff is
now re-enabled.
Manual
24
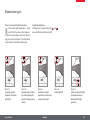
Illumination types
Three-level incident light illumination
The incident light illumination is made
up of 5 LEDs. Two, three or five diodes are
switched on depending on the level. Accordingly, the angle of incidence of the light beam
on the object is switched from high to low.
Press 1×
Five diodes: greatest
brightness for incident
light objects
Leica E Series
Regulating brightness
The brightness is adjusted using the
keys and affects all switched-on LEDs.
Press 2×
Top three diodes: shadowless uniform lighting for
objects with highly uneven
surfaces
Press 3×
Two diodes: side light
emphasizes structures and
increases the contrast
Manual
and
Press 4×
Incident light off
Press 1×
Switch on transmitted light
for transparent objects
and transmitted light
specimens.
25
Focusing
Focusing raises and lowers the stereomi-
croscope using the focusing drive. The
specimen is brought into sharp focus as soon as
it is in the focal point of the objective.
Focusing
1. Set the magnification changer to the lowest
level (8).
3. Set the magnification changer to the
second level (35).
4. Use the focusing drive once again for fine
focus.
The focusing drive can be operated either leftor right-handed.
ness at high magnification, it remains
After you have adjusted the image sharp-
constant even if you switch magnification levels
(parfocal).
2. Set the working distance to approx.
100 mm for coarse focusing.
Focusing drive torque
Leica E Series
Manual
26
Magnification Display
tion on the right-hand rotary knob of the
You can read the configured magnifica-
Leica EZ4 models. The additional magnification
provided by the eyepieces is already incorporated in the scale
Leica EZ4 models with open tubes
On the EZ4 model without eyepieces,
only the magnification factors of the
magnification changer are indicated: 0.8, 1,
1.25, 1.6, 2, 2.5, 3, 3.5.
ble depending on which eyepieces are
Different total magnifications are possi-
used with the EZ4. The magnification of the
eyepieces is indicated on their outer surfaces,
e.g. 10×/20, 16×/16 or 20×/12.
Leica E Series
Manual
27
Adjusting the Resistance of the Focus Drive
Adjusting the resistance
Is the focusing drive too easy or too difficult
to adjust? No problem - the resistance can be
adjusted individually depending on your personal preferences:
1. Grip the drive knobs with both hands and
turn them towards each other until the
desired resistance is reached during focusing.
Leica E Series
Manual
28
Eyepieces (only for
Leica EZ4)
Leica E Series
Manual
29
Changing Eyepieces (Only for Leica EZ4, Open Version)
Changing eyepieces
Various eyepieces are available for the Leica
EZ4, allowing the stereomicroscope to be adapted even better to the specific requirements.
The following eyepieces are available for selection:
ϘϘ Eyepieces replaceable, fixed or adjustable:
10×/20, 16×/16 or 20×/12
ϘϘ
Eyepieces for eyeglass wearers 10×/20B
and 16×/15B, fixed and adjustable
Adjustable eyepieces for eyeglasses with straight
eyecups.
The interchangeable eyepieces also offer the
following advantages:
ϘϘ
The dioptric range is adjustable from +5 to
–5
ϘϘ
Measurement graticules can be used, see
page 34 and the following.
Leica E Series
Manual
30
Eyepieces and Eyecups (Only for Leica EZ4, Open Version)
Eyecups
The eyecups can be replaced.
Risk of infection
Direct contact with eyepieces is a potential transmission method for bacterial
and viral infections of the eye. The risk can be
minimized by the use of individual eyecups.
Eyeglass eyepiece with
adjustable diopter and straight
eyecups
Leica E Series
Manual
Eyepiece for users who do not
wear eyeglasses with adjustable
diopter and inclined eyecup
Fixed eyepiece with inclined
eyecup.
31
Dioptric Correction (Only for Leica EZ4, Open Version)
Dioptric Correction
The adjustable eyepieces for the Leica
EZ4 are also available with built-in dioptric correction, allowing the microscope to be
used without glasses even by those with vision
problems. The correction comprises a maximum of ±5 diopter settings.
Users with normal vision do not need adjustable eyepieces. An adjustable eyepiece is
sufficient for mild shortsightedness.
Adjusting
1. Set the dioptric correction for both eyepieces to "0".
If vision is extremely poor or when graticules
are used, two adjustable eyepieces are needed.
2. Select the lowest magnification and focus
on a flat specimen.
When the diopters are regulated exactly, the
sharpness is constant over the entire magnification range (=parfocal).
3. Select the highest magnification and readjust the sharpness.
Once the diopters have been set, the procedure
does not have to be repeated. Simply restore
your diopter values on the eyepiece before
beginning work with the stereomicroscope
4. Select the lowest magnification again, but
do not look into the eyepieces.
5. Carry out steps 6 to 8 for each objective
individually.
6. Rotate the eyepiece counterclockwise in
the "+" direction as far as it will go (+5 diopter settings).
Leica E Series
Manual
32
Dioptric Correction (Continued)
7. Look into the eyepiece.
8. Slowly rotate the eyepiece individually
in the "–" direction until the eye sees the
object sharply imaged.
9. Select the highest magnification and refocus if necessary.
Now, if you adjust the magnification from the
highest to the lowest level, the specimen is
always brought into sharp focus. If not, repeat
the process.
Leica E Series
Manual
33
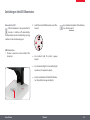
Graticules (Only for Leica EZ4, Open Version)
Graticules
The transparent graticules can be inserted in the adjustable eyepieces of the
Leica EZ4. They enable easy measurements at
the specimen.
Available eyepiece inserts
Graticules
10 mm/ 0.1 mm
5 mm/ 0.1 mm
5 mm/ 0.05 mm
100 Div / 0.002"
For equipment with a graticule in one
eyepiece, two adjustable eyepieces
are needed. Since one eye is focussed on the
eyepiece with the graticule, it needs a second,
adjustable eyepiece so that it can be aligned
optically with the first.
Leica E Series
100 Div / 0.001"
150 Div / 0.0005"
stage micrometers
50 mm (0.1 / 0.01 mm graduation)
1" (0.001" graduation)
Crosshairs
Crosshairs
Manual
34
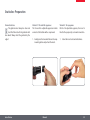
Graticules: Preparation
Care instructions
The graticule must always be clean and
dust-free! Never touch the graticule with
bare hands! Always hold the graticule by the
edges!
Leica E Series
Variant 1: 10× and 20× eyepieces
The 10× and 20× adjustable eyepieces include
an insert at the bottom with a snap mount.
Variant 2: 16× eyepieces
On the 16× adjustable eyepieces, the insert is
fixed to the eyepiece by a screwed connection.
1. Gently press the two small tabs on the snap
mount together and pull out the insert.
1. Screw the insert out counterclockwise.
Manual
35
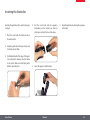
Inserting the Graticules
Inserting the graticules is the same for all eyepiece types.
4. Put the insert back into the eyepiece.
Depending on the variant, you have to
either press or twist the insert into place.
6. Align the graticules by turning the eyepiece
in the tube.
1. Place the insert with the knurled side on
the work surface.
2. Grasp the graticule so that you see the scale
in laterally correct form.
3. Carefully take hold of the edge of the graticule and push it sideways into the holder
in the insert. Make sure that both plastic
holders snap into place.
Leica E Series
5. Insert the eyepiece into the tube.
Manual
36
Photography
Using the Leica EZ4 HD
Leica E Series
Manual
37
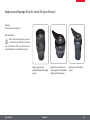
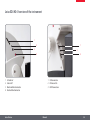
Leica EZ4 HD: Overview of the instrument
1
1
2
3
2
4
1
2
3
4
3
SD card slot
Status LED
Black multifunction button
Red multifunction button
Leica E Series
1 USB connection
2 Pinhole switch
3 HDMI connection
Manual
38
General Instructions
General Instructions
ϘϘ The software for control is included on the
DVD provided with the instrument.
ϘϘ
Install the software before connecting the
Leica EZ4 HD to the PC or Mac.
ϘϘ
As soon as the EZ4 HD is connected to a
power cable and the main switch is turned
on, the integrated camera is also ready for
use.
ϘϘ
If a USB cable is not connected and there is
no SD card in the card slot of the Leica EZ4
HD, the status LED of the instrument lights
up RED.
Leica E Series
Manual
39
Introduction
The Leica EZ4 HD puts some extremely interesting additional functions at your fingertips. The
integrated digital camera is designed for the
sole purpose of giving you the best possible
quality for your documentation – with particularly easy handling.
Real Full HD display
The integrated HDMI output allows the microscope image to be output to a High-Definition
(HD)-capable display unit (monitor, television
set or projector), where the following resolutions are possible:
ϘϘ
1920×1080i ("Full HD"). This resolution
provides the best possible imaging performance on a Full HD-capable display unit.
ϘϘ
1280×720p ("HD ready"). This resolution is
suitable for display on televisions labeled
"HD ready".
Leica E Series
Leica Application Suite EZ
Together with the Leica EZ4 HD, you have also
obtained the "Leica Application Suite EZ" software (standard LAS on request). It allows various tasks to be completed in which the television and monitor can even be used together.
Thus you are ideally prepared for every situation: work at the computer, presentations, training sessions, trade show appearances, material testing and more.
User-friendly even in the smallest detail
Like every digital camera, that of the Leica EZ4
HD reacts differently to different light sources.
However, the white balance is factory-set to
match the LED illumination of the microscope.
This ensures that you obtain the best results
automatically.
Manual
40
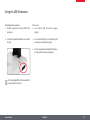
Standard delivery
DVD with Leica software,
drivers and manuals
USB cable
HDMI cable
SD card
Optional: Remote control
with battery (Type CR2025)
Please do not discard any of the packing
materials. They should be used for safely
storing and transporting the instrument should
the need arise.
Leica E Series
Manual
41
HD mode and PC mode
The camera is normally in what is known as "HD
mode" after being switched on. In this mode, it
outputs a high-resolution signal in 16:9 widescreen format. The images can then be saved
directly to an SD card.
If the Leica EZ4 HD is connected to a computer
via USB and the Leica software provided is started, the camera switches automatically to what
is called "PC mode". In this mode, images are
transmitted to the computer with a size of up
to 3 megapixels. The aspect ratio is always 4:3.
Leica E Series
If the camera is in PC mode, images
cannot be captured directly to an SD card.
All images are stored on the PC.
If the camera is in HD mode, it is not
detected by the Leica software. All
images are stored on the SD card.
Optional remote control
You can use the optional remote control
only if the camera is HD mode – with the
exception of the "i" button, which you can use
to show various information on the monitor
even in PC mode.
The microscope remains in the last selected mode (HD or PC mode) until you
change it. You can do this automatically by starting the Leica software or manually by pressing
and holding the black multifunction button for
5 seconds.
Manual
42
Capturing Images without a Computer in HD Mode
Saving to SD card
Images can be saved directly to an inserted SD card. The card has to be formatted
using the "FAT" file system.
When the SD memory card is full, the LED
on the camera is illuminated in red. No
more images can be captured.
Leica E Series
Changing between PC and HD mode
In order to take photos without a computer you must be in HD mode (not PC
mode). After the camera is switched on, it is in
the last selected mode. However, it switches to
PC mode whenever the Leica software is started.
1. To switch between PC and HD mode, press
and hold the black multifunction button for
5 seconds.
Manual
Detecting the active mode
ϘϘ The camera is in HD mode when the LED
status display is illuminated in red.
ϘϘ
The camera is in PC mode when the LED
status display is illuminated in red and
flashes green approximately once per
second.
43
Capturing Images without a Computer in HD Mode (Continued)
Capturing an image
1. Insert the SD memory card into the SD card
slot until you hear it click into position.
2. Press the red image capture button briefly.
You hear an audible signal as confirmation
and the camera LED flashes green.
The LED illuminates in green. The camera is now
ready to save images to the SD card.
You will hear another beep when the Leica
ICC50 HD has completed capturing the image.
The image is now saved on the SD card.
Leica E Series
Manual
44
High-resolution Video Display without a Computer (HD mode)
Cables
1. Connect the camera and the HDMI device
via the integrated HDMI port.
The HDMI cable required for this purpose
is included in the standard delivery of the
Leica EZ4 HD.
Live images and captured images can be
output in high resolution via the HDMI
Changing the Resolution
The output resolution (Full HD or HD ready) is
configured directly on the microscope.
1. Press a pin into the pinhole switch in order
to change the resolution.
cable:
Leica E Series
ϘϘ
Full HD: 1920×1080 pixels
ϘϘ
HD ready: 1280×720 pixels
ϘϘ
Movie: 720×480 pixels
Manual
45
PC Mode: Use with a Computer
For instructions on operating the instrument in PC mode, refer to the DVD included in the standard delivery of the Leica EZ4 HD.
3. Follow the instructions in the software for
adjusting and acquiring an image.
The 10× eyepieces of the Leica EZ4 HD
have a field of view of 20 mm. Unlike the
circular object field through the eyepieces, the
image section of the camera is rectangular and
has a diagonal measurement of 16.4 mm. Therefore, the image field of the camera is smaller
than the visible object field through the eyepieces.
The LED changes color from yellow to
red. You can now start the software. Once
you have done so, the LED flashes yellow briefly,
then stays steady green.
Installing and Connecting
1. Place the DVD provided into the computer's
disk drive and follow the instructions for
loading the software.
2. Connect the camera and the computer
using the USB cable.
Leica E Series
Manual
46
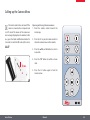
PC Mode: Limitations
Aspect ratio
If the Leica EZ4 HD is connected to a
computer and is in PC mode, images are
always output in a 4:3 size ratio and in a lower
resolution – even if a 16:9 monitor or television
set is connected via HDMI. The image is necessarily compressed on such a device.
In this case, we recommend that you not
connect the television to the microscope, but
to the computer as a second monitor.
4:3 aspect ratio
16:9 aspect ratio
Remote control
If the Leica EZ4 HD is in PC mode, the
optional remote control cannot be used.
The menus of the camera are also no longer
displayed on the monitor. Instead, all settings
are configured on the computer using the Leica
software.
Leica E Series
Manual
47
PC Mode: Additional Use of a HDMI Device
In PC mode, the camera image is always
shown in the preview window of the
Leica software. In addition, another computer
monitor or television can be connected via the
HDMI interface.
The image resolution on the attached
HDMI or television screen is limited to
the live image resolution inside the LAS EZ
software. Due to technical constraints, it is not
possible to send a live image stream to the
connected screen in "HD ready" or "Full HD"
quality.
Leica E Series
To use a higher resolution on the connected screen, select HD mode on the
camera:
Connecting the HDMI monitor
1. Connect the HDMI cable provided to the
camera.
1. To switch between PC and HD mode, press
and hold the black multifunction button for
5 seconds.
2. Connect the HDMI cable to the HDMI television or monitor.
Manual
48
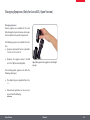
Configuring the White Balance
W
When configuring the white balance of
the camera, make sure that no specimen
is in the beam path and that a standard illumination is available.
5 sec.
Configuring a New White Balance
Press and hold the red exposure button for
5 seconds. Wait for the beep. As soon as the
signal sounds, a new white balance has been
configured.
Leica E Series
Manual
e recommend carrying out a new
white balance adjustment whenever you change the illumination type or color
temperature. This is particularly necessary if
you are working with an external light source
that can be switched from yellow (low intensity) to blue (high intensity). The new white
balance generates a neutral background for
both types of illuminator.
49
Restoring Factory Settings
Factory settings
1. Press the red multifunction button for 10
seconds to delete all individual settings
and reset the instrument to the factory
settings.
10 sec.
Leica E Series
Manual
50
The Camera Menu
If you purchased the optional remote, you
will have access to the camera menu.
Leica E Series
Manual
51
Optional Remote Control
The remote control does not work if the
camera is in PC mode.
1
2
3
4
5
6
1.
2.
3.
4.
5.
6.
7.
8.
9.
Start video recording
Stop video recording
Save still image to SD card
Stop/continue live image
Pause/play movie clip
Playback mode
Show / hide information box
Arrow keys for navigation
OK / confirm
Call up the camera menu
7
8
9
Leica E Series
Manual
52
Viewing Images and Movies with the Optional Remote Control
If you have purchased the optional
remote control, you can display the
images and videos captured by the HD camera
directly on a HD screen.
1. Miniature view:
3. To return to live view press any button on
the camera or press the key 1, 2 or 9 on the
remote control (see previous page).
007/0109 ICC500007.MP4
(press 1×)
ϘϘ
Select miniature: , , and
ϘϘ
Show full-size image or play back video:
Playback / fullscreen view
2. Play back individual image:
ϘϘ
Previous/next image: or
ϘϘ
Play back video:
ϘϘ
Fast forward/reverse: or
007/0109 ICC500007.MP4
(press 2×)
Thumbnail view
Leica E Series
Manual
53
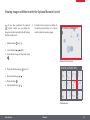
Calling up the Camera Menu
The remote control does not work if the
camera is connected to a computer and
is in PC mode. The menus of the camera are
also no longer displayed on the monitor. In this
case, press the black multifunction button for
5 seconds to switch to HD mode (refer also to
page 42).
Opening and closing the camera menu
1. Point the remote control towards the
microscope.
2. Press the ▤ key on the remote control to
show the camera menus on the monitor.
3. Press the ▲▼◀ and ▶ buttons to select a
menu item.
5 sec.
4. Press the "OK" button to confirm a menu
item.
5. Press the ▤ button again to hide the
camera menus.
Leica E Series
Manual
54
COLOR (Automatic White Balance)
COLOR
SET WHITE BAL
PRESS OK
EXPOSURE
WB MODE
AUTO
RESOLUTION
RED LEVEL
SETUP CAMERA
BLUE LEVEL
SETUP USER
BLACK LEVEL
MAIN MENU
Enabling automatic white balance
1. Press the ▤ button on the remote control.
2. Call up the "COLOR" entry.
3. Set the value for "WB MODE" to "AUTO".
4. Press the ▤ button to exit the menu.
SUBMENU
The "COLOR" function makes it possible to adapt the camera to the
ambient light so that color-neutral images can be acquired.
The values for "RED" and "BLUE" cannot be adjusted if the "WB
MODE" setting is set to "AUTO".
If the "WB MODE" is set to "AUTO", the white balance is carried out
continuously. This mode is recommended only for color-neutral
specimens and those stained over a wide area.
Leica E Series
Manual
55
COLOR (Manual White Balance)
COLOR
SET WHITE BAL
PRESS OK
EXPOSURE
WB MODE
MANUAL
RESOLUTION
RED LEVEL
SETUP CAMERA
BLUE LEVEL
SETUP USER
BLACK LEVEL
MAIN MENU
Adjusting the white balance manually (recommended)
1. Move the specimen out of the field of view so that only the illumination is seen.
2. Press the ▤ button on the remote control.
3. Call up the "COLOR" entry.
SUBMENU
4. Select the "SET WHITE BAL" menu item and press the "OK" button.
The "COLOR" function makes it possible to adapt the camera chip
to the ambient light so that color-neutral images can be acquired.
Leica E Series
4. If necessary, correct the values for "RED" and "BLUE" until the image
shows a uniform gray area.
5. Press the ▤ button to exit the menu.
Manual
56
EXPOSURE
COLOR
EXP MODE
EXPOSURE
EXPOSURE
RESOLUTION
GAIN
SETUP CAMERA
BRIGHTNESS
SETUP USER
GAMMA
MAIN MENU
EXP MODE
EXPOSURE
EXPOSURE
RESOLUTION
GAIN
SETUP CAMERA
BRIGHTNESS
SETUP USER
GAMMA
Leica E Series
Submenu
Manual exposure
1. Press the ▤ button on the remote control.
2. Call up the command for manual exposure (see diagram at the left).
3. Set the value for "EXP MODE" to "MANUAL".
4. Correct the values for "EXPOSURE", "GAIN" and "GAMMA" until you
obtain the desired results.
SUBMENU
COLOR
Main menu
MANUAL
AUTO
Automatic exposure
1. Press the ▤ button on the remote control.
2. Call up the command for automatic exposure (see diagram at the left).
3. Set the value for "EXP MODE" to "AUTO".
4. Correct the values for "BRIGHTNESS" and "GAMMA" until you obtain
the desired results.
Manual
57
RESOLUTION
COLOR
LIVE
1280X1080
EXPOSURE
CAPTURED
2048X1536
RESOLUTION
MOVIE
720X480
SETUP CAMERA
QUALITY
HIGH
SETUP USER
SHARPNESS
HIGH
MAIN MENU
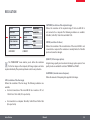
CAPTURED (resolution of the captured image)
Defines the resolution of the captured image if the Leica EZ4 HD is
not connected to a computer. The following resolutions are available:
640×480, 1024×768, 1600×1200 and 2048×1536.
MOVIE (resolution of videos)
Defines the resolution of the recorded videos if the Leica EZ4 HD is not
connected to a computer. The resolution is currently limited to 720×480
pixels and cannot be changed.
SUBMENU
The "RESOLUTION" menu enables you to define the resolution
for the live image on the computer, still image capture and video
capture individually. This provides optimum results in every situation.
QUALITY (of the image capture)
A higher image quality can slow down the image capture process. Two
quality levels are available for selection: "NORMAL" and "HIGH".
SHARPNESS (internal camera sharpness)
Define the amount of sharpening to be applied to the image.
LIVE (resolution of the live image)
Defines the resolution of the live image. The following resolutions are
available:
ϘϘ For direct connection of the Leica EZ4 HD to a monitor or TV set:
1280×720 or 1920×1080 (16:9 aspect ratio).
ϘϘ
For connection to a computer: 640×480, 1024×768 and 1440×1080
(4:3 aspect ratio)
Leica E Series
Manual
58
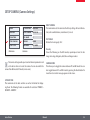
SETUP CAMERA (Camera Settings)
COLOR
SET DATE TIME
PRESS OK
EXPOSURE
RESET CAMERA
PRESS OK
RESOLUTION
FLIP IMAGE
0°
SETUP CAMERA
OVERLAY
NONE
SETUP USER
CAM MODE
PC-MODE
Main menu
RESET CAMERA
This command resets the camera to the factory settings. All user information (such as white balance, resolution etc.) is reset.
FLIP IMAGE
Rotates the live image by 180°.
Overlay
Shows the following on the HD monitor, superimposed over the live
image: Leica logo, histogram, date/time and image counter.
Submenu
The camera settings enable you to control internal parameters such
as the date or time or to reset the camera. You can also switch the
camera from HD mode to PC mode (or vice versa).
CAMERA MODE
This allows you to toggle the camera between PC and HD mode. You can
also toggle between PC and HD mode by pressing the black button for
more than 5 sec until a message appears on the screen.
SET DATE TIME
This command sets the date and time as well as the format for displaying them. The following formats are available for selection: YYMMDD –
DDMMYY – MMDDYY.
Leica E Series
Manual
59
SETUP USER (User-defined Settings)
COLOR
SET ILLUM
ILLUM-1
EXPOSURE
MENUCOLOR
LEICA/LAS
RESOLUTION
SHOW MENU
15 SEC
SETUP CAMERA
SHOW CAPTURE
2 SEC
SETUP USER
LANGUAGE
ENGLISH
Main menu
SET MENUCOLOR
Currently, two color schemes are available for the menu guidance. Additional colors may be provided in the future via a firmware update.
SHOW CAPTURE
Defines how long an image is displayed on the screen after being captured.
Submenu
SHOW MENU
Defines how long the menu is displayed on the screen.
The user-defined settings enable you to, for example, save illumination scenarios and retrieve them later.
SET LANGUAGE
Select the language of the menu.
SET ILLUM -1 to 3 (save illumination modes)
These settings allow you to store up to three different illumination modes
and retrieve them later. Select the number of the illumination mode and
press "OK" to store the current camera settings for later acquisition situations.
Leica E Series
Manual
60
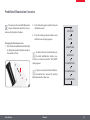
Predefined Illumination Scenarios
The camera in the Leica EZ4 HD provides
various illumination modes that cover a
wide variety of possible situations.
2. Press the button again to switch to the next
illumination mode.
3. Press the red image capture button or wait
until the menu no longer appears.
Changing the illumination mode
1. Press the black multifunction button briefly
to display the current illumination mode on
the monitor or TV set.
AUTO
BRIGHTFIELD
To return to the last selected mode, press
the black multifunction button several times in succession until the "LAST USED"
setting appears.
If you do not press the black multifunction button for 5 seconds, the selected
illumination mode is taken over.
Leica E Series
LAST USED
Manual
DARKFIELD
ILLUMINATION-1
ILLUMINATION-2
ILLUMINATION-3
61
Care and Transport
Leica E Series
Manual
62
Care and Transport
General Instructions
ϘϘ Keeping all optical components clean is
important for maintaining good optical
performance.
ϘϘ
ϘϘ
ϘϘ
Always protect the microscope and camera
with the plastic cover when the instrument is not in use. (Included in the delivery
package of the microscope.) Be sure power
to the camera is off when the dust cover is
in place.
If any optical surface becomes badly coated
with dust or dirt, it should be cleaned by
blowing the surface with a syringe or brushing it off with a camel hair brush before
attempting to wipe the surface clean.
ϘϘ
Avoid excessive use of solvents. The lintfree cloth, lens cloth or cotton swab should
be soaked with solvent, but not so wet that
solvent runs over the lens.
ϘϘ
Protect the microscope from moisture,
fumes and acids and from alkaline, caustic
and corrosive materials. Do not store
chemicals in the vicinity.
ϘϘ
Protect the microscope from oil and grease.
Never grease or oil mechanical parts or
sliding surfaces.
ϘϘ
It is advisable to enter a service agreement
with Leica Service.
Transport
Always use both hands to carry the
microscope. There is a handle on the
back of the microscope and an undercut in the
front for this purpose.
Optical surfaces should be cleaned using
a lint-free cloth, lens cloth or cotton swab
moistened with a commercially available
glass cleaner. Do not use alcohol.
Leica E Series
Manual
63
Specifications
Leica E Series
Manual
64
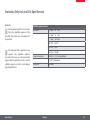
Camera Module
Camera
Weight
700 g (camera only)
Height
50mm
Exposure time
2 msec – 2 sec
Live image
Max. 45 fps (1256 × 720 px) – 20 fps (1920 ×1080 px)
Full frame image acquisition
2048 × 1536 pixels, 3.1 megapixels
Movie clip
720 × 480 pixels (MP4)
Sensor size
6.55 mm × 4.92 mm
Pixel size
3.2 μm × 3.2 μm
Sensor grade
Micron 1/2“ CMOS
Gain
1× to 20×
Color Depth
24-bit
Data format
JPEG / TIFF / BMP / MP4
Operating systems
Windows XP, Windows Vista, Windows 7, Mac OS X
Software available
LAS EZ software (PC), optional LAS modules, Acquire (Mac)
Min. computer config.
Intel Pentium 4 or DuoCore, 2 GHz, 2 GB RAM, 24-bit graphics, 1248 × 1024, DVD
Min. display specification
• HD ready (1280×720)
• Full HD (1920×1080)
• Standard HDMI port*
* Connection via DVI using a HDMI–DVI adapter is not recommended!
Leica E Series
Manual
65
Camera Module (Continued)
Mechanical and optical interfaces
ϘϘ Integrated camera module
Other
ϘϘ Power supply: integrated power supply
ϘϘ
Light distribution Optical 50% / Camera 50%
ϘϘ
Power requirement: 4 W
ϘϘ
Internal video magnification 0.5×
ϘϘ
Operating temperature range +5 °C to 50 °C
ϘϘ
Sensor Centered to optical axis ± 0.1 mm
ϘϘ
Relative humidity 10% to 90%
ϘϘ
Hoizontally / Vertically aligned ± 1 degree
ϘϘ
CE Declaration of Conformity Available
ϘϘ
Tested standards EMI/RFI: EN55011-B EN50082-1
ϘϘ
EMC: 61000-3-2 61000-3-3
Electronic interfaces
ϘϘ USB 2.0, mini-USB plug
ϘϘ
Mini-HDMI (HD ready and Full HD)
ϘϘ
LED with 2 colors: green ("ready"), red ("image capture")
ϘϘ
Integrated slot SD (Secure Digital) card
ϘϘ
SD card: 1-8 GB, WIFI, WORM support, High Capacity (HC)
ϘϘ
Black multifunction button for changing the illumination mode (press
for 1 second) and for switching between HD and PC mode (press and
hold for 5 seconds)
ϘϘ
Red multifunction button for image capture using SD card (press
for 1 second), configuring a new white balance (press and hold for 5
seconds), reset camera (press and hold for 10 seconds)
Leica E Series
Manual
66
Dimensions
Leica E Series
Manual
67
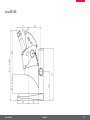
Leica ES2
Leica E Series
Manual
68
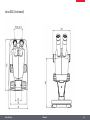
Leica ES2 (Continued)
Leica E Series
Manual
69
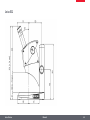
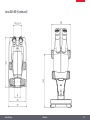
Leica EZ4 HD
Leica E Series
Manual
70
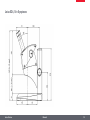
Leica EZ4 HD (Continued)
Leica E Series
Manual
71
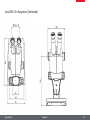
Leica EZ4, 10× Eyepieces
Leica E Series
Manual
72
Leica EZ4, 10× Eyepieces (Continued)
Leica E Series
Manual
73
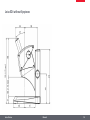
Leica EZ4 without Eyepieces
Leica E Series
Manual
74
Leica EZ4, without Eyepieces (Continued)
Leica E Series
Manual
75