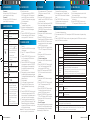
1
Problem
Possible cause
solution
item
Specification
The LCD displays nothing when
the device is started.
Battery is too low.
Charge the battery.
Capacity
128MB or above
Power Switch is turn off
Turn on the power
Battery Type
No sound when playing an
audio file.
The volume is too low
Adjust the volume.
Rechargeable lithiumion polymer battery
Bad audio file.
Delete or skip the file.
Battery Life
Approx. 5 Hours
The player cannot be connected
to the PC.
The USB interface is not supported by
PC’s motherboard.
Update or replace the PC’s
motherboard.
LCD Display
OLED(128*64)
Earphone Power
5mW+5Mw
The displayed time is changing
constantly.
The bit rate of the MP3 file is changing
during playback.
Try to use fixed bit rate to compress
the MP3 file.
Audio Format
MP3, WMA, APE, FLAC
Bit Rate
The PC has error when you plug
and unplug the player.
The player is disconnected from the PC
abruptly while transferring files.
Do not disconnect the player from
the PC when transferring files.
MP3: 8~320kbps; WMA:
8~320kbps
SNR
>80dB
Total memory displayed on the
player is not in accordance with
the marked amount.
Part of memory is used to store
programs and display characters.
USB Port
USB2.0 full speed
Operational
Temperature
-10°C ~ +40°C
Some of MP3 files cannot be
played properly.
The MP3 file is compressed by a
standard, such as MPEG I Layer 1
or Layer 2 that the player does not
support.
1. Delete the unsupported MP3 files.
2. Use MPEG I Layer 3 standards
to compress the unsupported
MP3 files.
Storage Temperature
-20°C ~ +55°C
Operational Relative
Humidity
20% ~ 80% (40°C)
The TXT file cannot be read
The file format is not supported.
Skip it or reload another file.
Storage Relative
Humidity
20% ~ 93% (40°C)
13. trouBle sHooting
7/09/2009 2:34:07 PM
Please read
carefully before use
User Manual
MP3-a9-4gB
14. tecHnical sPecifications
cautions
> Do not drop the device or otherwise treat
it roughly.
> Do not use the player in extreme hot or cold,
dusty or damp conditions. Do not expose it
to direct sunlight for extended periods.
> Back up the data frequently in case of
accidental data loss.
> Avoid using the player in strong
magnetic fields.
> In the event that water or other liquids
enter the device, power off the product
immediately, and clean the device with
a dry cloth.
> All responsibility for data integrity shall be
born by the end user.
> Do not attempt to disassemble, repair or
otherwise modify the product. This will
invalidate any warranty agreements.
> The design of the player or actual display
may be different from what is shown in this
manual.
> Please disconnect this player from your PC
properly to avoid data loss.
> The transfer rate displayed on the PC may
be different depending on the operating
system. Exact transfer rate should be
subject to player indication.
> Towards peak data storage, the response of
the device may be slowed.
1. key features
> MP3 & WMA & APE & FLAC Player
> Folder Navigation
> Voice Recorder
> Stereo FM radio
> FM recording
> Removable Storage Device
> Built-in rechargeable lithium-ion polymer
battery
> Adjustable settings
2. systeM reQuireMents
> Hardware: IBM PC & Compatible PC,
Notebook with USB interface
> Operating System: Windows 98/SE, Windows
Me, Windows 2000/XP/VISTA
3 Before using
3.1 Connect to a PC and download audio files
This player is plug & play for WIN2000/
XP/ME OS. But for Windows98/SE, you are
required to install a driver before connection
(See “Driver Installation” section for details).
(1) To connect it with PC for transferring files,
Plug the larger end of the USB cable to the
USB port of the PC, and plug the smaller
end to the USB port of the player.
(2) When the
icon appear at the right
bottom of the PC screen, double click
“My Computer” on the desktop to see a
removable disk which represents the new
player. Just use this removable disk as a
regular local disk, copying files from or to it.
3.2 Removing the player from the PC safely
For Windows2000/XP:
(1) Left click the icon at the right hand
corner of the taskbar.
(2) Click the pop-up mini-window with
message of “Stop the USB Mass Storage
Device – Drive (X)”.
(3) When you are prompted to remove the
device, pull out the player.
For Win98, please make sure the data
transfer is completed before unplugging
the MP4 player.
3.3 Charge the battery
The device has a built-in lithium-ion polymer
rechargeable battery. It is charged via the
USB connection. You are required to charge
it when you use it for the first time. It takes
about 3 hours to fully charge the battery.
Connect the larger end of the USB cable to
the USB interface of PC, and connect the
other smaller end of the USB cable to the
USB interface of this player. The device is
connected to PC and being charged.
NOTICE:
For maximum performance, lithium-ion polymer
batteries need to be used often. If you don’t
use the device often, be sure to recharge the
battery at least once per month.
A9 user manual.indd 1
> Play recordings
To play the recording, switch to the MUSIC
mode, enter folder navigation mode, search and
play the recording file.
> Record
(1) On the main menu, select “Record”, and press
the MENU button to enter the recording
mode.
(2) Shortly press the PLAY/PAUSE button to
start recording. During recording, you can
press the PLAY/PAUSE button to pause or
resume recording.
(3) Press the MENU button to stop and save
recording.
12. Voice recording
laser a9
4gB MP3 Player
For technical support please visit
www.LaserCo.com.au
4. Power On/Off
6. Playing music
8. FM Radio
9. Browsing all files
10. Deleting file
To power on,
Press and hold the PLAY/PAUSE button until
you see ”welcome” on the display.
To power off,
Press and hold the PLAY/PAUSE button until
you see “Bye-Bye” on the display
6.1Enter the music mode
On the main menu, press the PREVIOUS/
NEXT button to select “Music” menu, and
press the MENU button to confirm. Now
you are in MUSIC mode, refer music playing
to the basic operation.
6.2Folder navigation
To navigate through folders:
(1) When music is being played, press the
MENU button to enter folder navigation
mode.
(2) Press the PREVIOUS/NEXT button to select
a folder or track, press the MENU button to
enter, or press the VOL button to exit
To browse all files stored in the player,
(1)On the main menu, select “Navigation”, and
press the MENU button to enter the browser
mode.
(2)Press PREVIOUS/NEXT button to select a
file that you want to view, and press the
MENU button to play or display it.
To delete a file,
(1)In the folder navigation mode, select the file
that you want to delete.
(2)Press and hold the VOL button until a dialogue
box shows up.
(3)Use the PREVIOUS/NEXT button to select
“YES” and press the MENU button to confirm.
5Basic operation
Function
Operation
Play/Pause
Press the PLAY/PAUSE button to
play or pause.
Menu M
Press the M button to enter or
confirm
Adjust Volume
VOL
Previous Track
Next Track
Fast Forward
(1)Shortly press the VOL button
to highlight the
volume
icon at the top of the screen.
(2)Press the PREVIOUS/NEXT
button to decrease or
increase volume.
(3)Press the VOL button again
to confirm.
Shortly press the PREVIOUS
button.
Shortly press the NEXT button
Press and hold the NEXT button
Rewind
Press and hold the PREVIOUS
button
A-B Repeat
To repeat a specified section of a
track enter A-B repeat mode
(1)During playing, Shortly press
VOL to highlight the button.
(2)Shortly press MENU button to
select the starting point.
(3)Shortly press MENU button
again to select the ending
point.
(4) During A-B repeat play,
Shortly press MENU to cancel
7. Reading E-book
7.1 Reading
(1) Press and hold the MENU button to display
the main menu.
(2) Select “TXT” and press the MENU button to
confirm.
(3) Press the PREVIOUS/NEXT button to select
a .txt file, and press the MENU button to
open the selected file.
(4) Press the PREVIOUS/NEXT button to page
up or page down, or press the PLAY/PAUSE
button to page up or down automatically
(by setting the time interval in Settings/
Auto Slide show/Text).
(5) During reading, you can use the bookmark
to mark the page for resuming reading later.
For information about bookmark, see “Using
bookmark” section.
7.2 Using bookmark
(1) Go to the page that you want to mark.
(2) Press and hold the VOL button to show
up a “Save Bookmark” window for saving
bookmark.
(3) Press the PREVIOUS/NEXT button to select
one line on the menu and press the MENU
button to confirm. The bookmark is saved. It
starts from the first line of current page.
(4) To read the page that you marked, shortly
press the VOL button to show up the “Load
Bookmark” window. Select the bookmark
and press the MENU button to confirm. You
will be guided to that page.
Note: Some TXT file may not be read. That maybe because
its format is not supported. Skip it or reload another file.
A9 user manual.indd 2
On the main menu, select “FM” and press the
MENU button to turn on the FM radio.
> Search Station
(1)Shortly press the MENU button to show the
submenu. Press the PREVIOUS/NEXT button
to select a menu item.
(2)Select “auto” or “manual”, and press the MENU
button to activate auto-search or manualsearch mode. In the Manual mode, press the
PREVIOUS/NEXT button to tune in stations.
> To save the found station,
(1)Shortly press the MENU button to activate
the submenu.
(2)Press the PREVIOUS/NEXT button to select
“mem” and press the MENU button to confirm.
(3)Press the PREVIOUS/NEXT button to select
an empty location for the station, and press
the MENU button to continue.
(4)Press the PREVIOUS/NEXT button to select
“YES” or “NO”, and press the MENU button to
confirm.
(5)Shortly press the PLAY button to exit the
save channel menu.
> To listen to saved station,
(1)Shortly press the MENU button to activate
submenu.
(2)Press the PREVIOUS/NEXT button to switch
to the “Preset” menu and press the MENU
button to enter the PRESET mode.
(3)In the PRESET mode, press the PREVIOUS/
NEXT button to select a saved station for
listening.
> Delete station
(1)Shortly press the MENU button to activate
submenu.
(2)Press the PREVIOUS/NEXT button to switch
to the “Del” menu and press the MENU
button to continue.
(3)Press the PREVIOUS/NEXT button to select
the station that you want to delete, and
press the MENU button to continue.
(4)Press the PREVIOUS/NEXT button to select
“YES” or “NO”, and press the MENU to confirm.
(5)Shortly press the PLAY button to exit the
Del channel menu.
> Record FM program
When you are listening to a station, you can press
and hold the VOL non-highlited button to record
your favourite programs. For detail information
about recording, see “Record” section.
11. Customized Settings
To customise the player settings:
(1)On the main menu, select the “SYS” item and press the MENU button to enter the system settings
mode.
(2)Press the PREVIOUS/NEXT button to select setting item and press the MENU button to confirm or
press the VOL button to cancel/return
Music
FM Radio
Record
Auto
Browse
Display
System
Power off
Language
Once (Play current track once and then stop)
Repeat One (Repeat current track)
Folder Once (Play all audio files in the current folder and stop after playing)
Repeat mode
Folder Repeat (Repeat all audio files in the current folder)
All once (Play all audio files stored in the player and stop after playing all)
All Repeat (Repeat all audio files stored in the player)
Intro (Play the first 10 seconds of every audio file)
Order (Play audio files in order)
Play mode
Shuffle (Play audio files randomly)
EQ Select
Normal, MS playFX, Rock, Pop, Classical, Bass, Jazz, User EQ
MS playFX set
3D HeadPhone, Pure Bass ,AutoVolume
(1)Press the VOL button to switch EQ column.
User EQ
(2)Press the PREVIOUS/NEXT button to adjust value.
(User-defined
(3)Repeat pressing the VOL button until the cursor is on the “Yes” or “No” button,
equalizer
and then press the MENU button to select Yes or No.
setting)
(4)Go to the EQ Select menu, and select User EQ to enable the equalizer setting.
Stereo SW
On, Off (Enable or disable stereo effect)
FM region
China, Europe, Japan, U.S.A.
REC Quality
High Quality, General Quality
REC Volume
+1, +2, +3, +4, +5
Text Browse (Set interval between the previous and the next page when the device is in auto page
up/down mode.)
5 seconds, 10 seconds, 15 seconds, 20 seconds, 30 seconds, Always On. (Backlight
Blight time
time selection)
Lum (Brightness :Set the brightness of the screen)
Normal ,Power Save (Backlight mode :Turn off the screen when there is no activity
Blight mode
within a certain time)
About - Information about the product
Upgrade - Upgrade the firmware
Default Set- Restore the player to default setting
Off, 10 minutes, 15minutes, 30 minutes, 60 minutes, 120 minutes (Set the continuous playing time
before the player is turned off automatically.)
Simplified Chinese, Traditional Chinese, English, German, Swedish, Thai, Korean, Poland, Danish,
French, Dutch, Portuguese, Japanese, Italian, Russian, Greek, Czech, Turkish, Spanish, Hebrew,
Arabic (Select language in which the on-screen text is displayed)
7/09/2009 2:34:08 PM