1
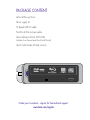
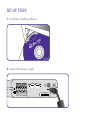
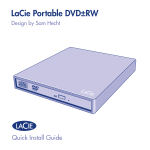
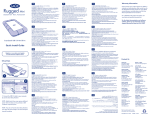
DRIVE
Quick Install Guide
THE PROFESSIONAL CHOICE
Blu-ray
ACCESSORIES
Blu-ray Discs & DVDs
LaCie USB 2.0 PCI Card
LaCie FireWire 400 PCI Card
LaCie Security Lock
LaCie d2 Rackmount Kit
LaCie d2 Desk Rack
To order, please visit:
www.lacie.com/accessories
package content
LaCie d2 Blu-ray Drive
Power supply kit
Hi-Speed USB 2.0 cable
FireWire 400 6-to-6-pin cable
LaCie Software Utilities DVD-ROM (includes User Manual and Quick Install Guide)
Quick Install Guide (Printed version)
Protect your investment – register for free technical support:
www.lacie.com/register
set up steps
1. Install the recording software.
2. Connect the power supply.
!
XXXXXX
Serial Number XXXXXXXXX
WARRANTY VOID IF
SEAL BROKEN.
• • • ••• •••••••••••
• • • • • • •••••••
LaCie Ltd.
3. Connect the FireWire or Hi-Speed USB 2.0 cable to your drive and to your
computer.
!
XXXXXX
WARRANTY VOID IF
SEAL BROKEN.
• • • ••• •••••••••••
• • • • • • •••••••
LaCie Ltd.
Serial Number XXXXXXXXX
4. Your drive should automatically
switch on and the blue power button
will light up. If necessary, press the
blue button to switch on the drive.
blue power button
See your User Manual located on the LaCie Software Utilities DVD-ROM for complete instructions and information about your drive.
Copyright © 2006, LaCie
FR
ÉTAPES DE CONFIGURATION
1. Installez le logiciel de gravure.
2. Branchez l’alimentation.
3. Connectez le câble FireWire ou Hi-Speed USB 2.0 entre votre graveur et votre
ordinateur.
4. Votre graveur doit automatiquement se mettre sous tension et le bouton d’alimentation
bleu s’allumer. Si nécessaire, appuyez sur le bouton bleu pour mettre le graveur sous
tension.
Pour obtenir des instructions détaillées, reportez-vous au manuel d’utilisation fourni sur le
DVD-ROM d’utilitaires logiciels LaCie.
Copyright © 2006, LaCie
IT
PROCEDURA PER L'INSTALLAZIONE
1. Installare il software di masterizzazione.
2. Collegare l'unità all'alimentazione elettrica.
3. Collegare il cavo FireWire o Hi-Speed USB 2.0 all’unità e al computer.
4. Generalmente l'unità si accende automaticamente e si illumina la spia blu del tasto di
accensione. Se ciò non accade, premere il tasto per accendere l'unità.
Per informazioni e istruzioni sull'uso dell'unità, consultare la Guida per l'utente contenuta
sul DVD-ROM con le utility LaCie.
Copyright © 2006, LaCie
DE
EINRICHTUNGSSCHRITTE
1. Installieren Sie die Aufzeichnungssoftware.
2. Schließen Sie das Netzteil an.
3. Schließen Sie das FireWire- oder Hi-Speed USB 2.0-Kabel an das Laufwerk und den
Computer an.
4. Das Laufwerk sollte sich automatisch einschalten; die blaue Netztaste leuchtet auf.
Drücken Sie nötigenfalls die blaue Taste, um das Laufwerk einzuschalten.
Vollständige Anweisungen und Informationen zu Ihrem Laufwerk finden Sie im Benutzerhandbuch auf der DVD mit den LaCie Dienstprogrammen.
Copyright © 2006, LaCie
ES
GUIA DE INSTALACIÓN
1. Instalar el software de grabación.
2. Conectar la fuente de alimentación.
3. Enchufar el cable FireWire o Hi-Speed USB 2.0 a la grabadora y al ordenador.
4. La unidad debería encenderse e iluminarse el botón de encendido azul.
Si es necesario, pulsar el botón de encendido para encender la unidad.
Consultar el Manual de usuario incluido en el DVD-ROM de Utilidades de software de
LaCie para completar las instrucciones y la información acerca de la unidad.
Copyright © 2006, LaCie
NL
INSTALLATIE
1. Installeer de opnamesoftware.
2. Sluit de voeding aan.
3. Sluit de FireWire- of Hi-Speed USB 2.0-kabel aan op het station en op uw computer.
4. Het station moet automatisch worden ingeschakeld en het blauwe voedingslampje moet
gaan branden. Druk indien nodig op de blauwe knop om het station in te schakelen.
Raadpleeg de gebruikershandleiding op de dvd-rom LaCie Software Utilities voor
complete instructies en informatie over uw station.
Copyright © 2006, LaCie
PT
PASSOS DE INSTALAÇÃO
1. Instale o software de gravação.
2. Ligue a fonte de alimentação.
3. Ligue o cabo FireWire ou Hi-Speed USB 2.0 à unidade e ao computador.
4. A unidade deverá ligar-se automaticamente e o botão de alimentação azul
acender-se-á. Se necessário, prima o botão azul para ligar a unidade.
Para obter instruções e informações completas sobre a sua unidade, consulte o User
Manual incluído no DVD-ROM LaCie Software Utilities.
Copyright © 2006, LaCie
SV
INSTALLATIONSSTEG
1. Installera inspelningsprogrammet.
2. Anslut enheten till elnätet.
3. Anslut FireWire- eller Hi-Speed USB 2.0-kabeln till enheten och datorn.
4. Enheten slås på automatiskt och den blå strömknappen tänds. Tryck på den blå
knappen för att slå på enheten om den inte startas automatiskt.
Kompletta anvisningar för enheten och mer information om densamma finns i bruksanvisningen på dvd-romskivan LaCie Software Utilities.
Copyright © 2006, LaCie
DA
OPSÆTNING
1. Installér brænderprogrammet.
2. Tilslut strømforsyningen.
3. Tilslut FireWire- eller Hi-Speed USB 2.0-kablet til drevet og computeren.
4. Enheden tændes normalt automatisk, og tænd/sluk-knappen lyser blåt. Tryk om
nødvendigt på tænd/sluk-knappen for at tænde for enheden.
Læs brugervejledningen på LaCie software Utilities DVD’en for at få fyldestgørende
instruktioner og oplysninger om disken.
Copyright © 2006, LaCie
FI
ASENNUSVAIHEET
1. Asenna tallennusohjelmisto.
2. Kytke virtalähde.
3. Kytke FireWire- tai Hi-Speed USB 2.0 -kaapeli asemaan ja tietokoneeseen.
4. Aseman tulisi käynnistyä ja virtapainikkeen sinisen valon syttyä automaattisesti. Kytke
tarvittaessa asemaan virta painamalla sinistä virtapainiketta.
Täydelliset ohjeet ja tietoja asemasta on LaCie Software Utilities -DVD-ROM-levyltä
löytyvässä käyttöoppaassa.
Copyright © 2006, LaCie
PL
ETAPY INSTALACJI
1. Zainstaluj oprogramowanie do nagrywania.
2. Podłącz zasilanie.
3. Podłącz przewód FireWire lub Hi-Speed USB 2.0 do dysku i komputera.
4. Dysk powinien włączyć się automatycznie i zapali się niebieski przycisk zasilania. Jeśli to
koniecznie, naciśnij przycisk zasilania, aby włączyć dysk.
Dokładne instrukcje i informacje na temat dysku twardego można znaleźć w Podręczniku
użytkownika znajdującym się na płycie DVD LaCie Software Utilities.
Copyright © 2006, LaCie
RU
ЭТАПЫ НАСТРОЙКИ
1. Установите программное обеспечение для записи.
2. Подключите шнур питания.
3. Подключите кабель FireWire или высокоскоростного интерфейса USB 2.0 к приводу
и компьютеру.
4. Питание привода автоматически включится. Загорится синяя подсветка кнопки
питания. При необходимости нажмите на эту кнопку для включения питания привода.
Подробные сведения о приводе и инструкции по работе с ним см. в руководстве
пользователя, находящемся на DVD-диске с утилитами LaCie.
© LaCie, 2006
EL
ΒΗΜΑΤΑ ΕΓΚΑΤΑΣΤΑΣΗΣ
1. Εγκαταστήστε το λογισµικό εγγραφής.
2. Συνδέστε το τροφοδοτικό.
3. Συνδέστε το καλώδιο FireWire ή Hi-Speed USB 2.0 στον οδηγό και στον υπολογιστή.
4. Ο οδηγός πρέπει να ενεργοποιηθεί αυτόµατα και το µπλε κουµπί τροφοδοσίας να φωτιστεί.
Εάν είναι απαραίτητο, πατήστε το µπλε κουµπί τροφοδοσίας για να ενεργοποιήσετε το δίσκο.
Βλ. το Εγχειρίδιο Χρήσης που βρίσκεται στο DVD-ROM βοηθητικών προγραµµάτων λογισµικού
(Software Utilities) της LaCie για ολοκληρωµένες οδηγίες και πληροφορίες σχετικά µε τον
οδηγό.
Copyright © 2006, LaCie
JP
セットアップの手順
1. 記録用ソフトウェアをインストールします。
2. 電源を接続します。
3. FireWire または Hi-Speed USB 2.0 ケーブルをドライブとコンピュータに接続します。
4. ドライブが自動的にオンになり、青い電力ボタンが点灯します。 必要な場合は、
青いボタンを押して、ドライブをオンにします。
ドライブに関する詳細については、LaCie Software Utilities DVD-ROM に収録されてい
るユーザー マニュアルを参照してください。
Copyright © 2006, LaCie
TR
KURULUM ADIMLARI
1. Kayıt yazılımını yükleyin.
2. Güç kaynağını bağlayın.
3. FireWire veya Yüksek Hızlı USB 2.0 kablosunu sürücüye ve bilgisayara bağlayın.
4. Sürücü otomatik olarak açılır ve mavi güç düğmesi ışığı yanar. Gerekirse, sürücüyü açmak
için mavi düğmeye basın.
Sürücü hakkındaki tüm yönergeler ve bilgiler için LaCie Software Utilities (Yazılım Yardımcı
Programları) DVD-ROM'undaki Kullanım Kılavuzu'na bakın.
Telif Hakkı © 2006, LaCie
contact us
LaCie USA
22985 NW Evergreen Pkwy
Hillsboro, OR 97124
[email protected]
LaCie Canada
235 Dufferin St.
Toronto, Ontario M6K 1Z5
[email protected]
LaCie Spain
C/ Núñez Morgado, 3, 5a pl.
28036 Madrid
[email protected]
LaCie France
17, rue Ampère 91349 Massy Cedex
[email protected]
LaCie Germany
Am Kesselhaus 5
D-79576 Weil Am Rhein
[email protected]
LaCie Switzerland
Davidsbodenstrasse 15 A
4004 Basel
[email protected]
LaCie Asia (HK)
25/F Winsan Tower
98 Thomson Road
Wanchai, Hong-Kong
[email protected]
LaCie Italy
Centro Direzionale Edificio B4
Via dei Missaglia 97
20142 Milano
[email protected]
LaCie Asia (Singapore)
Centennial Tower, Level 21
3 Temasek Avenue
Singapore 039190
[email protected]
LaCie Japan K.K.
Uruma Kowa Bldg. 6F
8-11-37 Akasaka, Minato-ku
Tokyo 107-0052
[email protected]
LaCie United Kingdom
and Ireland
46 Gillingham Street
London, England SW1V 1HU
UK: [email protected]
Ireland: [email protected]
LaCie Australia
458 Gardeners Rd.
Alexandria, NSW 2015
[email protected]
LaCie Netherlands
Postbus 134
3480 DC Harmelen
[email protected]
LaCie Belgium
Vorstlaan 165/ Bld du Souverain 165
1160 Brussels
[email protected]
LaCie Nordic
(Sweden, Denmark, Norway, Finland)
Sveavägen 90, 5tr
113 59 Stockholm, Sweden
[email protected]
710444
LaCie Worldwide Export
17, rue Ampère
91349 Massy Cedex, France
[email protected]
[email protected]
Visit www.lacie.com for more
information on LaCie products.