1
FAX System (K)
Operation Guide
Contents
General Notice . . . . . . . . . . . . . . . . . . . . . . . . . . . . . . . . . . . . . . . . . . . . . . . . . . . . . . . . . . . . . . . . . . . . . iii
Legal and Safety Information . . . . . . . . . . . . . . . . . . . . . . . . . . . . . . . . . . . . . . . . . . . . . . . . . . . . . . . . . vii
Legal Notice . . . . . . . . . . . . . . . . . . . . . . . . . . . . . . . . . . . . . . . . . . . . . . . . . . . . . . . . . . . . . . . . . vii
Safety Conventions in This Guide. . . . . . . . . . . . . . . . . . . . . . . . . . . . . . . . . . . . . . . . . . . . . . . . . vii
Important! Please Read First. . . . . . . . . . . . . . . . . . . . . . . . . . . . . . . . . . . . . . . . . . . . . . . . . . . . . ix
Installation Precautions . . . . . . . . . . . . . . . . . . . . . . . . . . . . . . . . . . . . . . . . . . . . . . . . . . . . . . . . . . x
Precautions for Use. . . . . . . . . . . . . . . . . . . . . . . . . . . . . . . . . . . . . . . . . . . . . . . . . . . . . . . . . . . . . x
Introduction . . . . . . . . . . . . . . . . . . . . . . . . . . . . . . . . . . . . . . . . . . . . . . . . . . . . . . . . . . . . . . . . . . . . . . . xi
Overview of Operation Guide . . . . . . . . . . . . . . . . . . . . . . . . . . . . . . . . . . . . . . . . . . . . . . . . . . . . xi
Conventions . . . . . . . . . . . . . . . . . . . . . . . . . . . . . . . . . . . . . . . . . . . . . . . . . . . . . . . . . . . . . . . . . xii
1
FAX System Parts
FAX System . . . . . . . . . . . . . . . . . . . . . . . . . . . . . . . . . . . . . . . . . . . . . . . . . . . . . . . . . . . . . . . . 1-2
Operation Panel . . . . . . . . . . . . . . . . . . . . . . . . . . . . . . . . . . . . . . . . . . . . . . . . . . . . . . . . . . . . . 1-3
2
Preparing to Fax
Menu Table . . . . . . . . . . . . . . . . . . . . . . . . . . . . . . . . . . . . . . . . . . . . . . . . . . . . . . . . . . . . . . . . . 2-2
Selecting the Line Type (Inch Model Only) . . . . . . . . . . . . . . . . . . . . . . . . . . . . . . . . . . . . . . . . . 2-3
Configuring TTI Settings . . . . . . . . . . . . . . . . . . . . . . . . . . . . . . . . . . . . . . . . . . . . . . . . . . . . . . . 2-4
Entering Fax Information (Local Information) . . . . . . . . . . . . . . . . . . . . . . . . . . . . . . . . . . . . . . . 2-5
Setting the Current Date and Time (Date & Time Setting) . . . . . . . . . . . . . . . . . . . . . . . . . . . . . 2-7
3
Basic Operation
Menu Table . . . . . . . . . . . . . . . . . . . . . . . . . . . . . . . . . . . . . . . . . . . . . . . . . . . . . . . . . . . . . . . . . 3-2
Sending Documents . . . . . . . . . . . . . . . . . . . . . . . . . . . . . . . . . . . . . . . . . . . . . . . . . . . . . . . . . . 3-4
Select the Original Size. . . . . . . . . . . . . . . . . . . . . . . . . . . . . . . . . . . . . . . . . . . . . . . . . . . . . . . 3-13
Select the Size for Fax . . . . . . . . . . . . . . . . . . . . . . . . . . . . . . . . . . . . . . . . . . . . . . . . . . . . . . . 3-14
Zoom Transmission. . . . . . . . . . . . . . . . . . . . . . . . . . . . . . . . . . . . . . . . . . . . . . . . . . . . . . . . . . 3-15
Continuous Scanning . . . . . . . . . . . . . . . . . . . . . . . . . . . . . . . . . . . . . . . . . . . . . . . . . . . . . . . . 3-16
Automatic Fax Reception . . . . . . . . . . . . . . . . . . . . . . . . . . . . . . . . . . . . . . . . . . . . . . . . . . . . . 3-17
Canceling Communications . . . . . . . . . . . . . . . . . . . . . . . . . . . . . . . . . . . . . . . . . . . . . . . . . . . 3-18
Entering Characters . . . . . . . . . . . . . . . . . . . . . . . . . . . . . . . . . . . . . . . . . . . . . . . . . . . . . . . . . 3-20
Address Book . . . . . . . . . . . . . . . . . . . . . . . . . . . . . . . . . . . . . . . . . . . . . . . . . . . . . . . . . . . . . . 3-24
Redialing . . . . . . . . . . . . . . . . . . . . . . . . . . . . . . . . . . . . . . . . . . . . . . . . . . . . . . . . . . . . . . . . . . 3-39
4
Basic Functions
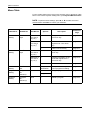
Menu Table . . . . . . . . . . . . . . . . . . . . . . . . . . . . . . . . . . . . . . . . . . . . . . . . . . . . . . . . . . . . . . . . . 4-2
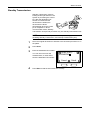
Standby Transmission . . . . . . . . . . . . . . . . . . . . . . . . . . . . . . . . . . . . . . . . . . . . . . . . . . . . . . . . . 4-3
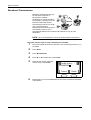
Broadcast Transmission . . . . . . . . . . . . . . . . . . . . . . . . . . . . . . . . . . . . . . . . . . . . . . . . . . . . . . . 4-4
Direct Transmission . . . . . . . . . . . . . . . . . . . . . . . . . . . . . . . . . . . . . . . . . . . . . . . . . . . . . . . . . . 4-7
Interrupt Transmission . . . . . . . . . . . . . . . . . . . . . . . . . . . . . . . . . . . . . . . . . . . . . . . . . . . . . . . . 4-8
Timer-based Transmission . . . . . . . . . . . . . . . . . . . . . . . . . . . . . . . . . . . . . . . . . . . . . . . . . . . . . 4-9
Deleting a Job in Memory . . . . . . . . . . . . . . . . . . . . . . . . . . . . . . . . . . . . . . . . . . . . . . . . . . . . . 4-11
Manual Fax Transmission . . . . . . . . . . . . . . . . . . . . . . . . . . . . . . . . . . . . . . . . . . . . . . . . . . . . . 4-13
Manual Fax Reception . . . . . . . . . . . . . . . . . . . . . . . . . . . . . . . . . . . . . . . . . . . . . . . . . . . . . . . 4-14
OPERATION GUIDE
i
One-Touch Keys . . . . . . . . . . . . . . . . . . . . . . . . . . . . . . . . . . . . . . . . . . . . . . . . . . . . . . . . . . . . 4-15
Programs. . . . . . . . . . . . . . . . . . . . . . . . . . . . . . . . . . . . . . . . . . . . . . . . . . . . . . . . . . . . . . . . . . 4-23
5
Advanced Functions
Menu Table . . . . . . . . . . . . . . . . . . . . . . . . . . . . . . . . . . . . . . . . . . . . . . . . . . . . . . . . . . . . . . . . . 5-2
Remote Switching . . . . . . . . . . . . . . . . . . . . . . . . . . . . . . . . . . . . . . . . . . . . . . . . . . . . . . . . . . . . 5-5
Polling Communication . . . . . . . . . . . . . . . . . . . . . . . . . . . . . . . . . . . . . . . . . . . . . . . . . . . . . . . . 5-7
Subaddress Communications . . . . . . . . . . . . . . . . . . . . . . . . . . . . . . . . . . . . . . . . . . . . . . . . . . 5-11
Subaddress-based Confidential Communications . . . . . . . . . . . . . . . . . . . . . . . . . . . . . . . . . . 5-12
Fax Forwarding . . . . . . . . . . . . . . . . . . . . . . . . . . . . . . . . . . . . . . . . . . . . . . . . . . . . . . . . . . . . . 5-24
Password-based Communications . . . . . . . . . . . . . . . . . . . . . . . . . . . . . . . . . . . . . . . . . . . . . . 5-31
Encrypted Communication . . . . . . . . . . . . . . . . . . . . . . . . . . . . . . . . . . . . . . . . . . . . . . . . . . . . 5-38
E-mail Notification of Job Results . . . . . . . . . . . . . . . . . . . . . . . . . . . . . . . . . . . . . . . . . . . . . . . 5-45
Displaying Job Status . . . . . . . . . . . . . . . . . . . . . . . . . . . . . . . . . . . . . . . . . . . . . . . . . . . . . . . . 5-46
Printing Communication Management Reports . . . . . . . . . . . . . . . . . . . . . . . . . . . . . . . . . . . . 5-53
User Login. . . . . . . . . . . . . . . . . . . . . . . . . . . . . . . . . . . . . . . . . . . . . . . . . . . . . . . . . . . . . . . . . 5-55
Job Accounting . . . . . . . . . . . . . . . . . . . . . . . . . . . . . . . . . . . . . . . . . . . . . . . . . . . . . . . . . . . . . 5-56
6
Network Fax
Overview of Network Fax . . . . . . . . . . . . . . . . . . . . . . . . . . . . . . . . . . . . . . . . . . . . . . . . . . . . . . 6-2
Initial FAX System Settings . . . . . . . . . . . . . . . . . . . . . . . . . . . . . . . . . . . . . . . . . . . . . . . . . . . . . 6-4
7
FAX System Settings
Menu Table . . . . . . . . . . . . . . . . . . . . . . . . . . . . . . . . . . . . . . . . . . . . . . . . . . . . . . . . . . . . . . . . . 7-2
Printing Reports . . . . . . . . . . . . . . . . . . . . . . . . . . . . . . . . . . . . . . . . . . . . . . . . . . . . . . . . . . . . . 7-4
Volume . . . . . . . . . . . . . . . . . . . . . . . . . . . . . . . . . . . . . . . . . . . . . . . . . . . . . . . . . . . . . . . . . . . . 7-8
Redial . . . . . . . . . . . . . . . . . . . . . . . . . . . . . . . . . . . . . . . . . . . . . . . . . . . . . . . . . . . . . . . . . . . . 7-10
Fax Media Type. . . . . . . . . . . . . . . . . . . . . . . . . . . . . . . . . . . . . . . . . . . . . . . . . . . . . . . . . . . . . 7-11
Number of Rings . . . . . . . . . . . . . . . . . . . . . . . . . . . . . . . . . . . . . . . . . . . . . . . . . . . . . . . . . . . . 7-12
Fax Reception Mode . . . . . . . . . . . . . . . . . . . . . . . . . . . . . . . . . . . . . . . . . . . . . . . . . . . . . . . . . 7-14
Reception Date and Time . . . . . . . . . . . . . . . . . . . . . . . . . . . . . . . . . . . . . . . . . . . . . . . . . . . . . 7-18
2in1 Reception . . . . . . . . . . . . . . . . . . . . . . . . . . . . . . . . . . . . . . . . . . . . . . . . . . . . . . . . . . . . . 7-19
Bulk Printing . . . . . . . . . . . . . . . . . . . . . . . . . . . . . . . . . . . . . . . . . . . . . . . . . . . . . . . . . . . . . . . 7-20
Remote Diagnosis. . . . . . . . . . . . . . . . . . . . . . . . . . . . . . . . . . . . . . . . . . . . . . . . . . . . . . . . . . . 7-21
Remote Diagnosis ID . . . . . . . . . . . . . . . . . . . . . . . . . . . . . . . . . . . . . . . . . . . . . . . . . . . . . . . . 7-22
8
Troubleshooting
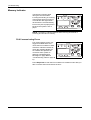
Memory Indicator . . . . . . . . . . . . . . . . . . . . . . . . . . . . . . . . . . . . . . . . . . . . . . . . . . . . . . . . . . . . 8-2
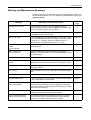
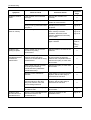
Warning and Maintenance Messages . . . . . . . . . . . . . . . . . . . . . . . . . . . . . . . . . . . . . . . . . . . . . 8-3
Troubleshooting Table. . . . . . . . . . . . . . . . . . . . . . . . . . . . . . . . . . . . . . . . . . . . . . . . . . . . . . . . . 8-5
9
Reference Information
Specifications . . . . . . . . . . . . . . . . . . . . . . . . . . . . . . . . . . . . . . . . . . . . . . . . . . . . . . . . . . . . . . . 9-2
Menu Flowcharts. . . . . . . . . . . . . . . . . . . . . . . . . . . . . . . . . . . . . . . . . . . . . . . . . . . . . . . . . . . . . 9-3
Error Code Table . . . . . . . . . . . . . . . . . . . . . . . . . . . . . . . . . . . . . . . . . . . . . . . . . . . . . . . . . . . . . 9-7
Index . . . . . . . . . . . . . . . . . . . . . . . . . . . . . . . . . . . . . . . . . . . . . . . . . . . . . . . . . . . . . . . . . . . . . . . . .Index-1
ii
OPERATION GUIDE
General Notice
Trademark Information
•
Microsoft, Windows, Windows NT and Internet Explorer are registered
trademarks of Microsoft Corporation of the US and other countries.
•
Windows ME and Windows XP are trademarks of Microsoft
Corporation.
•
Ethernet is a registered trademark of Xerox Corporation.
•
IBM and IBM PC-AT are trademarks of International Business
Machines Corporation.
•
Adobe and Acrobat are registered trademarks Adobe Systems
Incorporated.
All other company and product names contained in this Operation Guide
are trademarks or registered trademarks of their respective companies.
The designations™ and ® will not be used in this guide.
FCC PART 68 REQUIREMENTS
1. This equipment complies with Part 68 of the FCC rules and the
requirements adopted by the ACTA. On the rear side of the equipment to
install FAX System (K) is a label that contains, among other information, a
product identifier in the format US:AAAEQ##TXXXX. If requested, this
number must be provided to the telephone company.
2. This equipment connects to the network via USOC RJ11C.
3. A plug and jack used to connect this equipment to the premises wiring
and telephone network must comply with the applicable FCC Part 68 rules
and requirements adopted by the ACTA. A compliant telephone cord and
modular plug is provided with this product. It is designed to be connected
to a compatible modular jack that is also compliant. See installation
instructions for details.
4. The REN is used to determine the number of devices that may be
connected to a telephone line. Excessive RENs on a telephone line may
result in the devices not ringing in response to an incoming call. In most but
not all areas, the sum of RENs should not exceed five (5.0). To be certain
of the number of devices that may be connected to a line, as determined
by the total RENs, contact the local telephone company. For products
approved after July 23, 2001, the REN for this product is part of the product
identifier that has the format US:AAAEQ##TXXXX. The digits represented
by ## are the REN without a decimal point (e.g., 03 is a REN of 0.3). For
earlier products, the REN is separately shown on the label.
OPERATION GUIDE
iii
5. If this equipment causes harm to the telephone network, the telephone
company will notify you in advance that temporary discontinuance of
service may be required. But if advance notice isn't practical, the telephone
company will notify the customer as soon as possible. Also, you will be
advised of your right to file a complaint with the FCC if you believe it is
necessary.
6. The telephone company may make changes in its facilities, equipment,
operations or procedures that could affect the operation of the equipment.
If this happens the telephone company will provide advance notice in order
for you to make necessary modifications to maintain uninterrupted service.
7. If trouble is experienced with this equipment, please contact the
following company for repair and (or) warranty information:
If the equipment is causing harm to the telephone network, the telephone
company may request that you disconnect the equipment until the problem
is resolved.
8. This equipment cannot be used on public coin service provided by the
telephone company. Connection to Party line service is subject to state
tariffs. Contact the state public utility commission, public service
commission or corporation commission for information.
9. If your home has specially wired alarm equipment connected to the
telephone line, ensure the installation of this equipment does not disable
your alarm equipment. If you have questions about what will disable alarm
equipment, consult your telephone company or a qualified installer.
10. The Telephone Consumer Protection Act of 1991 makes it unlawful for
any person to use a computer or other electronic device, including FAX
machines, to send any message unless such message clearly contains in
a margin at the top or bottom of each transmitted page or on the first page
of the transmission, the date and time it is sent and an identification of the
business or other entity, or other individual sending the message and the
telephone number of the sending machine or such business, other entity,
or individual. (The telephone number provided may not be a 900 number
or any other number for which charges exceed local or long-distance
transmission charges.)
In order to program this information into your FAX machine, you should
complete the following steps:(Insure that it will be transmitted, see Selfstation registration on page 2-5, Setting the date and time on page 2-7, and
Transmit Terminal Identifier on page 2-4.)
iv
OPERATION GUIDE
IMPORTANT SAFETY INSTRUCTIONS
When using your telephone equipment, basic safety precautions should
always be followed to reduce the risk of fire, electric shock and injury to
persons, including the following:
CAUTION: To reduce the risk of fire, use only No.26 AWG or larger UL
listed or CSA certified telecommunication line cord.
1. Do not use this product near water, for example, near a bath tub, wash
bowl, kitchen sink or laundry tub, in a wet basement or near a swimming
pool.
2. Avoid using a telephone (other than a cordless type) during an electrical
storm. There may be a remote risk of electric shock from lightning.
3. Do not use the telephone to report a gas leak in the vicinity of the leak.
4. Use only the power cord and batteries indicated in this manual. Do not
dispose of batteries in a fire. They may explode. Check with local codes for
possible special disposal instructions.
SAVE THESE INSTRUCTIONS
IMPORTANTES MESURES DE SECURITE
Certaines mesures de securite doivent etre prises pendant l'utilisation de
materiel telephonique afin de reduire les risques d'incendie, de choc
electrique et de blessures. En voici quelques unes:
1. Ne pas utiliser l'appareil pres de l'eau, p. ex., pres d'une baignoire, d'un
lavabo, d'un evier de cuisine, d'un bac a laver, dans un sous-sol humide
ou pres d'une piscine.
2. Eviter d'utiliser le telephone (sauf s'il s'agit d'un appareil sans fil)
pendant un orage electrique. Ceci peut presenter un risque de choc
electrique cause par la foudre.
3. Ne pas utiliser l'appareil telephonique pour signaler une fuite de gaz s'il
est situe pres de la fuite.
4. Utiliser seulement le cordon d'alimentation et le type de piles indiques
dans ce manuel. Ne pas jeter les piles dans le feu: elles peuvent exploser.
Se conformer aux reglements pertinents quant a l'elimination des piles.
CONSERVER CES INSTRUCTIONS
OPERATION GUIDE
v
CANADIAN IC REQUIREMENTS
"This product meets the applicable Industry Canada technical
specifications"
"The Ringer Equivalence Number is an indication of the maximum number
of devices allowed to be connected to a telephone interface. The
termination on an interface may consist of any combination of devices
subject only to the requirement that the sum of the RENs of all the devices
does not exceed five."
The REN (CANADA) of this product is 0.8.
CONDITIONS DE L'IC CANADIENNE
"Le present materiel est conforme aux specifications techniques
applicables d'Industrie Canada."
"L'indice d'equivalence de la sonnerie (IES) sert a indiquer le nombre
maximal de terminaux qui peuvent etre raccordes a une interface
telephonique. La terminaison d'une interface peut consister en une
combinaison quelconque de dispositifs, a la seule condition que la somme
d'indices d'equivalence de la sonnerie de tous les dispositifs n'excede pas
5."
Le IES (CANADA) pour ce produit est 0.8.
Safety Instructions Regarding the Disconnection of Power
CAUTION: The power plug is the main isolation device! Other switches on
the equipment are only functional switches and are not suitable for
isolating the equipment from the power source.
ATTENTION: Le débranchement de la fiche secteur est le seul moyen de
mettre l'appareil hors tension. Les interrupteurs sur l'appareil ne sont que
des interrupteurs de fonctionnement : ils ne mettent pas l'appareil hors
tension.
vi
OPERATION GUIDE
Legal and Safety Information
Legal Notice
WE SHALL HAVE NO LIABILITY FOR LOSS, WHETHER OR PARTIAL,
OF RECEIVED DOCUMENTS WHEN SUCH LOSS IS CAUSED BY
DAMAGES TO THE FAX SYSTEM, MALFUNCTIONS, MISUSE, OR
EXTERNAL FACTORS SUCH AS POWER OUTAGES; OR FOR PURELY
ECONOMIC LOSSES OR LOST PROFITS RESULTING FROM MISSED
OPPORTUNITIES ATTRIBUTABLE TO MISSED CALLS OR RECORDED
MESSAGES RESULTING THEREFROM.
Safety Conventions in This Guide
Please read the Operation Guide before using the facsimile. Keep it close
to the facsimile for easy reference.
The sections of this handbook and parts of the facsimile marked with
symbols are safety warnings meant to protect the user, other individuals
and surrounding objects, and ensure correct and safe usage of the
facsimile. The symbols and their meanings are indicated below.
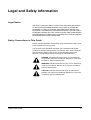
DANGER: Indicates that serious injury or even death will
very possibly result from insufficient attention to or incorrect
compliance with the related points.
WARNING: Indicates that serious injury or even death may
result from insufficient attention to or incorrect compliance
with the related points.
CAUTION: Indicates that personal injury or mechanical
damage may result from insufficient attention to or incorrect
compliance with the related points.
OPERATION GUIDE
vii
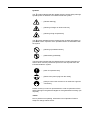
Symbols
The
symbol indicates that the related section includes safety warnings.
Specific points of attention are indicated inside the symbol.
.... [General warning]
.... [Warning of danger of electrical shock]
.... [Warning of high temperature]
The
symbol indicates that the related section includes information on
prohibited actions. Specifics of the prohibited action are indicated inside
the symbol.
.... [Warning of prohibited action]
.... [Disassembly prohibited]
The z symbol indicates that the related section includes information on
actions which must be performed. Specifics of the required action are
indicated inside the symbol.
.... [Alert of required action]
.... [Remove the power plug from the outlet]
....
[Always connect the machine to an outlet with a ground
connection]
Please contact your service representative to order a replacement if the
safety warnings in the guide are illegible or if the guide itself is missing. (fee
required)
<Note>
Due to performance updating, information in this Operation Guide is
subject to change without notice.
viii
OPERATION GUIDE
Important! Please Read First.
This Operation Guide includes information on using the facsimile functions
of this machine. Be sure to read the Operation Guide as well. Keep both
guides near the machine for ready reference.
During use, refer to the Operation Guide for your machine to obtain the
following information.
OPERATION GUIDE
•
Caution Labels
•
Installation Precautions
•
Precautions for Use
•
Loading Paper
•
Cleaning the Machine
•
Toner Container Replacement
•
Troubleshooting
•
Paper Jam
ix
Installation Precautions
Power supply/Grounding the product
Do not connect this product to the same outlet as an air conditioner or
copier, etc.
Precautions for Use
x
•
Do not open the top cover, turn off the power switch, or pull out the
power plug while transmitting, receiving, or copying.
•
This product may only be used within the country of purchase due to
the different safety and communication standards in each country.
(International communication standards, however, make the
communication between countries possible.)
•
This product may be inoperable in areas with poor telephone lines or
communication conditions.
•
“CALL WAITING” or other telephone company optional services that
produce audible tones or clicks on the line can disrupt or cause
termination of facsimile communications.
•
Be sure that the size of the paper loaded in the paper source matches
the size of the paper configured with the paper source size selection.
Failure to do so may cause the part of the received documents not
printed.
•
Be sure that the size of original documents matches the size
configured with the original size selection. Failure to do so may cause
the bottom portion of the original document not scanned.
OPERATION GUIDE
Introduction
Overview of Operation Guide
This Operation Guide has the following chapters:
Chapter 1: FAX System Parts
Identifies part names and functions.
Chapter 2: Preparing to Fax
Describes preliminary settings and how to prepare the FAX System for
use.
Chapter 3: Basic Operation
Describes basic fax operations, such as sending and receiving documents.
Chapter 4: Basic Functions
Describes basic functions provided by the FAX System.
Chapter 5: Advanced Functions
Describes more advanced fax functions.
Chapter 6: Network Fax
Describes the setup procedure and how to prepare the FAX System for
network fax.
Chapter 7: FAX System Settings
Describes mechanical and functional settings and usage reports.
Chapter 8: Troubleshooting
Describes how to resolve problems and respond to error messages.
Chapter 9: Reference Information
Provides FAX System specifications, menu flowcharts, and error code
tables.
OPERATION GUIDE
xi
Conventions
This manual uses the following conventions:
Convention
Description
Example
Italic Typeface
Used to emphasize a key word,
phrase, or message. (Also used
to indicate references to other
manuals.)
A Completed message is displayed, and
you are returned to the Copy Basic
screen.
Notes
Additional or useful information
about a function or feature. May
contain references to other
manuals.
Important
Important information.
Caution
Indicates the potential for
mechanical damage resulting
from a specific action.
Warning
xii
Warns users of the potential for
personal injury.
NOTE: For information on storing the
pin, refer to step 10.
IMPORTANT: Make sure the paper is not
folded, curled, or otherwise damaged.
CAUTION: Do not hold the front of the
machine when pulling out the cassette.
WARNING: The charger section
contains high voltages.
OPERATION GUIDE
1 FAX System Parts
This chapter identifies and describes FAX System parts and
Operation Panel keys:
•
•
OPERATION GUIDE
FAX System.................................................................. 1-2
Operation Panel ........................................................... 1-3
1-1
FAX System Parts
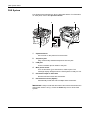
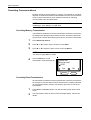
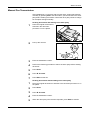
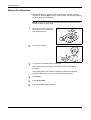
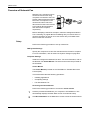
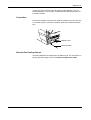
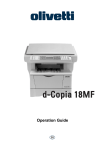
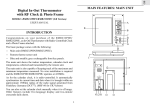
FAX System
FAX System parts pertaining to fax are described below. For information
on other parts, refer to the Operation Guide.
1
3
6
4
5
1
2
Operation Panel
Use controls on this panel to fax documents.
2
Telephone jack
Plug commercially-available telephones into this jack.
3
LINE jack
Connect modular phone cables to this jack.
4
Main power switch
Turn on this switch (|) to send faxes or make copies. The
message display will light when the FAX System is ready for use.
5
Document output or stack area
Received fax documents are stored here.
6
Document Processor (Option)
Automatically feeds and scans multiple sheet documents.
IMPORTANT: Keep in mind that documents cannot be received when the
main power switch is off ({). Press the Power key to turn off the FAX
System.
1-2
OPERATION GUIDE
FAX System Parts
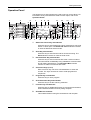
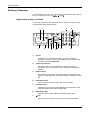
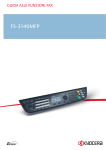
Operation Panel
The following keys and indicators are used to send or receive faxes. For
information on keys and indicators used to make copies, refer to the
Operation Guide.
1
4
5
6
7
8
9
10
11
12
13
14
Ready to send.
2005/01/08 11:09
2
3
15
16
17
18
1
Left
Placemnt
Off
Subject
19
20
22
21
23
24
26
25
27 28
Status/Job Cancel Key and Indicator
Press this key to enter Status/Job Cancel mode and to check job
status or cancel jobs. The Status/Job Cancel indicator remains
on while in Status/Job Cancel mode.
2
Send Key and Indicator
Press this key to enter Send mode for fax and scanning. The
Send indicator remains on while in Send mode.
3
Document Box Key and Indicator
Press this key to enter Document Box mode. Use this mode to
send documents confidentially using subaddress communication
and for polling transmission. The Document Box indicator
remains on while in Document Box mode.
4
One-touch Keys (1 to 8)
Each one-touch key can store a fax destination or chain dial
number. The keys can also be used to recall programmed
sequences.
5
Program Key and Indicator
Press this key to use a program.
6
Scan Resolution Key and Indicator
Press this key to set the scanning resolution.
7
Function Key and Indicator
Press this key for additional function such as direct transmission,
timer-based transmission and fax polling reception.
8
Send/Receive Indicator
This indicator flashes during fax transmission and reception.
OPERATION GUIDE
1-3
FAX System Parts
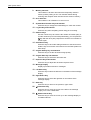
9
Memory Indicator
This indicator is lit when documents are temporarily stored in
memory before printing or fax. The indicator flashes during
scanning and reception when documents are stored in memory.
10 Error Indicator
This indicator is lit or flashes if an error occurs.
11 System Menu/Counter Key and Indicator
Press this key to change the initial settings or check the counter.
12 Log Out Key and Indicator
Press this key after completing a task using job accounting.
13 Numeric Keys
Use the numeric keys to enter the fax number of another party or
for other number input. Even with pulse dialing, you can press the
key after the other party responds to send the next number as
a tone signal.
14 Reset/Power Key
Press this key to cancel the setting and return to the basic screen.
Hold the key for more than 2 seconds to turn the FAX System into
Auto Sleep.
15 Original Quality Key and Indicator
Press this key to set the document image quality.
16 Original Size Key and Indicator
Press this key to select the document size.
17 Exposure Key and Indicator
Press this key to adjust the document exposure level.
18 Message Display
Displays procedures and error messages.
19 Left Select Key
Press this key to select the left item on the bottom of the message
display.
20 Right Select Key
Press this key to select the right item on the bottom of the
message display.
21 Back Key
Press this key to return to the previous, upper menu.
22 W Destination Key
Press this key to move the cursor to the left on the message
display or to enter a destination.
23 S Address Recall Key
Press this key to move the cursor up on the message display or
for Address Recall.
1-4
OPERATION GUIDE
FAX System Parts
24 T On-Hook/Pause Key
Press this key to move the cursor down on the message display
or to place the FAX System in off-hook mode when transmitting/
receiving the fax manually. You also can use this key to insert a
pause when entering another party’s number.
25 X Address Book Key
Press this key to move the cursor to the right on the message
display or to launch the Address Book when selecting the fax
destination.
26 Enter Key
Press this key to confirm your selection.
27 Stop/Clear Key
Press this key to cancel the job during scanning or clear entered
characters or numbers. On basic screen, press this key to delete
all the registered destination.
28 Start Key and Indicator
Press this key to start fax.
OPERATION GUIDE
1-5
FAX System Parts
1-6
OPERATION GUIDE
2 Preparing to Fax
Perform the required settings described in this chapter before
sending a fax for the first time.
This chapter discusses the following topics:
•
•
•
•
•
OPERATION GUIDE
Menu Table................................................................... 2-2
Selecting the Line Type (Inch Model Only)................... 2-3
Configuring TTI Settings............................................... 2-4
Entering Fax Information (Local Information) ............... 2-5
Setting the Current Date and Time (Date & Time Setting)
..................................................................................... 2-7
2-1
Preparing to Fax
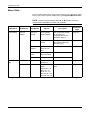
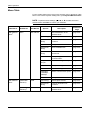
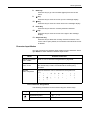
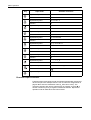
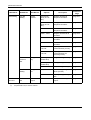
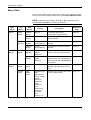
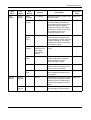
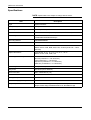
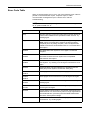
Menu Table
For the system setting menu using in this chapter, refer to the Menu Table
below. To access the system setting menu, press System Menu/Counter.
NOTE: To perform these settings, press S or T to select the menu/
submenu/item and Enter to confirm your selection.
Main Menu
FAX Setting
Date/Timer
Set
2-2
Options
Reference
Page
Sub Menu1
Sub Menu2
Description
FAX TX
Setting
FAX Line
Setting
Tone (DTMF),
Pulse (10pps)
Set up the FAX System
for the line type
corresponding to the
telephone service.
page 2-3
TTI
Off, Outside,
Inside
Set up printing details for
the Transmit Terminal
Identifier (TTI).
page 2-4
Local FAX
Number
(Numerical
Entry of Fax
No.)
Enter this fax number.
page 2-5
Local FAX
Name
(Text Entry of
the Fax Name)
Enter this fax name.
Local FAX ID
0000 – 9999
Enter this fax ID.
Time Zone
–
(Time Zone
Selection)
Select the local time zone.
page 2-7
Year/Time
–
Year: 2000 –
2037
Month: 01 – 12
Day: 01 – 31
Hour: 00 – 23
Minute: 00 – 59
Second: 00 – 59
Enter the current date and
time.
page 2-7
OPERATION GUIDE
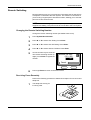
Preparing to Fax
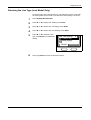
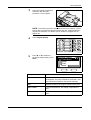
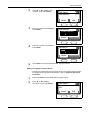
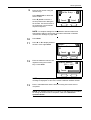
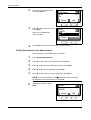
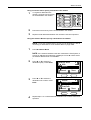
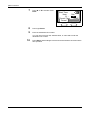
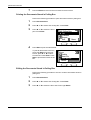
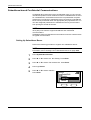
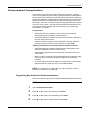
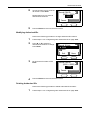
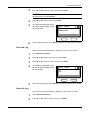
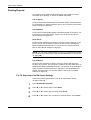
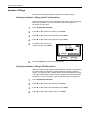
Selecting the Line Type (Inch Model Only)
Choose the line type corresponding to your telephone service. Note that
the FAX System cannot send or receive faxes if this setting is incorrect.
1
Press System Menu/Counter.
2
Press S or T to select FAX Setting. Press Enter.
3
Press S or T to select FAX TX Setting. Press Enter.
4
Press S or T to select FAX Line Setting. Press Enter.
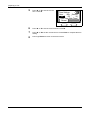
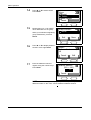
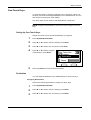
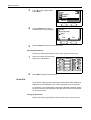
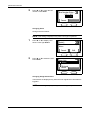
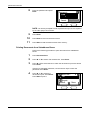
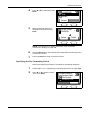
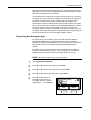
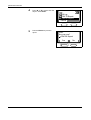
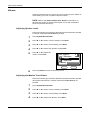
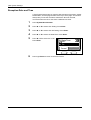
5
Press S or T to select the line
type. Press Enter to complete the
setting.
FAX Line Setting :
*Tone(DTMF)
Pulse(10pps)
Cancel
6
OPERATION GUIDE
Press right Select to return to the basic screen.
2-3
Preparing to Fax
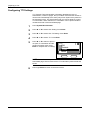
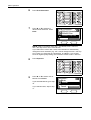
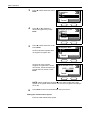
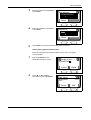
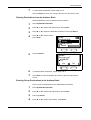
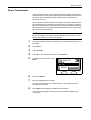
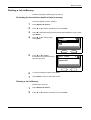
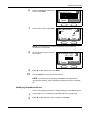
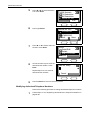
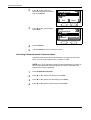
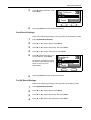
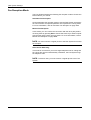
Configuring TTI Settings
TTI (Transmit Terminal Identifier) information identifies the time of
transmission, number of pages, and your station name and fax number. It
can be sent automatically to the other party’s FAX System to be printed on
the faxed document. This FAX System lets you choose whether to send
TTI information. When selected, TTI information can be printed inside or
outside the border of the transmitted page.
1
Press System Menu/Counter.
2
Press S or T to select FAX Setting. Press Enter.
3
Press S or T to select FAX TX Setting. Press Enter.
4
Press S or T to select TTI. Press Enter.
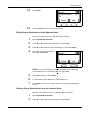
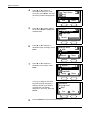
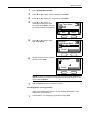
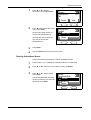
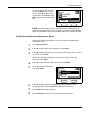
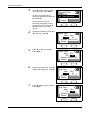
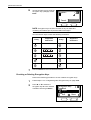
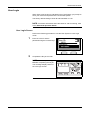
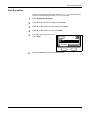
5
Press S or T to select to print or
not print TTI information and the
position if printed. Next, press
Enter to complete the TTI setting.
TTI :
*Off
Outside
Inside
Cancel
NOTE: Select Outside to print TTI information outside the border of the
transmitted page. Select Inside to have TTI information printed inside the
border.
6
2-4
Press right Select to return to the basic screen.
OPERATION GUIDE
Preparing to Fax
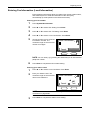
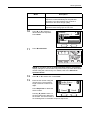
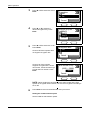
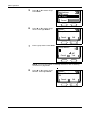
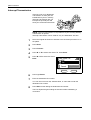
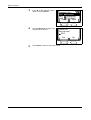
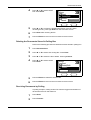
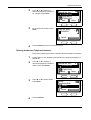
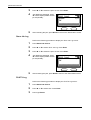
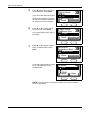
Entering Fax Information (Local Information)
Enter identifying information about your station (fax number, station name,
and station ID) here to send this information to the other party
automatically (it will be printed on the faxed documents).
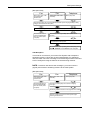
Entering your fax number
1
Press System Menu/Counter.
2
Press S or T to select FAX Setting. Press Enter.
3
Press S or T to select FAX TX Setting. Press Enter.
4
Press S or T to select Local FAX Number. Press Enter.
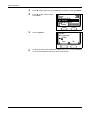
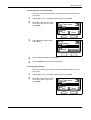
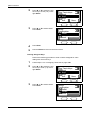
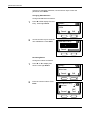
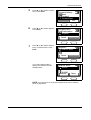
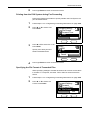
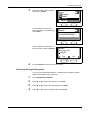
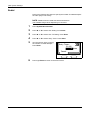
5
Use the numeric keys to enter the
local station number. The
maximum length of the local FAX
number is 20 digits.
Local FAX Number :
Cancel
NOTE: You can enter [+] by pressing the asterisk key for an international
telephone number.
6
Press Enter to complete the fax number setting.
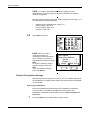
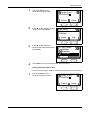
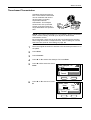
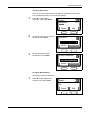
Entering your station name
1
Press S or T to select Local FAX Name. Press Enter.
2
Enter your station name. The
maximum length of the local FAX
name is 32 characters.
Local FAX Name :
Cancel
ABC
Text
NOTE: For detailed information on entering characters, refer to Entering
Characters on page 3-20.
3
OPERATION GUIDE
Press Enter to complete the station name setting.
2-5
Preparing to Fax
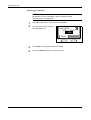
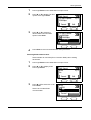
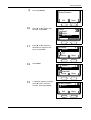
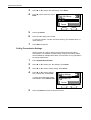
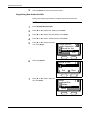
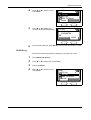
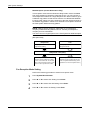
Entering your station ID
NOTE: The local station ID is used for secure communications involving
passwords. For more information, refer to Password-based
Communications on page 5-31.
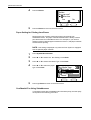
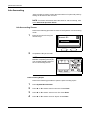
1
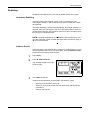
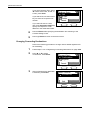
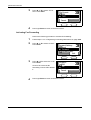
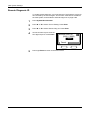
Press S or T to select Local FAX ID. Press Enter.
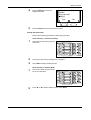
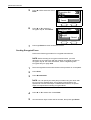
2
Use the numeric keys to enter a
four-digit station ID.
Local FAX ID :
* (0000 ~ 9999)
1409
Cancel
2-6
3
Press Enter to complete the station ID setting.
4
Press right Select to return to the basic screen.
OPERATION GUIDE
Preparing to Fax
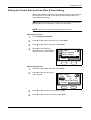
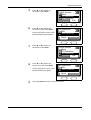
Setting the Current Date and Time (Date & Time Setting)
Set the date and time to appear in the message display. Confirm that the
date and time set here are correct (they will serve as the basis for all
scheduled transmissions).
IMPORTANT: Periodically check the time that is shown in the message
display and adjust as necessary to match the current time.
NOTE: Set the time zone before setting the date and time.
Setting the time zone
1
Press System Menu/Counter.
2
Press S or T to select Date/Timer Set. Press Enter.
3
Press S or T to select Time Zone. Press Enter.
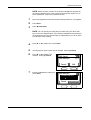
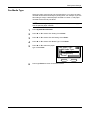
4
Press S or T to select the
desired time zone. Press Enter to
complete the time zone setting.
Time Zone :
-05:00 Indiana
-05:00 Bogota
-05:00 Estn Time
Cancel
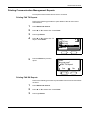
Setting date and time
OPERATION GUIDE
1
Press S or T to select Year/Time. Press Enter.
2
Press S or T to set the current
year. Press X.
3
Press S or T to set the current month. Press X.
4
Press S or T to set the current day. Press Enter.
Date Setting :
Year Month
Day
2005
01
08
( Time Zone: Estn Time)
Cancel
2-7
Preparing to Fax
2-8
5
Press S or T to set the current
hour. Press X.
6
Press S or T to set the current minute. Press X.
7
Press S or Tto set the current second. Press Enter to complete the time
setting.
8
Press right Select to return to the basic screen.
Time Setting :
Hour
Min. Second
11
c :
09 :
10
(Time Zone: Estn Time)
Cancel
OPERATION GUIDE
3 Basic Operation
This chapter discusses the following topics:
OPERATION GUIDE
•
•
•
•
•
•
•
•
Menu Table................................................................... 3-2
Sending Documents ..................................................... 3-4
Select the Original Size .............................................. 3-13
Select the Size for Fax ............................................... 3-14
Zoom Transmission .................................................... 3-15
Continuous Scanning ................................................. 3-16
Automatic Fax Reception ........................................... 3-17
Canceling Communications........................................ 3-18
•
•
•
Entering Characters ................................................... 3-20
Address Book ............................................................. 3-24
Redialing .................................................................... 3-39
3-1
Basic Operation
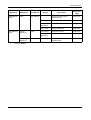
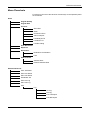
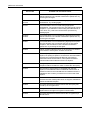
Menu Table
For the system setting menu using in this chapter, refer to the Menu Table
below. To access the system setting menu, press System Menu/Counter.
NOTE: To perform these settings, press S or T to select the menu/
submenu/item and Enter to confirm your selection.
Main Menu
Edit Address
book†
Edit Address
book
3-2
Sub Menu1
Sub Menu2
Menu
Add Address
(Destination
Selection)
Detail†
(Destination
Selection)†
Menu
Options
Reference
Page
Description
–
Add a destination to the
Address Book.
page 3-25
(Text Entry)
Enter recipient names.
page 3-25
(Numerical
Entry)
Enter destination fax
numbers.
page 3-25
001 – 120
Assign addresses.
page 3-25
(Numerical
Entry)
Enter subaddresses.
page 3-25
(Numerical
Entry)
Enter subaddress
passwords.
page 3-25
On, Off
Set up encrypted
communication.
page 3-25
Key01 –
Key20
Select the encryption key.
page 3-25
On, Off
Set up an encryption box.
page 3-25
0000 – 9999
Select an encryption box.
page 3-25
33600bps,
14400bps,
9600bps
Select a transmission speed.
page 3-25
On, Off
Set up ECM communication.
page 3-25
(Text Entry)
Edit recipient names.
page 3-32
(Numerical
Entry)
Change destination fax
numbers.
page 3-32
–
Delete a destination from the
Address Book.
page 3-33
OPERATION GUIDE
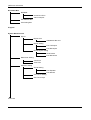
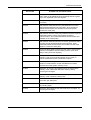
Basic Operation
Main Menu
Edit Address
book†
Edit Address
book
†.
Sub Menu1
Sub Menu2
Menu
Add Address
(Group
Selection)
Detail†
(Group
Selection)†
Menu
Options
Description
Reference
Page
–
Add a new group to the
Address Book.
page 3-33
(Text Entry)
Enter group names.
page 3-33
(Assigning
Members)
Assign group members.
page 3-33
001 – 120
Assign addresses.
page 3-33
(Text Entry)
Edit group names.
page 3-37
(Editing
Members)
Edit group member names.
page 3-37
–
Delete a group from the
Address Book.
page 3-37
Press right Select.
OPERATION GUIDE
3-3
Basic Operation
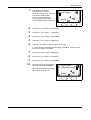
Sending Documents
The basic method for sending documents is described below.
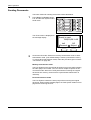
1
Press Send. The Send indicator
is lit, and the FAX System enters
Send mode.
The Send screen is displayed on
the message display.
Ready to send.
2005/01/08 11:09
Left
Placemnt
2
Off
Subject
Choose the fax mode. Select from memory transmission mode or direct
transmission mode. (The default setting is memory transmission mode.)
To choose direct transmission mode, follow the procedure given in Direct
Transmission on page 4-7.
Memory transmission mode
The FAX System scans the original document into memory before dialing
the other party’s fax number. You can choose multiple recipients in this
convenient mode. When the FAX System finishes scanning the original
document into memory, the document is ejected while transmission is
underway.
Direct transmission mode
The FAX System contacts the other party before scanning the original
document. When sending multiple pages, the FAX System sends one full
page before scanning the next.
3-4
OPERATION GUIDE
Basic Operation
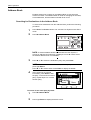
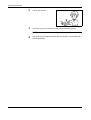
3
Place the original document to
transmit in the document
processor or on the platen.
NOTE: To avoid the part of the original document from missing, confirm
that the size of original documents matches the size configured with the
original size selection. For details, refer to Select the Original Size on
page 3-13.
4
Press Original Quality.
5
Press S or T to select the
document image quality. Press
Enter.
Item
OPERATION GUIDE
Original Quality :
*Text+Photo
Photo
Text
Cancel
Description
Photo
Select this mode if the original contains mainly
photographs. The scan resolution is set to 200 × 200
Fine. Document exposure must be set manually.
Text
Select this mode if the original contains mainly text.
Text + Photo
For fax transmissions, this setting is equivalent to
Text.
OCR
For fax transmissions, this setting is equivalent to
Text.
3-5
Basic Operation
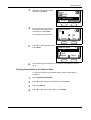
6
Press Scan Resolution.
7
Press S or T to select the
desired scan resolution. Press
Enter.
Scan Resolution :
*
*200x100
Normal
200x200 Fine
200x400 Sup Fine
Cancel
NOTE: Select a resolution from 200 × 100 Normal, 200 × 200 Fine,
200 × 400 Sup Fine or 400 × 400 Ult Fine.
If you select 300 × 300 or 600 × 600, scan resolution is automatically
changed to lower resolution (e.g. 300 × 300 is changed to 200 × 400 Sup
Fine.) when you select fax as a destination. In addition, if you choose
Photo in original quality setting, the resolution is fixed to 200 × 200 Fine.
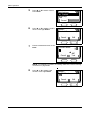
8
Press Exposure.
9
Press S or T to select Auto or
Manual. Press Enter.
If you selected Manual, go to step
10.
If you selected Auto, skip to step
11.
3-6
Exposure :
*Auto
Manual
Cancel
OPERATION GUIDE
Basic Operation
Mode
Description
Auto
If you select this mode, the optimal document
exposure is set automatically for the particular
document. You cannot select Auto if Photo is
selected for document image quality.
Manual
Select document exposure settings from seven
exposure levels if the grays are not clear.
10
Press S or T to select the
desired document exposure.
Press Enter.
11
Press W Destination.
Manual :
* Lighter -1
* Normal
Darker +1
Cancel
NOTE: If you select FAX in the initial destination settings, the message
display changes to a fax number entry screen when you enter the first fax
number using the numeric keys. For details, refer to the Advanced
Operation Guide.
12
Press S or T to select FAX. Press Enter.
13
Enter the fax number using the
numeric keys. The maximum
length of the fax number is 64
digits.
Press Stop/Clear to delete the
entire number.
Fax No. Entry :
0123456789
*
Cancel
Detail
Pressing T pause inserts a 3second pause when dialing the
fax number. Use this function to
set a waiting time for automatic response sequences.
OPERATION GUIDE
3-7
Basic Operation
NOTE: To configure the detailed transmission settings such as
subaddresses, perform the procedure given in Detailed Transmission
Settings on page 3-8.
Besides entering the other party’s fax number using the numeric keys, you
can dial using the following methods:
•
•
•
•
14
Dialing from the Address Book...page 3-24
Manual redial...page 3-39
One-touch dial...page 4-15
Program...page 4-23
Press Start to start fax.
NOTE: When you select
continuous scanning, a
confirmation screen will prompt
you to continue scanning the
original document after you press
Start.
To continue scanning, change
original document and press
Start.
If you are finished scanning,
press right Select.
Set original
and* press start key.
Job No. :
8
4
Page(s) :
End Scan
Cancel
Detailed Transmission Settings
After entering the other party’s fax number, you can complete settings for
the subaddress, encrypted communication, transmission speed, and ECM
communication.
Entering the Subaddress
Enter the subaddress and the password for subaddress confidential
communication. For details on subaddress communication and
subaddress confidential communication, refer to chapter 5 Advanced
Functions.
1
3-8
Press right Select on the destination fax input screen.
OPERATION GUIDE
Basic Operation
2
Press S or T to display Sub
Address. Press right Select.
FAX Detail:
Sub Address :
Cancel
3
Enter the number for Subaddress.
Press Enter.
1/ 4
Edit
Sub Address :
1234567890123
Cancel
4
Enter the number for Password.
Press Enter.
Password:
Cancel
5
Press Enter to return to the destination fax input screen.
Setting encrypted communications
Enter the encryption key and encryption box for encrypted communication.
For details on encrypted communication, refer to chapter 5 Advanced
Functions.
1
Press right Select on the destination fax input screen.
2
Press S or T to display
Encryption. Press right Select.
FAX Detail:
Encryption :
Off
Cancel
OPERATION GUIDE
2/ 4
Edit
3-9
Basic Operation
3
Press S or T to select On. Press
Enter.
Encryption :
*Off
On
Cancel
4
Press S or T to select the
desired encryption key. Press
Enter.
5
Press S or T to select On or Off.
Press Enter.
Choose Off if the recipient does
not support encryption box.
Encrypt. Key No. :
*Key02
Key03
Key04
Cancel
Encryption Box :
*Off
On
Cancel
Choose On if the recipient
supports encryption box. On the
next screen, use the numeric keys
to enter the box number. Press
Enter.
Box Number Entry :
(0000 ~ 9999)
0000
Cancel
NOTE: When sending the documents to the same model as the FAX
System in encrypted communication, be sure the encryption box setting is
set to Off.
6
Press Enter to return to the destination fax input screen.
Setting the communication speed
Enter the initial transmission speed.
3-10
OPERATION GUIDE
Basic Operation
1
Press right Select on the destination fax input screen.
2
Press S or T to display TX Start
Speed. Press right Select.
FAX Detail:
TX Start Speed :
33600bps
Cancel
3
Press S or T to select the
desired initial communication
speed. Press Enter.
4
Press Enter to return to the destination fax input screen.
3/ 4
Edit
TX Start Speed :
*9600bps
14400bps
*33600bps
Cancel
Selecting ECM communication
Select whether to use ECM (Error Correction Mode) when sending
documents.
1
Press right Select on the destination fax input screen.
2
Press S or T to display ECM.
Press right Select.
FAX Detail:
ECM:
On
Cancel
3
Press S or T to select On or Off.
Press Enter.
Select On to enable ECM
communication.
4/ 4
Edit
ECM:
*Off
On
Cancel
OPERATION GUIDE
3-11
Basic Operation
4
3-12
Press Enter to return to the destination fax input screen.
OPERATION GUIDE
Basic Operation
Select the Original Size
The original size is the physical size of the original. Since this setting
defines the area to be scanned, it must match the physical size of the
original. The following sizes are supported:
Letter, Legal, Statement, A4, A5, A6, B5, B6, Folio, OficioII, Executive, ISO
B5, 16K, Envelope #10, Envelope #9, Envelope Monarch, Envelope #6,
Envelope C5, Envelope DL, Hagaki, Oufukuhagaki, Youkei 2, Youkei 4,
and Custom
1
Press Send.
2
Press Original Size.
3
Press S or T to select the
original size. Press Enter to
return to the basic screen.
Original Size :
*Letter
Legal
Statement
Cancel
NOTE: Select Others to display the Others screen. Here, you can choose
postcard, envelope, or registered custom sizes.
OPERATION GUIDE
3-13
Basic Operation
Select the Size for Fax
You can specify the size at which the document will be faxed. Supported
sizes are as follows:
Same as Original, Letter, Legal, Statement, A4, A5, A6, B5, B6, Folio,
OficioII, Executive, ISO B5, 16K, Envelope #10, Envelope #9, Envelope
Monarch, Envelope #6, Envelope C5, Envelope DL, Hagaki,
Oufukuhagaki, Youkei 2, Youkei 4, and Custom
NOTE: When sending fax, we recommend you to select Same as
Original.
1
Press Send.
2
Press Function.
3
Press S or T to select Send Size. Press Enter.
4
Press S or T to select the size to
scan documents for transmission.
Press Enter.
Send Size :
*Same as Original
Letter
Legal
Cancel
NOTE: Select Others to display the Others screen. Here, you can choose
postcard, envelope, or registered custom sizes.
5
3-14
Press right Select to return to the basic screen.
OPERATION GUIDE
Basic Operation
Zoom Transmission
Follow these steps to scan the document in enlarged or reduced format for
fax. The following zoom options are available.
Mode
Description
100%
Fax at original size.
Auto
Automatically adjust the size as faxed to match the
document size.
1
Place the original document to transmit in the document processor or on
the platen.
2
Press Send.
3
Press Function.
4
Press S or T to select Zoom. Press Enter.
5
Press S or T to select 100% or
Auto. Press Enter.
Zoom :
* 100%
Auto
Cancel
6
OPERATION GUIDE
Press right Select to return to the basic screen.
3-15
Basic Operation
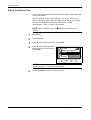
Continuous Scanning
Use Continuous Scan to send multiple original document placing on the
platen.
NOTE: For instructions on using continuous scanning mode, refer to
Sending Documents on page 3-4.
1
Press Send.
2
Press Function.
3
Press S or T to select Continuous Scan. Press Enter.
4
Press S or T to select On. Press
Enter.
Continuous Scan:
* Off
On
Cancel
5
3-16
Press right Select to return to the basic screen.
OPERATION GUIDE
Basic Operation
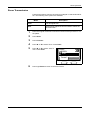
Automatic Fax Reception
To use the FAX System for fax communications only, select Automatic Fax
Reception mode. In this mode, no user operations are required to receive
faxes.
NOTE: Before faxes can be received automatically, you must select Auto
(Normal) using the method described in Fax Reception Mode on page 714.
The FAX System provides the following modes to receive a fax:
•
•
•
•
•
Automatic Fax Reception
Manual Fax Reception...page 4-14
Auto FAX/TEL Switching...page 7-14
Auto FAX/Answering Machine Switching...page 7-15
DRD Reception...page 7-16
To change reception modes, follow the procedure given in Fax Reception
Mode on page 7-14.
Delayed delivery
If received documents cannot be output because the FAX System has run
out of paper or due to paper jam, the FAX System will temporarily store
received documents in memory. The documents are printed later when
printing becomes available.
OPERATION GUIDE
3-17
Basic Operation
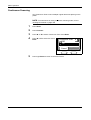
Canceling Communications
Enables canceling communication in progress. The method for canceling
depends on whether transmission was initiated from memory transmission
mode or direct transmission mode. Different methods for canceling
communications are described below.
NOTE: For instructions on canceling timer-based transmission jobs, refer
to Deleting a Job in Memory on page 4-11.
Canceling Memory Transmission
Transmissions initiated from memory transmission mode are processed in
the background. Background processes must be canceled in Status/Job
Cancel mode. Perform the following procedure to cancel the transmission.
1
Press Status/Job Cancel.
2
Press S or T to select Send Job Status. Press Enter.
3
Press S or T to select the job to cancel. Press left Select.
NOTE: To check transmission details, press right Select. Refer to Send
Job Status on page 5-47 for details.
4
Press left Select to cancel
transmission of that particular job.
Cancel Job.
Are you sure?
0010
Yes
No
Canceling Direct Transmission
All transmissions initiated from direct transmission mode are processed in
the foreground, and the status of these transmissions is always indicated
on the message display. Perform the following procedure to cancel the
transmission.
3-18
1
Press Send. The Send indicator is lit and the FAX System enters Send
mode.
2
The transmission status is shown on the message display. Confirm the
details.
OPERATION GUIDE
Basic Operation
3
Press left Select or Stop/Clear to
stop transmission. Any
documents placed in the
document processor are ejected.
Scanning.
*
Job No. :
Job No.:
0007
Cancel
OPERATION GUIDE
3-19
Basic Operation
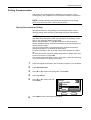
Entering Characters
To edit Address book, etc., the characters are entered using the numeric
keys. To move the cursor, use W, X, S and T.
Input screen and key functions
This section explains screen elements and the functions of keys on the
control panel during character entry.
1
2
3
4
Contact Name :
h_offic
Cancel
5
1
ABC
Text
6
7
8
9
10
11
12
13
Cursor
Characters are entered at the cursor position. To delete a
character, move the cursor to the location of the corresponding
character and press Stop/Clear.
2
Character Limit Icon
Indicates when you have entered the maximum number of
characters. You can continue to enter characters until this icon
appears.
3
Numeric Keys
Use numeric keys to enter characters. Refer to Character Input
Modes on page 3-21 for a list of the characters available for each
key.
4
Reset/Power Key
Press this key to clear the entry and exit input mode.
5
Left Select Key
Press this key to access options displayed on the bottom of the
message display and to select the left item.
6
Right Select Key
Press this key to switch between character input modes.
7
W Key
Press this key to move the cursor left in the message display.
3-20
OPERATION GUIDE
Basic Operation
8
Back key
Press this key to go one level back (higher) from the current
menu.
9
S Key
Press this key to move the cursor up in the message display.
10 T Key
Press this key to move the cursor down in the message display.
11 Enter Key
Press this key to enter the currently selected character.
12 X Key
Press this key to move the cursor to the right in the message
display.
13 Stop/Clear Key
Press this key to delete the currently selected character. If the
cursor is at an open position, the character to the left of the cursor
is deleted.
Character Input Modes
Use one of these three character input modes to enter characters. Press
right Select to switch between character input modes.
Mode
Available characters
Alphabetic/Symbol
Text Æ ABC
Refer to List of Character Assignments on page 3-21.
Numeric
Text Æ 123
Numbers can be entered by pressing the corresponding key on
the numeric keys. This is convenient when entering long
numbers.
Symbol
Text Æ Symbols
Special characters can be entered from the Symbol List.
(space)
!
”
#
$
%
&
’
(
)
*
+
,
-
.
/
:
;
<
=
>
?
@
[
\
]
^
_
`
{
|
}
~
List of Character Assignments
The following characters can be entered using the numeric keys:
Key
OPERATION GUIDE
Input mode
Available characters
Alphabetic/Symbol
.@-_/:~1
Numeric
1
3-21
Basic Operation
Key
Input mode
Available characters
Alphabetic/Symbol
abcABC2
Numeric
2
Alphabetic/Symbol
defDEF3
Numeric
3
Alphabetic/Symbol
ghiGHI4
Numeric
4
Alphabetic/Symbol
jklJKL5
Numeric
5
Alphabetic/Symbol
mnoMNO6
Numeric
6
Alphabetic/Symbol
pqrsPQRS7
Numeric
7
Alphabetic/Symbol
tuvTUV8
Numeric
8
Alphabetic/Symbol
wxyzWXYZ9
Numeric
9
Alphabetic/Symbol
.,-_’!?_0
Numeric
0
Alphabetic/Symbol
Switch between upper/lower case
Numeric
Alphabetic/Symbol/Numeric
#
Character Input Procedure
Follow the steps given below to enter characters for destination names and
other text input. This example uses the List of Character Assignments on
page 3-21 to enter the destination name (h_office show room). The
character changes each time a particular key is pressed, so press X or
another numeric keys key to register individual characters. Repeat this
operation until all characters have been entered.
3-22
OPERATION GUIDE
Basic Operation
1
The following procedure
illustrates how to enter a
destination name. (You must first
access the Contact Name
screen.) The procedure for
accessing the Contact Name
screen is described on page 3-25.
Contact Name :
Cancel
2
Press the f key 2 times. h is displayed.
3
Press the c key 4 times. _ is displayed.
4
Press the h key 3 times. o is displayed.
5
Press the e key 3 times. f is displayed.
6
Press X. The cursor moves one space to the right.
ABC
Text
To enter the same character consecutively, press X to move the cursor.
Enter the character once again.
7
Press the e key 3 times. f is displayed.
8
Press the f key 3 times. i is displayed.
9
Press the d key 3 times. c is displayed.
10
Enter the rest of the characters in
the same way and press Enter.
Registered will appear before you
return to the basic screen.
Contact Name :
h_office show room
Cancel
OPERATION GUIDE
ABC
Text
3-23
Basic Operation
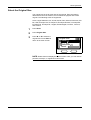
Address Book
Enables entering fax numbers in the Address Book to use them with
scanner functions. The Address Book is useful in managing fax numbers,
e-mail addresses, and the folders used with Scan to PC.
Searching for Destinations in the Address Book
To select a fax destination from the Address Book, perform the following
procedure.
1
Press Send. The Send indicator is lit, and the FAX System enters Send
mode.
2
Press X Address Book.
NOTE: If external address books are used with the FAX System, a
screen for address book selection is displayed. Press S or T to select
the desired address book. Press Enter.
3
Press S or T to select the destination party and press Enter.
NOTE: To check the entered information, select the party to review and
press right Select.
Press S or T to select Detail. Press Enter to display the details.
4
After confirming the entered
information, press Enter to add
the party. To send a fax to another
party, repeat steps 2 to 4 to add
another party.
ABCDE
*0123456789
[email protected]
ScanData
Cancel
Menu
To search for the other party by name:
3-24
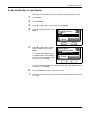
1
Press X Address Book.
2
Press right Select to display the Menu screen.
OPERATION GUIDE
Basic Operation
3
Press S or T to select Search
(Name). Press Enter.
4
Enter the first few characters of
the name of the party you are
searching for. Press Enter.
Menu :
*Select
Detail
Search(Name)
Cancel
Search(Name) :
TTT
This search is case-sensitive.
Cancel
ABC
Text
5
Press S or T to select the party.
Press Enter.
6
After confirming the information to be entered, press Enter to add the
party.
Address Book :
*TTT
UUU
VVV
Cancel
Menu
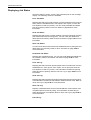
Entering Destinations in the Address Book
To enter fax recipients in the Address Book, perform the following
procedure.
OPERATION GUIDE
1
Press System Menu/Counter.
2
Press S or T to select Edit Addressbook. Press Enter.
3
Press right Select.
4
Press S or T to select Add Address. Press Enter.
3-25
Basic Operation
5
Press S or T to select Contact.
Press Enter.
Add Address
*Contact
Group
Cancel
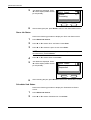
6
Press S or T to display Contact
Name. Press right Select.
Detail:
Contact Name:
1/ 6
Cancel
7
Enter the destination name. Press
Enter.
Edit
Contact Name :
Cancel
ABC
Text
NOTE: For detailed information on entering characters, refer to Entering
Characters on page 3-20.
8
Press S or T to display FAX
Number. Press right Select.
Detail:
FAX Number :
Cancel
3-26
2/ 6
Edit
OPERATION GUIDE
Basic Operation
9
Enter the fax number using the
numeric keys.
FAX No. Entry:
Press Stop/Clear to delete the
entire number.
Press T pause to insert a 3second pause when dialing the
fax number. Use this function to
set a wait time in an automatic
response sequence.
Cancel
Detail
NOTE: To complete settings for subaddresses and other advanced
transmission settings, perform the procedures described in Detailed
Transmission Settings on page 3-28.
10
Press Enter.
11
Press S or T to display Address
Number. Press right Select.
Detail:
Address Number :
53
Cancel
12
Enter the address number to be
registered using the numeric
keys. Press Enter.
6/ 6
Edit
Address Number :
* (001 ~ 120)
53
Cancel
NOTE: If you enter a previously entered address number, an error
message is displayed. In this case, choose a different address number.
13
Enter e-mail addresses and the folder for saving documents sent to
computers.
NOTE: For detailed information on entering e-mail addresses and folders
for saving documents sent to computers, refer to the Advanced
Operation Guide.
OPERATION GUIDE
3-27
Basic Operation
14
Press Enter.
Detail:
FAX Number
0123456789
Cancel
15
2/ 6
Edit
To enter another destination, repeat steps 3 to 14.
Press left Select to complete the entry. The message display returns to the
basic screen.
Detailed Transmission Settings
When entering fax number, you can also configure settings for the
subaddress, encrypted communication, transmission speed, and ECM
communication.
Setting the Subaddress
Enter the subaddress and password required for subaddress confidential
communication.
1
Press right Select on the
destination fax input screen.
Fax No. Entry :
0123456789
*
Cancel
2
Press S or T to display Sub
Address. Press right Select.
FAX Detail:
Sub Address :
Cancel
3-28
Detail
1/ 4
Edit
OPERATION GUIDE
Basic Operation
3
Enter the number for Subaddress.
Press Enter.
Sub Address :
1234567890123
Cancel
4
Enter the number for Password.
Press Enter.
Password:
Cancel
5
Press Enter to return to the destination fax input screen.
Setting up encrypted communication
Enter the encryption key and encryption box for use in encrypted
communication.
1
Press right Select on the
destination fax input screen.
Fax No. Entry :
0123456789
*
Cancel
2
Press S or T to display
Encryption. Press right Select.
FAX Detail:
Encryption :
Off
Cancel
OPERATION GUIDE
Detail
2/ 4
Edit
3-29
Basic Operation
3
Press S or T to select On. Press
Enter.
Encryption :
*Off
On
Cancel
4
Press S or T to select the
desired encryption key. Press
Enter.
5
Press S or T to select On or Off.
Press Enter.
Choose Off if the recipient does
not support encryption box.
Encrypt. Key No. :
*Key02
Key03
Key04
Cancel
Encryption Box :
*Off
On
Cancel
Choose On if the recipient
supports encryption box. On the
next screen, use the numeric keys
to enter the box number. Press
Enter.
Box Number Entry :
(0000 ~ 9999)
0000
Cancel
NOTE: When sending the documents to the same model as the FAX
System in encrypted communication, be sure the encryption box setting is
set to Off.
6
Press Enter to return to the destination fax input screen.
Setting the communication speed
Set the initial fax transmission speed.
3-30
OPERATION GUIDE
Basic Operation
1
Press right Select on the
destination fax input screen.
Fax No. Entry :
0123456789
*
Cancel
2
Press S or T to display TX Start
Speed. Press right Select.
Detail
FAX Detail:
TX Start Speed :
33600bps
Cancel
3
Press S or T to select the
desired initial transmission speed.
Press Enter.
4
Press Enter to return to the destination fax input screen.
3/ 4
Edit
TX Start Speed :
*9600bps
14400bps
*33600bps
Cancel
Setting up ECM communication
For fax communication, enables or disables ECM (Error Correction Mode).
1
Press right Select on the
destination fax input screen.
Fax No. Entry :
0123456789
*
Cancel
OPERATION GUIDE
Detail
3-31
Basic Operation
2
Press S or T to display ECM.
Press right Select.
FAX Detail:
ECM:
On
Cancel
3
Press S or T to select On or Off.
Press Enter.
Select On to enable ECM
communication.
4/ 4
Edit
ECM:
*Off
On
Cancel
4
Press Enter to return to the destination fax input screen.
Editing Destinations in the Address Book
Edit destinations in the Address Book as follows:
1
Press System Menu/Counter.
2
Press S or T to select Edit Addressbook. Press Enter.
3
Press S or T to select the destination to edit. Press Enter.
4
Press S or T to select Detail/Edit. Press Enter.
5
Press S or T to select the item to edit. Press right Select.
NOTE: For more information on editing each item, refer to Entering
Destinations in the Address Book on page 3-25.
6
After editing the items, press
Enter.
Detail :
Contact Name :
ABCDE
Cancel
3-32
1/ 6
Edit
OPERATION GUIDE
Basic Operation
7
To edit another destination, repeat steps 3 to 5.
Press left Select to save your changes and return to the basic screen.
Deleting Destinations from the Address Book
Delete destinations from the Address Book as follows:
1
Press System Menu/Counter.
2
Press S or T to select Edit Addressbook. Press Enter.
3
Press S or T to select the destination to delete. Press right Select.
4
Press S or T to select Delete.
Press Enter.
5
Press left Select.
Menu :
*Detail/Edit
Delete
Add Address
Cancel
Delete.
Are you sure?
ABCDE
Yes
No
6
To delete another destination, repeat steps 3 to 5.
7
Press Enter to finish the deletion and return to the Edit Addressbook
screen.
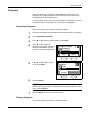
Entering Group Destinations in the Address Book
Enter a group of destinations in the Address Book as follows:
OPERATION GUIDE
1
Press System Menu/Counter.
2
Press S or T to select Edit Addressbook. Press Enter.
3
Press right Select.
4
Press S or T to select Add Address. Press Enter.
3-33
Basic Operation
5
Press S or T to select Group.
Press Enter.
Add Address
*Contact
Group
Cancel
6
Press S or T to select Group
Name. Press right Select.
Detail:
Group Name :
1/ 3
Cancel
7
Enter a group name. Press Enter.
Edit
Group Name :
Cancel
ABC
Text
NOTE: For more information on entering characters, refer to Entering
Characters on page 3-20.
8
Press S or T to select Group
Member. Press right Select.
Detail:
Group Member :
30
Cancel
3-34
2/ 3
Edit
OPERATION GUIDE
Basic Operation
9
Press right Select.
Group Member :
*
Exit
10
Press S or T to select Add
Member. Press Enter.
11
Press S or T to select the
destination to register to the
group. Press Enter.
12
Press Enter.
13
To delete a registered member,
press S or T to select the
member. Press right Select.
Menu :
Detail
Delete
Add Member
Cancel
Contacts:
*ABCDE
FGHIJ
TTT
Cancel
Menu
ABCDE
*0123456789
[email protected]
ScanData
Cancel
Menu
Group Member :
*ABCDE
Exit
OPERATION GUIDE
Menu
Menu
3-35
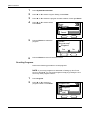
Basic Operation
14
Press S or T to select Delete.
Press Enter.
15
Repeat steps 9 to 14 to register
other destinations to the group.
When you are finished registering
group destinations, press left
Select.
16
Press S or T to display Address
Number. Press right Select.
Menu :
Detail
Delete
Add Member
Cancel
Group Member :
*ABCDE
Exit
Detail:
Address Number :
19
Cancel
17
Enter the address number to
register using the numeric keys.
Press Enter.
Menu
3/ 3
Edit
Address Number :
* (001 ~ 120)
53
Cancel
NOTE: An error message is displayed if you enter a previously entered
address number. In this case, choose a different address number.
3-36
OPERATION GUIDE
Basic Operation
18
Press Enter.
Detail:
Group Member :
30
Cancel
19
2/ 3
Edit
Press left Select to return to the basic screen.
Editing Group Destinations in the Address Book
Edit group destinations in the Address Book as follows:
1
Press System Menu/Counter.
2
Press S or T to select Edit Addressbook. Press Enter.
3
Press S or T to select the group destination to edit. Press Enter.
4
Press S or T to select the item to
edit. Press right Select.
Detail:
Group Name :
Cancel
1/ 3
Edit
NOTE: For more information on editing each item, refer to Entering
Group Destinations in the Address Book on page 3-33.
5
After editing the items, press Enter.
6
To edit another group destination, repeat steps 3 to 5.
7
Press Enter to save your changes and return to the Edit Addressbook
screen.
Deleting Group Destinations from the Address Book
Delete group destinations from the Address Book as follows:
OPERATION GUIDE
1
Press System Menu/Counter.
2
Press S or T to select Edit Addressbook. Press Enter.
3-37
Basic Operation
3
Press S or T to select the group destination to delete. Press right Select.
4
Press S or T to select Delete.
Press Enter.
5
Press left Select.
Menu :
*Detail/Edit
Delete
Add Address
Cancel
Delete.
Are you sure?
AAA
Yes
6
3-38
No
To delete another group destination, repeat steps 3 to 5. Press left Select
to confirm the deletions and return to the basic screen.
OPERATION GUIDE
Basic Operation
Redialing
Redialing means dialing the most recently dialed number once again.
Automatic Redialing
If the other party’s fax machine is busy, it may not respond to your
transmission attempt, in which case the FAX System redials the number
automatically.
Automatic Redialing is performed automatically. No manual operation is
required. Since the FAX System dials for a specified number of times at
predetermined intervals, this function is useful even when the other party’s
line is busy for extended periods.
NOTE: Automatic Redialing is not available for direct transmission. You
can also adjust the number of redial attempts. Refer to Redial on page 710 for more information.
Address Recall
If the other party’s fax machine fails to respond to a transmission or if you
want to transmit another fax to the same party, press S Address Recall
to view the most recently dialed number.
1
Press Send.
2
Press S Address Recall.
The message display shows the
previous party.
3
Press Start to start fax.
Address Recall information is discarded in the following cases:
•
•
•
OPERATION GUIDE
When the FAX System is turned off
When you try to send another fax (this stores new Address Recall
information)
When a user logs off
3-39
Basic Operation
3-40
OPERATION GUIDE
4 Basic Functions
This chapter discusses the following topics:
OPERATION GUIDE
•
•
•
•
•
•
•
•
Menu Table................................................................... 4-2
Standby Transmission .................................................. 4-3
Broadcast Transmission............................................... 4-4
Direct Transmission...................................................... 4-7
Interrupt Transmission.................................................. 4-8
Timer-based Transmission ........................................... 4-9
Deleting a Job in Memory............................................4-11
Manual Fax Transmission .......................................... 4-13
•
•
•
Manual Fax Reception ............................................... 4-14
One-Touch Keys......................................................... 4-15
Programs.................................................................... 4-23
4-1
Basic Functions
Menu Table
For the system setting menu using in this chapter, refer to the Menu Table
below. To access the system setting menu, press System Menu/Counter.
NOTE: To perform these settings, press S or T to select the menu/
submenu/item and Enter to confirm your selection.
Main Menu
Common
Setting
Common
Setting
Sub Menu2
One Touch
Keys
(Selection of
One-Touch
Key No.)
01 – 08
Assign a destination to a
one-touch key.
page 4-15
(Selection of
One-Touch
Key No.)†
–
Confirm information
registered to a one-touch
key.
page 4-17
–
Clear a one-touch key.
page 4-17
(Selection of
One-Touch
Key No.)
01 – 08
Assign a chain dial to a onetouch key.
page 4-18
(Selection of
One-Touch
Key No.)†
–
Confirm information on the
chain dial registered to a
one-touch key.
page 4-19
–
Clear chain dial details.
page 4-20
One Touch
Keys
Options
Reference
Page
Sub Menu1
Description
Common
Setting
One Touch
Set.
–
Program,
Destination
Set up one-touch keys for
use in programs or dialing.
page 4-15
Program
Setting
(Program
No.
Selection)
–
01 – 08
Assign a program.
page 4-23
Program
Setting
(Program
No.
Selection)†
Menu
Delete a program.
page 4-23
†.
4-2
Copy, Send
–
Press right Select.
OPERATION GUIDE
Basic Functions
Standby Transmission
Standby Transmission refers to
loading another job while the FAX
System is processing the current
job. After the destination fax
number is entered and the
documents are loaded, the
documents are faxed
automatically when the current
job is completed. In direct
communication mode, Standby
Transmission accepts and processes only one standby transmission task.
NOTE: You can schedule up to 10 reserved jobs at any given time
(including Standby Transmission, and Interrupt Transmission jobs).
1
Place the original documents to transmit in the document processor or on
the platen.
2
Press Send.
3
Enter the destination fax number.
You can use one-touch dial,
Address Book, or chain dial to
enter the destination fax number.
Fax No. Entry :
0123456789
*
Cancel
4
OPERATION GUIDE
Detail
Press Start to load the documents into memory.
4-3
Basic Functions
Broadcast Transmission
Broadcast Transmission lets you
fax the same document or
documents to multiple
destinations in a single operation.
For example, a document can be
faxed from the head office to
several branch offices in a single
step. The FAX System
temporarily stores the documents
to be faxed in memory, then
automatically dials the fax numbers and transmits a copy to each
destination.
NOTE: Up to 100 destinations can be set for Broadcast Transmission.
Using the numeric keys to enter a destination fax number
1
Place the original documents to transmit in the document processor or on
the platen.
2
Press Send.
3
Press W Destination.
4
Press S or T to select FAX. Press Enter.
5
Enter the fax number using the
numeric keys. Press Enter.
Fax No. Entry :
0123456789
*
Cancel
6
4-4
Detail
Repeat steps 3 to 5 until all destinations have been entered for Broadcast
Transmission.
OPERATION GUIDE
Basic Functions
Using one-touch dial to specify a destination fax number
1
To register a destination fax
number, press the one-touch key
for the destination fax number.
2
Press the one-touch key for the next destination fax number.
3
Repeat until all desired destination fax numbers have been specified.
Using the Address Book to specify a destination fax number
NOTE: To use the Address Book to specify group destinations, refer to
Searching for Destinations in the Address Book on page 3-24.
1
Press X Address Book.
NOTE: If the external address books are used with the FAX System, a
screen for address book selection is displayed. Press S or T to select
the desired address book. Press Enter.
OPERATION GUIDE
2
Press S or T to select the
destination party. Press Enter.
3
Press S or T to select the
destination fax number. Press
Enter.
4
Repeat steps 1 to 3 until all desired destination fax numbers have been
specified.
Address Book
*AAA
ABCDE
FGHIJ
Cancel
Menu
ABCDE
*0123456789
[email protected]
ScanData
Cancel
Menu
4-5
Basic Functions
5
4-6
Press Start to start fax.
OPERATION GUIDE
Basic Functions
Direct Transmission
The FAX System starts scanning original documents after contacting the
destination fax. If a multi-page original document is loaded in the document
processor, the FAX System will scan and transmit one page of the
document at a time.
If the original document is placed on the platen, the alarm notifies to place
the next page when scanning the previous page is completed. If another
page is not loaded within 15 seconds after the alarm (or within the time set
for Auto Reset), the FAX System assumes that the job has no other pages
and ends the fax transmission.
NOTE: Automatic Redialing is not available during Direct Transmission.
Direct Transmission cannot be used with Broadcast Transmission, Timerbased Transmission, or Polling transmission.
1
Place the original documents to transmit in the document processor or on
the platen.
2
Press Send.
3
Press Function.
4
Press S or T to select FAX Direct TX. Press Enter.
5
Press S or T to select On. Press
Enter.
FAX Direct TX :
*Off
On
Cancel
6
Press right Select.
7
Enter the destination fax number.
You can use one-touch dial, Address Book, or chain dial to enter the
destination fax number.
8
Press Start to start dialing the destination fax number.
The FAX System begins scanning the document after establishing a
connection.
OPERATION GUIDE
4-7
Basic Functions
Interrupt Transmission
If the fax is set up for Broadcast
Transmission or other jobs are
loaded before yours in memory,
Interrupt Transmission lets you
interrupt the queued jobs and
send your document before them.
NOTE: Interrupt Transmission is not possible if 10 jobs involving Standby
Transmission is queued.
Interrupt Transmission can be used for only one destination at a time.
1
Place the original documents to transmit in the document processor or on
the platen.
2
Press Send.
3
Press Function.
4
Press S or T to select FAX Direct TX. Press Enter.
5
Press S or T to select On. Press
Enter.
FAX Direct TX :
*Off
On
Cancel
6
Press right Select.
7
Enter the destination fax number.
You can use one-touch dial, Address Book, or chain dial to enter the
destination fax number.
8
Press Start to start dialing the destination fax number.
The FAX System begins loading the document after establishing a
connection.
4-8
OPERATION GUIDE
Basic Functions
Timer-based Transmission
Schedules fax transmission for
later. Timer-based Transmission
can be combined with various
other functions, including
sequential broadcast
transmission. This example
shows how to set up the FAX
System to fax documents to a
single destination at a specified
time.
NOTE: Timer-based Transmission is not available in Direct Transmission
mode. The fax memory can hold up to 30 jobs for timer-based
transmission at once.
Be sure that the correct time is set for the FAX System before sending
faxes using this method. To adjust the time, refer to Setting the Current
Date and Time (Date & Time Setting) on page 2-7.
1
Place the original documents to transmit in the document processor or on
the platen.
2
Press Send.
3
Press Function.
4
Press S or T to select FAX Delayed TX. Press Enter.
5
Press S or T to select On. Press
Enter.
FAX Delayed TX :
*Off
On
Cancel
6
OPERATION GUIDE
Press S or T to set Hour. Press
X.
Start Time :
Hour
Min.
c11 :
45
( Current Time
11:45)
Cancel
4-9
Basic Functions
7
Press S or T to set Min. Press
Enter.
8
Press right Select.
9
Enter the destination fax number.
Start Time :
Hour
Min.
11 :
45
c
( Current Time
11:45)
Cancel
You can use one-touch dial, Address Book, or chain dial to enter the
destination fax number.
10
4-10
Press Start to start loading the document and transmit the document at the
time specified.
OPERATION GUIDE
Basic Functions
Deleting a Job in Memory
Enables reviewing or deleting jobs in memory.
Reviewing the transmission details of jobs in memory
Check the details of jobs in memory.
1
Press Status/Job Cancel.
2
Press S or T to select Scheduled Job. Press Enter.
3
Press S or T to select the job whose transmission details to review. Press
right Select.
4
Press S or T to select Detail.
Press Enter.
5
Press S or T to display
information on the jobs in memory
one after the other.
Menu
*Detail
Cancel Job
0011 Detail:
* :
Status
Suspended
6
To finish reviewing the jobs, press Enter.
7
Press Reset to return to the basic screen.
1/ 7
Deleting a Job in Memory
Delete jobs in memory.
OPERATION GUIDE
1
Press Status/Job Cancel.
2
Press S or T to select Scheduled Job. Press Enter.
4-11
Basic Functions
3
Press S or T to select the job to
delete. Press left Select.
4
Press left Select once again. The
selected job is deleted.
Scheduled Job :
0011
Broadcast
*
0017
0324256345
0018
0756545865
Cancel
Menu
Cancel Job.
Are you sure?
0017
Yes
5
4-12
No
Press Reset to return to the basic screen.
OPERATION GUIDE
Basic Functions
Manual Fax Transmission
After establishing a connection with the other party, begins transmission
manually by pressing Start. Use this mode if you want to talk to the other
party before sending documents or when the other party needs to change
fax reception settings manually.
Sending documents after talking to the other party
1
Place the original documents to
transmit in the document
processor or on the platen.
2
Pick up the receiver.
3
Enter the destination number.
4
Perform the following procedure to talk to the other party before sending
document.
5
Press Send.
6
Press T On-Hook.
7
Press Start to start fax.
Sending documents without talking to the other party
OPERATION GUIDE
1
Place the original documents to transmit in the document processor or on
the platen.
2
Press Send.
3
Press T On-Hook.
4
Enter the destination number.
5
When the other party’s fax machine responds, press Start to start fax.
4-13
Basic Functions
Manual Fax Reception
After establishing a connection with the other party, initiates reception
manually by pressing Start. Use this mode to talk to the other party before
receiving their fax transmission.
NOTE: To receive documents manually, set Manual as described in Fax
Reception Mode on page 7-14.
1
When an incoming call arrives,
the telephone connected to the
FAX System will ring.
2
Pick up the receiver.
3
Confirm the connection with the other party.
If the calling machine is used to send faxes, perform the following
procedure.
If the calling machine is used as a telephone, perform the following
procedure after talking to start receiving the fax transmission.
4-14
4
Press Send.
5
Press T On-Hook.
6
Press left Select to start reception.
OPERATION GUIDE
Basic Functions
One-Touch Keys
To send documents to frequent recipients more convenient, assign onetouch keys to fax and scanning destinations in the Address Book. You can
also set one-touch keys for chain dialing.
One-touch keys can be used to recall destinations or programs.
NOTE: Program and Destination cannot be mixed to assign one-touch
keys.
Setting Up One-Touch Keys
Assign one-touch keys to specific destinations or programs.
1
Press System Menu/Counter.
2
Press S or T to select Common Setting. Press Enter.
3
Press S or T to select One Touch Set. Press Enter.
4
Press S or T to select Program
or Destination. Press Enter.
One Touch Set. :
*Program
Destination
Cancel
5
Press right Select to return to the basic screen.
Destination
You can assign destinations in the Address Book to one-touch keys.
Assigning Destinations
Perform the following procedure to assign one-touch keys.
OPERATION GUIDE
1
Press System Menu/Counter.
2
Press S or T to select Common Setting. Press Enter.
3
Press S or T to select One Touch Keys. Press Enter.
4-15
Basic Functions
4
Press S or T to select an
unassigned number for a onetouch key. Press Enter. The onetouch key number is displayed as
---.
5
Press S or T to select Address
Book. Press Enter to display the
Address Book.
One Touch Keys :
*Key5
Key6
-------------Exit
Menu
Register:
*Address Book
Chain Dial
Cancel
6
Press S or T to select the
destination party to assign. Press
Enter.
7
Press S or T to select the
destination fax number. Press
Enter.
If you try to assign a one-touch
key that’s already assigned, a
dialogue will ask if you want to
overwrite the one already
assigned. In this case, press left
Select.
8
4-16
Address Book
*AAA
ABCDE
FGHIJ
Cancel
Menu
ABCDE
*0123456789
[email protected]
ScanData
Cancel
Menu
Overwrite.
Are you sure?
Key7
Yes
No
Press left Select to return to the basic screen.
OPERATION GUIDE
Basic Functions
Checking Details of Assigned Keys
Perform the following procedure to check destinations assigned to onetouch keys.
1
Follow steps 1 to 3 in Assigning Destinations on page 4-15.
2
Press S or T to select the onetouch key to check (1-8). Press
right Select.
3
Press S or T to select Detail.
Press Enter.
4
After checking the details, press Enter.
5
Press left Select to return to the basic screen.
One Touch Keys :
*Back
Key1
Key2
Exit
Menu
Menu :
*Register
Detail
Delete
Cancel
Clearing Assigned Keys
Perform the following procedure to clear destinations assigned to onetouch keys.
OPERATION GUIDE
1
Follow steps 1 to 3 in Assigning Destinations on page 4-15.
2
Press S or T to select the onetouch key to clear (1-8). Press
right Select.
One Touch Keys :
*Back
Key1
Key2
Exit
Menu
4-17
Basic Functions
3
Press S or T to select Delete.
Press Enter.
4
Press left Select to clear the
destination previously assigned.
Menu :
Register
Detail
Delete
Cancel
Delete.
Are you sure?
Key1
Yes
5
No
Press left Select to return to the basic screen.
Recalling Destinations
Perform the following procedure to send a fax using one-touch keys.
1
2
Press a one-touch key previously
assigned to a destination.
0123456789
Press Start to begin sending the fax.
Chain Dial
Chain dial is a dialing function that adds a number (the chain number) for
dialing before the destination fax numbers assigned to one-touch keys.
For example, if you assign 800 for chain dial, to dial 800-XX-XXXX, simply
press the one-touch key assigned to 800 and enter the rest of the number
on the numeric keys.
Assigning Chain Dial
Perform the following procedure to set up chain dial for one-touch keys.
4-18
OPERATION GUIDE
Basic Functions
1
Press System Menu/Counter.
2
Press S or T to select Common Setting. Press Enter.
3
Press S or T to select One Touch Keys. Press Enter.
4
Press S or T to select an
unassigned number for a onetouch key. Press Enter. The onetouch key number is displayed as
---.
5
Press S or T to select Chain
Dial. Press Enter.
One Touch Keys :
*Key5
Key6
-------------Exit
Menu
Register:
*Address Book
Chain Dial
Cancel
6
Use the numeric keys to enter the
number. Press Enter.
Chain Dial :
Cancel
NOTE: If you try to assign the one-touch key that’s already assigned, a
dialogue will ask if you want to overwrite the one already assigned. In this
case, press left Select.
7
Press left Select to return to the basic screen.
Checking Details of Assigned Keys
Perform the following procedure to check numbers assigned for chain
dialing with one-touch keys.
1
OPERATION GUIDE
Follow steps 1 to 3 inAssigning Chain Dial on page 4-18.
4-19
Basic Functions
2
Press S or T to select the onetouch key to check (1-8). Press
right Select.
3
Press S or T to select Detail.
Press Enter.
4
Press Enter.
5
Press left Select to return to the basic screen.
One Touch Keys :
*Back
Key1
Key2
Exit
Menu
Menu :
*Register
Detail
Delete
Cancel
Clearing Assigned Keys
Perform the following procedure to clear numbers assigned for chain
dialing with one-touch keys.
4-20
1
Follow steps 1 to 3 in Assigning Chain Dial on page 4-18.
2
Press S or T to select the onetouch key to clear (1-8). Press
right Select.
3
Press S or T to select Delete.
Press Enter.
One Touch Keys :
*Back
Key1
Key2
Exit
Menu
Menu :
Register
Detail
Delete
Cancel
OPERATION GUIDE
Basic Functions
4
Press left Select to clear the
assigned number.
Delete.
Are you sure?
Key1
Yes
5
No
Press left Select to return to the basic screen.
Dialing with Chain Dial
Perform the following procedure to dial using chain dial.
Chain dial key + one-touch dial key
1
Press the one-touch key set up for
chain dial.
800
2
Press the one-touch key assigned to a recipient.
3
Press Start to begin sending the fax.
Chain dial key + Address Book
1
Press a one-touch key previously
set up for chain dial.
800
2
OPERATION GUIDE
Press S or T to select Address Book. Press Enter.
4-21
Basic Functions
3
Press S or T to select the
recipient. Press Enter.
4
Press S or T to select the
number. Press Enter.
Address Book :
*ABCDE
FGHIJ
KLMNO
Cancel
Menu
ABCDE
*0123456789
Cancel
5
Menu
Press Start to begin sending the fax.
Chain dial key + numeric keys
1
Press a one-touch key previously
set up for chain dial.
800
2
Press S or T to select FAX No. Entry. Press Enter.
3
Use the numeric keys to enter the
recipient’s number. Press Enter.
FAX No. Entry :
800
Cancel
4
4-22
Detail
Press Start to begin sending the fax.
OPERATION GUIDE
Basic Functions
Programs
Stores combinations of frequently used destinations and functions as
programs. Up to eight programs can be stored; up to four of these can
incorporate fax or scanning functions.
One-touch keys can be used to recall destinations or programs. For more
information, refer to Setting Up One-Touch Keys on page 4-15.
Registering Programs
Perform the following procedure to register programs.
1
Set up the combination of destinations and functions to store as a program.
2
Press System Menu/Counter.
3
Press S or T to select Program Setting. Press Enter.
4
Press S or T to select an
unassigned number for a program
number. Press Enter. The onetouch key number is displayed as
---.
5
Press S or T to select Copy or
Send. Press Enter.
Program Setting :
*Program5
Program6
-------------Exit
Menu
Register:
*Copy
Send
Cancel
6
Press left Select.
NOTE: If you try to assign the program number that’s already assigned, a
dialogue will ask if you want to overwrite the one already assigned. In this
case, press left Select.
7
Press left Select to return to the basic screen.
Deleting Programs
Perform the following procedure to delete programs.
OPERATION GUIDE
4-23
Basic Functions
1
Press System Menu/Counter.
2
Press S or T to select Program Setting. Press Enter.
3
Press S or T to select the program number to delete. Press right Select.
4
Press S or T to select Delete.
Press Enter.
Menu :
*Register
Delete
Cancel
5
Press left Select to delete the
program.
Delete.
Are you sure?
Program1
Yes
6
No
Press left Select to return to the basic screen.
Recalling Programs
Perform the following procedure to recall programs.
NOTE: If you set up programs as described in Setting Up One-Touch
Keys on page 4-15, you can recall programs simply by pressing the onetouch key of the program number.
4-24
1
Press Program.
2
Press S or T to select the
program number. Press Enter.
Program Call :
*Program1
Program2
Program3
Exit
OPERATION GUIDE
5 Advanced Functions
This chapter discusses the following topics:
OPERATION GUIDE
•
•
•
•
•
•
•
•
Menu Table................................................................... 5-2
Remote Switching ........................................................ 5-5
Polling Communication................................................. 5-7
Subaddress Communications .....................................5-11
Subaddress-based Confidential Communications ..... 5-12
Fax Forwarding .......................................................... 5-24
Password-based Communications............................. 5-31
Encrypted Communication ......................................... 5-38
•
•
•
•
•
E-mail Notification of Job Results............................... 5-45
Displaying Job Status ................................................. 5-46
Printing Communication Management Reports.......... 5-53
User Login .................................................................. 5-55
Job Accounting........................................................... 5-56
5-1
Advanced Functions
Menu Table
For the system setting menu using in this chapter, refer to the Menu Table
below. To access the system setting menu, press System Menu/Counter.
NOTE: To perform these settings, press S or T to select the menu/
submenu/item and Enter to confirm your selection.
Main Menu
Sub Menu2
FAX Setting
FAX RX
Setting
Remote SW
Dial
00 – 99
Specify the remote
switching number.
page 5-5
Doc. Box
Setting
Polling
Setting
–
Remain File,
Delete File
Keep or discard
documents after polling
transmission.
page 5-10
Sub Address
Box
Sub Address
Box†
(Entering
Characters)
Enter subaddresses.
page 5-12
(Entering
Characters)
Enter box names.
page 5-12
01 – 20
Enter box numbers.
page 5-12
(Entering
Characters)
Change subaddresses.
page 5-13
(Entering
Characters)
Change box names.
page 5-13
(Numerical
Entry)
Change passwords.
page 5-13
01 – 20
Change box numbers.
page 5-13
(User Selection)
Change users.
page 5-13
All, User Only
Change usage
restrictions.
page 5-13
–
Delete subaddress boxes.
page 5-17
(Subaddress
Box
Selection)††
(Subaddress
Box
Selection)†
5-2
Options
Reference
Page
Sub Menu1
Description
OPERATION GUIDE
Advanced Functions
Main Menu
Sub Menu1
Sub Menu2
Doc. Box
Setting
Box Media
Type
Report
FAX Setting
Reference
Page
Options
Description
–
All Media Type,
Plain,
Transparency,
Rough, Vellum,
Labels,
Recycled,
Preprinted,
Bond,
Cardstock,
Color,
Prepunched,
Letterhead,
Envelope,
Thick, Custom
1–8
Specify the paper type for
jobs from the subaddress
box.
page 5-18
Report Print
SubAddr Box
List
–
Print subaddress box
lists.
page 5-22
FAX RX
Setting
Forward
Setting
(Destination
Selection)
Specify forwarding
destinations to store.
page 5-24
(Destination
Selection)
Change stored forwarding
destinations.
page 5-26
All day, Time
Specificat.
Schedule the period for
forwarding.
page 5-27
0:00 – 23:59
Schedule when
forwarding starts.
page 5-27
0:00 – 23:59
Schedule when
forwarding ends.
page 5-27
On, Off
Print from the FAX
System during forwarding.
page 5-29
TIFF, PDF
For designating the file
format to forward.
page 5-29
On, Off
For fax forwarding (On/
Off).
page 5-30
OPERATION GUIDE
5-3
Advanced Functions
Main Menu
FAX Setting
Sub Menu1
Sub Menu2
FAX RX
Setting
TX/RX
Restrict.
FAX
Common
Set.
FAX RX
Setting
User/Job
Account
†.
††.
5-4
Job Account.
Set
Encryption
Key
Encryption
RX
Account.
Report
Options
Reference
Page
Description
(Numerical
Entry of Fax
No.)
Register authorized
telephone numbers.
page 5-31
(Numerical
Entry of Fax
No.)
Change authorized
telephone numbers.
page 5-32
–
Delete authorized
telephone numbers.
page 5-33
0000 – 9999
Register authorized ID
numbers.
page 5-34
0000 – 9999
Change authorized ID
numbers.
page 5-35
–
Delete authorized ID
numbers.
page 5-35
User Permit
List, Off
Specify password-based
communication (for fax).
page 5-36
User Permit
List, Off
Specify password-based
communication (for
receiving faxes).
page 5-36
(Entering
Characters)
Register encryption keys.
page 5-39
(Entering
Characters)
Change encryption keys.
page 5-40
–
Delete encryption keys.
page 5-40
On, Off
For receiving encrypted
faxes (On/Off).
page 5-41
01 – 20
Specify encryption key
IDs.
page 5-41
–
Print job accounting
report.
page 5-56
Press right Select.
If a password is set, it must be entered
OPERATION GUIDE
Advanced Functions
Remote Switching
Remote switching lets you receive faxes by forwarding the fax signal from
a telephone connected to the FAX System. This function is convenient if
you are using a regular phone at another location, allowing you to use that
phone to receive faxes as well.
NOTE: Remote switching requires a telephone provided by the user that
supports tone dialing. This phone must be connected to the FAX System.
Changing the Remote Switching Number
Change the remote switching number (the default value is 55).
1
Press System Menu/Counter.
2
Press S or T to select FAX Setting. Press Enter.
3
Press S or T to select FAX RX Setting. Press Enter.
4
Press S or T to select Remote SW Dial. Press Enter.
5
Use the numeric keys to enter the
new remote switching number (2
digits). Press Enter to register the
number.
Remote SW Dial :
(00 ~ 99)
55
Cancel
6
Press right Select to return to the basic screen.
Receiving Faxes Remotely
Perform the following procedure to initiate fax reception from a connected
telephone.
1
OPERATION GUIDE
The telephone will ring for
incoming calls.
5-5
Advanced Functions
2
Pick up the receiver.
3
If you hear a fax tone, dial the two-digit remote switching number.
NOTE: The default remote switching number is 55.
4
5-6
The incoming fax will be switched to the FAX System, and reception will
start automatically.
OPERATION GUIDE
Advanced Functions
Polling Communication
With polling, fax transmissions are initiated by the recipient, not the
sending party. The recipient can receive the fax at him/her convenience.
NOTE: Polling generally incurs telephone charges for the receiving
party, since they must make a call to receive the fax.
Storing Documents for Polling
Documents to be sent using polling are scanned first. When a caller
requests polling, those documents are faxed to him/her automatically.
NOTE: For polling transmission, set the FAX System to the mode other
than Manual Fax Reception mode. For information on switching modes,
refer to Fax Reception Mode on page 7-14.
Before polling requests, you can add documents to the documents
already stored for polling. All stored documents will be faxed together on
request from the caller.
You can set the system to continue storing the documents stored for
polling transmission or to delete them after polling.
For more information, refer to Polling Transmission Settings on page 510.
To check documents stored for polling transmission or delete them, refer
to Store Job Status on page 5-48.
You cannot select resolutions of 300 × 300 or 600 × 600 when specifying
scanning resolutions for polling transmission.
OPERATION GUIDE
1
Place the original documents in the document processor or on the platen.
2
Press Document Box.
3
Press S or T to select FAX Polling Box. Press Enter.
4
Press right Select.
5
Press S or T to select New File.
Press Enter.
6
Press Start to start scanning the documents.
Menu :
Detail/Edit
Delete
New File
Cancel
5-7
Advanced Functions
7
Press left Select to return to the document box basic screen.
Printing the Documents Stored in Polling Box
Perform the following procedure to print documents stored in polling box:
1
Press Document Box.
2
Press S or T to select FAX Polling Box. Press Enter.
3
Press S or T to select the file to
print. Press Enter.
4
Press Start to print the selected file.
To print all documents in the box,
press right Select. On the next
screen, press S or T to select
Print All File. Press Enter. Press
Start to print all documents in the
box.
FAX Polling Box :
*List
Common
Report
Exit
Menu
Menu :
Delete
New File
Print All File
Cancel
Editing the Documents Stored in Polling Box
Perform the following procedure to check or rename documents stored in
polling box:
5-8
1
Press Document Box.
2
Press S or T to select FAX Polling Box. Press Enter.
3
Press S or T to select the file to edit. Press right Select.
OPERATION GUIDE
Advanced Functions
4
Press S or T to select Detail/
Edit. Press Enter.
5
Press S or T to confirm the detailed information of the file. When
renaming the file, press right Select on the File Name screen.
6
Press Enter after checking the file.
7
Press left Select to return to the document box basic screen.
Menu :
Print
Detail/Edit
Delete
Cancel
Deleting the Documents Stored in Polling Box
Perform the following procedure to delete documents stored in polling box:
1
Press Document Box.
2
Press S or T to select FAX Polling Box. Press Enter.
3
Press S or T to select the file to delete. Press right Select.
4
Press S or T to select Delete.
Press Enter.
5
Press left Select to delete the selected file.
6
Press left Select to return to the document box basic screen.
Menu :
Print
Detail/Edit
Delete
Cancel
Receiving Documents by Polling
In polling reception, calling another fax machine triggers transmission of
documents stored on that machine.
OPERATION GUIDE
1
Press Send.
2
Press Function.
5-9
Advanced Functions
3
Press S or T to select FAX RX Polling. Press Enter.
4
Press S or T to select On. Press
Enter.
FAX RX Polling :
*Off
On
Cancel
5
Press right Select.
6
Enter the other party’s fax number.
To enter the number, use the one-touch dial keys, the Address Book, or
chain dial keys.
7
Press Start to start fax.
Polling Transmission Settings
Set the system to continue storing the documents stored for polling
transmission or to delete them after polling. Keeping documents makes
them available for multiple callers after you scan them once in preparation
for polling transmission.
1
Press System Menu/Counter.
2
Press S or T to select Doc. Box Setting. Press Enter.
3
Press S or T to select Polling Setting. Press Enter.
4
Press S or T to select Remain
File or Delete File. Press Enter.
To keep documents after polling
transmission, select Remain File.
Polling Setting :
* Remain File
Delete File
Cancel
5
5-10
Press right Select to return to the basic screen.
OPERATION GUIDE
Advanced Functions
Subaddress Communications
In subaddress communications, faxes are sent and received using
subaddresses – – numbers or character strings that conform to
conventions adopted by many fax machine manufacturers. Subaddresses
support confidential fax, previously possible only between machines from
the same manufacturer. The FAX System uses subaddress boxes to
exchange confidential faxes with other parties. Receiving these faxes in
the FAX System doesn’t require a subaddress password. If the other
party’s machine requires passwords, specify the password when sending
to them.
NOTE: This function requires that the other party’s fax machine support
subaddress communications.
Subaddress communication can be combined with other fax functions.
You can save time when using this function by assigning subaddresses
and passwords beforehand to one-touch dial keys or to Address Book
entries. For more information, refer to the instructions for these functions
and the instructions for assigning keys.
Subaddresses Used by the FAX System
The FAX System uses subaddresses as well as passwords for subaddress
communication.
Subaddresses
When specifying a receiving party to receive a confidential fax, you must
enter their subaddress, just as they must specify yours when sending to
you. Subaddresses must also be specified for subaddress boxes where
confidential faxes are received. The length of the maximum subaddress
depends on the other party’s fax machine. If the subaddresses do not
comply with the supported length, confidential fax is not possible. Before
using subaddresses, confirm the other party’s subaddress. The FAX
System supports subaddresses of up to 20 characters, consisting of
numbers, asterisks [*], the sharp symbol [#], and spaces.
Passwords
The FAX System does not use passwords when receiving confidential
faxes. Passwords are used if required by the other party’s fax machine.
The maximum password length depends on the other machine. If the
passwords do not comply with the supported length, confidential fax is not
possible. Before using subaddresses, confirm the other party’s password.
The FAX System supports passwords of up to 20 characters, consisting of
numbers, asterisks [*], the sharp symbol [#], and spaces.
OPERATION GUIDE
5-11
Advanced Functions
Subaddress-based Confidential Communications
Confidential fax protects document confidentiality when you do not want
unauthorized parties to view certain documents. If subaddresses are used
for confidential fax, the faxed documents are not printed after reception.
Instead, they are stored in subaddress boxes. Documents in subaddress
boxes can be printed later when the appropriate party specifies them. You
can also designate passwords for subaddress boxes to prevent others
from printing the stored documents.
NOTE: Subaddress-based confidential communications require that the
other party’s fax machine support subaddress and confidential
communications.
Subaddress-based confidential communications cannot be combined with
encrypted communication.
Setting Up Subaddress Boxes
Perform the following procedure to register new subaddress boxes:
NOTE: You can print the list of registered subaddress boxes. For more
information, refer to Printing Lists of Subaddress Boxes on page 5-22.
5-12
1
Press System Menu/Counter.
2
Press S or T to select Doc. Box Setting. Press Enter.
3
Press S or T to select Sub Address Box. Press Enter.
4
Press right Select.
5
Press S or T to select Add Box.
Press Enter.
Menu :
Detail/Edit
Delete
Add Box
Cancel
OPERATION GUIDE
Advanced Functions
6
Enter the subaddress of the box to
set up. Press Enter.
Sub Add. Entry :
Cancel
7
Enter the box name. Press Enter.
Box Name Entry :
Box03
Cancel
ABC
Text
NOTE: For instructions on entering characters, refer to Entering
Characters on page 3-20.
8
Use the numeric keys to enter the
box number.
Box Number Entry :
*
(01 ~ 20)
3
Cancel
9
10
Press S or T to select Exit. Press Enter.
Press left Select to return to the basic screen.
NOTE: For instructions on assigning subaddress box passwords or
changing box settings, refer to Modifying Subaddress Boxes on page 513.
Modifying Subaddress Boxes
Perform the following procedure to change settings for subaddress boxes:
OPERATION GUIDE
1
Follow steps 1 to 3 in Setting Up Subaddress Boxes on page 5-12.
2
Press S or T to select the box to change. Press Enter.
5-13
Advanced Functions
If the box is password-protected, use the numeric keys to enter the
password. Press Enter.
Changing Subaddresses
Change subaddresses as follows:
1
Press S or T to display Sub Add.
Entry. Press right Select.
Detail:
Sub Add. Entry :
1234
Cancel
2
Use the numeric keys to enter the
new subaddress. Press Enter.
1/ 4
Edit
Sub Add. Entry :
Cancel
Renaming Boxes
Change box names as follows:
1
Press S or T to display Box
Name. Press right Select.
Detail:
Box Name :
Arlen box
Cancel
2
Enter the new box name. Press
Enter.
Edit
Box Name Entry :
Arlen box
Cancel
5-14
2/ 4
ABC
Text
OPERATION GUIDE
Advanced Functions
Changing Passwords
Perform the following procedure to change the passwords used to print
from subaddress boxes or to change box settings:
1
Press S or T to display
Password. Press right Select.
Detail:
Password:
Cancel
2
Use the numeric keys to enter the
password. Press Enter.
3/ 4
Edit
Password:
Cancel
3
Re-enter the password for
confirmation. Press Enter.
Confirm Password :
Cancel
Changing Box Numbers
Change box numbers as follows:
1
Press S or T to display Box
Number. Press right Select.
Detail:
Box Number :
02
Cancel
OPERATION GUIDE
4/ 4
Edit
5-15
Advanced Functions
2
Press S or T to enter the box
number. Press Enter.
Box Number Entry :
*
(01 ~ 20)
2
Cancel
Changing Users
Change users as follows:
NOTE: This setting is displayed only when user login is specified.
1
Press S or T to display User
Name. Press right Select.
Detail:
User Name :
Arlen
Cancel
2
Press S or T to select the user.
Press Enter.
3/ 6
Edit
User List :
*Arlen
Harold
Richard
Cancel
Changing Usage Restrictions
These boxes are displayed only when the user registered in User Name is
logged in.
NOTE: This setting is displayed only when user login is specified.
5-16
OPERATION GUIDE
Advanced Functions
1
Press S or T to display
Permission. Press right Select.
Detail:
Permission:
All
Cancel
2
Press S or T to select All or User
Only. Press Enter.
Choose All to allow all user to
access this subaddress box.
Choose User Only to allow the
only user to access this
subaddress box.
4/ 6
Edit
Permission :
*All
User Only
Cancel
3
Press Enter.
4
Press left Select to return to the basic screen.
Deleting Subaddress Boxes
Perform the following procedure to delete subaddress boxes:
1
Follow steps 1 to 3 in Setting Up Subaddress Boxes on page 5-12.
2
Press S or T to select the box to delete. Press right Select.
3
Press S or T to select Delete.
Press Enter.
If the box is password-protected,
use the numeric keys to enter the
password. Press Enter.
OPERATION GUIDE
Menu :
*Detail/Edit
Delete
Add Box
Cancel
5-17
Advanced Functions
4
Press left Select.
Delete.
Are you sure?
Arlen box
Yes
5
No
Press left Select to return to the basic screen.
Paper Setting for Printing from Boxes
Restricts the type of paper used when printing documents from
subaddress boxes. The paper cassette selected here is always used to
print documents from subaddress boxes. For example, if you use this
setting to assign a desired paper cassette to Custom 1, that paper cassette
will be used for printing.
NOTE: This setting is displayed only when the FAX System is equipped
with an optional paper cassette.
1
Press System Menu/Counter.
2
Press S or T to select Doc. Box Setting. Press Enter.
3
Press S or T to select Box Media Type. Press Enter.
4
Press S or T to select the paper
type. Press Enter.
5
Press right Select to return to the basic screen.
Box Media Type :
*All Media Type
Plain
Transparency
Cancel
Confidential Fax Using Subaddresses
To send documents to the subaddress box of another party, the other party
must perform the following procedure:
5-18
OPERATION GUIDE
Advanced Functions
NOTE: Before sending, confirm the recipient’s subaddress specified for
the target subaddress box. If the recipient’s fax machine requires you to
enter a password, confirm the password as well.
1
Place the original documents into the document processor or on the platen.
2
Press Send.
3
Press W Destination.
NOTE: You can specify the other party’s number using one-touch dial
keys or from the Address Book. If the required subaddress and password
are registered in the one-touch dial key or Address Book, you do not need
to enter them when sending.
4
Press S or T to select FAX. Press Enter.
5
Use the numeric keys to enter the fax number. Press right Select.
6
Press S or T to display Sub
Address. Press right Select.
FAX Detail:
Sub Address :
Cancel
7
Enter the subaddress number and
press Enter.
1/ 4
Edit
Sub Address :
1234567890123
Cancel
OPERATION GUIDE
5-19
Advanced Functions
8
Enter the password and press
Enter.
Password:
Cancel
NOTE: You will be prompted to enter a password only if such is required
by the other party’s fax machine.
9
Press Enter.
10
Press Enter to return to the basic screen.
11
Press Start to load stored documents from memory.
Printing Documents from Subaddress Boxes
Perform the following procedure to print documents from subaddress
boxes:
1
Press Document Box.
2
Press S or T to select Sub Address Box. Press Enter.
3
Press S or T to select the box in which the documents to print are stored.
Press Enter.
If the box is password-protected, use the numeric keys to enter the
password. Press Enter.
4
5-20
Press S or T to select the
document to print. Press Enter.
Press Start to print it.
Arlen box :
*List
Common
Report
Exit
Menu
OPERATION GUIDE
Advanced Functions
To print all documents in the box,
press right Select. On the next
screen, press S or T to select
Print All File. Press Enter. Press
Start to print all documents in the
box.
Menu :
Detail/Edit
Delete
Print All File
Cancel
NOTE: Document data remains in subaddress boxes after printing. To
delete the document data, refer to Deleting Documents from Subaddress
Boxes on page 5-22. Follow the procedure given there to delete the data.
Editing Documents from Subaddress Boxes
Perform the following procedure to check or rename documents from
subaddress boxes.
1
Press Document Box.
2
Press S or T to select Sub Address Box. Press Enter.
3
Press S or T to select the box in which the documents to check or rename
are stored. Press Enter.
If the box is password-protected, use the numeric keys to enter the
password. Press Enter.
OPERATION GUIDE
4
Press S or T to select the file to edit. Press right Select.
5
Press S or T to select Detail/
Edit. Press Enter.
6
Press S or T to confirm the detailed information of the file. When
renaming the file, press right Select on the File Name screen.
7
Press Enter after checking the file.
8
Press left Select to return to the document box basic screen.
Menu :
Print
Detail/Edit
Delete
Cancel
5-21
Advanced Functions
Deleting Documents from Subaddress Boxes
Perform the following procedure to delete documents from subaddress
boxes.
1
Press Document Box.
2
Press S or T to select Sub Address Box. Press Enter.
3
Press S or T to select the box in which the documents to delete are
stored. Press Enter.
If the box is password-protected, use the numeric keys to enter the
password. Press Enter.
4
Press S or T to select the document to delete. Press right Select.
5
Press S or T to select Delete.
Press Enter.
6
Press left Select.
7
Press left Select to return to the document box basic screen.
Menu :
Print
Detail/Edit
Delete
Cancel
Printing Lists of Subaddress Boxes
Perform the following procedure to print a list of subaddress boxes:
5-22
1
Press System Menu/Counter.
2
Press S or T to select Report. Press Enter.
3
Press S or T to select Report Print. Press Enter.
4
Press S or T to select SubAddr
Box List. Press Enter.
Report Print :
Status Page
Font List
SubAddr Box List
Exit
OPERATION GUIDE
Advanced Functions
5
OPERATION GUIDE
Press left Select to print the list.
5-23
Advanced Functions
Fax Forwarding
With fax forwarding, documents received at specified times are temporarily
stored and then automatically forwarded to another fax number previously
registered. This function supports subaddress-based communication for
document forwarding to the destination fax.
In addition to forwarding documents to be printed as faxes, you can
forward them as image files in e-mail messages or store them in a
specified folder on a computer.
NOTE: If fax forwarding fails, the received documents are printed from
the FAX System and deleted from memory.
Fax forwarding may be unavailable when combined with other functions,
such as encrypted communication.
Fax forwarding must be activated in advance. For more information, refer
to Activating Fax Forwarding on page 5-30.
Registering Forwarding Destinations
Perform the following procedure to register forwarding destinations:
5-24
1
Press System Menu/Counter.
2
Press S or T to select FAX Setting. Press Enter.
3
Press S or T to select FAX RX Setting. Press Enter.
4
Press S or T to select Forward Setting. Press Enter.
OPERATION GUIDE
Advanced Functions
5
Press S or T to select Forward
Dest. Press Enter.
6
Press S or T to select Register.
Press Enter.
Forward Setting :
*Back
Forward
Forward Dest.
Exit
Forward Dest.:
*Confirmation
Register
Cancel
7
Press S or T to select Address
Entry or Address Book. Press
Enter.
Register:
*Address Book
Address Entry
Cancel
If you select Address Book,
specify the recipient from the
Address Book.
Address Book :
*ABCDE
FGHIJ
KLMNO
Cancel
Menu
NOTE: For instructions on using the Address Book, refer to Address
Book on page 3-24.
OPERATION GUIDE
5-25
Advanced Functions
If you select Address Entry, press
S or T to select FAX, E-mail, or
Folder, press Enter.
If you select FAX, use the numeric
keys to enter the recipient’s fax
number.
Address Entry :
*FAX
E-mail
Folder
Cancel
If you select E-mail or Folder,
refer to the Operation Guide and
specify the recipient’s e-mail
address or the destination folder.
8
Press left Select after specifying the destination and returning to the
Forward Setting screen.
9
Press right Select to return to the basic screen.
Changing Forwarding Destinations
Perform the following procedure to change various details registered for
fax forwarding:
1
Follow steps 1 to 5 in Registering Forwarding Destinations on page 5-24.
2
Press S or T to select
Confirmation. Press Enter.
Forward Dest.:
*Confirmation
Register
Cancel
3
After confirming that a destination
is selected, press Enter.
Dest. Confirm.:
*0123456789
Exit
5-26
OPERATION GUIDE
Advanced Functions
4
Press S or T to select Edit. Press
Enter.
0123456789
*Edit
Delete
Cancel
5
Make the desired changes in
destination information. Press
Enter.
FAX No. Entry :
0123456789
Cancel
Detail
NOTE: For instructions on editing information, refer to Detailed
Transmission Settings on page 3-8.
6
Press left Select twice after specifying the destination and returning to the
Forward Dest screen.
7
Press right Select to return to the basic screen.
Specifying the Fax Forwarding Period
Perform the following procedure to schedule the forwarding timeframe:
OPERATION GUIDE
1
Follow steps 1 to 4 in Registering Forwarding Destinations on page 5-24.
2
Press S or T to select Forward
Time. Press Enter.
Forward Setting :
*Forward Dest.
File Format
Forword Time
Exit
5-27
Advanced Functions
3
Press S or T to select All day or
Time Specificat. Press Enter.
Choose Time Specificat. to
specify the start and end times for
fax forwarding.
Choose All day to set fax
forwarding throughout the day.
On the next screen, press right
Select to return to the basic
screen.
5-28
4
Specify the start time. Press S or
T to set hour. Press X.
5
Press S or T to set minutes.
Press Enter.
6
Specify the ending time. Press S
or T to specify the hour. Press X.
7
Press S or T to specify minutes.
Press Enter.
Forward Time :
*All day
Time Specificat.
Cancel
Start Time :
Hour : Min.
09 : 45
(Current Time 11:45)
Cancel
Start Time :
Hour : Min.
09 : 45
(Current Time 11:45)
Cancel
End Time :
Hour : Min.
11 : 45
(Current Time 11:45)
Cancel
End Time :
Hour : Min.
11 : 45
(Current Time 11:45)
Cancel
OPERATION GUIDE
Advanced Functions
8
Press right Select to return to the basic screen.
Printing from the FAX System during Fax Forwarding
Perform the following procedure to specify whether the FAX System is to
print forwarded faxes:
1
Follow steps 1 to 4 in Registering Forwarding Destinations on page 5-24.
2
Press S or T to select Print.
Press Enter.
3
Press S or T to select On or Off.
Press Enter.
Specify On to both print and
forward forwarded faxes.
Forward Setting :
*File Format
Forward Time
Print
Exit
Print :
*Off
On
Cancel
4
Press right Select to return to the basic screen.
Specifying the File Format of Forwarded Files
When specifying settings to forward documents via e-mail or to store them
in a folder on a computer, set either TIFF or PDF for the document file
format.
OPERATION GUIDE
1
Follow steps 1 to 4 in Registering Forwarding Destinations on page 5-24.
2
Press S or T to select File
Format. Press Enter.
Forward Setting :
*Forward
Forward Dest.
File Format
Exit
5-29
Advanced Functions
3
Press S or T to select TIFF or
PDF. Press Enter.
File Format :
*PDF
TIFF
Cancel
4
Press right Select to return to the basic screen.
Activating Fax Forwarding
Perform the following procedure to activate fax forwarding:
1
Follow steps 1 to 4 in Registering Forwarding Destinations on page 5-24.
2
Press S or T to select Forward.
Press Enter.
3
Press S or T to select On or Off.
Press Enter.
Choose On to activate fax
forwarding. Choose Off to disable
it.
4
5-30
Forward Setting :
*Back
Forward
Forward Dest.
Exit
Forward :
*Off
On
Cancel
Press right Select to return to the basic screen.
OPERATION GUIDE
Advanced Functions
Password-based Communications
This function restricts access to transmission and reception, requiring
users to meet password requirements. Password-based communications
lets you restrict the sending and receiving of faxes with the FAX System to
authorized individuals. Passwords are registered in advance for authorized
telephone numbers and authorized IDs, after which these functions are
activated. In this mode, no special steps involving passwords are required
to send or receive faxes. Jobs that meet the password requirements are
processed as usual, but those that do not result in errors, preventing
transmission or reception.
Requirements
•
Passwords must be registered in the FAX System (specifically,
authorized telephone numbers or authorized ID).
•
Authorized telephone numbers or authorized ID must be registered on
the other party’s fax machine.
•
Password communications must be activated in advance. (Refer to
Activating Password-based Communications on page 5-36.)
<Meeting Requirements for Password-based Communications>
•
Authorized telephone numbers registered in the FAX System must
match the telephone numbers of other parties.
•
Authorized IDs registered in the FAX System must match the IDs of
other parties.
•
When you fax to recipients using the Address Book, the last four digits
of their number must match the last four digits of the authorized
numbers.
•
To receive faxes, the last four digits of the other party’s number must
match the last four digits of an entry in the Address Book.
NOTE: For instructions on setting the ID of the FAX System, refer to
Entering your station ID on page 2-6.
Registering New Authorized Telephone Numbers
Perform the following procedure to register authorized telephone numbers:
NOTE: You can register up to 10 authorized telephone numbers.
OPERATION GUIDE
1
Press System Menu/Counter.
2
Press S or T to select FAX Setting. Press Enter.
3
Press S or T to select FAX RX Setting. Press Enter.
4
Press S or T to select TX/RX Restrict. Press Enter.
5-31
Advanced Functions
5
Press S or T to select Permit No.
List. Press Enter.
6
Press right Select.
7
Press S or T to select Add FAX
Number. Press Enter.
8
Use the numeric keys to enter the
authorized fax number. Press
Enter.
Repeat steps 6 to 8 to enter all
authorized fax numbers.
9
TX/RX Restrict.:
TX Restriction
RX Restriction
Permit No. List
Exit
Permit No. List :
*0123456789
3456789012
6789012345
Exit
Menu
Menu :
Detail/Edit
Delete
Add FAX Number
Cancel
FAX No. Entry :
Cancel
Press left Select to return to the basic screen.
Modifying Authorized Telephone Numbers
Perform the following procedure to change authorized telephone numbers:
1
5-32
Follow steps 1 to 5 in Registering New Authorized Telephone Numbers on
page 5-31.
OPERATION GUIDE
Advanced Functions
2
Press S or T to select the
authorized telephone number to
be changed. Press Enter.
3
Re-enter the fax number. Press
Enter.
Permit No. List :
*0123456789
3456789012
6789012345
Exit
Menu
FAX No. Entry :
0123456789
Cancel
4
Press left Select to return to the basic screen.
Deleting Authorized Telephone Numbers
Perform the following procedure to delete authorized telephone numbers:
OPERATION GUIDE
1
Follow steps 1 to 5 in Registering New Authorized Telephone Numbers on
page 5-31.
2
Press S or T to select the
authorized telephone number to
delete. Press right Select.
3
Press S or T to select Delete.
Press Enter.
4
Press left Select.
Permit No. List :
*0123456789
3456789012
6789012345
Exit
Menu
Menu :
*Detail/Edit
Delete
Add FAX Number
Cancel
5-33
Advanced Functions
5
Press left Select to return to the basic screen.
Registering New Authorized IDs
Perform the following procedure to register authorized ID numbers:
NOTE: You can register up to 5 authorized ID numbers.
1
Press System Menu/Counter.
2
Press S or T to select FAX Setting. Press Enter.
3
Press S or T to select FAX RX Setting. Press Enter.
4
Press S or T to select TX/RX Restrict. Press Enter.
5
Press S or T to select Permit ID
List. Press Enter.
6
Press right Select.
TX/RX Restrict.:
RX Restriction
Permit No. List
Permit ID List
Exit
Permit ID List :
*0004
0007
Exit
7
5-34
Press S or T to select Add FAX
ID. Press Enter.
Menu
Menu :
Detail/Edit
Delete
Add FAX ID
Cancel
OPERATION GUIDE
Advanced Functions
8
Use the numeric keys to enter the
ID number. Press Enter.
Repeat steps 6 to 8 to enter all
authorized ID numbers.
Permit FAX ID :
(0000 ~ 9999)
0000
Cancel
9
Press left Select to return to the basic screen.
Modifying Authorized IDs
Perform the following procedure to change authorized ID numbers:
1
Follow steps 1 to 5 in Registering New Authorized IDs on page 5-34.
2
Press S or T to select the
authorized ID number to change.
Press Enter.
Permit ID List :
*0004
0007
Exit
3
Re-enter the ID number. Press
Enter.
Menu
Permit FAX ID :
(0000 ~ 9999)
0004
Cancel
4
Press left Select to return to the basic screen.
Deleting Authorized IDs
Perform the following procedure to delete authorized ID numbers:
1
OPERATION GUIDE
Follow steps 1 to 5 in Registering New Authorized IDs on page 5-34.
5-35
Advanced Functions
2
Press S or T to select the
authorized ID number to delete.
Press right Select.
Permit ID List :
*0004
0007
Exit
3
Press S or T to select Delete.
Press Enter.
4
Press left Select.
5
Press left Select to return to the basic screen.
Menu
Menu :
*Detail/Edit
Delete
Add FAX ID
Cancel
Activating Password-based Communications
Activate this function to restrict transmission or reception to authorized
users. You can restrict transmission, reception, or both.
NOTE: Even if you activate this setting, authorized telephone numbers or
IDs must be registered in the FAX System in advance. Otherwise, the
system will not verify passwords.
5-36
1
Press System Menu/Counter.
2
Press S or T to select FAX Setting. Press Enter.
3
Press S or T to select FAX RX Setting. Press Enter.
4
Press S or T to select TX/RX Restrict. Press Enter.
OPERATION GUIDE
Advanced Functions
5
Press S or T to select TX
Restriction. Press Enter.
6
Press S or T to select Use
Permit List or Off. Press Enter.
Choose Use Permit List to check
passwords during transmission.
TX/RX Restrict.
Back
TX Restriction
RX Restriction
Exit
TX Restriction:
*Off
Use Permit List
Cancel
7
Press S or T to select RX
Restriction. Press Enter.
8
Press S or T to select Use
Permit List or Off. Press Enter.
Choose Use Permit List to check
passwords during reception.
TX/RX Restrict.
Back
TX Restriction
RX Restriction
Exit
RX Restriction:
*Off
Use Permit List
Cancel
9
OPERATION GUIDE
Press right Select to return to the basic screen.
5-37
Advanced Functions
Encrypted Communication
This function encrypts documents before transmission, protecting
document contents from viewing by unauthorized third parties, even if
transmission is intercepted. After reception, documents are decrypted by
the recipient and printed. This is a very effective way to fax documents for
which confidentiality is essential.
NOTE: Encrypted communications require the other fax machine to have
compatible encryption functions.
Successful encryption and decryption requires that the sender and
recipient use the same 16-character encryption key. If the encryption keys
of the parties do not match, encrypted communication is not possible. The
sender and recipient must determine encryption conditions beforehand
and register the encryption key under a two-digit encryption key ID.
Scanning
Sender
Recipient
Encryption
Decryption
Printing
Encrypted
Communication
Sender and Recipient Settings
Setting
Reference
Page
Sender
Recipient
Encryption key ID
(A) 2-digit
ID
(B) 2-digit
ID
page 5-39
Encryption key
(C) 16digit key
(C) 16digit key
page 5-39
Encryption key ID assigned
to a one-touch dial key or the
Address Book
(A) 2-digit
key
Encryption key ID in the
encrypted reception setting
page 3-25
(B) 2-digit
key
page 5-41
Use matching numbers for the settings above indicated by the same letters
in parenthesis. For example, the same number must be used by the sender
and recipient for the encryption key.
Encryption Keys and Encryption Key IDs
5-38
OPERATION GUIDE
Advanced Functions
Manage encryption keys by assigning them to encryption key IDs (a twodigit number, 01 to 20). This encryption key ID is used to specify encryption
keys during encrypted communications.
To print documents received in encrypted communications, the sender’s
encryption key must match the encryption key specified in the recipient’s
encrypted reception setting. The encryption key IDs need not match,
however. For example, encrypted communication is possible and
documents can be successfully printed if the sender specifies encryption
key ID 18 (for which the encryption key is ABFE468C2569D341) to fax a
document using encrypted communication, while the recipient uses
encryption key ID 09, which is assigned to the same encryption key. The
encryption keys match, although the recipient assigned encryption key ID
09 to this encryption key in the encrypted reception setting.
Registering New Encryption Keys
Encryption keys are necessary when the sender performs detailed
transmission settings for encrypted transmission, when the sender
specifies encrypted communication for one-touch dial keys or for Address
Book entries, and when a recipient performs detailed transmission
settings.
Encryption keys consist of a series of any 16 characters consisting of
numbers and the letters A through F. The encryption key you select is
registered to an encryption key ID (a two-digit number, 01 to 20).
NOTE: Up to 20 encryption keys can be registered.
OPERATION GUIDE
1
Press System Menu/Counter.
2
Press S or T to select FAX Setting. Press Enter.
3
Press S or T to select FAX Common Set. Press Enter.
4
Press S or T to select Encryption Key. Press Enter.
5
Press S or T to select an
unassigned number for an
encryption key ID (a number
displayed as ---). Press Enter.
Encryption Key :
Key13
Key14
-------------Exit
Menu
5-39
Advanced Functions
6
Use the numeric keys to enter the
encryption key (16 digits). Press
Enter.
Register:
Cancel
NOTE: Encryption keys consist of a series of any 16 characters
consisting of numbers (0 to 9) and the letters A through F.
Use the numeric keys to enter the following characters.
Supported
Characters
# Key
1
7
Supported
Characters
# Key
6
A B C 2
7
D E F 3
8
4
9
5
0
Press left Select to return to the basic screen.
Checking or Deleting Encryption Keys
Perform the following procedure to check or delete encryption keys.
5-40
1
Follow steps 1 to 4 in Registering New Encryption Keys on page 5-39.
2
Press S or T to select the
encryption key ID to be checked
or deleted. Press right Select.
Encryption Key :
*Back
Key01
Key02
Exit
Menu
OPERATION GUIDE
Advanced Functions
3
Press S or T to select Detail or
Delete. Press Enter.
Choose Detail to check keys.
After checking the encryption key,
press Enter.
Choose Delete to delete keys. In
the next screen, press left Select.
Menu :
Register
Detail
Delete
Cancel
Detail:
*
1/ 1
123456789ABCDEF1
Delete.
Are you sure?
Key01
Yes
4
No
Press left Select to return to the basic screen.
Setting Up Encrypted Reception
To receive encrypted transmissions, complete the encrypted reception
setting and specify the encryption key.
OPERATION GUIDE
1
Press System Menu/Counter.
2
Press S or T to select FAX Setting. Press Enter.
3
Press S or T to select FAX RX Setting. Press Enter.
4
Press S or T to select Encryption RX. Press Enter.
5-41
Advanced Functions
5
Press S or T to select On. Press
Enter.
Encryption RX :
*Off
On
Cancel
6
Press S or T to select the
encryption key ID. Press Enter.
7
Press right Select to return to the basic screen.
Encryption Key :
*Key01
Key02
Key03
Cancel
Sending Encrypted Faxes
Perform the following procedure for encrypted transmissions.
NOTE: Before sending an encrypted communication, you must
determine an encryption key with the recipient and register it under an
encryption key ID. For more information, refer to Registering New
Encryption Keys on page 5-39.
1
Place the original documents into the document processor or on the platen.
2
Press Send.
3
Press W Destination.
NOTE: You can specify the other party’s number using one-touch dial
keys or from the Address Book. If encrypted communications are
specified for one-touch dial keys or Address Book entries, no special
steps are required when sending encrypted faxes.
5-42
4
Press S or T to select FAX. Press Enter.
5
Use the numeric keys to enter the fax number, then press right Select.
OPERATION GUIDE
Advanced Functions
6
Press S or T to display
Encryption. Press right Select.
FAX Detail:
Encryption :
Off
Cancel
7
Press S or T to select On. Press
Enter.
2/ 4
Edit
Encryption :
*Off
On
Cancel
8
Press S or T to select the
encryption key ID. Press Enter.
9
Press S or T to select On or Off.
Press Enter.
Choose Off if the recipient does
not support encryption box.
Encrypt. Key No. :
*Key02
Key03
Key04
Cancel
Encryption Box :
*Off
On
Cancel
Choose On if the recipient
supports encryption box. On the
next screen, use the numeric keys
to enter the box number. Press
Enter.
Box Number Entry :
(0000 ~ 9999)
0000
Cancel
OPERATION GUIDE
5-43
Advanced Functions
NOTE: When sending the documents to the same model as the FAX
System in encrypted communication, be sure the encryption box setting is
set to Off.
10
Press Enter.
11
Press Enter to return to the basic screen.
12
Press Start to load stored documents from memory.
Receiving Encrypted Faxes
Perform the following procedure for encrypted reception.
NOTE: Before receiving encrypted communications, you must determine
an encryption key with the sender and register it under an encryption key
ID. For more information, refer to Registering New Encryption Keys on
page 5-39.
5-44
1
Complete the encrypted reception setting, specify encrypted reception,
and select the encryption key ID. For more information, refer to Setting Up
Encrypted Reception on page 5-41.
2
The sender will initiate encrypted transmission. If the encrypted
communication is successful, the encrypted documents will be decrypted
by the recipient’s fax machine before printing.
OPERATION GUIDE
Advanced Functions
E-mail Notification of Job Results
Set up the FAX System to notify you of the results of fax jobs by e-mail.
1
Press Send.
2
Press Function.
3
Press S or T to select Job End Report. Press Enter.
4
Press S or T to select On. Press
Enter.
Job End Report :
*Off
On
Cancel
5
Press S or T to select Address
Book or Address Entry. Press
Enter.
To select e-mail addresses from
the Address Book, select Address
Book. Choose the address on the
next screen. Press Enter.
Destination :
Address Book
Address Entry
Cancel
To enter e-mail addresses, select Address Entry. Enter the address on the
next screen. Press Enter.
OPERATION GUIDE
6
Press right Select to return to the basic screen.
7
Fax the document as usual. You will be notified of the transmission results
by e-mail.
5-45
Advanced Functions
Displaying Job Status
Check the status of recent, current, and scheduled jobs on the message
display. The following menus are available.
Print Job Status
Displays jobs that are currently printing or queued (printouts from received
faxes, from the subaddress box, from reports, from copies, or when the
FAX System is used as a printer). You can check job details and delete
jobs as necessary. Refer to Print Job Status on page 5-47 for more
information.
Send Job Status
Displays jobs that you are currently sending or that are queued for sending
(fax transmissions and scanning jobs). You can check job details and
delete jobs as necessary. Refer to Send Job Status on page 5-47 for more
information.
Store Job Status
You can review documents stored in the subaddress box or polling box and
delete them as necessary. Refer to Store Job Status on page 5-48 for
more information.
Scheduled Job Status
Displays jobs scheduled for fax. You can check job details and delete jobs
as necessary. Refer to Scheduled Job Status on page 5-48 for more
information.
Print Job Log
Displays jobs that have been printed (output from received faxes, from the
subaddress box, from reports, from copies, or from print jobs when the
FAX System is used as a printer). This information includes the printing
status and time of printing. Refer to Print Job Log on page 5-49 for more
information.
Send Job Log
Displays jobs that have been faxed (fax transmissions and scanning jobs).
This information includes the transmission status and time of fax. Refer to
Send Job Log on page 5-49 for more information.
Store Job Log
Displays confidential faxes received via subaddress communication and
completed jobs received via polling. This information includes the job
status and the time of completion. Refer to Store Job Log on page 5-50 for
more information.
FAX TX Log
5-46
OPERATION GUIDE
Advanced Functions
Displays faxed jobs. This information includes the transmission status and
destination. Refer to FAX TX Log on page 5-50 for more information.
FAX RX Log
Displays received jobs. This information includes the reception status and
destination. Refer to FAX RX Log on page 5-51 for more information.
Print Job Status
Perform the following procedure to display the Print Job Status screen.
1
Press Status/Job Cancel.
2
Press S or T to select Print Job Status. Press Enter.
3
Press S or T to select the job to check. Press Enter.
NOTE: To cancel jobs, select the jobs to delete and press left Select. On
the next screen, press left Select.
4
Press S or T to select Detail. Press Enter.
5
Job details are displayed. Press
S or T to display details of each
job sequentially.
6
0009 Detail:
* :
Status
Processing
1/ 6
After reviewing the jobs, press Reset to return to the Status Menu screen.
Send Job Status
Perform the following procedure to display the Send Job Status screen.
1
Press Status/Job Cancel.
2
Press S or T to select Send Job Status. Press Enter.
3
Press S or T to select the job to check. Press Enter.
NOTE: To cancel jobs, select the jobs to delete and press left Select. On
the next screen, press left Select.
4
OPERATION GUIDE
Press S or T to select Detail. Press Enter.
5-47
Advanced Functions
5
6
Job details are displayed. Press
S or T to display details of each
job sequentially.
0011 Detail:
* :
Status
Processing
1/ 7
After reviewing the jobs, press Reset to return to the Status Menu screen.
Store Job Status
Perform the following procedure to display the Store Job Status screen.
1
Press Status/Job Cancel.
2
Press S or T to select Store Job Status. Press Enter.
3
Press S or T to select the job to check. Press Enter.
NOTE: To cancel jobs, select the jobs to delete and press left Select. On
the next screen, press left Select.
4
Press S or T to select Detail. Press Enter.
5
Job details are displayed. Press
S or T to display details of each
job sequentially.
6
0009 Detail:
* :
Status
Suspended
1/ 6
After reviewing the jobs, press Reset to return to the Status Menu screen.
Scheduled Job Status
Perform the following procedure to display the Scheduled Job Status
screen.
5-48
1
Press Status/Job Cancel.
2
Press S or T to select Scheduled Job. Press Enter.
OPERATION GUIDE
Advanced Functions
3
Press S or T to select the job to check. Press Enter.
NOTE: To cancel jobs, select the jobs to delete and press left Select. On
the next screen, press left Select.
4
Press S or T to select Detail. Press Enter.
5
Job details are displayed. Press
S or T to display details of each
job sequentially.
6
0011 Detail:
* :
Status
Suspended
1/ 7
After reviewing the jobs, press Reset to return to the Status Menu screen.
Print Job Log
Perform the following procedure to display the Print Job Log screen.
1
Press Status/Job Cancel.
2
Press S or T to select Print Job Log. Press Enter.
3
Press S or T to select the job to check. Press Enter.
4
Job details are displayed. Press
S or T to display details of each
job sequentially.
5
0006 Detail:
* :
Result
OK
1/ 7
After reviewing the jobs, press Reset to return to the Status Menu screen.
Send Job Log
Perform the following procedure to display the Send Job Log screen.
OPERATION GUIDE
1
Press Status/Job Cancel.
2
Press S or T to select Send Job Log. Press Enter.
5-49
Advanced Functions
3
Press S or T to select the job to check. Press Enter.
4
Job details are displayed. Press
S or T to display details of each
job sequentially.
5
0003 Detail:
* :
Result
OK
1/ 8
After reviewing the jobs, press Reset to return to the Status Menu screen.
Store Job Log
Perform the following procedure to display the Store Job Log screen.
1
Press Status/Job Cancel.
2
Press S or T to select Store Job Log. Press Enter.
3
Press S or T to select the job to check. Press Enter.
4
Job details are displayed. Press
S or T to display details of each
job sequentially.
5
0009 Detail:
* :
Result
OK
1/ 7
After reviewing the jobs, press Reset to return to the Status Menu screen.
FAX TX Log
Perform the following procedure to display the FAX TX Log screen.
5-50
1
Press Status/Job Cancel.
2
Press S or T to select FAX. Press Enter.
3
Press right Select.
OPERATION GUIDE
Advanced Functions
4
Press S or T to select TX Log.
Press Enter.
5
Press S or T to display the
record of faxed jobs sequentially.
Log :
*TX Log
RX Log
FAX TX Report
Cancel
TX Log :
0123456789
OK
6
1/50
Detail
After reviewing the jobs, press Reset to return to the Status Menu screen.
FAX RX Log
Perform the following procedure to display the FAX RX Log screen.
OPERATION GUIDE
1
Press Status/Job Cancel.
2
Press S or T to select FAX. Press Enter.
3
Press right Select.
4
Press S or T to select RX Log.
Press Enter.
Log :
TX Log
RX Log
FAX TX Report
Cancel
5-51
Advanced Functions
5
Press S or T to display the
record of faxes received
sequentially.
RX Log :
0123456789
OK
6
5-52
1/50
Detail
After reviewing the jobs, press Reset to return to the Status Menu screen.
OPERATION GUIDE
Advanced Functions
Printing Communication Management Reports
Print reports of the faxes that were sent or received.
Printing FAX TX Reports
Perform the following procedure to print details of the 50 most recent
transmissions.
1
Press Status/Job Cancel.
2
Press S or T to select FAX. Press Enter.
3
Press right Select.
4
Press S or T to select FAX TX
Report. Press Enter.
5
Press left Select to print the
report.
Log :
TX Log
RX Log
FAX TX Report
Cancel
Print.
Are you sure?
FAX TX Report
Yes
No
Printing FAX RX Reports
Perform the following procedure to print details of the 50 most recent faxes
received.
OPERATION GUIDE
1
Press Status/Job Cancel.
2
Press S or T to select FAX. Press Enter.
3
Press right Select.
5-53
Advanced Functions
4
Press S or T to select FAX RX
Report. Press Enter.
5
Press left Select to print the
report.
Log :
RX Log
FAX TX Report
FAX RX Report
Cancel
Print.
Are you sure?
FAX RX Report
Yes
5-54
No
OPERATION GUIDE
Advanced Functions
User Login
When User Login function is indicated on the FAX System, you prompt to
enter your User ID and password to use the FAX System.
The factory default setting of User ID and Password is 1118.
NOTE: For further information and instructions for Job Accounting, refer
to the Advanced Operation Guide.
User Login Screen
Perform the following procedure to use the FAX System in User Login
mode.
1
Enter the user ID and the
password using the numeric keys.
2
Complete the fax job as usual.
User ID :
36878
Password :
NOTE: Be sure to press Log
Out after completing the fax job.
The message display returns to
the user login screen.
OPERATION GUIDE
5-55
Advanced Functions
Job Accounting
Job accounting is used to control the total number of copies and prints by
setting an ID-code for each account.
NOTE: For further information and instructions for Job Accounting, refer
to the Advanced Operation Guide.
Job Accounting Screen
Perform the following procedure to use the FAX System in Job Accounting
mode.
1
Enter the account ID using the
numeric keys.
2
Complete the fax job as usual.
Account ID :
NOTE: Be sure to press Log
Out after completing the fax job.
The message display returns to
the Job Accounting screen.
Job Accounting Report
Perform the following procedure to print the job accounting report.
5-56
1
Press System Menu/Counter.
2
Press S or T to select User/Job Account. Press Enter.
3
Press S or T to select Job Account. Set. Press Enter.
4
Press S or T to select Account. Report. Press Enter.
OPERATION GUIDE
Advanced Functions
5
Press left Select. The job
accounting report is printed.
Print.
Are you sure?
All Accounts
Yes
6
OPERATION GUIDE
No
Press right Select to return to the basic screen.
5-57
Advanced Functions
5-58
OPERATION GUIDE
6 Network Fax
This chapter discusses the following topics:
•
•
OPERATION GUIDE
Overview of Network Fax ............................................. 6-2
Initial FAX System Settings .......................................... 6-4
6-1
Network Fax
Overview of Network Fax
Network Fax is a feature used to
send and receive faxes using
computers connected to the FAX
System. Network fax transmission
lets users of computers on the
network send and receive fax
data; these functions are referred
to as network fax transmission
and network fax reception,
respectively.
Before attempting network fax reception, make the settings described in
Fax Forwarding on page 5-24. Fax forwarding lets you receive faxes on
network computers as well as via e-mail. It also lets you forward these
faxes to other fax machines.
Setup
Perform the following procedure to set up network fax.
FAX System Settings
Specify the computer to receive fax data and the file format for reception.
For more information, refer to Initial FAX System Settings on page 6-4.
Computer Settings
Install and configure the Network Fax driver. For more information, refer to
the Network Fax Online Manual. The driver and manual are provided on
the CD-ROM.
Online Manual
The Online Manual provided on the CD-ROM is in Portable Document
Format (PDF).
This manual describes the following operations:
•
Installing applications
•
Completing settings
•
Fax with Network Fax
Accessing the Online Manual
Perform the following procedure to access the online manual.
6-2
1
Load the provided CD-ROM into your computer’s CD-ROM drive. This
automatically displays the Main Menu screen for automatic setup.
2
Click Documentation on the Main Menu screen to view the online manual.
OPERATION GUIDE
Network Fax
Viewing the online manual requires Adobe Acrobat Reader. If it is not
already installed on your system, install Adobe Acrobat Reader from the
included CD-ROM.
Connection
Connect the modular cord (same as used for telephones) to the Line jack
on the FAX System. Connect the network cable to the network interface
port.
Modular Cord
Network Cable
Network Fax Settings Report
Check the Network Fax settings from the Status Page. For instructions on
printing the Status Page, refer to the Advanced Operation Guide.
OPERATION GUIDE
6-3
Network Fax
Initial FAX System Settings
Complete the following settings for network fax reception.
Destination Settings
Specify the computers to receive transmissions using network fax
reception. You can also specify e-mail forwarding. For more information,
refer to Registering Forwarding Destinations on page 5-24.
Reception Period
Specify to receive faxes using network fax reception all day long or only
during specified periods. For more information, refer to Specifying the Fax
Forwarding Period on page 5-27.
FAX System Printing Settings
Specify the FAX System to print faxes received even when these
transmissions are set to be received using network fax reception. For more
information, refer to Printing from the FAX System during Fax Forwarding
on page 5-29.
File Format for Faxes Received
Select to receive faxes as TIFF or PDF files. For more information, refer to
Specifying the File Format of Forwarded Files on page 5-29.
Network Fax Reception Settings
To enable network fax reception, activate fax forwarding. For more
information, refer to Activating Fax Forwarding on page 5-30.
6-4
OPERATION GUIDE
7 FAX System Settings
This chapter discusses the following topics:
OPERATION GUIDE
•
•
•
•
•
•
•
•
Menu Table................................................................... 7-2
Printing Reports............................................................ 7-4
Volume ......................................................................... 7-8
Redial ......................................................................... 7-10
Fax Media Type...........................................................7-11
Number of Rings ........................................................ 7-12
Fax Reception Mode .................................................. 7-14
Reception Date and Time........................................... 7-18
•
•
•
•
2in1 Reception ........................................................... 7-19
Bulk Printing ............................................................... 7-20
Remote Diagnosis ...................................................... 7-21
Remote Diagnosis ID ................................................. 7-22
7-1
FAX System Settings
Menu Table
For the system setting menu using in this chapter, refer to the Menu Table
below. To access the system setting menu, press System Menu/Counter.
NOTE: To perform these settings, press S or T to select the menu/
submenu/item and Enter to confirm your selection.
Main
Menu
Report
Sub
Menu1
Report
Setting
FAX
Setting
7-2
Options
Reference
Page
Description
FAX TX
Report
Off, On
For periodic printouts of
transmission reports (On/Off).
page 7-4
FAX RX
Report
Off, On
For periodic printouts of reception
reports (On/Off).
page 7-4
Send
Result
Off, On,
On(Conditions)
For printouts of transmission results
(On/Off).
page 7-5
FAX RX
Result
Off, On,
On(Conditions)
For printouts of reception results
(On/Off).
page 7-5
FAX
Speaker
Off, Minimum,
Middle,
Maximum
Adjust the speaker level and
volume of the fax monitoring tone.
page 7-8
FAX
Monitor
Off, Minimum,
Middle,
Maximum
Adjust the volume of the built-in
speaker during auto-transmission in
off-hook mode when T On-Hook is
not pressed.
page 7-8
FAX TX
Setting
Retry
Times
0 – 14 Times†
Specify the number of redial
attempts if the other party’s line is
busy.
page 7-10
FAX RX
Setting
FAX
Media
Type
All Media Type,
Plain,
Transparency,
Rough, Vellum,
Labels,
Recycled,
Preprinted,
Bond,
Cardstock,
Color,
Prepunched,
Letterhead,
Envelope,
Thick,
Custom 1–8
Select the type of paper to be used
to print received faxes.
page 7-11
Result
Rep. Set.
Common
Setting
Sub
Menu2
Sound
Setting
OPERATION GUIDE
FAX System Settings
Main
Menu
FAX
Setting
Service
Setting
†.
Sub
Menu1
Sub
Menu2
FAX RX
Setting
Rings
(Normal)
1 – 15 Rings
Specify the number of rings in auto
reception mode.
page 7-12
Rings
(TAD)
1 – 15 Rings
If the FAX System is set to enable
automatic switching between the
fax and answering machine (when
used with a regular telephone
answering machine), this setting
specifies the number of rings until
fax reception begins if the
answering machine is off.
page 7-12
Rings
(FAX/
TEL)
0 – 15 Rings
If the FAX System is set to enable
automatic switching between the
fax and telephone (when used with
a regular telephone), this setting
specifies the number of rings until
fax reception begins.
page 7-13
RX
Setting
Auto (Normal),
Auto (FAX/TEL),
Auto (TAD),
Auto (DRD),
Manual
Specify the desired fax reception
mode.
page 7-14
RX Date/
Time
Off, On
Print the date/time of reception,
sender identification, and page
number at the top of each
document page received.
page 7-18
2in1 RX
Off, On
Print two 5 1/2 × 8 1/2"/A5-sized
faxes received consecutively on a
single 11 × 8 1/2"/A4 sheet.
page 7-19
RX Bulk
Print
Off, On
Print all fax image data together
upon completed reception by the
FAX System.
page 7-20
Remote
Diag.Set.
–
Off, On
Enable the service center computer
to access the FAX System via the
telephone line for troubleshooting
when the user contacts a service
agent.
page 7-21
Remote
Diag. ID
–
0000 – 9999
Enter the FAX System’s unique ID
as instructed by a service agent.
page 7-22
Options
Description
Reference
Page
The available range varies depending on countries.
OPERATION GUIDE
7-3
FAX System Settings
Printing Reports
Print reports on the details of fax transmission and reception. Choose
automatic report printing, or choose to disable this feature.
Fax TX Report
Prints communication details after the specified number of transmissions.
For instructions on using this feature, refer to Fax TX Report and Fax RX
Report Settings on page 7-4.
Fax RX Report
Prints communication details after the specified number of receptions. For
instructions on using this feature, refer to Fax TX Report and Fax RX
Report Settings on page 7-4.
Send Result
Prints a report confirming transmission success or failure after fax. If you
prefer, you can set the system to print only after errors or subaddressbased confidential transmission. For instructions on using this feature,
refer to Send Result Settings on page 7-5.
NOTE: You can set the FAX System to notify you of transmission results
by e-mail. For more information, refer to E-mail Notification of Job Results
on page 5-45.
Fax RX Result
Prints a report confirming reception success or failure after faxes are
received. If you prefer, you can set the system to print only after errors or
subaddress-based confidential reception. You can also set up notification
of the reception results so that such notification is e-mailed rather than
printed. For instructions on using this feature, refer to Fax RX Result
Settings on page 7-5.
Fax TX Report and Fax RX Report Settings
Perform the following procedure to set up fax transmission and/or
reception reporting.
7-4
1
Press System Menu/Counter.
2
Press S or T to select Report. Press Enter.
3
Press S or T to select Report Setting. Press Enter.
4
Press S or T to select FAX TX Report or FAX RX Report. Press Enter.
OPERATION GUIDE
FAX System Settings
5
Press S or T to select On or Off.
Press Enter.
FAX TX Report :
*Off
On
Cancel
6
Press right Select to return to the basic screen.
Send Result Settings
Perform the following procedure to set up printing of transmission results.
1
Press System Menu/Counter.
2
Press S or T to select Report. Press Enter.
3
Press S or T to select Result Rep. Set. Press Enter.
4
Press S or T to select Send Result. Press Enter.
5
Press S or T to select Off, On, or
On (Conditions). Press Enter.
Choose On (Conditions) to print
the report of transmission result
when an error occurs in
transmission.
6
Send Result :
*
*Off
On
On(Conditions)
Cancel
Press right Select to return to the basic screen.
Fax RX Result Settings
Perform the following procedure to set up printing of reception results.
OPERATION GUIDE
1
Press System Menu/Counter.
2
Press S or T to select Report. Press Enter.
3
Press S or T to select Result Rep. Set. Press Enter.
4
Press S or T to select FAX RX Result. Press Enter.
7-5
FAX System Settings
5
Press S or T to select Off, On, or
On (Conditions). Press Enter.
If you select Off, skip to the step 8.
Choose On (Conditions) to print
the report of reception result when
an error occurs in fax reception.
6
Press S or T to select Report
Print or E-mail. Press Enter.
If you select Report Print, skip to
the step 8.
FAX RX Result:
*
*Off
On
On(Conditions)
Cancel
Report Output :
*
*Report
Print
E-mail
Cancel
7
Press S or T to select Address
Entry or Address Book. Press
Enter.
Destination:
*Address Book
Address Entry
Cancel
If you select Address Book, select
the e-mail address from the
Address Book.
Contacts :
*AAA
ABCDE
FGHIJ
Cancel
Menu
NOTE: For instructions on using the Address Book, refer to Address
Book on page 3-24.
7-6
OPERATION GUIDE
FAX System Settings
If you select Address Entry, enter
the e-mail address. Press Enter.
Address Entry :
Cancel
ABC
Text
NOTE: For instructions on entering e-mail addresses, refer to Entering
Characters on page 3-20.
8
OPERATION GUIDE
Press right Select to return to the basic screen.
7-7
FAX System Settings
Volume
Adjust the speaker level and volume of the fax monitoring tone. Switch off
sound setting if no tone or speaker output is needed.
NOTE: Refer to the Advanced Operation Guide for instructions on
adjusting the volume for warning tones (after errors) and confirmation
tones for operation panel keys.
Adjusting Speaker Levels
Perform the following procedure to adjust the volume of the built-in speaker
in off-hook mode when T On-Hook is pressed.
1
Press System Menu/Counter.
2
Press S or T to select Common Setting. Press Enter.
3
Press S or T to select Sound Setting. Press Enter.
4
Press S or T to select FAX Speaker. Press Enter.
5
Press S or T to adjust the
volume. Press Enter.
6
Press right Select to return to the basic screen.
FAX Speaker :
1 Minimum
* 2 Middle
3 Maximum
Cancel
Adjusting the Monitor Tone Volume
Perform the following procedure to adjust the volume of the built-in speaker
during auto-transmission in off-hook mode when T On-Hook is not
pressed.
7-8
1
Press System Menu/Counter.
2
Press S or T to select Common Setting. Press Enter.
3
Press S or T to select Sound Setting. Press Enter.
4
Press S or T to select FAX Monitor. Press Enter.
OPERATION GUIDE
FAX System Settings
OPERATION GUIDE
5
Press S or T to adjust the
volume. Press Enter.
6
Press right Select to return to the basic screen.
FAX Monitor :
1 Minimum
* 2 Middle
3 Maximum
Cancel
7-9
FAX System Settings
Redial
Perform the following procedure to specify the number of redial attempts if
the other party’s line is busy.
NOTE: Redial cannot be used with direct transmission.
The available range varies depending on countries.
1
Press System Menu/Counter.
2
Press S or T to select FAX Setting. Press Enter.
3
Press S or T to select FAX TX Setting. Press Enter.
4
Press S or T to select Retry Times. Press Enter.
5
Use the numeric keys to specify
the number of redial attempts.
Press Enter.
Retry Times :
(0~14)
3 times
Cancel
6
7-10
Press right Select to return to the basic screen.
OPERATION GUIDE
FAX System Settings
Fax Media Type
Select the paper type used to print received faxes. Your choice of paper
cassette can be used exclusively for printing faxes. For example, if you use
this setting to assign a desired paper cassette to Custom 1, that paper
cassette will be used to print faxes.
NOTE: This setting is displayed only when the FAX System is equipped
with an optional paper cassette.
OPERATION GUIDE
1
Press System Menu/Counter.
2
Press S or T to select FAX Setting. Press Enter.
3
Press S or T to select FAX RX Setting. Press Enter.
4
Press S or T to select FAX Media Type. Press Enter.
5
Press S or T to select the paper
type. Press Enter.
6
Press right Select to return to the basic screen.
FAX Media Type :
*All Media Type
Plain
Transparency
Cancel
7-11
FAX System Settings
Number of Rings
Perform the following procedure to specify the number of rings.
Setting the Number of Rings (Auto Fax Reception)
When the FAX System is set for automatic fax reception, specify 1-15 rings
before fax reception. For more information, refer to Automatic Fax
Reception on page 3-17.
1
Press System Menu/Counter.
2
Press S or T to select FAX Setting. Press Enter.
3
Press S or T to select FAX RX Setting. Press Enter.
4
Press S or T to select Rings (Normal). Press Enter.
5
Press S or T to specify the
number of rings. Press Enter.
Rings (Normal) :
(1 ~ 15)
5 Rings
Cancel
6
Press right Select to return to the basic screen.
Setting the Number of Rings (TAD Reception)
When automatic switching between fax/answering machine is enabled and
the FAX System is used with a regular telephone answering machine,
specify 1-15 rings until fax reception begins when the answering machine
is off. After the specified number of rings, reception of the faxed document
will begin. For more information, refer to TAD Reception on page 7-15.
7-12
1
Press System Menu/Counter.
2
Press S or T to select FAX Setting. Press Enter.
3
Press S or T to select FAX RX Setting. Press Enter.
4
Press S or T to select Rings (TAD). Press Enter.
OPERATION GUIDE
FAX System Settings
5
Use the numeric keys to specify
the number of rings. Press Enter.
Rings (TAD) :
(1 ~ 15)
5 Rings
Cancel
6
Press right Select to return to the basic screen.
Setting the Number of Rings (Fax/Tel Switching) (Inch Model Only)
When automatic switching between fax/telephone is enabled and the FAX
System is used with a regular telephone, specify 0-15 rings until fax
reception begins. After the specified number of rings, reception of the
faxed document will begin. If the call is a telephone call rather than a fax
transmission, the FAX System will continue to ring. For more information,
refer to Auto Fax/Tel Switching on page 7-14.
1
Press System Menu/Counter.
2
Press S or T to select FAX Setting. Press Enter.
3
Press S or T to select FAX RX Setting. Press Enter.
4
Press S or T to select Rings (FAX/TEL). Press Enter.
5
Use the numeric keys to specify
the number of rings. Press Enter.
Rings (FAX/TEL) :
(0 ~ 15)
5 Rings
Cancel
6
OPERATION GUIDE
Press right Select to return to the basic screen.
7-13
FAX System Settings
Fax Reception Mode
The FAX System features the following fax reception modes. Choose the
ideal mode for your needs.
Automatic Fax Reception
Choose automatic fax reception mode to use the FAX System exclusively
as a fax machine. No special operations are required for incoming faxes.
For more information, refer to Automatic Fax Reception on page 3-17.
Manual Fax Reception
In this mode, you can confirm the connection with the other party before
receiving faxes by pressing Start. Choose this mode if you want to speak
with the other party before receiving faxes. For more information, refer to
Manual Fax Reception on page 4-14.
NOTE: You must connect a regular phone to the FAX System for manual
fax reception.
Auto Fax/Tel Switching
This mode is convenient if you use a single telephone line for calling and
fax. Faxes are received automatically. Otherwise, the FAX System rings
for telephone calls.
NOTE: To answer calls, you must connect a regular phone to the FAX
System.
7-14
OPERATION GUIDE
FAX System Settings
[Reception flow]
Fax
Other party sends a fax
using automatic
transmission.
Fax
Other party sends a fax
manually.
Telephone
Other party calls.
The incoming call or fax is received without the FAX System ringing audibly. (Calling
charges are incurred from this point.)
The FAX System rings twice. (Audible only to the sender.)
The faxed document is
received automatically
from the sender (autoreception).
The FAX System rings audibly. (Also audible to the
sender.)
Incoming calls can be answered using an external phone
connected to the FAX System.
To receive faxes after speaking to the other party, press
Send,
On-Hook and left Select to start reception.
G
TAD Reception
This mode is convenient if you use the FAX System with a telephone
answering machine. Faxes are received automatically. For telephone
calls, the caller can leave a message on an answering machine connected
to the FAX System using the features of the answering machine.
NOTE: To answer calls and record messages, you must connect a
regular phone with an answering machine to the FAX System.
[Reception flow]
Fax
Fax
Telephone
Other party sends a fax
using automatic
transmission.
Other party sends a fax
manually.
The faxed document is
received automatically
from the sender (autoreception).
Answering machine plays the receiver's outgoing
message.
Other party calls.
Answering machine records a message from the sender.
After the sender starts fax, the FAX System begins
receiving the document.
OPERATION GUIDE
7-15
FAX System Settings
DRD Reception (Certain Destination Only)
This reception mode uses the Distinctive Ring Pattern service available
from some telephone companies. With this service, you can use two or
more telephone numbers on a single telephone line. Each number is given
a different ring pattern so that the fax machine can differentiate between
incoming calls. Assign one of the numbers to the FAX System and set up
the desired ring pattern in advance for automatic fax reception whenever
the FAX System detects that ring pattern.
NOTE: DRD reception requires a subscription to your telephone
company’s Distinctive Ring Pattern service. Contact your telephone
company for more information.
You must connect a regular phone to the FAX System for DRD Reception.
[Reception flow]
Telephone
Fax
Other party dials the number
designated for calling.
Other party dials the number
designated for fax.
Telephone Company
The FAX System issues the
distinctive ringing pattern for calling
to alert users of the call. An external
phone connected to the FAX System
can be used to speak to the caller.
The FAX System issues the
distinctive ringing pattern for fax and
starts reception automatically. (Same
operation as in auto-reception mode.)
Fax Reception Mode Setting
Perform the following procedure to select fax reception mode.
7-16
1
Press System Menu/Counter.
2
Press S or T to select FAX Setting. Press Enter.
3
Press S or T to select FAX RX Setting. Press Enter.
4
Press S or T to select RX Setting. Press Enter.
OPERATION GUIDE
FAX System Settings
5
Press S or T to select a
reception mode. Press Enter.
Option
RX Setting :
*Auto(Normal)
AUTO(FAX/TEL)
AUTO(TAD)
Cancel
Fax Reception Mode
Auto(Normal)
Automatic Fax Reception
Auto(FAX/TEL)
Auto Fax/Tel Switching
Auto(TAD)
TAD Reception
Auto(DRD)†
DRD Reception
Manual
Manual Fax Reception
†.
This option is available only for certain destination.
If you selected Auto(DRD), press
S or T to select the ringing
pattern. Press Enter.
Auto (DRD) :
*Pattern1
Pattern2
Pattern3
Cancel
NOTE: The DRD pattern setting is available only for certain destination.
6
OPERATION GUIDE
Press right Select to return to the basic screen.
7-17
FAX System Settings
Reception Date and Time
A FAX System feature lets you print the date and time of reception, sender
identification, and the page number at the top of each page. This feature
always lets you see the local time at which the fax was received,
convenient when the fax is sent from a different time zone.
1
Press System Menu/Counter.
2
Press S or T to select FAX Setting. Press Enter.
3
Press S or T to select FAX RX Setting. Press Enter.
4
Press S or T to select RX Date/Time. Press Enter.
5
Press S or T to select On or Off.
Press Enter.
RX Date/Time :
*Off
On
Cancel
6
7-18
Press right Select to return to the basic screen.
OPERATION GUIDE
FAX System Settings
2in1 Reception
Perform the following procedure to print two 5 1/2 × 8 1/2"/A5-sized faxes
received consecutively on a single 11 × 8 1/2"/A4 sheet.
1
Press System Menu/Counter.
2
Press S or T to select FAX Setting. Press Enter.
3
Press S or T to select FAX RX Setting. Press Enter.
4
Press S or T to select 2in1 RX. Press Enter.
5
Press S or T to select On or Off.
Press Enter.
2in1 RX :
*Off
On
Cancel
6
OPERATION GUIDE
Press right Select to return to the basic screen.
7-19
FAX System Settings
Bulk Printing
Activate this setting to print all fax image data together upon completed
reception by the FAX System. The incoming fax will be held until it is
completely received. This frees the FAX System for copying and other
functions during that time.
1
Press System Menu/Counter.
2
Press S or T to select FAX Setting. Press Enter.
3
Press S or T to select FAX RX Setting. Press Enter.
4
Press S or T to select RX Bulk Print. Press Enter.
5
Press S or T to select On or Off.
Press Enter.
RX Bulk Print :
*Off
On
Cancel
6
7-20
Press right Select to return to the basic screen.
OPERATION GUIDE
FAX System Settings
Remote Diagnosis
In case of the malfunction occurs with the FAX System, use this feature to
give the service center computer access to the FAX System via the
telephone line for updating the software when you contact a service agent.
Before using remote diagnosis, you must enter the unique ID into the FAX
System (this ID was provided by the service agent when you signed the
service agreement). For more information, consult your service agent or
dealer.
1
Press System Menu/Counter.
2
Press S or T to select Service Setting. Press Enter.
3
Press S or T to select Remote Diag.Set. Press Enter.
4
Press S or T to select On or Off.
Press Enter.
Remote Diag. Set. :
*Off
On
Cancel
5
OPERATION GUIDE
Press right Select to return to the basic screen.
7-21
FAX System Settings
Remote Diagnosis ID
To enable remote diagnosis, you must enter the FAX System’s unique ID
as instructed by the service agent. This function must also be enabled in
the FAX System, as described in Remote Diagnosis on page 7-21.
1
Press System Menu/Counter.
2
Press S or T to select Service Setting. Press Enter.
3
Press S or T to select Remote Diag. ID. Press Enter.
4
Use the numeric keys to enter the
four-digit unique ID. Press Enter.
Remote Diag. ID :
(0000 ~ 9999)
0000
Cancel
5
7-22
Press right Select to return to the basic screen.
OPERATION GUIDE
8 Troubleshooting
This chapter discusses the following topics:
•
•
•
OPERATION GUIDE
Memory Indicator.......................................................... 8-2
Warning and Maintenance Messages .......................... 8-3
Troubleshooting Table .................................................. 8-5
8-1
Troubleshooting
Memory Indicator
The Memory indicator lights
during fax communication
involving the sending or receiving
of documents stored in memory.
This indicator also lights when
documents are received directly
into memory due to paper jams or
because the system is out of
paper.
NOTE: The Memory indicator flashes while receiving documents or
scanning documents into memory.
FAX Communicating Errors
Fax communicating errors may
trigger an audible alarm and
cause the Error indicator to flash.
If the Error indicator remains lit,
check the message display for
error details and perform the
corrective action. (Refer to
Warning and Maintenance
Messages on page 8-3 and
Troubleshooting Table on page 85.)
Press Stop/Clear to clear the Error indicator if it remains lit even after you
take corrective action and resolve the error.
8-2
OPERATION GUIDE
Troubleshooting
Warning and Maintenance Messages
Take the following corrective actions if the message display shows any of
the messages as below. For error messages not listed below, refer to the
Operation Guide.
Description and Corrective Action
Reference
Page
The fax memory has been exhausted while sending or
receiving the documents. Press right Select to cancel the job.
Free some memory space, then try again.
—
Send error. ##
A communication error occurred during transmission. Press
right Select to cancel transmission.
—
Send error. 6199
Press right Select to cancel transmission. Specify the correct
size of original document and send it again. This error occurs
if Legal (8 1/2 × 14")/Folio original is scanned when the
document size is selected as Letter (8 1/2 × 11")/A4.
Sub address/Polling box not
stored.
Job is canceled.
The subaddress or polling box for fax is full. Press right Select
to cancel the job.
Reservation is full.
Job is canceled.
You have exceeded 50 jobs combined for timer-based,
standby, or interrupt transmission. Press right Select to cancel
the scheduled job.
—
Phone is off hook. Hang up.
The external phone is off the hook. Hang up the receiver.
—
Unable to connect to the
server.
Unable to access the external address book. Press right
Select and check the address book you are trying to access.
—
Enter FAX number.
You have not entered a fax number to dial. Enter the other
party’s fax number.
—
Line is busy.
The other party’s line is busy. Wait and try transmitting again
later.
—
No response.
The other party is not responding. Check the fax number.
—
Communication error.
A communication error has occurred. Check the error details
in the communication results report.
page 9-7
Transmission to this FAX
No.is not permitted.
During password-based communication, the specified
password failed to match the required password. Check the
FAX System settings. Also ask the intended recipient to check
their fax machine settings.
page 5-31
Sub address error.
The subaddresses do not match. Check the settings for
subaddress-based confidential communication.
page 5-12
Cannot select destination
which execute encryption.
The intended recipient’s fax machine is set up for encrypted
communication, but you attempted regular communication.
Make sure you have chosen the correct recipient.
Message
Fax Memory overflow.
OPERATION GUIDE
page 3-13
—
—
8-3
Troubleshooting
Message
The encryption key is not
registered.
8-4
Reference
Page
Description and Corrective Action
No encryption key is specified for the destination set for
encrypted communication. Be sure the encryption key is
entered correctly for the selected destination.
page 5-38
OPERATION GUIDE
Troubleshooting
Troubleshooting Table
Use this table to identify malfunction and perform the corrective action.
If problems persist, contact your dealer or the service agent.
Symptom
Unable to fax
Items to Check
Corrective Action
Reference
Page
Is the modular cord connected
correctly?
Connect the modular cord
correctly.
—
Is the Send error displayed?
Correct the error and try sending
again.
—
Have you set up password-based
transmission?
Disable password-based
transmission.
page 5-31
Have you specified the correct
line type for your telephone
service?
Check the telephone line setting.
page 2-3
Unable to fax from
memory
Is the memory full?
Try sending once again when
memory becomes available.
Otherwise, make memory
available as necessary and try
again.
page 3-18
page 5-20
page 5-22
Unable to fax using
encrypted
communication
Are you using the correct
encryption key?
Make sure the sender and
recipient are using matching
keys.
page 5-38
If the recipient must specify an
encrypted communication box,
has it been set up correctly?
Make sure the sender and
recipient are using matching
keys.
page 5-38
Are you using a dial-pulse
telephone line?
Depending on your phone, you
may be able to use the buttons on
your phone to send tone signals.
Refer to your telephone user’s
manual.
Unable to use
remote switching
I received a fax, but
it was not printed or
stored in memory.
OPERATION GUIDE
—
Did you dial the correct remote
switching number?
Check the registered number.
(Default: 55)
page 5-5
Did you set up fax forwarding?
If fax forwarding is on, contact the
recipient at the forwarding
address regarding the
documents.
page 5-24
8-5
Troubleshooting
Symptom
Unable to receive
faxes
Unable to receive
faxes in memory
Items to Check
Reference
Page
Corrective Action
Is the modular cord connected
correctly?
Connect the modular cord
correctly.
—
Is the Send error displayed?
Correct the error and ask the
sender to resend the fax.
—
Have you set up password-based
reception?
Disable password-based
reception.
page 5-31
Is the memory full?
Try receiving faxes once again
when memory becomes
available. Otherwise, make
memory available as necessary
and try again.
page 3-18
page 5-20
page 5-22
Confirm the paper is loaded in the
paper cassette.
Operation
Guide of
the
printing
system
Unable to use
polling reception
Did the sender use the correct
procedure for polling
transmission?
Ask the sender to check their fax
machine.
Unable to fax using
subaddress-based
confidential
transmission
Does the other party’s fax
machine support the same
features for confidential fax using
subaddresses?
This communication mode cannot
be used unless the other fax
machine has compatible features.
Ask the other party to check their
fax machine.
Has the other party set up boxes
for sending and receiving
confidential faxes (subaddress
confidential boxes)?
Ask the other party to check their
fax machine.
Was the correct subaddress
entered?
If the setting is correct on the FAX
System, ask the other party to
check their fax machine.
If a subaddress and password
must be entered on the other
party’s fax machine, were the
correct settings entered?
If the setting is correct on the FAX
System, ask the other party to
check their fax machine.
Is the memory of the other party’s
fax machine full?
Ask the other party to check their
fax machine.
Were the correct subaddress and
password entered for the
confidential box?
Check the settings for the
subaddress box.
Unable to print
documents from a
subaddress box.
8-6
—
—
—
—
—
—
page 5-12
OPERATION GUIDE
9 Reference Information
This chapter includes the following reference information:
•
•
•
OPERATION GUIDE
Specifications ............................................................... 9-2
Menu Flowcharts .......................................................... 9-3
Error Code Table .......................................................... 9-7
9-1
Reference Information
Specifications
NOTE: Specifications are subject to change without notice.
Item
Description
Type
Optional FAX Kit
Compatibility
Group 3
Line Requirements
Subscription telephone line
Transmission Time
Less than 3 seconds (33,600 bps, JBIG, ITU-T #1 chart)
Modem Speed
33600/31200/28800/26400/24000/21600/19200/16800/14400/
12000/9600/7200/4800/2400 bps
Encoding Method
JBIG/MMR/MR/MH
Error Correction
ECM
Document Dimensions
Inch version: 8 1/2 × 11", 8 1/2 × 14", 5 1/2 × 8 1/2"
Metric version: A4R, B5R, A5R, Folio, Custom (80 to 216 × 148 to
356 mm)
Paper Dimensions
Inch version: 8 1/2 × 11", 8 1/2 × 14", 5 1/2 × 8 1/2"
Metric version: A4R, A5R, Folio
Scanning Line Density
Horizontal × Vertical
Normal (8 dots/mm × 3.85 lines/mm)
Fine (8 dots/mm × 7.7 lines/mm)
Super fine (8 dots/mm × 15.4 lines/mm)
Ultra fine (16 dots/mm × 15.4 lines/mm)
Recording Resolution
600 dpi × 600 dpi
Grayscale
256 levels (Error diffusion)
One-Touch Dial
Max. 8 destinations (1-8)
Broadcast Transmission
Max. 100 destinations
Polling Reception
Max. 1 location
Installed Imaging Memory
3.5 MB
Output Reports
Communication Management Report, FAX Tx Report, FAX Rx
Report, Status Page, Subaddress Box List, NW Status Page
9-2
OPERATION GUIDE
Reference Information
Menu Flowcharts
For reference, the menu structures for function keys on the operation panel
are as follows:
Send
Original Quality
Original Size
Function
Send Size
Zoom
Continuous Scan
Job End Report
FAX Delayed TX
FAX Direct TX
FAX RX Polling
Scan Resolution
Exposure
Destination
Destination Confirmation
FAX
Address Book
Address Book
External Address Book
Status/Job Cancel
Print Job Status
Send Job Status
Store Job Status
Scheduled Job
Send Job Log
Store Job Log
FAX
Log
TX Log
RX Log
FAX TX Report
FAX RX Report
OPERATION GUIDE
9-3
Reference Information
Document Box
Function
Continuous Scan
Job End Report
Sub Address Box
FAX Polling Box
Program
System Menu/Counter
Report
Report Print
Subaddress Box List
Report Setting
FAX TX Report
FAX RX Report
Result Report Setting
Send Result
FAX RX Result
Date/Timer Setting
Year/Time
Time Zone
Common Setting
Sound Setting
FAX Speaker
FAX Monitor
One Touch Setting
One Touch Keys
Continued
9-4
OPERATION GUIDE
Reference Information
Continued from previous page
FAX Setting
FAX Common Setting
Encryption Key
FAX TX Setting
TTI (Transmit Terminal Identifier)
Local FAX Name
Local FAX ID
Local FAX Number
FAX Line Setting
Retry Times
FAX RX Setting
FAX Media Type
Rings (Normal)
Rings (TAD)
Rings (FAX/TEL)
Forward Setting
Forward
Forward Destination
File Format
Forward Time
Print
RX Setting
RX Date/Time
2in1 Reception
RX Bulk Print
Remote Switching Dial
TX/RX Restriction
TX Restriction
RX Restriction
Permit No. List
Permit ID List
Encryption RX
Continued
OPERATION GUIDE
9-5
Reference Information
Continued from previous page
Document Box Setting
Box Media Type
Sub Address Box
Polling Setting
Edit Addressbook
Program Setting
Service Setting
FAX Country Code
Remote Diagnosis Setting
Remote Diagnosis ID
9-6
OPERATION GUIDE
Reference Information
Error Code Table
When a communication error occurs, one of the following error codes is
printed on the transmission report, reception report, or other
communication management report. Use the error code for
troubleshooting.
NOTE: Error codes for errors during V34 transmission are designated by
an “E” prefix instead of a “U”.
Error Code
OPERATION GUIDE
Problem and Corrective Action
Busy
The line was busy or the other party did not answer after their
number was redialed for the specified number of times. Try
sending again.
Stopped
Transmission or reception was interrupted by pressing Stop/
Clear. During communication sessions involving multiple
recipients (such as polling reception), the FAX System was
unable to transmit to all destinations due to a communication
interruption.
U00300
The destination FAX System is out of paper. Contact the
recipient.
U00420 –
U00462
The sender established a connection but could not send the
document because the FAX System are incompatible.
Transmission interrupted.
U00600 –
U00690
Communication was interrupted due to problems with the
FAX System. Try sending or receiving the transmission once
again.
U00700
Communication was interrupted due to problems with the
other party’s FAX System. Contact the other party.
U00800
U00810
Some pages were not sent. Try sending again.
U00900
U00910
Some pages were not received. Try receiving the fax again.
U01000 –
U01092
A communication error occurred during transmission. Try
sending again.
U01100 –
U01199
A communication error occurred during reception. Try
receiving the fax again.
U01400
In timer-based communication, the number entered using the
Address Book or a one-touch key was no longer registered at
the scheduled time, preventing the scheduled transmission.
Check the FAX System settings.
U01500
A communication error occurred during high-speed
transmission. Try sending again.
9-7
Reference Information
Error Code
9-8
Problem and Corrective Action
U01600
A communication error occurred during high-speed reception.
Ask the sender to use a slower transmission speed, then try
receiving the fax again.
U01700
U01720
A communication error occurred during high-speed
transmission. Try sending again.
U01721
A communication error occurred during high-speed
transmission. The recipient’s fax may not support high-speed
reception. If you dialed the number using the address book or
a one-touch key, reduce the transmission speed and try
sending again.
U01800 –
U01820
A communication error occurred during high-speed reception.
Ask the sender to use a slower transmission speed, then try
receiving the fax again.
U01821
A communication error occurred during high-speed reception.
The FAX System may not support this type of high-speed
reception. Ask the sender to use a slower transmission
speed, then try receiving the fax again.
U03000
Polling reception failed because no documents were loaded
in the sender’s FAX System. Contact the sender.
U03300
The other party’s FAX System is compatible with the FAX
System, but polling reception to receive their document failed
because the required passwords failed to match during
password-based communication, when password-based
communication was enabled on their FAX System.
U03400
Polling reception failed because the sender’s password and
recipient’s station ID failed to match. Contact the other party.
U04000
The recipient’s FAX System is compatible with the FAX
System, but subaddress-based confidential transmission to
send documents to their subaddress box failed because the
subaddress box number you entered is not set in their FAX
System.
U04100
Transmission to a subaddress box or other box failed
because the other FAX System does not support subaddressbased confidential reception.
U04200
Encrypted transmission failed because the other party has
not set up an encryption box.
U04300
Encrypted transmission failed because the other party’s FAX
System does not support encrypted communication.
U04400
Encrypted transmission failed because the encryption keys
did not match.
OPERATION GUIDE
Reference Information
Error Code
OPERATION GUIDE
Problem and Corrective Action
U04401
Encrypted transmission could not be attempted. The other
party could not be dialed because the designated encryption
key is not registered in the FAX System.
U04500
Encrypted reception failed because the encryption keys did
not match.
U05100
Transmission failed because the passwords did not match
during password-based communication, when passwordbased communication was enabled on the FAX System.
Contact the other party.
U05200
Transmission from the other party failed because the required
passwords failed to match during password-based
communication, when password-based communication was
enabled on the FAX System.
U05300
Transmission failed because the necessary passwords failed
to match during password-based communication, when
password-based communication was enabled on their FAX
System. Contact the other party.
U09000
Communication failed because the other party’s FAX System
uses an incompatible communication protocol. (The other
party is using a G2 FAX System.)
U14000
Reception to a subaddress box failed because FAX System
memory is full. Print stored documents and try again, or
cancel subaddress-based confidential reception.
U14100
The recipient’s FAX System is compatible with the FAX
System, but transmission to their subaddress box failed
because their FAX System memory is full.
U19000
Reception to memory has failed because the FAX System
memory is full. Clear other data from memory and try
receiving the fax again.
U19100
Transmission failed because the other party’s FAX System
memory is full. Contact the other party.
U19200
The data stored in memory is corrupted. Repeat the
procedure just attempted.
U19300
Transmission failed because the data to be sent is corrupted.
Try sending again.
U19400
Reception failed because the data received is corrupted. Try
receiving the fax again.
9-9
Reference Information
9-10
OPERATION GUIDE
Index
Numerics
2in1 Reception 7-19
A
Address Book 3-24
Deleting Destinations from the Address
Book 3-33
Deleting Group Destinations from the
Address Book 3-37
Editing Destinations in the Address Book
3-32
Editing Group Destinations in the
Address Book 3-37
Entering Destinations in the Address
Book 3-25
Entering Group Destinations in the
Address Book 3-33
Searching for Destinations in the
Address Book 3-24
To search for the other party by name
3-24
Address Recall 3-39
Auto Fax/Tel Switching 7-14
Automatic Fax Reception 3-17, 7-14
Automatic Redialing 3-39
B
Broadcast Transmission 4-4
Bulk Printing 7-20
OPERATION GUIDE
C
Canceling Direct Transmission 3-18
Canceling Memory Transmission 3-18
Chain Dial 4-18
Assigning Chain Dial 4-18
Checking Details of Assigned Keys 4-19
Clearing Assigned Keys 4-20
Dialing with Chain Dial 4-21
Communication Management Reports 5-53
Printing FAX RX Reports 5-53
Printing FAX TX Reports 5-53
Continuous Scanning 3-16
D
Date & Time Setting 2-7
Deleting a Job in Memory 4-11
Direct Transmission 4-7
Direct transmission mode 3-4
DRD Reception 7-16
E
ECM communication 3-11
E-mail Notification of Job Results 5-45
Encrypted Communication 5-38
Checking or Deleting Encryption Keys
5-40
Receiving Encrypted Faxes 5-44
Registering New Encryption Keys 5-39
Sending Encrypted Faxes 5-42
Setting Up Encrypted Reception 5-41
Entering Characters 3-20
Error Code Table 9-7
Exposure Mode 3-6
Index-1
F
M
Fax Forwarding 5-24
Activating Fax Forwarding 5-30
Changing Forwarding Destinations 5-26
Printing from the FAX System during Fax
Forwarding 5-29
Registering Forwarding Destinations
5-24
Specifying the Fax Forwarding Period
5-27
Specifying the File Format of Forwarded
Files 5-29
Fax Information 2-5
Entering your fax number 2-5
Entering your station ID 2-6
Entering your station name 2-5
Fax Media Type 7-11
Fax Reception Mode 7-14
Fax Reception Mode Setting 7-16
Manual Fax Reception 4-14, 7-14
Manual Fax Transmission 4-13
Memory Indicator 8-2
Memory transmission mode 3-4
Menu Flowcharts 9-3
I
O
Interrupt Transmission 4-8
One-Touch Keys 4-15
Assigning Destinations 4-15
Checking Details of Assigned Keys 4-17
Clearing Assigned Keys 4-17
Destination 4-15
Recalling Destinations 4-18
Setting Up One-Touch Keys 4-15
Original Quality Mode 3-5
J
Job Accounting 5-56
Job Accounting Report 5-56
Job Accounting Screen 5-56
Job Status 5-46
FAX RX Log 5-51
FAX TX Log 5-50
Print Job Log 5-49
Print Job Status 5-47
Scheduled Job Status 5-48
Send Job Log 5-49
Send Job Status 5-47
Store Job Log 5-50
Store Job Status 5-48
N
Network Fax 6-1
Connection 6-3
Initial FAX System Settings 6-4
Network Fax Settings Report 6-3
Overview of Network Fax 6-2
Setup 6-2
Number of Rings 7-12
Auto Fax Reception 7-12
Fax/Tel Switching 7-13
TAD Reception 7-12
L
Line Type Setting 2-3
Index-2
OPERATION GUIDE
P
S
Password-based Communications 5-31
Activating Password-based
Communications 5-36
Deleting Authorized IDs 5-35
Deleting Authorized Telephone Numbers
5-33
Modifying Authorized IDs 5-35
Modifying Authorized Telephone
Numbers 5-32
Registering New Authorized IDs 5-34
Registering New Authorized Telephone
Numbers 5-31
Polling Communication 5-7
Deleting the Documents Stored in Polling
Box 5-9
Editing the Documents Stored in Polling
Box 5-8
Polling Transmission Settings 5-10
Printing the Documents Stored in Polling
Box 5-8
Receiving Documents by Polling 5-9
Storing Documents for Polling 5-7
Printing Reports 7-4
Fax RX Report 7-4
Fax RX Result 7-5
Fax TX Report 7-4
Send Result 7-5
Programs 4-23
Deleting Programs 4-23
Recalling Programs 4-24
Registering Programs 4-23
Scan Resolution Mode 3-6
Select the Original Size 3-13
Select the Size for Fax 3-14
Sending Documents 3-4
Setting the communication speed 3-10
Specifications 9-2
Standby Transmission 4-3
Subaddress Communications 5-11
Passwords 5-11
Subaddresses 5-11
Subaddress-based Confidential
Communications 5-12
Confidential Fax Using Subaddresses
5-18
Deleting Documents from Subaddress
Boxes 5-22
Deleting Subaddress Boxes 5-17
Editing Documents from Subaddress
Boxes 5-21
Modifying Subaddress Boxes 5-13
Paper Setting for Printing from Boxes
5-18
Printing Documents from Subaddress
Boxes 5-20
Printing Lists of Subaddress Boxes 5-22
Setting Up Subaddress Boxes 5-12
R
Reception Date and Time 7-18
Redial 7-10
Remote Diagnosis 7-21
Remote Diagnosis ID 7-22
Remote Switching 5-5
Changing the Remote Switching Number
5-5
Receiving Faxes Remotely 5-5
OPERATION GUIDE
T
TAD Reception 7-15
Timer-based Transmission 4-9
Troubleshooting 8-1
Troubleshooting Table 8-5
TTI Setting 2-4
U
User Login 5-55
User Login Screen 5-55
V
Volume 7-8
Adjusting Speaker Levels 7-8
Adjusting the Monitor Tone Volume 7-8
Index-3
W
Warning and Maintenance Messages 8-3
Z
Zoom Transmission 3-15
Index-4
OPERATION GUIDE
MEMO
MEMO
A1
2005.3
303JG80011
2005 KYOCERA MITA Corporation All rights reserved.