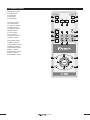
1
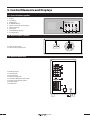
KH 2222 Surround Sound System with Q-Sound Operating Instructions En KH 2222 IB v. 1.0, 04-12-2003 Kompernaß Handelsgesellschaft mbH Burgstraße 21 D-44867 Bochum, Germany — www.kompernass.com Index 1. Technical Data 4 1.1. Output ....................................................................................................................................................................... 4 1.2. Speakers .................................................................................................................................................................... 4 1.3. Dimensions (in mm).................................................................................................................................................. 4 2. Scope of delivery 4 3. Application and Function 4 4. Safety Information/Setting up the equipment 4 5. Control Elements and Displays 6 5.1. Front of center speaker ........................................................................................................................................... 6 5.2. Back of center speaker ............................................................................................................................................ 6 5.3. Back of subwoofer ................................................................................................................................................... 6 5.4. Remote control ......................................................................................................................................................... 7 6. Preparing the Surround Sound System for Operation 8 6.1. Unpacking the components .................................................................................................................................... 8 6.2. Preparing the remote control for operation .......................................................................................................... 8 6.3. Positioning the speakers and the subwoofer......................................................................................................... 8 6.4. Connect speakers and subwoofer ........................................................................................................................... 8 6.5. Connecting the surround sound system to audio/video equipment ................................................................... 9 6.5.1. Connection via 5.1 channel/audio outputs........................................................................................................................................... 9 6.5.2. Connection via two cinch jacks as audio output................................................................................................................................. 9 6.5.3. Connection via Scart /Euro AV jacks.......................................................................................................................................................10 6.5.4. Connection via the headphone output................................................................................................................................................10 7. Using the Surround Sound System 10 8. Functions during operation 11 8.1. Set the main volume .............................................................................................................................................. 11 8.2. Set the volume of individual speakers ................................................................................................................. 11 8.3. Setting the bass and the treble ............................................................................................................................. 12 8.4. Setting the speaker balance ................................................................................................................................. 12 8.5. Switching the surround sound system to mute ................................................................................................... 12 9. Cleaning the surround sound system 12 10. Rectifying Malfunctions 12 10.1. The remote control does not work ...................................................................................................................... 12 10.2. No sound ............................................................................................................................................................... 12 10.3. No surround sound............................................................................................................................................... 13 10.4. Other malfunctions .............................................................................................................................................. 13 KH 2222 3 1. Technical Data 1.1. Output • • • Subwoofer.................................... 30 W (8 Ohm, THD: 1%) Front and rear speakers both ............................. 12 W (4 Ohm, THD: 1%) Center speaker ........................... 12 W (4 Ohm, THD: 1%) Power consumption................. 150 W Mains voltage ............................. AC 230 V ~ 50 Hz 1.2. Speakers Subwoofer.................................... ø 165 mm (6 1⁄2”) 4 Ohm Front and rear speakers both ............................. ø 70 mm (2 1⁄2”) 4 Ohm Center speakers ......................... ø 70 mm (2 1⁄2”) 4 Ohm 1.3. Dimensions (in mm) • • for connection to televisions, video recorder, DVD player and also to audio equipment such as CD player, hifi system and comparable devices to play back 5.1 channel surround sound on audio/ video media which has been equipped accordingly. to simulate 5.1 channel surround sound for stereo sound using the “Q SOUND” function for stationary application in closed rooms for private, non-commercial use Attention! No liability/guarantee will be assumed for damages caused by the inappropriate use of the surround sound system! 4. Safety Information/ Setting up the equipment Subwoofer.................................... 213 (W) × 365 (D) × 420 (H) Center speaker ........................... 290 (W) × 151 (D) × 105 (H) Front and rear speakers both ............................. 90 (W) × 100 (D) × 104 (H) Never open the casing of the subwoofer, center, front and rear speakers! They do not contain any parts that can be maintained by the user. If the casings of the units are opened, then the guarantee expires! 2. Scope of delivery No liability/guarantee will be assumed for damages which arise from 1. Surround sound system, consisting of • Subwoofer • Center speaker • 2 front speakers • 2 rear speakers 2. Infrared remote control 3. Two batteries for the remote control, type AAA/LR 03 (round cells) 4. Speaker cables: • 1 x 2 m (for center speaker) • 2 x 4 m (for front speaker) • 2 x 8 m (for rear speaker) 5. Data cable 1 x 3 m (to connect center speaker to the subwoofer) 6. These operating instructions 3. Application and Function The eBench KH 2222 surround sound system is solely intended … • • opening the casings of the components and/or trying to repair the unit and which are not carried out by specialized qualified personnel! Keep all components of the surround sound system away from sources of heat (e.g. radiators which have been put on)! Otherwise plastic parts could melt and/or the surround sound system could overheat. This can cause irreparable damage to the surround sound system. Warning! If the surround sound system overheats, there is also a fire risk! Do not place the surround sound system in damp environments, e.g. in cellars or in the sauna! Attention! If moisture penetrates into the components, it can cause irreparable damage to them! Warning! In this case there is additionally also a fire risk! • as a consumer electronics system For safety reasons do not put the surround sound system directly near to water (e.g. near to the bath). Also do not place 4 KH 2222 any container filled with water – such as e.g. vases – on the components. Attention! If water runs into the components, it can cause irreparable damage! Warning! Note: As long as the surround sound system is plugged into a power socket, it is not free of electrical current. This also applies when the surround sound system has been switched off. Take the mains plug of the surround sound system out of the power socket if it is not to be used for a longer period of time. This avoids unnecessary power consumption. In this case there is additionally also a fire risk! The technical components of the surround sound system are designed for temperatures between 5º C and 35º C. Therefore only use the surround sound system in this temperature range. Attention! This could, otherwise, cause malfunctions or damage to the surround sound system! Place all components of the surround sound system on a surface, which does not vibrate and which is flat and stable. You thus prevent the components from falling down and being damaged. No liability/guarantee is assumed for damages to the surround sound system and its components, which arise as a result of • • • • Effects of moisture Water which has penetrated into the unit Overheating Falling/being dropped! Do not bend and squash the power cord, the speaker cables and the data cable. Lay all cables so that they are not steppe on. Attention! Otherwise the cables can be damaged and this will cause malfunctions to the surround sound system. Warning! If the power cord has been damaged there is the risk of an electric shock! Therefore never try to repair a damaged power cord yourself! Repairs should be carried out solely by a qualified electrician or by our service partners. The addresses of our service partners can be found on the guarantee card. The guarantee is enclosed in the surround sound system. KH 2222 5 5. Control Elements and Displays 5.1. Front of center speaker 1. 2. 3. 4. 5. 6. 7. 8. 9. Display CD display AUX display Q SOUND display Stereo/3 channel stereo display DVD/5.1 display TV display Standby/Mute display 5.1 EXT display 3 7 2 6 4 5 9 8 1 5.2. Back of center speaker 10 11 10. Jacks for data cable 11. Terminal for speaker cable 5.3. Back of subwoofer 12 13 14 12. AUX input jack 13. TV input jack 14. CD input jack 15. DVD/5.1 input jacks 16. DISPLAY LINK jack for data cable 17. Terminals for speaker cables 18. Power switch 19. Power cord 15 16 17 18 19 6 KH 2222 5.4. Remote control 20. STANDBY button 21. MUTE button 22. CD button 23. TV button 24. AUX button 25. DVD/5.1 button 26. 5.1EXT button 27. STE./3STE. button 28. SURR + button 29. CENTER + button 30. RESET button 31. SW + button 32. SW – button 33. CENTER – button 34. SURR – button 20 21 25 22 26 35. Q.SOUND button 36. TREBLE - button 37. MAST.VOL + button 38. TREBLE + button 39. BALANCE.R button 40. BASS + button 41. MAST.VOL – button 42. BASS – button 43. BALANCE.L button 24 23 28 29 30 27 31 35 32 33 34 37 38 36 43 39 40 42 41 KH 2222 7 6. Preparing the Surround Sound System for Operation 6.1. Unpacking the components If you should want to dispose of the remote control of the surround sound system itself, then you have to remove the batteries beforehand! To guarantee that the remote control operates perfectly: • • • 1 Remove the components of the surround sound system • • • • 1 bass reflex active subwoofer with power cord 1 center speaker with integrated receiver 2 front speakers 2 rear speakers carefully from the packaging. Always point the remote control at the center speaker Ensure that there are no obstacles between the remote control and the center speaker which prevent reception Do not move more than 5 meters away from the center speaker when using the remote control. Disturbances could otherwise arise when operating the surround sound system with the remote control. 6.3. Positioning the speakers and the subwoofer The speakers should be positioned as follows to provide an optimal sound: 2 Then remove the accessories from the packaging • • • • • • • 1 data cable (3 metres) to transmit signals between the center speaker and the subwoofer 1 speaker cable (3 meters) to connect the center speaker to the subwoofer 2 speaker cables (each 4 meters) to connect the front speakers to the subwoofer 2 cables (each 8 meters) to connect the rear speakers to the subwoofer Infrared remote control 2 batteries 6.2. Preparing the remote control for operation 1 Open the battery compartment on the back of the remote control and remove the cover of the battery. • • • Front right and left speaker on the right and left of the television or your listening position Center speaker in the middle between the front left and right speaker Rear right and left speaker on the right and left behind your listening position Subwoofer: The human ear cannot locate the low tones of the subwoofer. Therefore the installation location of the subwoofer is optional. 6.4. Connect speakers and subwoofer Use the three shorter speaker cables to connect • • the center speaker and the front right and left speaker to the subwoofer. Use both the long speaker cables to 2 Now put in two batteries type AAA/LR 03 (round cells, not included in the scope of supply) into the battery compartment. Take care that the batteries are inserted with the correct polarity. 3 Put the cover of the battery compartment back on to the back of the remote control. • connect the rear right and left speakers to the subwoofer. Note: The four small speakers are identical. You can use any of these speakers as front or rear speaker. Replacing the batteries: 8 Use the data cable to connect the center speaker to the subwoofer. If the surround sound system cannot be operated properly or cannot be operated any longer with the remote control, then the batteries have to be replaced. Always replace both batteries, in order to be able to use the remote control at full capacity again. • Note: • Do not dispose of used battery in household waste! Throw away used batteries at a waste collection or disposal point or there, where you bought the batteries. 2 Then insert 1 To connect the front and rear speakers insert the end of the grey leads of the speaker cable into the red terminal and the end of the black lead of the speaker cable into the black terminal on the back of the loudspeaker. KH 2222 • • the end of the grey lead of the speaker cable into the red terminal and the end of the black lead of the speaker cable into the black terminal on the back of the subwoofer. Insert the individual speaker cables into the following terminals: • • • • • the cable of the front right speaker into the terminal marked FR the cable of the front left speaker into the terminal marked FL the cable of the center speaker in the terminal marked C the cable of the rear right speaker into the terminal marked SR the cable of the rear left speaker into the terminal marked SL 3 To connect the center speaker to the subwoofer: Insert the data cable into the DISPLAY LINK jack on the back of the subwoofer. Then tighten both screws on the plug. Insert the other end of the data cable into the jack on the back of the center speaker. Lastly also tighten both screws on the plug. 4 Now insert the power cord of the subwoofer into a power socket. 5 Switch the power switch on the back of the subwoofer to ON. STANDBY/MUTE will appear in the display of the center speaker. 6.5. Connecting the surround sound system to audio/video equipment You have the following options in using the surround sound system: A Playback of 5.1 channel surround sound on DVDs being equipped accordingly. For this purpose the surround sound system has to be connected to a DVD player, which has • • a DTS and/or AC3 decoder and six cinch audio outputs for front and rear speakers, center speakers and subwoofer. B Playback of simulated 5.1 channel surround sound if the audio/video devices connected only have stereo sound. This is made possible by using the so-called “Q SOUND”. C Playback of stereo sound from a connected audio/ video device. The following audio/video equipment can be connected to the surround sound system: • • • • • Television Video recorder DVD player Hifi system Computer and other comparable devices. Audio/Video equipment can be connected to the surround sound system in the following ways: ... Connection via . channel/audio outputs If you would like to play back 5.1 channel surround sound (from a DVD which has been equipped accordingly), the DVD player must have 6 cinch jacks as audio outputs. These are mostly marked with “5.1 Audio Out”, “5.1 Ch Audio Output” (or similar). All six cinch jacks are also marked with the audio channel, whose signal they output. The markings are mostly: • • • • “C”, “Center” or similar for the center speaker “FL”/“FR”, “Front L”/“Front R” or similar for the front speakers: “SL”/”SR”, “Rear L”/”Rear R” or similar for the rear speakers “SW”, “Subwoofer” or similar for the subwoofer Note: Please note that not all DVDs offer 5.1 channel surround sound. You can find information on this mostly on the DVD cover, on the DVD itself or the enclosed booklets. 1 Insert one cinch cable each (not included in the scope of supply, can be bought in specialized audio/video shops) in each of the six cinch jacks of the DVD player to be connected. 2 Insert the other end of the cinch cables into the corresponding cinch jacks on the back of the subwoofer: • • • • • • the cable for the center speaker in the jack marked C the cable for the front left speaker in the jack marked FL the cable for the front right speaker in the jack marked FR the cable for the rear left speaker in the jack marked SL the cable for the rear right speaker in the jack marked SR the cable for the subwoofer in the jack marked SW It may perhaps be necessary to adjust the settings in the internal menu of the DVD player, so that the sound playback works properly with the surround sound system. In case of doubt consult the operating instructions of the audio/video equipment. ... Connection via two cinch jacks as audio output If the audio/video device to be connected to the surround sound system only has two cinch jacks: KH 2222 9 1 Insert one cinch cable into each of the cinch jacks. Note: 2 Insert the other end of the cinch cable into one of the pairs of jacks It may perhaps be necessary to adjust the settings on the connected audio/video device so that the sound playback works properly with the surround sound system. In case of doubt consult the operating instructions of the audio/video equipment. • • • AUX L/R TV L/R CD L/R on the back of the subwoofers. It does not matter which of the three pairs of jacks you use. If you would like to connect several audio/video devices simultaneously, it is less confusing if you connect them to the jacks with the relevant marking, i.e.: • • • a television to the jacks marked TV a CD player/a hifi system to the jacks marked CD other devices to the jacks marked AUX. ... Connection via the headphone output If the audio/video equipment to be connected does not have any of the named audio outputs, but instead has a headphone output: Connect the device by using a plugtype/cinch adapter cable. This can be done, if other outputs of the audio/video device are already occupied. Plugtype/cinch adapter cables can be bought in specialized audio/video shops. Note: It may perhaps be necessary to adjust the settings on the connected audio/video device so that the sound playback works properly with the surround sound system. In case of doubt consult the operating instructions of the audio/video equipment. To connect the audio/visual equipment in this manner: 1 Insert the plug of the plug-type/cinch adapter cable into the headphones jacks of the audio/video device. ... Connection via Scart /Euro AV jacks If the audio/video equipment to be connected does not have any of the named audio outputs, but instead has a scart jack: Connect the device by using a scart cinch adapter cable. This can be done e.g. if you would like to play back the sound of a stereo television with the surround sound system. Scart cinch adapter cables can be bought in specialized audio/video shops. If the plug of the adapter cable does not fit into the headphones jacks of the audio/video device: Use a 3.5 to 6.5 mm plug-type adapter (can be bought in specialized audio/video shops) additionally. Put it on the plugs on the adapter cable. 2 Insert the cinch plugs of the plug-type/cinch adapter cable into one of the pair of jacks • • • AUX L/R TV L/R CD L/R on the back of the subwoofer. To connect the audio/video equipment in this manner: Note: 1 Insert the scart plug of the scart cinch adapter cable into the jack marked Scart/Euro AV of the audio/video device. It may perhaps be necessary to adjust the settings on the connected audio/video device so that the sound playback works properly with the surround sound system. In case of doubt consult the operating instructions of the audio/video equipment. 2 Insert the cinch plug of the scart cinch adapter cable into one of the pairs of jacks • • • AUX L/R TV L/R CD L/R on the back of the subwoofer. The surround sound system is now ready for operation. 7. Using the Surround Sound System After you 10 KH 2222 • • • • have positioned the components of the surround sound system in a suitable place and have connected them to the subwoofer with the supplied cables have connected the required audio/video devices with the named connecting options to the surround sound system and have connected the subwoofer to the power supply you can now use the surround sound system. To do this: • • 2 Then press the Q SOUND button. The Q SOUND function has now been switched on. Six-channel surround sound is simulated with the Q SOUND, if there is only two-channel sound. The stereo sound is then played back by the front, rear and the center speakers. 3 To switch back to only stereo sound playback, press the STE./3STE button once. 1 Switch on the audio/video device, which you have connected to the surround sound system. If necessary: Start the playback of the equipment which is to play back the sound with the surround sound system. 2 With the remote control of the surround sound system choose the source of the sound you would like to play back with the surround sound system: To play back 5.1 channel surround sound from a DVD player connected to the surround sound system: is connected to the TV cinch pair of jacks: Press the TV button on the remote control is connected to the CD cinch pair of jacks: Press the CD button on the remote control Press the STE./3STE. button again to switch on the socalled “3-Stereo” function. This makes the front and the center speakers and also the subwoofer play back the stereo sound. 8. Functions during operation 1 If the DVD player is connected to the television with a scart cable: First of all set the volume of the television to the minimum value. If the sound of a connected audio/video device is played back with the surround sound system, then the following functions are available: 2 Press the DVD/5.1 button on the remote control. DVD/ 5.1 will appear in the display of the center speaker. The sound is now played back by the front speakers and the subwoofer. 8.1. Set the main volume 3 Press the 5.1EXT and Q.SOUND buttons on the remote control one after the other. DVD/5.1, Q SOUND and 5.1EXT will appear in the display of the center speaker. The sound will now be played back by all the speakers and the subwoofer of the surround sound system. 4 If you press the STE./3STE. button on the remote control, Q SOUND will no longer appear in the display. The sound is now played back by the front speaker and the subwoofer. Press the STE./3STE. button once more, then DVD/5.1, 3 STEREO and 5.1EXT will appear in the display. The sound will be played back by the front and the center speakers and also the subwoofer. To play back stereo sound from an audio/video device with the Q SOUND function of the surround sound system as simulated surround sound: By setting the main volume of the surround sound system, you also change the volume of all speakers. Press the MAST.VOL + button to increase the main volume. Press the MAST.VOL – button to lower the main volume. Each time you press the buttons, you set the main volume between the values 00 (sound off ) and 80 (maximum volume). 8.2. Set the volume of individual speakers You can set the volume of • • • individually. The currently set volume is shown briefly on the display of the center speaker. • To change the volume of the rear speakers: Press the SURR + button to increase the volume. Press the SURR – button to lower the volume. Each time you press the buttons, you set the volume between the values -10 (minimum volume) and 10 (maximum volume). • To change the volume of the center speaker: Press the CENTER + button to increase the volume. Press the CENTER – button to lower the volume. Each time you 1 If the audio/video device, whose sound you would like play back with the surround sound system, • is connected to the AUX cinch pair of jacks: Press the AUX button on the remote control the rear speakers the center speakers and the subwoofers KH 2222 11 • press the buttons, you set the volume between the values -10 (minimum volume) and 10 (maximum volume). To change the volume of the subwoofer: Press the SW + button to increase the volume. Press the SW – button to lower the volume. Each time you press the buttons, you set the volume between the values -10 (minimum volume) and 10 (maximum volume). 8.3. Setting the bass and the treble You can change the intensity of the low tones (bass) and the high tones (treble) during sound playback. To increase the intensity of the bass, press the BASS + button. To decrease the intensity of the bass, press the BASS - button. Each time you press the buttons, you set the intensity of the bass between the values -10 (minimum intensity) and 10 (maximum intensity). The current setting is shown briefly in the display of the center speaker. 9. Cleaning the surround sound system Clean the casings of the components only with a slightly damp cloth and a mild detergent. Pay attention that when cleaning, no moisture gets inside the components! In particular, never immerse the components of the surround sound system into water! Attention! If moisture penetrates into the components or if water runs into it, then this can cause irreparable damage! Warning! In this case, there is additionally also a fire risk! To increase the intensity of the high tones, press the TREBLE + button. To reduce the intensity of the high tones, press the TREBLE – button. Each time you press the buttons, you set the intensity of the high tones between the values -10 (minimum intensity) and 10 (maximum intensity). The current setting is shown briefly in the display of the center speaker. 8.4. Setting the speaker balance To adapt the sound playback to the conditions of the room, you can set the speaker balance. With this, you can shift the sound from the front speaker to the left or right speakers. To shift the sound to the left speaker, press the BALANCE.L button. To shift the sound to the right speaker, press the BALANCE.R button. Each time you press the buttons, you set a value between 00 and 15. The currently set value is shown briefly in the display of the center speaker. Press the BALANCE button on the remote control, to cancel the shift of the sound to the left/right hand side. 0 will be shown briefly in the display of the center speaker. 8.5. Switching the surround sound system to mute To switch the sound playback to mute with the loudspeakers of the surround sound system: Press the MUTE button on the remote control once. STANDBY/MUTE will be shown in the display of the center speaker and the currently set volume will flash. To switch the sound playback back on again, press the MUTE button again. STANDBY/MUTE will disappear in the display of the center speaker. 12 10. Rectifying Malfunctions 10.1. The remote control does not work Possible causes: A Have the batteries in the remote control been put into the battery compartment with the correct polarity? B Are the batteries in the remote control exhausted? If necessary change both batteries. C Are there any obstacles between remote control and center speakers? D Have you moved more than 5 meters away from the center speaker when using the remote control? 10.2. No sound Possible causes: A Is the surround sound system – as described in chapter 6 – ready for operation? B Has the surround sound system been switched to mute by pressing the MUTE button? C Are all the cable connections between • • the speakers and the subwoofer the subwoofer and audio/video devices connected to it correct? Have all plugs been inserted firmly into the respective jacks? D Has the volume of audio/video devices, which have been connected to the surround sound system, been set loud enough? E Have the audio/video devices, which are connected to the surround sound system, been switched to mute? KH 2222 F Have you perhaps not chosen the source for the sound, which you would like to play back, with the remote control of the surround sound system? Example: You would like to play back the sound of an audio/video device, which is connected to the AUX pair of jacks. Instead of pressing the AUX button, you pressed the TV button. The sound of the audio/video device connected to the AUX pair of jacks will then not be played back . 10.3. No surround sound Possible causes: Attention! Never open the casing of the subwoofer, center, front and rear speakers! They do not have any parts that can be maintained by the user. If the casings are opened, then the guarantee expires! No liability / guarantee will be assumed for damages which arise • • from opening the casing of the components and/or from trying to repair them and which are not carried out by specialized qualified personnel! A Is the surround sound system – as described in chapter 6 – ready for operation? B Does the connected DVD player have six cinch jacks as audio outputs? Are all six audio outputs correctly connected with the six audio input jacks on the back of the subwoofer? C Are all cable connections between the speakers and the subwoofer correct? Are all plugs firmly inserted into the relative jacks? D Does the DVD, whose sound you would like to play back with the surround sound system, have 5.1 channel surround sound? You will find information on this on the DVDs, e.g. mostly on the DVD cover, the DVD itself or in the booklet of the DVD. E Are there any possible adjustments to the settings in the internal DVD player menu which have to be carried out? In the case of DVD players, carry out such settings e.g. in the internal DVD player menu. If in doubt, consult the operating instructions of the DVD player. F Have you chosen DVD/5.1 as source with the remote control of the surround sound system? 10.4. Other malfunctions If other malfunctions occur: 1 Switch off the surround sound system, by pressing the STANDBY button on the remote control. Then switch the power switch on the back of the subwoofer to OFF. 2 Wait ten seconds. Then switch the power switch on the back of the subwoofer back to ON. Check whether the surround sound system now works. Consult one of our service partners in your neighbourhood if • • the described malfunctions cannot be rectified as described or other malfunctions, which have not been described, occur. The addresses of our service partners can be found on the guarantee cards. The guarantee cards are attached to the surround sound system. KH 2222 13 KH IB v. ., -- Kompernaß Handelsgesellschaft mbH • Burgstraße • D- Bochum, Germany www.kompernass.com