1
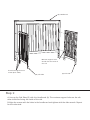
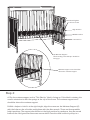
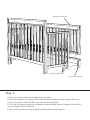
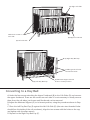
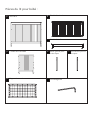
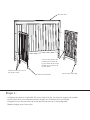
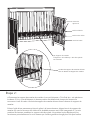
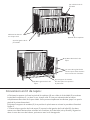
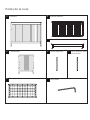
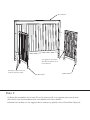
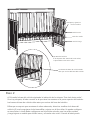
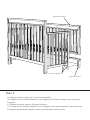
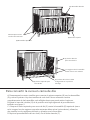
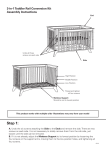
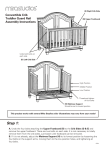
Bella Convertible Crib
Assembly Instructions
Instructions d'assemblage pour lit de
bébé transformable Bella
Instrucciones de montaje de la cuna
convertible Bella
©2014 Made under license from Sealy Technology, LLC ©2014. Fabrication
autorisée par Sealy Technology, S.A.R.L. www.sealybaby.com Manufactured for
Kolcraft Enterprises, Inc. Fabriqué pour Kolcraft Enterprises, Inc.
Q022
WARNING
FAILURE TO FOLLOW THESE WARNINGS AND THE ASSEMBLY INSTRUCTIONS COULD RESULT IN
SERIOUS INJURY OR DEATH.
READ ALL INSTRUCTIONS BEFORE ASSEMBLING CRIB. KEEP INSTRUCTIONS FOR FUTURE USE.
¢
¢
NEVER USE PLASTIC SHIPPING BAGS OR OTHER PLASTIC FILM AS MATTRESS COVERS
BECAUSE THEY CAN CAUSE SUFFOCATION.
¢
TO REDUCE THE RISK OF SUDDEN INFANT DEATH SYNDROME (SIDS), PEDIATRICIANS
RECOMMEND HEALTHY INFANTS BE PLACED ON THEIR BACKS TO SLEEP, UNLESS OTHERWISE
ADVISED BY YOUR PHYSICIAN.
¢
INFANTS CAN SUFFOCATE ON SOFT BEDDING. NEVER ADD A PILLOW OR COMFORTER.
NEVER PLACE ADDITIONAL PADDING UNDER AN INFANT.
STRANGULATION HAZARD
¢
STRINGS CAN CAUSE STRANGULATION! DO NOT PLACE ITEMS WITH A STRING AROUND A
CHILD’S NECK, SUCH AS HOOD STRINGS OR PACIFIER CORDS. DO NOT SUSPEND STRINGS OVER
A CRIB OR ATTACH STRINGS TO TOYS.
¢
TO HELP PREVENT STRANGULATION, TIGHTEN ALL FASTENERS. A CHILD CAN TRAP PARTS
OF THE BODY OR CLOTHING ON LOOSE FASTENERS.
¢
DO NOT PLACE CRIB NEAR A WINDOW WHERE CORDS FROM BLINDS OR DRAPES MAY
STRANGLE A CHILD.
FALL HAZARD
¢
WHEN CHILD IS ABLE TO PULL TO A STANDING POSITION, SET MATTRESS TO LOWEST
POSITION AND REMOVE BUMPER PADS, LARGE TOYS AND OTHER OBJECTS THAT COULD SERVE
AS STEPS FOR CLIMBING OUT.
¢
STOP USING CRIB WHEN CHILD BEGINS TO CLIMB OUT OR REACHES THE HEIGHT OF
35 IN. (89 CM).
¢
CHECK THIS PRODUCT FOR DAMAGED HARDWARE, LOOSE JOINTS, LOOSE BOLTS OR OTHER
FASTENERS, MISSING PARTS, OR SHARP EDGES BEFORE AND AFTER ASSEMBLY AND
FREQUENTLY DURING USE. SECURELY TIGHTEN LOOSE BOLTS AND OTHER FASTENERS. DO NOT
USE CRIB IF ANY PARTS ARE MISSING, DAMAGED, OR BROKEN. CONTACT KOLCRAFT
ENTERPRISES, INC (www.kolcraft.com/customer-service/contact-kolcraft) FOR REPLACEMENT
PARTS AND INSTRUCTIONAL LITERATURE IF NEEDED. DO NOT SUBSTITUTE PARTS.
¢
IF REFINISHING, USE A NON-TOXIC FINISH SPECIFIED FOR CHILDREN’S PRODUCTS.
¢
FOLLOW WARNINGS ON ALL PRODUCTS IN A CRIB.
¢
INFANTS CAN SUFFOCATE IN GAPS BETWEEN CRIB SIDES AND A MATTRESS THAT IS TOO
SMALL.
¢
ANY MATTRESS USED IN THIS CRIB MUST BE AT LEAST 27-1/4 IN. (69 CM) BY 51-5/8 IN. (131
CM), WITH A THICKNESS NOT EXCEEDING 6 IN. (15 CM). THE DIMENSIONS OF THE MATTRESS
SHOULD BE TAKEN FROM SEAM TO SEAM.
¢
PREVENT BURNS. KEEP CRIB AWAY FROM OPEN FIRES AND OTHER HEAT SOURCES.
Crib Parts:
A Headboard
B Upper Footboard
C Lower Footboard
D 2x Crib Side
E Left Day Bed Cap
G Mattress Support
H Allen Wrench
F Right Day Bed Cap
(A) Headboard
Mattress support holes
should face the inside of
the crib
Thread and tighten three
screws (both sides)
(D) Crib Side
(D) Crib Side
Step 1:
A. Line up the Crib Sides (D) with the Headboard (A). The mattress support holes on the crib
sides should be facing the inside of the crib.
B. Align the screws with the holes in the headboard and tighten with the allen wrench. Repeat
for the other side.
Thread and tighten
all four screws
High Position
Middle Position
Low Position
(G) Mattress Support
Label reading “This Side Up” should be
facing up
Mattress support arms should be
above the mattress support
Step 2:
A. Flip the mattress support so the “This Side Up” label is facing up. If the label is missing, the
correct orientation is with the springs at the top of the frame. The mattress support arms
should be above the mattress support.
B. With a helper to hold it at the right height, align the screws on the Mattress Support (G)
with the holes on the crib sides and tighten with the allen wrench. There are three possible
height positions. The support should start at the high position for newborns, then be moved
lower as the child grows and becomes more mobile. Once the child is able to pull up to a
(B) Upper Footboard
Thread and tighten all
(C) Lower Footboard
Step 3:
A. Place the Lower Footboard (C) against the crib sides.
B. Turn the two bottom screws into the lower footboard holes, but don’t tighten them yet.
C. Place the Upper Footboard (B) on top of the lower footboard.
D. Turn the two upper screws into the upper footboard holes, but don’t tighten them all the
way yet. Repeat for the other side.
E. Once all the screws are started, tighten them all with the allen wrench.
(D) Right Crib Side
Undo both screws on
each side
(B) Upper Footboard
(D) Left Crib Side
(F) Right Day Bed Cap
Toddler guard rail holes
should face inside
(E) Left Day Bed Cap
(G) Mattress Support Should
be set to lowest position
Converting to a Day Bed:
A. Undo the four screws attaching the Upper Footboard (B) to the Crib Sides (D) and remove
the upper footboard. There are two screws on each side. It is not necessary to totally remove
them from the crib sides, just loosen until footboard can be removed.
B. Adjust the Mattress Support (G) to its lowest position, using the procedure shown in Step
2.
C. Place the Left Day Bed Cap (E) against the left Crib Side (D) (the extra two threaded holes
should face the inside of the crib as shown), align the two screws with the holes on the cap,
and tighten with the allen wrench.
D. Repeat for the Right Day Bed Cap (F).
AVERTISSEMENT
RESPECTEZ LES AVERTISSEMENTS ET INSTRUCTIONS D'ASSEMBLAGE SUIVANTS POUR ÉVITER LE
RISQUE DE BLESSURES GRAVES OU MORTELLES.
¢
LISEZ TOUTES LES INSTRUCTIONS AVANT D'ASSEMBLER LE LIT DE BÉBÉ. CONSERVEZ CES
INSTRUCTIONS POUR POUVOIR LES CONSULTER ULTÉRIEUREMENT.
¢
N'UTILISEZ JAMAIS LES EMBALLAGES DE PLASTIQUE D'EXPÉDITION OU LES AUTRES PELLICULES
EN PLASTIQUE POUR RECOUVRIR LE MATELAS, CAR CES MATÉRIAUX REPRÉSENTENT UN RISQUE DE
SUFFOCATION.
¢
POUR RÉDUIRE LE RISQUE DU SYNDROME DE MORT SUBITE DU BÉBÉ, LES PÉDIATRES
RECOMMANDENT DE COUCHER LES BÉBÉS EN SANTÉ SUR LE DOS, SAUF SUR AVIS CONTRAIRE DE
VOTRE MÉDECIN.
¢
LA LITERIE SOUPLE REPRÉSENTE UN RISQUE DE SUFFOCATION POUR LES BÉBÉS. N'AJOUTEZ
JAMAIS D'OREILLER OU D'ÉDREDON. NE PLACEZ JAMAIS UN COUSSINET ADDITIONNEL SOUS UN
BÉBÉ.
RISQUE D'ÉTRANGLEMENT
¢
LES CORDONS REPRÉSENTENT UN RISQUE D'ÉTRANGLEMENT! NE PLACEZ JAMAIS D'ARTICLES À
CORDON AUTOUR DU COU D'UN ENFANT COMME DES CORDONS DE CAPUCHON OU DE SUCETTE.
NE SUSPENDEZ PAS DE CORDONS AU-DESSUS D'UN LIT DE BÉBÉ OU D'ATTACHER DES CORDONS
AUX JOUETS.
¢
SERREZ TOUTES PIÈCES DE FIXATION AFIN DE PRÉVENIR L'ÉTRANGLEMENT. DES PARTIES DU
CORPS DE L'ENFANT OU DE SES VÊTEMENTS PEUVENT SE COINCER DANS DES PIÈCES DE FIXATION
LÂCHES.
¢
NE PLACEZ PAS LE LIT DE BÉBÉ PRÈS D'UNE FENÊTRE OÙ LES CORDONS D'UN STORE OU D'UN
RIDEAU RISQUENT D'ÉTRANGLER L'ENFANT.
RISQUE DE CHUTE
¢
LORSQU'UN ENFANT EST CAPABLE DE POUSSER LORSQU'IL EST DEBOUT, AJUSTEZ LE MATELAS À
LA POSITION LA PLUS BASSE ET RETIREZ LES BORDURES COUSSINÉES, LES GROS JOUETS ET AUTRES
OBJETS POUVANT SERVIR À GRIMPER ET SORTIR DU LIT.
¢
N'UTILISEZ PLUS LE LIT DE BÉBÉ LORSQUE L'ENFANT COMMENCE À GRIMPER OU A ATTEINT UNE
GRANDEUR DE 89 CM (35 PO).
¢
ASSUREZ-VOUS QUE LA QUINCAILLERIE EST INTACTE, QUE LES JOINTS SONT SERRÉS, QUE LES
BOULONS ET AUTRES PIÈCES DE FIXATION SONT SERRÉS, QUE TOUTES LES PIÈCES SONT INSTALLÉES,
QUE LES BORDS NE SONT PAS COUPANTS AVANT ET APRÈS L'ASSEMBLAGE ET PÉRIODIQUEMENT
PENDANT L'UTILISATION DU LIT. SERREZ FERMEMENT TOUS LES BOULONS ET TOUTES LES PIÈCES DE
FIXATION LÂCHES. N'UTILISEZ PAS LE LIT POUR BÉBÉ SI L'UNE DES PIÈCES EST MANQUANTE,
ENDOMMAGÉE OU BRISÉE. COMMUNIQUEZ AVEC KOLCRAFT ENTERPRISES, INC
(www.kolcraft.com/customer-service/contact-kolcraft) POUR OBTENIR DES PIÈCES DE RECHANGE ET
LES INSTRUCTIONS, LE CAS ÉCHÉANT. NE SUBSTITUEZ AUCUNE PIÈCE.
¢
POUR REPEINDRE, UTILISEZ UN FINI NON TOXIQUE DESTINÉ AUX PRODUITS POUR ENFANT.
¢
RESPECTEZ TOUS LES AVERTISSEMENTS DE TOUS LES PRODUITS UTILISÉS AVEC LE LIT.
¢
LES ESPACES ENTRE LES CÔTÉS DU LIT ET UN MATELAS TROP PETIT REPRÉSENTENT UN RISQUE
DE SUFFOCATION POUR LES BÉBÉS.
¢
TOUS LES MATELAS UTILISÉS DANS CE LIT DOIVENT MESURER AU MOINS 69 CM (27 1/4 PO) PAR
131 CM (51 5/8) ET AVOIR UNE ÉPAISSEUR NE DÉPASSANT PAS 15 CM (6 PO). LES DIMENSIONS DU
Pièces du lit pour bébé :
A Tête de lit
B Pied de lit relevé
C Pied de lit inférieur
D 2 côtés de lit de bébé
E Barre gauche pour
lit de repos
G Support de matelas
H Clé hexagonale
F Barre droite pour lit
de repos
(A) Tête de lit
Les trous du support de
matelas sur les côtés du
lit pour bébé doivent être
dirigés vers l'intérieur du
lit pour bébé.
Vissez et serrez les trois vis
(de chaque côté)
(D) Côté de lit de bébé
(D) Côté de lit de bébé
Étape 1 :
A. Alignez les côtés du lit de bébé (D) avec la tête de lit (A). Les trous du support de matelas
sur les côtés du lit pour bébé doivent être dirigés vers l'intérieur du lit pour bébé.
B. Alignez les vis avec les trous de la tête de lit et serrez avec la clé hexagonale.
Répétez l'étape pour l'autre côté.
Vissez et serrez les
quatre vis
Position élevée
Position du milieu
Position basse
(G) Support de matelas
L'étiquette « This Side Up » doit être placée
sur le dessus.
Les bras de support de matelas doivent
être au-dessus du support de matelas
Étape 2 :
A. Retournez le support de matelas de manière à ce que l'étiquette « This Side Up » soit placée sur
le dessus. S'il n'y a pas d'étiquette, la bonne position est déterminée lorsque les ressorts se
trouvent au haut du cadre. Les bras de support de matelas doivent être au-dessus du support de
matelas.
B. Avec l'aide d'une personne qui tient la pièce à la bonne hauteur, alignez les vis du support de
matelas (G) avec les trous sur les côtés du lit de bébé et serrez avec la clé hexagonale. Il y a trois
positions de hauteur possibles. Le support doit être placé à la position la plus élevée pour les
nourrissons puis abaissez au fur et à mesure que l'enfant grandit et bouge plus. Dès que l'enfant
(B) Pied de lit supérieur
Vissez et serrez les trois
(C) Pied de lit inférieur
Étape 3 :
A. Placez le pied de lit inférieur (C) contre les côtés du lit pour bébé.
B. Tournez les deux vis du bas dans les trous du pied de lit inférieur, mais sans les serrer.
C. Placez le pied de lit supérieur (B) sur le dessus du pied de lit inférieur.
D. Tournez les deux vis du haut dans les trous du pied de lit supérieur, mais sans les serrer
complètement. Répétez l'étape pour l'autre côté.
E. Après avoir commencé le vissage de toutes les vis, serrez-les toutes avec la clé hexagonale.
(D) Côté droit du lit
de bébé
Dévissez les deux vis
sur chaque côté
(B) Pied de lit supérieur
(D) Côté gauche du lit
pour bébé
(F) Barre droite du lit de
repos
Les trous de la glissière de
sécurité pour enfant doivent
être tournés vers l'intérieur
(E) Barre gauche du lit de
repos
(G) Le support de matelas
doit être placé à sa position
la plus basse
Conversion en lit de repos :
A. Dévissez les quatre vis fixant le pied de lit supérieur (B) aux côtés du lit de bébé (D) et enlevez
le pied de lit supérieur. Il y a deux vis sur chaque côté. Il n'est pas nécessaire de les retirer
complètement des côtés du lit pour bébé. Vous pouvez simplement les dévisser jusqu'à ce que le
pied de lit puisse être enlevé.
B. Ajustez le support de matelas (G) à sa position la plus basse en suivant la procédure illustrée à
l'étape 2.
C. Placez la barre gauche du lit de repos (E) contre le côté gauche du lit de bébé (D) (les deux
autres trous filetés doivent être orientés vers l'intérieur du lit de bébé, tel qu'illustré), alignez les
deux vis avec les trous de la barre, puis serrez avec la clé hexagonale.
ADVERTENCIA
SI NO SIGUE LAS ADVERTENCIAS Y LAS INSTRUCCIONES DE MONTAJE, PODRÍA SUFRIR LESIONES
GRAVES O LA MUERTE.
¢
LEA TODAS LAS INSTRUCCIONES ANTES DE ARMAR LA CUNA. GUÁRDELAS PARA FUTURA
REFERENCIA.
¢
NUNCA USE BOLSAS DE EMBALAJE DE PLÁSTICO U OTRO TIPO DE PELÍCULA PLÁSTICA PARA
CUBRIR EL COLCHÓN, YA QUE PUEDEN CAUSAR ASFIXIA.
¢
PARA REDUCIR EL RIESGO DE SÍNDROME DE MUERTE SÚBITA DEL LACTANTE (SMLS), LOS
PEDIATRAS RECOMIENDAN RECOSTAR SOBRE LA ESPALDA A LOS LACTANTES SANOS AL
MOMENTO DE DORMIR, A MENOS QUE SU MÉDICO INDIQUE LO CONTRARIO.
¢
LOS BEBÉS PUEDEN SOFOCARSE A CAUSA DE LA ROPA DE CAMA SUAVE. NUNCA COLOQUE
UNA ALMOHADA O UN EDREDÓN. NUNCA COLOQUE MÁS ACOLCHADO DEBAJO DEL BEBÉ.
RIESGO DE ESTRANGULACIÓN
¢
¡LAS CUERDAS PUEDEN CAUSAR ESTRANGULACIÓN! NO COLOQUE ELEMENTOS CON
CUERDAS ALREDEDOR DE CUELLO DEL BEBÉ, POR EJEMPLO, CUERDAS DE GORROS O CHUPETES.
NO CUELGUE CUERDAS SOBRE LA CUNA NI ATE CUERDAS A LOS JUGUETES.
¢
PARA PREVENIR LA ESTRANGULACIÓN, AJUSTE TODOS LOS SUJETADORES. SI ESTÁN FLOJOS,
LA ROPA O ALGUNA PARTE DEL CUERPO DEL BEBÉ PUEDE QUEDAR ATRAPADA.
¢
NO COLOQUE LA CUNA CERCA DE UNA VENTANA CON CUERDAS DE PERSIANAS O
CORTINAS, YA QUE PUEDEN CAUSAR ESTRANGULACIÓN.
RIESGO DE CAÍDA
¢
CUANDO EL BEBÉ PUEDA PARARSE SOLO, COLOQUE EL COLCHÓN EN LA POSICIÓN MÁS
BAJA Y QUITE LOS ACOLCHADOS, LOS JUGUETES GRANDES Y OTROS OBJETOS QUE PUEDAN
USARSE COMO ESCALONES.
¢
NO USE MÁS LA CUNA CUANDO EL BEBÉ EMPIECE A TREPARSE O ALCANCE UNA ALTURA DE
89 CM (35 IN).
¢
TANTO ANTES COMO DESPUÉS DE ARMAR EL PRODUCTO Y CON FRECUENCIA DURANTE EL
USO, REVISE QUE NO HAYA ELEMENTOS DAÑADOS, CONEXIONES SUELTAS, PERNOS U OTROS
SUJETADORES FLOJOS, PIEZAS FALTANTES O BORDES FILOSOS. AJUSTE CON FIRMEZA LOS
PERNOS Y OTROS SUJETADORES FLOJOS. NO USE LA CUNA SI ALGUNA DE SUS PARTES FALTA,
ESTÁ DAÑADA O ESTÁ ROTA. CONTÁCTESE CON KOLCRAFT ENTERPRISES, INC
(www.kolcraft.com/customer-service/contact-kolcraft) SI NECESITA PIEZAS DE REPUESTO U OTRAS
INSTRUCCIONES IMPRESAS. NO SUSTITUYA PIEZAS.
¢
SI VA A APLICAR OTRO ACABADO, USE UNO NO TÓXICO Y ESPECÍFICO PARA PRODUCTOS
INFANTILES.
¢
RESPETE LAS ADVERTENCIAS DE TODOS LOS PRODUCTOS DE LA CUNA.
¢
LAS SEPARACIONES ENTRE LAS BARANDILLAS DE LA CUNA Y LOS COLCHONES MUY
PEQUEÑOS PUEDEN ASFIXIAR AL BEBÉ.
¢
LOS COLCHONES PARA ESTA CUNA DEBEN TENER AL MENOS 69 CM (27-1/4 IN) POR
131 CM (51-5/8 IN) Y SU ESPESOR NO DEBE SUPERAR LOS 15 CM (6 IN). LAS DIMENSIONES DEL
Partes de la cuna:
A Cabecera
B Piecera superior
C Piecera inferior
D 2 barandillas
E Listón izquierdo
F Listón derecho para
cama de día
G Base del colchón
H Llave Allen
(A) Cabecera
Los agujeros de la base
del colchón deben mirar
hacia adentro.
Enrosque y ajuste los tres
tornillos (ambos lados)
(D) Barandilla
(D) Barandilla
Paso 1:
A. Alinee las barandillas de la cuna (D) con la cabecera (A). Los agujeros que unen la base
del colchón con las barandillas de la cuna deben mirar hacia dentro.
B. Alinee los tornillos con los agujeros de la cabecera y ajústelos con la llave Allen. Repita el
Enrosque y ajuste los
cuatro tornillos
Posición alta
Posición media
Posición baja
(G) Base del colchón
Si la etiqueta dice “Este lado hacia arriba”,
la pieza debe mirar hacia arriba
Los brazos de base de colchón debe
estar por encima del base del colchón.
Paso 2:
A. Dé vuelta la base del colchón siguiendo la indicación de la etiqueta “Este lado hacia arriba”.
Si no hay etiqueta, el lado correcto es el que tiene los resortes en la parte superior del bastidor.
Los brazos de base de colchón debe estar por encima del base del colchón.
B. Busque un soporte para mantener la altura adecuada, alinee los tornillos de la base del
colchón (G) con los agujeros de las barandillas y ajuste con la llave allen. Se puede configurar
en tres alturas. La base debe configurarse en la posición más alta para los recién nacidos
y luego bajarse a medida que el bebé crece y se vuelve más activo. Cuando el bebé pueda
(B) Piecera superior
Enrosque y ajuste los
(C) Piecera inferior
Paso 3:
A. Coloque la piecera inferior (C) contra las barandillas.
B. Coloque los dos tornillos inferiores en los agujeros de la piecera inferior, pero todavía no
los ajuste.
C. Coloque la piecera superior (B) sobre la inferior.
D. Coloque los dos tornillos superiores en los agujeros de la piecera superior, pero todavía no
los ajuste completamente. Repita el mismo procedimiento del otro lado.
(D) Barandilla derecha
Desenrosque ambos
tornillos de cada lado
(B) Piecera superior
(D) Barandilla izquierda
(F) Listón derecho
para cama de día
Los agujeros de la barandilla
deben mirar hacia adentro
(E) Listón izquierdo para
cama de día
(G) La base del colchón debe
configurarse en la posición
más baja
Para convertir la cuna en cama de día:
A. Desenrosque los cuatro tornillos que conectan la piecera superior (B) con las barandillas
(D) y retire la primera. Hay dos tornillos de cada lado. No es necesario sacarlos
completamente de las barandillas, solo aflójelos hasta que pueda retirar la piecera.
B. Ajuste la base del colchón (G) en la posición más baja siguiendo el procedimiento
indicado en el paso 2.
C. Coloque el listón izquierdo para cama de día (E) contra la barandilla (D) izquierda (como
en la imagen, los dos agujeros roscados restantes deben mirar hacia adentro), alinee los
dos tornillos con los agujeros del listón y ajústelos con la llave Allen.
D. Repita el procedimiento del otro lado, con el listón derecho (F).