1
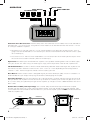
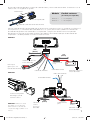
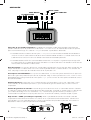
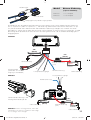
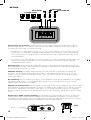
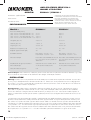
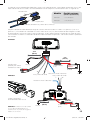
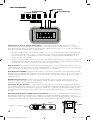
PXA Amplifiers PXA MONO AMPLIFIERS PXA200.1 | PXA500.1 Owner’s Manual | English Manual del Propietario | Español AMPLIFICADOR DEL LA SERIE PXA.1 Benutzerhandbuch | Deutsch MONOVERSTÄRKER DER PXA.1-SERIE Manuel d’utilisation | Française AMPLIFICATEUR DE SÉRIE PXA.1 2015 PX Mono Amplifiers Rev D.indd 1 8/26/2014 3:42:30 PM PXA.1-SERIES AMPLIFIERS OWNER’S MANUAL MODEL: PXA200.1 | PXA500.1 Authorized KICKER Dealer: IMPORTANT SAFETY WARNING – PROLONGED CONTINUOUS OPERATION OF AN AMPLIFIER IN A DISTORTED OR CLIPPED MANNER CAN CAUSE YOUR AUDIO SYSTEM TO OVERHEAT, POSSIBLY CATCHING FIRE AND RESULTING IN SERIOUS DAMAGE TO YOUR COMPONENTS AND/OR VEHICLE. Purchase Date: Serial Number: PERFORMANCE Model: PXA200.1 PXA500.1 RMS Power [Watts] @ 14.4V, 4Ω mono, ≤ 1% THD+N @ 14.4V, 2Ω mono, ≤ 1% THD+N @ 14.4V, 1Ω mono, ≤ 1% THD+N @ 14.4V, 0.5Ω mono, ≤ 1% THD+N 25 x 1 50 x 1 100 x 1 200 x 1 250 x 1 500 x 1 N/A N/A Length [in, cm] 4-3/4, 12 8-1/4, 21 Height [in, cm] 1-9/16, 4 1-9/16, 4 Width [in, cm] 3-7/16, 8.7 3-7/16, 8.7 Frequency Response [Hz] 25 - 120 25 - 120 Signal-to-Noise Ratio [dB] 95 95 Input Sensitivity Low Level: 125mV–5V High Level: 250mV–10V Low Level: 125mV–5V High Level: 250mV–10V Electronic Crossover Selectable 60Hz, 80Hz, 100Hz or Selectable 60Hz, 80Hz, 100Hz or 120Hz low pass; 24dB/octave slope 120Hz low pass; 24dB/octave slope KickEQ™ Bass Boost Selectable 0 or +6dB @ 40Hz Selectable 0 or +6dB @ 40Hz Subsonic Filter 25Hz, 24dB/octave slope 25Hz, 24dB/octave slope Remote Bass Yes Yes Pro Tip: To get the best performance from your new KICKER Amplifier and extend the warranty by 1 year, use genuine KICKER accessories and wiring. INSTALLATION Mounting: Choose a structurally sound location to mount your KICKER amplifier. Make sure there are no items behind the area where the screws will be driven. Choose a location that allows at least 4” (10cm) of open ventilation for the amplifier. Drill four holes using a 7/64” (3mm) bit and use the supplied #8 screws to mount the amplifier. Wiring: Disconnect the vehicle’s battery to avoid an electrical short. Then, connect the PXA harness to the amplifier. A good ground connections is important. If this amplifier is mounted in the front fairing of a motorcycle, it will be best to extend the ground wire all the way to the battery. The PXA amplifiers have the capability to receive almost any level of input signal. If a Hi-Level signal is coming from the speaker leads of the source unit, simply cut off the RCA jacks and connect it directly to the exposed wires. Set the Input Level switch to Hi. Set the Auto Turn-On to DC. If speaker leads are not available from your source unit, use an RCA stereo cable to connect directly to the RCA connectors of the PXA amplifier. Set the Input Level switch to Lo. Set the Auto Turn-On switch to +12V, and use the blue remote trigger wire to turn the amplifier on. 2 2015 PX Mono Amplifiers Rev D.indd 2 8/26/2014 3:42:37 PM KICKER KISL (optional) to amplifier Model External Fuse PXA200.1 1 x 15 Ampere PXA500.1 1 x 45 Ampere from source unit high-level speaker outputs Cut the looped red power cable located on the PXA harness and install a 15A (PXA200.1) or 45A (PXA500.1) fuse. Fuse installation should be within 18” (45cm) of the battery and in-line with the harness’ power cable, which is connected to your amplifier. If you ever need to remove the amplifier from the vehicle after it has been installed, the ground wire should be the last wire disconnected from the amplifier--just the opposite as when you installed it. PXA200.1 ≤24” (60cm) ≤18” (45cm) bare-metal chassis ground RCA inputs (remove to use hi-level input) external fuse (15A) 12V battery + - speaker outputs PXA500.1 remote turn-on bare-metal chassis ground speaker outputs - + remote turn-on insert power and ground terminal adapter PXA500.1: Use 8 gauge wire if the power wire is greater than 10 feet in length; 10 gauge if less. ≤18” (45cm) bare-metal chassis ground ≤24” (60cm) external fuse (45A) 12V bare-metal chassis ground 3 2015 PX Mono Amplifiers Rev D.indd 3 8/26/2014 3:42:37 PM OPERATION BASS-BOOST LO-PASS FILTER OFF ON 60Hz 80Hz 100Hz INPUT LEVEL AUTO TURN-ON LO 12V HI DC 120Hz Automatic Turn-On Selection: The PXA series offers two automatic turn-on modes that can be selected on the end panel; +12V or DC Offset. Using the DC Offset mode causes the REM terminal wire to have +12V out for turning on additional amplifiers. • Remote Turn-On: Set the switch to +12V to use the remote turn-on lead from the PXA harness. Run 18 gauge wire from the Remote Turn-On Lead on your source unit to the REM wire on the PXA harness. (Best for Lo-Level input) • DC Offset Turn-On: The DC Offset mode detects a 6V DC offset from the HI-Level speaker outputs when the source unit has been turned on. (Best for Hi-Level input) Input Level: The RCA inputs on KICKER PXA amplifiers are capable of receiving either Hi or Low-level signals from your source unit. When using a Hi-Level signal, simply set the Input Level switch on the amplifier to HI. LO-PASS Switches: Use the LO-PASS switches behind the protective rubber covering of the amplifier to set the internal crossover. Choose a cutoff of 60Hz, 80Hz, 100Hz, or 120Hz depending on the configuration of switches 1 and 2. Never change the switches with the audio system on! Bass Boost: The bass boost switch is designed to give you increased output (6dB) at 40Hz. If turned on, it is recommended that you readjust the input gain control to avoid clipping the amplifier. Input Gain Control: The input gain control is not a volume control. It matches the output of the source unit to the input level of the amplifier. Turn the source unit up to about 3/4 volume (if the source unit goes to 30, turn it to 25). Next, slowly turn (clockwise) the gain on the amplifier up until you can hear audible distortion, then turn it down a little. Remote Bass-CXRC (sold separately): You have the ability to control the output level of the amplifier remotely with the CXRC. To surface-mount the CXRC remote, screw the remote to the chosen location, then run the cable from the controller to the “Remote Bass” jack on the amplifier panel. Do NOT connect/disconnect while the amplifier is on. INPUT REMOTE BASS CXRC PXA500.1 only 4 2015 PX Mono Amplifiers Rev D.indd 4 8/26/2014 3:42:37 PM TROUBLESHOOTING If your amplifier does not appear to be working, check the obvious things first such as blown fuses, poor or incorrect wiring connections, incorrect setting of crossover switch and gain controls, etc. There is a Power Protection LED on the side power panel of your Kicker PXA series amplifier. Depending on the state of the amplifier and the vehicle’s charging system, the LED will glow either Red or Blue. When the blue LED is lit this indicates the amplifier is turned on and no trouble exists. Blue LED off, no output? With a Volt Ohm Meter (VOM) check the following: +12 volt power terminal (should read +12V to +16V) Remote turn-on terminal (should read +12V to +16V) Check for reversed power and ground connections Ground terminal, for proper conductivity. For Hi-Level input, check input wires for +6V. Blue LED on, no output? Check the following: RCA connections Test speaker outputs with a “known” good speaker. Substitute source unit with a “known” good source unit. Check for a signal in the RCA cable feeding the amplifier with the VOM meter set to measure “AC” voltage. Protection LED flashing with loud music? The red LED indicates low battery voltage. Check all the connections in your vehicle’s charging system. It may be necessary to replace or charge your vehicle’s battery or replace your vehicle’s alternator. Protection LED on, no output? Amplifier is very hot = thermal protection is engaged. Test for proper impedance at the speaker terminals with a VOM meter (see the diagrams in this manual for minimum recommended impedance and multiple speaker wiring suggestions). Also check for adequate airflow around the amplifier. Amplifier shuts down only while vehicle is running = voltage protection circuitry is engaged. Voltage to the amplifier is not within the 10–16 volt operating range. Have the vehicle’s charging and electrical system inspected. Amplifier will only play at low volume levels = short circuit protection is engaged. Check for speaker wires shorted to each other or to the vehicle chassis. Check for damaged speakers or speaker(s) operating below the minimum recommended impedance. No or low output? Check the balance control on source unit speaker output connections. Check the RCA (or speaker input) and Alternator noise-whining sound with engine’s RPM? Check for damaged RCA (or speaker input) cable Check the routing of RCA (or speaker input) cable Check the source unit for proper grounding Check the gain settings and turn them down if they are set too high. Reduced bass response? Reverse a speaker connection from positive to negative on the stereo/subwoofer channel(s); if the bass improves, the speaker was out of phase. Ground Noise? KICKER amplifiers are engineered to be fully compatible with all manufacturers’ head units. Some head units may require additional grounding to prevent noise from entering the audio signal. If you are experiencing this problem with your head unit, in most cases running a ground wire from the RCA outputs on the head unit to the chassis will remedy this issue. CAUTION: When jump starting the vehicle, be sure that connections made with jumper cables are correct. Improper connections can result in blown amplifier fuses as well as the failure of other critical systems in the vehicle. If you have more questions about the installation or operation of your new KICKER product, see the Authorized KICKER Dealer where you made your purchase. For more advice on installation, click on the SUPPORT tab on the KICKER homepage, www. kicker.com. Choose the TECHNICAL SUPPORT tab, choose the subject you are interested in, and then download or view the corresponding information. Please E-mail [email protected] or call Technical Services (405) 624-8583 for unanswered or specific questions. 5 2015 PX Mono Amplifiers Rev D.indd 5 8/26/2014 3:42:37 PM AMPLIFICADORES MODELO PXA.1 MANUAL DEL PROPIETARIO MODELO: PXA200.1 | PXA500.1 AVISO DE SEGURIDAD IMPORTANTE LA OPERACIÓN CONTINUA Y PROLONGADA DE UN AMPLIFICADOR DE MANERA DISTORSIONADA O ENTRECORTADA, PUEDE SOBRECALENTAR EL SISTEMA DE AUDIO, PROVOCAR POSIBLES RIESGOS DE INCENDIOS Y GENERAR GRAVES DAÑOS A SUS COMPONENTES Y/O VEHÍCULO. Distribuidor autorizado KICKER: Fecha de compra: Número de serie: RENDIMIENTO Modelo: PXA200.1 PXA500.1 Potencia RMS [Watts] @ 14.4V, 4Ω mono, ≤ 1% THD+N @ 14.4V, 2Ω mono, ≤ 1% THD+N @ 14.4V, 1Ω mono, ≤ 1% THD+N @ 14.4V, 0.5Ω mono, ≤ 1% THD+N 25 x 1 50 x 1 100 x 1 200 x 1 250 x 1 500 x 1 N/A N/A Longitud [en, cm] 4-3/4, 12 8-1/4, 21 Altura [en, cm] 1-9/16, 4 1-9/16, 4 Ancho [en, cm] 3-7/16, 8.7 3-7/16, 8.7 Respuesta en frecuencia [Hz] 25 - 120 25 - 120 Relación señal a ruido [dB] 95 95 Sensibilidad de entrada Nivel bajo: 125mV–5V Nivel alto: 250mV–10V Nivel bajo: 125mV–5V Nivel alto: 250mV–10V Cruce electrónico Paso bajo seleccionable a 60Hz, 80Hz, 100Hz o 120Hz; 24dB/ pendiente de octava. Paso bajo seleccionable a 60Hz, 80Hz, 100Hz o 120Hz; 24dB/ pendiente de octava. Aumento de bajos KickEQ™ Seleccionable a 0 o +6dB @ 40Hz Seleccionable a 0 o +6dB @ 40Hz Filtro subsónico 25Hz, 24dB/pendiente de octava 25Hz, 24dB/pendiente de octava Bajo remoto Sí Sí Consejo Pro: para obtener el mejor desempeño de su nuevo amplificador KICKER y extender el periodo de garantía en 1 año, use accesorios y cables genuinos KICKER. INSTALACIÓN Montaje: escoja un lugar de estructura sólida para montar su amplificador KICKER. Asegúrese que no haya objetos detrás del área donde se insertarán los tornillos. Escoja un lugar que permita al menos 4” (10cm) de ventilación abierta para el amplificador. Haga cuatro agujeros usando una broca de 7/64” (3mm) y use los tornillos de #8 suministrados para montar el amplificador. Cableado: desconecte la batería del vehículo para evitar un corto eléctrico. Luego, conecte el arnés PXA al amplificador. Conecte el cable de conexión a tierra a un punto metálico arnés PXA al amplificador. Conecte el cable a tierra a un área limpia y libre de pintura y corrosión, en el chasis del vehículo, que no sea mayor a 24” (60cm) de largo. Se recomienda agregar un cable a tierra adicional del mismo calibre (o mayor) entre el poste negativo de la batería y el chasis del vehículo. El amplificador PXA tiene entradas diferenciales de sensibilidad de entrada dual las cuales reciben señales de alto o bajo nivel desde la unidad fuente de su estéreo. Una señal de alto nivel se puede aplicar desde las salidas del altavoz de la unidad fuente hacia la entrada RCA del estéreo en el panel terminal del amplificador mediante el uso de KICKER ZISL como se muestra (asegúrese de poner el interruptor de nivel de entrada del amplificador PXA en posición “HI”). Alternativamente, la señal se puede enviar al amplificador mediante las salidas RCA de bajo nivel en la unidad fuente. Ponga el interruptor de nivel de entrada en el panel terminal del amplificador a “LO”. Cualquiera de los métodos de entrada ofrecen una señal de alto nivel en la salida. Mantenga el cable 6 2015 PX Mono Amplifiers Rev D.indd 6 8/26/2014 3:42:37 PM de señal de audio retirado de los arneses de cable de fábrica y otros cables de corriente. Si necesita cruzar el cable, cruce a un ángulo de 90 grados. KICKER KISL Modelo Fusible externo (en venta por separado) Hacia el amplificador PXA200.1 1 x 15 Amperes PXA500.1 1 x 45 Amperes Cable de salida de altavoz de alto nivel Cortar el cable de energía rojo bucleado que se localiza en el mazo PXA e instalar un fusible de 15A (PXA200.1) o 45A (PXA500.1). La instalación del fusible debe ser a 18” (45cm) de la batería y debe estar alineada con el cable de energía del mazo, conectado a su amplificador. Si alguna vez necesita retirar el amplificador del vehículo una vez que fue instalado, el cable a tierra deberá ser el último cable que se desconecte del amplificador – se debe proceder a la inversa cuando se instale. PXA200.1 ≤24” (60cm) ≤18” (45cm) Conexión a tierra en chasis desnudo RCA inputs (quitar para usar entrada de alto nivel) fusible externo (15A) + 12V battery - salidas de altavoces PXA500.1 encendido remoto Conexión a tierra en chasis desnudo salidas de altavoces - + encendido remoto Insertar el adaptador de energía y el de terminal a tierra. PXA500.1: Utilice un cable de calibre 8 si el cable de alimentación es de más de 10 pies de largo; Calibre 10 si menos. 2015 PX Mono Amplifiers Rev D.indd 7 ≤18” (45cm) Conexión a tierra en chasis desnudo ≤24” (60cm) fusible externo (45A) 12V battery Conexión a tierra en chasis desnudo 7 8/26/2014 3:42:37 PM OPERACIÓN BASS-BOOST LO-PASS FILTER OFF ON 60Hz 80Hz 100Hz INPUT LEVEL AUTO TURN-ON LO 12V HI DC 120Hz Selección de encendido automático: El modelo PXA ofrece dos modos de encendido automático que pueden seleccionarse en el panel terminal; desviación +12V o CD. Al usar el modo de desviación CD permite que la terminal REM tenga una salida de +12V para encender amplificadores adicionales. • Encendido remoto: establezca el interruptor a +12V para usar la terminal de encendido remoto desde el arnés PX. Instale un cable calibre18 desde la terminal de encendido remoto en su unidad fuente hacia el cable REM en el arnés PX. Este es el método automático de encendido preferente. • Encendido de desviación CD: Si el encendido remoto no es una opción, la siguiente mejor configuración es la desviación CD. El modo de desviación CD detecta una desviación de 6V CD desde el altavoz de alto nivel cuando se enciende la unidad fuente. Nivel de entrada: Las entradas RCA en los amplificadores KICKER PXA son capaces de recibir señales de alto o bajo nivel desde su unidad fuente. Si la única salida disponible desde su unidad fuente es una señal de alto nivel, solo ponga el interruptor de nivel de entrada en el amplificador a HI. Interruptores de PASO BAJO: Para fijar el cruce electrónico, usar los interruptores de PASO BAJO que están detrás de la goma de protección que cubre el amplificador. Elegir un interruptor de 60Hz, 80Hz, 100Hz o 120Hz, dependiendo de la configuración de los interruptores 1 y 2. ¡Nunca cambiar los interruptores teniendo el sistema de audio encendido! Aumento de bajos: El interruptor para aumento de bajos está diseñado para dar mayor salida (6dB) a 40Hz. Si se enciende, se recomienda que vuelva a ajustar el control de ganancia de entrada para evitar mutilar el amplificador. Control de ganancia de entrada: El control de ganancia de entrada no es un control del volumen. Coordina la salida de la unidad fuente con el nivel de entrada del amplificador. Encender la unidad fuente a ¾ del volumen (si la unidad fuente llega hasta 30, encenderla a 25). A continuación, gire lentamente (a la derecha) para ir aumentando el amplificador hasta que pueda escuchar una distorsión audible, y entonces bájelo un poco. Bajo remoto – CXRC (se vende por separado): Tiene la posibilidad de controlar el nivel de salida del amplificador remotamente con el CXRC. Para montar en la superficie el control remoto CXRC, atornillar en el lugar elegido, y pasar el cable del control a la clavija “bajo remoto” del panel del amplificador. NO conectar o desconectar mientras que el amplificador esté encendido. INPUT REMOTE BASS CXRC PXA500.1 sólo 8 2015 PX Mono Amplifiers Rev D.indd 8 8/26/2014 3:42:37 PM LOCALIZACIÓN DE FALLAS Si parece que su amplificador no funciona, revise las cosas obvias primero como fusibles quemados, conexiones deficientes o incorrectas de cables, configuraciones incorrectas del separador y controles de ganancia, etc. Hay un LED de protección de corriente en el panel lateral de energía de su amplificador Kicker modelo PX. Dependiendo del estado del amplificador y del sistema de carga del vehículo, el LED se iluminará en rojo o azul. Cuando el LED se ilumina en azul indica que el amplificador está encendido y que no hay problemas. LED azul apagado, ¿no hay salida? Con un voltímetro ( VOM) revise lo siguiente: terminal de corriente +12 voltios (debe leer +12V a +16V ) Terminal de encendido remoto (debe leer +12V a +16V Revise conexiones de corriente revertida y conexión a tierra La terminal de conexión a tierra debe tener buena conductividad. LED azul encendido, ¿no hay salida? Revise lo siguiente: conexiones RCA Pruebe las salidas con un altavoz en buen estado.Reemplace la unidad fuente con una unidad en buen estado.Revise la señal en el cable RCA que alimenta el amplificador con un voltímetro configurado a medir voltaje “CA”. ¿El LED de protección parpadea en volumen alto? El LED rojo indica bajo voltaje de batería. Revise todas las conexiones en el sistema de carga de su vehículo. Puede ser necesario reemplazar o cargar la batería del vehículo o reemplazar el alternador. LED de protección encendido, ¿no hay salida? El amplificador está muy caliente = protección térmica activada. Pruebe que haya impedancia apropiada en las terminales del altavoz con el voltímetro (vea los diagramas en este manual para impedancia mínima recomendada y múltiples sugerencias de cableado de altavoces). También verifique un flujo de aire adecuado alrededor del amplificador. El amplificador se apaga solo cuando el vehículo está encendido = circuito de protección de voltaje activado. El voltaje del amplificador no está dentro del rango de operación de 10 a16 voltios. Revise el sistema eléctrico y de carga del vehículo. El amplificador solo toca en volumen bajo = protección de corto circuito activada. Revise los cables de los altavoces por si cables con corto entre sí o con el chasis del vehículo. Revise si hay altavoces dañados o si operan por debajo de la impedancia mínima recomendada. ¿No hay salida o es baja? Revise el control de balance en la unidad fuente. salida RCA (o de entrada) del altavoz. Revise las conexiones de ¿Sonido chillante del alternador con RPM del motor? Revise si hay cables RCA dañados (o entrada de altavoz). Revise el encaminamiento del cable RCA (o entrada de altavoz). Revise la conexión a tierra de la unidad fuente Revise la configuración de ganancia y bájela si está demasiado alta. ¿Respuesta de bajo reducida? Revierta la conexión de un altavoz de positivo a negativo en el/los canal(es) de estéreo/subwoofer, si el bajo mejora, el altavoz estaba fuera de fase. ¿Ruido de tierra? Los amplificadores KICKER están diseñados para ser totalmente compatibles con las unidades cabezales de todos los fabricantes. Algunas unidades cabezales pueden requerir conexión a tierra adicional para prevenir que el ruido ingrese a las señales de audio. Si tiene este problema con su unidad cabezal, en muchos casos al tender un cable de conexión a tierra desde las salidas RCA en la unidad cabezal hacia el chasis se remedia este problema. PRECAUCIÓN: Cuando pase corriente con el vehículo, asegúrese que las conexiones hechas a los cables de paso de corriente sean las correctas. La conexión inapropiada puede resultar en fusibles quemados del amplificador así como fallas de otros sistemas importantes en el vehículo. Si tiene dudas sobre la instalación u operación de su nuevo producto KICKER, consulte a su Distribuidor autorizado KICKER en donde hizo su compra. Para soporte en la instalación, haga clic en la pestaña SOPORTE en el sitio web KICKER, www. kicker.com. Seleccione la pestaña SOPORTE TÉCNICO, luego seleccione el tema de su interés y descargue o consulte la información correspondiente. Por favor envíe un correo electrónico a [email protected] o llame a Soporte Técnico al (405) 624-8583 si tiene dudas o preguntas específicas. 9 2015 PX Mono Amplifiers Rev D.indd 9 8/26/2014 3:42:37 PM VERSTÄRKER DER PXA.1-SERIE BENUTZERHANDBUCH MODELL: PXA200.1 | PXA500.1 WICHTIGER SICHERHEITSHINWEIS: EIN LÄNGERER, DURCHGEHENDER BETRIEB EINES VERSTÄRKERS MIT VERZERRUNGEN ODER CLIPPING KANN ZU ÜBERHITZUNG IHRES AUDIOSYSTEMS FÜHREN, DADURCH KANN ES FEUER FANGEN UND SOMIT SCHWERE SCHÄDEN AN IHREN KOMPONENTEN UND/ ODER IHREM FAHRZEUG VERURSACHEN. Autorisierter KICKER-Händler: Kaufdatum: Seriennummer: LEISTUNG Modell: PXA200.1 PXA500.1 Effektivstrom [Watt] bei 14,4 V, 4 Ω mono, ≤ 1 % THD+N bei 14,4 V, 2 Ω mono, ≤ 1% THD+N bei 14,4 V, 1 Ω mono, ≤ 1 % THD+N bei 14,4 V, 0,5 Ω mono, ≤ 1 % THD+N 25 x 1 50 x 1 100 x 1 200 x 1 250 x 1 500 x 1 N/A N/A Länge [Zoll, cm] 4-3/4, 12 8-1/4, 21 Höhe [Zoll, cm] 1-9/16, 4 1-9/16, 4 Breite [Zoll, cm] 3-7/16, 8,7 3-7/16, 8,7 Frequenzgang [Hz] 25 - 120 25 - 120 Signal-Rausch-Abstand [dB] 95 95 Eingangsempfindlichkeit Low-Pegel: 125 mV–5 V High-Pegel: 250 mV–10 V Low-Pegel: 125 mV–5 V High-Pegel: 250 mV–10 V Elektronische Frequenzweiche Wählbarer Tiefpass 60 Hz, 80 Hz, Wählbarer Tiefpass 60 Hz, 80 Hz, 100 Hz oder 120 Hz; 24 dB/Oktave 100 Hz oder 120 Hz; 24 dB/Oktave KickEQ™-Bassanhebung Wählbar 0 oder +6 dB bei 40 Hz Subsonic-Filter 25 Hz, 24 dB/Oktave 25 Hz, 24 dB/Oktave Remote-Bass Ja Ja Wählbar 0 oder +6 dB bei 40 Hz Profi-Tipp: Um die beste Leistung Ihres neuen KICKER-Verstärkers sicherzustellen und die Garantie um ein Jahr zu verlängern, verwenden Sie ausschließlich Originalzubehör und Kabel von KICKER. INSTALLATION Montage: Wählen Sie eine strukturell geeignete Stelle für die Montage Ihres KICKER-Verstärkers s. Stellen Sie sicher, dass sich hinter den Stellen, an denen die Schrauben angebracht werden, nichts befindet. Wählen Sie eine Stelle, die mindestens 10 cm (4 Zoll) Freiraum für die Belüftung des Verstärkers lässt. Bohren Sie vier Löcher mit einem Durchmesser von 3 mm (7/64 Zoll) und montieren Sie den Verstärker mit den mitgelieferten #8 Schrauben. Verkabelung: Klemmen Sie die Batterie des Fahrzeugs ab, um einen Kurzschluß zu vermeiden. Schließen Sie den PX-Netzanschluss an den Verstärker an. Verbinden Sie das Erdungskabel, das nicht länger als 60 cm (24 Zoll) sein sollte, mit einem farb- und rostfreien Metallteil am Fahrzeuggehäuse. Es wird empfohlen, ein zusätzliches Erdungskabel der gleichen Stärke (oder größer) zwischen dem negativen Pol der Batterie und dem Fahrzeuggehäuse anzuschließen. Der PX-Verstärker ist mit differentiellen Dual-Eingängen ausgestattet, die hohe oder niedrige Signale von der Haupteinheit des Stereosystems empfangen. Ein High-Level-Signal kann mit dem KICKER ZISL (siehe Abbildung) von den Lautsprecherausgängen der Haupteinheit an den RCA-Stereoeingang am Endfeld des Verstärkers geleitet werden. Stellen Sie sicher, dass der Eingangspegel des PX-Verstärkers auf “HI” eingestellt ist). Das Signal kann auch über die RCA Low-Level-Ausgänge an der Haupteinheit an dem Verstärker übermittelt werden. Legen Sie den Eingangspegel am Endfeld des Verstärkers auf “LO” fest. Beide Methoden stellen ein Hi-Level-Signal am Ausgang sicher. Halten Sie das Audiosignalkabel von den Werkskabelanschlüssen und anderen Stromkabeln getrennt. Wenn Sie die Kabel überkreuzen müssen, machen Sie das in einem 90 Grad Winkel. 10 2015 PX Mono Amplifiers Rev D.indd 10 8/26/2014 3:42:38 PM KICKER KISL Modell Externe Sicherung (separat erhältlich) Zum Verstärker PXA200.1 1 x 15 Ampere PXA500.1 1 x 45 Ampere Hochpegel-Lautsprecherausgangskabel Schneiden Sie das geschleifte rote Stromkabel am PXA-Kabelstrang ab und installieren Sie eine Sicherung von 15 A (PXA200.1) oder 45 A (PXA500.1) . Die Sicherung sollte in einem Abstand von höchstens 18“ (45 cm) von der Batterie und in Reihe mit dem Netzkabel des Kabelstrangs erfolgen, das mit Ihrem Verstärker verbunden ist. Wird es jemals nötig, den Verstärker nach Installation aus Ihrem Fahrzeug zu entfernen, so sollte der Erdungsdraht der letzte Draht sein, der vom Verstärker getrennt wird – der Installationsreihenfolge genau entgegengesetzt. PXA200.1 ≤24” (60cm) ≤18” (45cm) Gehäuseerdung Externe Sicherung (15A) 12V Batterie RCA-Eingänge (entfernen, um Hi-LevelEingang zu verwenden) + - Lautsprecherausgänge Ferneinschal-tung Gehäuseerdung Lautsprecherausgänge PXA500.1 - + Ferneinschal-tung Setzen Sie die Leistungs- und Erdungsklemmenadapter ein ≤18” (45cm) Gehäuseerdung PXA500.1: Nutzen 8-Gauge-Kabel, wenn das Stromkabel von mehr ist 10 Meter in der Länge ist; 10 Gauge, wenn weniger. 2015 PX Mono Amplifiers Rev D.indd 11 ≤24” (60cm) Externe Sicherung (45A) 12V Batterie Gehäuseerdung 11 8/26/2014 3:42:38 PM BETRIEB BASS-BOOST LO-PASS FILTER OFF ON 60Hz 80Hz 100Hz INPUT LEVEL AUTO TURN-ON LO 12V HI DC 120Hz Automatische Einschaltwahl: Die PX-Serie umfasst drei automatische Einschaltmodi, die am Endfeld gewählt werden können: +12V oder DC Offset. Der DC Offset-Modus aktiviert am REM-Anschluss die +12V Ausgabe für das Einschalten zusätzlicher Verstärker. • Remote Turn-On: Legen Sie den Schalter auf +12V fest, um den Remote Turn-On-Schalter auf dem PXNetzanschluss zu verwenden. Verbinden Sie den Remote Turn-On-Anschluss an der Haupteinheit über ein 18 Gauge Kabel mit dem REM-Kabel am PX-Netzanschluss. Dies ist die bevorzugte automatische Einschaltmethode. • DC Offset Turn-On: Wenn Remote Turn-On nicht verfügbar ist, ist die nächstbeste Einstellung DC Offset. Der DC Offset-Modus erkennt einen 6V DC Offset der Hi-Level-Lautsprecherausgänge, wenn die Haupteinheit eingeschaltet ist. Eingangspegel: Die RCA-Eingänge an den KICKER PX-Verstärkern können hohe und niedrige Signale von der Haupteinheit empfangen. Wenn die einzige Ausgabe der Haupteinheit ein Hi-Level-Signal ist, legen Sie den Eingangspegel des Verstärkers auf HI fest. TIEFPASS-Schalter: Verwenden Sie die TIEFPASS-Schalter hinter dem schützenden Gummibelag des Verstärkers, um die interne Frequenzweiche einzustellen. Wählen Sie einen Cutoff von 60 Hz, 80 Hz, 100 Hz oder 120 Hz, je nach Konfiguration der Schalter 1 und 2 aus. Niemals die Schalter mit eingeschaltetem Audiosystem ändern! Bassanhebung: Der Bassanhebungsschalter ist für eine erhöhte Ausgangsleistung (6dB) bei 40 Hz ausgelegt. Wenn dieser eingeschaltet ist, wird empfohlen, den Eingangsverstärkungsregler nachzujustieren, um eine Begrenzung des Verstärkers zu vermeiden. Eingangsverstärkungsregler: Der Eingangsverstärkungsregler ist kein Lautstärkeregler. Er passt den Ausgang des Quellgeräts an den Eingangspegel des Verstärkers an. Stellen Sie das Quellgerät auf ca. 3/4 der Lautstärke ein (wenn das Quellgerät bis zu 30 reicht, stellen Sie es auf 25). Drehen Sie dann langsam (im Uhrzeigersinn) die Verstärkung am Verstärker auf, bis Sie eine hörbare Verzerrung wahrnehmen. Drehen Sie sie dann ein wenig zurück. Remote-Bass-CXRC (separat erhältlich): Sie können den Ausgangspegel des Verstärkers aus der Ferne mit dem CXRC regeln. Um die CXRC-Fernbedienung auf einer Oberfläche zu montieren, schrauben Sie die Fernbedienung am gewählten Ort fest und verlegen dann das Kabel vom Controller zur „Remote-Bass“-Buchse am Verstärker. NICHT verbinden/trennen, während der Verstärkers eingeschaltet ist. INPUT REMOTE BASS CXRC PXA500.1 einzig 12 2015 PX Mono Amplifiers Rev D.indd 12 8/26/2014 3:42:38 PM PROBLEMBEHANDLUNG Wenn der Verstärker nicht funktioniert, überprüfen Sie die offensichtlichen Fehlerquellen, beispielsweise durchgebrannte Sicherungen, falsche Kabelverbindungen, unzulässige Einstellung für Crossover, Verstärkerregelung, usw. Am seitlichen Netzschaltfeld des Kicker PX-Verstärkers befindet sich eine Leistungsschutz-LED. Abhängig vom Zustand des Verstärkers und des Ladesystems des Fahrzeugs leuchtet die LED rot oder blau. Eine blaue LED zeigt an, dass der Verstärker eingeschaltet ist und einwandfrei funktioniert. Blaue LED aus, keine Leistung? Überprüfen Sie mit einem Volt Ohm-Meter (VOM) Folgendes: Den +12 Volt Stromanschluss (sollte +12V bis +16V sein). Den Remote-Turn-On-Anschluss (sollte +12V bis +16V sein) Ob die Strom- und Erdungsanschlüsse umgekehrt sind. Den Erdanschluss auf Leitfähigkeit. Blaue LED an, keine Leistung? Überprüfen Sie Folgendes: RCA-Verbindungen Tie Lautsprecherausgabe mit einem funktionierenden Lautsprecher. Ersetzen Sie die Haupteinheit durch eine funktionierende Haupteinheit. Überprüfen Sie mit dem VOM-Meter, der auf Wechselspannung festgelegt ist, das RCA-Kabel des Verstärkers auf ein Signal. Blinkt die Leistungsschutz-LED bei lauter Musik? Die rote LED zeigt eine niedrige Batteriespannung an. Überprüfen Sie alle Verbindungen im Ladesystem Ihres Fahrzeugs. Möglicherweise müssen Sie die Fahrzeugbatterie ersetzen oder aufladen bzw. die Lichtmaschine ersetzen. Leistungsschutz-LED an, keine Leistung? Verstärker ist sehr heiß = Wärmeschutz ist aktiviert. Überprüfen Sie mit dem VOM-Meter den Scheinwiderstand an den Lautsprecheranschlüssen (die Diagramme in diesem Handbuch zeigen den empfohlenen Mindestscheinwiderstand und mehrere Vorschläge für die Lautsprecherverkabelung). Stellen Sie außerdem sicher, dass der Luftstrom um den Verstärker ausreichend ist. Der Verstärker schaltet sich nur aus, wenn das Fahrzeug in Bewegung ist = Der Spannungsschutzschalter ist eingeschaltet. Die Stromspannung für den Verstärker liegt nicht im Betriebsbereich von 10 bis 16 Volt. Lassen Sie das Lade- und Elektriksystem des Fahrzeugs überprüfen. Der Verstärker funktioniert nur bei niedrigen Lautstärkepegeln = Der Kurzschlussschutz ist aktiviert. Überprüfen Sie, ob sich die Lautsprecherkabel gegenseitig oder das Fahrgestell kurzgeschlossen haben. Überprüfen Sie, ob die Lautsprecher beschädigt sind oder die Lautsprecher unterhalb des empfohlenen Mindestscheinwiderstands betrieben werden. Keine oder niedrige Ausgabe? Überprüfen Sie den Balanceregler an der Haupteinheit. Überprüfen Sie die RCA (oder den Lautsprechereingang) und die Verbindungen am Lautsprecherausgang. Die Lichtmaschine macht ein heulendes Geräusch mit der Motordrehzahl? Überprüfen Sie, ob das RCA-Kabel (oder der Lautsprechereingang) beschädigt ist. Überprüfen Sie die RCA-Kabelführung (oder den Lautsprechereingang). Überprüfen Sie, ob die Haupteinheit richtig geerdet ist. Überprüfen Sie die Verstärkereinstellungen und reduzieren Sie die Einstellungen, wenn diese zu hoch sind. Reduzierte Basswiedergabe? Ändern Sie die Lautsprecherverbindung am Stereo/Subwoofer-Kanal von positiv in negativ. Wenn sich der Bass verbessert, war der Lautsprecher phasenverschoben. Eigenrauschen? Die KICKER-Verstärker sind für vollständige Kompatibilität mit den Headunits aller Hersteller ausgelegt. Einige Headunits erfordern möglicherweise eine zusätzliche Erdung, um Störgeräusche im Audiosignal zu verhindern. Wenn dieses Problem bei Ihrer Headunit auftritt, ist es meistens ausreichend, ein Erdungskabel in die RCA-Ausgänge an der Headunit und das Gehäuse einzustecken. Achtung: Wenn das Fahrzeug Starthilfe benötigt, stellen Sie sicher, dass das Überbrückungskabel richtig angeschlossen ist. Ein unsachgemäß angeschlossenes Überbrückungskabel kann verursachen, dass die Verstärkersicherungen durchbrennen oder andere wichtige Systeme im Fahrzeug beschädigt werden. Falls Sie weitere Fragen zur Installation oder den Betrieb Ihres neuen KICKERProdukts haben, wenden Sie sich an den autorisierten KICKER-Händler, bei dem Sie das Produkt gekauft haben. Weitere Informationen zur Installation finden Sie im Abschnitt SUPPORT auf der KICKER-Homepage unter www. kicker.com. Klicken Sie auf die Registerkarte “Technischer Support” und wählen Sie ein Thema aus, um die entsprechenden Informationen anzuzeigen. Sie können die Informationen aus herunterladen. Senden Sie eine E-Mail an [email protected] oder rufen Sie den technischen Support unter der Nummer (405) 624-8583 an, falls Sie noch weitere Fragen haben. 13 2015 PX Mono Amplifiers Rev D.indd 13 8/26/2014 3:42:38 PM AMPLIFICATEURS SÉRIE PXA.1MANUEL UTILISATEUR MODÈLE: PXA200.1 | PXA500.1 Distributeur agréé KICKER : CONSIGNES DE SÉCURITÉ IMPORTANTES : L’UTILISATION PROLONGÉE D’UN AMPLIFICATEUR DE FAÇON DÉFORMÉE OU ECRÊTÉE PEUT PROVOQUER UNE SURCHAUFFE DE VOTRE SYSTÈME AUDIO, D’OÙ UN RISQUE D’INCENDIE OU DE GRAVES DOMMAGES SUR VOS COMPOSANTS ET/OU VOTRE VÉHICULE. Date d’achat : Numéro de série : PERFORMANCES Modèle : PXA200.1 PXA500.1 Puissance RMS [Watts] sous 14,4 V, 4 Ω mono, DHT+B ≤ 1% sous 14,4 V, 2 Ω mono, DHT+B ≤ 1% sous 14,4 V, 1 Ω mono, DHT+B ≤ 1% sous 14,4 V, 0,5 Ω mono, DHT+B ≤ 1% 25 x 1 50 x 1 100 x 1 200 x 1 250 x 1 500 x 1 S. O. S. O. Longueur [po, cm] 4-3/4, 12 8-1/4, 21 Hauteur [po, cm] 1-9/16, 4 1-9/16, 4 Largeur [po, cm] 3-7/16, 8,7 3-7/16, 8,7 Réponse en fréquence [Hz] 25 - 120 25 - 120 Rapport signal sur bruit [dB] 95 95 Sensibilité d'entrée Bas niveau : 125 mV – 5 V Haut niveau : 250 mV – 10 V Bas niveau : 125 mV – 5 V Haut niveau : 250 mV – 10 V Filtre électronique Passe-bas sélectionnable 60 Hz, 80 Passe-bas sélectionnable 60 Hz, 80 Hz, 100 Hz ou 120 Hz ; pente 24 Hz, 100 Hz ou 120 Hz ; pente 24 dB/octave dB/octave Amplification des graves KickEQ™ Sélection de 0 ou +6 dB à 40 Hz Sélection de 0 ou +6 dB à 40 Hz Filtre subsonique 25 Hz, pente 24 dB/octave 25 Hz, pente 24 dB/octave Télécommande de graves Oui Oui Conseil de pro : Pour obtenir les meilleures performances de votre amplificateur KICKER et étendre sa garantie d’un an utiliser les accessoires et les éléments de câblage authentiques KICKER. INSTALLATION Montage : Choisissez un emplacement ferme et solide pour installer votre amplificateur KICKER. Assurez-vous qu’il n’y ait pas d’objet derrière la zone d’insertion des vis. Choisissez un emplacement offrant un dégagement d’au moins 10 cm pour la ventilation de l’amplificateur. Percez quatre trous avec un foret de 3 mm et utilisez les huit vis fournies pour monter l’amplificateur. Branchements : Débranchez la batterie du véhicule afin d’éviter les courts circuits. Connectez le faisceau pré-câblé à l’amplificateur. Reliez le fil de masse à une partie métallique solide, non peinte et non rouillée du châssis du véhicule, la longueur de ce câble ne devant pas dépasser 60 cm. Il est recommandé d’ajouter un fil de masse de même section (ou de section supérieure) entre la cosse négative de la batterie et le châssis du véhicule. L’amplificateur PXA dispose de deux entrées à différentiel de sensibilité d’entrée qui recevront tant des signaux de niveau fort que de niveau faible provenant de votre appareil stéréo. Le signal faible peut être amené à partir des sorties haut-parleur de votre appareil stéréo source reliées aux entrées RCA du panneau de connexion de l’amplificateur à l’aide du KICKER ZISL comme illustré (assurez-vous d’avoir placé le sélecteur de niveau d’entrée sur la position « HI »). En alternative le signal peut être envoyé à l’amplificateur en utilisant les sorties bas niveau des sorties RCA de l’appareil source. Placez le sélecteur de niveau d’entrée situé sur le panneau de connexion de l’amplificateur sur la position « LO ». Les deux méthodes permettront d’obtenir un signal fort en sortie. 14 2015 PX Mono Amplifiers Rev D.indd 14 8/26/2014 3:42:38 PM Le câble du signal audio doit être éloigné du faisceau pré-câblé et de tout autre câble d’alimentation. En cas de nécessité de croiser ces câbles, il est conseillé de le faire en adoptant une intersection avec un angle de 90. KICKER KISL Modèle Fusible externe (vendu séparément) PXA200.1 1 x 15 Ampères PXA500.1 1 x 45 Ampères Vers l’amplificateur Fil de sortie de haut-parleur de haut niveau Coupez la boucle de câble électrique rouge du faisceau PXA et installez un fusible 15 A (PXA200.1) ou 45 A (PXA500.1). L’installation du fusible doit se faire à moins de 45 cm (18”) de la batterie et être intégrée au câble d’alimentation du faisceau branché à votre amplificateur. Si vous devez enlever l’amplificateur du véhicule après son installation, le fil de masse doit être le dernier fil débranché de l’amplificateur, soit le contraire de la procédure d’installation. PXA200.1 ≤24” (60cm) ≤18” (45cm) Entrées RCA (enlever pour utiliser l’entrée haut niveau Masse fusible externe (15A) 12V batterie + PXA500.1 - haut-parleur de sortie Mise en marche à distance Masse haut-parleur de sortie - + Mise en marche à distance Insérez l’adaptateur d’alimentation et de masse ≤18” (45cm) Masse PXA500.1 : Utilisez un fil de calibre 8 si le câble d’alimentation est supérieure à 10 pieds de longueur; Calibre 10 si moins. 2015 PX Mono Amplifiers Rev D.indd 15 ≤24” (60cm) fusible externe (45A) 12V batterie Masse 15 8/26/2014 3:42:38 PM FONCTIONNEMENT BASS-BOOST LO-PASS FILTER OFF ON 60Hz 80Hz 100Hz INPUT LEVEL AUTO TURN-ON LO 12V HI DC 120Hz Sélection de la mise en marche automatique : La série PXA offre deux modes de mise en marche automatique pouvant être sélectionnés au niveau du panneau de connexion, commutateur sur +12 V ou DC offset (décalage en continu). Le mode DC offset entraine la délivrance d’un signal +12V au niveau du connecteur REM pour l’activation d’amplificateurs supplémentaires. • Mise en marche distante : Positionnez le sélecteur sur +12V pour utiliser le fil de mise en marche distante du faisceau pré-câblé. Tirez un fil de 1,5 mm2 (18AWG) à partir du connecteur correspondant de votre appareil source jusqu’au câble REM du faisceau pré-câblé. L’utilisation de cette méthode de mise en marche distante est conseillée. • Mise en marche en mode DC offset : S’il n’est pas possible de mettre en place la mise en marche distante, la meilleure configuration est alors le mode DC offset. Ce mode détecte le signal DC offset émanant de la sortie de niveau haut des haut-parleurs à l’allumage de l’appareil source. Niveau d’entrée : Les entrées RCA des amplificateurs KICKER PXA peuvent recevoir des signaux hauts et bas provenant de votre appareil source. Si la seule sortie disponible sur votre appareil source est un signal de niveau haut il suffit de placer le sélecteur de niveau de l’amplificateur sur la position HI. Commutateurs LO-PASS : utilisez les commutateurs LO-PASS de l’amplificateur situés derrière le couvercle de protection en caoutchouc pour régler le filtre interne. Choisissez une coupure à 60 Hz, 80 Hz, 100 Hz ou 120 Hz selon la configuration des commutateurs 1 et 2. Ne basculez jamais les commutateurs lorsque le système audio est allumé ! Amplification des graves : le commutateur d’amplification des graves est conçu pour vous offrir une puissance supérieure (6 dB) à 40 Hz. Lorsqu’elle est activée, on recommande de refaire le réglage du gain d’entrée afin d’éviter une saturation de l’amplificateur. Commande de gain d’entrée : la commande de gain d’entrée n’est pas une commande de volume. Elle fait correspondre la sortie de l’appareil source au niveau d’entrée de l’amplificateur. Réglez l’appareil source à environ 3/4 de son volume (si l’appareil source va jusqu’à 30, réglez-le à 25). Tournez ensuite lentement (dans le sens horaire) le gain de l’amplificateur jusqu’à ce que vous puissiez entendre une distorsion, puis revenez légèrement en arrière. Télécommande de graves CXRC (vendue séparément) : vous avez la possibilité de commander le niveau de sortie de l’amplificateur à distance avec la CXRC. Pour accrocher la télécommande CXRC, vissez-la à l’emplacement choisi, faites ensuite passer le câble du contrôleur jusqu’à la prise Remote Bass du panneau de l’amplificateur. NE BRANCHEZ ET DÉBRANCHEZ PAS le câble lorsque l’amplificateur est allumé. INPUT REMOTE BASS CXRC PXA500.1 seulement 16 2015 PX Mono Amplifiers Rev D.indd 16 8/26/2014 3:42:38 PM DIAGNOSTIC DES PANNES Si votre amplificateur ne fonctionne pas commencez par vérifier les choses qui pourraient être évidentes telles qu’un fusible grillé, un câblage insuffisant ou incorrect, une mauvaise configuration des sélecteurs du filtre passif et de contrôle du gain, etc. Un voyant à LED est disponible sur le panneau latéral de votre amplificateur Kicker série PX. En fonction de l’état de l’amplificateur et du niveau de charge de la batterie du véhicule, le voyant LED sera rouge ou bleu. Lorsque le voyant est bleu, cela indique que l’amplificateur est en service et qu’il n’y a pas de problème. Pas de voyant bleu, rien en sortie. À l’aide d’un multimètre, contrôlez ce qui suit : la borne +12 volts (la valeur lue doit être +12V à + 16V) La borne de mise en marche distante (la valeur doit être +12V à +16V) vérifiez qu’il n’y ait pas d’’inversion de polarité et la connexion à la masse La bonne conduction du câble de masse. La LED bleue est allumée, pas de sortie. Contrôlez ce qui suit : Les branchements des connecteurs RCA Vérifiez la sortie haut-parleur au niveau d’un haut-parleur dont vous êtes sûr du fonctionnement. Remplacez l’appareil source par une source dont vous êtes sûr du fonctionnement. Contrôlez la présence d’un signal dans le câble RCA qui fournit le signal à l’amplificateur avec un multimètre configuré pour mesurer une tension alternative. La LED clignote lors de l’écoute à niveau de musique élevé. La LED rouge indique un niveau de charge de la batterie faible. Vérifiez toutes les connexions du système de charge de votre véhicule. Il peut être nécessaire de remplacer ou de recharger la batterie ou de remplacer l’alternateur du véhicule. Le voyant LED est allumé, pas de sortie. L’amplificateur est très chaud = la protection thermique est activée. Vérifier la correcte impédance au niveau des cosses du haut-parleur avec un multimètre (voir les schémas dans ce manuel pour les impédances minimales recommandées et les suggestions de câblage de plusieurs haut-parleurs). Contrôlez que rien ne gêne la circulation d’air autour de l’amplificateur. L’amplificateur cesse de fonctionner seulement quand le véhicule est en marche = le circuit de protection de la batterie est activé. La tension appliquée à l’amplificateur n’est pas comprise entre 10 et 16 V. Avez-vous contrôlé le système de charge électrique du véhicule. L’amplificateur ne fonctionne qu’à bas volume = la protection contre les courts circuits est activée. Vérifiez qu’il n’y ait pas de court-circuit au niveau des fils du haut-parleur ou au niveau du châssis du véhicule. Contrôlez si les haut-parleurs sont endommagés ou si les haut-parleurs fonctionnent avec une impédance inférieure à la valeur minimum recommandée. Pas de sortie ou sortie faible. Vérifiez la balance sur l’appareil Contrôlez les fiches RCA (ou les entrées haut-parleur) et les branchements de sortie du haut-parleur. Bruit de l’alternateur – son variant avec le régime moteur. Contrôlez si le câble RCA (ou entrée hautparleur) n’est pas endommagé Contrôlez le chemin du câble RCA (ou de l’entrée haut-parleur) Contrôlez que l’appareil source soit bien connecté à la masse. Contrôlez les réglages du volume et les diminuer s’ils sont trop élevés. Basses insuffisantes. Inversez les connexions du positif et du négatif d’un haut-parleur sur le(s) canal ou canaux du caisson de basses, si le niveau des basses augmente le haut-parleur n’était pas en phase. Bruit de fond. Les amplificateurs KICKER sont conçus pour être entièrement compatibles avec tous les autoradios quel que soit le fabricant. Certains autoradios peuvent demander une mise à la masse supplémentaire pour empêcher le bruit de perturber le signal audio. Si vous rencontrez ce problème avec votre autoradio, dans la plupart des cas, le branchement d’un fil de masse au niveau des sorties RCA de l’autoradio au châssis permettra de remédier ce problème. ATTENTION : lors du démarrage du véhicule via un chargeur ou un autre véhicule via des câbles, assurez-vous que les polarités soient bien respectées. Des branchements incorrects peuvent entraîner la fusion du fusible de l’amplificateur ainsi que des dommages à d’autres systèmes essentiels du véhicule. En cas de questions supplémentaires à propos de l’installation ou du fonctionnement de votre nouveau produit KICKER, consultez votre distributeur agréé KICKER à l’endroit où vous avez fait votre achat. Pour plus de conseils sur l’installation, cliquez sur l’onglet SUPPORT sur la page d’accueil www.kicker.com. Choisissez l’onglet ASSISTANCE TECHNIQUE, choisissez le sujet qui vous intéresse et téléchargez ou visualisez les informations. Pour des questions spécifiques ou si vous ne trouvez pas de réponse sur notre support en ligne envoyez un courriel à [email protected] ou appelez le service technique au (405)624-8583 17 2015 PX Mono Amplifiers Rev D.indd 17 8/26/2014 3:42:38 PM ELECTRONICS LIMITED WARRANTY When purchased from an Authorized KICKER Dealer, KICKER warrants this product to be free from defects in material and workmanship under normal use for a period of TWO (2) YEARS from date of original purchase. If this product is identified as “Refurbished” or “B Goods”, the warranty is limited to a period of THREE (3) MONTHS from date of original purchase. In all cases you must have the original receipt. Should service be necessary under this warranty for any reason due to manufacturing defect or malfunction during the warranty period, KICKER will repair or replace (at its discretion) the defective merchandise with equivalent merchandise. Warranty replacements may have cosmetic scratches and blemishes. Discontinued products may be replaced with more current equivalent products. This warranty is valid only for the original purchaser and is not extended to owners of the product subsequent to the original purchaser. Any applicable implied warranties are limited in duration to a period of the express warranty as provided herein beginning with the date of the original purchase at retail, and no warranties, whether express or implied, shall apply to this product thereafter. Some states do not allow limitations on implied warranties; therefore, these exclusions may not apply to you. This warranty gives you specific legal rights; however you may have other rights that vary from state to state. WHAT TO DO IF YOU NEED WARRANTY OR SERVICE: Defective merchandise should be returned to your local Authorized Stillwater Designs (KICKER) Dealer for warranty service. Assistance in locating an Authorized Dealer can be found at www.kicker.com or by contacting Stillwater Designs directly. You can confirm that a dealer is authorized by asking to see a current authorized dealer window decal. If it becomes necessary for you to return defective merchandise directly to Stillwater Designs (KICKER), call the KICKER Customer Service Department at (405) 624-8510 for a Return Merchandise Authorization (RMA) number. Package only the defective items in a package that will prevent shipping damage, and return to: Stillwater Designs, 3100 North Husband St, Stillwater, OK 74075 The RMA number must be clearly marked on the outside of the package. Please return only defective components. The return of functioning items increases your return freight charges. Non-defective items will be returned freightcollect to you. For example, if a subwoofer is defective, only return the defective subwoofer, not the entire enclosure. Include a copy of the original receipt with the purchase date clearly visible, and a “proof-of-purchase” statement listing the Customer’s name, Dealer’s name and invoice number, and product purchased. Warranty expiration on items without proof-ofpurchase will be determined from the type of sale and manufacturing date code. Freight must be prepaid; items sent freight-collect, or COD, will be refused. WHAT IS NOT COVERED? This warranty is valid only if the product is used for the purpose for which it was designed. It does not cover: o Damage due to improper installation o Subsequent damage to other components o Damage caused by exposure to moisture, excessive heat, chemical cleaners, and/or UV radiation o Damage through negligence, misuse, accident or abuse. Repeated returns for the same damage may be considered abuse o Any cost or expense related to the removal or reinstallation of product o Speakers damaged due to amplifier clipping or distortion o Items previously repaired or modified by any unauthorized repair facility o Return shipping on non-defective items o Products with tampered or missing barcode labels o Products with tampered or missing serial numbers o Products returned without a Return Merchandise Authorization (RMA) number o Products purchased from an UNAUTHORIZED dealer o Freight Damage o The cost of shipping product to KICKER o Service performed by anyone other than KICKER stillwaterdesigns HOW LONG WILL IT TAKE? KICKER strives to maintain a goal of one week turnaround for all electronics (amplifiers, crossovers, equalizers, etc.) returns. Delays may be incurred if lack of replacement inventory or parts is encountered. Failure to follow these steps may void your warranty. Any questions can be directed to the KICKER Customer Service Department at (405) 624-8510. Contact your International KICKER dealer or distributor concerning specific procedures for your country’s warranty policies. Note: All specifications and performance figures are subject to change. Please visit www.kicker.com for the most current information. 18 2015 PX Mono Amplifiers Rev D.indd 18 15PXA.1-D-20140826 8/26/2014 3:42:38 PM INTERNATIONAL WARRANTY Contact your International KICKER dealer or distributor concerning specific procedures for your country’s warranty policies. WARNING: KICKER products are capable of producing sound levels that can permanently damage your hearing! Turning up a system to a level that has audible distortion is more damaging to your ears than listening to an undistorted system at the same volume level. The threshold of pain is always an indicator that the sound level is too loud and may permanently damage your hearing. Please use common sense when controlling volume. GARANTÍA INTERNACIONAL Our goods come with guarantees that cannot be excluded under the Australian Consumer Law. You are entitled to a replacement or refund for a major failure and for compensation for any other reasonably foreseeable loss or damage. You are also entitled to have the goods repaired or replaced if the goods fail to be of acceptable quality and the failure does not amount to a major failure. Versión Español Comuníquese con su concesionario o distribuidor KICKER internacional para obtener infor ación sobre procedimientos específicos relacionados con las normas de garantía de su país. ADVERTENCIA: Los excitadores KICKER son capaces de producir niveles de sonido que pueden dañar permanentemente el oído. Subir el volumen del sistema hasta un nivel que produzca distorsión es más dañino para el oído que escuchar un sistema sin distorsión al mismo volumen. El dolor es siempre una indicación de que el sonido es muy fuerte y que puede dañar permanentemente el oído. Sea precavido cuando controle el volumen. La frase “combustible para vivir la vida Livin’ Loud™ a todo volumen” se refiere al entusiasmo por la vida que la marca KICKER de estéreos de automóvil representa y a la recomendación a nuestros clientes de que vivan lo mejor posible (“a todo volumen”) en todo sentido. La línea de altavoces y amplificadores KICKER es la mejor del mercado de audio de automóviles y por lo tanto representa el “combustible” para vivir a todo volumen en el área de “estéreos de automóvil” de la vida de nuestros clientes. Recomendamos a todos nuestros clientes que obedezcan todas las reglas y reglamentos locales sobre ruido en cuanto a los niveles legales y apropiados de audición fuera del vehículo. INTERNATIONALE GARANTIE Deutsche Version Nehmen Sie mit Ihren internationalen KICKER-Fachhändler oder Vertrieb Kontakt auf, um Details über die Garantieleistungen in Ihrem Land zu erfahren. WARNUNG: KICKER-Treiber können einen Schallpegel erzeugen, der zu permanenten Gehörschäden führen kann! Wenn Sie ein System auf einen Pegel stellen, der hörbare Verzerrungen erzeugt, schadet das Ihren Ohren mehr, als ein nicht verzerrtes System auf dem gleichen Lautstärkepegel. Die Schmerzschwelle ist immer eine Anzeige dafür, dass der Schallpegel zu laut ist und zu permanenten Gehörschäden führen kann. Seien Sie bei der Lautstärkeeinstellung bitte vernünftig! Der Slogan “Treibstoff für Livin’ Loud” bezieht sich auf die mit den KICKER-Autostereosystemen assoziierte Lebensfreude und die Tatsache, dass wir unsere Kunden ermutigen, in allen Aspekten ihres Lebens nach dem Besten (“Livin’ Loud”) zu streben. Die Lautsprecher und Verstärker von KICKER sind auf dem Markt für Auto-Soundsysteme führend und stellen somit den “Treibstoff” für das Autostereoerlebnis unserer Kunden dar. Wir empfehlen allen unseren Kunden, sich bezüglich der zugelassenen und passenden Lautstärkepegel außerhalb des Autos an die örtlichen Lärmvorschriften zu halten. GARANTIE INTERNATIONALE Version Française Pour connaître les procédures propres à la politique de garantie de votre pays, contactez votre revendeur ou distributeur International KICKER. AVERTISSEMENT: Les haut-parleurs KICKER ont la capacité de produire des niveaux sonores pouvant endommager l’ouïe de façon irréversible ! L’augmentation du volume d’un système jusqu’à un niveau présentant une distorsion audible endommage davantage l’ouïe que l’écoute d’un système sans distorsion au même volume. Le seuil de la douleur est toujours le signe que le niveau sonore est trop élevé et risque d’endommager l’ouïe de façon irréversible. Réglez le volume en faisant prevue de bon sens! L’expression “ carburant pour vivre plein pot “ fait référence au dynamisme de la marque KICKER d’équipements audio pour véhicules et a pour but d’encourager nos clients à faire le maximum (“ vivre plein pot “) dans tous les aspects de leur vie. Les haut-parleurs et amplificateurs KICKER sont les meilleurs dans le domaine des équipements audio et représentent donc pour nos client le “ carburant pour vivre plein pot “ dans l’aspect “ installation audio de véhicule “ de leur vie. Nous encourageons tous nos clients à respecter toutes les lois et réglementations locales relatives aux niveaux sonores acceptables à l’extérieur des véhicules. P.O. Box 459 • Stillwater, Oklahoma 74076 • USA • (405) 624–8510 2015 PX Mono Amplifiers Rev D.indd 19 19 8/26/2014 3:42:38 PM ©2014 Stillwater Designs® 2015 PX Mono Amplifiers Rev D.indd 20 8/26/2014 3:42:39 PM