1
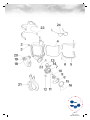
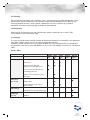
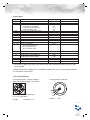
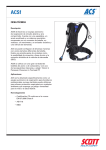
SEA
Full Face Mask
Ref. No. 009775
Edition C April 2002
9000422 E
1
User Instructions
SEA FULL FACE MASK
SEA Full Face Mask, Natural Rubber
SEA Full Face Mask, Silicone Rubber
SEA Full Face Mask, Chloroprene Rubber
SEA Full Face Mask Procomp
Model No. FN
Model No. FS
Model No. FC
Model No. FP
1. General
The SEA full face mask is a panorama full view mask. It is designed to protect the respiratory system
and face against hazardous gases and particles and to maintain a wide field of vision. The mask is
used as a filtering device together with gas, particle or combined filters (threaded filters) as well as
with portable and hose-fitted constructions. The mask has a speech diaphragm made of plastic film
with minimal sound absorption. The SEA full face mask conforms to EN 136 in Europe and AS1716 in
Australia.
Respiratory filters may be of one of two types:
• Threaded filters conforming to EN 148-1.
• Clip-in filters, to be fitted to the filter adaptor supplied with the mask, which is then screwed into the
mask.
2. Limitations of use
2.1
The filtering device must not be used if the environment and contamination are unknown. In
case of doubt, self-contained respirators which function independently of the atmosphere must
be used.
2.2 The filtering device must not be used in restricted spaces (e.g. cisterns, tunnels) because of
oxygen deficiency or presence of heavy oxygen-displacing gases (e.g. carbon dioxide).
2.3 The filtering device may be used only if the oxygen content of the air is 18 - 23 vol.% (minimum
USA 19,5%). An oxygen analysis instrument is recommended for measuring the oxygen content.
2.4 Gas filters do not protect against particles. Similarly, particle filters do not provide protection
against gases or vapours. In case of doubt, use combined filters.
2.5 Normal filtering devices do not protect against certain gases such as CO (carbon monoxide),
CO2 (carbon dioxide) and N2 (nitrogen).
2.6 SEA recommends that filters be changed after single use if they have been used against
radioactive agents, micro-organisms (virus, bacteria, fungi and spores) or enzymes.
2.7 It is likely that adequate protection cannot be guaranteed if the sealing edge of the mask is
obstructed by the user’s beard, hair or spectacle frames. With the SEA full face mask one can
use special spectacles (see spare part FSF-T).
2.8 When a breathing protector is used in explosive atmospheres, please follow the instructions
given for such areas.
2.9 The weight of filter used with a full face mask shall not exceed 500 g.
2.10 Gas filters shall be replaced when the user begins to sense odour, taste or irritation. Filters used
against detrimental gases that do not display any significant indications, require special
regulations for the duration of use and correct usage.
2
3. Selection of breathing protector equipped with filter – Applies to NON-USA users
Type of protective device
Full face mask with particle filter P2
Multiples of
threshold
concentration
15
Remarks, limitations
Particles, excluding radioactive substances,
bacteria, fungi, viruses and enzymes
Full face mask with particle filter P3
400
Particles
Full face mask with gas filter *)
400
Filter types A, B, E, K, AX, SX, Hg-P3 and NOP3 have different applications. For more
information, see User Instructions of SEA
threaded filters.
Full face mask with combined filter
The specified multiples of threshold value for the gas or particle
filters are given separately, but in all cases the lowest value applies
*) Provided that the maximum permissible detrimental gas concentration for the gas filter is not exceeded. For
non-powered filtering devices with gas filter, concentration must not exceed 0.1 vol.% in gas filter class 1 and 0.5
vol.% in gas filter class 2 and 1.0 vol.% in gas filter class 3.
4. Preparations for use, and Donning
4.1 Before use, check the following:
• facepiece condition and intactness
• intactness of rubber parts
• head harness condition and elasticity
• visor condition and cleanliness
• that speech diaphragm is in place
• that exhalation valve is in place and exh. valve cover is properly fastened
• that inh. and exh. valves function properly
• that the filter is correct for the intended use. Filter type and class are evident from the marking.
• storage period of the filter.
4.2 Screw the filter tightly in the connector of the mask (=inhalation valve body) (fig. 1).
4.3 When needed, connect the spectacles to the inner mask and adjust their position (see instructions
provided with the spectacle frame).
4.4 Loosen the head harness.
4.5 A sweat band is recommended to control excessive hair (fig. 2).
4.6 Don the facepiece by placing first the jaw end on your face, then pull the head harness over the
head (fig. 3).
4.7 Adjust the head harness evenly (straps in the order 1-2-3) so that the cradle lies centered on the
back of the head (fig. 4).
4.8 Check the tightness of the mask by closing the exhalation opening with your hand. Exhale to
create overpressure. If you fail to get overpressure (=potential leakage), tighten the head harness and
the filter. Alternatively, close the filter opening and inhale to make the mask press onto your face (fig.
5).
4.9 After use the mask must be maintained as instructed in the Service Table.
Fig. 1
Fig. 2
Fig. 3
Fig. 4
Fig. 5
3
5. Maintenance and storage
5.1 Test for function and leak-tightness
If components have been replaced (visor, valve discs or speech diaphragm), a test for function and
leak-tightness must be carried out with an appropriate test device (e.g. Pro-Tester). The test is also
done in case of a mask stored unused for a longer period, and at least once a year. Check also that
the faceblank has maintained its shape, the head harness is reasonably elastic, the visor and the
sealing edge are undamaged, and that the valve discs and the speech diaphragm’s O-ring are good
and well in position. Damage must be repaired.
5.2 Replacing the visor
The visor material code is found in the right upper corner of the visor. Replace visor if damaged, dirty
or scratched.
Material codes:
F
polycarbonate
( )
triplex (chemical resistant laminated glass)
• Unscrew the screws (crosshead Phillips), loosen the visor frames, and remove the visor (fig. 6).
• Place a new visor in the faceblank (see the marking “up/down” on the visor). Align the check marks
of the visor and faceblank with each other (fig. 7).
• Press the upper frame into place (fig. 8).
• Bend the mask at the connector to give space for the lower frame under the connector support
piece (fig. 9). Tighten the two screws.
• Carry out the leak-tightness test (point 5.1).
Fig. 6
Fig. 7
Fig. 8
Fig. 9
5.3 Replacing the exhalation valve disc
• Pull out the connector lid (fig. 10).
• Separate the exh. valve disc (grey) from the exh. valve body (pinch on the edge of the disc) (fig.
11).
• Replace the disc. Pull the disc tail through the central hole (fig. 12) to the inner side of the mask to
secure a good fit.
Fig. 10
Fig. 11
Fig. 12
4
5.4 Replacing the inhalation valve discs
• Remove the connector lid.
• Remove the rubber inhalation valve seat (by pulling from the tip) (fig. 13).
• Remove the inh. valve disc (fig. 14) and replace it.
• Put the valve seat back to the bottom of the valve body. Do not press too tight (the disc comes
immobilised) because the disc must be free to move.
• The valve discs of the inner mask (fig. 15) are replaced similarly. Make sure that the rubber edge of
the inner mask comes in the valve seat groove.
Fig. 13
Fig. 14
Fig. 15
5.5 Replacing the speech diaphragm
• Bend the head harness over the visor (fig. 16).
• Fold the jaw cup inside out, towards yourself (fig. 17).
• Remove the speech diaphragm (fig. 18).
• To make assembly easier, moisten the O-ring with water. Position the tip of the speech diaphragm
into the notch of the connector (fig. 19-20) to prevent any leakage. Press the speech diaphragm
into place (fig. 21).
• Fold back the jaw cup (fig. 22).
Fig. 16
Fig. 20
Fig. 17
Fig. 21
Fig. 18
Fig. 19
Fig. 22
5.6 Replacing the head harness
Thread the rubber bands through the buckles (fig. 23).
Fig. 23
5
5.7 Cleaning
Remove the filter, exhalation valve, inhalation valves, spectacle frame and speech diaphragm. Clean
the facepiece and the components with lukewarm water and mild detergent (neutral, pH 6-8) (e.g.
washing-up liquid). A brush can be used for stubborn dirt. Do not use solvents (e.g. acetone,
turpentine), hot water or bleaching agents (perborate, percarborate).
5.8 Disinfection
After cleaning, disinfect the mask with a disinfection solution and let it dry for a while. Finally,
reassemble the mask. See Service Table.
5.11 Storage
The mask should be stored carefully cleaned, disinfected and ready for use. Keep the mask protected
from direct sunlight, grease and oil. The store should be dry and cool.
A properly stored, unused mask stays in good condition for a long storage period. The components
should not be more than 10 years old. Before use, the mask must undergo a function test, see Service
Table.
Service Table
Component
Mask, complete
Work to be done
Cleaning
Intervals
Before After
use
use
■
Disinfection
Inh. and exh.
valve discs
(11, 12, 18)
Connector of
the mask (7)
Speech
diaphragm
(13, 14)
*) when needed
Test for function and leaktightness/Pro-Tester (point 5.1)
■
Pre-use check done by the user,
according to point 4.1
■
Every
year
■
■
■
■ *)
■
Replace visor, head harness and
other parts
Check discs
■ *)
Replace discs
■ *)
Check tightness of exh. valve
disc/Pro-Tester
Check inh. valve seat (9)
■
■
■
■
Verify body inner thread (with gauge)
Check
■
■
Replace
■
Every 2
years
Every 6
years
■
■
■
■
6
6. Spare parts
Item
1
2&3
4
5&6
7
8
9
10
13 & 14
15 & 16
17
11, 12, 18
19 & 20
21
22
23
24
-
Description
Faceblank
Buckle with retainer
Visor options:
Polycarbonate (standard)
Hard coated polycarbonate
Laminated triplex glass
Visor frame assembly with screws
Connector
Exhalation valve cover
Inhalation valve seat
Rivet for inhalation valve
Speech diaphragm with o-ring
Steel band and buckle
Inner mask
Valve set, including:
Qty 2 inner mask valves
Qty 1 inhalation valve
Qty 1 exhalation valve
Part number
FF-B
Inner mask valve seat with rivet
Neck strap assy
Head harness natural rubber or
Head harness silicone rubber
Support for connector
Spectacle frame with fasteners
Visor cover (protective film) (10 per pack)
Comments
New mask
-
VP
VHC
VLG
FV
FF-EVC
FF-IVS
FF-IVR
FF-SD
FF-V
To be assessed by SEA *)
To be assessed by SEA *)
To be assessed by SEA *)
-
FF-IMVS
FF-NS
FHN
FHS
FSF-T
VC
To be assessed by SEA *)
-
*) Assessments require the entire mask to be sent to SEA to decide whether the mask is able
to be repaired.
A Product Maintenance Agreement is available from SEA which covers servicing of the product.
For more details contact SEA.
7. Year of manufacture
In the head harness, and the facepiece
(inner side of the facepiece; on the left).
In the exhalation valve disc
K575
96
98
97
98
Outer circle quarter-of-year circle
Inner circle year circle
Example:
1999, April-June
99
Example:
1999
7
NOTES
8
NOTES
Safety Equipment Australia Pty Ltd
A.C.N.: 002 727 586
North Shore Business Park
35/1 Jubilee Avenue, Warriewood NSW 2102, Australia
Mail: Private Bag, Mona Vale NSW 2103, Australia
Telephone: [+61] (0)2 9910 7500 — Fax: [+61] (0)2 9979 5364
Email: [email protected]
Safety Equipment Europe AB
Org. Nr.: 556518-3711
Safety Equipment America, Inc.
11 Business Park Drive
Branford, CT 06405, USA
Telephone: [+1] (203) 483 9483 — Fax: [+1] (203) 483 6633
TollFree (USA and Canada only): 1888-732-3500
Email: [email protected]
Waasa Graphics Oy 2002
Storgatan 64, S-331 31 Värnamo, Sweden
Telephone: [+46] (0)370 69 34 40 — Fax: [+46] (0)320 179 79
Email: [email protected]