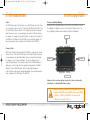
1
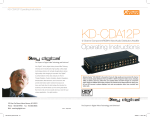
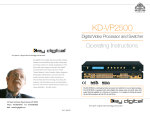
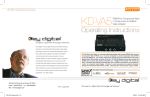
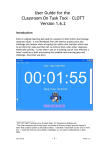
KDCDA3_OperInstructions.qxd
1/4/06
12:57 PM
Page 2
KD-CDA3
KD-CDA3 Operating Instructions
HDTV
Distribution Amplifier
3-Channel Component Video & Audio Distribution Amplifier
OPERATING INSTRUCTIONS
Key Digital®, led by digital video pioneer Mike Tsinberg,
develops and manufactures high quality, cutting-edge
technology solutions for virtually all applications where
high quality video imaging is important. Key Digital® is
at the forefront of the video industry for Home Theater
Retailers, Custom Installers, System Integrators,
Broadcasters, Manufacturers, and Consumers. We
provide total video system solutions because we
know and help drive the technology, the industry, the
business, and all the latest up-and-coming standards.
But most of all, we know exactly what you need for
your unique application – the right solution.
Web :: www.keydigital.com
Phone :: 914-667-9700
Fax :: 914-668-8666
Rev 0 - December 2005
The KD-CDA3 3-Channel HDTV Component Video & Audio Distribution Amplifier by Key
Digital® is the perfect solution for small video and audio distribution applications. Convenient and practical, the KD-CDA3 is the ideal choice for high-quality and economical 3-channel Analog signal distribution from any HDTV or SDTV Component Video (YPbPr) or RGBHV Video source including 1080p, as
well as analog stereo or digital (PCM) Audio. It delivers crystal-clear, color-rich, artifact-free, and pristine
HDTV and SDTV images to component HDTV-ready monitors in all video formats, including 1080p. The
KD-CDA3 is the ideal product for driving your HD and SD sources to plasma displays, front and rear
projectors, direct view monitors, and video walls; and can even be adapted for Composite Video and SVideo SDTV applications. The Output format and resolution = the Input format and resolution. Futureproof, expandable, 300 MHz Video bandwidth, the KD-CDA3 drives cables up to 300 feet. It is compact and rugged, and comes equipped with its own convenient mounting bracket. Only operate the
KD-CDA3 with the Key Digital® external Power Supply provided with your unit.
KDCDA3_OperInstructions.qxd
1/4/06
12:57 PM
KD-CDA3 Operating Instructions
Page 4
KD-CDA3 Operating Instructions
CAUTION!
KD-CDA3 HDTV Distribution Amplifier
3-Channel Component Video & Audio Distribution Amplifier
CAUTION: YOUR KD-CDA3 HDTV
DISTRIBUTION AMPLIFIER COMES
WITH ITS OWN EXTERNAL POWER
SUPPLY THAT MUST BE ATTACHED
TO THE UNIT.
No other Power Supply Adapter can be used
with this unit! Using a Power Supply other
than the one provided by Key Digital® with
your unit VOIDS THE ENTIRE PRODUCT
WARRANTY, may cause damage to your unit
and associated equipment, and is a potential
safety hazard.
You MUST use the Power Supply
that came with your unit:
+ 5V DC, 110-120 VAC, 60 Hz (7 watts)
KDCDA3_OperInstructions.qxd
1/4/06
12:57 PM
Page 6
Page 1 of 29
KD-CDA3 Operating Instructions
KD-CDA3 Operating Instructions
Safety Instructions – Please be sure to follow these
instructions for safe operation of your unit
1.
Read these instructions.
2.
Keep these instructions.
3.
Heed all warnings.
4.
Follow all instructions.
5.
Do not use this apparatus near water.
6.
Clean only with dry cloth.
7.
Do not block any ventilation openings. Install in accordance with the manufacturer’s instructions.
8.
Do not install near any heat sources such as radiators, heat registers, stoves, or other
apparatus (including amplifiers) that produce heat.
9.
Do not defeat the safety purpose of the polarized or grounding-type plug. A polarized
plug has two blades with one wider than the other. A grounding type plug has two
blades and a third grounding prong. The wide blade or the third prong are provided for
your safety. If the provided plug does not fit into your outlet, consult an electrician for
replacement of the obsolete outlet.
10.
Protect the power cord from being walked on or pinched particularly at plugs,
convenience receptacles, and the point where they exit from the apparatus.
Table of Contents
Introduction.....................................................................................................2
Getting Started................................................................................................6
11.
Only use attachments/accessories specified by the manufacturer.
12.
Use only with the cart, stand, tripod, bracket, or table specified by
the manufacturer, or sold with the apparatus. When a cart is
used, use caution when moving the cart/apparatus combination
to avoid injury from tip-over.
Technical Specifications ..................................................................................24
13.
Unplug this apparatus during lightning storms or when unused
for long periods of time.
How to Contact Key Digital®.............................................................................28
14.
Refer all servicing to qualified service personnel. Servicing is required
when the apparatus has been damaged in any way, such as power-supply
cord or plug is damaged, liquid has been spilled or objects have fallen into the apparatus, the
apparatus has been exposed to rain or moisture, does not operate normally, or has
been dropped.
Connecting A/V Equipment to your Unit.............................................................8
Troubleshooting...............................................................................................20
© 2005 Key Digital Systems, Inc. All rights reserved.
KDCDA3_OperInstructions.qxd
1/4/06
12:57 PM
Page 2
Page 2 of 29
Page 3 of 29
KD-CDA3 Operating Instructions
Introduction
Key Digital’s® dedication to providing the best possible solution to the Home Theater
community is reflected in the KD-CDA3 HDTV Distribution Amplifier, manufactured
under stringent quality control standards that exceed the industry norm. This commitment to quality, reliability and performance is reflected throughout the entire Key
Digital® product line. Every product is tested and certified by a limited warranty of
two years parts and labor, one of the best in the business. Please read the installation instructions below and enjoy your Component Video/Audio Distribution Amplifier
for years to come.
The KD-CDA3 HDTV Distribution Amplifier by Key Digital® provides convenience
and economy for your small-scale professional Video/Audio distribution applications.
Perfect for both the board room and home entertainment applications, this versatile
component is the ideal complement to your video and audio equipment, making possible the interface of your HDTV or SDTV source signals (Video and Audio) to as
many as three (3) independent video displays. In addition, the KD-CDA3 HDTV
Analog Distribution Amplifier can also switch PCM digital and/or left and right stereo
Audio for as many input/output combinations. The interface is via the RCA type connector array, supporting Component Video (YPbPr) or “VGA” (RGBHV) Video formats
up to and including 1080P. The KD-CDA3 can even be adapted for Composite
Video and S-Video SDTV applications.
KD-CDA3 Operating Instructions
Typical source components you may need to distribute with your KD-CDA3 HDTV
Distribution Amplifier can include the following:
■
DVD Players
■
Electronic game boxes
■
Cable TV, satellite and terrestrial DTV set-top receivers
■
Digital Video Recorders
■
D-VHS, S-VHS and VHS VCR’s
KDCDA3_OperInstructions.qxd
1/4/06
12:57 PM
Page 4
Page 4 of 29
Page 5 of 29
KD-CDA3 Operating Instructions
KD-CDA3 Operating Instructions
Key Features
Technology
Your KD-CDA3 HDTV Distribution Amplifier enables 3-channel signal distribution from
any HDTV or SDTV Component Video (YPbPr) or RGBHV Video source including
1080p, to HDTV-ready displays. The KD-CDA3 distributes Video and analog stereo
or digital (PCM) Audio with the crystal-clear images you’ve come to expect from Key
Digital®.
As for all Key Digital® products, it’s our custom technology that allows us to deliver
the highest standard of picture quality, like:
There is so much in store with Key Digital’s® new KD-CDA3 HDTV Distribution
Amplifier:
■ Pristine, crystal-clear distribution of ALL your HD and SD Analog sources, even
1080p, out to 300 MHz:
➾ Component Video (YPbPr) or “VGA” (RGBHV) Video
- RGBHV installations preclude Audio distribution with your KD-CDA3 unit
➾ Digital PCM or analog stereo (Left & Right pairs) Audio
➾ RCA connectors
➾ Output video format & resolution = Input video format & resolution
➾ It is possible to substitute Composite Video (CVBS) or S-Video in place
of the Component Video signals, using appropriate adapter cables
■
Easy to set up and operate:
➾ Simply connect your source and displays, and you are up and running
➾ You must use the external Power Supply provided with your unit
Expandable and cascadable with additional KD-CDA3 or other Key Digital® HDTV
Distribution Amplifiers
■ Convenient mounting bracket provided for ease of installation
■
LHBC (Linear High Bandwidth Circuit)
Surface Mount Technology
Multi-Layer Board Technology
KDCDA3_OperInstructions.qxd
1/4/06
12:57 PM
Page 6
Page 6 of 29
Page 7 of 29
KD-CDA3 Operating Instructions
KD-CDA3 Operating Instructions
Getting Started
The KD-CDA3 HDTV Distribution Amplifier is capable of distributing any Analog
three-wire Component Video (YPbPr) and/or five-wire “VGA” Video (RGBHV) source,
as well as analog/digital audio, to as many as three (3) outputs (typically your displays
or projectors). If your source device output is on a VGA connector, you will need a
breakout cable to RGBHV on separate RCA connectors; RGBHV installations preclude Audio distribution with your KD-CDA3 unit. Once configured, there are no controls to operate and the unit will be “transparent” to your entire installation or application. It’s truly “configure and forget about it” - you are done.
This KD-CDA3 HDTV Distribution Amplifier accepts virtually any Component Video
input signal (YPbPr) with a matching left and right stereo audio pair (L&R audio can
be substituted by a single digital PCM audio connection), and distributes it to up to
three (3) Display devices around your home or showroom without the loss of signal
quality. “VGA”-like video, called RGBHV, can be used in place of the Component
Video and Audio. A typical hookup will consist of a “Source” device that outputs
Component Video (or Composite Video or S-Video with optional video adapters) such
as a DVD player, Set-Top Box unit, Satellite receiver, digital VCR, Sony-PlaystationÍ,
XBOXÍ, GameCubeÍ or any other consumer video device.
CAUTION: Always test all connections and final operation
first, before sealing cables behind walls or completing difficult wire routings. Since the KD-CDA3 HDTV Distribution
Amplifier does NOT perform video processing, the output
video format and resolution is the same as the input video
format and resolution. This means that the video resolution
is not changed and also that if you input one form of video,
for example Component Video (YPbPr), the output will be in
exactly the same format.
Functionality of a Three-Channel Distribution Amplifier
Input
Three-Channel
DVD Player
Component Video
(YPbPr) Output
PCM Digital Audio
Output A/V
Analog HDTV
Distribution Amplifier
Outputs
Video Display 1
Component Video
(YPbPr) Input
PCM Digital Audio Input
Video Display 2
Component Video
(YPbPr) Input
PCM Digital Audio Input
Video Display 3
Component Video
(YPbPr) Input
PCM Digital Audio Input
Open the carton and you will find the following contents:
1.
One (1) KD-CDA3 HDTV Distribution Amplifier unit
2.
One (1) +5V DC external Power Supply adapter module*
3.
One (1) plastic mounting bracket
3.
One (1) Operating Instructions Manual
4.
One (1) Warranty card
KDCDA3_OperInstructions.qxd
1/4/06
12:57 PM
Page 8
Page 8 of 29
Page 9 of 29
KD-CDA3 Operating Instructions
KD-CDA3 Operating Instructions
*Power Requirements
■
■
External power supply
+ 5V DC, 110-120 VAC, 60 Hz (7 watts)
CAUTION: No other power supply adapter can be used with
the KD-CDA3 unit; you must use the Power Supply provided!
Using a power supply other than the one provided by Key
Digital® with your unit VOIDS THE WARRANTY, may cause
damage to your unit and associated equipment, and is a
potential safety hazard.
CONNECTING A/V EQUIPMENT TO YOUR UNIT
In this section, you will be instructed as to how to connect all of your A/V Input and
Output devices to your KD-CDA3 HDTV Distribution Amplifier unit.
Setting up your KD-CDA3 HDTV Distribution Amplifier for operation:
Your KD-CDA3 HDTV Distribution Amplifier is easy to configure and operate. Simply
connect your Input analog Video and analog or digital Audio source, and drive up to
three (3) displays. For Component Video applications, you can also simultaneously
drive your displays or Surround Sound processors with digital or analog Audio.
There are no other controls, and no other setup is required other than supplying
power to your unit with the Power Supply adapter provided with your unit.
CAUTION: When unpacking the unit, make all hookups and
connections before plugging in the Power Adapter provided
with your unit. Do NOT apply power to the unit until all Video
and Audio connections have been made to your KD-CDA3
unit from the “Source” device to the Display(s) and/or Audio
system(s). You MUST use the Power Supply provided with
your unit or you VOID the Key Digital® Warranty and risk
damage to your unit and associated equipment.
You may wish to distribute the signal from your DVD Player, Video Game, Cable TV,
Satellite and Terrestrial DTV set-top receiver, Digital Video Recorder, D-VHS, S-VHS, or
VHS VCR “Source” to several Displays. Typical Application Examples of how you may
use the KD-CDA3 HDTV Distribution Amplifier in your installation are shown here.
Because not all consumer equipment marketed uses RCA connector interfaces, it
may be necessary to employ BNC-to-RCA, VGA-to-RCA, and other adapter plugs
and/or cable assemblies to interface these various devices to your KD-CDA3 HDTV
Distribution Amplifier.
KDCDA3_OperInstructions.qxd
1/4/06
12:57 PM
Page 10
Page 10 of 29
Page 11 of 29
KD-CDA3 Operating Instructions
KD-CDA3 Operating Instructions
Typical Application Examples for the KD-CDA3 HDTV Analog A/V Distribution Amplifier
Display
Display
Display
Display
PCM Audio
Pb
Display
Display
Y
Pr
The KD-CDA3 HDTV Distribution Amplifier has one (1) bank of RCA-type Input connectors,
and three (3) banks of RCA-type Output connectors. Each of the RCA connectors are color
coded to match most “Source” and “Display” devices available in the consumer industry;
Red, Green and Blue for Component Video; White, and Red for left and right audio respectively (PCM audio can be distributed by using either the left or right audio channel).
Y
Pb
Pb
Y
Pr
PCM Audio
Pr
Y
Pb
Some of your Source equipment and Displays may have an analog video output that is
called Component Video. Component Video is a three-wire video format, with the video
signals typically labeled YPbPr. Another common analog video output format is RGB (like
the “VGA” outputs on your computer), which typically has separate H&V sync signals.
PCM Audio
Pr
KD-CDA3 HD Analog Component Video
(YPbPr) and Digital PCM Audio One
Source can drive up to THREE Displays
High-quality Component Video (YPbPr) and “VGA” (RGBHV) Equipment
PCM Audio
Typical Connectors Color-code
or
DVD Changer
Display
Display
Display
Display
Display
Display
Display
Display
CVBS
CVBS
CVBS
CVBS
HDTV Set Top Box
Display
Display
Component Video
(YPbPr)
Display
Display
CVBS
Pr
Display
Display
CVBS
CVBS
Y
Pb
Stereo System
L&R Audio
“Y” Out to Pr In
L&R Audio
CVBS
or
VCR
Video Camera
“Y” Out to Pb In
KD-CDA3 Distribution Amplifier for
Composite Video. One Composite
Video Source can drive up to
SEVEN Composite Video Displays
Red
“VGA” Video
(RGBHV)
R
Left & Right
Analog Stereo
Audio (L&R)
Digital PCM Audio
Red
R
Red
PCM 1
Red**
L
White
PCM 2
White**
Green
G
Green
Blue
B
Blue
H=
Horizontal
Sync
Red*
V=
Vertical
Sync
White
*Note: H Sync may also be Yellow on some Source and Sync products
**Note: These are the colors on the KD-CDA3 RCA connectors; however, the corresponding
colors on your Source and Sink products may vary
KDCDA3_OperInstructions.qxd
1/4/06
12:57 PM
Page 12
Page 12 of 29
Page 13 of 29
KD-CDA3 Operating Instructions
Be careful not to confuse the Red lead of a Component Video (YPbPr) cable with the
Right or Red audio channel. To avoid confusion, note that the Red lead (Pr) from the
Component Video cable is often bundled to the Green lead (Y) and Blue lead (Pb)
from the component cable. Typically an analog Audio cable is comprised of a Rightchannel stereo (Red-colored) connector together with a Left-channel stereo (Whitecolored) connector.
KD-CDA3 Operating Instructions
Connect your COMPONENT VIDEO Source Input
Before supplying power to your KD-CDA3 HDTV Distribution Amplifier unit, connect
the Output of the Component Video Source device you wish to distribute to your displays to the Inputs of KD-CDA3.
Typically, connecting the KD-CDA3 HDTV Distribution Amplifier into your system is as
simple as matching the proper color-coded connectors. When inserting the RCA connectors use a slight twisting motion when inserting the cables, this assures a proper
connection by seating the RCA connector all the way in. Be sure to use high-quality
75 Ohms cables for the video. When running long lengths of cable please make sure
to use heavy shielded high quality cables.
Each Input of the KD-CDA3 has its own 75 Ohms termination
■
Do NOT feed a Source to multiple KD-CDA3 Inputs without
proper Distribution equipment
Note: Since the KD-CDA3 HDTV Distribution Amplifier does NOT perform video
processing, the output video format is the same as the input video format. This
means that the video resolution is not changed and also that if you input one form of
video, for example Component Video, the output will be in exactly the same format.
Digital PCM
Audio
Component
Video Inputs
Caution: For proper operation of the high quality electrical
circuits in your KD-CDA3 unit, do NOT “daisy chain” Inputs:
■
L&R Analog
Audio
Pr
Y
Pb
R
G
B
H
V
“VGA” Video Inputs
The “Source” device Outputs should be connected to the jacks marked “Input” on the
KD-CDA3. After hooking up the “Source” device to the marked input connectors, the
KD-CDA3 will distribute the selected input signal to all of the output connectors.
Alternate Video Inputs
RGBHV
RGBHV installations with separate H & V syncs preclude Audio distribution with your
KD-CDA3 unit. Simply follow the labels on your KD-CDA3 and connect the RGB
Video signals, and H&V Sync signals, accordingly. You may require breakout cables
or adapters to the RCA Inputs of the KD-CDA3.
KDCDA3_OperInstructions.qxd
1/4/06
12:57 PM
Page 14
Page 14 of 29
Page 15 of 29
KD-CDA3 Operating Instructions
KD-CDA3 Operating Instructions
S-Video
Connect your Output Displays
For SDTV S-Video, simply follow the labels on your KD-CDA3 and connect the Y and
color (chrominance) signals. Use the “Y” Input of the KD-CDA3 for the S-Video Y signal. Note that if you may use either the Pr or Pb Input for the S-Video chrominance
signal. However, be sure to correspondingly use the same (Pr or Pb) when driving
your displays. For example, if you input the S-Video color signal on the Pr path, then
you MUST use the Pr Outputs of the KD-CDA3 to drive your S-Video displays. You
may require breakout cables or adapters to the RCA Inputs of the KD-CDA3.
Now that the Video and Audio Inputs are connected to your KD-CDA3, run each of
the individual set of Output connectors to their respective “Display” devices. The
three (3) Output port banks are labeled Output 1, Output 2, and Output 3.
Output 2
Composite Video
SDTV Composite Video, frequently called CV or CVBS, is a single-wire video format.
You must use one of the three KD-CDA3 inputs for the Composite Video Input, and
correspondingly use the same Output label to drive your Composite Video display.
For example, use the “Y” Inputs and Outputs. This way, you will have three (3)
Composite Video Outputs. You can achieve a higher level of CVBS distribution, for
driving up to seven (7) Composite Video displays, by feeding back the KD-CDA3
Outputs to the open KD-CDA3 Inputs. Refer to the Application Example for
Composite Video provided later in this Operating Manual. You may require breakout
cables or adapters to the RCA Inputs of the KD-CDA3.
Output 3
Output 1
Input
Always test all connections and final operation first, before sealing cables
behind walls or completing difficult wire routings.
Caution: For proper operation of the high-quality electrical
circuits in your KD-CDA3 unit, you MUST ensure for each Output:
■
Each run of YPbPr cable MUST be the same length
■
Maximum run length = 300 feet
KDCDA3_OperInstructions.qxd
1/4/06
12:58 PM
Page 16
Page 16 of 29
Page 17 of 29
KD-CDA3 Operating Instructions
Make sure to use the correct wires when making the connections to the “Display”
device (use the color matching system if possible).
The same consideration applies to the audio interfaces. Both analog and digital output options are provided on the KD-CDA3 HDTV Distribution Amplifier. Your analog
Audio may drive the speakers in your display. Your digital Audio may connect instead
to an A/V receiver having coaxial digital (PCM) interfaces for decoding surround
sound signals.
KD-CDA3 Operating Instructions
You MUST use the Power Supply
that came with your unit:
+ 5V DC, 110-120 VAC, 60 Hz (7 watts)
For added safety and protection it is always recommended to use a good quality
surge protector.
Use a reliable “Source” to test your connections (like a DVD player) before routing or
hiding any wires behind walls or ceilings.
Insert the Power Supply adapter plug, here
Next, plug the external Power Supply provided with your unit into an appropriate* wall outlet.
*Power Requirements
■
■
External power supply
+ 5V DC, 110-120 VAC, 60 Hz (7 watts)
Mounting and Maintenance instructions
The KD-CDA3 HDTV Distribution Amplifier is built for years of trouble free operation.
It can be installed in any home theater, showroom, or other system using multiple displays. Cleaning or maintenance is usually not necessary, but if needed use a soft
non-abrasive dry cloth to wipe the dust from the unit.
Since the KD-CDA3 is an electrically powered device, it will produce a small amount
of heat; therefore it is recommended to leave a few inches of room around the unit to
dissipate this heat. You may attach the mounting clip provided to a suitable location, and
then carefully clip the KD-CDA3 into the mounting clip once the mounting clip is secure.
KDCDA3_OperInstructions.qxd
1/4/06
12:58 PM
Page 18
Page 18 of 29
Page 19 of 29
KD-CDA3 Operating Instructions
Mounting Information
■
A convenient mounting bracket is provided
■
The top and bottom of the unit are solid metal (no vents)
■
The unit may be oriented horizontally, or mounted vertically on a wall
-Use #8 or M4 screws to hang the unit (keyhole slots are provided on the base of
the unit)
KD-CDA3 Operating Instructions
If you need to expand the distribution capability of your KD-CDA3 HDTV Distribution
Amplifier, simply use one of the Outputs of the unit that may now be going to one of
your displays, and connect that output to the input of another Key Digital® Analog
Distribution Amplifier. The total distribution capability is the sum of the total Outputs
of all units, minus one. For example, using the KD-CDA3 3-output Distribution
Amplifier, cascaded with the Key Digital® KD-CDA6 6-output Distribution Amplifier,
you will need to use one of the three Outputs of the KD-CDA3 to drive the Input of
the Input of the KD-CDA6. Hence, you will be able to drive your Source to up to 8
displays (3 - 1 + 6 = 8).
Remember, you MUST only use the Power Supplies intended for each product, as
provided with each Unit. Do not attempt to share or swap Power Supplies.
Expansion with two KD-CDA3 HDTV Distribution Amplifiers
allows you to drive up to 3 – 1 + 3 = 5 displays
Caution: If installing the KD-CDA3 unit or Mounting Bracket
into sheet-rock or hollow walls, provide proper screw support with bolts or sheet-rock anchors.
YPbPr Component Video
Expansion
You may find that as your Video and Audio system grows, you may need to distribute
your Source to more than three displays. The full line of Key Digital® Analog
Distribution Amplifiers is truly expandable and cascadeable. Not only is your system
future-proof, but also you will be able to enjoy beautiful, crystal-clear images, because
the signal will not be degraded in any way when you properly cascade Key Digital®
products.
Audio
KDCDA3_OperInstructions.qxd
1/4/06
12:58 PM
Page 20
Page 20 of 29
Page 21 of 29
KD-CDA3 Operating Instructions
TROUBLESHOOTING
If you encounter problems or find that the KD-CDA3 unit fails to properly distribute
the “Source” signal (such as from your DVD player) to the Video Display(s) and/or
Audio system(s), it is suggested you first check for the following:
■
Verify that your Source device and displays are functioning properly without the
KD-CDA3. Connect your Source directly to your displays and check for proper
operation. If you are not able to obtain satisfactory operation, correct the problem
before proceeding with the KD-CDA3 in the path.
■
Validate that all of the connections are made at all points: the Source Output, the
KD-CDA3 Input and Outputs, and your Display and Audio system Inputs.
■
Be sure that you have supplied power to the KD-CDA3 unit, using ONLY the Power
Supply adapter provided in the package with your unit.
■
Ensure you have good-quality cables, of equal length, no greater than 300 feet
each in length.
Troubleshooting Guide
If you still encounter a problem with your unit or installation after checking for the
items above, you may find it helpful to review the Troubleshooting Guide, next page:
KD-CDA3 Operating Instructions
PROBLEM: No power to the unit.
You MUST use the Power Supply provided with your unit:
Verify that the external Power Supply provided with your unit is properly connected
to a standard 110V household outlet.
Check to make sure that the power connector is properly inserted into the jack on
the KD-CDA3.
Check and verify that the wall outlet is active by plugging in a component known
to be operational, such as a desk lamp.
Unplug the adapter from the wall and verify that the cable is not cut or interrupted
anywhere.
If none of the above works, please contact Key Digital® technical support. See
“How to Contact Key Digital® at the end of these Operating Instructions.
PROBLEM: You are not able to view a picture on any or all of your Display
devices.
Check to make sure that the connected Display devices are capable of operating
with the format and resolution of the “Source”. For example, if the Source (such as
your DVD player) outputs Component Video (YPbPr) at 1080p, but your display
device only accepts 720p RGBHV, then there is a compatibility problem among
your equipment.
If any Display device connected to the output of the KD-CDA3 is not capable of
handling HDTV-compatible video signals, make sure that the “Source” device connected to the Input of the KD-CDA3 for distribution is set to output SD-compatible
signals (Standard Definition or 480i).
KDCDA3_OperInstructions.qxd
1/4/06
12:58 PM
Page 22
Page 22 of 29
KD-CDA3 Operating Instructions
For “VGA” (RGBHV) operation, verify that the Sync is either present on the Green
connector or the H & V connectors. Make sure you have properly connected Sync
from the Output jacks of your “Source” to the Input of your KD-CDA3, and that the
corresponding Outputs of the KD-CDA3 are properly connected to your Display(s).
Note: For Component Video (YPbPr), sync is present on the “Y” Channel.
PROBLEM: You are able to view a picture on the Display(s), but the image
is Black and White, Green, or Pink in Nature.
This is indicative of a mismatch between “Source” and Display devices in the
Video connections. Make sure that your Source and Displays are all of the same
format. For example, if the Source outputs “Component Video” (YPbPr) then the
connections to your Display(s) must also be via the “Component Video” path (and
not the VGA).
Make sure that the Component Video (YPbPr) or “VGA” Video (RGBHV) connections are properly maintained throughout the entire chain from the Source, to the
KD-CDA3, to your Display device(s).
PROBLEM: There is a picture but it is “scrolling” across the screen of one
or more of your Display devices.
This happens when the Input signal from your Source device is not compatible
you’re your Display, or if there is a problem with the Sync signal(s).
For example, if one or more of your Displays connected to the Output of the KDCDA3 is not capable of handling HDTV-compatible video signals, make sure that the
“Source” device is set to output SD- compatible signals (Standard Definition or 480i).
For “VGA” (RGBHV) operation, verify the presence of the Sync signal.
Note: For Component Video (YPbPr), sync is present on the “Y” Channel.
Page 23 of 29
KD-CDA3 Operating Instructions
PROBLEM: You are able to view a picture but there is interference, noise, or
hum bars visible on the image on one or more of your Display devices.
This can happen when crossing power lines when routing the cable from the
“Source” device to the KD-CDA3, or when routing the cables from the KD-CDA3 to
your Display device(s).
If crossing power lines is inevitable, make sure to use heavy, shielded, high-quality
Video and Audio cables.
Sometimes using a shielded and noise filtering surge protector can eliminate noise
in power lines.
PROBLEM: There is no Audio from your Audio system.
Check to make sure that the volume is turned up to an audible level on the “Source”
device as well as the Display device. If you still encounter a problem, then:
Make sure that the Audio connections were properly configured, and that your display has speakers. Check the connections from start to finish for the Left (white)
and Right (red) stereo Audio channels.
When using the Digital Audio connection (“PCM” or coaxial audio), make sure that
the Display device is capable of decoding this compressed bit stream of audio
information. Most often when using the “PCM” audio function, the audio will be
connected to an AV-Receiver or amplifier capable of decoding Dolby Digital®.
KDCDA3_OperInstructions.qxd
1/4/06
12:58 PM
Page 24
Page 24 of 29
Page 25 of 29
KD-CDA3 Operating Instructions
TECHNICAL SPECIFICATIONS
KD-CDA3 Operating Instructions
■
RCA connectors for all Video and Audio inputs and outputs
■
Future-proof and expandable:
➾ Can be cascaded to KD-CDA3 or other Key Digital® Distribution Amplifiers
to drive as many outputs as desired from one source
■
It is possible to substitute Composite Video (CVBS) or S-Video in place of the
Component Video signals, using appropriate adapter cables
Model: KD-CDA3 Operating Instructions
HDTV Distribution Amplifier
3-Channel Component Video & Audio Distribution Amplifier
Key Features
Enables 3-channel signal distribution from any HDTV or SDTV Component Video
(YPbPr) or RGBHV Video source including 1080p, to HDTV-ready displays
➾ Also distributes S-Video
➾ Also distributes a Composite Video (CVBS) signal to up to seven (7)
Composite Video displays
Compatible Video Signals
■
Distributes Video and analog stereo or digital (PCM) Audio
➾ RGBHV installations preclude Audio distribution with your KD-CDA3 unit
Video
■
No controls
■
Crystal-clear images
■
Inputs and Outputs
■
One (1) Audio/Video Input
■
Compatible with all standard analog video signal formats that use 50Hz or 60Hz
refresh rates, including:
➾ 1080p, 1080i, 720p, 576p, 576i, 540p, 480p, 480i
■
Component Video (YPbPr) or RGBHV Video
➾ RGBHV installations preclude Audio distribution with your KD-CDA3 unit
■
Three RCA-type color-coded input connectors (YPbPr, RGB)
■
1V p-p @ 75 ohms, terminated
■
300 MHz video bandwidth
■
Sync:
■
Three (3) Audio/Video Outputs
➾ Component Video (YPbPr) sync on "Y" input
■
Each Input and Output array is comprised of three (3) component YPbPr analog
Video connectors, and two (2) analog stereo Left and Right Audio connectors:
➾ Instead of analog Audio Input/Output,
the two (2) connectors can be used for:
– The Horizontal (H) and Vertical (V) sync for RGBHV signals, or
– Two (2) PCM digital Audio signals
➾ The analog audio input/output connectors also serve as the Horizontal
and Vertical sync for RGBHV signals
■
It is possible to substitute Composite Video (CVBS) or S-Video in place of the
Component Video signals, using appropriate adapter cables
➾ Supports up to seven (7) CVBS Outputs or three (3) S-Video Outputs
KDCDA3_OperInstructions.qxd
1/4/06
12:58 PM
Page 26
Page 26 of 29
Page 27 of 29
KD-CDA3 Operating Instructions
Cable Recommendations
■
Each run of YPbPr cable MUST be the same length (300’ maximum)
KD-CDA3 Operating Instructions
■
Weight: 1.5 lbs. (0.7 kg.)
■
Enclosure Type: Metal
■
Plastic mounting bracket, included
Bandwidth
■
-3 dB @ 300 MHz
Mounting Information
■
Linear phase pass-band
■
■
Drives video signals up to 300 feet
■
The top and bottom of the unit are solid metal (no vents)
■
The unit may be oriented horizontally, or mounted vertically on a wall
➾ Use #8 or M4 screws to hang the unit (keyhole slots are provided on the base of
the unit)
Video Gain
■
Unity gain for YPbPr and RGBHV
CAUTION: If installing the KD-CDA3 unit or Mounting
Bracket into sheet-rock or hollow walls, provide proper
screw support with bolts or sheet-rock anchors.
Analog Audio
■
Analog stereo (Left and Right) Audio
■
Two RCA-type color-coded input connectors (L, R)
■
High-impedance (1K ohm) line level inputs
■
RGBHV installations preclude Audio distribution with your KD-CDA3 unit
A convenient mounting bracket is provided
Power Requirements
■
■
External power supply
+ 5V DC, 110-120 VAC, 60 Hz (7 watts)
Digital Audio
■
Use the analog Audio Left and Right connectors for digital PCM Audio
■
Standard PCM digital format
■
RGBHV installations preclude Audio distribution with your KD-CDA3 unit
Mechanical
■
Size: 4” x 8” x 1-13/16”
CAUTION: No other power supply adapter can be used with
this unit! Using a power supply other than the one provided
by Key Digital® with your unit VOIDS THE ENTIRE PRODUCT
WARRANTY, may cause damage to your unit and associated
equipment, and is a potential safety hazard.
KDCDA3_OperInstructions.qxd
1/4/06
12:58 PM
Page 28
Page 28 of 29
Page 29 of 29
KD-CDA3 Operating Instructions
How to contact Key Digital®
Repairs and Warranty Service
■
Should your KD-CDA3 HDTV Distribution Amplifier require warranty service, please
contact Key Digital® to obtain a Returned Materials Authorization (RMA) number
■
Please contact us at either:
■
Phone:
1-914-667-9700
■
E-mail:
[email protected]
Technical Support
■
For technical questions about using our products, please contact us at either:
■
Phone:
1-914-667-9700 or Toll-free 1-888-258-2028
■
E-mail:
[email protected]
Customer Support
■
For customer support questions about using our products, please contact us at
either:
■
Phone:
1-914-667-9700
■
E-mail:
[email protected]
KD-CDA3 Operating Instructions
WARRANTY
All Key Digital® products are built to high manufacturing standards and should
provide years of trouble-free operation. They are backed by a limited two-year
parts and labor warranty.
KDCDA3_OperInstructions.qxd
1/4/06
12:58 PM
Page 30
KD-CDA3 Operating Instructions
Notes
KD-CDA3 Operating Instructions
Notes