1
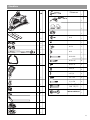
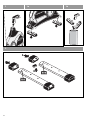
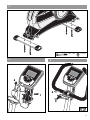
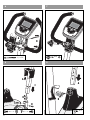
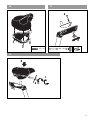
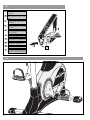
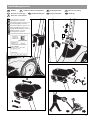
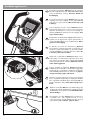
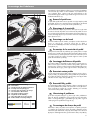
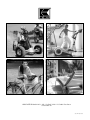
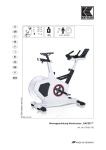
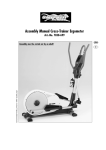
Montageanleitung „X1“
Art.-Nr. 07681-500
D
C
A
A
100
B
B
53
cm
C
128 40 kg 130 kg
max.
GB
F
NL
E
I
PL
CZ
DK
Der Umwelt zuliebe: wir drucken auf 100% Altpapier!
P
Abb. ähnlich
GB
Assembly Instructions
Before assembling or using the exercise cycle , please read the following instructions carefully. They contain important
information for use and maintenance of the equipment as well as for your personal safety. Keep these instructions in a
safe place for maintenance purposes or for ordering spare parts.
For Your Safety
■
■
! ATTENTION! The crosstrainer should be used only for its
intended purpose, i.e. for physical exercise by adult people.
ATTENTION! Any other use of the equipment is prohibited
and may be dangerous. The manufacturer cannot be held liable
for damage or injury caused by improper use of the equipment.
!
■ Exercise has been designed in accordance with the latest standards of safety. Any features which may have been a possible
cause of injury have been avoided or made as safe as possible.
■ Incorrect repairs and structural modifications (e.g. removal or
replacement of original parts) may endanger the safety of the
user.
■ Damaged components may endanger your safety or reduce the
lifetime of the equipment. For this reason, worn or damaged parts
should be replaced immediately and the equipment taken out
of use until this has been done. Use only original KETTLER spare
parts.
■ If the equipment is in regular use, check all its components thoroughly every 1 -2 months. Pay particular attention to the tightness
of bolts and nuts.This applies especially to the securing bolts for
saddle and handelbars.
■ To ensure that the safety level is kept to the highest possible
standard, determined by its construction, this product should be
serviced regulary (once a year) by specialist retailers.
■
ATTENTION! Instruct people using the equipment (in particular children) on possible sources of danger during exercising.
!
for a longer period.
■ Ensure that the power cable is not pinched and that no-one can
trip over it.
■ All electric appliances emit electromagnetic radiation when in
operation. Please do not leave especially radiation-intensive
appliances (e.g. mobile telephones) directly next to the cockpit
or the electronic controlsystem as otherwise values displayed might
be distorted (e.g. pulse measurement).
■ Before beginning your program of exercise, consult your doctor
to ensure that you are fit enough to use the equipment. Base your
program of exercise on the advice given by your doctor. Incorrect
or excessive exercise may damage your health!
■ Any interference with parts of the product that are not described
within the manual may cause damage, or endanger the person
using this machine. Extensive repairs must only be carried out
by KETTLER service staff or qualified personnel trained by
KETTLER.
■ Always observe the general safety rules and precautions for
working with electrical equipment.
■
■ Our products are subject to a constant innovative quality
assurance. We reserve the right to perform technical modifications.
■ In case of enquiry, please contact your KETTLER dealer.
■ The device requires a supply voltage of 230V, 50 Hz.
Connect the power cord with a protective contact socket.
■
IMPORTANT! Do not under any circumstances carry out electrical repairs or alterations yourself. Always ensure that such work
is done by a properly qualified electrician.
■
IMPORTANT! disconnect the apparatus from the mains before
doing repair, maintenance or cleaning work.
In choosing the location of the apparatus, ensure a sufficient safety
distance from any obstacles. The apparatus must not be mounted
in the immediate vicinity of main passageways (paths, doorways,
corridors).
!
!
■ Do not use a multiple power socket for the running belt. If an
extension cable is being used, ensure that it complies with the
VDE regulations.
■ Unplug the power cord of the device from the socket if not used
ATTENTION! Before beginning your program of training, study
the instructions for training carefully.
!
■ For a comfortable training position please adjust the handlebar
andsaddle position to your body height.
■
ATTENTION! While assembly of the product keep off
children’s reach (Choking hazard - contains small parts).
■
WARNING! Heart rate monitoring systems may be inaccurate. Over exercise may result in serious injury or death. If you
feel faint stop exercising immediately.
!
!
Handling the equipment
■ Before using the equipment for exercise, check carefully to
ensure that it has been correctly assembled.
are allowed to use the equipment, ensure that they are instructed
in its proper use and supervised accordingly.
■ It is not recommended to use or store the apparatus in a damp
room as this may cause it to rust. Please ensure that no part of
the machine comes in contact with liquids (drinks, perspiration
etc.). This may cause corrosion.
■ The exercise cycle complies with the DIN EN 957 - 1/5, class
HA.
■ The machine is designed for use by adults and children should
not be allowed to play with it. Children at play behave unpredictably and dangerous situations may occur for which the
manufacturer cannot be held liable. If, in spite of this, children
■ A slight production of noise at the bearing of the centrifugal mass
is due to the construction and has no negative effect upon operation. Possibly occurring noise during reverse pedalling result
from engineering and are absolutely safe.
4
■ Before beginning your first training session, familiarize yourself
thoroughly with all the functions and settings of the unit.
■ The exercise cycle has a magnetic brake system.
■ The equipment is independent of revolutions per minute.
■ Please ensure that liquids or perspiration never enter the machine
or the electronics.
■ Before use, always check all screws and plug-in connections as
well as respective safety devices fit correctly.
■ Use for your regular cleaning, maintenance and care our
appliance maintenance set (Article no. 07921-000) specifically
licensed for KETTLER Sports apparatus and available from the
Sport specialized trade.
■ Nobody may be in the moving range of a training person
during training.
■ Always wear suitable shoes when using.
Instructions for Assembly
■ Ensure that you have received all the parts required (see check
list) and that they are undamaged. Should you have any cause
for complaint, please contact your KETTLER dealer.
packaging material in such a way that it may not cause any
danger. There is always a risk of suffocation if children play with
plastic bags!
■ Before assembling the equipment, study the drawings carefully
and carry out the operations in the order shown by the diagrams.
The correct sequence is given in capital letters.
■ The fastening material required for each assembly step is shown
in the diagram inset. Use the fastening material exactly as
instructed. The required tools are supplied with the equipment.
■ The equipment must be assembled with due care by an adult
person. If in doubt call upon the help of a second person, if possible technically talented.
■ Bolt all the parts together loosely at first, and check that they have
been assembled correctly. Tighten the locknuts by hand until resistance is felt, then use spanner to finally tighten nuts completely
against resistance (locking device). Then check that all screw
connections have been tightened firmly. Attention: once locknuts
have been unscrewed they no longer function correctly (the
locking device is destroyed), and must be replaced.
■ Please note that there is always a danger of injury when working
with tools or doing manual work. Therefore please be careful
when assembling this machine.
■ Ensure that your working area is free of possible sources of danger,
for example don’t leave any tools lying around. Always dispose
■ For technical reasons, we reserve the right to carry out preliminary
assembly work (e.g. addition of tubing plugs).
List of spare parts page 32-34
When ordering spare parts, always state the full article number,
spare-partnumber, the quantity required and the S/N of the product
(see handling).
Waste Disposal
KETTLER products are recyclable. At the end of its
useful life please dispose of this article correctly and
safely (local refuse sites).
Example order: Art.no. 07681-500 / spare-part no. 10100030
/ 2 pieces / S/N ....................
Please keep original packaging of this article, so that it may be
used for transport at a later date, if necessary.
Goods may only be returned after prior arrangement and in
(internal) packaging, which is safe for transportation, in the original
box if possible.
It is important to provide a detailed defect description / damage
report!
Important: spare part prices do not include fastening material; if
fastening material (bolts, nuts, washers etc.) is required, this should
be clearly stated on the order by adding the words „with fastening
material“.
KETTLER (GB) Ltd.
Merse Road · North Moons Moat · Redditch,
Worcestershire B98 9HL · Great Britain
http://www.kettler.co.uk
GB
KETTLER International Inc.
1355 London Bridge Road · Virginia Beach · Virginia VA
23453 USA
http://www.kettlerusa.com
USA
5
Messhilfe für Verschraubungsmaterial
GB
Measuring help for screw connections
I
Misura per il materiale di avvitamento
F
Gabarit pour système de serrage
PL
Wzornik do połączeń śrubowych
NL
Meethulp voor schroefmateriaal
CZ
Měřící pomůcka pro materiál k přišroubování
E
Referencia de medición para el material de atornilladura
DK
P
Auxiliar de medição para materiais de aparafusamento
Beispiele
Examples
Examples
Esempio
Przyktady
Příklad
22
Bij voorbeeld Ejemplos
Eksempel Exemplo
Hjælp til måling af skruer
Checkliste
Stck.
Pulsmesser
1
1
1
1
1
M8
2
1
2
M 16
1/1
1
M8
M 8 x 60
1
1
1
1
1
1
1
M 8 x 45
4
M 8 x 16
2
ø 25/8
1
1
5
ø 21/8
2
3,9 x 25
3
3,9 x 50
2
Steckschlüssel
SW 10/13
Mehrzweckschlüssel
1
1
1
1
1
23
1a
1
1b
2
A
B
klack
24
klack
3
M 8 x 45
4
ø 25/8
5
A
B
A
C
B
25
6
7
A
B
M8
3,9 x 50
8
9
MAX.
A
A
C
B
E
M 8 x 16
26
B
D
M 8 x 16
M 16
11
10
A
B
M8 x 60
3,9 x 25
12
B
C
A 1x
27
13
D
Zur Montageerleichterung die
Zehriemen im warmen Wasser
anwärmen.
GB In order to make installation easier,
gently warm the foot strap in warm
water
F
Pour faciliter le montage, réchauffer
les sangles des pédales dans de
lʼeau chaude.
NL
Om de montage te vergemakkelijken de voetriemen in warm water
verwarmen.
E
Para facilitar el montaje témplense
las correas de fijación de los pedales
en agua caliente.
I
Per facilitare il montaggio, riscaldare
le cinghie dei pedali in acqua calda
PL
W celu ułatwienia montażu pasek
pedału podgrzać w ciepłej wodzie.
B
CZ Za účelem usnadnění montáže
nahřejte třmen v teplé vodě.
A
DK Opvarm pedalstropperne i varmt
vand så de er nemmere at montere.
P
!
Para facilitar a montagem, é conveniente aquecer previamente as fivelas
de fixação do pé em água quente.
14
R
L
28
Handhabungshinweise
GB
Handling
F
Indications relatives à la manipulation
I
Avvertenze per il maneggio
P
Notas sobre o manuseamento
D
GB
F
NL
E
I
PL
CZ
DK
P
PL
Wskazówki obsługowe
NL
Bedieningsinstrukties
E
Instrucciones de manejo
CZ
Pokyny k manipulaci
DK
Håndtering
Beispiel Typenschild - Seriennummer
Example Type label - Serial number
Example Plaque signalétiqu - Numèro de serie
Bij voorbeeld Typeplaatje - Seriennummer
Ejemplo Placa identificativa - Número de serie
C
Esempio Targhetta tecnica - Numero di serie
Przyklady Tabliczka identifikacyna - Numer serii
Přiklad typového štítku – sériové číslo
Eksempel type label – serienummer
Exemplo placa de características - número de série
!
B
MAX.
A
D
B
C
B
A
A
C
29
Handhabungshinweise
D
Bei Geräten mit Netzteil: Achtung! Betrieb nur mit mitgeliefertem Original-Netzteil oder Original-KETTLER-Ersatzteil
(siehe Ersatzteilliste) zulässig. Ansonsten Gefahr der
Beschädigung.
GB
For products with power supply: Attention! Only use with
original power unit as supplied, or with original KETTLER
spare part (see spare part list). Otherwis this may result
in damage.
F
NL
E
I
B
30
A
PL
Pour les appareils avec bloc secteur: Attention! Exploiter
uniquement l’appareil avec son bloc secteur original qui
fait partie de la fourniture ou une pièce de rechange originale de KETTLER (voir liste des pièces de rechange). Sinon
risque de détérioration.
Bij apparaten met transformator: Let op! Gebruik alleen toegestaan met de bijgeleverde orginele transformator of
orgineel KETTLER-onderdeel (zie onderdelenlijst). Anders
gevaar voor beschadiging.
En aparatos con fuente de alimentación: ¡Atención!
Funcionamiento solamente autorizado con la fuente de alimentación original suministrada o con pieza de recambio
original de KETTLER (ver lista de piezas de recambio). De
lo contrario podría ocasionar daños.
Apparecchi con alimentatore: Attenzione! L’utilizzo è consentito soltanto con l’alimentatore originale fornito in dotazione oppure con parte di ricambio originale della KETTLER
(vedasi lista delle parti di ricambio). Altrimenti sussiste il
rischio di danneggiamenti.
Dotyczy urządzeń z zasilaczem: Uwaga! Eksploatacja
urządzenia jest możliwa tylko z dostarczonym oryginalnym
zasilaczem lub z oryginalnym urządzeniem zastępczym
marki KETTLER (patrz ? Lista części zamiennych). W przeciwnym razie istnieje ryzyko uszkodzenia.
CZ
U přístrojů se síťovým zdrojem: Pozor! Provoz je přípustný
pouze s originálním síťovým zdrojem obsaženým v dodávce
nebo originálním náhradním dílem od firmy KETTLER (viz
seznam náhradních dílů). Jinak vzniká nebezpečí poškození.
DK
Maskiner med netdel: OBS! Det er kun tilladt at bruge den
medleverede originale netdel eller den originale reservedel
fra KETTLER (se reservedelslisten). I modsat fald kan maskinen beskadiges.
P
Em aparelhos com cabo: Atenção! O funcionamento só
é permitido com o cabo original fornecido ou com a
peça sobressalente original KETTLER (ver lista de peças
sobressalentes). Caso contrário, perigo de danos.
Demontage der Pedalarme
Zum Abziehen des Pedalarms entfernen Sie zuerst die Schutzkappe
und Schraube (A). Halten Sie den Pedalarm fest und drehen Sie
eine Schraube M12 (gehört nicht zum Lieferumfang) in die
Gewindeöffnung (B). Nach einigen Umdrehungen können Sie den
Pedalarm abnehmen (C).
1
GB
Removal of pedal arms
To pull off the pedal arms remove cap and screw (A). Grip the pedal
arm tightly, and screw in an M12 bolt (not supplied) into the thread
(B). After a few turns you may take off the pedal arm (C)
F
A
Démontage de la manivelle
Enlevez d'abord le capot de protection ainsi que la vis (A) avant
de retirer le bras de la pédale. Tenez le bras de la pédale et vissez
une vis M12 (ne fait pas partie de la gamme de livraison) dans l'ouverture de filetage (B). Vous pouvez retirer le bras de la pédale (C)
après plusieurs tours.
NL
Demontage van de krenk
Voor het losmaken van de cranken, verwijdert u eerst het beschermdopje en schroef (A). Houd de crank vast en draai e
g van de schroefdraad (B). Na enkele omwentelingen kunt u de crank
verwijderen (C).
2
E
Desmontaje de las manivelas de pedal
Para quitar la manivela de pedal hay que quitar primero la tapa
protectora y el tornillo (A). Retenga la manivela de pedal y apriete
un tornillo M12 (no forma parte del volumen de suministro) en la
rosca (B). Después de haber efectuado algunas vueltas podrá
quitar la manivela de pedal (C).
I
A
C
B
Smontaggio dell’attacco del pedale
Per togliere l’attacco del pedale togliete prima il coperchietto protettivo e la vite (A). Tenete fermo l’attacco del pedale e girate una
vite M12 (non compresa nella fornitura) nella filettatura (B). Dopo
aver effettuato alcuni giri, potete togliere l’attacco del pedale (C).
PL
Demontaż ramion pedału
W celu zdjęcia ramienia pedału należy najpierw usunąć osłonę i
wykręcić śrubę. (A). Przytrzymując ramię pedału wkręć śrubę M12
(nie należy do zakresu dostawy) w gwintowany otwór (B). Po kilku
obrotach możesz zdjąć ramię pedału (C).
CZ
–D–
– GB –
–F–
– NL –
–E–
–I–
– PL –
– CZ –
–P–
– DK –
Gehört nicht zum Lieferumfang.
Not included.
Ne fait pas partie du domaine de livraison.
Is niet bij de levering inbegrepen.
No forma parte del volumen de entrega.
Non in dotazione alla fornitura.
Nie należy do zakresu dostawy.
Nepatří do rozsahu dodávky
Não está incluído nas peças fornecidas
Er ikke inkluderet i leveringsomfanget.
Demontáž kliky pedálu
Pro sejmutí kliky pedálu nejprve odejměte ochrannou čepičku a šroub
(A). Pevně přidržte kliku pedálu a do závitového otvoru (B) zašroubujte šroub M12 (nepatří do rozsahu dodávky). Po několika
otočeních lze kliku pedálu odebrat (C).
DK
Afmontering af pedalarme
Fjern først beskyttelseskappen og skruen (A) inden pedalarmen
tages af. Tag fat i pedalarmen og skru en M 12 bolt (er ikke inkluderet i leveringsomfanget) i gevindåbningen (B). Efter nogle få
omdrejninger kan pedalarmen tages af (C).
P
Desmontagem dos braços do pedal
Para retirar o braço do pedal, remova primeiro a capa de protecção
e o parafuso (A). Segure bem o braço do pedal e aparafuse um parafuso M12 (não está incluído nas peças fornecidas) no furo da rosca
(B). Depois de dar algumas voltas, pode levantar o braço do pedal (C).
31
Ersatzteilzeichnung
25
20
24
28
58
32
31
52 62
30
23
35
21
22
66
36
27
41 33 40
26
39 56 54
57
53
48
34
44
37 15
55
42
38 13
47
65 49
50
16
4
46
45
51
2
17
14
8 19
3
63
1
9
12
5
9
7
11
47
61
29
10
59 60
18
43
6
42
2
32
5
64
Ersatzteilliste Heimtrainer „X 1“
Pos.
Beschreibung
1
2
3
4
5
6
7
8
9
10
11
12
13
14
15
16
17
18
19
20
21
22
23
24
25
26
27
28
29
30
31
32
33
34
35
36
37
38
39
40
41
42
43
44
45
46
47
48
49
50
51
52
53
54
55
56
57
58
59
Rahmen gepulvert
Bodenrohr ø 60x2x450 mm
Rollenschoner rechts
Rollenschoner links
Verstellschoner
Antriebsrad mit VKT-Achse
Kugellager 6203 ZZ (paarweise je Achse wechseln)
Schwungrad mit Achse, Freilauf, Lagern und Befestigung
Lageraufnahme (2579) mit Buchsen und Befestigung
Sicherungsring (ø16 mm) für Schwungrad
Keilrippenriemen 1059mm, PJ8
Zugfeder mit Gewindeeinsatz
Geschwindigkeitsabn. mit Kabel 375 mm und Befestig.
Aufnahme (4196) für Netzstecker
Führungs-Stopfen (3773) für Rahmen
Steuerung für Magnetspule mit Befestigung
Aufnahmeblech BD 1333 mit Befestigung
Spannrolle mit Umlenkhebel montiert
Leitung 850 mm, mit Buchse
Cockpit-Oberteil (4490) mit Befestigung
Distanzhülse 12 mm lang (zu Pos. 23)
Klemmschelle
Griffschraube M8x55 mm
Cockpit-Unterteil (4491) mit Befestigung
Computer X 1 (SF2B)
Cockpit-Vorderteil (4485) mit Befestigungselementen
Lenksäule gepulvert
Pulsabnehmer M 3406
Stromkabel unten, 950 mm
Griffbügel mit Griffschläuchen und Stopfen
Griffschlauch 580 mm lang
Stopfen für ø 25 mm
Sattelrohr verchromt, mit Sattelrohrabdeckungen .Pos.40 und 41
Gleitprofil
Sattel
Sattelabdeckung (3097)
Sterngriffschraube M8
Drehgriffschraube
Stromkabel oben, 1100 mm
Sattelrohrabdeckung rechts (4687) (mit Teil 41 bestellen)
Sattelrohrabdeckung links (4688) (mit Teil 40 bestellen)
Pedale mit Fußriemen Paar
Zehriemen rechts
Zehriemen links
Spulenkörper gewickelt mit Splint
Spulenbleche
Pedalarm Paar
Lenkrohrabdeckung (4484)
Federscheibe ø 17,3 mm (zu Pos. 7)
Seegerring ø 17 mm (zu Pos. 7)
Antriebshülse ø 34,5 mm mit Freilauf HFL 1626
Schraubterminal
Seitenverkleidung Unterteil rechts (4479)
Seitenverkleidung Unterteil links (4480)
Seitenverkleidung rechts (4481)
Seitenverkleidung links (4482)
Lüftungsgitter (3338)
Erdungskabel
Pedalverkleidung (4483)
Stück
Ersatzteil-Nr.
1
2
1
1
2
1
2
1
2
3
1
1
1
1
1
1
1
1
1
1
1
1
1
1
1
1
1
1
1
1
2
2
1
1
1
1
1
1
1
1
1
1
1
1
1
15
1
1
2
1
1
1
1
1
1
1
1
1
2
91111948
91111951
91170738
91170739
91170740
91130125
33100023
91140441
98585006
10709016
67005122
25638032
91170417
70129308
70127716
91170428
97200247
91140373
42860012
70129303
97200562
97200363
91170576
70129304
91170638
70129305
91150671
67000421
67000873
91150593
10118095
10100030
91160127
97100571
72002610
70129291
10105003
10103801
67000874
70129292
70129293
33300020
33300106
33300105
91140276
1701305B
33001010
70129313
10601003
10709021
91140269
67000699
70129309
70129310
70129316
70129317
70129307
67000805
70129302
33
Ersatzteilliste Heimtrainer „X 1“
Pos.
Beschreibung
60
61
62
63
64
65
66
67
Lamellenstopfen
Lasche
Cockpit-Stütze (4486)
Aufnahmewinkel
Netztrafo kpl.
Kugellager 6203 ZZ (paarweise je Achse wechseln)
Schnittstelle mit Kabel 300 mm lang
Schraubenbeutel (ohne Abbildung)
34
Stück
Ersatzteil-Nr.
2
2
1
1
1
2
1
1
10100200
97200258
70129306
97200243
42860006
33100054
67000743
91180487
35
HEINZ KETTLER GmbH & Co. KG · Postfach 1020 · D - 59463 Ense -Parsit
www.kettler.de
docu 2414a/08.09