1
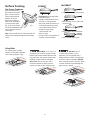
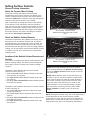
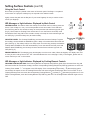
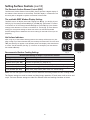
Use & Care Guide
Manual de Uso y Cuidado
Manuel d’utilisation et d’entretien
English / Español / Français
Models/Modelos/Modèles: 790.4531*, 790.4541*.
Kenmore Elite
®
Electric Cooktop
Parrilla de Cocinar Eléctrica
Table de cuisson électrique
* = Color number, número de color, numéro de couleur
P/N 318205618B (1405)
Sears Brands Management Corporation
Hoffman Estates, IL 60179 U.S.A.
www.kenmore.com
www.sears.com
TM
Table of Contents
Warm & Hold Feature...................................................12
Locking the Controls ......................................................12
Minute Timer ...................................................................13
General Care & Cleaning .......................................... 13-14
Cleaning Various Parts of Your Cooktop ....................13
Ceramic Glass Cooktop Cleaning & Maintenance.. 13-14
Care and Cleaning of Stainless Steel ......................... 14
Before You Call ...............................................................15
Notes ...................................................................................16
Protection Agreements ..................................................... 17
Sears Service ......................................................................18
Warranty ............................................................................. 2
IMPORTANT SAFETY INSTRUCTIONS ....................... 3-4
Serial Plate Location ..........................................................4
Product Record ....................................................................4
Cooktop Features................................................................ 5
Surface Cooking ................................................................. 6
Setting Surface Controls .............................................. 7-14
General Cooktop Information ................................... 7-9
Operating the Single Radiant Surface Elements ...... 10
Operating the Triple Surface Elements ....................... 11
Sabbath Feature Mode .................................................12
Kenmore Elite Warranty
When installed, operated and maintained according to all instructions supplied with the product, if this appliance fails
due to a defect in material and workmanship within one year from the date of purchase, call 1-800-4-MY-HOME®
to arrange for free repair.
This warranty applies for only 90 days from the date of purchase if this appliance is ever used for other than private
family purposes.
This warranty covers only defects in material and workmanship. Sears will NOT pay for:
1. Cracks in a ceramic glass cooktop that are not a result of thermal shock.
2. Stains and scratches on a ceramic glass cooktop resulting from accident or improper operation or
maintenance.
3. Expendable items that can wear out from normal use, including but not limited to filters, belts, light bulbs,
and bags.
4. A service technician to instruct the user in correct product installation, operation or maintenance.
5. A service technician to clean or maintain this product.
6. Damage to or failure of this product if it is not installed, operated or maintained according to the all
instructions supplied with the product.
7. Damage to or failure of this product resulting from accident, abuse, misuse or use for other than its intended
purpose.
8. Damage to or failure of this product caused by the use of detergents, cleaners, chemicals or utensils other
than those recommended in all instructions supplied with the product.
9. Damage to or failure of parts or systems resulting from unauthorized modifications made to this product.
Disclaimer of implied warranties; limitation of remedies
Customer’s sole and exclusive remedy under this limited warranty shall be product repair as provided herein.
Implied warranties, including warranties of merchantability or fitness for a particular purpose, are limited to one
year or the shortest period allowed by law. Sears shall not be liable for incidental or consequential damages.
Some states and provinces do not allow the exclusion or limitation of incidental or consequential damages, or
limitation on the duration of implied warranties of merchantability or fitness, so these exclusions or limitations
may not apply to you.
This warranty applies only while this appliance is used in the United States or Canada.
This warranty gives you specific legal rights, and you may also have other rights which vary from state to state.
Sears Brands Management Corporation, Hoffman Estates, IL 60179
Sears Canada Inc., Toronto, Ontario, Canada M5B 2B8
Printed in China
2
IMPORTANT SAFETY INSTRUCTIONS
Read all instructions before using this appliance. Save these instructions for future reference.
This manual contains important safety symbols and instructions. Please pay attention to these symbols
and follow all instructions given.
This symbol will help alert you to situations that may cause serious bodily harm, death
or property damage.
This symbol will help alert you to situations that may cause bodily injury or property damage.
• Remove all tape and packaging before using
• DO NOT TOUCH SURFACE UNITS OR AREAS
the appliance. Destroy the carton and plastic
NEAR THESE SURFACES. Surface units may be
bags after unpacking the appliance. Never
hot even though they are dark in color. Areas
allow children to play with packaging material.
near surface units may become hot enough to
Do not remove the model/serial plate attached
cause burns. During and after use, do not touch,
to the cooktop.
or let clothing or other flammable materials
touch these areas until they have had sufficient
• Proper Installation. Be sure your appliance is
time
to cool. Among these areas are the cooktop
properly installed and grounded by a qualified
and areas facing the cooktop.
technician in accordance with National
• Wear Proper Apparel. Loose-fitting or hanging
Electrical Code ANSI/NFPA No.70-latest
garments should never be worn while using
edition and local code requirements. Install
the appliance. Do not let clothing or other
only per installation instructions provided in the
flammable materials contact hot surfaces.
literature package for this appliance.
• In case of an emergency, know how to
Never use your appliance for
disconnect the electrical power to the
warming or heating the room.
appliance at the circuit breaker or fuse box.
• Do Not Use Water or Flour on Grease Fires.
• User Servicing—Do not repair or replace
Smother the fire with a pan lid, or use baking
any part of the appliance unless specifically
soda, a dry chemical or foam-type extinguisher.
recommended in the manuals. All other servicing • When heating fat or grease, watch it closely.
should be done only by a qualified technician to
Fat or grease may catch fire if allowed to
reduce the risk of personal injury and damage
become too hot.
to the cooktop. Sears Parts & Repair is the
• Use Only Dry Potholders. Moist or damp
recommended repair service for this appliance.
potholders on hot surfaces may result in burns
• Never modify or alter the construction of an
from steam. Do not let the potholders touch
appliance by removing panels, wire covers or
hot heating surface units. Do not use a towel or
any other part of the product.
other bulky cloth instead of a potholder.
Stepping or leaning on this
• Do Not Heat Unopened Food Containers.
cooktop can result in serious injuries and may
Buildup of pressure may cause the container
also cause damage to the cooktop. Do not allow
to burst and result in injury.
children to climb or play around the cooktop.
IMPORTANT. Do not attempt to operate the
• Storage on Appliance. Flammable materials
cooktop during a power failure. If the power
should not be stored near surface units. This
fails, always turn off the cooktop. If the cooktop
includes paper, plastic and cloth items, such
is not turned off and the power resumes, the
as cookbooks, plasticware and towels, as well
cooktop will begin to operate again. Food left
as flammable liquids. Do not store explosives,
unattended could catch fire or spoil.
such as aerosol cans, on or near the appliance. IMPORTANT INSTRUCTIONS FOR USING
Flammable materials may explode and result in YOUR COOKTOP
fire or property damage.
• Know which touch pad controls each surface unit.
Do not store items of interest to
• Clean the appliance regularly to keep all parts
children in the cabinets above the appliance.
free of grease that could catch fire. Exhaust fan
• Do not leave children alone. Children should
ventilation hoods and grease filters should be
not be left alone or unattended in the area
kept clean. Do not allow grease to accumulate
where an appliance is in use. They should
on hood or filter. Greasy deposits in the fan
never be allowed to sit or stand on any part of
could catch fire. When flaming food under the
the appliance.
hood, turn fan on. Refer to hood manufacturer’s
3 instructions for cleaning.
IMPORTANT SAFETY INSTRUCTIONS
Use Proper Pan Size. This
appliance is equipped with one or more surface
units of different sizes. Select utensils having
flat bottoms large enough to cover the surface
unit. The use of undersized utensils will expose
a portion of the surface heating unit to direct
contact and may result in ignition of clothing.
Proper relationship of utensil to the surface unit
will also improve efficiency.
• Utensil Handles Should Be Turned Inward
from Edges of Cooktop and Should Not Extend
Over Adjacent Surface Units. To reduce the risk
of burns, ignition of flammable materials, and
spillage due to unintentional contact with the
utensil.
• Never Leave Surface Units Unattended at a
Hi Heat Settings. Boilovers cause smoking and
greasy spillovers that may ignite, or a pan that
has boiled dry may melt.
• Protective Liners. Do not use aluminum foil to line
any part of the appliance. Only use aluminum
foil as recommended for baking if used as a
cover placed on the food. Any other use of
protective liners or aluminum foil may result in a
risk of electric shock or fire or short circuit.
• Glazed Cooking Utensils. Only certain types
of glass, glass/ceramic, ceramic, earthenware,
or other glazed utensils are suitable for range
top service without breaking due to the sudden
change in temperature. Check the manufacturer’s
recommendations for cooktop use.
• Ventilating hood. The ventilating hood above
your cooking surface should be cleaned
frequently, so the grease from cooking vapors
does not accumulate on the hood or filter.
• Do Not Use Decorative Surface Element
Covers. If an element is accidentally turned
on, the decorative cover will become hot and
possibly melt. Burns will occur if the hot covers
are touched. Damage may also be done to the
appliance.
• Do Not Clean or Operate a Broken Cooktop.
If cooktop should break, cleaning solutions and
spillovers may penetrate the broken cooktop
and create a risk of electric shock. Contact a
qualified technician immediately.
• Clean Cooktop with Caution. If a wet sponge
or cloth is used to wipe spills on a hot cooking
area, be careful to avoid a steam burn. Some
cleaners can produce harmful fumes if applied
to a hot surface.
• Do Not Place Hot Cookware on Cold Cooktop
Glass. This could cause glass to break.
• Do not slide pans across the cooktop surface.
They may scratch the cooktop surface.
• Do not let pans boil dry. Pans that boil dry
may permanently damage the cooktop by
breaking, fusing to, or marking it. (This type of
damage is not covered by your warranty).
Product Record
Serial Plate Location
In this space below, record the date of purchase, model and
serial number of your product. You will find the model and
serial number printed on the serial plate. This serial plate is
located under the cooktop. See bottom of this page for the
serial plate location.
You will find the model and serial number printed on the
serial plate. The serial plate is located under the cooktop.
IMPORTANT SAFETY NOTICE
The California Safe Drinking Water and Toxic
Enforcement Act requires the Governor of
California to publish a list of substances known
to the state to cause cancer, birth defects or
other productive harm, and requires businesses
to warn customers of potential exposure to such
substances.
Please see the illustration for exact location. Remember to
record the serial number for future reference (See Product
Record above).
Model No. 790.
______________________________________
Serial No. _______________________________________
Date of purchase ________________________________
Save these instructions and your sales receipt for future
reference.
4
Serial plate is
located under the
burner box.
Cooktop Features
READ THESE INSTRUCTIONS CAREFULLY BEFORE USING THE COOKTOP
The Cooking Zones may appear to be cool while turned ON and after they have been turned OFF. The glass
surface may be HOT form residual heat transferred from the cookware and burns may occur.
1.
2.
3.
4.
5.
6.
7.
8.
9.
10.
11.
12.
13.
14.
15.
16.
17.
18.
19.
20.
21.
22.
23.
Left Rear Single Radiant Element
Center Rear Single Radiant Element
Right Rear Single Radiant Element
Left Front Turbo Boil Flex Radiant Element
Right Front Triple radiant Element
Right Rear Single Element Control Pads
Center Rear Single Element Control Pads
Left Rear Single Element Control Pads
Left Front Turbo Boil Flex Control Pads
Right Front Triple Element Control Pads
Main Cooktop Controls
2
1
6
3
7
8
9
Cooktop Power Key Pad
Cooktop Power Indicator Light
Warm & Hold Setting Key Pad
Controls Lock Key Pad
Controls Lockout Indicator Light
Minute Timer Setting Key Pads
Minute Timer Display (displays up
to 99 min.)
Element On/Off Key Pad
Element Size Key Pad
(Triple element only)
Element Size Indicator Light
(Triple elements only)
Increase and Decrease Key pads
(for each element)
Element Power Level Display
(for each element)
10
5
4
11
Fig. 1 - 30” Model
6
1
3
2
7
8
9
10
5
4
11
Fig. 2 - 36” Model
21
16
22
18
15
23
22
23
14
17
19
12
13
11 Main Cooktop Controls
678&9
Single Element Controls
5
19
10 Triple Element Control
20
Surface Cooking
CORRECT
INCORRECT
Use Proper Cookware
Cookware should have
flat bottoms that make
good contact with the
entire surface heating
element. Check for
flatness by rotating a
ruler across the bottom
of the cookware (See
Fig. 1). Be sure to follow
the recommendations for
using cookware as shown
to the right.
• Curved and warped pan bottoms.
Fig. 1
Note: The size and type of cookware used will
influence the setting needed for best cooking
results.
• Flat bottom and straight sides.
• Tight fitting lids.
• Weight of handle does not tilt
pan. Pan is well balanced.
• Pan sizes match the amount of
food to be prepared and the
size of the surface element.
• Made of material that
conducts heat well.
• Easy to clean.
• Always match pan diameter to
element surface diameter.
• Pan overhangs unit by more than
one-half inch.
• Pan is smaller than the element.
• Heavy handle tilts the pan.
Using Woks
For ceramic glass cooktop
models, use only flat bottomed
woks (without support rings).
DO NOT use a wok if it is
equipped with a metal ring that extends
beyond the surface element. Because this
ring traps heat, the surface element and
cooktop surface could be damaged.
Wire trivets: Do not use wire trivets.
Cookware bottoms must be in direct
contact with the surface cooking areas.
6
DO NOT use two
surface cooking areas, if your
appliance is not equipped with a
bridge element, to heat one large pan
such as a roaster or griddle. DO NOT
allow cooking utensils to boil dry. Either
of these situations could damage the
glass ceramic cooktop.
Setting Surface Controls
General Cooktop Information
About the Ceramic Glass Cooktop
The ceramic cooktop has radiant surface elements
located below the surface of the glass. The design of the
ceramic cooktop outlines the area of the surface element
underneath. Make sure the diameter of the pan matches the
diameter of the element outline on the cooktop.
Heat is transferred up through the surface of the cooktop
to the cookware. Only flat-bottom cookware should be
used. The type and size of cookware, the number of surface
elements in use and their settings, are all factors that will
affect the amount of heat that will spread to areas beyond
the surface elements. The areas surrounding the elements
may become hot enough to cause burns.
30" Cooktop - Location of the
Radiant Surface Elements and Controls
Fig. 1
About the Radiant Surface Elements
The element temperature rises gradually and evenly. As the
temperature rises, the element will glow red. To maintain
the selected setting, the element will cycle on and off. The
heating element retains enough heat to provide a uniform
and consistent heat during the off cycle. For energy efficient
cooking, turn off the element several minutes before cooking
is complete. This will allow residual heat to complete the
cooking process.
Locations of the Radiant Surface Elements and
Controls
36" Cooktop - Location of the
Radiant Surface Elements and Controls
Fig. 2
Your cooktop is equipped with radiant surface elements with
different wattage ratings. The ability to heat food quicker
and in larger volumes increases as the element wattage
increases.
NOTE: Please read detailed instructions for ceramic
glass cooktop cleaning in the General Care & Cleaning
section and Before You Call checklist section of this Use
and Care Guide.
The radiant surface elements are located on the 30"
cooktop as follows (See Fig. 1):
• Three small 6 inch radiant elements located at the right,
center and left rear positions.
• One Triple 12 inch radiant element located at the right
front position.
• One large 9 inch Turbo Boil Flex radiant element located
at the left front position.
NOTE: Radiant elements have a limiter that allows the
element to cycle on and off to maintain consistent heat
even at the HI setting. This helps to prevent damage to
the ceramic cooktop. Cycling is normal and will occur
even more often if the cookware is too small for the
radiant element or if the cookware bottom is not flat
(For information concerning cookware, refer to Use
Proper Cookware on page 6 of this Use and Care
Guide)
The radiant surface elements are located on the 36" cooktop
as follows (See Fig. 2):
• Two small 6 inch radiant elements located at the right
and left rear positions.
• One 7 inch radiant element located at the center rear
positions.
• One large 9 inch Turbo Boil Flex radiant element located
at the left front position.
• One Triple 12 inch radiant element located at the right
front position.
NOTE: (White glass cooktops only). Due to the high intensity
of heat generated by the surface elements, the glass
surface will turn green when the element is turned off. This
phenomenon is normal and the glass will come back to its
original white color after it has completely cooled down.
7
Setting Surface Controls (cont’d)
Using the Touch Control
Be sure that your finger is placed in the center of the touch pad. If the finger is not placed
on the center of a pad, the cooktop may not respond to the selection made.
Lightly contact the pad with the flat part of your entire fingertip. Do not just use the narrow
end of your fingertip.
LED Messages or Light Indicators Displayed by Main Control
CONTROLS LOCK- This feature allows the cooktop to be locked when no cooking zones are
active. If the cooktop is in use, it will not be possible to lock the controls. Touch and hold
the LOCK key pad for few seconds. A beep will sound and the Lock indicator light will glow
(Fig. 2). Once locked no Cooking Zones will activate. To turn the Controls Lock OFF, touch
and hold the LOCK key pad for few seconds. A beep will sound, the Lock indicator light will
turn OFF (Fig. 1) and the cooktop may be used normally.
COOKTOP POWER - The Cooktop POWER key pad activates the entire Cooktop. To power
the cooktop, touch and hold the POWER key pad. A beep will sound and the Power LED will
glow (See Fig. 4). The cooktop will be in a ready mode. If no other key pads are touched the
Cooktop Main POWER will turn OFF automatically. To turn the Main Power OFF, touch and
hold the Main POWER key pad. A beep will sound and the Power Indicator Light will turn
OFF (See Fig. 3).
Fig. 1
Fig. 2
Fig. 3
Fig. 4
Fig. 5
Fig. 6
ERROR CODES E0 XX- The element power level displays can show error codes. When this happen, two displays are used
to show the error code in format "E0" "XX" where XX indicates the error code (Figs. 5 & 6). If this happen, please refer to
section "Before you call" in this manual.
LED Messages or Light Indicators Displayed by Cooking Element Controls
COOKING ZONE ON/OFF PAD- Each Cooking Element has separate ON/OFF key pads. Once the Main Power key pad
has been touched to activate the cooktop, touch the corresponding Cooking Element ON/OFF key pad once to active the
Cooking Zone needed. "- -" will appear in the LED display. If the corresponding (increase) / (decrease) key pad is
not touched, the request to turn the Cooking Element ON will cancel and the Cooktop Main Power will turn OFF. To set a
Cooking Element power level touch the corresponding Cooking Element (increase) or (decrease) key pad once. To turn
OFF a Cooking Element, touch the Cooking Element ON/OFF key pad once. The Cooking Element Indicator Light will turn
OFF.
8
Setting Surface Controls (cont’d)
The Electronic Surface Element Control (ESEC)
The Electronic Surface Element Control (ESEC) feature provides a digital display of
the radiant surface elements on the cooktop. The ESEC display in combination with
the touch pads is designed to replace conventional control knobs.
Fig. 1
Fig. 2
Fig. 3
Fig. 4
After using any of the radiant element positions the cooktop will become very hot.
After turning any of these elements OFF, the cooktop will remain HOT for some time.
"HE" (hot element) will appear in the element power level display while the element
is still hot. The HE indicator (See Fig. 7) will remain in the display until the element
has cooled sufficiently.
Fig. 5
Fig. 6
Recommended Surface Cooking Settings
Fig. 7
Fig. 8
The available ESEC Window Display Settings
The ESEC control will display heat levels ranging from Hi (Fig. 1) to Lo (Fig. 6) and
OFF (Fig. 8). The settings between 9.5(Fig. 2) and 3.0 (Fig. 3) decrease or increase
in increments of .5. The settings between 3.0 (Figure 3) and 1.2 (Fig. 5) are Simmer
settings which decrease or increase in increments of .2 to Lo (Fig. 6, lowest Simmer
setting) for more precise settings at lower heat levels. Use the Recommended
Surface Setting Chart to determine the correct setting for the kind of food you are
preparing.
Hot Surface Indicators
Recommended Settings for Single & Triple Surface Elements
Setting
Type of Cooking
HIGH (8.0 - Hi)
Start most foods, bring water to a boil or pan broiling.
MEDIUM HIGH (5.0 - 8.0)
Continue a rapid boil, fry, deep fat fry.
MEDIUM (3.0 - 5.0)
Maintain a slow boil, thicken sauces and gravies, steam vegetables.
MEDIUM LOW (2.0 - 4.0)
Keep foods cooking, poach, stew (2.8 or lower is a simmer setting).
LOW/SIMMER (Lo - 2.0)
Keep warm, melt, simmer (2.8 or lower is a simmer setting).
Note: The size and type of cookware used will influence the setting needed for best cooking results.
The Simmer settings are used to simmer and keep larger quantities of foods warm such as stews and
soups. The lower Simmer settings are ideal for delicate foods and melting chocolate or butter.
9
Setting Surface Controls (cont’d)
Operating Single Radiant Surface Elements
The cooktop has 4 SINGLE radiant surface elements: the RIGHT REAR, LEFT REAR, CENTER REAR and the LEFT FRONT
positions (Fig. 1 & 2).
To Operate the Single Radiant Surface Elements:
1. Place correctly sized cookware on the radiant surface element.
2. Touch and hold the
key pad until a beep sounds. The power indicator light will turn ON.
Note: If no key pad is touched within 10 seconds the request to Power ON the cooktop will
clear.
3. Touch the
pad for the desired element position until a beep is heard. The display will
show "--". Note: If no further pads are touched within 10 seconds the request to power the
element ON will clear.
4. Touch pad once to turn ON the power level to HI (See Fig. 3). Touch pad
once for Lo.
5. Each touch of the or pad will decrease or increase the power level from
9.5 through 3.0 by .5 increments. Simmer power levels between 3.0 and 1.2 will
decrease or increase by .2 increments. Lo is the lowest power level available. Note:
The power level may be adjusted at any time while the element is ON.
6. Start most cooking operations on a higher setting and then turn to a lower setting
to finish cooking. Each surface element provides a constant amount of heat at
each setting. A glowing red surface heating area extending beyond the bottom
edge of the cookware indicates the cookware is too small for the surface heating
area.
7.
Fig. 1 - 30” Model
Fig. 2 - 36” Model
pad once to turn the element
When cooking has been completed touch the
OFF and if no other surface element is used touch the
key pad to turn off the
cooktop.
Note: The HE (hot element) message will remain ON if the cooktop is still hot and
will remain ON until the heating surface area has cooled sufficiently.
Fig. 3
Radiant surface elements may appear to have cooled after they have been turned off. The glass surface may
still be hot and burns may occur if the glass surface is touched before it has cooled sufficiently.
Do not place plastic items such as salt and pepper shakers, spoon holders or plastic wrappings on top of the
range when it is in use. These items could melt or ignite. Potholders, towels or wooden spoons could catch fire if placed too
close to the surface elements.
Do not allow aluminum foil, or ANY material that can melt to make contact with the ceramic glass
cooktop. If these items melt on the cooktop they will damage the ceramic cooktop.
10
Setting Surface Controls (cont’d)
Operating the Triple Surface Element
The cooktop is equipped with a Triple radiant
surface element located at the right front cooktop
position (Figures 1 & 2). Indicator lights on the
control panel at that position are used to indicate
what portions of the Triple radiant element will heat.
The light indicates that only the inner element
will heat. The light indicates that both inner and
double elements will heat together. The
light
indicates that all 3 portions of the element will
heat. You may switch between all of these different
settings at any time during cooking.
To Operate the Triple Surface Element:
Fig. 1 - 30” Model
Fig. 3
Fig. 2 - 36” Model
Fig. 4
Fig. 5
1. Place correctly sized cookware on the radiant surface element.
2. Touch and hold the
key pad until a beep sounds. The
power indicator light will turn ON. Note: If no key pad is
touched within 10 seconds the request to Power ON the
cooktop will clear.
pad for the Triple element position until a beep
3. Touch the
is heard. The display will show "- -".
Note: If no further pads are touched within 10 seconds the
request to power the element ON will clear.
3 elements (See
4. Select the (See Fig. 3), (See Fig. 4) or
Fig. 6
Fig. 5) to heat by pressing the
pad once, twice or three
times (Figures 5 & 6 show indicator lights with ALL 3 elements selected).
5. Touch HI pad once to turn ON the power level to HI. Touch Lo pad once for Lo (See Fig. 6).
6. Each touch of the or Lo pad will decrease or increase the power level from 9.5 through 3.0 by .5 increments.
Simmer power levels between 3.0 and 1.2 will decrease or increase by .2 increments. Lo is the lowest power level
available. Note: The power level may be adjusted at any time while the element is ON.
7. Start most cooking operations on a higher setting and then turn to a lower setting to finish cooking. Each surface
element provides a constant amount of heat at each setting. A glowing red surface heating area extending beyond the
bottom edge of the cookware indicates the cookware is too small for the surface heating area.
8. When cooking has been completed touch the
pad once to turn the element OFF and if no other surface element is
key pad to turn off the cooktop.
used touch the
Note: The HE (hot element) message will remain ON if the cooktop is still hot and will remain ON until the heating
surface area has cooled sufficiently.
Radiant surface elements may appear to have cooled after they have been turned off. The glass surface may
still be hot and burns may occur if the glass surface is touched before it has cooled sufficiently.
Do not place plastic items such as salt and pepper shakers, spoon holders or plastic wrappings on top of the
range when it is in use. These items could melt or ignite. Potholders, towels or wooden spoons could catch fire if placed too
close to the surface elements.
Do not allow aluminum foil, or ANY material that can melt to make contact with the ceramic glass
cooktop. If these items melt on the cooktop they will damage the ceramic cooktop.
11
Setting Surface Controls (cont’d)
Sabbath Feature Mode
When the Sabbath feature is ON, the timer display show “Sb”and all electronic surface element control
displays show "HE". The surface elements can be used even if the Sabbath Feature is on.
To activate the Sabbath Feature Mode:
In order to enter Sabbath at least one radiant burner has to be active. The user has to activate the
(timer up slew) pad and the
(lock) pad at the same time for a few seconds. Timer display will show “Sb” and element
displays will show “HE”.
To modify a Surface Element power when the Sabbath Feature is active:
When necessary, it is possible to adjust the power of the surface element but you have to remember that the surface element
control will adjust the temperature with a 15-30 seconds delay. Note: No element size change is allowed during Sabbath. If
needed, it has to be changed prior to Sabbath entry.
To turn OFF the Surface Element when the Sabbath Feature is active:
To shut off the surface element while the Sabbath feature is ON, proceed as usual (press the
that the element will immediately turn off.
Note:
keys can be used to turn Off any element.
key will turn off all elements.
key pad) but take note
To deactivate the Sabbath Feature Mode:
Touch and hold
(timer up slew) pad and the
(lock) pad at the same time for a few seconds. "Sb" will disappear
from the timer display and “HE” will disappear from the element control displays except if it is still hot. The cooktop is now
in its normal operation mode.
If a power failure happens when Sabbath mode is active:
The unit wakes up in Ready mode with all displays lit. "SF" (Sabbath Failure) will be displayed on the timer display and “HE”
(timer up slew) pad and the
in the element displays. To get out of Sabbath mode after the power failure, press the
(lock) pad.
Warm & Hold Feature
The Warm & Hold feature may be used with any of the Cooking Elements.
To Turn the Warm & Hold Feature ON:
1. To select the Warm & Hold feature for any Cooking Element touch the
key pad for the corresponding Cooking
Element.
key pad located in the main control area. The associated display will show LH (low heat) indicating
2. Touch the
that the Cooking Element is properly set to Warm & Hold. If no other key pads are pressed the control will activate the
desired Cooking Element at the Warm & Hold setting.
Locking the controls
The Cooktop Controls can be locked in order to prevent the cooktop from accidentally being turned ON. This feature can be
activated only when no cooking zone is active. If the cooktop is in use, it will not be possible to lock the controls.
To Turn ON the Controls Lock Feature:
key pad. After a few seconds a beep will sound. The Lock Indicator Light above the
key pad will turn
Touch and hold the
ON indicating the cooktop is locked. This will keep any Cooking Element or Cooktop functions from being accidentally turned ON.
Note: If the cooktop is in used when the Control Lock Feature is activated, the command will be ignored.
To Turn OFF the Controls Lock Feature:
Touch and hold the
key pad. After a few seconds a beep will sound. The Lock Indicator Light above the
key pad
will turn OFF indicating the cooktop is unlocked. The Cooking Elements or any of the other Cooktop functions may now be
used.
12
Setting Surface Controls (cont’d)
Minute Timer
The Minute Timer feature may be useful in the kitchen if a recipe calls for keeping track of time. This feature will keep track
of time from 1 to 99 minutes. The Minute Timer Display located to the left of the Timer UP/DOWN arrow key pads will
begin to count down minutes once set.
To Set the Minute Timer:
1. Touch the located above TIMER. Touching and releasing the or the key pads will increase or decrease the
Minute Timer setting by 1 minute with each key press (up to 99 minutes).
2. Once the Minute Timer display shows the desired amount of time, release the UP or DOWN Arrow key pads to allow the
minute timer to begin the countdown. Once the Minute Timer reaches 00 the buzzer sounds for 3 seconds each minute
indicating that the time is up. To stop the control from beeping, touch the and key pads at the same time.
To Cancel the Minute Timer:
1. Touch the and key pads at the same time or touch and hold either the or key pad and scroll to 00.
2. If cancelling the Minute Timer using the scrolling method, once the Minute Timer display reaches 00, release the Arrow key pad.
3. The set time will disappear from the Minute Timer display indicating that the Minute Timer is no longer active.
General Care & Cleaning
Cleaning Various Parts of Your Cooktop
Before cleaning any part of the cooktop, be sure all controls are turned OFF and the cooktop is COOL. REMOVE SPILLOVERS
AND HEAVY SOILING AS SOON AS POSSIBLE. REGULAR CLEANINGS NOW WILL REDUCE THE DIFFICULTY AND EXTENT
OF A MAJOR CLEANING LATER.
Surfaces
How to Clean
Aluminum (Trim Pieces)
Painted and Plastic
Control Knobs, Body Parts, and
Decorative Trim
Use hot, soapy water and a cloth or paper towel. Dry with a clean cloth.
For general cleaning, use hot soapy water and a cloth. For more difficult soils and builtup grease, apply a liquid detergent directly onto the soil. Leave on soil for 30 to 60
minutes. Rinse with a damp cloth and dry. DO NOT use abrasive cleaners on any of these
materials; they can scratch or dull the finish.
Clean with hot, soapy water and a dishcloth. Rinse with clean water and cloth. Do not
use cleaners with high concentrations of chlorides or chlorines. Do not use harsh scrubbing cleaners. Only use kitchen cleaners that are especially made for cleaning stainless
steel. Always be sure to rinse the cleaners off from the surface as bluish stains may occur
during heating that cannot be removed.
See Ceramic Glass Cooktop Cleaning & Maintenance in this Use & Care Guide.
Stainless Steel, Chrome parts
Decorative Trim Cooktop
Ceramic Glass
Cooktop
Ceramic Glass Cooktop Cleaning & Maintenance
Consistent and proper cleaning is essential to maintaining your Ceramic glass cooktop
Prior to using your cooktop for the first time, apply the recommended CookTop® Cleaning Creme to the ceramic surface (on
the web visit www.sears.com for replacement cooktop cleaner, item number 40079). Buff with a non-abrasive cloth or noscratch cleaning pad. This will make cleaning easier when soiled from cooking. The
special cooktop cleaning cream leaves a protective finish on the glass to help prevent
scratches and abrasions.
Sliding aluminum or copper clad bottom pans on the cooktop can cause metal
markings on the cooktop surface. These marks should be removed immediately after
the cooktop has cooled using the cooktop cleaning cream. Metal marks can become
permanent if not removed prior to future use.
Cookware (cast iron, metal, ceramic or glass) with rough bottoms can mark or scratch
the cooktop surface. Do not slide anything metal or glass across the cooktop. Do
not use your cooktop as a cutting board or work surface in the kitchen. Do not cook
foods directly on the cooktop surface without a pan. Do not drop heavy or hard
objects on the glass cooktop, because they may cause it to crack.
13
General Care & Cleaning
Cleaning Recommendations for the Ceramic Glass Cooktop
Before cleaning the cooktop, be sure the controls are turned to OFF and the cooktop is COOL.
DO NOT use a cooktop cleaner on a hot cooktop. The fumes can be hazardous to your health, and can
chemically damage the ceramic glass surface.
For light to moderate soil:
Apply a few drops of CookTop® Cleaning Creme directly to the cooktop. Use a paper towel or use a non-abrasive plastic
type no-scratch pad to clean the entire cooktop surface. Make sure the cooktop is cleaned thoroughly, leaving no residue.
For heavy, burned on soil:
Apply a few drops of CookTop® Cleaning Creme directly to the soiled area. Rub the soiled area using a non-abrasive
plastic type no-scratch pad, applying pressure as needed. Do not use the pad you use to clean the cooktop for any other
purpose.
If soils remain, carefully scrape soils with a metal razor blade scraper, holding
scraper at a 30 degree angle to the surface. Reapply CookTop® Cleaning
Creme and buff surface clean.
IMPORTANT NOTE: Damage to the ceramic glass cooktop may occur if you
use an abrasive type scratch pad. Only use cleaning products that have been
specifically designed for ceramic glass cooktop.
Plastic or foods with a high sugar content:
These types of soils need be removed immediately if spilled or melted onto the ceramic cooktop surface. Permanent
damage (such as pitting of the cooktop surface) may occur if not removed immediately. After turning the surface elements
OFF, use a razor blade scraper or a metal spatula with a mitt and scrape the soil from the hot surface (as illustrated). Allow
the cooktop to cool, and use the same method for heavy or burned on soils.
Do not use the following on the ceramic glass cooktop:
• Do not use abrasive cleaners and scouring pads, such as metal and
some nylon pads. They may scratch the cooktop, making it more
difficult to clean.
• Do not use harsh cleaners, such as chlorine bleach, ammonia or oven
cleaners, as they may etch or discolor the cooktop.
• Do not use dirty sponges, cloths or paper towels, as they can leave soil
or lint on the cooktop which can burn and cause discoloration.
Special Caution for Aluminum Foil and Aluminum Cooking Utensils
• Aluminum foil
Use of aluminum foil will damage the cooktop. Do not use under any
circumstances.
• Aluminum utensils
Since the melting point of aluminum is much lower than that of other
metals, care must be taken when aluminum pots or pans are used. Pans
that boil dry may permanently damage cooktop by breaking, fusing to,
or marking it.
Care and Cleaning of Stainless Steel (some models)
Some models are equipped with stainless steel exterior parts. Special care and cleaning are required for maintaining the
appearance of stainless parts. Refer to the General Care & Cleaning table for detailed cleaning instructions.
14
Before You Call
OCCURRENCE
POSSIBLE CAUSE/SOLUTION
Entire cooktop does not operate.
House fuse has blown or circuit breaker has tripped. Check/reset breaker or replace
fuse. If the problem is a circuit overload, have this situation corrected by a qualified
electrician.
Wiring connection is not complete. Call 1-800-4-MY-HOME® for service (see back
cover).
Power outage. Check house lights to be sure. Call your local electric company for
service.
Mechanical interference with control panel touch pads. Make sure nothing rest on the
control panel. Clean cooktop surface is required. Call 1-800-4-MY-HOME® for service
(see back cover).
Error code is shown
Surface element does not heat.
Surface element too hot or not
hot enough.
Food not heating evenly.
Scratches or abrasions on
Ceramic glass cooktop surface.
Metal marks on Ceramic glass
cooktop surface.
Brown streaks and specks on
Ceramic glass cooktop surface.
Areas of discoloration on
Ceramic glass cooktop surface.
No power to the appliance. Check steps under "Entire Cooktop Does Not Operate" in
this Before You Call checklist.
Too low heat setting. Turn control to a slightly higher setting until element comes on.
Incorrect control is on. Be sure to use correct control for the element to be used.
Incorrect control setting. Raise or lower setting until proper amount of heat is obtained.
Dial markings are an indicator of relative heat settings and will vary slightly.
Voltage is incorrect. Be sure appliance is properly connected to the specified power
source. If you are not sure about this requirement call 1-800-4-MY-HOME® for service
(see back cover).
Lightweight or warped pans were used. Be sure to use proper cookware. Use only
flat bottom, evenly balanced medium or heavyweight cookware. Heavy and medium
weight pans heat evenly. Because lightweight pans heat unevenly, foods may burn
easily.
Lightweight or warped pans were used. Be sure to use proper cookware. Use only
flat bottom, evenly balanced medium or heavyweight cookware. Heavy and medium
weight pans heat evenly. Because lightweight pans heat unevenly, foods may burn
easily.
Incorrect control setting. Raise or lower setting until proper amount of heat is obtained.
Coarse particles such as salt or sand between cooktop and utensils can cause
scratches. Be sure cooktop surface and bottoms of utensils are clean before usage.
Small scratches do not affect cooking and will become less visible with time.
Cleaning materials not recommended for ceramic-glass cooktop have been used. See
Ceramic Glass Cooktop Cleaning & Maintenance in this Use and Care Guide.
Cookware with rough bottom has been used. Use smooth, flat-bottomed cookware.
Sliding or scraping of metal utensils on cooktop surface. Do not slide metal utensils on
cooktop surface. Use a ceramic-glass cooktop cleaning cream to remove the marks.
See Ceramic Glass Cooktop Cleaning & Maintenance in this Use and Care Guide.
Boilovers have cooked onto surface. Use razor blade scraper to remove soil. See
Ceramic Glass Cooktop Cleaning & Maintenance in this Use and Care Guide.
Cleaning materials not recommended for ceramic-glass cooktop have been used. Use
recommended cleaners and cleaning method. See Ceramic Glass Cooktop Cleaning &
Maintenance in this Use and Care Guide.
Mineral deposits from water and food. Remove using a ceramic-glass cooktop cleaning
creme. To avoid this occurrence use cookware with clean, dry bottoms.
15
Notes
16
MASTER PROTECTION AGREEMENTS
Congratulations on making a smart purchase. Your new Kenmore® product is designed and manufactured for years of
dependable operation. But like all products, it may require preventive maintenance or repair from time to time. That’s when
having a Master Protection Agreement can save you money and aggravation.
The Master Protection Agreement also helps extend the life of your new product. Here’s what the Agreement* includes:
;Parts and labor needed to help keep products operating properly under normal use, not just defects. Our coverage
goes well beyond the product warranty. No deductibles, no functional failure excluded from coverage – real
protection.
;Expert service by a force of more than 10,000 authorized Sears service technicians, which means someone you
can trust will be working on your product.
;Unlimited service calls and nationwide service, as often as you want us, whenever you want us.
;«No-lemon» guarantee – replacement of your covered product if four or more product failures occur within twelve
months.
;Product replacement if your covered product can’t be fixed.
;Annual Preventive Maintenance Check at your request – no extra charge.
;Fast help by phone – we call it Rapid Resolution – phone support from a Sears representative on all products.
Think of us as a «talking owner’s manual».
;Power surge protection against electrical damage due to power fluctuations.
;$250 Food Loss Protection annually for any food spoilage that is the result of mechanical failure of any covered
refrigerator or freezer.
;Rental reimbursement if repair of your covered product takes longer than promised.
;25% discount off the regular price of any non-covered repair service and related installed parts.
Once you purchase the Agreement, a simple phone call is all that it takes for you to schedule service. You can call anytime
day or night, or schedule a service appointment online.
The Master Protection Agreement is a risk free purchase. If you cancel for any reason during the product warranty period,
we will provide a full refund. Or, a prorated refund anytime after the product warranty period expires. Purchase your Master
Protection Agreement today!
Some limitations and exclusions apply. For prices and additional information in the U.S.A. call 1-800-827-6655.
* Coverage in Canada varies on some items. For full details call Sears Canada at 1-800-361-6665.
Sears Installation Service
For Sears professional installation of home appliances, garage door openers, water heaters, and other major home items,
in the U.S.A. or Canada call 1-800-4-MY-HOME®.
17
18