1
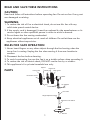
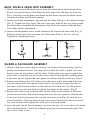
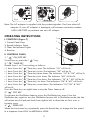
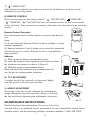
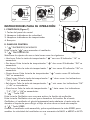
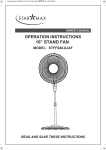
Use & Care Guide
Manual de Uso y Cuidado
English/Español
Kenmore
DC Motor Stand Fan
®
3 Speeds, Oscillation Switch
DC Motor Stand Fan
3 Velocidades, Oscilación Interruptor
Model/Modelo: 405.34012310
Customer Assistance /Asistencia al Cliente
1-855-438-7899
Sears Brands Management Corporation
Hoffman Estates, IL 60179 U.S.A.
www.kenmore.com
www.sears.com
www.kmart.com
®
READ AND SAVE THESE INSTRUCTIONS
CAUTION
Read and follow all instructions before operating fan. Do not use fan if any part
are damaged or missing.
WARNING
1. To reduce the risk of fire or electrical shock, do not use this fan with any
solid-state speed control device.
2. If the supply cord is damaged, it must be replaced by the manufacturer or its
service agent or other qualified person in order to avoid a hazard.
3. Do not leave the fan running unattended.
4. Keep electrical appliances out of reach of children. Do not let them use the
appliances without supervision.
RULES FOR SAFE OPERATION
1. Never insert fingers or any other objects through the fan housing when the
tower fan is running. Unplug the fan when moving it from one location to
another.
2. Disconnect the fan before cleaning.
3. To avoid overturning, be sure the fan is on a stable surface when operating it.
4. To reduce the risk of electric shock, DO NOT use the fan by a window.
5. This appliance is for private household use only.
PARTS
Spinner
Front guard
Plastic nut
Blade set
Rear guard
Decorative Cover
Motor
Ring
Control Panel
AC Adapter
Screw
Inner Pole
Height Adjustment Ring
Extension Pole Stand
Base
1
Screw
BASE, POLES & HEAD UNIT ASSEMBLY
1. Uncrew and remove the three screws from the underside of the Extension Pole
Stand. Insert the bottom of the Extension Pole Stand into the Base as shown in
Fig.1. Carrfully turn the Base and Stand upside down and use the three screws
to attach the Base and Stand together.
2. Loosen the height adjustment ring and pull the Inner Pole up to the desired height
(Fig. 2). Tighten the ring. Note: The Inner Pole may slide all the way down inside
the stand when loosening the adjustment ring. Invert the stand so that the Inner
Pole slides out for adjustment.
3. Loosen the attachment screw at the bottom of the Head Unit back side (Fig. 3).
Slide the Head Unit down onto the top of the Inner Pole as far as it will go.
Tighten the attachment screw.
Fig.1
F ig.2
Fig.3
Head unit
Loosen
GUARD & FAN BLADE ASSEMBLY
Attachment screw
1. Unscrew and remove the spinner clockwise (or obtain from parts bag), and the
plastic nut counterclockwise. You may have to hold the shaft in place with one
hand to unscrew the spinner with the other. Position the rear guard against the
motor face so that the two pins on the motor face fit through the matching holes
in the rear guard. Tighten the rear guard into place with the plastic nut. (Fig.4)
2. Remove and discard the PVC sleeve from the motor shaft. Mount the blade set
onto the motor shaft through the center hole in the blade set. Insert the pin on
the motor shaft into the notches on the back of the blade set. Turn the spinner
counterclockwise onto the shaft to tighten the blade set into place. (Fig.5)
3. Remove the small screw from the clear plastic clasp on the bottom of the front
guard and set aside. Place the front guard over the rear guard so that the tab
at the top of the front guard fits over the rear guard rim (Fig. 6). Push the two
guards together. Close the clasp at the front guard bottom over the rear guard
rim, and re-insert and tighten the small screw removed earlier.
4. Insert the jack end of the AC adapter cord into the port for it just above the Head
Unit attachment screw. Insert the adapter plug end into an electrical outlet. The
fan is now ready to use.
2
Fig.4
Fig.5
Fig.6
Blade Set
Note: The AC adapter is supplied with the product together. Don't use other AC
adapter. If your AC adapter is damaged, call customer assistance number:
1-855-438-7899 to purchase one new AC adaper.
OPERATING INSTRUCTIONS
I. CONTROLS (Figure 7)
1. Control Panel Keys
2. Speed Indicator Lights
3. Timer Set Indicator Lights
4. Receiver
3
II. CONTROLS PANEL
4
1
2
1. “
” ON/OFF KEY
To turn fan on, press the “
” key.
2. “
” TIMER KEY
Fig.7
Choose from 1 to 7 hour setting as follows:
• 1 hour: Press the “ ” Timer key once. The indicator “1H” will be lit.
• 1 hour: Press the “ ” Timer key twice. The indicator “2H” will be lit.
• 1 hour: Press the “ ” Timer key three times. The indicators “1H” & “2H” will be lit.
• 1 hour: Press the “ ” Timer key four times. The indicator “4H” will be lit.
• 1 hour: Press the “ ” Timer key five times. The indicators “1H” & “ 4H” will be lit.
• 1 hour: Press the “ ” Timer key six times. The indicators “2H” & “4H” will be lit.
• 1 hour: Press the “ ” Timer key seven times. The indicators “1H”,”2H” & “4H”
will be lit.
Press the Timer key an eighth time to turn the Timer feature off.
3.“
” OSC KEY
To activate the Oscillation feature, press the Oscillation key once. Press the
Oscillation key again to turn the Oscillation feature off. In Oscillation mode, the fan
will rotate slowly back and forth from right to left to direct the air flow over a
broader area.
4.“
” SPEED KEY
When the fan turned on, repeatedly press the Speed key to change the fan speed
in a sequence from LOW to MEDIUM to HIGH.
3
5.“
” DISPLAY KEY
After the fan has started, press this key to turn off all indicators, and turn on all
indicators by pressing again.
III. REMOTE CONTROL
There are four keys on the remote control. “ ” ON/OFF KEY, “ ” SPEED KEY,
“ ” TIMER KEY, “ ” OSC KEY.The keys correspond to those on the control panel
of the fan body. They operate by pressing in the same way described in the previous
section.
Remote Control Operation
Point the remote control at the receiver and press the desired
key.
Note:
(1) Do not leave the Remote Control in direct sunlight or it may
become damaged.
(2) Remove batteries if unit is going to be stored for extended
period beyond two weeks. Dispose of old or used batteries
appropriately.
Batteries
(1) Slide open the battery compartment cover.
(2) Insert the batteries (not supplied), and make sure that
the batteries are placed as shown in Figure 9.
(3) Slide the battery compartment closed.
Note: Alkaline AAA batteries are recommended for
use. Do not use rechargeable batteries.
IV. TILT ADJUSTMENT
To adjust the air flow upward or downward, lightly
push the guards in the desired direction.
Fig.8
Fig.9
V. HEIGHT ADJUSTMENT
The height of the fan can be adjusted by loosening the
height adjustment ring and carefully raising or lowering
the fan and firmly tightening the adjustment ring again.
MAINTENANCE INSTRUCTIONS
Fig.10
The fan requires little maintenance. Do not try to fix it by
yourself. Refer it to qualified service personnel if service is needed.To inquire about
possible repair, call the following customer assistance number: 1-855-438-7899.
4
1. Always make sure that the fan is unplugged from any electrical outlet before
cleaning or assembly.
2. To ensure adequate air circulation to the motor, keep vents at the rear of the motor
housing free of dust, fluff, etc. A vacuum cleaner should not be used to clean these
vents. Do not disassemble the fan to remove dust.
3. Wipe the exterior parts with a soft cloth soaking a mild detergent. Do not use any
abrasive detergent or solvents that could scratch the surface. Do not use any of the
following as a cleaner: gasoline or thinner.
4. Do not allow water or any other liquid into the motor housing or interior parts.
CLEANING
1. Be sure to unplug fan from the electrical supply source before cleaning.
2. Plastic parts should be cleaned with mild soap and damp cloth or sponge.
Thoroughly remove soap film with clean water.
3. Be sure not to allow water or other liquid to enter the inside of the motor.
PRINTED IN CHINA
5
LEA Y GUARDE ESTAS INSTRUCCIONES
ADVERTENCIA
Lea cuidadosamente y guarde estas instrucciones.
PRECAUCION
1. Para reducir el riesgo de descarga eléctrica, no use este ventilador junto con
un dispositivo de control de velocidad.
2. Si el cable de alimentación está dañado, el fabricante, su agente de servicio
u otra persona calificada deben reemplazarlo para evitar que se convierta
en un riesgo.
4. No deje el ventilador funcionando sin supervisión.
5. Mantenga todos los dispositivos eléctricos fuera del alcance de los niños. No
deje que un niño use este aparato sin supervisión adulta.
REGLAS DE OPERACION SEGURA
1. Nunca inserte sus dedos, lápices o cualquier otro objeto en el compartimiento
cuando el ventilador torre esta funcionando. Desconéctelo cuando vaya a
moverlo de un lugar a otro.
2. Desconecte el ventilador al limpiar.
3. Asegúrese que el ventilador esta en una superficie estable cuando funciona.
4. Para reducir el riesgo de descarga eléctrica o lesiones a personas, No utilice
en las ventanas.
5. Este aparato es solo para uso doméstico privado.
PARTES
Cubierta Decorativa
Anillo
Adaptador AC
Panel de Control
Soporte de Polo de Extensión
1
CONJUNTO DE BASE, POLOS Y UNIDAD DE CABEZA
1. Destornille y quite los tres tornillos de la parte inferior del Soporte de Polo de
Extensión. Inserte la parte inferior del Soporte del Polo de Extensión en la Base
como se demuestra en la figura 1. Y gire la Base y el Soporte desde arriba hacia
abajo cuidadosamente y utilice los tres tornillos para fijar la Base y el Soporte
juntamente.
2. Afloje el anillo de ajuste de altura y tire el Polo Interior arriba a la altura deseada
(Figura 2). Apriete el anillo. Nota: El Polo Interior puede deslizarse completamente
hacia abajo en el interior del soporte al aflojar el anillo de ajuste. Y Invierta el
soporte a fin de que el Polo Interior afuera para ajuste.
3. Afloje el tornillo de fijación en la parte inferior de la Unidad de Cabeza en el
lado posterior (Figura 3). Deslice la Unidad de Cabeza hacia abajo encima de la
parte superior del Polo Interior por lo más lejos posible. Entonces apriete el tornillo
de fijación.
Fig.1
F ig.2
Fig.3
Unidad de cabeza
Aflojar
Tornillo de fijación
CONJUNTO DE GUARDA Y HOJA DE VENTILADOR
1. Desatornille el spinner en el sentido horario y la tuerca en el sentido anti-horario
para quitar ambos Ponga la guardia trasera en la posición adecuada con el
tirador hacia arriba Atornille sobre la tuerca plástica fuerte para sujetar la
guardia trasera. (Fig. 4)
2. Instale la hoja en el eje hasta que ésta levante el alfiler de conserva Atornille el
spinner en el eje del motor en sentido anti-horario a la hoja. (Fig. 5)
3. Quite el pequeño tornillo del broche plástico transparente de la parte inferior de
la guardia delantera y lo coloque bien para la utilización. Coloque la guardia
delantera encima de la guardia trasera a fin de que la etiqueta de la parte
superior de la guardia delantera se ajuste encima del borde de guardia trasera
(Figura 6). Y empuje las dos guardias juntamente, inserte de nuevo y apriete el
tornillo pequeño quitado anteriormente.
4. Inserte el extremo de enchufe del cable del adaptador AC en el puerto justo
encima del tornillo de fijación de la Unidad de Cabeza. Inserte el enchufe del
adaptador en un tomacorriente eléctrico. Ahora el ventilador está listo a la
utilización.
Nota: El adaptador AC se proporciona con el producto juntamente. No utilice un otro
adaptador AC. Si el adaptador AC se daña, por favor llama al número de asistencia
al cliente: 1-855-438-7899 para comprar un nuevo adaptador AC.
2
Aguja
Apretar
Aguta
Apretar
Aflojar
Fig.4
Turerca
Plástica
Fig.5
Aspa
Ranura
Perno De
Retención
Fig.6
INSTRUCCIONES PARA SU OPERACIÓN
3
I. CONTROLES (Figura 7)
1. Teclas del panel de control
2. Lámapras indicadoras de velocidad
3. Lámparas indicadoras de temporizador
4. Receptor
1
2
4
II. PANEL DE CONTROL
1. “ ” ENCENDIDO/APAGADO
Pulse la tecla “ ” para encender el ventilador
Fig.7
2. “ ” TEMPORIZADOR
Seleccione los ajustes de una a siete horas como los siguientes:
• Una hora: Pulse la tecla de temporizador “ ” una vez. El indicador “1H” se
encenderá.
• Dos horas: Pulse la tecla de temporizador “ ” dos veces. El indicador “2H” se
encenderá.
• Tres horas: Pulse la tecla de temporizador “ ” tres veces. El indicador “3H” se
encenderá.
• Cuatro horas: Pulse la tecla de temporizador “ ” cuatro veces. El indicador
“4H” se encenderá
• Cinco horas: Pulse la tecla de temporizador “ ” cinco veces. Los indicadores
“1H” y “4H” se encenderán.
• Seis horas: Pulse la tecla de temporizador “ ” seis veces. Los indicadores “2H”
y “4H” se encenderán.
• Siete horas: Pulse la tecla de temporizador “ ” siete veces. Los indicadores
“1H”, “2H” y “4H”se encenderán.
3. “
” Tecla OSC
Pulse la tecla Oscillation una vez para activar la función de oscilación.
Pulse la tecla Oscillation otra vez para desactivar la function. En el modo
Oscillation, el ventilador el girará lentamente hacia adelante y hacia atrás de
derecha a izquierda para dirigir el flujo de aire sobre un área más amplia.
4. “ ” Tecla SPEED
Cuando el ventilador está encendido, pulse repetidamente la tecla SPEED para
cambiar la velocidad del ventilador en una secuencia de BAJO a MEDIO a ALTO.
3
5. “ ” TECLADO DE PANTALLA
Después de iniciar el ventilador, presione el botón para apagar todos los
indicadores, y encienda todos los indicadores por presionando de nuevo.
III. MANDO A DISTANCIA
Hay cuatro teclas en el mando a distancia, que corresponden a las mismas en el
panel de control del cuerpo del ventilador. Apresiónalas de la misma forma que
está escrita en el apartado de arriba para hacerlas funcionar.
Funcionamiento del Mando a Distancia
Apunte el mando a distancia hacia el receptor y pulse la tecla
deseada.
Nota:
(1) No deje el mando a distancia a la luz solar directa para
que no se dañe.
(2) Retire las baterías si la unidad va a ser almacenada durante
un periodo largo de más de dos semanas. Deseche las
baterías viejas o usadas apropiadamente.
Baterías
Figura 8
Mando a distancia
(1) Deslice para abrir la tapa del compartimiento de
batería.
(2) Introduzca las baterías (no provistas) y asegúrese
de que las baterías se colocan como se muestra en
la figura 9.
(3) Deslice para cerrar el compartimiento de batería.
Nota: Las baterías alcalinas AAA se recomiendan para
su uso. No utilice baterías recargables.
Baterías
Tapa del
compartimiento
de batería
Figura 9 Compartimiento de Batería
IV. AJUSTE DE LA INCLINACIÓN
Para ajustar el flujo del aire hacia arriba o hacia abajo,
empuje suavemente las guardas en la dirección deseada.
V. AJUSTE DE LA ALTURA
La altura del ventilador puede ajustarse por aflojando
el anillo de ajuste de altura, levante o baje el ventilador
cuidadosamente y apriete el anillo de ajuste de nuevo
firmemente.
Fig.10
INSTRUCCIONES DE MANTENIMIENTO
El ventilador no necesita mucho mantenimiento. No intente repararlo usted mismo.
Contacte a un centro de reparación calificado si es necesario. Para solicitar
información sobre su posible reparación, llame al siguiente número de asistencia al
cliente: 1-855-438-7899.
1. No enchufe el cable en la toma de corriente antes de limpiarlo o ensamblarlo.
4
2. Para garantizar una circulación de aire adecuada en el motor, mantenga limpios
los respiraderos en la parte trasera de la carcasa del motor. No use una
aspiradora para limpiarlos sin primero desconectar el ventilador. No desarme el
ventilador para limpiarlo.
3. Use un paño suave y detergente no abrasivo para limpiar el exterior. No use
solventes o detergentes abrasivos que pudieran rayar la superficie. No use
gasolina o quitapinturas para limpiar el ventilador.
4. Asegúrese de que no entre agua u otros líquidos en el motor o en las partes
interiores.
LIMPIANDO
1. Asegúrese de que el cable de poder este desconectado del tomacorriente antes
de limpiar.
2. Las partes plásticas deben ser limpiadas con una paño húmedo o esponja con
detergente suave. Luego remueva la capa de detergente con agua limpia.
3. Asegúrese que ninguna parte adentro del motor sea tocada por agua u otro
liquido.
IMPRESO EN CHINA
5
Kenmore One Year Limited Warranty
When installed, operated and maintained according to all supplied instructions, if this appliance fails
due to a defect in material and workmanship within one year from the date of purchase, return it with
proof of purchase to any Sears store, Parts & Repair Service Center or other Kenmore outlet in the
United States for free repair or replacement if repair is unavailable.
This warranty covers ONLY defects in material and workmanship, and will NOT pay for:
1. Expendable items that can wear out from normal use, including but not limited to filters, belts, light
bulbs, and bags.
2. A service technician to instruct the user in correct product installation, operation or maintenance.
3. A service technician to clean or maintain this product.
4. Damage to or failure of this product if it is not installed, operated or maintained according to the all
instructions supplied with the product.
5. Damage to or failure of this product resulting from accident, abuse, misuse or use for other than its
intended purpose.
6. Damage to or failure of this product caused by the use of detergents, cleaners, chemicals or utensils
other than those recommended in all instructions supplied with the product.
7. Damage to or failure of parts or systems resulting from unauthorized modifications made to this product.
This warranty is void if this appliance is ever used for other than private household purposes.
This warranty gives you specific legal rights, and you may also have other rights which vary from state
to state. Sears Brands Management Corporation, Hoffman Estates, IL 60179
Kenmore Un Año de Garantía Limitada
A la instalación, la operación y el mantenimiento según las instrucciones provistas, si este electrodomestico
se falla debido a un defecto de material y mano de obra durante un año a partir de la fecha de compra
, devuélvalo con el comprobante de compra a cualquier tienda Sears, Centro de Repuestos y Servicio de
Reparación o otro medio de Kenmore en los Estados Unidos para su reparación o sustitución gratuita si la
reparación no está disponible.Esta garantía SÓLO cubre defectos en materiales y mano de obra, y no va
a pagar por:
1. Los artículos no reutilizables que pueden gastarse por el uso normal, incluyendo, pero no limitado a,
filtros, correas, focos y bolsas.
2. Un técnico de servicio para mostrar al usuario la instalación, la operación o el mantenimiento correcto
del producto.
3. Un tecnico de servicio para limpiar o mantener este producto.
4. Daños o fallas de este producto si no está instalado, operado o mantenido conforme a todas las
instrucciones provistas con el producto.
5. Daños o fallas de este producto por accidente, abuso, uso indebido o un uso diferente de los fines
previstos.
6. Daños o fallas de este producto por el uso de detergentes, limpiadores, productos quimicos o utensilios
diferentes de los recomendados en todas las instrucciones provistas con el producto.
7. Daños o fallas de piezas o sistemas como resultados de modificaciones no autorizadas de este producto.
Esta garantía no es válida si el aparato se usa con fines que no sean los hogares privados.
Esta garantía le otorga derechos legales específicos, y usted también puede tener otros derechos que
varían de estado a estado. Sears Brands Management Corporation, Hoffman Estates, IL 60179
®
P/N FS40-12URD-001