1
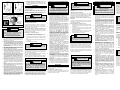
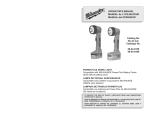
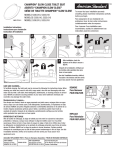
¡ADVERTENCIA!
Para reducir el riesgo de una lesión,
desconecte siempre la herramienta antes de
darle cualquier mantenimiento. Nunca
desarme la herramienta ni trate de hacer
modificaciones en el sistema eléctrico de la
misma. Acuda siempre a un Centro de
Servicio MILWAUKEE para TODAS las
reparaciones.
Mantenimiento de la lámpara de trabajo
Si la lámpara no opera a plena potencia con una
batería completamente cargada, limpie los
contactos en la batería y la lámpara de trabajo con
una goma de borrar. Si la lámpara de trabajo
todavía no funciona correctamente, devuelva la
lámpara de trabajo a un centro de servicio
MILWAUKEE para que se realicen reparaciones.
WARRANTY
Every MILWAUKEE product is warranted to be free
from defects in material and workmanship.
MILWAUKEE will repair or replace any product which
examination proves to be defective in material or
workmanship.
Limitations: This warranty does not cover: 1) repairs made or attempted by other than MILWAUKEE
or MILWAUKEE Authorized Service Station personnel; 2) normal wear and tear; 3) abuse; 4) misuse;
5) improper maintenance; 6) continued use after partial failure; 7) tools that have been modified; or product used with an improper accessory.
Battery Packs are warranted for one (1) year from
the date of purchase.
Should a problem develop, return the complete product to any MILWAUKEE Factory Service Center or
MILWAUKEE Authorized Service Station, freight
prepaid and insured. If inspection shows the problem is caused by a defect in material or workmanship, all repairs or a replacement will be made at no
charge and the product will be returned, transportation prepaid. No other warranty, written or verbal, is
authorized.
THE REPAIR AND REPLACEMENT REMEDIES
DESCRIBED HEREIN ARE EXCLUSIVE. IN NO
EVENT SHALL MILWAUKEE BE LIABLE FOR ANY
INCIDENTAL, SPECIAL, OR CONSEQUENTIAL
DAMAGES, INCLUDING LOSS OF PROFITS.
THIS WARRANTY IS IN LIEU OF ALL OTHER WARRANTIES, EXPRESSED OR IMPLIED WHETHER
FOR MERCHANTABILITY OR FITNESS FOR PARTICULAR USE OR PURPOSE.
This warranty gives you specific legal rights. You
may also have other rights that vary from state to
state. In those states that do not allow the exclusion of implied warranties or limitations of incidental or consequential damages, the above limitations or exclusions may not apply to you.
GARANTIE
Chaque produit MILWAUKEE porte la garantie d’être
exempt de défauts de matériaux ou de fabrication.
MILWAUKEE réparera ou remplacera tout produit
porteur de défauts de matériaux ou de fabrication.
Limites : La présente garantie ne s’applique pas
dans les cas suivants : (1) Des réparations ont été
effectuées ou tentées par d’autres personnes que
des techniciens mandatés par MILWAUKEE ou ses
centres de service accrédités. (2) Les réparations
sont rendues nécessaires par l’usure normale de
l’outil. (3) L’outil a été employé abusivement. (4)
L’outil a servi à un usage anormal. (5) L’outil a reçu
un entretien inadéquat. (6) L’outil a été utilisé après
une défaillance partielle. (7) L’outil a été modifié ou
employé avec un accessoire incompatible.
Les batteries sont garanties pour un (1) an à compter
de la date d’achat.
S’il survient un trouble, retournez l’outil au complet
port payé à une succursale de service MILWAUKEE
ou un centre de service MILWAUKEE accrédité. Si
l’examen de l’outil démontre que le trouble est dû à
un défaut de fabrication ou de matériaux, les
réparations seront effectuées gratuitement et l’outil
vous sera retourné aux frais de MILWAUKEE. Nulle
autre forme de garantie, écrite ou verbale, n’est
autorisée.
LES RÉPARATIONS OU REMPLACEMENTS
DÉCRITS CI-DESSUS SONT EXCLUSIFS.
MILWAUKEE NE SAURAIT, EN AUCUN CAS,
ÊTRE TENUE RESPONSABLE DES DOMMAGES
INCIDENTS, SPÉCIAUX OU CONSÉCUTIFS, Y
COMPRIS LA PERTE DE REVENUS.
LA PRÉSENTE GARANTIE ANNULE ET
REMPLACE TOUTE AUTRE GARANTIE,
EXPRESSE OU IMPLICITE, DE QUALITÉ
MARCHANDE OU D?APTITUDE À UN USAGE OU
À UN BUT PARTICULIER.
La présente garantie vous confère des droits
juridiques spécifiques. Vous pouvez avoir
d’autres droits variant d’un état à l’autre. Dans
ces états qui ne permettent pas l’exclusion de
garanties implicites ou de limites de dommages
incidents ou consécutifs, il se peut que les exclusions ou limites de la présente garantie ne
soient pas applicables.
UNITED STATES
CANADA
MILWAUKEE Service
Service MILWAUKEE
To locate the factory SERVICE
CENTER or authorized service
station nearest you, call
Milwaukee Electric Tool
(Canada) Ltd
755 Progress Avenue
Scarborough, Ontario M1H 2W7
Tel. (416) 439-4181
Fax: (416) 439-6210
1-800-414-6527
TOLL FREE • NATIONWIDE
Monday-Friday • 8:00 AM - 4:30 PM •
Local Time
In addition, there is a worldwide network
of distributors ready to assist you.
Check your “Yellow Pages” under
“Tools-Electric” for the names of those
nearest you.
En outre le réseau de distributeurs est à la
disposition de la clientèle d’un océan à
l’autre. Consultez les pages jaunes de
l’annuaire téléphonique pour l’adresse du
centre le plus près de chez vous.
In addition, there is a worldwide network of
distributors ready to assist you. Check your
“Yellow Pages”under “Tools-Electric” for
the names of those nearest you.
OPERATOR'S MANUAL
MANUEL de L'UTILISATEUR
MANUAL del OPERADOR
Catalog No.
No de Cat.
Catálogo No.
49-24-0100
GARANTIA
Se garantiza que todos los productos MILWAUKEE
están libres de fallas en el material y la mano de
obra. MILWAUKEE reparará o reemplazará
cualquier producto que, luego de una revisión, se
encuentre está defectuoso ya sea en el material o
en la mano de obra.
Límites: Esta garantía no cubre: 1) reparaciones o
intentos realizados por personas ajenas a
MILWAUKEE o al Taller Autorizado de Servicio
MILWAUKEE; 2) uso y desgaste normal; 3) abuso;
4) mal uso; 5) mantenimiento inadecuado; 6) uso
continuo luego de presentar fallas parciales; 7)
herramientas que han sido modificadas; o productos
utilizados con un accesorio inadecuado.
Las baterías están garantizadas por un (1) año a
partir de la fecha de compra.
En caso de que se presente un problema, favor de
regresar el producto completo a cualquier Centro
de Servicio de Fábrica MILWAUKEE o Taller
Autorizado de Servicio MILWAUKEE , con flete
pagado y asegurado. Si se encontrase que el
problema es causado por fallas en el material o la
mano de obra, se reparará o reemplazará el
producto sin cargo y se le regresará (con flete
pagado) a su propietario. No se reconoce ninguna
otra garantía ni verbal ni escrita.
NO EXISTE NINGUNA OTRA POSIBILIDAD DE
REPARACION Y REEMPLAZO QUE LA DESCRITA
EN LA PRESENTE GARANTIA. EN NINGUN CASO
MILWAUKEE
SERA
CONSIDERADA
RESPONSABLE POR DAÑOS INCIDENTALES,
ESPECIALES O CONSECUENTES, INCLUYENDO
LA PERDIDA DE GANANCIAS.
ESTA GARANTIA SE CONFIERE EN LUGAR DE
TODA OTRA GARANTIA, EXPRESA O IMPLICITA
DE COMERCIALIZACION O DE IDONEIDAD PARA
UN USO O PROPOSITO EN PARTICULAR.
Esta garantía le otorga derechos legales
específicos. Podría tener además otros derechos
que varían de estado a estado. En aquellos estados
que no permiten la exclusión de garantías
implícitas o límites por daños incidentales o
consecuentes, los límites o las exclusiones
anteriores podrían no aplicar en su caso.
For further information on factory
SERVICE CENTER
or authorized service station locations,
visit our website at:
www.mil-electric-tool.com
MEXICO
Servicios de MILWAUKEE
Milwaukee Electric Tool
División de :
Atlas Copco Mexicana S.A. de C.V.
Blvd. Abraham Lincoln no. 13
Colonia Los Reyes Zona Industrial
Corporate Product Service Support Warranty and Technical Information
Tlalnepantla, Edo. México C.P.
54073
Brookfield, Wisconsin USA
Tels. 5565-1414
1-800-729-3878
5565-4720
Fax: 5565-0925
Además se cuenta con una red nacional
de distribuidores listos para apoyarlo. Vea
en las “Páginas Amarillas” sección
“Herramientas Eléctricas”.
MILWAUKEE ELECTRIC TOOL CORPORATION
A Company within the Atlas Copco Group
13135 West Lisbon Road • Brookfield, Wisconsin, U.S.A. 53005
58-14-6500d2
11/02
Printed in U.S.A.
WORK LIGHT
Compatible with MILWAUKEE 9.6V and 12V Battery Packs
(Sold without battery pack)
LAMPE DE TRAVAIL
Compatible avec batteries de 9,6V et 12V de MILWAUKEE
(Offerte sans batterie)
LAMPARA DE TRABAJO
Compatible con baterías de 9,6V y
de 12V MILWAUKEE
(Se vende sin la batería)
Cat. No.
Ni-Cd Battery
No. de Cat. Ni-Cd Batteries
Cat. de No. Ni-Cd Baterías
Volts
Volts
Volts
48-11-0140
———
48-11-0200 Super Tough
48-11-0250 Super Tough 2
48-11-0080
———
12
12
12
9.6 (9,6)
A-HR
A-HR
A-HR
1.4
1.7
2.0
1.4
(1,4)
(1,7)
(2,0)
(1,4)
TO REDUCE THE RISK OF INJURY, USER MUST READ AND UNDERSTAND
OPERATOR'S MANUAL.
AFIN DE RÉDUIRE LE RISQUE DE BLESSURES, L'UTILISATEUR DOIT LIRE ET
BIEN COMPRENDRE LE MANUEL DE L'UTILISATEUR.
PARA REDUCIR EL RIESGO DE LESIONES, EL USUARIO DEBE LEER Y
ENTENDER EL MANUAL DEL OPERADOR.
Fig. 1
10. Maintain labels and nameplates. These carry
important information. If unreadable or missing,
contact a MILWAUKEE service facility for a free
replacement.
Fig. 2
RÈGLES DE SÉCURITÉ GÉNÉRALES
AVERTISSEMENT!
ASSEMBLY
Removing Battery Pack from the Work Light (Fig. 1)
Push in the release buttons and pull the battery pack
away from the tool.
VOUS DEVEZ LIRE ET COMPRENDRE
TOUTES LES INSTRUCTIONS
Inserting the Battery Pack into the Work Light (Fig. 2)
Fig. 3
Spare light bulb
Amboule de rechange
Bombilla de reserva
Bezel Assembly
Logement de lunette
Ensamblaje de bisel
Retaining clip
Fixation
metallique
Pinza metálica
Light bulb
Ampoule
Bombillas
GENERAL SAFETY RULES
WARNING!
READ AND UNDERSTAND ALL
INSTRUCTIONS.
Failure to follow all instructions listed
below, may result in electric shock, fire
and/or serious personal injury.
SAVE THESE INSTRUCTIONS
2.
3.
4.
5.
6.
7.
8.
9.
Know your work light. Read this manual carefully to learn your work light's applications and
limitations as well as potential hazards associated with this type of tool.
A battery operated tool with integral batteries
or a separate battery pack must be recharged
only with the specified charger for the battery.
A charger that may be suitable for one type of
battery may create a risk of fire when used with
another battery.
Use battery operated tool only with specifically designated battery pack. Use of any other
batteries may create a risk of fire.
Use only accessories that are recommended
by the manufacturer for your model. Accessories that may be suitable for one tool may create
a risk of injury when used on another tool.
Disconnect battery pack from tool or place the
switch in the locked or off position before making any adjustments, changing accessories, or
storing the tool. Such preventive safety measures
reduce the risk of starting the tool accidentally.
Maintain tool carefully. Keep handles dry, clean
and free from oil and grease. Follow instructions
for changing accessories. Have damaged parts
repaired or replaced by a MILWAUKEE service
facility.
Store idle tools out of reach of children and
other untrained persons. Tools are dangerous
in the hands of untrained users.
When battery pack is not in use, keep it away
from other metal objects like: paper clips,
coins, keys, nails, screws, or other small metal
objects that can make a connection from one
terminal to another. Shorting the battery terminals together may cause sparks, burns, or a fire.
Never insert anything into the light bulb socket
except MILWAUKEE replacement light bulbs. Inserting objects other than light bulbs may cause
short circuit of battery and personal injury.
Le non-respect, même partiel, des instructions
ci-après entraîne un risque de choc électrique,
d'incendie et/ou de blessures graves.
CONSERVEZ CES INSTRUCTIONS
Réglage de la tête pivotante
1.
WARNING!
To reduce the risk of injury, DO NOT operate
work light without bezel assembly in place.
Light bulb does get hot.
Label
Plaque
Placa
1.
To insert the battery pack, push in the release buttons
and slide it into the body of the work light.
Press the trigger to turn “ON” the work light. Press
the trigger again to turn “OFF”.
Adjusting the Pivot Head
The pivot head can pivot to a range of 120°-90° up
and 30° down with detents every 10°. Pivot head to
desired position. Allow the detent to snap into place.
Do not forcibly pivot the head.
Attaching the Hook for Hanging the Work Light
The work light comes with a detachable hook for
hanging. The hook can be attached in two locations
on the back of the handle.
Replacing the Light Bulb (Fig. 3)
1.
Remove battery pack before changing light bulb.
Allow the bulb to cool before removing.
2.
Unscrew the bezel on pivot head by turning
counterclockwise. Remove the bezel assembly.
3.
Press gently on the bulb and slide retaining clip
to the side.
4.
Carefully remove the bulb.
WARNING!
To reduce the risk of injury and damage,
never insert objects other than bulbs in the
bulb socket.
To install new bulb, follow above directions in reverse.
A spare bulb is provided with the work light. The
bulb is located inside the front of the pivot head,
behind the bezel assembly.
See your nearest MILWAUKEE retailer or Service
Center to obtain replacement bulbs.
Keep your work light, battery pack and charger in good
repair by adopting a regular maintenance program.
MAINTENANCE
WARNING!
To reduce the risk of injury, always unplug
the charger and remove the battery pack from
the charger or tool before performing any
maintenance. Never disassemble the tool,
battery pack or charger. Contact a
MILWAUKEE service facility for ALL repairs.
FAMILIARISEZ-VOUS AVEC VOTRE LAMPE
DE TRAVAIL. Lisez attentivement ce manuel pour
apprendre les applications, limitations et risques
inhérents au maniement de ce genre d’outil.
2. Un outil à bloc-batterie amovible ou à
batterie intégrée ne doit être rechargé
qu'avec le chargeur prévu pour la batterie.
Un chargeur qui convient à tel type de batterie
peut présenter un risque d'incendie avec tel
autre type de batterie.
3. N'utilisez un outil qu'avec un bloc-batterie
conçu spécifiquement pour lui. L'emploi d'un
autre bloc-batterie peut créer un risque d'incendie.
4. N'utilisez que des accessoires que le
fabricant recommande pour votre modèle
d'outil. Certains accessoires peuvent convenir
à un outil, mais être dangereux avec un autre.
5. Retirez le bloc-batterie ou mettez
l'interrupteur sur ARRÊT ou en position
verrouillée avant d'effectuer un réglage, de
changer d'accessoire ou de ranger l'outil.
De telles mesures préventives réduisent le risque de démarrage accidentel de l'outil.
6. PRENEZ SOIN DE L’OUTIL. Gardez les
poignées propres, sèches et exemptes d’huile
ou de graisse. Suivez les instructions pour
changer les accessoires. Faites réparer ou
remplacer les pièces défectueuses à un centre
de service MILWAUKEE accrédité.
7. Rangez les outils hors de la portée des
enfants
et
d'autres
personnes
inexpérimentées. Les outils sont dangereux
dans les mains d'utilisateurs novices.
8. Lorsque le bloc-batterie n'est pas en service,
tenez-le à l'écart d'autres objets métalliques
(trombones, pièces de monnaie, clés, clous,
vis, etc.) susceptibles d'établir un contact
électrique entre les deux bornes. La mise en
court-circuit des bornes de la batterie peut
produire des étincelles et constitue un risque
de brûlures ou d'incendie.
9. N’INTRODUISEZ RIEN DANS LA DOUILLE
DE LAMPE, sauf une ampoule de rechange
MILWAUKEE . L’introduction d’objets autres
qu’une ampoule appropriée pourrait causer un
court-circuit et occasionner des blessures
corporelles.
10. Entretenez les étiquettes et marques du
fabricant. Les indications qu'elles contiennent
sont précieuses. Si elles deviennent illisibles ou
se détachent, faites-les remplacer gratuitement
à un centre de service MILWAUKEE accrédité.
MONTAGE
Retrait de la batterie (Fig. 1)
Enfoncez les boutons déclencheurs et retirez la
batterie de l’outil.
Maintaining Work Light
Introduction de la batterie (Fig. 2)
If the work light does not operate at full power with
a fully charged battery pack, clean the contacts on
the battery pack and work light with an eraser. If the
work light still does not work properly, return the
work light to a MILWAUKEE service facility for repairs.
Pour placer la batterie dans l’outil, enfoncez les
boutons déclencheurs et glissez la batterie dans le
corps de la lampe de travail.
Retirar la batería de la lámpara de trabajo (Fig. 1)
¡ADVERTENCIA!
Pour éliminer les risques de blessures
corporelles, n’utilisez pas la lampe de travail
sans la lentille. L'ampoule pourra rester encore
chaude au toucher.
Appuyez sur l’interrupteur pour allumer la lampe de
travail. Appuyez de nouveau sur l’interrupteur pour
l’éteindre.
La tête pivotante a une portée de 120° : 90° vers le
haut et 30° vers le bas réglable aux 10°. Faites
pivoter la tête à la position désirée et laissez le clabot
s’enclencher. Ne forcez pas la tête pivotante.
Montage du crochet pour suspendre la lampe
de travail
La lampe de travail est livrée munie d’un crochet
amovible. Ce crochet peut être fixé à deux endroits
sur le dos de la poignée.
Remplacement de l’ampoule (Fig. 3)
1. Retirez la batterie avant de changer l’ampoule.
Permettez à l'ampoule de se refroidir avant
l'enlèvement.
2. Dévissez le logement de lunette de la tête
pivotante en le tournant en sens inverse-horaire.
Retirez le logement.
3. Appuyez légèrement sur l’ampoule et faites
glisser la fixation métallique vers le côté.
4. Retirez délicatement l’ampoule.
AVERTISSEMENT!
Afin de minimiser les risques de blessures
corporelles ou de dom-mage à l’outil,
n’introduisez jamais d’objets autres qu’une
ampoule appropriée dans la douille de lampe.
Pour installer une nouvelle ampoule, inversez la
procédure mentionnée ci-dessus.
Une ampoule de rechange accompagne la lampe
de travail. Elle est placée àl’intérieur du devant de
la tête pivotante, derrière le logement de lunette.
Adressez-vous au centre de service MILWAUKEE
le plus près pour obtenir des ampoules de rechange.
Gardez votre lampe de travail, batterie et chargeur
en bonne condition en adoptant un programme de
maintenance approprié.
MAINTENANCE
AVERTISSEMENT!
Pour minimiser les risques de blessures
corporelles, débranchez le chargeur et retirez la
batterie du chargeur ou de l’outil avant d’y
effectuer des travaux d’entretien. Ne démontez
jamais l’outil, la batterie ou le chargeur. Pour toute
réparation, consultez un centre de service
MILWAUKEE accrédité.
Entretien de la lampe de travail
Si la lampe de travail n’éclaire pas à pleine puissance avec une batterie àpleine charge, nettoyez
les contacts entre la batterie et la lampe à l’aide
d’une gomme à effacer. Si la lampe n’éclaire
toujours pas correctement, faites-la réparer à un
centre de service MILWAUKEE accrédité.
ENSAMBLAJE
INSTRUCCIONES GENERALES DE
AVERTISSEMENT!
LEA Y ENTIENDA TODAS LAS
INSTRUCCIONES
El no seguir las instrucciones a continuación
puede ocasionar una descarga eléctrica,
incendio y/o lesiones graves.
GUARDE ESTAS INSTRUCCIONES
CONOZCA SU HERRAMIENTA. Lea al detalle
este manual del operario para que conozca las
aplicaciones y limitaciones, al igual que los
riesgos potenciales que ofrece una herramienta
de este tipo.
2. Una herramienta con baterías incorporadas
o con una batería separada debe ser
recargada solamente con el cargador
específico para este tipo de batería. Un
cargador que es apropiado para un tipo de
batería puede producir riesgo de incendio si se
usa con otra batería.
3. Use la herramienta a batería solamente con
la batería especificamente designada para
ella. El uso de cualquier otro tipo de batería
puede producir riesgo de incendio.
4. Utilice solamente los accesorios
recomendados por el fabricante para ese
modelo. Los accesorios que son apropiados
para una herramienta pueden aumentar el
riesgo de lesiones cuando se usan con otra
herramienta.
5. Desconecte la batería de la herramienta o
coloque el gatillo en la posición de bloqueo
o apagado antes de realizar un ajuste,
cambiar accesorios o almacenar la
herramienta. Tales medidas preventivas de
seguridad reducen el riesgo de encender la
herramienta accidentalmente.
6. MANTENGA SU HERRAMIENTA CON
CUIDADO. Mantenga los mangos secos,
limpios y sin aceite ni grasa. Mantenga los filos
de corte afilados y limpios. Siga siempre las
instrucciones para lubricación y cambio de
accesorios. Las partes dañadas deberán ser
reparadas o cambiadas por un Centro de
Servicio Autorizado MILWAUKEE.
7. Almacene las herramientas que no se estén
usando fuera del alcance de los niños y de
personas que no estén capacitadas. Es
peligroso permitir a los usuarios utilizar las
herramientas, si no están capacitados
previamente.
8. Cuando la herramienta no esté en uso,
manténgala alejada de otros objetos
metálicos tales como clips, moneda, llaves,
clavos, tornillos u otro objetos pequeños
metálicos que pueden realizar una conexión
desde un terminal a otro. Hacer un
cortocircuito de los terminales de la batería,
puede producir chispas, quemaduras o un
incendio.
9. NUNCA INSERTE NINGUNA COSA EN EL
CASQUILLO PARA LA BOMBILLA SALVO
bombillas de reemplazo de MILWAUKEE .
Insertar objetos aparte de bombillas pueda
resultar en el cortocircuito de la batería y
heridas personales.
10. Guarde las etiquetas y placas de
especificaciones. Estas tienen información
importante. Si son ilegibles o si no se pueden
encontrar, póngase en contacto con un centro
de servicio de MILWAUKEE para una refacción
gratis.
Oprima los botones de liberación y sáquela de la
herramienta.
Insertar la batería en la lámpara de trabajo (Fig. 2)
Es posible que la batería pueda estar caliente
despuês del ciclo de carga. Si es así, permita que
la batería se enfrie por algunos minutos antes de
insertar la lámpara de trabajo para maximizar el
rendimiento de la batería. Para insertar la batería,
oprima los botones de liberación e introduzcala en
la lámpara de trabajo.
1.
¡ADVERTENCIA!
Para reducir el riesgo de una lesión, NO opere la
luz de trabajo sin la unidad el bisel
correctamente en su lugar. La bombillas
puede ser que sienta se calente.
Oprima el interruptor para encender la lámpara de
trabajo. Oprima el interruptor de nuevo para
apagarla.
Ajuste de la cabeza de pivote
La cabeza pivote puede girar de 120°-90° hacia
arriba y de 30° hacia abajo con retenes a cada 10°.
Gire la cabeza a la posición deseada. Permita que
el retén se fije en posición. No fuerce que la cabeza
gire.
Como colocar el gancho para colgar la luz de
trabajo
La lámpara de trabajo viene con un gancho extraíble
para poder colgarla. Se puede fijar el gancho en
dos lugares en la parte posterior del mango.
Reemplazo de las bombillas (Fig. 3)
1.
Retire la batería antes de cambiar la bombilla.
Permita que el bulbo se refresque antes de
quitar.
2.
Destornille el bisel en la cabeza pivote,
girándolo en el sentido contrario al de las
manillas del reloj. Retire el ensamblaje de bisel.
3.
Oprima la bombilla ligeramente y deslice la
pinza metálica hacia un lado.
4.
Retire la bombilla cuidadosamente.
¡ADVERTENCIA!
Para reducir el riesgo de heridas y daños,
nunca inserte otros objetos en el casquillo,
aparte de las bombillas.
Para instalar la bombilla nueva, siga las
instrucciones anterior en orden inversa.
Se proporciona una bombilla de reserva con la
lámpara de trabajo. La bombilla está ubicada en
frente de la cabeza pivote y detrás del ensamblaje
de bisel.
Vaya al centro de servicio MILWAUKEE más
cercano para obtener bombillas de reemplazo.
Mantenga la lámpara de trabajo, batería y cargador
en buen estado, adoptando un programa regular
de mantenimiento.