1
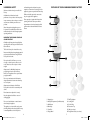
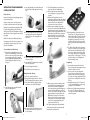
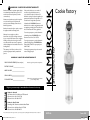
KAMBROOK 12 MONTH REPLACEMENT WARRANTY
Kambrook warrants the purchaser against defects
in workmanship and material for a period of 12
months from the date of purchase (3 months
commercial use).
Guarantee and purchase receipt for this product
are to be retained as proof of purchase and
must be presented if making a claim under the
Kambrook guarantee.
Kambrook reserves the right to replace or repair
the appliance within the warranty period.
Warranty does not apply to any defect,
deterioration, loss, injury or damage occasioned
by, or as a result of the misuse or abuse, negligent
handling or if the product has not been used in
accordance with the instructions. The guarantee
excludes breakages and consumable items such as
kneading blades.
This warranty is void if there is evidence of the
product being tampered with by unauthorised
persons.
Cookie Factory
If the product includes one or a number of
accessories only the defective accessory
or product will be replaced. In the event of
Kambrook choosing to replace the appliance, the
guarantee will expire at the original date, i.e. 12
months from the original date of purchase.
In Australia, this KAMBROOK Guarantee is
additional to the conditions and guarantees which
are mandatory as implied by the Trade Practises
Act 1974 and State and Territory legislation.
For service, spare parts or product information
in Australia, please call KAMBROOK on the
Customer Service Line; 1300 139 798.
For service, spare parts or product information
in New Zealand, please call KAMBROOK New
Zealand; 0800 273 845. For spare parts phone
0800 273 845.
If claiming this guarantee the product must be
returned freight prepaid.
KAMBROOK 12 MONTH REPLACEMENT WARRANTY
YOUR PURCHASE RECORD (Please complete)
Attach a copy of the purchase receipt here.
DATE OF PURCHASE
MODEL NUMBER
SERIAL NUMBER
PURCHASED FROM
(Please don’t return purchase record until
you are making a claim.)
Register your warranty at www.kambrook.com.au/service.asp
Kambrook - Australia
461 Plummer Street, Port Melbourne, 3207, Australia
Customer Service Line 1300 139 798
Customer Service Fax 1800 621337
Kambrook - New Zealand
Private Bag 94411, Greenmount, Auckland, New Zealand
Customer Service Line/Spare Parts 09 271 3980
Customer Service Fax 0800 288 513
Due to continual improvement in design or otherwise, the product you purchase may differ slightly from the illustration in this book. Issue 1/08
KCP100_COOKIE FACTORY_FA.indd 2-3
KCP100
Issue 1/08
30/5/08 11:47:59 AM
Kambrook Safety
FEATURES OF YOUR KAMBROOK COOKIE FACTORY
and knowledge, unless they have been given
supervision or instruction concerning use of the
appliance by a person responsible for their safety.
Welcome to Kambrook and your new Cookie
Factory.
Children should be supervised to ensure that
they do not play with the appliance.
At Kambrook we believe that the safe
performance of our products is the first priority
in any consumer product so that you, our valued
customer, can confidently use and trust our
products.
1
Close supervision is required at all times when
operating the Cookie Factory near children.
2
Any maintenance other than cleaning should be
performed at an authorised Kambrook Service
Centre.
We ask that any electrical appliance you use
be operated in a sensible fashion with due care
and attention placed on the following important
operating instructions:
9
IMPORTANT SAFEGUARDS FOR YOUR
COOKIE FACTORY
Carefully read all instructions thoroughly before
operating the Cookie Factory and retain them for
future reference.
3
The Cookie Factory is for household use only.
4
Remove and safely discard any packaging material
and promotional labels before using the Cookie
Factory for the first time.
5
Do not place the Cookie Factory on or near
a hot gas or electric burner, or where it could
touch a heated oven. Do not place it in direct
sunlight.
Always ensure 3 x AA alkaline batteries are
properly inserted into the Cookie Factory
before use. The appliance will not operate unless
properly assembled.
8
10
6
Do not use new batteries with old batteries;
change all batteries at the same time when they
run out of power.
7
Always remove the batteries if the Cookie
Factory will not be used for an extended period
of time.
Ensure batteries are disposed of correctly.
Keep the appliance clean. Refer to care and
cleaning (page 8).
1.
2.
3.
4.
5.
6.
Do not use harsh abrasives or caustic cleaners
when cleaning this appliance.
This appliance is not intended for use by person
(including children) with reduced physical, sensory
or mental capabilities, or lack of experience
KCP100_COOKIE FACTORY_FA.indd 4-5
Hanging loop
Battery Compartment (3 x AA batteries)
‘ON’ Button
Main Body
Press Disc
Dough Barrel
7.
8.
9.
10.
11.
12.
Disk/Tip Adapter
Locking Disk
Cookie Discs
Decoration Tips
Shaft (not shown)
Dough Barrel Cover (not shown)
30/5/08 11:47:59 AM
OPERATING YOUR KAMBROOK
COOKIE FACTORY
3. Insert the Shaft fully into the Main Body until
the Press Disc sits flush against the Locking
Disc.
Before first use
Remove and safely discard any packaging material
and promotional labels.
Wipe the outside of the cookie factory main
body with a soft, damp cloth and dry thoroughly.
Wash all of the attachments (Locking Disc, Shaft,
Press Disc, Dough Barrel, 10 x Cookie Discs,
4 x Decoration Tips, Disc/Tip Adapter and Dough
Barrel Cover) in warm, soapy water. Rinse and dry
thoroughly.
4. Insert the Dough Barrel into the assembly
area, aligning the tabs of the Dough Barrel
with the grooves of the Locking Disc and
Press Disc.
NOTE: Never immerse the Main Body or Battery
Compartment of the Cookie Factory in water or any
other liquid. Do not place any part of the Cookie
Factory in the dishwasher.
5. Turn the Dough Barrel anti-clockwise to
unlock and remove from Main Body.
6. Fill the dough barrel with freshly made
cookie dough (see recipes, page 10) using
a spatula.
7. Re-attach the Dough Barrel into the
assembly area, aligning the tabs of the Dough
Barrel with the grooves of the Locking Disc
and Press Disc. Turn the Dough Barrel
clockwise until it locks into position.
8. Hold the main body firmly in an upright
position. Press and hold the ‘ON’ Button for
approximately 10 seconds (depending on the
thickness of the dough and the fullness of the
Dough Barrel) until Press Disc compresses
dough towards the bottom of the Dough
Barrel and it begins to extrude through the
cut-out of the Cookie Disc.
10. Continue making cookies with the same
Cookie Disc, or to change shapes select a
different Cookie Disc. If a new Cookie Disc
is to be inserted and dough remains in the
Dough Barrel, repeat steps 2-4 of ‘Using
the Cookie Factory’ (page 4) and proceed
making cookies with the new shape Cookie
Disc.
11. To refill the Dough Barrel when it becomes
empty it is necessary to remove the Dough
Barrel and return the Shaft and Press Disc
back to the original position before adding
more dough, refer to steps 3-4 of (page 4)
‘Before first use’. Follow steps 5 -7 of ‘Using
the Cookie Factory’ to fill Dough Barrel.
Continue making cookies.
To assemble the Cookie Factory
1. Slide the Battery Compartment open and
remove from the Main Body. Insert 3 x AA
batteries, ensure the polarity of each battery
is correctly aligned according to graphics.
Insert the Battery Compartment back into
the Main Body, push in fully until ‘clicks’
into place.
5. Turn the Dough Barrel clockwise until it
locks into position.
6. Insert the Disc/Tip Adapter, turn clockwise
into the lock position.
7. Insert the Dough Barrel Cover.
Helpful tips
1. Practice makes perfect with the Cookie
Factory. It may take a few attempts until you
achieve the results you desire.
2. For best results, only use freshly made
dough. For best results follow the recipes
provided in this instruction booklet (page
10). Using store-bought refrigerated cookie
dough is not recommended for the Cookie
Factory.
3. Refrigerate the dough for 10-15 minutes if
it is too sticky. Refrigerating cookie dough
overnight is not recommended.
4. Each barrel of dough makes approximately
25 cookies. This may vary depending on
the recipe used, thickness and shape of the
cookies being made.
The Cookie Factory is now ready to use.
Using the Cookie Factory
1. Select one of the Cookie Discs.
2. Remove the Dough Barrel Cover. Turn the
Disc/Tip Adapter anti-clockwise to remove.
3. Place the Cookie Disc, ridged side facing
downwards, into the Disc/Tip Adapter.
2. Insert and align the Locking Disc with the
tabs in the assembly area.
4. Re-insert the Disc/Tip Adapter back on to
the Dough Barrel and turn clockwise into
the lock position.
KCP100_COOKIE FACTORY_FA.indd 6-7
9. When ready to commence making cookies
hold the Main Body in an upright position
with the base of the Disc/Tip Adapter in
firm contact with an un-greased baking tray.
Press and hold the ‘ON’ Button until your
desired cookie thickness and shape is formed
(approximately 4-6 seconds). Release the
‘ON’ Button and wait 1-2 seconds before
lifting up the Cookie Factory and moving to
a new position on the baking sheet. Repeat
this process, leaving approximately 2cm
space between each cookie.
Note: Practice makes perfect with the Kambrook
Cookie Factory. It may take a few attempts until
you achieve the results you desire.
30/5/08 11:48:01 AM
Using the decorating tips
Care and cleaning
Use the Decorating Tips to decorate cookies and
other desserts.
It is essential that the Cookie Factory is cleaned
after every use to maintain optimal performance.
Follow these simple steps for cleaning.
Follow the steps for ‘Using the Cookie Factory’
and insert your chosen Decorating Tip into the
Disc/Tip Adapter.
1. Turn the Disc/Tip Adapter anti-clockwise
and remove from Dough Barrel.
2. Remove Cookie Disc or Decorating Tip from
the Disc/Tip Adapter.
3. Turn the Dough Barrel anti-clockwise to
remove from the Main Body.
4. Hold onto the Press Disc and gently pull to
remove the Shaft from the Main Body.
5. Turn the Locking Disc anti-clockwise and
remove it from the Main Body.
6. Remove batteries from Battery
Compartment before cleaning Main Body.
7. Use a damp cloth to wipe the exterior of
the Main Body and dry thoroughly. Ensure
to clean around the assembly area of the
main body to remove any dough that may
have become lodged. Be careful that water
does not get into the internals of the Cookie
Factory.
8. Wash all the attachments (Locking Disc,
Shaft, Press Disc, Dough Barrel, Cookie Discs
and/or Decoration Tips, Disc/Tip Adapter
and Dough Barrel Cover in warm, soapy
water. It may be necessary to use a soft brush
to remove dough lodged in crevices of the
attachments.
9. Rinse well and dry thoroughly.
Fill the Dough Barrel with freshly made icing (see
recipes, page 8).
A steady hand and some patience are required
when decorating cookies and cakes. Practice
makes perfect.
HINTS FOR WEIGHING AND
MEASURING
Metric weighing scales
Care should be taken when weighing and
measuring ingredients to achieve accuracy and
consistency.
For consistent results it is recommended that a
set of metric weighing scales be used to weigh
larger quantities as they provide greater accuracy
than measuring cups.
Recipes in this instruction book have been
developed using Australian metric weights and
measurements.
Tare (zero) the scales with the container in
position then spoon or pour ingredients in until
the desired weight is achieved.
Metric measuring cups and spoons
Australian metric measurements
mLS
1 teaspoon
5
1 TABLESPOON
20
1 CUP
250
If using graduated metric measuring cups, it is
important to spoon the dry ingredients loosely
into the required cup. Do not tap the cup on the
bench or pack the ingredients into the cup unless
otherwise directed. Level the top of the cup with
a knife. When using graduated metric measuring
spoons, level the top of the spoon with a straight
edged knife or spatula.
The New Zealand tablespoon is 5ml less than the
Australian tablespoon, so care should be taken
when measuring ingredients to compensate for
the variance. For example, 1 Australian tablespoon
= 1 New Zealand tablespoon + 1 New Zealand
teaspoon.
NZ metric measurements
mLS
1 teaspoon
5
1 TABLESPOON
15
1 CUP
250
Metric liquid measuring jugs
If using a graduated, metric measuring jug, place
jug on a flat surface and check for accuracy at eye
level.
NOTE: Never immerse the Main Body or Battery
Compartment in water or any other liquid.
NOTE: Do not wash any parts or accessories of the
Cookie Factory in dishwasher.
NOTE: Clean the Cookie Factory immediately after
use. It is difficult to clean of dough has dried and
hardened.
Storage
Always remove the batteries before storing if the
Cookie Factory will not be used for an extended
period of time.
Store the Cookie Factory out of direct sunlight.
Note: The Hanging Loop makes storing the Cookie
Factory easy and convenient. Hang on a hook in a
safe place such as a kitchen cupboard.
KCP100_COOKIE FACTORY_FA.indd 8-9
30/5/08 11:48:01 AM
RECIPES
RECIPES
BASIC ALMOND COOKIE
Makes 60 (approx)
VANILLA CUSTARD CREAMS
Makes 25 (approx)
CITRUS DELIGHTS
Makes 50 (approx)
50g butter, softened
50g margarine
½ cup (70g) icing sugar
1 x 60g egg
1 cup (100g) almond meal
1¼ cups (190g) plain flour
125g butter, softened
¼ cup (35g) icing sugar
½ cup (75g) plain flour
¼ cup (35g) corn flour
¼ cup (35g) custard powder
125g butter, softened
1/3 cup (45g) icing sugar
1 teaspoon finely grated lemon rind
2 teaspoons lemon juice
½ cup (75g) plain flour
½ cup (75g) self raising flour
1 tablespoon corn flour
¼ cup (25g) almond meal
Filling:
1 cup (140g) icing sugar
1 teaspoon vanilla extract
1 tablespoon hot water
1. Pre-heat oven to 180ºC.
2. Cream butter, margarine and icing sugar until
light and fluffy. Add in egg and beat well.
3. Sift together almond meal and flour. Fold in
flour and almond meal mixture one spoonful
at a time until smooth dough is formed.
1. Pre-heat oven to 180ºC.
2. Cream butter and icing sugar until light and
fluffy.
4. Assemble Cookie Factory with desired
Cookie Disc and fill Dough Barrel with dough
mixture.
3. Sift together plain flour, corn flour and custard
powder. Gradually fold though dry ingredients
until mixture is just combined.
5. Hold the cookie factory upright in contact
with an ungreased baking tray. Press ‘ON’
button and hold until cookie forms desired
shape and thickness.
4. Assemble Cookie Factory with desired
Cookie Disc and fill Dough Barrel with dough
mixture.
6. Bake for 10-12 minutes until lightly golden.
Remove from baking tray and allow to cool
before decorating.
5. Hold Cookie Factory upright in contact with
an ungreased baking tray. Press ‘ON’ button
and hold until cookie forms desired shape and
thickness
Variations:
6. Bake for 10-12 minutes until lightly golden.
Remove from baking tray and allow to cool
completely.
VANILLA:
Add 1 teaspoon of vanilla extract, during step 2.
7. To make filling, combine icing sugar, vanilla
extract and water in small bowl. Mix until
smooth.
CHOCOLATE:
Add ½ teaspoon of vanilla extract during step 2.
Add 2 tablespoons cocoa powder, during step 3.
SWEET MAPLE TREATS
(GLUTEN, NUT & EGG FREE)
Makes 50 (approx)
125g butter, softened
1 teaspoon vanilla extract
1
/3 cup maple syrup
1½ cups (270g) rice flour (gluten free)
½ cup (70g) corn flour (gluten free)
1. Pre-heat oven to 180ºC.
1. Pre-heat oven to 180ºC.
2. Cream butter, vanilla and maple syrup until
light and fluffy.
2. Cream butter and icing sugar until light and
fluffy. Add lemon rind and juice, beat well.
3. Sift together rice flour and corn flour. Fold in
dry ingredients until mixture is just combined.
3. Sift together plain flour, self raising four, corn
flour and almond meal. Gradually fold though
dry ingredients until mixture is just combined.
4. Assemble Cookie Factory with desired
Cookie Disc and fill Dough Barrel with dough
mixture.
4. Assemble Cookie Factory with desired
Cookie Disc and fill Dough Barrel with dough
mixture.
5. Hold Cookie Factory upright in contact with
ungreased baking tray. Press ‘ON’ button and
hold until cookie forms desired shape and
thickness.
5. Hold Cookie Factory upright in contact with
ungreased baking tray. Press ‘ON’ button and
hold until cookie forms desired shape and
thickness.
6. Bake for 8-10 minutes or until lightly golden.
Remove from baking tray and allow to cool
completely.
6. Bake for 10-12 minutes or until lightly golden.
Remove from baking tray and allow to cool
completely.
Variation:
Replace lemon with the same quantity of orange
or lime rind and juice.
8. Place a small dollop of filling on to the base
of one biscuit and sandwich together with
another. Allow to set.
SPICE:
Add ½ teaspoon vanilla extract, during step 2.
Add 1 teaspoon cocoa powder, 1 teaspoon
cinnamon, ½ teaspoon ground ginger, ¼ teaspoon
ground cloves and ¼ teaspoon nutmeg, during
step 3.
Decorating idea:
Dust cookies with icing sugar before serving.
10
KCP100_COOKIE FACTORY_FA.indd 10-11
11
30/5/08 11:48:01 AM
RECIPES
CHOC – PEPPERMINT CRISPS
(GLUTEN FREE)
Makes 50 (approx)
125g butter, softened
¾ cup (105g) icing sugar (gluten free)
1 x 60g egg
½ teaspoon peppermint essence
½ teaspoon vanilla extract
1 cup (180g) rice flour (gluten free)
1 cup (140g) corn flour (gluten free)
¼ cup (35g) cocoa
ROYAL ICING
BUTTER CREAM ICING
CREAM CHEESE FROSTING
1 egg white
1½ cups (210g) icing sugar, sifted
¼ teaspoon lemon juice
Food colouring (optional)
125g butter, softened
1½ cups (210g) icing sugar, sifted
1 tablespoon milk
125g cream cheese, softened
1 cup (140g) icing sugar, sifted
1. Cream butter until light and fluffy. Continue to
beat and gradually add in icing sugar and milk.
1. Beat cream cheese until light and fluffy.
Continue to beat and gradually add in icing
sugar.
2. Assemble Cookie Factory with desired
Decorating Tip and fill Dough Barrel with icing
mixture.
2. Assemble Cookie Factory with desired
Decorating Tip and fill Dough Barrel with icing
mixture.
3. Press ‘ON’ button to extrude icing.
3. Press ‘ON’ button to extrude icing.
1. Beat egg whites until just foamy. Gradually add
icing sugar, beating well after each addition.
Continue to beat until desired consistency,
then add lemon juice and combine.
2. To make different colours separate icing
mixture into small bowls. Add 1-2 drops of
the desired food colouring to and stir through.
1. Pre-heat oven to 180ºC.
2. Cream butter and icing sugar until light and
fluffy. Add in egg, peppermint and vanilla
essence. Beat well.
3. Assemble Cookie Factory with desired
Decorating Tip and fill Dough Barrel with icing
mixture.
3. Sift together rice flour, corn flour and cocoa.
Fold in dry ingredients until mixture is just
combined.
4. Press ‘ON’ button to extrude icing.
Note: Cover royal icing with plastic wrap if not in use,
this prevents the icing hardening and forming a crust.
4. Assemble Cookie Factory with desired
Cookie Disc and fill Dough Barrel with dough
mixture.
RECIPES
Variations:
Variation:
VANILLA:
Add finely grated zest of one lemon, lime or
orange.
Add ½ teaspoon vanilla extract to creamed
mixture.
CHOCOLATE:
Add 2 tablespoons cocoa to creamed mixture.
5. Hold Cookie Factory upright with in contact
with ungreased baking tray. Press ‘ON’ button
and hold until cookie forms desired shape and
thickness.
6. Bake for 8-10 minutes. Remove from baking
tray and allow to cool completely.
Decorating idea:
Melt 250g good quality dark eating chocolate.
Dip half of each biscuit into chocolate, place on
non-stick baking paper or aluminium foil and allow
chocolate to set.
12
KCP100_COOKIE FACTORY_FA.indd 12-13
13
30/5/08 11:48:01 AM