1
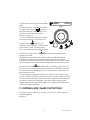
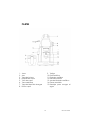
Espresso maker
Cafetera express
EXP 25022
www.KALORIK.com
120V~ 800W
IMPORTANT SAFEGUARDS
1. READ ALL INSTRUCTIONS
2. Check that your mains voltage corresponds to that stated on the
appliance.
3. Do not touch hot surfaces. Use handles or knobs.
4. To protect against electrical shock do not immerse cord, plugs, or
the appliance in water or other liquid.
5. Close supervision is necessary when any appliance is used by or
near children.
6. Unplug from outlet when not in use and before cleaning. Allow to
cool before putting on or taking off parts.
7. Do not operate any appliance with a damaged cord or plug or
after the appliance malfunctions or has been damaged in any
manner. Return appliance to the nearest authorized service
facility for examination, repair, or adjustment.
8. The use of accessory attachments not recommended by the
appliance manufacturer may cause injuries.
9. Do not use outdoors.
10. Do not let cord hang over edge of table or counter, or touch hot
surfaces.
11. Do not place on or near a hot gas or electric burner, or in a
heated oven.
12. Extreme caution must be used when moving an appliance
containing hot oil or other hot liquids.
13. Always attach plug to appliance first, then plug cord into the wall
outlet. To disconnect, put the switch in off position, then remove
plug from wall outlet.
14. Do not use appliance for other than intended use.
15. Scalding may occur if the lid of the water tank or if the filter
holder is removed during use.
16. Make sure the appliance never comes into contact with
inflammable materials such as curtains, textiles, ... when it is in use
as they might catch fire.
2
EXP 25022 -080204
17. When removing lime scale, only use special products for the
removal of lime scale. Never use ammonia or any other
substance that might damage your health.
18. Never use your espresso maker without water in it.
19. Avoid contact with steam, since scalding can occur if care is not
taken when steaming milk or any time the steam valve is open.
SAVE THESE INSTRUCTIONS
POLARIZED PLUG INSTRUCTIONS
Some appliances are equipped with a polarized plug (one blade is
wider than the other). To reduce the risk of electric shock, this plug
will fit into the polarized outlet only one way. If the plug does not
properly fit into the outlet at first, reverse it. If it still does not fit,
contact a competent qualified electrician. Do not attempt to modify
the plug in any way.
For appliances equipped with a standard plug, simply insert the plug
into the outlet without paying attention to the way you plug it.
SHORT CORD INSTRUCTIONS
A short power supply cord is provided to reduce the hazards resulting
from becoming entangled in, or tripping over a longer cord.
Extension cords may be used if care is exercised in their use.
• The electrical rating of the extension cord should be at least
that of the appliance. If the electrical rating of the extension
cord is too low, it could overheat and burn.
• The resulting extended cord should be arranged so that it will
not drape over the counter top or tabletop where it can be
pulled on by children or tripped over.
3
EXP 25022 -080204
PART DESCRIPTION
1.
2.
3.
4.
5.
6.
7.
8.
Carafe
Handle
Carafe cover
Frothing device
Steamtube
Measuring cup
Tank cover
Steam knob
9. Indicator
10. Steel mesh
11. Metal funnel
12. Press bar
13. Metal funnel handle
14. Removable shelf
15. Drip tray
4
EXP 25022 -080204
A. BEFORE FIRST USE
1. Remove the coffee maker from the package, and check the
accessories according to the list.
2. Clean all the detachable components according to the following
section of “CLEANING AND MAINTENANCE”. Then assemble them
completely.
3. Ensure the steel mesh place in position. Place the carafe on
removable shelf.
4. Operate the appliance without coffee powder in steel mesh.
Repeat 2-3 times.
B. MAKE ESPRESSO COFFEE
1. Remove the tank cover by turning it in anti-clockwise. Pour
appropriate water in water tank with the carafe. Do not exceed the
maximum capacity.
Note: the carafe has the cup marks, the maximum tank capacity is
equal to 4 cups marks water quantity. The minimum tank capacity is
equal to 2 cups marks water quantity.
2. Before pouring the water into the water tank, be sure the power
cord is unplug from the power outlet and the steam knob is in the
OFF
RELEASE position.
Replace the tank cover in place by turning the cover in clockwise
until it locks in position.
3. Put the steel mesh into metal funnel, add coffee powder to steel
mesh with measuring spoon, a spoon coffee powder can make
about a cup of top-grade coffee. Then press the coffee powder
tightly with the tamper.
Note: Select your desired coffee powder to make desired cups
coffee, the steel mesh has 2 cups and 4 cups marks.
4. Make sure the tubers on the funnel align with the grooves in the
appliance, then insert the funnel into from the “INSERT” position, and
you can fix the funnel into coffee maker firmly through turn it anticlockwise until it is locked in the “LOCK” position (see Fig. 1).
5
EXP 25022 -080204
5. Place the carafe on the removable
shelf.
6. Plug the power cord into the outlet.
Turn the steam knob to
position,
and the indicator is illuminated, wait
for about 2 minutes, there will be
coffee flowing out.
7. After the desired quantity of coffee
has been obtained, you should turn
LOCK
I NSERT
Fig. 1
steam knob to
position, the
indicator go out and the coffee maker
stops working, your coffee is ready
now. Then remove the carafe and turn
OFF
the steam control knob to RELEASE position release the residual
steam in the tank.
WARNING: Do not leave the coffee maker unattended during
making the coffee, as you need operate manually sometimes!
8. Before removing the steel mesh or opening the tank cover, make
sure the pressure in the tank shall be released. The method is turn the
OFF
R
ELEASE
steam knob to the
position firstly, the steam in the tank will
eject from the frothing device. After pressure has released, and wait
for the steel mesh cooling down, you can remove the steel mesh or
open the tank cover.
9. After finishing making the coffee, you can take the metal funnel
out by turning it clockwise, and then pour the coffee residue out with
the steel mesh pressed by press bar (which holds the mesh in place).
Let them cool down completely, then rinse under running water.
(When assemble the steel mesh again, you shall turn over the press
bar to the original position)
C. FROTHING MILK/ MAKE CAPPUCCINO
You get a cup of cappuccino when you top up a cup of espresso
with frothing milk.
Method:
6
EXP 25022 -080204
1. Prepare espresso first with container big enough according to the
part “B. MAKE ESPRESSO COFFEE”.
2. Fill a jug with desired amount of milk for each cappuccino to be
prepared, you are recommended to use whole milk at refrigerator
temperature (not hot!).
Note: In choosing the size of jug, it is recommend the diameter is not
less than 70±5mm, and bear in mind that the milk increases in
volume, make sure the height of jug is enough.
3. Turn the steam knob to the
position, the indicator will light up.
4. Insert the frothing device into the milk about two centimetres, after
about 2 minutes, the steam will come out from the frothing device.
Froth milk in the way moving vessel round from up to down.
5. When the required purpose is reached, you can turn the steam
control knob to
position stop frothing. Then remove the jug and
OFF
turn the steam control knob to RELEASE position release the residual
steam in the tank.
Note: Clean steam outlet with wet sponge immediately after the
steam stops generating, but care not to hurt yourself ot not getting
burned!
6. Pour the frothed milk into the espresso prepared, now the
cappuccino is ready. Sweeten to taste and if desired, sprinkle the
froth with a little cocoa powder.
Note: We recommend you allow the appliance to cool down before
making coffee again. Otherwise burnt odor may occur in your
espresso coffee.
CLEAN AND MAINTENANCE
1. Cut off power source and let the coffee maker cool down
completely before cleaning.
2. Clean housing of coffee maker with moisture-proof sponge often.
Note: Do not clean with alcohol or solvent cleanser. Never immerse
the housing in water for cleaning.
3. Detach the metal funnel through turn it clockwise, get rid of coffee
residue inside, then you can clean it with cleanser, but at last you
must rinse with clear water.
7
EXP 25022 -080204
4. Clean all the detachable attachments in the water and dry
thoroughly.
CLEANING MINERAL DEPOSITS
1. To make sure that your coffee maker operates efficiently, that
internal piping is clean and the flavor of coffee is optimal, you should
clean away the mineral deposits left every 2-3 months.
2. Fill the tank with water and descaler to the MAX level (the scale of
water and descaler is 4:1, the detail refers to the instruction of
descaler. Please use “household descaler”, you can use citric acid
(obtainable from chemist’s or drug stores) instead of the descaler
(the one hundred parts of water and three parts of citric acid).
3. According to the program of make espresso coffee, put the metal
funnel (no coffee powder in it) and carafe (jug) in place. Brewing
water per “B. MAKE ESPRESSO COFFEE”.
position, the indicator will be
4. Turn the steam knob to
illuminated, and make two cups coffee (about 2Oz). Then turn the
OFF
steam knob to RELEASE position and wait for 5s.
5. Turn the steam knob to
position and make steam for 2min,
OFF
then turn the steam knob to RELEASE position to stop the unit
immediately, make the descalers deposit in the unit at least 15
minutes.
6. Restart the unit and repeat the steps of 4-5 at least 3 times.
position to brew until no
7. Then turning the steam knob to
descaler is left.
8. Then brew coffee (no coffee powder) with tap water in the MAX
level, repeat the steps 4-5 for 3 times (it is not necessary to wait for 15
minutes in step of 5), then brew until no water is left in the tank.
9. Repeat the step of 8 at least 3 times to make sure the piping is
clean.
8
EXP 25022 -080204
TROUBLE SHOOTING
Symptom
Carafe leakage
water or water
leaks out from lid of
carafe
The metal parts in
the tank have rust.
Water leaks from
the bottom of
coffee maker.
Cause
The carafe is not
located properly
The level of water in
the tank exceeds the
scale of MAX.
The descaler is not
recommended type.
It may corrode the
metal parts in the
tank.
There is much water
in the drip tray.
The coffee maker is
malfunction.
Corrections
Let centreline of carafe
aligns with leakage
opening of brew
basket well.
The water level in the
tank should be within
the scale of MIN and
MAX.
Use the descaler
recommended by
manufacturer.
Please clean the drip
tray.
Please contact with
the authorized service
facility for repairing.
Water leaks out of
outer side of filter.
There is some coffee
powder on filter
edge.
Acid (vinegar) taste
exists in Espresso
coffee.
Clean coffee maker
No clean correctly
per the content in
after cleaning mineral
“before the first use” for
deposits.
several times.
Please use fresh coffee
powder, or store
unused coffee powder
The coffee powder is
in a cool, dry place.
stored in a hot, wet
After opening a
place for a long time.
package of coffee
The coffee powder
powder, reseal it tightly
turns bad.
and store it in a
refrigerator to maintain
its freshness.
9
Get rid of them.
EXP 25022 -080204
The coffee maker
cannot work any
more.
The steam cannot
froth.
The power outlet is
not plugged well.
The steam ready
indicator (green
indicator) is not
illuminated.
The container is too
big or the shape is not
fit.
You have used
skimmed milk
Plug the power cord
into a wall outlet
correctly, if the
appliance still does not
work, please contact
with the authorized
service facility for
repairing.
Only after the steam
ready indicator (green
indicator) is illuminated,
the steam can be used
to froth.
Use high and narrow
cup.
Use whole milk or halfskimmed milk
Do not take apart the appliance by yourself if the cause of failure is
not found, you should better contact a certified service center.
10
EXP 25022 -080204
WARRANTY
We suggest that you complete and return the enclosed Product
Registration Card promptly to facilitate verification of the date of
original purchase. However, return of the Product Registration Card is
not a condition of these warranties. You can also fill this warranty
card online, at the following address: www.KALORIK.com
This KALORIK product is warranted for 1 year from the date of
purchase against defects in material and workmanship. This warranty
is not transferable. Keep the original sales receipt. Proof of purchase
is required to obtain warranty performance.
During this period, the KALORIK product that, upon inspection by
KALORIK, is proved defective, will be repaired or replaced, at
KALORIK's option, without charge to the customer. If a replacement
product is sent, it will carry the remaining warranty of the original
product.
This warranty does not apply to any defect arising from a buyer's or
user's misuse of the product, negligence, failure to follow KALORIK
instructions noted in the user’s manual, use on current or voltage
other than that stamped on the product, wear and tear, alteration
or repair not authorized by KALORIK, or use for commercial purposes.
There is no warranty for glass parts, glass containers, filter basket,
blades and agitators, and accessories in general. There is also no
warranty for parts lost by the user.
ANY WARRANTY OF MERCHANTABILITY OR FITNESS WITH RESPECT TO
THIS PRODUCT IS ALSO LIMITED TO THE ONE YEAR LIMITED WARRANTY
PERIOD
Some states do not allow limitation on how long an implied warranty
lasts or do not allow the exclusion of incidental or consequential
damages, so the above limitations may not apply to you. This
warranty gives you specific legal rights, and you may also have other
rights which vary from state to state.
11
EXP 25022 -080204
If the appliance should become defective within the warranty
period and more than 30 days after date of purchase, do not return
the appliance to the store: often, our Consumer Service
Representatives can help solve the problem without having the
product serviced. If servicing is needed, a Representative can
confirm whether the product is under warranty and direct you to the
nearest service location.
If this is the case, bring the product (or send it, postage prepaid),
along with proof of purchase and indicating a return authorization
number given by our Consumer Service Representatives, to the
nearest authorized KALORIK Service Center (please visit our website
at www.KALORIK.com or call our Customer Service Department for
the address of the nearest authorized KALORIK Service Center).
If you send the product, please include a letter explaining the nature
of the claimed defect.
If you have additional questions, please call our Consumer Service
Department (please see below for complete contact information),
Monday through Friday from 9:00am - 6:00pm (EST). Please note
hours are subject to change.
If you would like to write, please send your letter to:
KALORIK Consumer Service department
Team International Group of America Inc
1400 N.W 159th Street, Suite 102
Miami Gardens, FL 33169 USA
Or call :
Toll Free: +1 888-521-TEAM
Only letters can be accepted at this address above. Shipments and
packages that do not have a return authorization number will be
refused.
12
EXP 25022 -080204
CONSEJOS DE SEGURIDAD
1. LEA TODAS LAS INSTRUCCIONES.
2. Antes de utilizar el aparato, compruebe que el voltaje de la red
eléctrica coincide con el del aparato.
3. No toque las superficies calientes. Siempre utilice las asas o los
botones.
4. Para protegerse contra una descarga eléctrica, no sumerja el
aparato o el enchufe en agua o en otros líquidos.
5. Es siempre necesaria la supervisión cercana cuando se utiliza
este aparato cerca de niños. Este aparato no debe ser usado
por niños.
6. Desconecte el aparato de la toma de corriente cuando la
unidad no se encuentra en uso o antes de limpiarla. Deje enfriar
el aparato antes de insertar o sacar accesorios.
7. No opere este y ningún aparato si el cable o el enchufe están
dañados, o después de que el aparato ha funcionado
inadecuadamente o ha sido dañado en cualquier manera. El
aparato debe ser reemplazado por el fabricante o por un centro
de servicio autorizado o por una persona similar cualificada.
8. El uso de accesorios no recomendados por el fabricante puede
causar lesiones.
9. No use en exteriores
10. No permita que el cable cuelgue del borde de la mesa o del
mostrador o toque las partes calientes.
11. No coloque este aparato cerca de quemadores de gas o
eléctricos, o dentro de un horno caliente.
12. Tenga mucho cuidado cuando desplace un aparato lleno de
aceite caliente u otros líquidos calientes.
13. Enchufe siempre primero el cable al aparato y después en el
enchufe de la red eléctrica. Para desconectar el aparato,
ponga el interruptor en la posición apagada y desenchufe el
aparato.
14. No use este aparato más que para lo que ha sido diseñado.
15. Pueden ocurrir quemaduras si se abre la tapa del depósito de
agua o si se quita el porta filtro durante el uso.
13
EXP 25022 -080204
16. Procure que el aparato no entre en contacto con materiales
fácilmente inflamables como cortinas, tejidos, etc., cuando esté
en funcionamiento, ya que podría provocar un incendio.
17. Si quiere eliminar la cal del aparato utilice solamente un
producto especialmente estudiado para este fin. No utilice
amoniaco o cualquier otro producto que pueda perjudicar la
salud.
18. No haga funcionar la cafetera express sin agua.
19. Evite cualquier contacto con el vapor ya que pueden ocurrir
quemaduras siempre la válvula del vapor esté abierta.
GUARDE ESTAS INSTRUCCIONES
INFORMACIÓN SOBRE EL ENCHUFE POLARIZADO
Algunos aparatos están provistos con un enchufe polarizado (una
pata es más ancha que la otra). Para reducir el riesgo de choque
eléctrico, este enchufe calza en el tomacorriente polarizado de una
sola manera. Si el enchufe no cabe totalmente en el tomacorriente,
gire el enchufe. Si aún así no calza, consulte a un servicio técnico
cualificado. No intente anular esta característica de seguridad.
Para los aparatos provistos con un enchufe clásico, basta con
insertar el enchufe en la toma de corriente.
INSTRUCCIONES DEL CABLE
El cable de alimentación del aparato es un cable corto a fin de
disminuir el riesgo de accidentes (caídas al tropezar con él, etc.)
Puede utilizar un alargador si es necesario.
• Asegúrese de que el nivel eléctrico del cable es igual o
mayor que el indicado. Una extensión con un bajo nivel
eléctrico correría el riesgo de sobrecalentarse y de
estropearse.
• Para evitar riesgos colocar de forma tal que los niños no
puedan jalarlo o tropezar con él. Que no arrastre nunca por
el suelo.
14
EXP 25022 -080204
PARTES
1.
2.
3.
4.
5.
6.
7.
8.
Jarra
Asa
Tapa de la jarra
Boquilla de vapor
Tubo de vapor
Taza medidora
Tapa del depósito de agua
Botón vapor
9. Testigo
10. Red metálica
11. Embudo metálico
12. Barra de presión
13. Asa del embudo metálico
14. Placa amovible
15. Bandeja para recoger el
agua
15
EXP 25022 -080204
A. ANTES DEL USO
1. Saque la cafetera del embalaje y compruebe que estén todos los
accesorios.
2. Limpie todos los accesorios amovibles según las instrucciones del
párrafo “LIMPIEZA Y MANTENIMIENTO”. Luego puede asemblarlo
todo.
3. Compruebe que la red metálica esté bien posicionada. Ponga la
jarra en la placa amovible.
4. Ponga el aparato en marcha sin café en la red metálica. Repita 2
o 3 veces.
B. HACER CAFÉ EXPRESSO
1. Remueva la tapa del depósito girándolo en el sentido contrario
de las agujas del reloj. Vierta el agua en el depósito con la jarra. No
sobrepase la cantidad máxima.
Nota: la jarra tiene marcas de tazas, la cantidad máxima es de 4
tazas, la cantidad mínima es de dos tazas.
2. Antes de verter el agua en el depósito, compruebe que el
aparato esté desenchufado y que el botón de vapor esté en
OFF
posición RELEASE.
Ponga la tapa del depósito girándola en el sentido de las agujas del
reloj hasta que esté fijada.
3. Ponga la red metálica en el embudo metálico, añada café
molido en la red metálica con la cuchara provista. Una cuchara
basta por una taza de café de mucho gusto. Luego presione con
fuerza el café molido.
Nota : elija su café molido deseado y la cantidad de tazas
deseadas, la red metálica tiene marcas por 2 o 4 tazas.
4. Compruebe que las uñas del embudo estén alineadas con las
ranuras del aparato, luego insierta el embudo en la posición
« INSERT ». Ahora puede atar firmemente el embudo en el aparato
girádolo en el sentido contrario de las agujas del reloj hasta que esté
bloqueado en la posición « LOCK ». (fig. 1)
5. Ponga la jarra en la placa amovible. Enchufe el aparato.
16
EXP 25022 -080204
6. Gire el botón de vapor en la posición
. El testigo luminoso se
encenderá. Espere aproximadamente dos minutos, el café va a
pasar.
7. Una vez obtenida la cantidad de café deseada, gire el botón
vapor en la posición
, el testigo luminoso se apagará y el
aparato deja de funcionar, su café está listo. Remueva la jarra y gire
OFF
el botón vapor en posición RELEASE para evacuar el vapor que
queda en el depósito.
CUIDADO : no deje el aparato sin vigilancia durante la preparación
del café puesto que de vez en cuando tendrá que hacerlo
funcionar manualmente.
8. Antes de remover la red metálica o de abrir la tapa del depósito,
compruebe que no haya más presión en el depósito. Por esto, gire
OFF
R
ELEASE
el botón vapor en posición
, el vapor en el depósito va a
evacuarse de la boquilla de vapor. Una vez evacuada la presión,
espere que la red metálica esté enfriada, y luego remuévala o abra
la tapa del depósito.
9. Una vez pasado el café, puede remover la red metálica
girándola en el sentido de las agujas del reloj. Luego vierta el residuo
de café con la red metálica presionada por la barra de presión
(que mantiene la red en su sitio). Déjelos enfriar y enjuáguelos con
agua corriente. Cuando asemble de nuevo la red metálica, ponga
la barra de presión en su posición original.)
C. ESPUMA DE LECHE / HACER CAPPUCINO
Obtiene una taza de cappucino cuando cubre una taza de
espresso con espuma de leche.
1. Por esto, prepare primero un espresso con un recipiente bastante
grande como descrito en la parte « B. HACER ESPRESSO ».
2. Llene una jarra con la cantidad correspondiente de leche por
cada taza deseada. Le recomendamos utilice leche entera a
temperatura de nevera (no caliente !)
Nota : el diámetro de la jarra no debe estar inferior a 75mm. Puesto
que el volumen de la leche va a aumentar, compruebe que la jarra
esté bastante alta.
17
EXP 25022 -080204
3. Gire el botón vapor en posición
, el testigo luminoso se
encenderá.
4. Insierte el boquilla de vapor de dos centímetros en la leche,
después de aproximadamente dos minutos, el vapor saldrá de la
boquilla de vapor. Mueva la taza arriba y abajo para obtener una
espuma uniforme.
5. Una vez conseguida la espuma, gire el botón vapor en posición
para dejar de espumar. Remueva la jarra y gire el botón vapor
OFF
en posición RELEASE para evacuar el vapor que queda en el
depósito.
Nota : limpie inmediatamente la boquilla de vapor con una esponja
una vez acabada la producción de vapor, pero tenga cuidado de
no sufrir quemaduras.
6. Vierta la leche espumada en el espresso ya preparado, el
cappucino está listo. Puede suavizar el gusto y espolvorear con un
poco de cacao.
Nota : le recomendamos dejen el aparato enfriar antes de volver a
hacer café. Si no lo hace, su cappucino podría oler un poco a
quemado.
LIMPIEZA Y MANTENIMIENTO
1. Desenchufe la fuente eléctrica y deje enfriar el aparato
completamente antes de limpiarlo.
2. Limpie a menudo la caja del aparato con una esponja húmeda.
Nota : no limpie con alcohol o disolvente. No sumerja nunca el
aparato en agua para su limpieza.
3. Desate el embudo de metal girándolo en el sentido de las agujas
del reloj, remueva los residuos de café y límpielo con jabón, o al
menos enjuáguelo con agua corriente.
4. Limpie todos los elementos amovibles en agua y séquenlos
cuidadosamente.
18
EXP 25022 -080204
LIMPIAR LOS RESIDUOS MINERALES
1. Para asegurarse que su aparato funcione correctamente, que los
tubos internos estén limpios y que el gusto del café esté bueno,
limpie el residuo mineral cada dos o tres meses.
2. Llene el depósito con agua y desincrustante hasta el nivel MAX
(una dosis de desincrustante por cuatro dosis de agua). Les
recomendamos utilicen un desincrustante « doméstico », puede
utilizar ácido cítrico (disponible en farmacías o en tiendas) en vez
del desincrustante.
3. Ponga el embudo de metal (sin café) y la jarra en su sitio. Pase el
agua come indicado en B. HACER EXPRESSO.
, el testigo se iluminará.
4. Gire el botón vapor en posición
Prepare dos tazas de café. Luego gire el botón vapor en posición
OFF
RELEASE y espere 5 segundos.
5. Gire el botón vapor en posición
y produzca vapor durante 2
OFF
minutos, luego gire el botón vapor en posición RELEASE para apagar
inmediatamente el aparato. Deje el desincrustante actuar en el
aparato durante al menos 15 minutos.
6. Enciende de nuevo el aparato y repita las étapas 4-5 al menos 3
veces.
7. Luego gire el botón vapor en posición
para pasar café hasta
que no haya más desincrustante.
8. Luego pase agua (sin café) con agua corriente en el nivel
máximo. Repita las étapas 4-5 3 veces (no hace falta esperar 15
minutos en la étapa 5), luego pase agua hasta que no haya más
agua en el depósito.
9. Repita la étapa 8 al menos tres veces para asegurarse que los
tubos internos estén limpios.
19
EXP 25022 -080204
RESOLUCION DE PROBLEMAS
Síntomas
La jarra flue o agua
flue de la tapa de
la jarra
Causa
La jarra no está
colocado
correctamente
El nivel de agua en
el depósito está por
encima del nivel
MAX.
Las partes
El desincrustante no
metálicas del
conviene. Puede
depósito están
corroer las partes
herrumbrosas.
metálicas del
depósito
Hay mucha agua en
la bandeja para
Agua flue del fondo recoger el agua
del aparato
El aparato está
defectuoso
Solución
Ponga la línea central
de la jarra alineada
con la abertura de
pasaje del café
El nivel de agua del
depósito debería estar
entre el nivel MIN y
MAX.
Utilice el
desincrustante
recomendado por el
fabricante
Limpie la bandeja
para recoger agua
Contacte un servicio
cualificado
competente para
reparaciones.
Agua flue por el
exterior del filtro
Hay pólvora de café
en el borde del filtro
Remueve el café que
está en el borde
El café tiene sabor
de ácido (vinagre)
El aparato todavía
tiene residuos
minerales
Limpie el aparato
según indicado en el
párrafo “Antes del
primer uso” varias
veces.
20
EXP 25022 -080204
El café está
guardado en un
lugar caliente y
húmedo. Puede
podrir.
El aparato no
funciona.
El aparato no está
bien enchufado
El testigo luminoso
de vapor (luz verde)
no está encendido.
La boquilla de
vapor no hace
espuma.
El recipiente es
demasiado grande
o su forma no
conviene.
Ha utilizado leche
desnatada.
Utilice café fresco, y
guarde el café en un
lugar fresco y seco.
Después de abrir el
paquete de café,
ciérrelo
correctamente y
guárdelo en la nevera
para mantenerlo
fresco.
Enchufe
correctamente la
ficha en la toma de
corriente, si el aparato
todavía no funciona
correctamente,
contacte un servicio
cualificado por
reparaciones.
Only after the steam
ready indicator (green
indicator) is
illuminated, the steam
can be used to froth.
Utilice un recipiente
más alto y lás estrecho
Utilice leche entera o
semi-entera
CUIDADO: NO INTENTE NUNCA ABRIR O DESMONTAR EL CUERPO DEL
APARATO.
21
EXP 25022 -080204
GARANTÍA
Le sugerimos rellenen y nos envíen rápidamente la Tarjeta adjunta
de Registro de Producto adjunto para facilitar la verificación de la
fecha de compra. Por lo tanto, la devolución de esa Tarjeta de
Registro de Producto no es una condición imprescindible para la
aplicación de esa garantía. Puede también rellenar esa carta de
garantía en línea en la dirección siguiente : www.KALORIK.com
A partir de la fecha de compra, este producto KALORIK está
garantizado un año contra los defectos materiales y de fabricación.
Esta garantía no es transferable. Conserve la prueba de compra
original. Se exige una prueba de compra para obtener la aplicación
de la garantía.
Durante este périodo, si el producto KALORIK que, después de una
inspección por parte de KALORIK, se manifiesta defectuoso, será
reparado o reemplazado, según lo que decida KALORIK, sin gastos
para el consumidor. Si se envía un producto de reemplazamiento, se
aplicará la garantía que queda del producto original.
Esta garantía no se aplica a los defectos causados por una mala
utilización por parte del comprador o del utilizador, a una
negligencia, al no respeto del manual de instrucciones KALORIK, a
una utilización en un circuito eléctrico cuyo voltaje es diferente al
que figura en el producto, a un desgaste normal, a modificaciones
o reparaciones no autorizadas por KALORIK, o por un uso con fines
comerciales. No existe garantía por las partes de cristal, jarras de
cristal, filtros, cestos, hojas y accesorios en general. No existe
tampoco garantía por las piezas perdidas por el utilizador.
Toda garantía de valor comercial o de adaptabilidad a este
producto está limitada a un año también.
Algunos estados no ponen límites a la duración de la garantía tácita
o no autorizan la exclusión de daños y perjuicios accesorios o
indirectos, por lo que puede que las restricciones anteriormente
mencionadas no le sean aplicables a Usted. Esta garantía le otorga
derechos legales particulares, pero usted puede tener también otros
22
EXP 25022 -080204
derechos que varían de un estado a otro y algunos derechos
pueden variar de un estado a otro.
Si el aparato tuviera un defecto durante el periodo de garantía y
más de 30 días después de que se compró, no devuelva el aparato
en la tienda donde le compró : a menudo, nuestro Servicio al
Consumidor puede ayudar a resolver el problema sin que el
producto tenga que ser reparado. Si hace falta una reparación, uno
de nuestros representantes puede confirmar si el producto está bajo
garantía y dirigirle al servicio post-venta lo más próximo.
Si fuera el caso, traiga el producto (o envíalo, correctamente
franqueado) con la prueba de compra que mencione el número de
autorización de devolución indicado por nuestro Servicio al
Consumidor, al servicio post-venta KALORIK lo más próximo. (Visite
nuestra web www.KALORIK.com o llame al Servicio al Consumidor
para obtener la dirección del Servicio post-venta KALORIK exclusivo
lo más próximo).
Si envía el producto, le rogamos añadan una carta explicando la
naturaleza del defecto.
Si tiene preguntas adicionales, por favor llame al Servicio al
Consumidor (véase abajo para los datos completos), de lunes a
viernes, de las 9 a las 18 (EST). Note que las horas pueden ser
modificadas.
Si quiere escribirnos, puede hacerlo a la dirección siguiente :
KALORIK Servicio al Consumidor
Team International Group of America Inc
1400 N.W 159th Street, Suite 102
Miami Gardens, FL 33169 USA
O llame gratuitamente al +1 888-521-TEAM
las cartas se aceptan solamente en la dirección anteriormente
mencionada. Los envíos y paquetes que no tengan número de
autorización de devolución serán rechazados.
23
EXP 25022 -080204
K080204
www.KALORIK.com
Back cover page (last page)
Assembly page 24/24