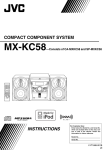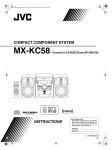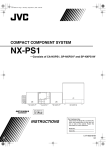
1
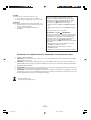
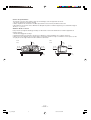
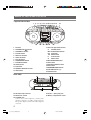
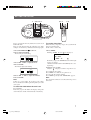
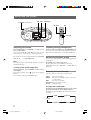
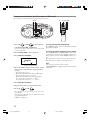
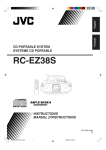
CD PORTABLE SYSTEM
RC-EZ38S
STANDBY/
ON /
CD
TAPE
USB
MENU/
FM MODE
TUNER/
BAND
STOP/
ENTER
RANDOM
REPEAT
PROGRAM/
PRESET
MUTING
SLEEP
EQ
1
2
4
5
7
8
9
0
3
6
VOL
REMOTE CONTROL UNIT
INSTRUCTIONS
For Customer Use:
Enter below the Model No. and Serial No.
which are located either on the rear, bottom or side of the cabinet. Retain this
information for future reference.
Model No.
Serial No.
LVT1494-003A
[J]
01_Cover.p65
1
06.6.26, 8:54 PM
Warnings, Cautions and Others
Mises en garde, précautions et indications diverses
CAUTION
RISK OF ELECTRIC SHOCK
DO NOT OPEN
DO NOT EXPOSE TO RAIN OR MOISTURE
NE PAS EXPOSER À LA PLUIE NI À L’HUMIDITÉ
ATTENTION:RISQUE DE CHOC ELECTRIQUE, NE PAS OUVRIR
The lightning flash with arrowhead symbol,
within an equilateral triangle is intended to
alert the user to the presence of uninsulated
“dangerous voltage” within the product’s
enclosure that may be of sufficient magnitude to constitute a risk of electric shock to
persons.
The exclamation point within an equilateral
triangle is intended to alert the user to the
presence of important operating and maintenance (servicing) instructions in the literature accompanying the appliance.
WARNING: TO REDUCE THE RISK OF FIRE OR
ELECTRIC SHOCK, DO NOT EXPOSE THIS APPLIANCE TO RAIN OR MOISTURE.
For Canada Only:
This Class B digital apparatus complies with
Canadian ICES-003.
Cet appareil nuérimque de la classe B est conforme
à la norme NMB-003 du Canada.
For U.S.A.
This equipment has been tested and found to comply
with the limits for a Class B digital device, pursuant to
part 15 of the FCC Rules. These limits are designed to
provide reasonable protection against harmful
interference in a residential installation.
This equipment generates, uses and can radiate radio
frequency energy and, if not installed and used in
accordance with the instructions, may cause harmful
interference to radio communications. However, there
is no guarantee that interference will not occur in a
particular installation. If this equipment does cause
harmful interference to radio or television reception,
which can be determined by turning the equipment off
and on, the user is encouraged to try to correct the
interference by one or more of the following measures:
Reorient or relocate the receiving antenna.
Increase the separation between the equipment and
receiver.
Connect the equipment into an outlet on a circuit
different from that to which the receiver is connected.
Consult the dealer or an experienced radio/TV
technician for help.
CAUTION
Changes or modifications not approved by JVC could
void the user’s authority to operate the equipment.
For Canada/pour le Canada
THIS DIGITAL APPARATUS DOES NOT EXCEED
THE CLASS B LIMITS FOR RADIO NOISE EMISSIONS FROM DIGITAL APPARATUS AS SET OUT IN
THE INTERFERENCE-CAUSING EQUIPMENT
STANDARD ENTITLED “DIGITAL APPARATUS,”
ICES-003 OF THE DEPARTMENT OF COMMUNICATIONS.
CET APPAREIL NUMERIQUE RESPECTE LES
LIMITES DE BRUITS RADIOELECTRIQUES
APPLICABLES AUX APPAREILS NUMIRIQUES DE
CLASSE B PRESCRITES DANS LA NORME SUR LE
MATERIEL BROUILLEUR; “APPAREILS
NUMERIQUES”, NMB-003 EDICTEE PAR LE
MINISTRE DES COMMUNICATIONS.
– G-1 –
02_Safety.p65
1
06.6.28, 10:06 AM
CAUTION
To reduce the risk of electrical shocks, fire, etc.:
1. Do not remove screws, covers or cabinet.
2. Do not expose this appliance to rain or moisture.
ATTENTION
Afin d’èviter tout risque d’électrocution, d’lncendie. etc.:
1. Ne pas enlever les vis ni les panneaux et ne pas
ouvrir le coffret de l’appareil.
2. Ne pas exposer l’appareil à la pluie ni à
l’humidité.
CAUTION ––
STANDBY/ON button !
Disconnect the mains plug to shut the power off
completely (all lamps and indications go off). When
installing the product, ensure that the plug is easily
STANDBY/ON button in any
accessible. The
position does not disconnect the mains line.
• When the unit is on standby, the STANDBY lamp lights
red.
• When the unit is turned on, the STANDBY lamp goes
off.
The power can be remote controlled.
ATTENTION –– Touche
STANDBY/ON
Déconnectez la fiche de secteur pour mettre l’appareil
complètement hors tension (tous les témoins et toutes
les indications s’éteignent). Lors de l’installation de
l’appareil, assurez-vous que la fiche soit facilement
STANDBY/ON dans
accessible. La touche
n’importe quelle position ne déconnec-te pas l’appareil
du secteur.
• Quand l’appareil est en mode d’attente, le témoin
STANDBY est al-lumé en rouge.
• Quand l’appareil est sous tension, le témoin
STANDBY s’éteint.
L’alimentation ne peut pas être commandée à distance.
IMPORTANT FOR LASER PRODUCTS / IMPORTANT POUR PRODUITS LASER
1. CLASS 1 LASER PRODUCT
2. CAUTION: Do not open the top cover. There are no user serviceable parts inside the unit; leave all servicing to
qualified service personnel.
3. CAUTION: (For U.S.A.) Visible and/or invisible class II laser radiation when open. Do not stare into beam. (For
Canada) Visible and/or invisible class 1M laser radiation when open. Do not view directly with optical instruments.
1. PRODUIT LASER CLASSE 1
2. ATTENTION: N’ouvrez pas le couvercle supérieur. Il n’y a aucune pièce réparable par l’utilisateur à l’intérieur de
l’appareil; confiez toute réparation à un personnel qualifié.
3. ATTENTION: (Pour les Etats-Unis) Radiation laser de classe II visibles et/ou invisible si l’appareil est ouvert. Ne
regardez pas le rayon. (Pour le Canada) Rayonnement laser visible et/ou invisible de classe 1M une fois ouvert.
Ne pas regarder directement avec des instruments optiques.
[European Union only]
[Union européenne seulement]
– G-2–
02_Safety.p65
2
06.6.28, 10:06 AM
Caution: Proper Ventilation
To avoid risk of electric shock and fire, and to prevent damage, locate the apparatus as follows:
1. Front: No obstructions and open spacing.
2. Sides/ Top/ Back: No obstructions should be placed in the areas shown by the dimensions below.
3. Bottom: Place on the level surface. Maintain an adequate air path for ventilation by placing on a stand with a height of
10 cm (3-15/16") or more.
Attention: Aération correcte
Pour prévenir tout risque de décharge électrique ou d’incendie et éviter toute détérioration, installez l’appareil de la
manière suivante:
1. Avant: Bien dégagé de tout objet.
2. Côtés/dessus/dessous: Assurez-vous que rien ne bloque les espaces indiqués sur le schéma ci-dessous.
3. Dessous: Posez l’appareil sur une surface plane et horizontale. Veillez à ce que sa ventilation correcte puisse se faire
en le plaçant sur un support d’au moins dix centimètres de hauteur.
Front
Face
15 cm
(5-15/16")
Side
Côté
15 cm
(5-15/16")
REMOTE
SENSOR
STANDBY
STANDBY/
ON
DISPLAY/
CLOCK
EQ
USB
CD
TUNER/
BAND
HBS
15 cm
(5-15/16")
15 cm
(5-15/16")
15 cm
(5-15/16")
15 cm
(5-15/16")
TAPE
VOLUME
STOP/
ENTER
REPEAT/
PRESET
MENU/
FM MODE
10 cm
(3-15/16")
10 cm
(3-15/16")
– G-3 –
02_Safety.p65
3
06.6.28, 10:06 AM
Thank you for purchasing this JVC product.
Please read these instructions carefully before starting operation to be sure to obtain optimum performance and a
longer service life from the unit.
CONTENTS
FEATURES ................................................................. 1
SAFETY PRECAUTIONS ......................................... 1
HANDLING PRECAUTIONS ................................... 2
POWER SUPPLY ....................................................... 3
NAMES OF PARTS AND CONTROLS .................... 4
REMOTE CONTROL UNIT ...................................... 5
TURNING THE UNIT ON/OFF ................................. 6
SETTING THE CLOCK ............................................. 7
ADJUSTING THE SOUND ........................................ 8
PLAYING COMPACT DISCS ................................... 9
RADIO RECEPTION ............................................... 16
CASSETTE PLAYBACK ......................................... 18
RECORDING ............................................................ 19
MAINTENANCE ...................................................... 20
TROUBLESHOOTING ............................................ 21
SPECIFICATIONS ................................................... 22
FEATURES
1 Portable system incorporating CD player
• CD functions can be operated with the remote
control unit as well as on the main unit.
• 8-cm CD playback capability
2 Digital LCD (Liquid Crystal Display) indicates
general playback status.
3 Synchronized recording with CD/USB
playback
4 MP3/WMA playback capability
5 Hyper-Bass Sound effect
SAFETY PRECAUTIONS
Prevention of Electric Shocks, Fire Hazards
and Damages
• Even when the STANDBY/ON
button is set to
STANDBY, a very small current will flow. When the
unit is turned on, the display window lights up. When
the unit is in standby mode, the display window turns
off. (Note, however, that the display window does not
light even when the unit is turned on if the unit is
operated on batteries.) To save power and for safety
when not using the unit for an extended period of time,
disconnect the power cord from the household AC
outlet.
• Do not handle the power cord with wet hands.
• When unplugging from the wall outlet, always grasp
and pull the plug, not the power cord.
• Consult your nearest dealer when damage,
disconnection, or contact failure is found with the cord.
• Do not bend the cord sharply, or pull or twist it.
• Rating label is placed on the exterior of the rear of the
unit.
• Do not modify the power cord in any manner.
• Do not remove screws to disassemble the unit and do
not touch anything inside the unit to avoid accidents.
• Do not insert any metallic objects into the unit.
• Unplug the power cord when there is a possibility of
lightning.
• If water gets inside the unit, unplug the power cord
from the outlet and consult your dealer.
• Do not block the ventilation holes of the unit so that
heat can escape.
• Do not install the unit in a badly ventilated place.
1
03_01-22_RC-EZ38S.p65
1
06.6.26, 8:46 PM
HANDLING PRECAUTIONS
Do not use this unit in direct sunlight or leave the unit
in a closed automobile (or yacht, etc.) where it would
be exposed to high temperatures above 40°C (104°F).
1 Avoid using the unit in the following places:
• Where the temperature may become excessively
high or low; the recommended temperature range
is 5°C and 35°C (41°F and 95°F).
• Where it could be subject to vibrations.
• Where it is excessively humid, such as in a
bathroom.
• Where it could be magnetized by a magnet or
speaker.
2 Pay attention to dust.
Be sure to close the disc door so that the lens is not
contaminated by dust. Do not touch the lens.
3 Condensation
Condensation may occur in the following cases, in
which the unit may not operate correctly:
• The unit is in a room where a heater has just been
switched on.
• The unit is in a place where there is smoke or high
humidity.
• The unit has just moved from a cold place to a
warm room.
In these cases, set the STANDBY/ON button to ON
and wait one or two hours before use.
4 Volume control
Compact discs produce very little noise compared
with analog records. If you adjust the volume by
listening to the noise as you do with analog records,
the speakers could be damaged by a sudden blast of
sound when playback starts. Therefore, turn down
the volume before starting and adjust it as required
while playing a CD.
5 Safety mechanism
The unit incorporates a safety interlock mechanism
which switches off the laser beam when the disc door
is opened.
6 Do not place magnetic objects such as
cassette tapes near the speakers.
Since the speakers contain magnets inside, do not
place cassette tapes or magnetic cards nearby as
recorded data could be erased.
7 Keep the unit away from the TV.
When the unit is used near a TV, the TV picture could
be distorted. If this happens, move the unit away from
the TV. If this does not correct the situation, avoid
using the unit when the TV is turned on.
8 Cleaning the cabinet
If the cabinet gets dirty, wipe it with a soft, dry cloth.
Never use benzine or thinner as these could damage
the surface finish.
9 When listening with headphones
• Do not listen at high volumes as it could damage
your hearing.
• For safety, do not drive while listening with
headphones.
10 Carrying handle
Do not raise or lower the carrying handle with the
telescopic antenna extended, to avoid damaging the
antenna. Position the carrying handle so that it does
not interfere with operation.
2
03_01-22_RC-EZ38S.p65
2
06.6.26, 8:46 PM
POWER SUPPLY
Checking batteries
Operation on household AC
When the tape speed or output sound level decreases, or
CD playback becomes intermittent, replace all batteries
with fresh ones.
When making an important recording, use new batteries
(preferably alkaline batteries for a longer service life) to
avoid any possible failure.
Connect the AC power cord.
For better battery usage
Supplied power cord
AC outlet
CAUTIONS:
• Use only with the JVC power cord provided with this
unit to avoid malfunction or damage to the unit.
Remove batteries when using the power cord.
• Be sure to unplug the power cord from the outlet when
going out or when the unit is not in use for an extended
period of time.
Operation on batteries
Loading batteries
1 Open the battery cover.
Pull the battery cover toward you while pressing the
sections marked by the arrows.
2 Insert eight R20 (SUM-1)/D (13D)-size batteries
(not supplied).
Be sure to insert the batteries with the ª and ·
terminals positioned correctly.
1
4
3
6
2
8
7
5
• Continuous operation of the unit causes the battery
power to be consumed more quickly than
noncontinuous operation.
• Operation of the unit in a cold place causes the battery
power to be consumed more quickly than in a warm
place.
CAUTIONS:
• When not using the unit for a long time (more than
two weeks) or when using the household AC, remove
the batteries to avoid a malfunction or damage to the
unit.
• When the JVC power cord provided with this unit is
connected, the power is automatically switched from
the batteries to the household AC even when the
batteries are loaded.
However, remove the batteries when using the power
cord.
CAUTIONS WHEN USING BATTERIES:
When batteries are used incorrectly, it may result in
the leakage of chemicals from the batteries or they
may explode. The following care should be taken:
• Check that the positive ª and negative ·
terminals of the batteries are positioned correctly
and load them as shown in the figure on the left.
• Do not mix new and old batteries together, or mix
different types of batteries.
• Do not try to recharge non-rechargeable batteries.
• Remove the batteries when the unit is not to be used
for an extended period of time.
If chemicals from the batteries come in contact with
your skin, wash them off immediately with water. If
chemicals leak onto the unit, clean the unit
completely.
R20 (SUM-1)/D (13D)-size batteries
3 Replace the cover.
3
03_01-22_RC-EZ38S.p65
3
06.6.26, 8:46 PM
NAMES OF PARTS AND CONTROLS
Top and front sides
1 2 3 4 5 6 7 8 9 10 11 12 13 14
15
1
2
3
4
5
6
7
8
9
10
11
12
13
16
17
21
20
18 19
14 Cassette operation buttons
8
PAUSE button
§ STOP/EJECT button
¡ FF button
1 REW button
3
PLAY button
¶
REC button
15 7 STOP/ENTER button
16 4 button
17 REPEAT/PRESET button
18 ¢ button
19 MENU/FM MODE button
20 VOLUME button (+/-)
21 USB terminal
CD door
button
STANDBY/ON
STANDBY indicator
CLOCK button
DISPLAY window
USB 6 button
CD 6 button
TUNER/BAND button
CASSETTE holder
TAPE button
EQ button
REMOTE SENSOR section
HBS button
Rear side
22
23 24
1
2
BEAT CUT PHONES
AC IN
26
22 FM Telescopic antenna
23 BEAT CUT switch
24 PHONES jack
Connect stereo mini headphones (3.5-mm (3/16")
diameters, impedance of 16 Ω to 32 Ω) to this jack.
The speaker output is switched off with headphones
connected.
25
25 AC IN Ó (AC input) jack
26 Battery compartment cover
4
03_01-22_RC-EZ38S.p65
4
06.6.26, 8:47 PM
REMOTE CONTROL UNIT
3 Replace the battery cover.
Installing batteries
1 Remove the battery cover from the back of the
remote control unit.
Battery replacement
2 Insert two AAA (UM-4)/R03-size batteries (not
supplied).
Insert the batteries with the ª and · terminals
matching the indication inside the battery
compartment. Insert the · ends first.
AAA (UM-4)/R03-size batteries
The maximum operating distance between the remote
control unit and the remote sensor section of the unit is
approximately 7 meters. When the operating range
decreases or remote control operation becomes unstable,
replace the batteries with new ones.
Notes on using the remote control
unit
• Point the top of the remote control unit toward the
remote sensor section of the unit as directly as possible.
The operable distance from the main unit decreases if
you point the remote control unit at an angle.
• Press the buttons gently and firmly.
• Do not expose the remote sensor section of the unit to
strong light (direct sunlight or artificial lighting) and
make sure that there are no obstacles between the
remote sensor section and the remote control unit.
Names of buttons
1
2
STANDBY/
ON /
TAPE
MENU/
FM MODE
CD
USB
TUNER/
BAND
STOP/
ENTER
3
4
5
6
RANDOM
REPEAT
PROGRAM/
PRESET
MUTING
SLEEP
EQ
1
2
3
4
5
6
7
8
9
0
VOL
REMOTE CONTROL UNIT
7
1 STANDBY/ON
button
2 TAPE button
MENU/FM MODE button
CD button
USB button
TUNER/BAND button
3 4 button
STOP/ENTER button
¢ button
4 RANDOM button
REPEAT button
PROGRAM/PRESET button
5 MUTING button
SLEEP button
EQ button
6 Number buttons
7 VOLUME +/– buttons
5
03_01-22_RC-EZ38S.p65
5
06.6.26, 8:47 PM
TURNING THE UNIT ON/OFF
STANDBY/ON
STANDBY/ON
STANDBY/
ON /
TAPE
CD
USB
MENU/
FM MODE
TUNER/
BAND
STOP/
ENTER
RANDOM
REPEAT
PROGRAM/
PRESET
MUTING
SLEEP
EQ
1
2
3
4
5
6
7
8
9
0
VOL
REMOTE CONTROL UNIT
STANDBY/ON
button
Press the STANDBY/ON
button on the unit to
turn the unit on.
button on
You can also press the STANDBY/ON
the remote control unit.
The display window lights up when the unit is turned on.
(Note, however, that the display window does not light
even when the unit is turned on if the unit is operated on
batteries.) The unit comes on ready to play the source
selected when the unit was last turned off.
To switch off the power supply completely
Unplug the AC power cord from the AC outlet. If the
batteries are inserted in the unit, take them out.
Notes:
• When you unplug the AC power cord or if a power
failure occurs, the clock is reset to “AM 12:00,” while
the tuner preset stations (see page 17) will be erased in
a few days. The clock indication will keep flashing
until you set the clock again.
• Remove the batteries when carrying the unit by hand
or in the trunk of a car. This prevents the power from
being accidentally turned on, thus avoiding wasteful
battery consumption.
6
03_01-22_RC-EZ38S.p65
6
06.6.26, 8:47 PM
SETTING THE CLOCK
1
2, 4, 6 3, 5
3, 5 1
STANDBY/
ON /
CD
3, 5
TAPE
USB
MENU/
FM MODE
TUNER/
BAND
STOP/
ENTER
RANDOM
REPEAT
PROGRAM/
PRESET
MUTING
SLEEP
EQ
1
2
3
4
5
6
7
8
9
0
VOL
REMOTE CONTROL UNIT
Before operating the unit any further, first set the clock
built in this unit.
There is a time limit in doing the following steps. If the
setting is canceled before you finish, start from step 2 again.
To set the sleep timer
1 Press STANDBY/ON
to turn on.
2 Press and hold CLOCK.
The hour digits start flashing.
1 Press SLEEP.
Flashing “SLEEP 10” and “ S ” are displayed.
When the time you specify elapses, the system will be
turned off automatically.
On the remote control only.
005 00:01
SLEEP 10
3 Press 4 or ¢ to adjust the hour.
4 Press CLOCK.
The minute digits start flashing.
5 Press 4 or ¢ to adjust the minutes.
6 Press CLOCK.
Note:
If there is a power failure, the clock loses the setting.
The clock indication will keep flashing until you set the
clock again.
S
Each time you press the SLEEP button, the time length
changes as follows:
10=20=30=60=90=120=OFF=(back to the
beginning)
2 Wait for a few seconds.
Only the “ S ” is displayed, and the sleep timer is set.
To Confirm the Sleep Time:
Press SLEEP once while the sleep timer is set.
To Cancel the Sleep Timer Setting:
Press SLEEP repeatedly until “SLEEP OFF” appears.
Note:
The sleep timer will also be cancelled when the power is
turned off.
To show the clock when the unit is on
Press CLOCK.
Each time you press the button, the display changes the
clock indication and the normal indication alternately.
7
03_01-22_RC-EZ38S.p65
7
06.6.26, 8:47 PM
ADJUSTING THE SOUND
PHONES (on the rear)
EQ HBS
VOLUME +/–
EQ
MUTING
STANDBY/
ON /
CD
TAPE
MENU/
FM MODE
USB
TUNER/
BAND
STOP/
ENTER
RANDOM
REPEAT
PROGRAM/
PRESET
MUTING
SLEEP
EQ
1
2
3
4
5
6
7
8
9
0
VOL
VOL 5/∞
REMOTE CONTROL UNIT
Adjusting the volume
Listening through headphones
Press VOLUME + or VOLUME – to increase or
decrease the volume.
You can press VOL 5 or VOL ∞ on the remote control
unit to increase or decrease the volume respectively.
Connect a pair of headphones to the PHONES jack.
No sound comes out of the speakers anymore. Be sure to
turn down the volume before connecting headphones.
The volume level can be adjusted in 41 steps (VOLUME
MIN, 01, 02, ... 39, VOLUME MAX).
Reinforcing the bass sound
Note:
The volume level is automatically adjusted to 15 when
the unit is turned on.
Turning off the sound temporarily
During playback, press MUTING on the remote
control unit.
The sound is turned off and appears in the display
window.
To restore the sound, press MUTING again.
You can enjoy powerful bass sound with the Hyper-Bass
Sound effect.
Press HBS once to turn on the effect.
To turn off the effect, press HBS one more time.
When HBS is pressed, “HBS ON” or “HBS OFF” is
displayed.
Selecting the sound modes
You can select one of the 5 preset sound modes.
JAZZ
ROCK
: Good for jazz music.
: Boosts low and high frequency. Good for
acoustic music.
POP
: Good for vocal music.
CLASSIC: Good for classical music.
FLAT
: Normal sound.
To select the sound mode
Press EQ repeatedly until the indicator for the sound
mode you want appears in the display window.
Each time you press the button, the sound mode changes
as follows:
JAZZ
ROCK
CLASSIC
POP
FLAT
8
03_01-22_RC-EZ38S.p65
8
06.6.26, 8:47 PM
PLAYING COMPACT DISCS
Notes on compact discs
This unit has been designed only to play back the
following CDs.
• Digital audio CD
• Recordable digital audio CD (CD-R)
• Rewritable digital audio CD (CD-RW)
– Playback order of MP3/WMA tracks may be
different from the one you have intended while
recording. If a folder does not include MP3/WMA
tracks, they are ignored.
Handling discs
Since dirty, damaged or warped discs could damage the
unit, care should be taken of the following:
• Do not touch the reflective recorded surface.
• Do not stick or write anything on the label side.
• Do not bend discs.
Storage
When playing a CD-R or CD-RW
You can play back finalized CD-R or CD-RW recorded
in music CD format or in MP3 or WMA format. (If a
CD-RW has been recorded in a different format, erase
all the data on the CD-RW completely before recording
on it.)
• You can play back CD-R or CD-RW in music CD
format like an audio CD.
• Some CD-R or CD-RW may not be played back on
this unit because of their disc characteristics, damage
or stain on them, or if the player lens is dirty.
• The reflection factor of CD-RW is lower than that of
other CDs, possibly causing CD-RW to take longer
time to read.
• After removing a disc from the unit, be sure to put it
back in its case.
• Do not expose discs to direct sunlight, high
temperatures from a heater, etc., high humidity or dust.
Cleaning discs
Before loading a disc, wipe off any dust, dirt or
fingerprints with a soft, dry cloth. Discs should be
cleaned by wiping radially, from the center to edge.
Never use thinner, benzine, record cleaner or antistatic
spray.
• Removing the disc from its storage case and
replacing it
Playing Back a Disc/USB Memory/DAP:
• This System cannot play “packet write” discs.
• For MP3/WMA playback...
– MP3/WMA discs are required a longer readout time
than regular CDs. (It depends on the complexity of
the group/file configuration.)
– Some MP3/WMA files cannot be played back and
will be skipped.
This result from their recording processes and
conditions.
– When making MP3/WMA discs, use ISO 9660 Level
1 for the disc format.
– This System can play back MP3/WMA files with the
extension code <.mp3> or <.wma> (regardless of the
letter case–upper/lower).
– Some characters or symbols will not be shown
correctly on the display.
The maximum character number shown on the
display is 32 (without the extension code) for files,
and 30 for ID3 tag.
– It is recommended that you make each MP3 file at a
sampling rate of 44.1 kHz and at a bit rate of 128
kbps. Similarly each WMA file at a sampling rate of
44.1 kHz and at a bit rate of 96 kbps.
– This System can recognize the total of 999 tracks
and of 499 groups. Those exceeding the maximum
number cannot be recognized.
Press the center and lift out.
Press to secure the disc.
• Handling
Incorrect
• Cleaning
Correct
Incorrect
9
03_01-22_RC-EZ38S.p65
9
06.6.26, 8:47 PM
PLAYING COMPACT DISC
2
31
4
3
4
STANDBY/
ON /
CD
MENU/
FM MODE
TAPE
TUNER/
BAND
USB
STOP/
ENTER
RANDOM
REPEAT
PROGRAM/
PRESET
MUTING
SLEEP
EQ
1
2
3
4
5
6
7
8
9
0
VOL
REMOTE CONTROL UNIT
1 Press PUSH OPEN/CLOSE to open the disc door.
2 Load a disc with the label side facing up and close
the disc door.
• 8-cm CD can be played on the unit without an
adapter.
The following indications are displayed.
Track number
4 Adjust the volume.
Notes:
• When an MP3 or WMA file is loaded, it may take more
than 30 seconds to be read in, depending on the amount
of information compiled in the disc.
• The following indication may be displayed when the
disc is loaded upside down. Reload the disc correctly.
CD:
001 00:00
Total 12
56:03
• Mistracking may occur if a strong shock is applied to
the unit or if it is used in a place subject to vibrations
(e.g. in a car travelling on a rough road).
Total number of tracks
Track number
MP3:
WMA
CD SCANNED
NO DISC
Total
playing time
To stop playback
001 00:00
Total 141
Press STOP/ENTER.
You can press STOP/ENTER on the remote control unit
to stop playback.
Total number of tracks
3 Press CD
STOP/
ENTER
STOP/
ENTER
to start playback.
You can start playback by pressing CD on the remote
control unit.
Main unit
Remote
CD:
001
00:13
Elapsed
playing time
CD
DA
(Track information scroll)
Track number
MP3:
WMA
001
Caution:
Stop playback before opening the disc door. Check that
the disc has completely stopped rotating before
unloading the disc.
Sampling frequency
00:13
MP
3
44
KHZ
128
KBPS
Bit rate
(File information scroll)
File format
Elapsed playing time
10
03_01-22_RC-EZ38S.p65
10
06.6.26, 8:47 PM
To pause playback
Press CD
during playback.
To resume playback, press the button again.
CD
CD
Main unit
Remote
Selecting a desired track directly
Use the number buttons on the remote control unit.
Example:
• To select track 8, press 8.
• When the total number of tracks is double-digits:
To select track 21, press 0 , 2 , then 1.
• When the total number of tracks is triple-digits:
To select track 21, press 0 , 0 , 2 , then 1.
To select track 115, press 0 , 1 , 1 , then 5.
Search – locating a desired position on the
disc (audio CD only)
Press and hold 4 or ¢ during playback.
Monitor the sound and release the button when the
desired position is located.
Main unit
Remote
11
03_01-22_RC-EZ38S.p65
11
06.6.26, 8:47 PM
PLAYING USB
Playing a USB
Operate in the order shown
2
4
2
1
2
STANDBY/
ON /
TAPE
CD
USB
4
MENU/
FM MODE
TUNER/
BAND
STOP/
ENTER
RANDOM
REPEAT
PROGRAM/
PRESET
MUTING
SLEEP
EQ
1
2
3
4
5
6
7
8
9
0
VOL
REMOTE CONTROL UNIT
1 Open the USB terminal cover.
2 Insert a USB.
• Press the USB 6 button to start play.
3 The track number is displayed.
To stop play
During playback, press the 7 button to stop play.
STOP/
ENTER
STOP/
ENTER
Elapsed playing time
Track
number
USB
001
00:02
44
KHZ
128
KBPS
MP MY HEART WILL GO ON.MP3
3
4 Adjust the sound.
Skipping
• To skip back to the previous track
During playback, press 4 once to return to the
beginning of the current track, press twice to skip back
to the beginning of the previous track.
• To skip to the next track
During playback, press ¢ to skip to the beginning
of the next track.
Main unit
Remote
Main unit
• To stop a USB temporarily
Press the USB PLAY/PAUSE 6 button to stop
play temporarily.
When pressed again, play resumes from the point
where it was paused.
USB
USB
Main unit
12
Remote
IMPORTANT:
• Always set volume to “VOLUME MIN” when
connecting or disconnecting the other equipment.
• Connect the USB Memory or DAP directly to the
top cabinet of the unit. Connecting via a USB hub
may result in malfunction.
• USB Memory and DAPs compatible with the USB
mass storage class specifications are connectable.
• Some DAPs are not compatible with the unit.
• Copyrighted tracks (WMA-DRM* tracks) cannot
be played on the unit.
• Coded or encrypted tracks in a special method
cannot be played on the unit.
* DRM (Digital Rights Management): Any of several
technical methods used to control or restrict the use of
digital media content on electronic devices with such
technologies installed.
12
03_01-22_RC-EZ38S.p65
Remote
06.6.26, 8:48 PM
Repeat/Random playback (for CD mode or USB mode)
REPEAT
REPEAT
STANDBY/
ON /
CD
TAPE
USB
MENU/
FM MODE
TUNER/
BAND
STOP/
ENTER
RAN
DOM
RANDOM
REPEAT
PROGRAM/
PRESET
MUTING
SLEEP
EQ
1
2
3
4
5
6
7
8
9
0
VOL
REMOTE CONTROL UNIT
Repeat playback
Random playback
Press REPEAT during playback.
Press RANDOM in CD mode so that the RANDOM
indicator lights up in the display window.
You can press RANDOM on the remote control unit to
select random playback.
Tracks are played in random order.
REPEAT/
PRESET
REPEAT
Main unit
Remote
Each time you press the button, the repeat mode changes
in the following order:
To cancel random playback, press the button again so
that the RANDOM indicator goes off.
In case of an audio CD or USB mode:
Repeat playback of a single track
1
Repeat playback of all tracks on the disc
ALL
Repeat playback is canceled.
13
03_01-22_RC-EZ38S.p65
13
06.6.26, 8:48 PM
Programmed playback (for CD mode or USB mode)
Up to 32 tracks can be programmed to play in any desired order.
2 1, 7
1, 7 2 3, 5
4
STANDBY/
ON /
TAPE
CD
USB
MENU/
FM MODE
TUNER/
BAND
STOP/
ENTER
RANDOM
REPEAT
PROGRAM/
PRESET
MUTING
SLEEP
EQ
1
2
3
4
5
6
7
8
9
0
VOL
REMOTE CONTROL UNIT
1 Press CD
or USB
to enter each mode,
if the unit is in TUNER or TAPE mode.
You can press CD or USB on the remote control unit
to enter each mode.
2 Press STOP/ENTER to enter stop mode.
3 Press PROGRAM/PRESET.
PROGRAM
P 01 T
Track to be programed
4 Press the number buttons on the remote control
unit to select a desired track to be programmed.
Example:
• To select track 8, press 8.
• When the total number of tracks is double-digits:
To select track 21, press 0 , 2 , then 1.
• When the total number of tracks is triple-digits:
To select track 21, press 0 , 0 , 2 , then 1.
To select track 115, press 0 , 1 , 1 , then 5.
To repeat programmed playback
Press REPEAT on the remote control unit after starting
programmed playback.
To erase the entire program in the memory
Press STOP/ENTER (or STOP/ENTER on the remote
control unit) in stop mode when “PROG” is displayed.
The program is cleared, and the PROG indicator goes
off.
The program is also cleared when you open the disc door,
turn off the unit or change to other audio sources.
Note:
You cannot program more than 32 tracks.
“FULL MEMORY” is displayed when you program the
32nd track.
5 Press PROGRAM/PRESET.
6 Repeat steps 4 and 5 to program other tracks.
7 Press CD
or USB
.
The tracks are played in the order you have
programmed.
You can press CD on the remote control unit to start
programmed playback.
“PROG” is displayed.
14
03_01-22_RC-EZ38S.p65
14
06.6.26, 8:48 PM
Confirm/Play MP3 or WMA files on a CD or a USB
1 Press MENU/FM MODE.
Floders are displayed.
ROOT
USB
ROOT
ALBUM1
• Press 4 or ¢ to change to another folder on
the same layer.
• Press STOP/ENTER to change to a lower layer.
• Press MENU/FM MODE to change to an upper
layer.
2 Press 4 or ¢ to select a desired track(file).
3 Press STOP/ENTER to play.
: Track
: Folder
15
03_01-22_RC-EZ38S.p65
15
06.6.26, 8:48 PM
RADIO RECEPTION
Tuning in a station
21
3
2
123
STANDBY/
ON /
CD
TAPE
USB
MENU/
FM MODE
TUNER/
BAND
STOP/
ENTER
RANDOM
REPEAT
PROGRAM/
PRESET
MUTING
SLEEP
EQ
1
2
3
4
5
6
7
8
9
0
VOL
REMOTE CONTROL UNIT
1 Press TUNER/BAND to select the band, FM or
AM.
You can press TUNER on the remote control unit to
select the band.
2 Press and hold 4 or ¢ for more than 1
second.
The unit starts searching and stops when a station of
sufficient signal strength is tuned in.
If you press 4 or ¢ briefly and repeatedly,
the frequency changes.
3 Adjust the volume.
Using the antennas
FM
AM
Changing the FM reception mode
When an FM stereo broadcast is hard to receive or noisy,
reception improves in monaural reception.
Press MENU/FM MODE.
STEREO indicator appears in the display window.
Press the button again to show MONO indicator in
the display window.
Select either mode for a better reception.
MENU/
FM MODE
MENU/
FM MODE
Main unit
Note:
The built-in ferrite core antenna may pick up interference
from television receivers in the neighborhood disturbing
AM reception.
Remote
Note:
The FM reception mode setting may be canceled when
you tune in another station.
16
03_01-22_RC-EZ38S.p65
16
06.6.26, 8:48 PM
Presetting stations
You can preset 30 FM and 15 AM stations.
2, 4
3
3
2, 4 3
STANDBY/
ON /
TAPE
CD
USB
MENU/
FM MODE
TUNER/
BAND
STOP/
ENTER
RANDOM
REPEAT
PROGRAM/
PRESET
MUTING
SLEEP
EQ
1
2
3
4
5
6
7
8
9
0
VOL
REMOTE CONTROL UNIT
There is a time limit in doing the following steps. If the
setting is canceled before you finish, start from step 3
again.
Note:
In some cases, test frequencies have been already
memorized for the tuner since the factory examined the
tuner preset function before shipment. This is not a
malfunction. You can preset the stations you want into
memory by following the presetting method.
1 Tune in the station you want to preset.
2 Press STOP/ENTER.
The preset number starts blinking in the display
window.
STEREO
FM
Tuning in a preset station
1 Press TUNER/BAND to select the band, FM or
AM.
2 Press PROGRAM/PRESET.
3 Press 4 or ¢ to select the preset number.
You can use the number buttons on the remote control
unit to select the preset number directly.
Example:
To select preset number 5, press 5.
To select preset number 15, press 0, 1, then 5.
To select preset number 20, press 0, 2, then 0.
Note:
If you unplug the AC power cord or if a power failure
occurs, the preset stations will be erased in a few days. If
this happens, preset the stations again.
91.50 MHz
MEMORY CH 04
Preset number
3 Press 4 or ¢ to select the preset number.
4 Press STOP/ENTER.
“STORED” is displayed and the tuned station is
stored.
STEREO
FM
91.50 MHz
STORED
Repeat steps 1 to 4 to preset other stations, using
different preset numbers.
17
03_01-22_RC-EZ38S.p65
17
06.6.26, 8:48 PM
CASSETTE PLAYBACK
Notes on cassette tapes
Loading a cassette
• Use only type-I normal tapes. The recording/playback
characteristics of this unit are those for normal tapes,
which have different characteristics from CrO2 and
metal tapes.
• The use of tapes longer than 120 minutes is not
recommended, since characteristic deterioration may
occur and these tapes easily jam in the pinch roller and
the capstan.
• Loose tape may cause trouble. Gently tighten the tape
with a pencil as shown in the figure below.
1 Press § STOP/EJECT to open the cassette
holder.
2 Load a cassette with the open side up and the
playback side facing out as shown in the figure
below.
Forward direction =
Turn the pencil to take up
the slack.
3 Close the cassette holder by pressing it gently and
firmly.
The cassette holder clicks back into position.
• To prevent recordings from being accidentally erased,
remove the tab(s) with a screwdriver. After the tabs
have been broken off, reseal the slots with adhesive
tape to erase or re-record.
Basic operation
1 3 4
2
1
STANDBY/
ON /
CD
TAPE
USB
4
MENU/
FM MODE
TUNER/
BAND
STOP/
ENTER
RANDOM
REPEAT
PROGRAM/
PRESET
MUTING
SLEEP
EQ
1
2
3
4
5
6
7
8
9
0
VOL
REMOTE CONTROL UNIT
1 Press TAPE to enter the tape mode.
2 Load a cassette.
Use only a type-I normal tape.
3 Press 3 PLAY to start playback.
4 Adjust the volume.
To stop playback
Press § STOP/EJECT.
The tape also stops when it reaches the end.
Fast-winding a tape
Press 1 REW or ¡ FF.
When the tape reaches the end, press § STOP/EJECT
to release 1 REW or ¡ FF.
18
03_01-22_RC-EZ38S.p65
18
06.6.26, 8:48 PM
RECORDING
1
3
2
1
STANDBY/
ON /
CD
1
TAPE
MENU/
FM MODE
USB
TUNER/
BAND
STOP/
ENTER
RANDOM
REPEAT
PROGRAM/
PRESET
MUTING
SLEEP
EQ
1
2
3
4
5
6
7
8
9
0
VOL
REMOTE CONTROL UNIT
Standard recording
1 Prepare the recording source.
• When recording from the radio:
Set to the tuner mode and tune in a desired station.
• When recording from a CD:
Set to the CD mode and load a CD.
2 Load a blank or erasable cassette.
Use only a type-I normal tape.
3 Press ¶ REC.
3 PLAY is also depressed, and recording starts.
To stop recording
Press § STOP/EJECT.
The tape also stops when it reaches the end.
Notes:
• It should be noted that it may be unlawful to rerecord pre-recorded tapes, records, or discs without
the consent of the owner of copyright in the sound
or video recording, broadcast or cable program and
in any literary, dramatic, musical, or artistic work
embodied therein.
• The recording level is automatically set correctly, so it
is not affected by VOLUME. Thus, during recording
you can adjust the sound you are actually listening to
without affecting the recording level.
• If a recording you made has excessive noise or static,
the unit may have been too close to a TV which was on
during the recording. Either turn off the TV or increase
the distance between the TV and the unit.
Using the beat-cut function
When recording an AM broadcast, beats may occur.
If this happens while recording an AM broadcast, adjust
the BEAT CUT switch on the rear to select the beat-cut
setting, “1” or “2.”
1
2
BEAT CUT
Synchronized recording with the CD or USB
player
• In this unit, the CD or USB player starts playback when
deck enters the recording mode.
1 Set the STANDBY/ON
button to ON.
2 Load a cassette.
3 Load a disc.
4 Set to CD or USB.
5 Press the ¶ REC button and 3 PLAY buttons,
synchronized recording will start.
• When the tape reaches the end first, the CD or USB
player pauses automatically; when the CD or USB
player stops first, the tape continues running. In this
case, press the § STOP/EJECT button to stop
the tape.
8 PAUSE button
First of all, press the 8 PAUSE button. Then, press the ¶
REC and 3 PLAY buttons, thus entering the record-pause
(standby) mode. After that re-press the PAUSE button at
the exact moment you want to start recording. This releases
the tape to begin recording at a precise moment.
• Do not leave the unit in pause mode for more than a
few minutes. Instead, push the § STOP/EJECT
button and turn the power off.
Erasing
When recording on a pre-recorded tape, the previous
recording is automatically erased and only the new
material can be heard when the tape is played.
To erase a tape without making a new
recording ...
1 Press TAPE to enter the tape mode.
2 Press ¶ REC to start recording.
Caution:
If a recording you make has excessive noise or static, the
unit may have been too close to a TV which was on
during the recording. Either turn off the TV or increase
the distance between the TV and the unit.
19
03_01-22_RC-EZ38S.p65
19
06.6.29, 4:36 PM
MAINTENANCE
Cleaning the heads, capstan and
pinch roller
Cleaning is important!
When the tape is running, magnetic powder and dust
naturally accumulate on the heads, capstan and pinch
roller. When they become too dirty;
• Sound quality deteriorates.
• The sound output level drops.
• The previous recording is not completely erased.
• Recording is not performed satisfactorily.
To avoid these, clean the heads, capstan and pinch roller
every 10 hours of use.
Cleaning the CD pickup lens
If the CD pickup lens is dirty, the sound may be
degraded.
Open the disc door and clean the lens.
Use a blower (available at a camera store, etc.) to blow
off dust on the lens.
Head (recording/playback)
Pinch roller
Erasure head
Capstan
Open the cassette holder. Clean the heads, capstan
and pinch roller.
For effective cleaning, use a cleaning kit available at an
audio store.
After cleaning, make sure that the cleaning fluid has
dried completely before loading a cassette.
Blower
Lens
Cautions:
• Keep magnets and metallic objects away from the
head. If the head becomes magnetized, noise will
increase and the sound will deteriorate.
• Demagnetize the recording/playback head every 20 to
30 hours of use with a head demagnetizer available at
an audio store. When demagnetizing the head, the unit
should be turned off.
As the erasure head of the unit is of magnetic type,
do not demagnetize it.
• Do not use anything other than alcohol for cleaning.
Thinner and benzine will damage the rubber pinch
roller.
20
03_01-22_RC-EZ38S.p65
20
06.6.26, 8:49 PM
TROUBLESHOOTING
• If you are having a problem with your unit, check this
list for a possible solution before calling for service.
Symptom
• If you cannot solve the problem from the hints given
here, or the unit has been physically damaged, call a
qualified person, such as your dealer, for service.
Possible cause
Power cannot be turned on.
The power cord is unplugged.
When 3 PLAY is pressed, tape does not 8 PAUSE is pressed.
move.
Action
Connect the power cord.
Press 8 PAUSE again to release it.
Playback sound is at a very low level.
• Batteries are run down.
• The head is dirty.
¶ REC does not function.
• The safety tabs of the cassette have • Reseal the slots with adhesive tape.
been broken off.
• No cassette is loaded.
• Load a cassette.
The disc is loaded but does not play.
• The disc is upside down.
•
•
•
•
No sound from the speakers.
The disc is dirty.
The disc is damaged or warped.
The lens is dirty.
There is moisture condensation.
Headphones are connected.
• Replace the batteries with new ones.
• Clean the head.
• Load the disc with the label side facing
up.
• Clean the disc.
• Replace the disc with a playable one.
• Clean the lens.
• Turn the unit on and wait one or two
hours before use.
Disconnect the headphones.
Since the tape speed is irregular, wow • The pinch roller or capstan is dirty.
and flutter occur.
• Batteries are run down.
• Clean the pinch roller and capstan.
• Replace the batteries with new ones.
Radio reception is poor and there is The antenna is not properly adjusted.
much static.
Adjust the antenna correctly.
Remote control is impossible.
• Batteries in the remote control unit are • Replace the batteries with new ones.
run down.
• The remote sensor section is exposed • Try not to operate the unit under direct
to bright light (direct sunlight, etc.)
sunlight, etc.
If this product does not function properly even after you have implemented the possible solutions
given above
Many functions of this product are implemented by microcomputers. If malfunction is caused by thunder or static
electricity, or the main unit does not function properly even when you press a button, disconnect the power plug from
the AC outlet, wait for a while, and then connect this product again.
Note:
When the unit is moved from a cold place of around 0˚C (32°F) to a warm place, it may not operate normally, because
moisture has formed inside the unit. Normal operation will be restored after waiting one or two hours.
21
03_01-22_RC-EZ38S.p65
21
06.6.26, 8:49 PM
SPECIFICATIONS
CD player
CD capacity
Signal-to-noise ratio
Dynamic range
General
: 1 CD
: 60 dB
: 60 dB
Speakers
Speaker impedance
Output power
Tuner
FM tuning range
AM tuning range
Antennas
: 87.5 MHz – 108.0 MHz
: 520 kHz – 1 710 kHz
: Telescopic antenna for FM
Ferrite core antenna for AM
Output terminals
Power supply
Power consumption
Cassette deck
Frequency response
Wow & flutter
Fast wind time
: 100 Hz – 8 000 Hz
: 0.35% (WRMS)
: Approx. 170 sec.
(C-60 cassette)
Dimensions
Mass
Accessories provided
: Main
10 cm cone × 2
Tweeter 3.5 cm cone × 2
: 3Ω
: 2 W per channel, min. RMS,
driven into 3 Ω at 1 kHz with
no more than 10 % total
harmonic distortion.
: PHONES × 1
: AC 120 V Ó, 60 Hz
DC 12 V (R20 (SUM-1)/D
(13D)-size batteries × 8)
: 10 W (at operation)
1.4 W (on standby)
: 435 mm × 165 mm ×
240 mm (17-3/16" × 6-1/2" ×
9-1/2") (W/H/D)
: Approx. 3.6 kg (8lbs)
(without batteries)
: AC power cord × 1
Remote control unit × 1
Design and specifications are subject to change without
notice.
22
03_01-22_RC-EZ38S.p65
22
06.6.28, 10:07 AM
WARRANTY REPAIR / REPLACEMENT FORM
PLEASE COMPLETE THE FOLLOWING;
PLEASE NOTE : P.O. BOXES ARE NOT ACCEPTABLE
NAME:
STREET ADDRESS:
CITY:
STATE
ZIPCODE
DAY TIME PHONE NUMBER:
REASON FOR RETURN
Please do not return your product to the retailer. Instead, please box the product carefully, preferably
in the original carton, and ship, insured to the JVC repair/replacement facility nearest you.
A COPY OF YOUR BILL OF SALE, A COMPLETED WARRANTY REPAIR/REPLACEMENT FORM AND
ALL OF THE ORIGINAL ACCESSORIES WHICH CAME WITH YOUR UNIT MUST ACCOMPANY THE
PRODUCT TO BE ELIGIBLE FOR REPAIR/REPLACEMENT UNDER WARRANTY.
To obtain the address of the location nearest you, please call (800) 252-5722 or visit our website http://www.jvc.com.
If you have any questions concerning your JVC Product, please contact our Customer Care Center at (800) 252-5722.
BT-51025-5
(0605)
03_01-22_RC-EZ38S.p65
23
06.6.26, 8:49 PM
03_01-22_RC-EZ38S.p65
24
06.6.26, 8:49 PM
EN
© 2006 Victor Company of Japan, Limited
99_AR-FCV_RC-EZ38S.p65
2
0606NSMCREMTS
06.6.15, 1:40 PM