1
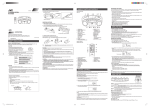
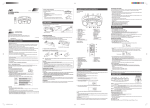
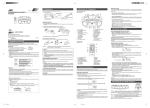
CD PORTABLE SYSTEM
SISTEMA PORTÁTIL CON REPRODUCTOR DE CDs
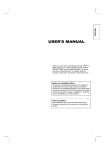
RC-EX30B
PROGRAM
/
CLOCK SET
PRES
ET
DOWN
PRESET
UP
HBS/
PRESET
STANDBY/ON
CD/
RANDOM
1
TUNER/
BAND
TAPE
2
3
EQ
PUSH
DISPLAY
4
5
6
HBS/
PRESET EQ
7
8
FM MODE
/BEAT CUT
9
GR
OU
OVER
P
0
UP
PROGRAM/
CLOCK SET
INTRO
+
PRESET
REPEAT
MUTING
GROUP
DOWN
–
TA
PE
STOP
RAND
US
/PA
OM
CD
E
PLAY
TUNE
BAND
R
REMOTE
SENSOR
DISPLAY
VOLUME
RM-SRCEX30J REMOTE CONTROL
INSTRUCTIONS
MANUAL DE INSTRUCCIONES
For Customer Use:
Enter below the Model No. and Serial No.
which are located on the rear of the
cabinet.
Retain this information for future reference.
Model No.
Serial No.
LVT1213-001A
[J]
00_FCV_RC-EX30B_J.p65
1
04.4.12, 3:56 PM
Warnings, Cautions and Others
Avisos, precauciones y otras notas
CAUTION
RISK OF ELECTRIC SHOCK
DO NOT OPEN
DO NOT EXPOSE TO RAIN OR MOISTURE
NE PAS EXPOSER À LA PLUIE NI À L'HUMIDITÉ
ATTENTION:RISQUE DE CHOC ELECTRIQUE, NE PAS OUVRIR
The lightning flash with arrowhead symbol, within
an equilateral triangle is intended to alert the user
to the presence of uninsulated “dangerous voltage”
within the product’s enclosure that may be of
sufficient magnitude to constitute a risk of electric
shock to persons.
The exclamation point within an equilateral triangle
is intended to alert the user to the presence of
important operating and maintenance (servicing)
instructions in the literature accompanying the
appliance.
For U.S.A.
This equipment has been tested and found to comply with the
limits for a Class B digital device, pursuant to part 15 of the FCC
Rules.
These limits are designed to provide reasonable protection against
harmful interference in a residential installation.
This equipment generates, uses and can radiate radio frequency
energy and, if not installed and used in accordance with the
instructions, may cause harmful interference to radio
communications. However, there is no guarantee that interference
will not occur in a particular installation. If this equipment does
cause harmful interference to radio or television reception, which
can be determined by turning the equipment off and on, the user
is encouraged to try to correct the interference by one or more of
the following measures:
Reorient or relocate the receiving antenna.
Increase the separation between the equipment and receiver.
Connect the equipment into an outlet on a circuit different from
that to which the receiver is connected.
Consult the dealer or an experienced radio/TV technician for help.
– G-1 –
01_G1-G2_RC-EX30B_J.p65
1
04.4.12, 3:56 PM
WARNING: TO REDUCE THE RISK OF FIRE
OR ELECTRIC SHOCK, DO NOT EXPOSE
THIS APPLIANCE TO RAIN OR MOISTURE.
CAUTION
To reduce the risk of electrical shocks, fire, etc.:
1. Do not remove screws, covers or cabinet.
2. Do not expose this appliance to rain or moisture.
PRECAUCIÓN
Para reducir posibles riesgos de descargas eléctricas, incendios, etc,
le recomendamos que:
1. No quite los tornillos, cubiertas ni el cabinete.
2. No deje expuesto este aparato a la lluvia ni a la humedad.
Caution — STANDBY/ON button!
Disconnect the mains plug to shut the power off completely. The
STANDBY/ON button in any position does not disconnect the
mains line.
Precaución — Interruptor STANDBY/ON!
Desconectar el cable de alimentación para desactivar la
alimentación totalmente. Cualquier que sea la posición de ajuste
del interruptor STANDBY/ON, la alimentación no es cortada
completamente.
IMPORTANT FOR LASER PRODUCTS
1. CLASS 1 LASER PRODUCT
2. CAUTION: Do not open the top cover. There are no user serviceable
parts inside the unit; leave all servicing to qualified service personnel.
3. CAUTION: Visible and invisible laser radiation when open and
interlock failed or defeated. Avoid direct exposure to beam.
4. REPRODUCTION OF LABEL: CAUTION LABEL, PLACED INSIDE
THE UNIT.
IMPORTANTE PARA PRODUCTOS LÁSER
1. PRODUCTO LÁSER CLASE 1
2. PRECAUCIÓN: No abra la tapa superior. En el interior de la unidad
no hay piezas que pueda reparar el usuario; encargue el servicio a
personal técnico cualificado.
3. PRECAUCIÓN: Radiación láser visible e invisible en caso de
apertura o con interbloqueo averiado o defectuoso. Evite la
exposición directa a los haces.
4. REPRODUCCIÓN DE LA ETIQUETA: ETIQUETA DE
PRECAUCIÓN, COLOCADA EN EL INTERIOR DE LA UNIDAD.
CAUTION -
INVISIBLE LASER RADIATION WHEN OPEN AND
INTERLOCKS DEFEATED. AVOID EXPOSURE TO BEAM.
VORSICHT !
UNSICHTBARE LASERSTRAHLUNG TRITT AUS, WENN
DECKEL GEÖFFNET UND WENN
SICHERHEITSVERRIEGELUNG ÜBERBRÜCKT IST. NICHT
DEM STRAHL AUSSETZEN!
VARNING -
OSYNLIG LASERSTRÅLNING NÄR DENNA DEL ÄR ÖPPNAD
OCH SPÄRR ÄR URKOPPLAD STRÅLEN ÄR FARLIG.
ADVARSEL -
USYNLIG LASERSTRÅLING VED ÅBNING NÅR
SIKKERHEDSAFBRYDERE ER UDE AF FUNKTION. UNDGÅ
UDSÆTTELSE FOR STRÅLING.
– G-2 –
01_G1-G2_RC-EX30B_J.p65
2
04.4.12, 3:56 PM
English
CONTENTS
FEATURES ................................................................. 1
SAFETY PRECAUTIONS ......................................... 1
HANDLING PRECAUTIONS ................................... 2
POWER SUPPLY ....................................................... 3
NAMES OF PARTS AND CONTROLS .................... 4
REMOTE CONTROL UNIT ...................................... 5
TURNING THE UNIT ON/OFF ................................. 6
SETTING THE CLOCK ............................................. 7
ADJUSTING THE SOUND ........................................ 8
PLAYING COMPACT DISCS ................................... 9
RADIO RECEPTION ............................................... 15
CASSETTE PLAYBACK ......................................... 17
RECORDING ............................................................ 19
MAINTENANCE ...................................................... 21
TROUBLESHOOTING ............................................ 22
SPECIFICATIONS ................................................... 23
FEATURES
1 Portable system incorporating CD player
• CD functions can be operated with the remote
control unit as well as on the main unit.
• 8-cm (3-3/16") CD playback capability
2 Digital LCD (Liquid Crystal Display) indicates
general playback status.
3 Synchronized recording with CD playback
4 MP3 playback capability
5 Hyper-Bass Sound effect
SAFETY PRECAUTIONS
Prevention of Electric Shocks, Fire Hazards
and Damages
• Even when the STANDBY/ON button is set to
STANDBY, a very small current will flow. When the
unit is turned on, the display window lights in blue.
When the unit is in standby mode, the display window
turns off. (Note, however, that the display window does
not light even when the unit is turned on if the unit is
operated on batteries.) To save power and for safety
when not using the unit for an extended period of time,
disconnect the power cord from the household AC
outlet.
• Do not handle the power cord with wet hands.
• When unplugging from the wall outlet, always grasp
and pull the plug, not the power cord.
• Consult your nearest dealer when damage,
disconnection, or contact failure is found with the cord.
•
•
•
•
•
•
•
•
•
Do not bend the cord sharply, or pull or twist it.
Rating label is placed on the exterior of the bottom.
Do not modify the power cord in any manner.
Do not remove screws to disassemble the unit and do
not touch anything inside the unit to avoid accidents.
Do not insert any metallic objects into the unit.
Unplug the power cord when there is a possibility of
lightning.
If water gets inside the unit, unplug the power cord
from the outlet and consult your dealer.
Do not block the ventilation holes of the unit so that
heat can escape.
Do not install the unit in a badly ventilated place.
1
02_01-23_RC-EX30B_J_En.p65
1
04.4.12, 3:56 PM
Do not use this unit in direct sunlight or leave the unit
in a closed automobile (or yacht, etc.) where it would
be exposed to high temperatures above 40°C (104°F).
1 Avoid using the unit in the following places:
• Where the temperature may become excessively
high or low; the recommended temperature range
is 5°C (41°F) and 35°C (95°F).
• Where it could be subject to vibrations.
• Where it is excessively humid, such as in a
bathroom.
• Where it could be magnetized by a magnet or
speaker.
2 Pay attention to dust.
Be sure to close the disc door so that the lens is not
contaminated by dust. Do not touch the lens.
3 Condensation
Condensation may occur in the following cases, in
which the unit may not operate correctly:
• The unit is in a room where a heater has just been
switched on.
• The unit is in a place where there is smoke or high
humidity.
• The unit has just moved from a cold place to a
warm room.
In these cases, set the STANDBY/ON button to ON
and wait one or two hours before use.
4 Volume control
Compact discs produce very little noise compared
with analog records. If you adjust the volume by
listening to the noise as you do with analog records,
the speakers could be damaged by a sudden blast of
sound when playback starts. Therefore, turn down
the volume before starting and adjust it as required
while playing a CD.
5 Safety mechanism
The unit incorporates a safety interlock mechanism
which switches off the laser beam when the disc door
is opened.
6 Do not place magnetic objects such as
cassette tapes near the speakers.
Since the speakers contain magnets inside, do not
place cassette tapes or magnetic cards nearby as
recorded data could be erased.
7 Keep the unit away from the TV.
When the unit is used near a TV, the TV picture could
be distorted. If this happens, move the unit away from
the TV. If this does not correct the situation, avoid
using the unit when the TV is turned on.
8 Cleaning the cabinet
If the cabinet gets dirty, wipe it with a soft, dry cloth.
Never use benzine or thinner as these could damage
the surface finish.
9 When listening with headphones
• Do not listen at high volumes as it could damage
your hearing.
• For safety, do not drive while listening with
headphones.
10 Carrying handle
Do not raise or lower the carrying handle with the
telescopic antenna extended, to avoid damaging the
antenna. Position the carrying handle so that it does
not interfere with operation.
2
02_01-23_RC-EX30B_J_En.p65
2
04.4.12, 3:56 PM
English
HANDLING PRECAUTIONS
English
POWER SUPPLY
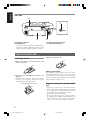
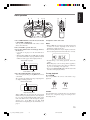
Checking batteries
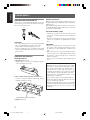
Operation on household AC
The AC power cord provided with this unit has one-way
connections to prevent electric shock. Refer to the figure
below for correct connection.
AC IN
When the tape speed or output sound level decreases, or
CD playback becomes intermittent, replace all batteries
with fresh ones.
When making an important recording, use new batteries
(preferably alkaline batteries with a longer service life)
to avoid any possible failure.
For better battery usage
CAUTIONS:
• Use only with the JVC power cord provided with this
unit to avoid malfunction or damage to the unit.
Remove batteries when using the power cord.
• Be sure to unplug the power cord from the outlet when
going out or when the unit is not in use for an extended
period of time.
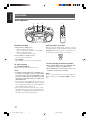
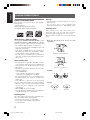
Operation on batteries
Loading batteries
1 Open the battery cover.
Pull the battery cover toward you while pressing the
sections marked by the arrows.
2 Insert six R20 (SUM-1)/D (13D)-size batteries.
Be sure to insert the batteries with the ª and ·
terminals positioned correctly.
1
3
2
6
• Continuous operation of the unit causes the battery
power to be consumed quicker than noncontinuous
operation.
• Operation of the unit in a cold place causes the battery
power to be consumed more quickly than in a warm
place.
CAUTIONS:
• When not using the unit for a long time (more than
two weeks) or when using the household AC, remove
the batteries to avoid a malfunction or damage to the
unit.
• When the JVC power cord provided with this unit is
connected, the power is automatically switched from
the batteries to the household AC even when the
batteries are loaded.
However, remove the batteries when using the power
cord.
CAUTIONS WHEN USING BATTERIES:
When batteries are used incorrectly, it may result in
the leakage of chemicals from the batteries or they
may explode. The following care should be taken:
• Check that the positive ª and negative ·
terminals of the batteries are positioned correctly
and load them as shown in the figure on the left.
• Do not mix new and old batteries together, or mix
different types of batteries.
• Do not try to recharge non-rechargeable batteries.
• Remove the batteries when the unit is not to be used
for an extended period of time.
If chemicals from the batteries come in contact with
your skin, wash them off immediately with water. If
chemicals leak onto the unit, clean the unit
completely.
5
4
R20 (SUM-1)/D (13D)-size batteries
3 Replace the cover.
3
02_01-23_RC-EX30B_J_En.p65
3
04.4.12, 3:56 PM
English
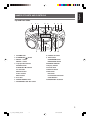
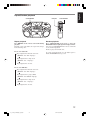
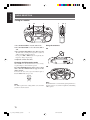
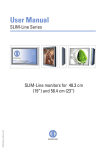
NAMES OF PARTS AND CONTROLS
Top and front sides
1
2
3
4
5
6
7
8
PROGRAM/
CLOCK SET
PRE
SET
DOW
N
PRESET
UP
HBS/
PRESET
EQ
PUSH
GR
OU
P
TA
PE
RAN
DO
M
CD
P
STO
S
AU
Y/P
PLA
TUN
ER
BAN
D
9
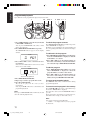
1 VOLUME knob
2 STANDBY/ON
button
3 GROUP – button
GROUP + button
4 Tape operation buttons
PAUSE 8 button
STOP/EJECT § button
FF 1 button
REW ¡ button
PLAY 2 button
REC ¶ button
5 Disc door
6 PRESET DOWN button
7 PROGRAM/CLOCK SET button
REMOTE
SENSOR
10 11 12
E
DISPLAY
13
14
15
8 PRESET UP button
9 TAPE button
CD/RANDOM button
BAND/TUNER button
10 REMOTE SENSOR
11 Display window
12 Casette deck
13 DISPLAY button
14 4 button
¢ button
PLAY/PAUSE 3/8 button
STOP 7 button
15 HBS/PRESET EQ button
4
02_01-23_RC-EX30B_J_En.p65
4
04.4.12, 3:56 PM
English
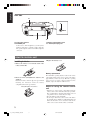
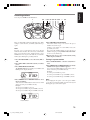
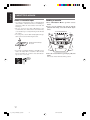
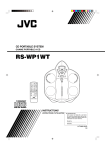
Rear side
15
16
17
15 Telescopic antenna
16 PHONES jack
Connect stereo mini headphones (3.5-mm (3/16")
diameters, impedance of 16 Ω to 32 Ω) to this jack.
The speaker output is switched off with headphones
connected.
18
17 Battery compartment cover
18 ÓAC IN (AC input) jack
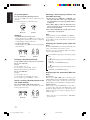
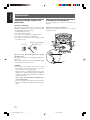
REMOTE CONTROL UNIT
Installing batteries
3 Replace the battery cover.
1 Remove the battery cover from the back of the
remote control unit.
Battery replacement
2 Insert two AAA (UM-4)/R03-size batteries (not
supplied).
Insert the batteries with the ª and · terminals
matching the indication inside the battery
compartment. Insert the · ends first.
AAA (UM-4)/R03-size batteries
The maximum operating distance between the remote
control unit and the remote sensor section of the unit is
approximately 7 meters (23 feet). When the operating
range decreases or remote control operation becomes
unstable, replace the batteries with new ones.
Notes on using the remote control
unit
• Point the top of the remote control unit toward the
remote sensor section of the unit as directly as possible.
The operable distance from the main unit decreases if
you point the remote control unit at an angle.
• Press the buttons gently and firmly.
• Do not expose the remote sensor section of the unit to
strong light (direct sunlight or artificial lighting) and
make sure that there are no obstacles between the
remote sensor section and the remote control unit.
5
02_01-23_RC-EX30B_J_En.p65
5
04.4.12, 3:56 PM
English
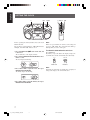
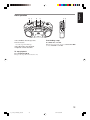
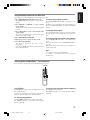
Names of buttons
1
1 STANDBY/ON
button
2 DISPLAY button
HBS/PRESET EQ button
FM MODE/BEAT CUT button
3 PRESET UP/DOWN buttons
4 PROGRAM/CLOCK SET button
INTRO button
REPEAT button
MUTING button
5 3/8 button
4 button
¢ button
7 button
6 CD/RANDOM button
TUNER/BAND button
TAPE button
7 Number buttons
8 GROUP +/– buttons
9 VOLUME +/– buttons
6
STANDBY/ON
CD/
RANDOM
TUNER/
BAND
TAPE
1
2
3
4
5
6
7
8
DISPLAY
7
HBS/
PRESET EQ
2
9
FM MODE
/BEAT CUT
OVER
0
3
4
UP
PROGRAM/
CLOCK SET
INTRO
+
PRESET
REPEAT
MUTING
GROUP
8
–
DOWN
5
9
VOLUME
RM-SRCEX30J REMOTE CONTROL
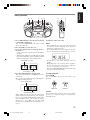
TURNING THE UNIT ON/OFF
STANDBY/ON
STANDBY/ON
STANDBY/ON
PROGRA
M/
CLOCK SET
PRE
SET
DOW
N
PRESET
UP
HBS/
PRESET
PUSH
CD/
RANDOM
TUNER/
BAND
1
2
4
5
7
8
TAPE
3
DISPLAY
EQ
6
HBS/
PRESET EQ
FM MODE
/BEAT CUT
9
OVER
0
GR
OU
P
TA
PE
STOP
RAND
/PAU
PLAY
OM
CD
TUNE
R
BAND
REMOTE
SENSOR
UP
PROGRAM/
CLOCK SET
INTRO
+
PRESET
REPEAT
MUTING
GROUP
DOWN
–
SE
VOLUME
DISPLAY
RM-SRCEX30J REMOTE CONTROL
STANDBY/ON
STANDBY/ON
button
Press the STANDBY/ON
button on the unit to
turn on and off the unit.
You can also press the STANDBY/ON
button on
the remote control unit.
The display window lights up when the unit is turned on.
(Note, however, that the display window does not light
even when the unit is turned on if the unit is operated on
batteries.) The unit comes on ready to play the source
selected when the unit was last turned off.
Notes:
• When you unplug the AC power cord or if a power
failure occurs, the clock is reset to “AM 12:00” right
away, while the tuner preset stations (see page 16) will
be erased in a few days. The clock indication will keep
flashing until you set the clock again.
• Remove the batteries when carrying the unit by hand
or in the trunk of a car. This prevents the power from
being accidentally turned on, thus avoiding wasteful
battery consumption.
To switch off the power supply completely
Unplug the AC power cord from the AC outlet. If the
batteries are inserted in the unit, take them out.
02_01-23_RC-EX30B_J_En.p65
6
6
04.4.12, 3:56 PM
English
SETTING THE CLOCK
1
3,4
2,3,4
1 2,3,4
STANDBY/ON
PROGRA
M/
CLOCK SET
PRE
SET
DOW
N
PRESET
UP
HBS/
PRESET
CD/
RANDOM
TUNER/
BAND
1
2
4
5
7
8
3,4
TAPE
3
DISPLAY
EQ
PUSH
6
HBS/
PRESET EQ
FM MODE
/BEAT CUT
9
OVER
0
GR
OU
TA
PE
P
STOP
RAND
OM
CD
UP
PROGRAM/
CLOCK SET
INTRO
+
PRESET
REPEAT
MUTING
GROUP
DOWN
–
SE
/PAU
PLAY
TUNE
BAND
R
REMOTE
SENSOR
VOLUME
DISPLAY
RM-SRCEX30J REMOTE CONTROL
Before operating the unit any further, first set the clock
built in this unit.
The clock uses 12-hour indication. “AM 12:00” indicates
midnight, and “PM 12:00” indicates noon.
Note:
If there is a power failure, the clock loses the setting and
is reset to “AM 12:00.” The clock indication will keep
flashing until you set the clock again.
1 Press STANDBY/ON
to turn off the unit, if it
is turned on.
The clock flashes on the display window.
2 Press and hold PROGRAM/CLOCK SET for more
than 2 seconds.
The hour digits start flashing.
To show the clock when the unit is on
Press DISPLAY.
Each time you press the button, the display changes the
clock indication and the normal indication alternately.
DISPLAY
Main unit
3 Press 4 or ¢ to adjust the hour, then press
PROGRAM/CLOCK SET.
The minute digits start flashing.
7
7
Remote
Note:
Operating the unit while clock indication is displayed
changes the display to the normal indication.
4 Press 4 or ¢ to adjust the minutes, then press
PROGRAM/CLOCK SET.
02_01-23_RC-EX30B_J_En.p65
DISPLAY
04.4.12, 3:56 PM
English
ADJUSTING THE SOUND
PHONES (on the rear)
HBS/PRESET EQ
VOLUME
MUTING
HBS/PRESET EQ
STANDBY/ON
PROGRA
M/
CLOCK SET
PRE
SET
DOW
N
PRESET
UP
HBS/
PRESET
CD/
RANDOM
VOLUME +/–
TUNER/
BAND
1
2
4
5
7
8
TAPE
3
DISPLAY
EQ
PUSH
6
HBS/
PRESET EQ
FM MODE
/BEAT CUT
9
OVER
0
GR
OU
P
TA
PE
STOP
RAND
OM
CD
PLAY
TUNE
R
BAND
REMOTE
SENSOR
/PAU
UP
PROGRAM/
CLOCK SET
INTRO
+
PRESET
REPEAT
MUTING
GROUP
DOWN
–
SE
VOLUME
DISPLAY
RM-SRCEX30J REMOTE CONTROL
Adjusting the volume
Reinforcing the bass sound
Turn VOLUME clockwise to increase the volume or
counterclockwise to decrease it.
You can press VOLUME + or VOLUME – on the remote
control unit to increase or decrease the volume
respectively.
You can enjoy powerful bass sound with the Hyper-Bass
Sound effect.
Press and hold HBS/PRESET EQ so that the HBS
indicator lights up in the display window.
To turn off the effect, press and hold the button again so
that the HBS indicator goes off.
The volume level can be adjusted in 31 steps (MIN, 1, 2,
... 29, MAX).
Selecting the sound mode
You can select one of the 5 preset sound modes.
Caution:
DO NOT turn off the unit with the volume set to an
extremely high level; otherwise a sudden blast of sound
could damage your hearing and/or the speakers and
headphones, when you turn on the unit or start playing
another source next time.
REMEMBER you cannot adjust the volume unless the
unit is turned on.
Turning off the sound temporarily
During playback, press MUTING on the remote
control unit.
The sound is turned off and “MUTING” appears in the
display window.
To restore the sound, press MUTING again.
CLASSIC: Good for classical music.
ROCK : Boosts low and high frequency. Good for
acoustic music.
POP
: Good for vocal music.
JAZZ
: Good for jazz music.
FLAT
: Normal sound.
To select the sound mode
Press HBS/PRESET EQ repeatedly until the indicator
for the sound mode you want appears in the display
window.
Each time you press the button, the sound mode changes
as follows:
CLASSIC
ROCK
FLAT
JAZZ
POP
Listening through headphones
Connect a pair of headphones to the PHONES jack.
No sound comes out of the speakers anymore. Be sure to
turn down the volume before connecting headphones.
8
02_01-23_RC-EX30B_J_En.p65
8
04.4.12, 3:56 PM
English
PLAYING COMPACT DISCS
Notes on compact discs
This unit has been designed only to play back the
following CDs.
• Digital audio CD
• Recordable digital audio CD (CD-R)
• Rewritable digital audio CD (CD-RW)
Storage
• After removing a disc from the unit, be sure to put it
back in its case.
• Do not expose discs to direct sunlight, high
temperatures from a heater, etc., high humidity or dust.
Cleaning discs
Before loading a disc, wipe off any dust, dirt or
fingerprints with a soft, dry cloth. Discs should be
cleaned by wiping radially, from the center to edge.
Never use thinner, benzine, record cleaner or antistatic
spray.
When playing a CD-R or CD-RW
You can play back finalized CD-R or CD-RW recorded
in music CD format or in MP3 format. (If a CD-RW
has been recorded in a different format, erase all the data
on the CD-RW completely before recording on it.)
• You can play back CD-R or CD-RW in music CD
format like an audio CD.
• Some CD-R or CD-RW may not be played back on
this unit because of their disc characteristics, damage
or stain on them, or if the player lens is dirty.
• The reflection factor of CD-RW is lower than that of
other CDs, possibly causing CD-RW to take longer
time to read.
• Removing the disc from its storage case and
replacing it
Press the center and lift out.
Notes for MP3 files
• The unit can only recognize files with “MP3” or “mp3”
as the extensions, which can be in any combination of
upper and lower cases. The file name needs to be up to
20 characters.
• This unit recognizes files and folders on a disc in the
following conditions:
– up to 640 MP3 files,
– up to 256 folders (including the root folder),
– up to 8th layers (including the root folder).
• It is recommended that you record your material at a
44.1-kHz sampling rate, using the 128-kbps data
transfer rate.
• Some MP3 files or discs may not be played back
because of their characteristics or recording conditions.
• MP3 discs require a longer readout time than normal
discs because of the complexity of the folder/file
configuration.
• MP3i and MP3 Pro are not available.
• The title, artist name and album name can be displayed
as the ID3 TAG (ID3v1/1.1) information.
Press to secure the disc.
• Handling
Incorrect
• Cleaning
Correct
Handling discs
Since dirty, damaged or warped discs could damage the
unit, care should be taken of the following:
• Do not touch the reflective recorded surface.
• Do not stick or write anything on the label side.
• Do not bend discs.
9
02_01-23_RC-EX30B_J_En.p65
9
04.4.12, 3:56 PM
Incorrect
English
Basic operation
5
1
3
2
4
4
1
STANDBY/ON
PROGRA
M/
CLOCK SET
PRE
SET
DOW
N
PRESET
UP
HBS/
PRESET
CD/
RANDOM
5
TUNER/
BAND
TAPE
1
2
3
4
5
7
8
DISPLAY
EQ
PUSH
6
HBS/
PRESET EQ
FM MODE
/BEAT CUT
9
OVER
0
GR
OU
TA
PE
P
STOP
RAND
OM
UP
PROGRAM/
CLOCK SET
INTRO
+
PRESET
REPEAT
MUTING
GROUP
DOWN
–
SE
/PAU
PLAY
CD
TUNE
R
BAND
REMOTE
SENSOR
VOLUME
DISPLAY
RM-SRCEX30J REMOTE CONTROL
1 Press CD/RANDOM to enter CD mode, if the unit
is in TUNER or TAPE mode.
You can press CD/RANDOM on the remote control
unit to enter CD mode.
2 Press ) PUSH to open the disc door.
3 Load a disc with the label side facing up and close
the disc door.
• 8-cm (3-3/16") CD can be played on the unit without
an adapter.
• When loading an MP3 disc, the MP3 indicator lights
up, and the total number of groups (albums) and total
number of tracks appear in the display window.
Total number of groups
5 Adjust the volume and sound.
Notes:
• When an MP3 disc is loaded, it may take more than 30
seconds to be read in, depending on the amount of
information compiled in the disc.
• The following indication may be displayed when the
disc is loaded upside down. Reload the disc correctly.
• If mistracking occurs during playback, lower the
volume.
• Mistracking may occur if a strong shock is applied to
the unit or if it is used in a place subject to vibrations
(e.g. in a car travelling on a rough road).
• If you press CD/RANDOM while in CD mode, the unit
enters the random playback mode.
Total number of tracks
4 Press PLAY/PAUSE 3/8 to start playback.
You can start playback by pressing 3/8 on the remote
control unit.
The current track number and elapsed playing time
are displayed during playback.
To stop playback
Press STOP 7.
You can press 7 on the remote control unit to stop
playback.
STOP
Current track number
Main unit
Elapsed playing time
When an MP3 disc is loaded, after the current track
number and elapsed playing time have been displayed
for 5 seconds, the ID3 TAG information (title, artist
name and album name) scrolls through the display
window once, if the MP3 disc has ID3 TAG
information. For displaying the disc information, see
page 11.
Remote
Caution:
Stop playback before opening the disc door. Check that
the disc has completely stopped rotating before
unloading the disc.
10
02_01-23_RC-EX30B_J_En.p65
10
04.4.12, 3:56 PM
English
To pause playback
Press PLAY/PAUSE 3/8 during playback.
You can press 3/8 on the remote control unit to stop
playback.
To resume playback, press the button again.
PLAY/PAUSE
Main unit
Remote
Skipping
• To skip back to the previous track
During playback, press 4 once to return to the
beginning of the current track, press twice to skip back
to the beginning of the previous track.
• To skip to the next track
During playback, press ¢ to skip to the beginning
of the next track.
Main unit
Remote
Selecting a desired track directly
Use the number buttons on the remote control unit.
In case of an audio CD:
Example:
To select track 8, press 8.
To select track 21, press OVER, 2, then 1.
Playback starts from the specified track.
In case of an MP3 disc:
Example:
To select track 8, press 8.
To select track 21, press OVER, 0, 2, then 1.
To select track 115, press OVER, 1, 1, then 5.
Search – locating a desired position on the
disc (audio CD only)
Press and hold 4 or ¢ during playback.
Monitor the sound and release the button when the
desired position is located.
Main unit
Remote
Selecting a desired group (album) and
track (MP3 disc only)
1 In stop mode, press GROUP + or GROUP – (on
either the main unit or the remote control unit)
repeatedly until the desired group (album) number
is displayed.
2 Press 4 or ¢ (on either the main unit or the
remote control unit) to select a desired track from
the current group (album).
3 Press PLAY/PAUSE 3/8 (or 3/8 on the remote
control unit) to start playback.
Note:
During playback, if you press GROUP + or GROUP –,
playback skips to the first track of the next or previous
group (album), and the track number is shown in the
display window.
Checking the remaining time (audio CD
only)
Press and hold DISPLAY (on either the main unit or the
remote control unit) for more than 1 second.
Each time you press and hold the button, the display
changes in the following order:
Track number being played and elapsed playing
time
Track number being played and remaining time of
the track
(“TRACK” and “REMAIN” light up.)
Track number being played and remaining time of
the disc
(“TOTAL” and “REMAIN” light up.)
Displaying the disc information (MP3 disc
only)
In stop mode:
When you press 4 or ¢ to select a track, the group
(album) number and group name/file name scroll through
the display window twice, and then the current group
(album) number and track number are displayed again.
During playback:
When you press and hold DISPLAY for more than 1
second, the title, artist name and album name* scroll
through the display window once, and then the track
number being played and elapsed playing time are
displayed again.
* If the track has no text information, “NO INFO”
appears instead.
11
02_01-23_RC-EX30B_J_En.p65
11
04.4.12, 3:56 PM
English
Repeat/Random playback
CD/RANDOM
REPEAT
CD/RANDOM
STANDBY/ON
PROGRA
M/
CLOCK SET
PRE
SET
DOW
N
PRESET
UP
HBS/
PRESET
PUSH
CD/
RANDOM
TUNER/
BAND
1
2
4
5
7
8
TAPE
3
DISPLAY
EQ
6
HBS/
PRESET EQ
FM MODE
/BEAT CUT
9
OVER
0
GR
OU
TA
PE
P
STOP
RAND
OM
CD
UP
PROGRAM/
CLOCK SET
INTRO
+
PRESET
REPEAT
MUTING
GROUP
DOWN
–
SE
AU
AY/P
PL
TUNE
R
BAND
REMOTE
SENSOR
VOLUME
DISPLAY
RM-SRCEX30J REMOTE CONTROL
Repeat playback
Random playback
Press REPEAT on the remote control unit during
playback.
Each time you press the button, the repeat mode changes
in the following order:
Press CD/RANDOM in CD mode so that the
RANDOM indicator lights up in the display window.
You can press CD/RANDOM on the remote control unit
to select random playback.
Tracks are played in random order.
In case of an audio CD:
Repeat playback of all tracks on the disc
(“REPEAT” and “ALL” light up.)
To cancel random playback, press the button again so
that the RANDOM indicator goes off.
Repeat playback of a single track
(“REPEAT” and “1” light up.)
Repeat playback is canceled.
In case of an MP3 disc:
Repeat playback of all tracks on the disc
(“REPEAT” and “ALL” light up.)
Repeat playback of a group (album)
(“REPEAT” and “GROUP” light up.)
Repeat playback of a single track
(“REPEAT” and “1” light up.)
Repeat playback is canceled.
12
02_01-23_RC-EX30B_J_En.p65
12
04.4.12, 3:56 PM
English
Programmed playback
Up to 40 tracks can be programmed to play in any desired order.
1
3,5
2,4,5 6
6 2,4,5 1 3
STANDBY/ON
PROGRA
M/
CLOCK SET
PRE
SET
DOW
N
PRESET
UP
HBS/
PRESET
CD/
RANDOM
TUNER/
BAND
1
2
4
5
7
8
3
TAPE
3
DISPLAY
EQ
PUSH
6
HBS/
PRESET EQ
FM MODE
/BEAT CUT
9
OVER
0
GR
OU
TA
PE
P
STOP
RAND
OM
CD
PLAY
TUNE
BAND
R
REMOTE
SENSOR
/PAU
UP
PROGRAM/
CLOCK SET
INTRO
+
PRESET
REPEAT
MUTING
GROUP
DOWN
–
SE
VOLUME
DISPLAY
RM-SRCEX30J REMOTE CONTROL
1 Press CD/RANDOM to enter CD mode, if the unit
is in TUNER or TAPE mode.
You can press CD/RANDOM on the remote control
unit to enter CD mode.
2 Press PROGRAM/CLOCK SET in stop mode.
The PROGRAM indicator appears in the display
window.
To check the program contents
Press PROGRAM/CLOCK SET repeatedly in stop mode
when “PROGRAM” is displayed.
Each time you press the button, the program number and
the corresponding track number are shown in the display
window.
To add tracks in the program
PROGRAM
3 Press 4 or ¢ to select a desired track to be
programmed.
You can use the number buttons on the remote control
unit to select a desired track.
PROGRAM
Track to be programmed
4 Press PROGRAM/CLOCK SET.
5 Repeat steps 3 and 4 to program other tracks.
6 Press PLAY/PAUSE 3/8.
The tracks are played in the order you have
programmed.
You can press 3/8 on the remote control unit to start
programmed playback.
Note:
If you press CD/RANDOM while in CD mode, the unit
enters the random playback mode.
1 Press PROGRAM/CLOCK SET repeatedly in stop
mode when “PROGRAM” is displayed so that the
track number “0” is shown.
2 Press 4 or ¢ (or use the number buttons on
the remote control unit) to select the track number
to be added, then press PROGRAM/CLOCK SET.
To edit the program
1 Press PROGRAM/CLOCK SET in stop mode
when “PROGRAM” is displayed so that the
program number you want to edit is shown.
2 Press 4 or ¢ (or use the number buttons on
the remote control unit) to select a new track
number, then press PROGRAM/CLOCK SET.
To repeat programmed playback
Press REPEAT on the remote control unit after starting
programmed playback.
To erase the entire program in the memory
Press STOP 7 (or 7 on the remote control unit) in stop
mode when “PROGRAM” is displayed.
The program is cleared, and the PROGRAM indicator
goes off.
The program is also cleared when you open the disc door,
turn off the unit or change to other audio sources.
Note:
You cannot program more than 40 tracks.
“– – FULL – –” is displayed when you try to program
the 41st track.
13
02_01-23_RC-EX30B_J_En.p65
13
04.4.12, 3:56 PM
English
Programmed playback of an MP3 disc
Up to 40 tracks can be programmed to play in any desired order.
1 Press PROGRAM/CLOCK SET in stop mode.
The PROGRAM indicator appears in the display
window.
2 Press GROUP + or GROUP – to select a desired
group (album).
The first track number in the selected group (album)
is shown.
3 Press 4 or ¢ to select a desired track in the
group (album).
You can use the number buttons on the remote control
unit to select a desired track.
4 Press PROGRAM/CLOCK SET.
5 Repeat steps 2 to 4 to program other tracks.
6 Press PLAY/PAUSE 3/8.
The tracks are played in the order you have
programmed.
You can press 3/8 on the remote control unit to start
programmed playback.
To check the program contents
Press PROGRAM/CLOCK SET repeatedly in stop
mode.
Each time you press the button, the program number and
the corresponding track number are shown in the display
window.
To change the program
You can add tracks in the program or edit the program in
the same manner as for an audio CD. See the previous
page.
To erase the entire program in the memory
Press STOP 7 (or 7 on the remote control unit) in stop
mode.
The program is cleared, and the PROGRAM indicator
goes off.
The program is also cleared when you open the disc door
or turn off the unit.
Note:
You cannot program more than 40 tracks.
“– – FULL – –” is displayed when you try to program
the 41st track.
Playing back introductions – Intro playback
Every track of a CD can be played for the beginning ten seconds.
INTRO
CD/
RANDOM
STANDBY/ON
TUNER/
BAND
1
2
4
5
7
8
TAPE
3
DISPLAY
6
HBS/
PRESET EQ
FM MODE
/BEAT CUT
9
OVER
0
UP
PROGRAM/
CLOCK SET
INTRO
+
PRESET
REPEAT
MUTING
GROUP
DOWN
–
VOLUME
RM-SRCEX30J REMOTE CONTROL
Press INTRO.
To cancel intro playback without stopping
The INTRO indicator appears in the display window and
intro playback starts.
To use intro playback for programmed and random
playback, press the button after starting playback.
Press INTRO during playback.
The INTRO indicator goes off and the unit continues
playback.
To stop during playback
Press STOP 7 (or STOP on the remote control unit).
The INTRO indicator goes off and the unit exits from
the intro playback.
14
02_01-23_RC-EX30B_J_En.p65
14
04.4.12, 3:56 PM
English
RADIO RECEPTION
Tuning in a station
4
1,2
3
3
1,2 4
STANDBY/ON
PROGRA
M/
CLOCK SET
PRE
SET
DOW
N
PRESET
UP
HBS/
PRESET
CD/
RANDOM
TUNER/
BAND
1
2
4
5
7
8
TAPE
3
DISPLAY
EQ
PUSH
6
HBS/
PRESET EQ
FM MODE
/BEAT CUT
9
OVER
0
GR
OU
P
TA
PE
STOP
RAND
PROGRAM/
CLOCK SET
INTRO
+
PRESET
REPEAT
MUTING
GROUP
DOWN
–
SE
/PAU
PLAY
OM
CD
UP
TUNE
R
BAND
REMOTE
SENSOR
VOLUME
DISPLAY
RM-SRCEX30J REMOTE CONTROL
1 Press BAND/TUNER to enter the tuner mode.
2 Press BAND/TUNER to select the band, FM or
AM.
3 Press and hold 4 or ¢ for more than 1 second.
The unit starts searching and stops when a station of
sufficient signal strength is tuned in.
If you press 4 or ¢ briefly and repeatedly, the
frequency changes step by step.
4 Adjust the volume and sound.
Using the antennas
FM
Changing the FM reception mode
When an FM stereo broadcast is hard to receive or noisy,
reception improves in monaural reception.
Press FM MODE/BEAT CUT on the remote control
unit so that the MONO indicator appears in the
display window.
To restore the stereo effect, press the button again so
that the MONO indicator goes off.
AM
PROGRAM/
CLOCK SET
PRESE
DOWNT
HBS/
PRESET
PRESET
UP
EQ
PUSH
GR
OU
P
TA
PE
STOP
RAND
US
/PA
PLAY
OM
CD
TUNE
BAND
R
REMOTE
SENSOR
E
DISPLAY
FM MODE
/BEAT CUT
Note:
The FM reception mode setting will be canceled when
you tune in another station.
Note:
The built-in ferrite core antenna may pick up interference
from television receivers in the neighborhood disturbing
AM reception.
15
02_01-23_RC-EX30B_J_En.p65
15
04.4.12, 3:56 PM
English
Presetting stations
You can preset 20 FM and 10 AM stations.
1
2,6
3,5,6 4,6 2,6 4,6 3,5,6
STANDBY/ON
PROGRA
M/
CLOCK SET
PRE
SET
DOW
N
PRESET
UP
HBS/
PRESET
PUSH
1
CD/
RANDOM
TUNER/
BAND
1
2
4
5
7
8
4,6
TAPE
3
DISPLAY
EQ
6
HBS/
PRESET EQ
FM MODE
/BEAT CUT
9
OVER
0
GR
OU
TA
PE
P
STOP
RAND
OM
CD
PLAY
TUNE
BAND
R
REMOTE
SENSOR
/PAU
UP
PROGRAM/
CLOCK SET
INTRO
+
PRESET
REPEAT
MUTING
GROUP
DOWN
–
SE
VOLUME
DISPLAY
RM-SRCEX30J REMOTE CONTROL
There is a time limit in doing the following steps. If the
setting is canceled before you finish, start from step 3
again.
Note:
In some cases, test frequencies have been already
memorized for the tuner since the factory examined the
tuner preset function before shipment. This is not a
malfunction. You can preset the stations you want into
memory by following the presetting method.
1 Press BAND/TUNER to select the band, FM or
AM.
2 Press 4 or ¢ to tune in the station you want to
preset.
3 Press PROGRAM/CLOCK SET.
The PROGRAM indicator and the preset number start
blinking in the display window.
PROGRAM
MHz
4 Press PRESET UP or PRESET DOWN to select
the preset number.
You can use the number buttons on the remote control
unit to select the preset number directly.
Example:
To select preset number 5, press 5.
To select preset number 15, press OVER, 1, then 5.
To select preset number 20, press OVER, 2, then 0.
5 Press PROGRAM/CLOCK SET.
The tuned station in step 2 is stored in the preset
number selected in step 4.
Storing a new station on a used number erases the
previously stored one.
If you used the number buttons to select the preset
number in step 4, pressing PROGRAM/CLOCK SET
is not necessary in this step.
6 Repeat steps 2 to 5 to preset other stations, using
different preset numbers.
Tuning in a preset station
1 Press BAND/TUNER to select the band, FM or
AM.
2 Press PRESET UP or PRESET DOWN repeatedly
until the desired preset number appears.
You can use the number buttons on the remote control
unit to select the preset number directly.
Example:
To select preset number 5, press 5.
To select preset number 15, press OVER, 1, then 5.
To select preset number 20, press OVER, 2, then 0.
Note:
If you unplug the AC power cord or if a power failure
occurs, the preset stations will be erased in a few days. If
this happens, preset the stations again.
PROGRAM
MHz
Preset number
16
02_01-23_RC-EX30B_J_En.p65
16
04.4.12, 3:56 PM
English
CASSETTE PLAYBACK
Notes on cassette tapes
Loading a cassette
• Use only type-I normal tapes. The recording/playback
characteristics of this unit are those for normal tapes,
which have different characteristics from CrO2 and
metal tapes.
• The use of tapes longer than 120 minutes is not
recommended, since characteristic deterioration may
occur and these tapes easily jam in the pinch roller and
the capstan.
• Loose tape may cause trouble. Gently tighten the tape
with a pencil as shown in the figure below.
1 Press STOP/EJECT § to open the cassette
holder.
2 Load a cassette with the open side up and the
playback side facing out as shown in the figure
below.
+ Forward direction
E
/PAUS
PLAY
CD
TU
NE
R
BA
REMOTE
SENSOR
DISPLAY
ND
Turn the pencil to take up
the slack.
• To prevent recordings from being accidentally erased,
remove the tab(s) with a screwdriver. After the tabs
have been broken off, reseal the slots with adhesive
tape to erase or re-record.
3 Close the cassette holder by pressing it gently and
firmly.
The cassette holder clicks back into position.
17
02_01-23_RC-EX30B_J_En.p65
17
04.4.12, 3:56 PM
English
Basic operation
4
1
2
3
1 4
STANDBY/ON
PROGRA
M/
CLOCK SET
PRE
SET
DOW
N
PRESET
UP
HBS/
PRESET
CD/
RANDOM
TUNER/
BAND
TAPE
1
2
3
4
5
7
8
DISPLAY
EQ
PUSH
6
HBS/
PRESET EQ
FM MODE
/BEAT CUT
9
OVER
0
GR
OU
P
TA
PE
STOP
RAND
PROGRAM/
CLOCK SET
INTRO
+
PRESET
REPEAT
MUTING
GROUP
DOWN
–
SE
/PAU
PLAY
OM
CD
UP
TUNE
R
BAND
REMOTE
SENSOR
VOLUME
DISPLAY
RM-SRCEX30J REMOTE CONTROL
1 Press TAPE to enter the tape mode.
2 Load a cassette.
Use only a type-I normal tape.
3 Press PLAY 2 to start playback.
4 Adjust the volume and sound.
Fast-winding a tape
Press REW ¡ or FF 1.
When the tape reaches the end, press STOP/EJECT §
to release REW ¡ or FF 1.
To stop playback
Press STOP/EJECT §.
The tape also stops when it reaches the end.
18
02_01-23_RC-EX30B_J_En.p65
18
04.4.12, 3:56 PM
English
RECORDING
Basic operation
1
2
3
1
CD/
RANDOM
STANDBY/ON
PROGRA
M/
CLOCK SET
PRE
SET
DOW
N
PRESET
UP
HBS/
PRESET
PUSH
TUNER/
BAND
1
2
4
5
7
8
TAPE
3
DISPLAY
EQ
6
HBS/
PRESET EQ
FM MODE
/BEAT CUT
9
OVER
0
GR
OU
P
TA
PE
STOP
RAND
PROGRAM/
CLOCK SET
INTRO
+
PRESET
REPEAT
MUTING
GROUP
DOWN
–
SE
/PAU
PLAY
OM
CD
UP
TUNE
R
BAND
REMOTE
SENSOR
VOLUME
DISPLAY
RM-SRCEX30J REMOTE CONTROL
Standard recording
Using the beat-cut function
1 Prepare the recording source.
• When recording from the radio:
Set to the tuner mode and tune in a desired station.
• When recording from a CD:
Set to the CD mode and load a CD.
2 Load a blank or erasable cassette.
Use only a type-I normal tape.
3 Press REC ¶.
PLAY 2 is also depressed, and recording starts.
When recording an AM broadcast, beats may occur. If
this happens while recording an AM broadcast, press FM
MODE/BEAT CUT on the remote control unit to select
the better beat-cut setting, “CUT-1” or “CUT-2.”
FM MODE
/BEAT CUT
To start recording at the exact moment
To stop recording
Press STOP/EJECT §.
The tape also stops when it reaches the end.
Notes:
• It should be noted that it may be unlawful to rerecord pre-recorded tapes, records, or discs without
the consent of the owner of copyright in the sound
or video recording, broadcast or cable program and
in any literary, dramatic, musical, or artistic work
embodied therein.
• The recording level is automatically set correctly, so it
is not affected by VOLUME. Thus, during recording
you can adjust the sound you are actually listening to
without affecting the recording level.
• If a recording you made has excessive noise or static,
the unit may have been too close to a TV which was on
during the recording. Either turn off the TV or increase
the distance between the TV and the unit.
1 Press PAUSE 8 first, then press REC ¶, thus
entering the record-pause (standby) mode.
2 Press PAUSE 8 to release the tape at the exact
moment you want to start recording.
Note:
Do not leave the unit in pause mode for more than a few
minutes. Instead, press STOP/EJECT § to stop the
tape.
19
02_01-23_RC-EX30B_J_En.p65
19
04.4.12, 3:56 PM
English
Synchronized recording with CD playback
You can make the CD player to start playback when the tape deck enters the recording mode.
3
1
5 2 4
4
3 4
CD/
RANDOM
STANDBY/ON
PROGRA
M/
CLOCK SET
PRE
SET
DOW
N
PRESET
UP
HBS/
PRESET
PUSH
TUNER/
BAND
1
2
4
5
7
8
TAPE
3
DISPLAY
EQ
6
HBS/
PRESET EQ
FM MODE
/BEAT CUT
9
OVER
0
GR
OU
P
TA
PE
STOP
RAND
INTRO
+
PRESET
REPEAT
MUTING
GROUP
DOWN
–
SE
/PAU
PLAY
OM
CD
UP
PROGRAM/
CLOCK SET
TUNE
R
BAND
REMOTE
SENSOR
VOLUME
DISPLAY
RM-SRCEX30J REMOTE CONTROL
1 Load a cassette.
Use only a type-I normal tape.
2 Load a CD.
3 Press CD/RANDOM to enter CD mode.
You can press CD/RANDOM on the remote control
unit to enter CD mode.
4 To start recording from the desired track, select
the track by pressing 4 or ¢ in stop mode.
You can use the number buttons on the remote control
unit to select the track.
5 Press REC ¶.
PLAY 2 is also depressed, and synchronized
recording starts.
When the tape reaches the end first, the CD player enters
the pause mode. Press PLAY/PAUSE 3/8 (or 3/8 on
the remote control unit) to continue playback, or press
STOP 7 (or 7 on the remote control unit) to stop
playback.
When the CD player stops first, the tape continues
running. In this case, press STOP/EJECT § to stop
the tape.
• The CD SYNC indicator appears in the display
window during synchronized recording.
Erasing
When recording on a pre-recorded tape, the previous
recording is erased and only the new recording is heard
next time the tape is played back.
To erase a tape without making a new
recording
1 Press TAPE on the unit to enter the tape mode.
2 Press REC ¶.
20
02_01-23_RC-EX30B_J_En.p65
20
04.4.12, 3:56 PM
English
MAINTENANCE
Cleaning the heads, capstan and
pinch roller
Cleaning is important!
When the tape is running, magnetic powder and dust
naturally accumulate on the heads, capstan and pinch
roller. When they become too dirty;
• Sound quality deteriorates.
• The sound output level drops.
• The previous recording is not completely erased.
• Recording is not performed satisfactorily.
To avoid these, clean the heads, capstan and pinch roller
every 10 hours of use.
Cleaning the CD pickup lens
If the CD pickup lens is dirty, the sound may be
degraded.
Open the disc door and clean the lens.
Use a blower (available at a camera store, etc.) to blow
off dust on the lens.
Head (recording/playback)
Erasure head
Pinch roller
Capstan
Blower
Open the cassette holder. Clean the heads, capstan
and pinch roller.
For effective cleaning, use a cleaning kit available at an
audio store.
After cleaning, make sure that the cleaning fluid has dried
completely before loading a cassette.
Lens
Cautions:
• Keep magnets and metallic objects away from the
head. If the head becomes magnetized, noise will
increase and the sound will deteriorate.
• Demagnetize the recording/playback head every 20 to
30 hours of use with a head demagnetizer available at
an audio store. When demagnetizing the head, the unit
should be turned off.
As the erasure head of the unit is of magnetic type,
do not demagnetize it.
• Do not use anything other than alcohol for cleaning.
Thinner and benzine will damage the rubber pinch
roller.
21
02_01-23_RC-EX30B_J_En.p65
21
04.4.12, 3:56 PM
• If you are having a problem with your unit, check this
list for a possible solution before calling for service.
Symptom
• If you cannot solve the problem from the hints given
here, or the unit has been physically damaged, call a
qualified person, such as your dealer, for service.
Possible cause
Power cannot be turned on.
The power cord is unplugged.
Action
Connect the power cord.
When PLAY 2 is pressed, tape does not PAUSE 8 is pressed.
move.
Press PAUSE 8 again to release it.
Playback sound is at a very low level.
• Batteries are run down.
• The head is dirty.
• Replace the batteries with new ones.
• Clean the head.
REC ¶ does not function.
• The safety tabs of the cassette have • Reseal the slots with adhesive tape.
been broken off.
• No cassette is loaded.
• Load a cassette.
The disc is loaded but does not play.
• The disc is upside down.
•
•
•
•
No sound from the speakers.
The disc is dirty.
The disc is damaged or warped.
The lens is dirty.
There is moisture condensation.
Headphones are conneced.
• Load the disc with the label side facing
up.
• Clean the disc.
• Replace the disc with a playable one.
• Clean the lens.
• Turn the unit on and wait one or two
hours before use.
Disconnect the headphones.
Since the tape speed is irregular, wow • The pinch roller or capstan is dirty.
and flutter occur.
• Batteries are run down.
• Clean the pinch roller and capstan.
• Replace the batteries with new ones.
Radio reception is poor and there is The antenna is not properly adjusted.
much static.
Adjust the antenna correctly.
Remote control is impossible.
• Batteries in the remote control unit are • Replace the batteries with new ones.
run down.
• The remote sensor section is exposed • Try not to operate the unit under direct
to bright light (direct sunlight, etc.)
sunlight, etc.
Note:
When the unit is moved from a cold place of around 0˚C
(32˚F) to a warm place, it may not operate normally,
because moisture has formed inside the deck. Normal
operation will be restored after waiting one or two hours.
22
02_01-23_RC-EX30B_J_En.p65
22
04.4.12, 3:56 PM
English
TROUBLESHOOTING
English
SPECIFICATIONS
CD player
CD capacity
Signal-to-noise ratio
Dynamic range
General
: 1 CD
: 75 dB
: 60 dB
Speakers
Speaker impedance
Output power
: FM 87.5 – 108.0 MHz
AM 530 – 1 710 kHz
: Telescopic antenna for FM
Ferrite core antenna for AM
Output terminals
Power supply
Tuner
Frequency range
Antennas
Dimensions
Cassette deck
Frequency response
Wow & flutter
Fast wind time
Power consumption
: 60 Hz – 10 000 Hz
: 0.15% (WRMS)
: Approx. 150 sec.
(C-60 cassette)
Mass
Accessories provided
: 9 cm (3.5") cone × 2
:4Ω
: 2 W per channel, min. RMS,
driven into 4 Ω at 1 kHz with
no more than 10% total
harmonic distortion
: PHONES × 1
: AC 120 V Ó, 60 Hz
DC 9 V (R20 (SUM-1)/D
(13D)-size batteries × 6)
: 18 W (at operation)
3 W (on standby)
: 420 mm × 178 mm ×
250 mm (W/H/D)
(169/16" × 71/16" × 97/8")
: Approx. 3.2 kg (7.1 lbs)
(without batteries)
: AC power cord × 1
Remote control unit × 1
Design and specifications are subject to change without
notice.
23
02_01-23_RC-EX30B_J_En.p65
23
04.4.12, 3:56 PM
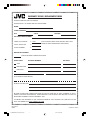
WARRANTY REPAIR / REPLACEMENT FORM
PLEASE COMPLETE THE FOLLOWING;
PLEASE NOTE: P. O. BOXES ARE NOT ACCEPTABLE
NAME:
STREET ADDRESS:
CITY:
STATE
ZIPCODE
DAY TIME PHONE NUMBER:
LABOR, S/H CHARGE
$ 19.95
LOCAL SALES TAX
$
TOTAL PAYMENT
$
(FOR PRODUCT MORE THAN 90 DAYS, BUT LESS
THAN 365 DAYS FROM RETAIL PURCHASE)
METHOD OF PAYMENT
CHECK OR MONEY ORDER ENCLOSED
CREDIT CARD
ACCOUNT NUMBER
EXP. DATE
VISA
MASTERCARD
DISCOVER
CARD HOLDER NAME
(IF DIFFERENT FROM ABOVE)
CARD HOLDER SIGNATURE
REASON FOR RETURN
BE SURE TO ENCLOSE COMPLETED FORM, A COPY OF YOUR BILL OF SALE, PAYMENT (IF APPLICABLE), SUPPLIED ACCESSORIES, TOGETHER WITH THE PRODUCT AND RETURN TO THE JVC
REPAIR/REPLACEMENT FACILITY NEAREST YOU.
TO OBTAIN THE ADDRESS OF THE LOCATION NEAREST YOU <PLEASE CALL (800) 252-5722 OR
VISIT OUR WEBSITE AT HTTP://WWW.JVC.COM
BT-51025-2
(0103)
04_WARRANTY_RC-EX30B_J.p65
PRINTED IN CHINA
1
04.4.12, 3:56 PM
LIMITED WARRANTY
PORTABLE AUDIO EXCHANGE 1-90
JVC COMPANY OF AMERICA warrants this portable audio product and all parts thereof, except as set forth below ONLY TO THE
ORIGINAL PURCHASER AT RETAIL to be FREE FROM DEFECTIVE MATERIALS AND WORKMANSHIP from the date of the original
retail purchase for the period shown below. ("The Warranty Period")
LABOR 90 DAYS
PARTS 1 YR
THIS LIMITED WARRANTY IS VALID ONLY IN THE FIFTY (50) UNITED STATES, THE DISTRICT OF COLUMBIA AND IN THE
COMMONWEALTH OF PUERTO RICO.
WHAT WE WILL DO:
If this product is found to be defective within the warranty period, JVC will, at its option, either repair or replace the defective
part(s) or replace the product with a new or refurbished functionally equivalent product. Within 90 days from date of retail sale,
repair or replacement will be at no charge to the customer. From 91 to 365 days from the date of retail sale, a charge for labor plus
shipping and handling will apply. Please refer to the attached warranty repair/replacement form for the amount of this charge.
WHAT YOU MUST DO FOR WARRANTY SERVICE:
Please do not return your product to the retailer. Instead, please box the product carefully, preferably in the original carton, and
ship insured to the JVC repair/replacement facility nearest you.
To obtain the address of the location nearest you, please call (800) 252-5722 or visit our website at http://www.jvc.com
PLEASE BE SURE TO INCLUDE A COPY OF YOUR BILL OF SALE, A COMPLETED WARRANTY REPAIR/REPLACEMENT FORM
AND ALL OF THE ORIGINAL ACCESSORIES WHICH CAME WITH YOUR UNIT. IF APPLICABLE, PLEASE INCLUDE PAYMENT AS
INDICATED ON ATTACHED REPAIR/REPLACEMENT FORM
If you have any questions concerning your JVC Product, please contact our Customer Relations Department at (800) 252-5722.
WHAT IS EXCLUDED:
The warranty does not cover:
1. Products which have been subject to abuse, accident, alteration, modification, tampering, negligence, misuse, faulty installation,
lack of reasonable care, or if repaired or serviced by anyone other than a service facility authorized by JVC to render such
service, or if affixed to any attachment not provided with the products, or if the model or serial number has been altered,
tampered with, defaced or removed.
2. Initial installation, installation and removal, from “built in” entertainment centers, and other mounting systems.
3. Operational adjustments covered in the Owner’s Manual, normal maintenance, including head cleaning.
4. Damage that occurs in shipment, due to act of God, and cosmetic damage.
5. Signal reception problems and failures due to line power surge.
6. Products used for commercial purposes (including but not limited to rental).
7. Accessories.
8. Batteries (except that Rechargeable Batteries are covered for 90 days from the date of purchase).
There are no express warranties except as listed above.
AFTER THE WARRANTY:
Please contact JVC’s Customer Relations Department at (800) 252-5722 to obtain the cost of out of warranty repair or replacement.
THE DURATION OF ANY IMPLIED WARRANTIES, INCLUDING THE IMPLIED WARRANTY OF MERCHANTABILITY, IS LIMITED TO
THE DURATION OF THE EXPRESS WARRANTY HEREIN.
JVC SHALL NOT BE LIABLE FOR ANY LOSS OF USE OF THE PRODUCT, INCONVENIENCE, OR ANY OTHER DAMAGES, WHETHER
DIRECT, INCIDENTAL OR CONSEQUENTIAL (INCLUDING, WITHOUT LIMITATION, DAMAGE TO TAPES, RECORDS OR DISCS)
RESULTING FROM THE USE OF THIS PRODUCT, OR ARISING OUT OF ANY BREACH OF THIS WARRANTY. ALL EXPRESS AND
IMPLIED WARRANTIES, INCLUDING THE WARRANTIES OF MERCHANTABILITY AND FITNESS FOR PARTICULAR PURPOSE,
ARE LIMITED TO THE WARRANTY PERIOD SET FORTH ABOVE.
Some states do not allow the exclusion of incidental or consequential damages or limitations on how long an implied warranty
lasts, so these limitations or exclusions may not apply to you. This warranty gives you specific legal rights and you may also have
other rights which vary from state to state.
JVC COMPANY OF AMERICA
1700 Valley Road
DIVISION OF JVC AMERICAS CORP.
Wayne, New Jersey 07470
http://www.jvc.com
REFURBISHED PRODUCTS CARRY A SEPARATE WARRANTY THIS WARRANTY DOES NOT APPLY. FOR DETAILS OF
REFURBISHED PRODUCT WARRANTY, PLEASE REFER TO THE REFURBISHED PRODUCT WARRANTY INFORMATION
PACKAGED WITH EACH REFURBISHED PRODUCT.
For customer use:
Enter below the Model No. and Serial No. which are located either on the rear, bottom or side of the cabinet.
Retain this information for future reference.
Model No.:
Serial No.:
Purchase Date:
Name of Dealer:
04_WARRANTY_RC-EX30B_J.p65
2
04.4.12, 3:56 PM
EN, SP
© 2004 Victor Company of Japan, Limited
99_BCV_RC-EX30B_J.p65
2
0504MZMBICORI
04.4.12, 3:57 PM
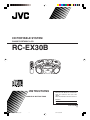
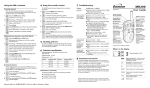
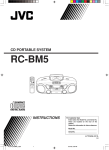
CD PORTABLE SYSTEM
CHAINE PORTABLE A CD
RC-EX30B
PROGRAM
/
CLOCK SET
PRES
ET
DOWN
PRESET
UP
HBS/
PRESET
STANDBY/ON
CD/
RANDOM
1
TUNER/
BAND
TAPE
2
3
EQ
PUSH
DISPLAY
4
5
6
HBS/
PRESET EQ
7
8
FM MODE
/BEAT CUT
9
GR
OU
OVER
P
0
UP
PROGRAM/
CLOCK SET
INTRO
+
PRESET
REPEAT
MUTING
GROUP
DOWN
–
TA
PE
STOP
RAND
US
/PA
OM
CD
E
PLAY
TUNE
BAND
R
REMOTE
SENSOR
DISPLAY
VOLUME
RM-SRCEX30J REMOTE CONTROL
INSTRUCTIONS
MANUEL D’INSTRUCTIONS
For Customer Use:
Enter below the Model No. and Serial No.
which are located on the rear of the
cabinet.
Retain this information for future reference.
Model No.
Serial No.
LVT1213-002A
[C]
00_FCV_RC-EX30B_C.p65
1
04.4.12, 3:58 PM
Warnings, Cautions and Others
Mises en garde, précautions et indications diverses
CAUTION
RISK OF ELECTRIC SHOCK
DO NOT OPEN
DO NOT EXPOSE TO RAIN OR MOISTURE
NE PAS EXPOSER À LA PLUIE NI À L'HUMIDITÉ
ATTENTION:RISQUE DE CHOC ELECTRIQUE, NE PAS OUVRIR
The lightning flash with arrowhead symbol, within
an equilateral triangle is intended to alert the user
to the presence of uninsulated “dangerous voltage”
within the product’s enclosure that may be of
sufficient magnitude to constitute a risk of electric
shock to persons.
The exclamation point within an equilateral triangle
is intended to alert the user to the presence of
important operating and maintenance (servicing)
instructions in the literature accompanying the
appliance.
For U.S.A.
This equipment has been tested and found to comply with the
limits for a Class B digital device, pursuant to part 15 of the FCC
Rules.
These limits are designed to provide reasonable protection against
harmful interference in a residential installation.
This equipment generates, uses and can radiate radio frequency
energy and, if not installed and used in accordance with the
instructions, may cause harmful interference to radio
communications. However, there is no guarantee that interference
will not occur in a particular installation. If this equipment does
cause harmful interference to radio or television reception, which
can be determined by turning the equipment off and on, the user
is encouraged to try to correct the interference by one or more of
the following measures:
Reorient or relocate the receiving antenna.
Increase the separation between the equipment and receiver.
Connect the equipment into an outlet on a circuit different from
that to which the receiver is connected.
Consult the dealer or an experienced radio/TV technician for help.
CAUTION -
INVISIBLE LASER RADIATION WHEN OPEN AND
INTERLOCKS DEFEATED. AVOID EXPOSURE TO BEAM.
VORSICHT !
UNSICHTBARE LASERSTRAHLUNG TRITT AUS, WENN
DECKEL GEÖFFNET UND WENN
SICHERHEITSVERRIEGELUNG ÜBERBRÜCKT IST. NICHT
DEM STRAHL AUSSETZEN!
VARNING -
OSYNLIG LASERSTRÅLNING NÄR DENNA DEL ÄR ÖPPNAD
OCH SPÄRR ÄR URKOPPLAD STRÅLEN ÄR FARLIG.
ADVARSEL -
USYNLIG LASERSTRÅLING VED ÅBNING NÅR
SIKKERHEDSAFBRYDERE ER UDE AF FUNKTION. UNDGÅ
UDSÆTTELSE FOR STRÅLING.
– G-1 –
01_G1-G2_RC-EX30B_C.p65
1
04.4.12, 3:58 PM
WARNING: TO REDUCE THE RISK OF FIRE
OR ELECTRIC SHOCK, DO NOT EXPOSE
THIS APPLIANCE TO RAIN OR MOISTURE.
For Canada/pour le Canada
CAUTION: TO PREVENT ELECTRIC SHOCK, MATCH WIDE
BLADE OF PLUG TO WIDE SLOT, FULLY INSERT.
ATTENTION: POUR EVITER LES CHOCS ELECTRIQUES,
INTRODUIRE LA LAME LA PLUS LARGE DE LA FICHE DANS LA
BORNE CORRESPONDANTE DE LA PRISE ET POUSSER
JUSQUAU FOND.
CAUTION
To reduce the risk of electrical shocks, fire, etc.:
1. Do not remove screws, covers or cabinet.
2. Do not expose this appliance to rain or moisture.
ATTENTION
Afin d’éviter tout risque d’électrocution, d’incendie, etc.:
1. Ne pas enlever les vis ni les panneaux et ne pas ouvrir le coffret de
l’appareil.
2. Ne pas exposer l’appareil à la pluie ni à l’humidité.
Caution — STANDBY/ON button!
Disconnect the mains plug to shut the power off completely. The
STANDBY/ON button in any position does not disconnect the mains
line.
Attention — Commutateur STANDBY/ON!
Déconnecter la fiche de secteur pour couper complètement le
courant. Le commutateur STANDBY/ON ne coupe jamais
complètement la ligne de secteur, quelle que soit sa position.
IMPORTANT FOR LASER PRODUCTS
1. CLASS 1 LASER PRODUCT
2. CAUTION: Do not open the top cover. There are no user serviceable
parts inside the unit; leave all servicing to qualified service personnel.
3. CAUTION: Visible and invisible laser radiation when open and interlock
failed or defeated. Avoid direct exposure to beam.
4. REPRODUCTION OF LABEL: CAUTION LABEL, PLACED INSIDE
THE UNIT.
IMPORTANT POUR PRODUITS LASER
1. PRODUIT LASER CLASSE 1
2. ATTENTION: N’ouvrez pas le couvercle supérieur. Il n’y a aucune pièce
réparable par l’utilisateur à l’intérieur de l’appareil; confiez toute
réparation à un personnel qualifié.
3. ATTENTION: Risque de radiations laser visible et invisible quand
l’appareil est ouvert et que le système de verrouillage ne fonctionne
pas ou a été mis hors service. Évitez toute exposition directe au rayon.
4. REPRODUCTIONS DE L’ÉTIQUETTE: ÉTIQUETTE DE
PRÉCAUTION PLACÉE À L’INTÉRIEUR DE L’APPAREIL.
For Canada/pour le Canada
THIS DIGITAL APPARATUS DOES NOT EXCEED THE CLASS B
LIMITS FOR RADIO NOISE EMISSIONS FROM DIGITAL
APPARATUS AS SET OUT IN THE INTERFERENCE-CAUSING
EQUIPMENT STANDARD ENTITLED “DIGITAL APPARATUS,”
ICES-003 OF THE DEPARTMENT OF COMMUNICATIONS.
CET APPAREIL NUMERIQUE RESPECTE LES LIMITES DE
BRUITS RADIOELECTRIQUES APPLICABLES AUX APPAREILS
NUMERIQUES DE CLASSE B PRESCRITES DANS LA NORME
SUR LE MATERIEL BROUILLEUR: “APPAREILS NUMERIQUES”,
NMB-003 EDICTEE PAR LE MINISTRE DES COMMUNICATIONS.
– G-2 –
01_G1-G2_RC-EX30B_C.p65
2
04.4.12, 3:58 PM
English
CONTENTS
FEATURES ................................................................. 1
SAFETY PRECAUTIONS ......................................... 1
HANDLING PRECAUTIONS ................................... 2
POWER SUPPLY ....................................................... 3
NAMES OF PARTS AND CONTROLS .................... 4
REMOTE CONTROL UNIT ...................................... 5
TURNING THE UNIT ON/OFF ................................. 6
SETTING THE CLOCK ............................................. 7
ADJUSTING THE SOUND ........................................ 8
PLAYING COMPACT DISCS ................................... 9
RADIO RECEPTION ............................................... 15
CASSETTE PLAYBACK ......................................... 17
RECORDING ............................................................ 19
MAINTENANCE ...................................................... 21
TROUBLESHOOTING ............................................ 22
SPECIFICATIONS ................................................... 23
FEATURES
1 Portable system incorporating CD player
• CD functions can be operated with the remote
control unit as well as on the main unit.
• 8-cm CD playback capability
2 Digital LCD (Liquid Crystal Display) indicates
general playback status.
3 Synchronized recording with CD playback
4 MP3 playback capability
5 Hyper-Bass Sound effect
SAFETY PRECAUTIONS
Prevention of Electric Shocks, Fire Hazards
and Damages
• Even when the STANDBY/ON button is set to
STANDBY, a very small current will flow. When the
unit is turned on, the display window lights in blue.
When the unit is in standby mode, the display window
turns off. (Note, however, that the display window does
not light even when the unit is turned on if the unit is
operated on batteries.) To save power and for safety
when not using the unit for an extended period of time,
disconnect the power cord from the household AC
outlet.
• Do not handle the power cord with wet hands.
• When unplugging from the wall outlet, always grasp
and pull the plug, not the power cord.
• Consult your nearest dealer when damage,
disconnection, or contact failure is found with the cord.
•
•
•
•
•
•
•
•
•
Do not bend the cord sharply, or pull or twist it.
Rating label is placed on the exterior of the bottom.
Do not modify the power cord in any manner.
Do not remove screws to disassemble the unit and do
not touch anything inside the unit to avoid accidents.
Do not insert any metallic objects into the unit.
Unplug the power cord when there is a possibility of
lightning.
If water gets inside the unit, unplug the power cord
from the outlet and consult your dealer.
Do not block the ventilation holes of the unit so that
heat can escape.
Do not install the unit in a badly ventilated place.
1
02_01-23_RC-EX30B_C_En.p65
1
04.4.12, 3:58 PM
Do not use this unit in direct sunlight or leave the unit
in a closed automobile (or yacht, etc.) where it would
be exposed to high temperatures above 40°C.
1 Avoid using the unit in the following places:
• Where the temperature may become excessively
high or low; the recommended temperature range
is 5°C and 35°C.
• Where it could be subject to vibrations.
• Where it is excessively humid, such as in a
bathroom.
• Where it could be magnetized by a magnet or
speaker.
2 Pay attention to dust.
Be sure to close the disc door so that the lens is not
contaminated by dust. Do not touch the lens.
3 Condensation
Condensation may occur in the following cases, in
which the unit may not operate correctly:
• The unit is in a room where a heater has just been
switched on.
• The unit is in a place where there is smoke or high
humidity.
• The unit has just moved from a cold place to a
warm room.
In these cases, set the STANDBY/ON button to ON
and wait one or two hours before use.
4 Volume control
Compact discs produce very little noise compared
with analog records. If you adjust the volume by
listening to the noise as you do with analog records,
the speakers could be damaged by a sudden blast of
sound when playback starts. Therefore, turn down
the volume before starting and adjust it as required
while playing a CD.
5 Safety mechanism
The unit incorporates a safety interlock mechanism
which switches off the laser beam when the disc door
is opened.
6 Do not place magnetic objects such as
cassette tapes near the speakers.
Since the speakers contain magnets inside, do not
place cassette tapes or magnetic cards nearby as
recorded data could be erased.
7 Keep the unit away from the TV.
When the unit is used near a TV, the TV picture could
be distorted. If this happens, move the unit away from
the TV. If this does not correct the situation, avoid
using the unit when the TV is turned on.
8 Cleaning the cabinet
If the cabinet gets dirty, wipe it with a soft, dry cloth.
Never use benzine or thinner as these could damage
the surface finish.
9 When listening with headphones
• Do not listen at high volumes as it could damage
your hearing.
• For safety, do not drive while listening with
headphones.
10 Carrying handle
Do not raise or lower the carrying handle with the
telescopic antenna extended, to avoid damaging the
antenna. Position the carrying handle so that it does
not interfere with operation.
2
02_01-23_RC-EX30B_C_En.p65
2
04.4.12, 3:58 PM
English
HANDLING PRECAUTIONS
English
POWER SUPPLY
Checking batteries
Operation on household AC
The AC power cord provided with this unit has one-way
connections to prevent electric shock. Refer to the figure
below for correct connection.
AC IN
When the tape speed or output sound level decreases, or
CD playback becomes intermittent, replace all batteries
with fresh ones.
When making an important recording, use new batteries
(preferably alkaline batteries with a longer service life)
to avoid any possible failure.
For better battery usage
CAUTIONS:
• Use only with the JVC power cord provided with this
unit to avoid malfunction or damage to the unit.
Remove batteries when using the power cord.
• Be sure to unplug the power cord from the outlet when
going out or when the unit is not in use for an extended
period of time.
Operation on batteries
Loading batteries
1 Open the battery cover.
Pull the battery cover toward you while pressing the
sections marked by the arrows.
2 Insert six R20 (SUM-1)/D (13D)-size batteries.
Be sure to insert the batteries with the ª and ·
terminals positioned correctly.
1
3
2
6
• Continuous operation of the unit causes the battery
power to be consumed quicker than noncontinuous
operation.
• Operation of the unit in a cold place causes the battery
power to be consumed more quickly than in a warm
place.
CAUTIONS:
• When not using the unit for a long time (more than
two weeks) or when using the household AC, remove
the batteries to avoid a malfunction or damage to the
unit.
• When the JVC power cord provided with this unit is
connected, the power is automatically switched from
the batteries to the household AC even when the
batteries are loaded.
However, remove the batteries when using the power
cord.
CAUTIONS WHEN USING BATTERIES:
When batteries are used incorrectly, it may result in
the leakage of chemicals from the batteries or they
may explode. The following care should be taken:
• Check that the positive ª and negative ·
terminals of the batteries are positioned correctly
and load them as shown in the figure on the left.
• Do not mix new and old batteries together, or mix
different types of batteries.
• Do not try to recharge non-rechargeable batteries.
• Remove the batteries when the unit is not to be used
for an extended period of time.
If chemicals from the batteries come in contact with
your skin, wash them off immediately with water. If
chemicals leak onto the unit, clean the unit
completely.
5
4
R20 (SUM-1)/D (13D)-size batteries
3 Replace the cover.
3
02_01-23_RC-EX30B_C_En.p65
3
04.4.12, 3:58 PM
English
NAMES OF PARTS AND CONTROLS
Top and front sides
1
2
3
4
5
6
7
8
PROGRAM/
CLOCK SET
PRE
SET
DOW
N
PRESET
UP
HBS/
PRESET
EQ
PUSH
GR
OU
P
TA
PE
RAN
DO
M
CD
P
STO
S
AU
Y/P
PLA
TUN
ER
BAN
D
9
1 VOLUME knob
2 STANDBY/ON
button
3 GROUP – button
GROUP + button
4 Tape operation buttons
PAUSE 8 button
STOP/EJECT § button
FF 1 button
REW ¡ button
PLAY 2 button
REC ¶ button
5 Disc door
6 PRESET DOWN button
7 PROGRAM/CLOCK SET button
REMOTE
SENSOR
10 11 12
E
DISPLAY
13
14
15
8 PRESET UP button
9 TAPE button
CD/RANDOM button
BAND/TUNER button
10 REMOTE SENSOR
11 Display window
12 Casette deck
13 DISPLAY button
14 4 button
¢ button
PLAY/PAUSE 3/8 button
STOP 7 button
15 HBS/PRESET EQ button
4
02_01-23_RC-EX30B_C_En.p65
4
04.4.12, 3:58 PM
English
Rear side
15
16
17
15 Telescopic antenna
16 PHONES jack
Connect stereo mini headphones (3.5-mm diameters,
impedance of 16 Ω to 32 Ω) to this jack. The speaker
output is switched off with headphones connected.
18
17 Battery compartment cover
18 ÓAC IN (AC input) jack
REMOTE CONTROL UNIT
Installing batteries
3 Replace the battery cover.
1 Remove the battery cover from the back of the
remote control unit.
Battery replacement
2 Insert two AAA (UM-4)/R03-size batteries (not
supplied).
Insert the batteries with the ª and · terminals
matching the indication inside the battery
compartment. Insert the · ends first.
AAA (UM-4)/R03-size batteries
The maximum operating distance between the remote
control unit and the remote sensor section of the unit is
approximately 7 meters. When the operating range
decreases or remote control operation becomes unstable,
replace the batteries with new ones.
Notes on using the remote control
unit
• Point the top of the remote control unit toward the
remote sensor section of the unit as directly as possible.
The operable distance from the main unit decreases if
you point the remote control unit at an angle.
• Press the buttons gently and firmly.
• Do not expose the remote sensor section of the unit to
strong light (direct sunlight or artificial lighting) and
make sure that there are no obstacles between the
remote sensor section and the remote control unit.
5
02_01-23_RC-EX30B_C_En.p65
5
04.4.12, 3:58 PM
English
Names of buttons
1
1 STANDBY/ON
button
2 DISPLAY button
HBS/PRESET EQ button
FM MODE/BEAT CUT button
3 PRESET UP/DOWN buttons
4 PROGRAM/CLOCK SET button
INTRO button
REPEAT button
MUTING button
5 3/8 button
4 button
¢ button
7 button
6 CD/RANDOM button
TUNER/BAND button
TAPE button
7 Number buttons
8 GROUP +/– buttons
9 VOLUME +/– buttons
6
STANDBY/ON
CD/
RANDOM
TUNER/
BAND
TAPE
1
2
3
4
5
6
7
8
DISPLAY
7
HBS/
PRESET EQ
2
9
FM MODE
/BEAT CUT
OVER
0
3
4
UP
PROGRAM/
CLOCK SET
INTRO
+
PRESET
REPEAT
MUTING
GROUP
8
–
DOWN
5
9
VOLUME
RM-SRCEX30J REMOTE CONTROL
TURNING THE UNIT ON/OFF
STANDBY/ON
STANDBY/ON
STANDBY/ON
PROGRA
M/
CLOCK SET
PRE
SET
DOW
N
PRESET
UP
HBS/
PRESET
PUSH
CD/
RANDOM
TUNER/
BAND
1
2
4
5
7
8
TAPE
3
DISPLAY
EQ
6
HBS/
PRESET EQ
FM MODE
/BEAT CUT
9
OVER
0
GR
OU
P
TA
PE
STOP
RAND
/PAU
PLAY
OM
CD
TUNE
R
BAND
REMOTE
SENSOR
UP
PROGRAM/
CLOCK SET
INTRO
+
PRESET
REPEAT
MUTING
GROUP
DOWN
–
SE
VOLUME
DISPLAY
RM-SRCEX30J REMOTE CONTROL
STANDBY/ON
STANDBY/ON
button
Press the STANDBY/ON
button on the unit to
turn on and off the unit.
You can also press the STANDBY/ON
button on
the remote control unit.
The display window lights up when the unit is turned on.
(Note, however, that the display window does not light
even when the unit is turned on if the unit is operated on
batteries.) The unit comes on ready to play the source
selected when the unit was last turned off.
Notes:
• When you unplug the AC power cord or if a power
failure occurs, the clock is reset to “AM 12:00” right
away, while the tuner preset stations (see page 16) will
be erased in a few days. The clock indication will keep
flashing until you set the clock again.
• Remove the batteries when carrying the unit by hand
or in the trunk of a car. This prevents the power from
being accidentally turned on, thus avoiding wasteful
battery consumption.
To switch off the power supply completely
Unplug the AC power cord from the AC outlet. If the
batteries are inserted in the unit, take them out.
02_01-23_RC-EX30B_C_En.p65
6
6
04.4.12, 3:59 PM
English
SETTING THE CLOCK
1
3,4
2,3,4
1 2,3,4
STANDBY/ON
PROGRA
M/
CLOCK SET
PRE
SET
DOW
N
PRESET
UP
HBS/
PRESET
CD/
RANDOM
TUNER/
BAND
1
2
4
5
7
8
3,4
TAPE
3
DISPLAY
EQ
PUSH
6
HBS/
PRESET EQ
FM MODE
/BEAT CUT
9
OVER
0
GR
OU
TA
PE
P
STOP
RAND
OM
CD
UP
PROGRAM/
CLOCK SET
INTRO
+
PRESET
REPEAT
MUTING
GROUP
DOWN
–
SE
/PAU
PLAY
TUNE
BAND
R
REMOTE
SENSOR
VOLUME
DISPLAY
RM-SRCEX30J REMOTE CONTROL
Before operating the unit any further, first set the clock
built in this unit.
The clock uses 12-hour indication. “AM 12:00” indicates
midnight, and “PM 12:00” indicates noon.
Note:
If there is a power failure, the clock loses the setting and
is reset to “AM 12:00.” The clock indication will keep
flashing until you set the clock again.
1 Press STANDBY/ON
to turn off the unit, if it
is turned on.
The clock flashes on the display window.
2 Press and hold PROGRAM/CLOCK SET for more
than 2 seconds.
The hour digits start flashing.
To show the clock when the unit is on
Press DISPLAY.
Each time you press the button, the display changes the
clock indication and the normal indication alternately.
DISPLAY
Main unit
3 Press 4 or ¢ to adjust the hour, then press
PROGRAM/CLOCK SET.
The minute digits start flashing.
7
7
Remote
Note:
Operating the unit while clock indication is displayed
changes the display to the normal indication.
4 Press 4 or ¢ to adjust the minutes, then press
PROGRAM/CLOCK SET.
02_01-23_RC-EX30B_C_En.p65
DISPLAY
04.4.12, 3:59 PM
English
ADJUSTING THE SOUND
PHONES (on the rear)
HBS/PRESET EQ
VOLUME
MUTING
HBS/PRESET EQ
STANDBY/ON
PROGRA
M/
CLOCK SET
PRE
SET
DOW
N
PRESET
UP
HBS/
PRESET
CD/
RANDOM
VOLUME +/–
TUNER/
BAND
1
2
4
5
7
8
TAPE
3
DISPLAY
EQ
PUSH
6
HBS/
PRESET EQ
FM MODE
/BEAT CUT
9
OVER
0
GR
OU
P
TA
PE
STOP
RAND
OM
CD
PLAY
TUNE
R
BAND
REMOTE
SENSOR
/PAU
UP
PROGRAM/
CLOCK SET
INTRO
+
PRESET
REPEAT
MUTING
GROUP
DOWN
–
SE
VOLUME
DISPLAY
RM-SRCEX30J REMOTE CONTROL
Adjusting the volume
Reinforcing the bass sound
Turn VOLUME clockwise to increase the volume or
counterclockwise to decrease it.
You can press VOLUME + or VOLUME – on the remote
control unit to increase or decrease the volume
respectively.
You can enjoy powerful bass sound with the Hyper-Bass
Sound effect.
Press and hold HBS/PRESET EQ so that the HBS
indicator lights up in the display window.
To turn off the effect, press and hold the button again so
that the HBS indicator goes off.
The volume level can be adjusted in 31 steps (MIN, 1, 2,
... 29, MAX).
Selecting the sound mode
You can select one of the 5 preset sound modes.
Caution:
DO NOT turn off the unit with the volume set to an
extremely high level; otherwise a sudden blast of sound
could damage your hearing and/or the speakers and
headphones, when you turn on the unit or start playing
another source next time.
REMEMBER you cannot adjust the volume unless the
unit is turned on.
Turning off the sound temporarily
During playback, press MUTING on the remote
control unit.
The sound is turned off and “MUTING” appears in the
display window.
To restore the sound, press MUTING again.
CLASSIC: Good for classical music.
ROCK : Boosts low and high frequency. Good for
acoustic music.
POP
: Good for vocal music.
JAZZ
: Good for jazz music.
FLAT
: Normal sound.
To select the sound mode
Press HBS/PRESET EQ repeatedly until the indicator
for the sound mode you want appears in the display
window.
Each time you press the button, the sound mode changes
as follows:
CLASSIC
ROCK
FLAT
JAZZ
POP
Listening through headphones
Connect a pair of headphones to the PHONES jack.
No sound comes out of the speakers anymore. Be sure to
turn down the volume before connecting headphones.
8
02_01-23_RC-EX30B_C_En.p65
8
04.4.12, 3:59 PM
English
PLAYING COMPACT DISCS
Notes on compact discs
This unit has been designed only to play back the
following CDs.
• Digital audio CD
• Recordable digital audio CD (CD-R)
• Rewritable digital audio CD (CD-RW)
Storage
• After removing a disc from the unit, be sure to put it
back in its case.
• Do not expose discs to direct sunlight, high
temperatures from a heater, etc., high humidity or dust.
Cleaning discs
Before loading a disc, wipe off any dust, dirt or
fingerprints with a soft, dry cloth. Discs should be
cleaned by wiping radially, from the center to edge.
Never use thinner, benzine, record cleaner or antistatic
spray.
When playing a CD-R or CD-RW
You can play back finalized CD-R or CD-RW recorded
in music CD format or in MP3 format. (If a CD-RW
has been recorded in a different format, erase all the data
on the CD-RW completely before recording on it.)
• You can play back CD-R or CD-RW in music CD
format like an audio CD.
• Some CD-R or CD-RW may not be played back on
this unit because of their disc characteristics, damage
or stain on them, or if the player lens is dirty.
• The reflection factor of CD-RW is lower than that of
other CDs, possibly causing CD-RW to take longer
time to read.
• Removing the disc from its storage case and
replacing it
Press the center and lift out.
Notes for MP3 files
• The unit can only recognize files with “MP3” or “mp3”
as the extensions, which can be in any combination of
upper and lower cases. The file name needs to be up to
20 characters.
• This unit recognizes files and folders on a disc in the
following conditions:
– up to 640 MP3 files,
– up to 256 folders (including the root folder),
– up to 8th layers (including the root folder).
• It is recommended that you record your material at a
44.1-kHz sampling rate, using the 128-kbps data
transfer rate.
• Some MP3 files or discs may not be played back
because of their characteristics or recording conditions.
• MP3 discs require a longer readout time than normal
discs because of the complexity of the folder/file
configuration.
• MP3i and MP3 Pro are not available.
• The title, artist name and album name can be displayed
as the ID3 TAG (ID3v1/1.1) information.
Press to secure the disc.
• Handling
Incorrect
• Cleaning
Correct
Handling discs
Since dirty, damaged or warped discs could damage the
unit, care should be taken of the following:
• Do not touch the reflective recorded surface.
• Do not stick or write anything on the label side.
• Do not bend discs.
9
02_01-23_RC-EX30B_C_En.p65
9
04.4.12, 3:59 PM
Incorrect
English
Basic operation
5
1
3
2
4
4
1
STANDBY/ON
PROGRA
M/
CLOCK SET
PRE
SET
DOW
N
PRESET
UP
HBS/
PRESET
CD/
RANDOM
5
TUNER/
BAND
TAPE
1
2
3
4
5
7
8
DISPLAY
EQ
PUSH
6
HBS/
PRESET EQ
FM MODE
/BEAT CUT
9
OVER
0
GR
OU
TA
PE
P
STOP
RAND
OM
UP
PROGRAM/
CLOCK SET
INTRO
+
PRESET
REPEAT
MUTING
GROUP
DOWN
–
SE
/PAU
PLAY
CD
TUNE
R
BAND
REMOTE
SENSOR
VOLUME
DISPLAY
RM-SRCEX30J REMOTE CONTROL
1 Press CD/RANDOM to enter CD mode, if the unit
is in TUNER or TAPE mode.
You can press CD/RANDOM on the remote control
unit to enter CD mode.
2 Press ) PUSH to open the disc door.
3 Load a disc with the label side facing up and close
the disc door.
• 8-cm CD can be played on the unit without an
adapter.
• When loading an MP3 disc, the MP3 indicator lights
up, and the total number of groups (albums) and total
number of tracks appear in the display window.
Total number of groups
5 Adjust the volume and sound.
Notes:
• When an MP3 disc is loaded, it may take more than 30
seconds to be read in, depending on the amount of
information compiled in the disc.
• The following indication may be displayed when the
disc is loaded upside down. Reload the disc correctly.
• If mistracking occurs during playback, lower the
volume.
• Mistracking may occur if a strong shock is applied to
the unit or if it is used in a place subject to vibrations
(e.g. in a car travelling on a rough road).
• If you press CD/RANDOM while in CD mode, the unit
enters the random playback mode.
Total number of tracks
4 Press PLAY/PAUSE 3/8 to start playback.
You can start playback by pressing 3/8 on the remote
control unit.
The current track number and elapsed playing time
are displayed during playback.
To stop playback
Press STOP 7.
You can press 7 on the remote control unit to stop
playback.
STOP
Current track number
Main unit
Elapsed playing time
When an MP3 disc is loaded, after the current track
number and elapsed playing time have been displayed
for 5 seconds, the ID3 TAG information (title, artist
name and album name) scrolls through the display
window once, if the MP3 disc has ID3 TAG
information. For displaying the disc information, see
page 11.
Remote
Caution:
Stop playback before opening the disc door. Check that
the disc has completely stopped rotating before
unloading the disc.
10
02_01-23_RC-EX30B_C_En.p65
10
04.4.12, 3:59 PM
English
To pause playback
Press PLAY/PAUSE 3/8 during playback.
You can press 3/8 on the remote control unit to stop
playback.
To resume playback, press the button again.
PLAY/PAUSE
Main unit
Remote
Skipping
• To skip back to the previous track
During playback, press 4 once to return to the
beginning of the current track, press twice to skip back
to the beginning of the previous track.
• To skip to the next track
During playback, press ¢ to skip to the beginning
of the next track.
Main unit
Remote
Selecting a desired track directly
Use the number buttons on the remote control unit.
In case of an audio CD:
Example:
To select track 8, press 8.
To select track 21, press OVER, 2, then 1.
Playback starts from the specified track.
In case of an MP3 disc:
Example:
To select track 8, press 8.
To select track 21, press OVER, 0, 2, then 1.
To select track 115, press OVER, 1, 1, then 5.
Search – locating a desired position on the
disc (audio CD only)
Press and hold 4 or ¢ during playback.
Monitor the sound and release the button when the
desired position is located.
Main unit
Remote
Selecting a desired group (album) and
track (MP3 disc only)
1 In stop mode, press GROUP + or GROUP – (on
either the main unit or the remote control unit)
repeatedly until the desired group (album) number
is displayed.
2 Press 4 or ¢ (on either the main unit or the
remote control unit) to select a desired track from
the current group (album).
3 Press PLAY/PAUSE 3/8 (or 3/8 on the remote
control unit) to start playback.
Note:
During playback, if you press GROUP + or GROUP –,
playback skips to the first track of the next or previous
group (album), and the track number is shown in the
display window.
Checking the remaining time (audio CD
only)
Press and hold DISPLAY (on either the main unit or the
remote control unit) for more than 1 second.
Each time you press and hold the button, the display
changes in the following order:
Track number being played and elapsed playing
time
Track number being played and remaining time of
the track
(“TRACK” and “REMAIN” light up.)
Track number being played and remaining time of
the disc
(“TOTAL” and “REMAIN” light up.)
Displaying the disc information (MP3 disc
only)
In stop mode:
When you press 4 or ¢ to select a track, the group
(album) number and group name/file name scroll through
the display window twice, and then the current group
(album) number and track number are displayed again.
During playback:
When you press and hold DISPLAY for more than 1
second, the title, artist name and album name* scroll
through the display window once, and then the track
number being played and elapsed playing time are
displayed again.
* If the track has no text information, “NO INFO”
appears instead.
11
02_01-23_RC-EX30B_C_En.p65
11
04.4.12, 3:59 PM
English
Repeat/Random playback
CD/RANDOM
REPEAT
CD/RANDOM
STANDBY/ON
PROGRA
M/
CLOCK SET
PRE
SET
DOW
N
PRESET
UP
HBS/
PRESET
PUSH
CD/
RANDOM
TUNER/
BAND
1
2
4
5
7
8
TAPE
3
DISPLAY
EQ
6
HBS/
PRESET EQ
FM MODE
/BEAT CUT
9
OVER
0
GR
OU
TA
PE
P
STOP
RAND
OM
CD
UP
PROGRAM/
CLOCK SET
INTRO
+
PRESET
REPEAT
MUTING
GROUP
DOWN
–
SE
AU
AY/P
PL
TUNE
R
BAND
REMOTE
SENSOR
VOLUME
DISPLAY
RM-SRCEX30J REMOTE CONTROL
Repeat playback
Random playback
Press REPEAT on the remote control unit during
playback.
Each time you press the button, the repeat mode changes
in the following order:
Press CD/RANDOM in CD mode so that the
RANDOM indicator lights up in the display window.
You can press CD/RANDOM on the remote control unit
to select random playback.
Tracks are played in random order.
In case of an audio CD:
Repeat playback of all tracks on the disc
(“REPEAT” and “ALL” light up.)
To cancel random playback, press the button again so
that the RANDOM indicator goes off.
Repeat playback of a single track
(“REPEAT” and “1” light up.)
Repeat playback is canceled.
In case of an MP3 disc:
Repeat playback of all tracks on the disc
(“REPEAT” and “ALL” light up.)
Repeat playback of a group (album)
(“REPEAT” and “GROUP” light up.)
Repeat playback of a single track
(“REPEAT” and “1” light up.)
Repeat playback is canceled.
12
02_01-23_RC-EX30B_C_En.p65
12
04.4.12, 3:59 PM
English
Programmed playback
Up to 40 tracks can be programmed to play in any desired order.
1
3,5
2,4,5 6
6 2,4,5 1 3
STANDBY/ON
PROGRA
M/
CLOCK SET
PRE
SET
DOW
N
PRESET
UP
HBS/
PRESET
CD/
RANDOM
TUNER/
BAND
1
2
4
5
7
8
3
TAPE
3
DISPLAY
EQ
PUSH
6
HBS/
PRESET EQ
FM MODE
/BEAT CUT
9
OVER
0
GR
OU
TA
PE
P
STOP
RAND
OM
CD
PLAY
TUNE
BAND
R
REMOTE
SENSOR
/PAU
UP
PROGRAM/
CLOCK SET
INTRO
+
PRESET
REPEAT
MUTING
GROUP
DOWN
–
SE
VOLUME
DISPLAY
RM-SRCEX30J REMOTE CONTROL
1 Press CD/RANDOM to enter CD mode, if the unit
is in TUNER or TAPE mode.
You can press CD/RANDOM on the remote control
unit to enter CD mode.
2 Press PROGRAM/CLOCK SET in stop mode.
The PROGRAM indicator appears in the display
window.
To check the program contents
Press PROGRAM/CLOCK SET repeatedly in stop mode
when “PROGRAM” is displayed.
Each time you press the button, the program number and
the corresponding track number are shown in the display
window.
To add tracks in the program
PROGRAM
3 Press 4 or ¢ to select a desired track to be
programmed.
You can use the number buttons on the remote control
unit to select a desired track.
PROGRAM
Track to be programmed
4 Press PROGRAM/CLOCK SET.
5 Repeat steps 3 and 4 to program other tracks.
6 Press PLAY/PAUSE 3/8.
The tracks are played in the order you have
programmed.
You can press 3/8 on the remote control unit to start
programmed playback.
Note:
If you press CD/RANDOM while in CD mode, the unit
enters the random playback mode.
1 Press PROGRAM/CLOCK SET repeatedly in stop
mode when “PROGRAM” is displayed so that the
track number “0” is shown.
2 Press 4 or ¢ (or use the number buttons on
the remote control unit) to select the track number
to be added, then press PROGRAM/CLOCK SET.
To edit the program
1 Press PROGRAM/CLOCK SET in stop mode
when “PROGRAM” is displayed so that the
program number you want to edit is shown.
2 Press 4 or ¢ (or use the number buttons on
the remote control unit) to select a new track
number, then press PROGRAM/CLOCK SET.
To repeat programmed playback
Press REPEAT on the remote control unit after starting
programmed playback.
To erase the entire program in the memory
Press STOP 7 (or 7 on the remote control unit) in stop
mode when “PROGRAM” is displayed.
The program is cleared, and the PROGRAM indicator
goes off.
The program is also cleared when you open the disc door,
turn off the unit or change to other audio sources.
Note:
You cannot program more than 40 tracks.
“– – FULL – –” is displayed when you try to program
the 41st track.
13
02_01-23_RC-EX30B_C_En.p65
13
04.4.12, 3:59 PM
English
Programmed playback of an MP3 disc
Up to 40 tracks can be programmed to play in any desired order.
1 Press PROGRAM/CLOCK SET in stop mode.
The PROGRAM indicator appears in the display
window.
2 Press GROUP + or GROUP – to select a desired
group (album).
The first track number in the selected group (album)
is shown.
3 Press 4 or ¢ to select a desired track in the
group (album).
You can use the number buttons on the remote control
unit to select a desired track.
4 Press PROGRAM/CLOCK SET.
5 Repeat steps 2 to 4 to program other tracks.
6 Press PLAY/PAUSE 3/8.
The tracks are played in the order you have
programmed.
You can press 3/8 on the remote control unit to start
programmed playback.
To check the program contents
Press PROGRAM/CLOCK SET repeatedly in stop
mode.
Each time you press the button, the program number and
the corresponding track number are shown in the display
window.
To change the program
You can add tracks in the program or edit the program in
the same manner as for an audio CD. See the previous
page.
To erase the entire program in the memory
Press STOP 7 (or 7 on the remote control unit) in stop
mode.
The program is cleared, and the PROGRAM indicator
goes off.
The program is also cleared when you open the disc door
or turn off the unit.
Note:
You cannot program more than 40 tracks.
“– – FULL – –” is displayed when you try to program
the 41st track.
Playing back introductions – Intro playback
Every track of a CD can be played for the beginning ten seconds.
INTRO
CD/
RANDOM
STANDBY/ON
TUNER/
BAND
1
2
4
5
7
8
TAPE
3
DISPLAY
6
HBS/
PRESET EQ
FM MODE
/BEAT CUT
9
OVER
0
UP
PROGRAM/
CLOCK SET
INTRO
+
PRESET
REPEAT
MUTING
GROUP
DOWN
–
VOLUME
RM-SRCEX30J REMOTE CONTROL
Press INTRO.
To cancel intro playback without stopping
The INTRO indicator appears in the display window and
intro playback starts.
To use intro playback for programmed and random
playback, press the button after starting playback.
Press INTRO during playback.
The INTRO indicator goes off and the unit continues
playback.
To stop during playback
Press STOP 7 (or STOP on the remote control unit).
The INTRO indicator goes off and the unit exits from
the intro playback.
14
02_01-23_RC-EX30B_C_En.p65
14
04.4.12, 3:59 PM
English
RADIO RECEPTION
Tuning in a station
4
1,2
3
3
1,2 4
STANDBY/ON
PROGRA
M/
CLOCK SET
PRE
SET
DOW
N
PRESET
UP
HBS/
PRESET
CD/
RANDOM
TUNER/
BAND
1
2
4
5
7
8
TAPE
3
DISPLAY
EQ
PUSH
6
HBS/
PRESET EQ
FM MODE
/BEAT CUT
9
OVER
0
GR
OU
P
TA
PE
STOP
RAND
PROGRAM/
CLOCK SET
INTRO
+
PRESET
REPEAT
MUTING
GROUP
DOWN
–
SE
/PAU
PLAY
OM
CD
UP
TUNE
R
BAND
REMOTE
SENSOR
VOLUME
DISPLAY
RM-SRCEX30J REMOTE CONTROL
1 Press BAND/TUNER to enter the tuner mode.
2 Press BAND/TUNER to select the band, FM or
AM.
3 Press and hold 4 or ¢ for more than 1 second.
The unit starts searching and stops when a station of
sufficient signal strength is tuned in.
If you press 4 or ¢ briefly and repeatedly, the
frequency changes step by step.
4 Adjust the volume and sound.
Using the antennas
FM
Changing the FM reception mode
When an FM stereo broadcast is hard to receive or noisy,
reception improves in monaural reception.
Press FM MODE/BEAT CUT on the remote control
unit so that the MONO indicator appears in the
display window.
To restore the stereo effect, press the button again so
that the MONO indicator goes off.
AM
PROGRAM/
CLOCK SET
PRESE
DOWNT
HBS/
PRESET
PRESET
UP
EQ
PUSH
GR
OU
P
TA
PE
STOP
RAND
US
/PA
PLAY
OM
CD
TUNE
BAND
R
REMOTE
SENSOR
E
DISPLAY
FM MODE
/BEAT CUT
Note:
The FM reception mode setting will be canceled when
you tune in another station.
Note:
The built-in ferrite core antenna may pick up interference
from television receivers in the neighborhood disturbing
AM reception.
15
02_01-23_RC-EX30B_C_En.p65
15
04.4.12, 3:59 PM
English
Presetting stations
You can preset 20 FM and 10 AM stations.
1
2,6
3,5,6 4,6 2,6 4,6 3,5,6
STANDBY/ON
PROGRA
M/
CLOCK SET
PRE
SET
DOW
N
PRESET
UP
HBS/
PRESET
PUSH
1
CD/
RANDOM
TUNER/
BAND
1
2
4
5
7
8
4,6
TAPE
3
DISPLAY
EQ
6
HBS/
PRESET EQ
FM MODE
/BEAT CUT
9
OVER
0
GR
OU
TA
PE
P
STOP
RAND
OM
CD
PLAY
TUNE
BAND
R
REMOTE
SENSOR
/PAU
UP
PROGRAM/
CLOCK SET
INTRO
+
PRESET
REPEAT
MUTING
GROUP
DOWN
–
SE
VOLUME
DISPLAY
RM-SRCEX30J REMOTE CONTROL
There is a time limit in doing the following steps. If the
setting is canceled before you finish, start from step 3
again.
Note:
In some cases, test frequencies have been already
memorized for the tuner since the factory examined the
tuner preset function before shipment. This is not a
malfunction. You can preset the stations you want into
memory by following the presetting method.
1 Press BAND/TUNER to select the band, FM or
AM.
2 Press 4 or ¢ to tune in the station you want to
preset.
3 Press PROGRAM/CLOCK SET.
The PROGRAM indicator and the preset number start
blinking in the display window.
PROGRAM
MHz
4 Press PRESET UP or PRESET DOWN to select
the preset number.
You can use the number buttons on the remote control
unit to select the preset number directly.
Example:
To select preset number 5, press 5.
To select preset number 15, press OVER, 1, then 5.
To select preset number 20, press OVER, 2, then 0.
5 Press PROGRAM/CLOCK SET.
The tuned station in step 2 is stored in the preset
number selected in step 4.
Storing a new station on a used number erases the
previously stored one.
If you used the number buttons to select the preset
number in step 4, pressing PROGRAM/CLOCK SET
is not necessary in this step.
6 Repeat steps 2 to 5 to preset other stations, using
different preset numbers.
Tuning in a preset station
1 Press BAND/TUNER to select the band, FM or
AM.
2 Press PRESET UP or PRESET DOWN repeatedly
until the desired preset number appears.
You can use the number buttons on the remote control
unit to select the preset number directly.
Example:
To select preset number 5, press 5.
To select preset number 15, press OVER, 1, then 5.
To select preset number 20, press OVER, 2, then 0.
Note:
If you unplug the AC power cord or if a power failure
occurs, the preset stations will be erased in a few days. If
this happens, preset the stations again.
PROGRAM
MHz
Preset number
16
02_01-23_RC-EX30B_C_En.p65
16
04.4.12, 3:59 PM
English
CASSETTE PLAYBACK
Notes on cassette tapes
Loading a cassette
• Use only type-I normal tapes. The recording/playback
characteristics of this unit are those for normal tapes,
which have different characteristics from CrO2 and
metal tapes.
• The use of tapes longer than 120 minutes is not
recommended, since characteristic deterioration may
occur and these tapes easily jam in the pinch roller and
the capstan.
• Loose tape may cause trouble. Gently tighten the tape
with a pencil as shown in the figure below.
1 Press STOP/EJECT § to open the cassette
holder.
2 Load a cassette with the open side up and the
playback side facing out as shown in the figure
below.
+ Forward direction
E
/PAUS
PLAY
CD
TU
NE
R
BA
REMOTE
SENSOR
DISPLAY
ND
Turn the pencil to take up
the slack.
• To prevent recordings from being accidentally erased,
remove the tab(s) with a screwdriver. After the tabs
have been broken off, reseal the slots with adhesive
tape to erase or re-record.
3 Close the cassette holder by pressing it gently and
firmly.
The cassette holder clicks back into position.
17
02_01-23_RC-EX30B_C_En.p65
17
04.4.12, 3:59 PM
English
Basic operation
4
1
2
3
1 4
STANDBY/ON
PROGRA
M/
CLOCK SET
PRE
SET
DOW
N
PRESET
UP
HBS/
PRESET
CD/
RANDOM
TUNER/
BAND
TAPE
1
2
3
4
5
7
8
DISPLAY
EQ
PUSH
6
HBS/
PRESET EQ
FM MODE
/BEAT CUT
9
OVER
0
GR
OU
P
TA
PE
STOP
RAND
PROGRAM/
CLOCK SET
INTRO
+
PRESET
REPEAT
MUTING
GROUP
DOWN
–
SE
/PAU
PLAY
OM
CD
UP
TUNE
R
BAND
REMOTE
SENSOR
VOLUME
DISPLAY
RM-SRCEX30J REMOTE CONTROL
1 Press TAPE to enter the tape mode.
2 Load a cassette.
Use only a type-I normal tape.
3 Press PLAY 2 to start playback.
4 Adjust the volume and sound.
Fast-winding a tape
Press REW ¡ or FF 1.
When the tape reaches the end, press STOP/EJECT §
to release REW ¡ or FF 1.
To stop playback
Press STOP/EJECT §.
The tape also stops when it reaches the end.
18
02_01-23_RC-EX30B_C_En.p65
18
04.4.12, 3:59 PM
English
RECORDING
Basic operation
1
2
3
1
CD/
RANDOM
STANDBY/ON
PROGRA
M/
CLOCK SET
PRE
SET
DOW
N
PRESET
UP
HBS/
PRESET
PUSH
TUNER/
BAND
1
2
4
5
7
8
TAPE
3
DISPLAY
EQ
6
HBS/
PRESET EQ
FM MODE
/BEAT CUT
9
OVER
0
GR
OU
P
TA
PE
STOP
RAND
PROGRAM/
CLOCK SET
INTRO
+
PRESET
REPEAT
MUTING
GROUP
DOWN
–
SE
/PAU
PLAY
OM
CD
UP
TUNE
R
BAND
REMOTE
SENSOR
VOLUME
DISPLAY
RM-SRCEX30J REMOTE CONTROL
Standard recording
Using the beat-cut function
1 Prepare the recording source.
• When recording from the radio:
Set to the tuner mode and tune in a desired station.
• When recording from a CD:
Set to the CD mode and load a CD.
2 Load a blank or erasable cassette.
Use only a type-I normal tape.
3 Press REC ¶.
PLAY 2 is also depressed, and recording starts.
When recording an AM broadcast, beats may occur. If
this happens while recording an AM broadcast, press FM
MODE/BEAT CUT on the remote control unit to select
the better beat-cut setting, “CUT-1” or “CUT-2.”
FM MODE
/BEAT CUT
To start recording at the exact moment
To stop recording
Press STOP/EJECT §.
The tape also stops when it reaches the end.
Notes:
• It should be noted that it may be unlawful to rerecord pre-recorded tapes, records, or discs without
the consent of the owner of copyright in the sound
or video recording, broadcast or cable program and
in any literary, dramatic, musical, or artistic work
embodied therein.
• The recording level is automatically set correctly, so it
is not affected by VOLUME. Thus, during recording
you can adjust the sound you are actually listening to
without affecting the recording level.
• If a recording you made has excessive noise or static,
the unit may have been too close to a TV which was on
during the recording. Either turn off the TV or increase
the distance between the TV and the unit.
1 Press PAUSE 8 first, then press REC ¶, thus
entering the record-pause (standby) mode.
2 Press PAUSE 8 to release the tape at the exact
moment you want to start recording.
Note:
Do not leave the unit in pause mode for more than a few
minutes. Instead, press STOP/EJECT § to stop the
tape.
19
02_01-23_RC-EX30B_C_En.p65
19
04.4.12, 3:59 PM
English
Synchronized recording with CD playback
You can make the CD player to start playback when the tape deck enters the recording mode.
3
1
5 2 4
4
3 4
CD/
RANDOM
STANDBY/ON
PROGRA
M/
CLOCK SET
PRE
SET
DOW
N
PRESET
UP
HBS/
PRESET
PUSH
TUNER/
BAND
1
2
4
5
7
8
TAPE
3
DISPLAY
EQ
6
HBS/
PRESET EQ
FM MODE
/BEAT CUT
9
OVER
0
GR
OU
P
TA
PE
STOP
RAND
INTRO
+
PRESET
REPEAT
MUTING
GROUP
DOWN
–
SE
/PAU
PLAY
OM
CD
UP
PROGRAM/
CLOCK SET
TUNE
R
BAND
REMOTE
SENSOR
VOLUME
DISPLAY
RM-SRCEX30J REMOTE CONTROL
1 Load a cassette.
Use only a type-I normal tape.
2 Load a CD.
3 Press CD/RANDOM to enter CD mode.
You can press CD/RANDOM on the remote control
unit to enter CD mode.
4 To start recording from the desired track, select
the track by pressing 4 or ¢ in stop mode.
You can use the number buttons on the remote control
unit to select the track.
5 Press REC ¶.
PLAY 2 is also depressed, and synchronized
recording starts.
When the tape reaches the end first, the CD player enters
the pause mode. Press PLAY/PAUSE 3/8 (or 3/8 on
the remote control unit) to continue playback, or press
STOP 7 (or 7 on the remote control unit) to stop
playback.
When the CD player stops first, the tape continues
running. In this case, press STOP/EJECT § to stop
the tape.
• The CD SYNC indicator appears in the display
window during synchronized recording.
Erasing
When recording on a pre-recorded tape, the previous
recording is erased and only the new recording is heard
next time the tape is played back.
To erase a tape without making a new
recording
1 Press TAPE on the unit to enter the tape mode.
2 Press REC ¶.
20
02_01-23_RC-EX30B_C_En.p65
20
04.4.12, 3:59 PM
English
MAINTENANCE
Cleaning the heads, capstan and
pinch roller
Cleaning is important!
When the tape is running, magnetic powder and dust
naturally accumulate on the heads, capstan and pinch
roller. When they become too dirty;
• Sound quality deteriorates.
• The sound output level drops.
• The previous recording is not completely erased.
• Recording is not performed satisfactorily.
To avoid these, clean the heads, capstan and pinch roller
every 10 hours of use.
Cleaning the CD pickup lens
If the CD pickup lens is dirty, the sound may be
degraded.
Open the disc door and clean the lens.
Use a blower (available at a camera store, etc.) to blow
off dust on the lens.
Head (recording/playback)
Erasure head
Pinch roller
Capstan
Blower
Open the cassette holder. Clean the heads, capstan
and pinch roller.
For effective cleaning, use a cleaning kit available at an
audio store.
After cleaning, make sure that the cleaning fluid has dried
completely before loading a cassette.
Lens
Cautions:
• Keep magnets and metallic objects away from the
head. If the head becomes magnetized, noise will
increase and the sound will deteriorate.
• Demagnetize the recording/playback head every 20 to
30 hours of use with a head demagnetizer available at
an audio store. When demagnetizing the head, the unit
should be turned off.
As the erasure head of the unit is of magnetic type,
do not demagnetize it.
• Do not use anything other than alcohol for cleaning.
Thinner and benzine will damage the rubber pinch
roller.
21
02_01-23_RC-EX30B_C_En.p65
21
04.4.12, 3:59 PM
• If you are having a problem with your unit, check this
list for a possible solution before calling for service.
Symptom
• If you cannot solve the problem from the hints given
here, or the unit has been physically damaged, call a
qualified person, such as your dealer, for service.
Possible cause
Power cannot be turned on.
The power cord is unplugged.
Action
Connect the power cord.
When PLAY 2 is pressed, tape does not PAUSE 8 is pressed.
move.
Press PAUSE 8 again to release it.
Playback sound is at a very low level.
• Batteries are run down.
• The head is dirty.
• Replace the batteries with new ones.
• Clean the head.
REC ¶ does not function.
• The safety tabs of the cassette have • Reseal the slots with adhesive tape.
been broken off.
• No cassette is loaded.
• Load a cassette.
The disc is loaded but does not play.
• The disc is upside down.
•
•
•
•
No sound from the speakers.
The disc is dirty.
The disc is damaged or warped.
The lens is dirty.
There is moisture condensation.
Headphones are conneced.
• Load the disc with the label side facing
up.
• Clean the disc.
• Replace the disc with a playable one.
• Clean the lens.
• Turn the unit on and wait one or two
hours before use.
Disconnect the headphones.
Since the tape speed is irregular, wow • The pinch roller or capstan is dirty.
and flutter occur.
• Batteries are run down.
• Clean the pinch roller and capstan.
• Replace the batteries with new ones.
Radio reception is poor and there is The antenna is not properly adjusted.
much static.
Adjust the antenna correctly.
Remote control is impossible.
• Batteries in the remote control unit are • Replace the batteries with new ones.
run down.
• The remote sensor section is exposed • Try not to operate the unit under direct
to bright light (direct sunlight, etc.)
sunlight, etc.
Note:
When the unit is moved from a cold place of around 0˚C
to a warm place, it may not operate normally, because
moisture has formed inside the deck. Normal operation
will be restored after waiting one or two hours.
22
02_01-23_RC-EX30B_C_En.p65
22
04.4.12, 3:59 PM
English
TROUBLESHOOTING
English
SPECIFICATIONS
CD player
CD capacity
Signal-to-noise ratio
Dynamic range
General
: 1 CD
: 75 dB
: 60 dB
Output terminals
Power supply
Tuner
Frequency range
Antennas
: FM 87.5 – 108.0 MHz
AM 530 – 1 710 kHz
: Telescopic antenna for FM
Ferrite core antenna for AM
Power consumption
Dimensions
Mass
Cassette deck
Frequency response
Wow & flutter
Fast wind time
Speakers
Speaker impedance
Output power
: 60 Hz – 10 000 Hz
: 0.15% (WRMS)
: Approx. 150 sec.
(C-60 cassette)
Accessories provided
: 9 cm cone × 2
:4Ω
: 4 W (2 W + 2 W) at 4 Ω
(10% THD)
: PHONES × 1
: AC 120 V Ó, 60 Hz
DC 9 V (R20 (SUM-1)/D
(13D)-size batteries × 6)
: 18 W (at operation)
3 W (on standby)
: 420 mm × 178 mm ×
250 mm (W/H/D)
: Approx. 3.2 kg
(without batteries)
: AC power cord × 1
Remote control unit × 1
Design and specifications are subject to change without
notice.
23
02_01-23_RC-EX30B_C_En.p65
23
04.4.12, 3:59 PM
EN, FR
© 2004 Victor Company of Japan, Limited
99_BCV_RC-EX30B_C.p65
2
0504MZMBICORI
04.4.12, 3:59 PM