1
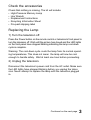
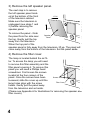
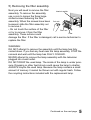
®
LAMP REPLACEMENT
INSTRUCTIONS
Replacement Lamp Kit
PK-CL200U
WARNING:
This Lamp Kit is for use only with JVC model
AV-61S902.
LCT0811-001A
The following instructions will tell you how to safely replace the projection
lamp. Please read these instructions fully before attempting to replace
the lamp. If you feel unsure about replacing the lamp, call a service
technician.
WARNING!
It is very important you DO NOT TOUCH THE GLASS SURFACE OF
THE NEW LAMP. Touching the glass surface will deposit oils from your
hand onto the lamp surface. When the lamp heats up to operating
temperature, the oil will cause a difference in temperature on the lamp
surface. This will likely cause the lamp to break.
This lamp is only for use with the AV-61S902. It is designed to work
specifically with the AV-61S902. Using this lamp with a different
television or other product could cause a malfunction and/or damage to
the television or the lamp.
Under operating conditions THE LAMP WILL GET EXTREMELY
HOT AND WILL CAUSE SEVERE BURNS IF TOUCHED. Before
attempting to replace the lamp, make sure the television has run
through its cooling cycle (indicated by the front panel LED lights)
and that the television is unplugged. If you feel any warmth coming
from the lamp DO NOT TOUCH IT. Wait until the lamp has fully
cooled before attempting to replace it.
NEVER attempt to replace the lamp with the television plugged into
a wall outlet. Attempting to replace a lamp with the television
plugged in could lead to a severe electrical shock.
This kit also includes instructions on recycling the used lamp.
Because the lamp contains a small amount of mercury, it cannot be
disposed of with normal trash in the U.S. Packaging, with a pre-paid
shipping label for returning the lamp to a JVC-authorized recycling
center for recycling, is included with the replacement lamp. See the
included sheet and page 63 in the AV-61S902 User’s Guide for
details on recycling information for customers in the United States.
2
Check the accessories
Check that nothing is missing. The kit will include:
• High-Pressure Mercury Lamp
• Hex Wrench
• Replacement Instructions
• Recycling Information Sheet
• Pre-paid shipping label
Replacing the Lamp
1) Turn the television off.
Press the Power button on the remote control or television’s front panel to
turn the television off. Wait until the picture has closed and the LED lights
on the front panel have stopped blinking indicating the lamp cool-down
cycle is complete.
Warning: The cool-down cycle cools the lamp from its normal operating temperatures. This does not mean the lamp will now be cool
enough to handle safely. Wait at least one hour before proceeding.
2) Unplug the television.
Disconnect the television’s power cord from the AC outlet. Make sure
the LED lights have stopped blinking before you unplug the television. Never attempt to replace the lamp with the television plugged
in.
Continued on the next page
3
3) Remove the left speaker panel.
The next step is to remove
the left speaker panel located at the bottom of the front
of the television cabinet.
Make sure the television is
unplugged (see steps 1 and
2) before removing the
speaker panel.
1. Pull
2. Lift
To remove the panel - Grab
Speaker
the panel from the side near
Panel
the top. Gently pull the top
away from the television.
When the top part of the
speaker panel is fully away from the television, lift up. The panel will
come away from the bottom of the television. Set the panel aside.
4) Remove the filter cover.
The lamp is located behind the air filter. To access the lamp you will need
to remove this filter assembly and the
filter panel covering it. To remove this
panel you will need a Phillips head
screwdriver. First loosen the screws
located at the four corners of the
Screws
panel. Once the screws have been
loosened, slide the cover up until the
Filter Cover
large holes align with the screw
heads. Gently pull the panel away
from the television and set aside.
(Please see Appendix A for illustrations for removing the speaker and
filter covers).
4
5) Removing the filter assembly.
Next you will need to remove the filter
Interlock switch
assembly. To remove the assembly,
use a coin to loosen the three largeslotted screws fastening the filter
assembly. When the screws have been Coin etc.
loosened, slide the filter assembly out
to remove it.
• Do not touch the surface of the filter
Filter unit
or try to remove it from the filter
Filter
assembly. These actions could
damage the filter. If the filter is damaged, call a service technician to
replace the filter.
WARNING:
DO NOT attempt to remove the assembly until the lamp has fully
cooled down. If you feel any heat near the lamp assembly, STOP the
removal and wait until the lamp has FULLY COOLED.
NEVER attempt to remove the lamp assembly with the television
plugged into a wall outlet.
DO NOT DROP the used lamp. The inside of the lamp is under pressure. Dropping or other hard shock could cause the lamp to shatter.
ALWAYS recycle the used lamp. Because the lamp contains a small
amount of mercury it cannot be thrown out with regular trash. Follow
the recycling instructions included with the replacement lamp.
Continued on the next page
5
6) Removing the lamp assembly.
Using the hex wrench included with the replacement lamp, loosen
the two hex screws fastening the lamp assembly unit. Remove the
screws and set aside. When the screws have been removed, remove
the lamp assembly by grabbing the handle and sliding the assembly
towards you.
7) Install the new lamp unit
Slide the new lamp assembly into the television by holding the handle attached to the unit. When the new lamp assembly is securely
installed inside the television,
Handle
replace the hex screws using
the hex wrench. To ensure
the new lamp assembly sits
properly inside the television,
secure the right hex screw
first, then the left. If the lamp
assembly does not sit
Light-source lamp unit
securely inside the television,
the television will not turn on. Hex wrench
WARNING!
Remember, it is very important you DO NOT TOUCH THE GLASS
SURFACE OF THE NEW LAMP. Please re-read the warnings on
page 2 regarding the new lamp unit.
This lamp is only for use with the AV-61S902. It is designed to work
specifically with the AV-61S902. Using this lamp with a different
television or other product could cause a malfunction and/or damage to
the television or the lamp.
THE USED LAMP MUST BE RECYCLED IN THE US. See the included sheet and page 63 of the AV-61S902’s User’s Guide for detailed
recycling information for customers in the US.
The lamp assembly in this product contains mercury. Disposal of the lamp
assembly may be regulated due to environmental considerations. For
information on replacement, disposal or recycling procedures, please
contact JVC Customer Relations at 1-800-252-5722.
6
8) Install the filter unit.
Position the filter assembly back into its place, being careful not to
touch the surface of the filter. Position the three screws and tighten
using an correct-sized coin.
9) Reinstall the filter cover.
Place the filter cover over the filter. Insert the four screws and tighten
them using the screwdriver.
10) Reinstall the speaker cover.
Replace the bottom of the speaker cover first. Insert the two pegs
located at the bottom of the cover into the holes at the bottom lip of
the television cabinet. When the pegs are in place, gently press the
top part of the speaker cover against the television to reinstall. Once
the speaker cover is back in place you may plug the television back
into the AC power supply and return to normal television viewing.
If you have read the installation instructions and do not feel comfortable changing the lamp yourself, please call for a service technician.
Continued on the next page
7
Warning Messages
If the lamp replacement was successful, the television will operate
normally. If there was a problem with the installation, one of several
messages may display on the front panel LED lights.
Lamp installed on a slant or not fully inside the television.
If the lamp assembly has been installed into the unit slanted (not flat)
or is not fully inserted into the lamp housing inside the television,
when the television is turned on the ON TIMER and POWER light
will flash. The 10 LEDs will light, then turn off one each five seconds.
When all LEDs are off, the television still will not display a picture.
To correct: Reinstall the new lamp assembly. Repeat the lamp installation steps, taking care to observe all warnings. Make sure when
the lamp assembly is reinstalled, it is inserted into the unit so it sits
FLAT inside the unit.
• If the ON TIMER light and/or POWER light is flashing you need to
reset the television. Reset the television by unplugging the power
cord from the AC outlet and then plugging the cord back into the
outlet again a little later.
Filter not properly reinstalled.
If the filter assembly has not been correctly reinstalled or if the filter
has been damaged, the television will not turn on. When the Power
button is pressed the 10 LEDs will turn on, then one will turn off
every five seconds. When three have turned off the television will
then enter a cool-down mode and the power will turn off.
To correct: Check to see that the filter has been installed properly.
Repeat steps 1 to 5 and 8 to 10. You do not need to remove and
reinstall the lamp. If the television still does not turn on, the filter may
have been damaged. Call a service technician for repair.
If the television does not work properly, or displays a message not
listed here, call a technician for service.
8
Warranty
For Canadian model televisions, see the separate sheet for
Canadian Warranty information.
JVC COMPANY OF AMERICA warrants this product and all parts thereof, except as
set forth below ONLY TO THE ORIGINAL PURCHASER AT RETAIL to be FREE
FROM DEFECTIVE MATERIALS AND WORKMANSHIP from the date of original
retail purchase for the period shown below. (“The Warranty Period”)
PARTS 1 YEAR
LABOR 1 YEAR LAMP
6 Months or
2000 Hours*
* whichever comes first.
THIS LIMITED WARRANTY IS VALID ONLY IN THE FIFTY (50) UNITED STATES,
THE DISTRICT OF COLUMBIA AND COMMONWEALTH OF PUERTO RICO.
WHAT WE WILL DO:
If this product is found to be defective within the warranty period, JVC will repair or
replace defective parts at no charge to the original owner.
Such repair and replacement services shall be rendered during regular business
hours by JVC authorized service centers. Parts used for
replacement are warranted only for the remainder of this Warranty Period.
Televisions with a screen size of 25 inches and larger are covered on
an in-home basis.
WHAT YOU MUST DO FOR WARRANTY SERVICE:
Either contact the selling dealer (retailer) or call 1-800-252-5722 to arrange inhome service. In-home service will require clear access to the Television by the
service technician.
WHAT IS NOT COVERED:
This limited warranty provided by JVC does not cover:
1. Products which have been subject to abuse, accident, alteration, modification,
tampering, negligence, misuse, faulty installation, lack of reasonable care, or if
repaired or serviced by anyone other than a service facility authorized by JVC to
render such service, or if affixed to any attachment not provided with the products, or if the model or serial number has been altered, tampered with, defaced
or removed.
2. Initial installation, installation and removal from "built-in" entertainment centers
and other mounting systems.
3. Operational adjustments covered in the Owner’s Manual, normal maintenance,
including head cleaning.
9
Warranty
4. Damage that occurs in shipment, due to an act of God, and cosmetic damage.
5. Signal reception problems and failures due to line power surge.
6. Products used for commercial purposes (including but not limited to rental).
*7. Lamp is covered for 6 months or 2000 hours from date of purchase (whichever
comes first). Labor to replace lamp is not included upon expiration of the lamp
warranty period.
8. Accessories.
9. Batteries (except that Rechargeable Batteries are covered for 90 days from date
of purchase).
There are no express warranties except as listed above.
THE DURATION OF ANY IMPLIED WARRANTIES, INCLUDING THE IMPLIED
WARRANTY OF MERCHANTABILTY, IS LIMITED TO THE DURATION OF THE
EXPRESS WARRANTY HEREIN.
JVC SHALL NOT BE LIABLE FOR THE LOSS OF USE OF THE PRODUCT, INCONVENIENCE, OR ANY OTHER DAMAGES, WHETHER DIRECT, INCIDENTAL OR
CONSEQUENTIAL (INCLUDING, WITHOUT LIMITATION, DAMAGE TO TAPES,
RECORDS OR DISCS) RESULTING FROM THE USE OF THIS PRODUCT, OR
ARISING OUT OF ANY BREACH OF THIS WARRANTY, ALL EXPRESS AND
IMPLIED WARRANTIES, INCLUDING THE WARRANTIES OF MERCHANTABILITY
AND FITNESS FOR PARTICULAR PURPOSE, ARE LIMITED TO THE WARRANTY
PERIOD SET FORTH ABOVE.
Some states do not allow the exclusion of incidental or consequential damages or
limitations on how long the warranty lasts, so these exclusions or limitations may
not apply to you. This warranty gives you specific legal rights and you may also
have other rights which vary state to state.
JVC COMPANY OF AMERICA
1700 Valley Road
DIVISION OF JVC AMERICAS CORP.
Wayne, New Jersey 07470
http://www.jvc.com
REFURBISHED PRODUCTS CARRY A SEPARATE WARRANTY. THIS WARRANTY DOES NOT APPLY. FOR DETAILS OF REFURBISHED PRODUCT WARRANTY, PLEASE REFER TO THE REFURBISHED PRODUCT WARRANTY
INFORMATION PACKAGED WITH EACH REFURBISHED PRODUCT.
For customer use:
Enter below the Model No. and Serial No. which is located either on the rear,
bottom or side of the cabinet. Retain this information for future reference.
Model No.:
Serial No.:
10
Purchase Date:
Name Of Dealer:
Authorized Service Centers
QUALITY
SERVICE
HOW TO LOCATE YOUR JVC SERVICE CENTER
TOLL FREE: 1 (800) 252-5722
http://www.jvc.com
Dear Customer,
In order to receive the most satisfaction from your purchase, please read
the instruction booklet before operating the unit. In the event that repairs
are necessary, please call 1 (800) 252-5722 or visit our website at
www.JVC.com.
Remember to retain your Bill of Sale for Warranty Service.
Do not service the television yourself
Caution
To prevent electrical shock, do not open the cabinet. There are no user serviceable parts inside. Please refer to qualified service personnel for repairs.
Accessories
To purchase accessories for your JVC product, please call toll free: 1 (800)
882-2345 or on the web at www.JVC.com
For service in Canada
To locate your local JVC service center or dealer in Canada please call:
In Eastern Canada:
1 (416) 293-1311
In Western Canada:
1 (604) 270-1311
En Français (Montréal):
1 (514) 871-1311
Or visit us on the web at www.JVC.ca
11
JVC COMPANY OF AMERICA
Division of JVC Americas Corp.
1700 Valley Road
Wayne, New Jersey, 07470
JVC CANADA, INC.
21 Finchdene Square
Scarborough, Ontario
Canada, M1X 1A7