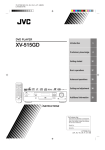
1
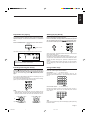
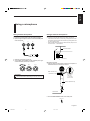
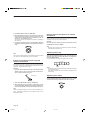
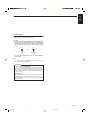
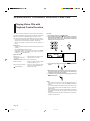
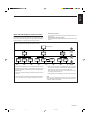
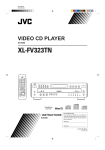
VIDEO CD PLAYER
XL-MV558GD
VCD POWER
TV POWER
DISC 1
DISC 2
DISC 3
1
2
3
5
6
7
8
9
10
+10
ON SCREEN
PROGRAM
CANCEL
V.REPLACE
MPX
VIDEO
INTRO
HIGHLIGHT
REPEAT
SURROUND
RANDOM
4
B.MARK
VIDEO CD VERSION 2.0
XL-MV558
KEY CONTROL
STANDBY
TV
PROG
–
TV VOL+
DOWN
NORMAL
JAPAN
1
2
3
4
5
6
7
8
9
10
11
12
13
14
15
16
17
18
19
20
UP
POWER
STOP
TV/VIDEO
DESIGNED BY JVC
VIDEO CD PLAYER
ON/STANDBY
SELECT
TV
PROG
+
WIRELESS MIC
KARAOKE
NORMAL
PBC OFF
3
PlayBack Control
DISC
TRIPLE TRAY
SHIFT
MIC 1
MIC 2
MIC 3
DIGITAL ECHO
BOOKMARK
VIDEO
INTRO
SURROUND
RETURN
SELECT
TV VOL–
KEY CONTROL
PREV
NEXT
RM-SXMV558U
MIN
MULTI BRAND REMOTE CONTROL
MAX
MIN
PHONES
KEY CONTROL
MAX
MIN
MAX
MIN
MAX
VOCAL
REPLACE
STILL
NTSC/PAL COMPATIBILITY
VIDEO CD
PROGRAM
COMPACT
PlayBack
Control
INSTRUCTIONS
DIGITAL VIDEO
'
GRAPHICS
+20
'
For Customer Use:
Enter below the Model No. and Serial No.
which are located either on the rear, bottom or
side of the cabinet. Retain this information for
the future reference.
Model No.
Serial No.
LET0089-001A
[UF]
XL-MV558GD/Cover
1
97.8.4, 10:00
Warnings
IMPORTANT for the U.K.
DO NOT cut off the plug for this equipment. If the plug fitted is
not suitable for the power points in your home or the cable is too
short to reach a power point, then obtain an appropriate safetyapproved extension lead or consult your dealer.
Caution –– POWER switch!
Disconnect the plug to shut the power off completely. The POWER
switch in any position does not disconnect the unit from the power
source. The power can be remote controlled.
BE SURE to replace the fuse only with an identical approved
type, as originally fitted.
If nontheless the plug is cut off, remove the fuse and dispose of
the plug immediately, to avoid a possible shock hazard by
inadvertent connection to the power supply.
If this product is not supplied fitted with a plug then follow the
instructions given below:
IMPORTANT.
DO NOT make any connection to the terminal which is marked
with the letter E or by a safety ground symbol or coloured green
or green/yellow.
The wires in the lead on this product are coloured in accordance
with the following codes:
Blue :
Neutral
Brown : Live
As these colours may not correspond with the coloured markings
identifying the terminals in your plug proceed as follows:
The wire which is coloured blue must be connected to the
terminal which is marked with the letter N or coloured black.
The wire which is coloured brown must be connected to the
terminal which is marked with the letter L or coloured red.
IF IN DOUBT - CONSULT A COMPETENT ELECTRICIAN.
CAUTION
To reduce the risk of electrical shock, fire, etc.:
1. Do not remove screws, covers or any parts.
2. Do not expose this appliance to rain or moisture.
G-1
XL-MV558GD/Safety
2
97.8.4, 9:53
IMPORTANT FOR LASER PRODUCTS
LABELS
1 CLASSIFICATION LABEL PLACED ON REAR ENCLOSURE
CLASS
LASER
1
PRODUCT
2 WARNING LABEL PLACED INSIDE THE UNIT
DANGER: Invisible laser
radiation when open and
interlock failed or defeated.
AVOID DIRECT EXPOSURE
TO BEAM.
(e)
VARNING: Osynlig laserstrålning när denna del är
öppnad och spärren är
urkopplad. Betrakta ej
strålen.
(s)
ADVARSEL: Usynlig laserstråling ved åbning, når
sikkerhedsafbrydere er ude
af funktion. Undgå udsættelse for stråling
(d)
VARO: Avattaessa ja suojalukitus ohitettaessa olet
alttiina näkymättömälle
lasersäteilylle. Älä katso
säteeseen.
(f)
1. CLASS 1 LASER PRODUCT
2. DANGER: Invisible laser radiation when open and interlock failed or
defeated. Avoid direct exposure to beam.
3. CAUTION: Do not open the top cover. There are no user serviceable parts inside the Unit; leave all servicing to qualified service
personnel.
G-2
XL-MV558GD/Safety
3
97.8.4, 9:53
English
GENERAL INFORMATION
Care and handling of
compact discs
How to handle CDs
When handling a compact disc, do not touch the surface of the disc
(reflective silver side –– the side without the label).
Since compact discs are made of plastic, they are easily damaged. If
a disc gets dirty, dusty, scratched or warped, the sound will not be
picked up correctly and, in addition, such a disc may cause the CD
player to malfunction.
Even on label side
Do not damage the label side, stick paper to or use any adhesive on
its surface.
Storage
Make sure that discs are kept in their cases. If discs are piled one on
top of another without their protective cases, they can be damaged. Do
not put discs in a location where they may be exposed to direct sunlight,
or in a place where the humidity or temperature is high. Avoid leaving
discs in your car!
Maintenance of discs
If there are fingerprints or other dirt adhering to a disc, wipe it with a soft
dry cloth, moving from the center outwards.
If a disc is difficult to clean, wipe with a cloth moistened with water.
Never use record cleaners, petrol, alcohol or any anti-static agents.
Which compact discs can be used?
Many types of compact discs are sold for a variety of uses. The Video
CD Player can play the following compact discs:
•
Video CD
for audio and video (moving picture) reproduction,
including multiplex sound.
•
Video CD with Playback Control function
featuring menu-type operation and super-fine still
pictures for audio and video (moving picture) reproduction, including multiplex sound.
•
CD Graphics (CD-G)
for audio and video (still picture) reproduction,
including multiplex sound.
•
Digital Audio CD, including single discs
for audio reproduction.
COMPACT
DIGITAL VIDEO
PlayBack
Control
'
GRAPHICS
'
CDs you can't play back
Do not play back CD-ROMs, DVDs, or CD-is on this equipment. Doing
so may generate a noise which can damage your speakers.
Using the remote control
The remote control is ready to use when its batteries are installed
properly.
To use it, point its infrared light-emitting window toward the display
window of the player and press a button. The operating range of the
remote control is up to about seven meters in front of the player and
within about 30 degrees to each side –– with nothing between the
remote control and the player interrupting the beam path.
If pressing a button on the remote control does not produce any
response, check to make sure it is pointed correctly and try again. If it
still does not function, check the batteries.
CAUTION
Sometimes during play noise or images may be garbled. This is
sometimes due to the disc. (It may not be up to industry standards.)
These symptom are caused by the discs, not by the malfunction of
the Player.
Page 1
XL-MV558GD
1
97.8.4, 9:37
BEFORE USING FOR THE FIRST TIME
Basic Connections
The Video CD Player must be connected directly to a television set or
an amplifier that is connected to a television or monitor. The television
set or the amplifier must have audio input jacks for right and left
channels and a video input jack.
Select a level, dry location free of dust and vibration, and having a
temperature maintained between 5 and 35°C (41 and 95°F).
Connecting player to a TV or amplifier
using the Audio Video cord
First connect the Audio Video cord — before connecting the AC power
cord.
Firmly insert the yellow pin plug of the Audio Video cord in the yellow
VIDEO OUT jack on the rear panel of the player; the red pin plug in the
red AUDIO OUT (RIGHT) jack; and the white pin plug in the white
AUDIO OUT (LEFT) jack. (The RIGHT and LEFT output jacks are for
the right and left audio channels.)
Then make sure that the television, amplifier or receiver is turned off,
disconnect the AC power cord and firmly insert the pin plugs at the
other end of the Audio Video cord into the matching video and audio
INPUT jacks.
AUDIO OUT
RIGHT
FREQ.
ADJUST
Connecting the power cord
IMPORTANT
Check the setting of the LINE VOLTS switch on the rear panel of the
player. Change the setting if the switch is not set for the main voltage
supplied to your home.
With the LINE VOLTAGE switch correctly set and the audio-video
connectors connected, insert the smaller plug of the power cord
firmly into the AC POWER CORD socket on the rear panel of the
player.
When the power cord is connected, the STANDBY indicator on the
left-hand side of the player’s front panel comes on. [See “Overview
of controls” for a description of the controls on the player.]
WIRELESS
MIC ANT.
VIDEO
OUT
Notes
• When you play a NTSC disc in PAL AUTO mode on a PAL exclusive
TV, the image may get distorted.
(If the signal doesn’t synchronize.)
In this case, reselect the mode to “PAL”.
• Select the mode before you play the disc. If you change the mode
during play, images may get distorted. In this situation stop the
player and reset the mode.
• When you play a NTSC disc in PAL AUTO mode on a Multi system
TV, the image may blink for a moment. This symptom is caused by
the Player detecting the format of the disc and not caused by a
malfunction of the Player.
VIDEO OUT SELECT
LEFT
PAL
NTSC
PAL AUTO
LINE VOLTS
115V-127V
220V-240V
AC POWER CORD
Audio Video cord
(Yellow) (Red) (White)
To input audio jack of
the television/amplifier/
receiver
To input video jack of
the television/amplifier/
receiver
Video out select
AC power cord
Set the VIDEO OUT SELECT switch on the rear panel to NTSC, PAL,
or PAL AUTO mode according to your television system.
NTSC .................... for NTSC exclusive TV
PAL ....................... for PAL exclusive TV
PAL AUTO ............ for Multisystem TV
PAL AUTO is the mode to detect the format of the
disc (NTSC/PAL) automatically and play the image on screen the right way.
Wall outlet
Line voltage alteration
What is your power main voltage? Is it between 115 and 127V, or 220
and 240V? If the LINE VOLTS switch on the rear panel of the player is
not set to your power main voltage, disconnect the power cord, if it is
already connected, and change the switch setting accordingly.
Page 2
XL-MV558GD
2
97.8.4, 9:37
Installing batteries
Putting batteries in the remote control
•
The battery compartment is located on the back of the remote control.
•
•
1. Insert a finger in the recess under the battery compartment
cover, and pull off the cover.
•
•
Remove batteries from the remote control if it is not going to be used
for a long period of time.
Remove dead batteries and dispose of them properly.
Never leave dead batteries lying around, take them apart, mix them
with other refuse, or throw them into an incinerator.
Never touch liquid that has leaked out of a battery.
Do not mix new and old batteries, or batteries of different types,
when replacing them.
Putting batteries in the microphone
1. Unscrew and remove the battery compartment cap as illustrated.
2. Place the two accessory R6P(SUM-3)AA(15F) batteries in
the remote control according to the polarity markings (“+” and
“–”) inside the compartment and on the batteries.
2. Insert 2 “R6P (SUM-3)/AA(15F)”-size batteries (provided), oriented correctly.
3. Insert the two tabs of the cover in their respective slots, and
snap the cover in place.
·
ª
ª
·
3. Screw the cap back on as illustrated.
The batteries last about one year with normal use. If function of the
remote control become erratic, replace the batteries.
Precautions for the safe use of batteries
Observe the following precautions for the safe use of batteries. Their
life will be shortened, they may burst or their contents may leak if they
are used improperly:
Page 3
XL-MV558GD
3
97.8.4, 9:37
English
BEFORE USING FOR THE FIRST TIME
OVERVIEW OF CONTROLS
Here the basic function of controls on the front panel of the Player and the
remote control are explained. The function of some controls may be
restricted in actual use depending on the on-going operations. The remote
control has fourteen (14) unique function buttons in addition to those on
the player.
18
XL-MV558
VIDEO CD PLAYER
3
ON/STANDBY
1
KEY CONTROL
2
STANDBY
DOWN
NORMAL
UP
POWER
11
WIRELESS MIC
KARAOKE
NORMAL
PBC OFF
PlayBack Control
4
MIC 1
3
5
MIC 2
MIC 3
DIGITAL ECHO
VIDEO
INTRO
15
BOOKMARK
16
12
6
SURROUND
MIN
RETURN
MIN
MAX
KEY CONTROL
MIN
MAX
MIN
MAX
SELEC
21
PREV
17
13
MAX
PHONES
DISC
TRIPLE TRAY
22
VOCAL
REPLACE
7
14
NTSC/PAL COMPATIBILITY
VIDEO CD
8
9
23
10
Left front panel of the Player
(controls marked (R) have equivalents on the remote control)
1
2
3
4
5
6
7
8
9
10
POWER button (R)
turns the power on and off.
STANDBY indicator (Red)
lights when the power cord is connected and the power is turned off.
The STANDBY indicator is not lit when the player is turned on.
KEY CONTROL button (R)
Transposes the music key.
DOWN button : used to flatten by a half tone.
NORMAL button : returns to original key tone.
UP # button
: used to sharpen by a half tone.
MODE switch
Switches the KARAOKE/NORMAL/PBC OFF mode.
KARAOKE mode : one track playing mode.
NORMAL mode
: continuous plural tracks playing mode. Required
also for the Playback Control (PBC) function.
PBC OFF mode : inhibits the Playback Control (PBC) function of
the video CD.
WIRELESS MIC button with indicator
activates/deactivates the wireless microphone. When the WIRELESS MIC button is pressed, the indicator is lit as follows.
green: tuning accomplished.
red:
not successful. For tuning, see page 16.
DIGITAL ECHO knob
adjusts the degree of the echo effect for the microphone (1 through
3) and the wireless microphone voice.
MIC1 to MIC3 knobs
adjusts volume of the microphone corresponding to MIC number.
Wireless microphone volume adjustment is performed using the
MIC 3 knob.
PHONE jack
used for connecting stereo headphones. The volume is set to a
predetermined level and is not adjustable.
KEY CONTROL jack
used for connecting a microphone with key control function.
MIC jacks (1 through 3)
used for connecting microphones (1 through 3). The jacks correspond to MIC 1 to 3 volume knobs located above.
Center front panel of the Player
11
12
13
14
15
16
17
DISC1 to DISC3 trays
used to load discs. To insert/remove one or up to three (3) discs,
press the 0 OPEN/CLOSE button located at the right of the tray.
BOOKMARK button (R)
Place a "bookmark" at a video segment you want to find later for
almost instant play. (See page 14.)
SURROUND button (R)
Changes the surround mode. (See page 14.)
VOCAL REPLACE button
activates the vocal replace function, which inserts your voice in
place of the vocals on the disc.
Display window
shows information about the status of operation.
VIDEO INTRO button (R)
applies to video CDs only. The introductory five (5) seconds of
tracks on a video CD are displayed on the television screen in order
to present the contents of the video CD. (See page 13.)
RETURN button (R)
Utilized for operation with the PBC function. This button is used to
return to a menu screen during play. (See page 18.)
Right front panel of the Player
18
19
20
0 (OPEN/CLOSE) buttons (Disc number 1 to 3)
Used to open and close disc trays 1 to 3 respectively. When, after
opening the DISC1 tray, another 0 (OPEN/CLOSE) button is
pressed, the DISC1 tray is first closed, then the other DISC tray
selected is opened.
DISC1 through DISC3 buttons with indicators (Green) (R)
plays the disc of the number indicated on the button. As soon as the
disc begins playing, the indicator blinks.
Number keys (1 to 20) (R:1 to 10)
used to specify a track number for playing, changing, or programming. To operate numbers above twenty (20), press the +20 button
once. The number keys (1 to 20) are then assigned 21 to 40
numbers instead of 1 to 20. The maximum key number assignment
is 99. In PBC function operation, the number keys are additionally
utilized for the selection of menu items. See page 18 “ Operation of
Playback Control function”.
Page 4
XL-MV558GD
4
97.8.4, 9:38
The controls with identical names on the Player as on the remote control
have the same function and are used in the same manner.
DISC 1
DISC 2
DISC 3
VCD POWER
TV POWER
27
18
19
VIDEO CD VERSION 2.0
1
2
3
DESIGNED BY JVC
4
1
2
3
4
5
6
7
8
9
10
+10
ON SCREEN
PROGRAM
CANCEL
V.REPLACE
MPX
VIDEO
INTRO
HIGHLIGHT
REPEAT
SURROUND
JAPAN
5
28
29
3
6
DISC
7
TRIPLE TRAY
9
10
30
31
20
32
33
VIDEO
INTRO
16
8
11
SELECT
21
12
13
14
15
RANDOM
B.MARK
34
RETURN
PREV
NEXT
SELECT
17
16
22
17
18
19
20
35
STILL
STOP
36
23
PROGRAM
+20
25
26
24
TV/VIDEO
TV
PROG
–
TV VOL+
TV
PROG
+
39
SHIFT
TV VOL–
40
KEY CONTROL
37
RM-SXMV558U
21
22
23
24
25
26
3 SELECT (PLAY) button (R)
Starts to play the disc with/without the Playback Control function.
4 / ¢ PREV / NEXT buttons
During operation with the Playback Control function
invokes previous or next screen.
During operation without the Playback Control function
skips forward or backward quickly from current track being played.
When pressed and held down, play fast backward/forward. See
page 8.
7 (STOP) button (R)
Stops play.
8 STILL (PAUSE) button (R)
temporarily suspends playing. Video motion freezes and audio
reproduction stops. Pressing the button repeatedly advances the
picture frame-by-frame. (Video CD only)
PROGRAM button (R)
Any desired sequence of tracks can be programmed with the
number keys and the +20 button. (on the remote control please use
+10) The program button is not available while the Playback Control
function is activated.
+20 button
used to shift the numbers assigned to the number keys to 21 or
higher (maximum 99).
On the remote control unit
27
28
29
30
31
VCD POWER/TV POWER button
Turns the player on and off.
When pressed after you hold down the SHIFT button, turns the TV
on or off.
+10 button
used to shift the numbers assigned to the number keys to 11 or
higher (maximum 99).
ON SCREEN button
Controls whether or not control and operation status are displayed
on the television screen or monitor.
CANCEL button
Cancels the latest track you have programmed or cancels the
bookmark. Also used to cancel a bookmark.
MPX button
Activates the multiplex function, which switches to NORMAL (stereo), L-ch monaural and R-ch monaural.
38
MULTI BRAND REMOTE CONTROL
32
33
34
35
36
37
38
39
40
HIGHLIGHT button
Applies to a video CD to see highlights of a track. Displays the first
(5) seconds of each of nine (9) equal-time segments of the track.
REPERT button
Repeats a track or inserted discs from 1 to 3.
RANDOM button
Changes the disc track program to a random sequence from disc
1 through 3 respectively.
4 / ¢ AUTO SEARCH button
Skips forward or backward from a current track. Holding down the
button causes it to skip tracks much faster.
1 / ¡ MANUAL SEARCH button
Shifts the playing location backward and forward quickly. Holding
down the button causes it to go much faster.
TV/VIDEO button
Used to preset the remote control unit, to control some functions on
your TV set. (See page 9.)
SHIFT button
Used together with other keys for various functions. (See page 9,
“Using the remote control.”)
TV VOL + / TV VOL – keys
Turns the TV volume up or down.
TV PROG – / TV PROG + /KEY CONTROL
Changes the television channel.
When pressed after you hold down the SHIFT button, changes the
key in which the music plays. (See page 9.)
Page 5
XL-MV558GD
5
97.8.4, 9:38
English
OVERVIEW OF CONTROLS
BASIC OPERATIONS
Now you can play a
variety of video CDs!!
Overview of the three modes
Description of the display window
This Player has three (3) modes called KARAOKE, NORMAL, and
PBC OFF mode. These are selected by the MODE switch. This
enables various ways of playing a video CD.
The display window indicates many aspects of control and operation
status.
KARAOKE
NORMAL
4
PBC OFF
KARAOKE mode: One track playing mode. Whenever one track has
completed play, the Player stops.
NORMAL mode: Continuous plural tracks playing mode. The Player
plays tracks continuously in the order they appear
on the disc.
PBC OFF mode: This mode is identical to the NORMAL mode,
except that the PBC function is inhibited.
To set the mode, switch the MODE switch on the left side of the front
panel.
Triple disc tray usage
Up to three (3) discs can be loaded in the Player. You may insert a disc
into any of the disc trays 1 through 3 whichever you prefer.
If you want to play only a specified disc, press the corresponding disc
1, 2 or, 3 button located to the right of the 0 (OPEN/CLOSE) button.
1
2
1
Shows the disc number being played.
Shows mainly the total number of tracks and the track number
being played.
3
Shows the surround mode status and the cumulative time (minutes
and seconds) of the track and afterward, total time of the disc is
displayed.
4
The combination of VCD, PBC, and CD-G indicators lit shows the
type of disc being played.
5
Each indicator in this area lights when the corresponding function
is activated.
DISC
TRIPLE TRAY
Page 6
XL-MV558GD
6
3
2
When three discs are in inserted, basic order of playing is as following.
• Pressing DISC 1: DISC 1 = DISC 2 = DISC 3 = STOP
• Pressing DISC 2: DISC 2 = DISC 3 = DISC 1 = STOP
• Pressing DISC 3: DISC 3 = DISC 1 = DISC 2 = STOP
3
5
97.8.4, 9:38
Preparation for playing
Starting to play disc(s)
Turn on the television set, amplifier or receiver to which the Player
is connected, and then select the proper channel and mode to
operate the Player, and set the sound volume to a reasonable
level.
Press the 3 SELECT (PLAY) button. The Player starts to play from
the disc indicated in the Display window.
Press one of the DISC 1 through 3 buttons and the Player plays the
disc you pressed, from the 1st track. For individual track selection, use the number keys or the 4/ ¢ PREV/NEXT buttons.
Press the POWER button on the front panel or remote control.
ON/STANDBY
SELECT
STANDBY
POWER
or
The STANDBY indicator
goes out.
The display window shows the initial information as shown below.
Easy start up
Without pressing the POWER button you can start up the Player by
pressing 3 SELECT button or disc buttons.
When you start play, the Display window shows disc number and the
track number being played.
During play, the indicator on the DISC button blinks.
If the PBC function is activated, the display window shows “Pb” until
you play a track, and the television screen shows the initial menu, DISC
number, and “PBC”. See page 18, “Operation of Playback Control
function”.
When you press 3 SELECT button during play, the disc will restart
from the beginning of the track except when the PBC function is
activated.
Inserting/removing the disc(s)
Using number keys
Press the 0 (OPEN/CLOSE) button (1 through 3) to open the disc
tray. Then place the disc in the round recess of the tray with label
side up. To close the tray, press the 0 (OPEN/CLOSE) button
again.
Press the number keys to select numbers.
If you press the 0 (OPEN/CLOSE) button of the playing disc, the
Player stops and then opens the tray.
If you press the 0 (OPEN/CLOSE) button of a disc that is not being
played, you can change discs without stopping play.
On the Player .................... 1 to 20 and +20 key
Example: For number 5, press 5. For number 15, press 15. For
number 32, press +20 button, then 12. For number 42, press +20 twice,
then 2.
1
2
3
4
5
6
7
8
9
10
11
12
13
14
15
16
17
18
19
20
+20
Notes
• When loading a disc in the disc tray, be sure to position the disc
inside the recess. Otherwise, the disc will be damaged when the
disc tray is closed, and the disc cannot be removed from the unit.
On the remote control ..... 1 to 10 and +10 key
Example: For number 5, press 5. For number 15, press +10, then 5.
For number 20, press +10, then 10. For number 32, press +10 three
times, then 2.
1
2
3
4
5
6
7
8
9
10
+10
CD
Tray
CORRECT
INCORRECT
Note
When you press number keys, track will start playing without pressing
3 SELECT button.
Page 7
XL-MV558GD
7
97.8.4, 9:39
English
BASIC OPERATIONS
BASIC OPERATIONS
Stopping play
Auto search/Manual search
Press the 7 (STOP) button to stop play at any time.
STILL
On the Player, during play, pressing the 4 button once causes
the Player to replay the current track from the beginning. Pressing the 4 button twice causes the Player to play the previous
track. Pressing the ¢ button once causes the Player to skip to
¢ buttons causes the disc
the next track. Holding down the 4/¢
to fast reverse or forward.
PREV
NEXT
Pausing play
Press the 8 STILL (PAUSE) button to temporarily suspend play.
STILL
¡ buttons causes
On the remote control, holding down the 1/¡
the disc to fast reverse or forward.
Continuing to hold down the buttons causes it to search much
faster.
STOP
Notes
• When the 8 STILL (PAUSE) button is pressed once, “PAUSE”
appears on the television screen, the video motion freezes and the
sound is turned off. The still picture advances frame-by-frame each
time the 8 STILL (PAUSE) button is pressed. This frame-by-frame
function is effective only for video CDs.
• To release the pause, press the SELECT or blinking DISC 1
through 3 button.
• During “PAUSE” the time counter on the display will blink.
(Remote control)
On the remote control, during play, pressing the 4 button once
causes the Player to replay the current track from the beginning.
Pressing the 4 button twice causes the Player to play the
previous track. Pressing the ¢ button once causes the Player
to skip to the next track.
SELECT
(Remote control)
Using stereo headphones
Connecting stereo headphones
Connect stereo headphones to the PHONES jack at the lower-left of
the front panel. The volume level is fixed and cannot be adjusted.
PHONES
Page 8
XL-MV558GD
8
97.8.4, 9:39
Using the remote control
Presetting the remote control to operate
your own TV
Using the SHIFT button on the remote
control unit
You can use the Player’s remote control unit to control some functions
on your TV set (e.g., turning the TV on and off, adjusting volume, or
selecting channels). First, though, you must preset the remote control
to make it compatible with your TV.
You can control other functions with the remote control, simply by
holding down the SHIFT button while pressing another button. Some
of these functions are useful for Karaoke and Video CD playing, others
for controlling the TV.
SHIFT
Operation
1. Check the Preset Code Table (page 10) to determine the twodigit brand code number for your TV.
2. While holding down the TV/VIDEO button on the remote control, press the Number keys to insert the two-digit brand code
number. (For example, if the code number is "28", press
Number key 2, then 8. If the first digit is a "0", press 10. Thus,
if the code number is "09", press Number key 10, then 9. If the
code number is "10", press Number key 1, then 10. If it is "20",
press Number key 2, then 10.)
Notes
• Before the remote control unit leaves the factory, the brand
code number is set as No. 01 (JVC).
• Depending on your television set’s age and other factors,
brand code numbers may be different from those shown in the
table. In such a case, try out other codes until you find one that
corresponds to your television.
3. While still holding down the TV/VIDEO button, press the STOP
button on the remote control.
TV/VIDEO
7 SHIFT button functions for Karaoke and Video CD playing
SHIFT + TV PROG – = KEY CONTROL (
)
SHIFT + TV PROG + = KEY CONTROL (#)
7 SHIFT button functions to control the TV
SHIFT + VCD POWER = Turns the TV on and off
SHIFT + 1 = TV Channel 1
SHIFT + 2 = TV Channel 2
SHIFT + 3 = TV Channel 3
SHIFT + 4 = TV Channel 4
STOP
+
SHIFT + 5 = TV Channel 5
SHIFT + 6 = TV Channel 6
4. If the code number is correct, the TV will turn off. Repeat the
procedure from the beginning if you weren’t successful the
first time.
SHIFT + 7 = TV Channel 7
SHIFT + 8 = TV Channel 8
SHIFT + 9 = TV Channel 9
SHIFT + 10 = TV Channel 0*
Note
• The asterisk * indicates that these operations do not work for some
manufacturers’ television sets.
Page 9
XL-MV558GD
9
97.8.4, 9:39
English
BASIC OPERATIONS
BASIC OPERATIONS
Preset code table
No.
Television Manufacturer
01
JVC
02
PANASONIC
03
SONY
04
SHARP
05
TOSHIBA/BEIJING/CHANGHONG
06
MITSUBISHI/CHANGHONG
07
HITACHI
08
SANYO
09
FUNAI
10
AIWA
11
DAEWOO
12
SAMSUNG
13
LG (GOLDSTAR)
14
THOMSON
15
FERGUSON
16
PHILIPS/TCL/CHANGHONG
17
GRUNDIG
18
ITT
19
MIVER
20
FINLUX
21
NOKIA
22
NEC
23
JINXING/PEONY1
24
PEONY2
25
PEONY3/CHANGHONG
26
KONKA
27
PEIJIN/NOBLEX
28
TCL
Page 10
XL-MV558GD
10
97.8.4, 9:39
English
VARIOUS UNIQUE FUNCTIONS
Various functions can
enhance your enjoyment
Display of operations status
Canceling a programmed track
Preparation
This function is controlled by the remote control.
Operation
There are three (3) canceling functions (canceling the last programmed track, canceling the current track, canceling the next
track to be played).
Operation
Press the ON SCREEN button on the remote control. By pressing
the ON SCREEN button, the following information may be easily
and quickly displayed or erased on the television screen.
•
Time, Disc mode, Echo effect, Key control, Program, Repeat, Random, Multiplexing, Vocal replace, Vocal masking, Bookmark, etc.
PROGRAMMED SONGS
2-1
2-2
2-3
2-4
2-5
PROGRAMMED SONGS
2-1
To cancel the last programmed track press the CANCEL
button on the remote control and the last programmed track
will be canceled. This can be done while a disc is playing.
1:30
ON SCREEN
3-1
1-1
1-2
1-3
The number located lowest is the
latest track programmed.
(Television screen)
(Remote control)
(Television screen)
•
•
Programming the track sequence you want
Preparation
It is not possible to enter programming mode during play.Verify
whether the Player is playing. If playing, stop the player with the 7
STOP button.
To cancel the current track press 7 STOP button.
To cancel the next track, wait until the current track has
finished and press the ¢ button and the next track will be
canceled and the unit will go to the next programmed track.
Note
To verify the tracks you programmed, stop the Player and see ON
SCREEN information
Operation
1. Press the PROGRAM button to enter the programming mode.
“PROGRAM” is displayed in the display window.
PROGRAM
2. Specify the disc by the DISC (1 through 3) button and then the
track by the number keys successively. You can program up
to nine (9) tracks by repeating this procedure.
3. To play the programmed track press the 3 SELECT (PLAY)
button.
Notes
• The track number playing, next track programmed, and number of
programmed tracks are displayed from the left-top of the television
screen. You may use the ON SCREEN button to delete this
information.
• Once the programmed track is played, it is deleted from the
program.
• You may continue to program even while the disc is playing.
Page 11
XL-MV558GD
11
97.8.4, 9:39
VARIOUS UNIQUE FUNCTIONS
Clearing a program
Randomly playing tracks
To delete all programmed tracks you have entered, press the 7
STOP button and then the PROGRAM button. “PROG OFF” will
be displayed on the television screen.
Preparations
• This function is controlled by the remote control.
• The RANDOM button is effective only in NORMAL/PBC OFF mode.
• This function plays tracks randomly from a single disc.
STILL
PROGRAM
Operation
1. Stop the Player.
2. Press the RANDOM button and random playing will start.
“RANDOM” is displayed in the display window.
Note
The Player does not cancel the track program even if the 7 (STOP)
button is pressed. Pressing the 3 SELECT (PLAY) button again
causes the Player to resume playing from the next track.
RANDOM
(Remote control)
Repeating tracks
7 (STOP)
3. To cancel random playing, after stopping the Player [7
button], press the RANDOM button again.
It is possible to repeat all discs or only a single track.
STILL
RANDOM
Preparation
This function is controlled by the remote control.
Operation
By pressing the REPEAT button, channel REPEAT modes are
cycled as shown below.
REPEAT
= All discs
= 1 track
(Remote control)
(Display window)
REPEAT ALL
REPEAT1
(All discs)
(1 track)
REPEAT OFF
(Television screen)
(Remote control)
Note
• Random is not effective in program or KARAOKE mode.
• Only REPEAT ALL is available when in RANDOM mode.
Playing a multiplex sound CD
This function is used for multiplex sound discs.
Operation
By pressing the MPX button, channel multiplexing modes are
cycled as shown below.
MPX
Notes
• When playing a programmed sequence of tracks,only one track
repeat is available.
• Only REPEAT1 is available in KARAOKE mode.
• The Repeat function is not available when the player is set to PBC
ON.
• Only REPEAT ALL is available when the player is in RANDOM
mode.
(Remote control)
NORMAL
L-CH MONO
(left-channel/
right-channel)
(Television screen)
Page 12
XL-MV558GD
12
97.8.4, 9:39
R-CH MONO
Viewing the VIDEO INTRO of a video CD
Viewing the highlights of a video CD
Preparation
When you play a video CD with the Playback Control function, the
mode switch is recommended to be in the PBC OFF mode or KARAOKE
mode.
This function is used for a movie video CD.
Operation
1. Play the disc you want to see a digest of.
2. Press the VIDEO INTRO button on the Player or the remote
control just after starting disc play. Then the Player starts to
display in sequence the first five (5) seconds and track numbers of all tracks on the disc.
VIDEO
INTRO
VIDEO
INTRO
Preparations
• When you play a video CD with the Playback Control function, the
mode switch is recommended to be in the PBC OFF mode or
KARAOKE mode.
• This function is controlled by the remote control unit.
Operation
1. Start playing the track you want to see the highlights of.
2. After the track begins to play, press the HIGHLIGHT button on
the remote control.
or
HIGH LIGHT
HIGHLIGHT
(Remote control)
3. To select a track during digest display, press the number key
corresponding to the item number on the television screen.
(Remote control)
1
2
3
4
5
6
8
9
7
(Television screen)
VIDEO INTRO
1
2
3
4
5
6
7
8
9
(Television screen)
Programming during VIDEO INTRO
Operation
1. Stop play.
2. Press the PROGRAM button so that PROGRAM is lit in the
display.
3. Press the disc button you want to play, and enter 1 on the
keypad.
4. Press the 3 button and then, after the disc has started to play,
press the VIDEO INTRO button.
5. The Player starts to display in sequence the first five (5)
seconds and track numbers of all tracks on the disc. Select the
number you want to program. You can program nine (9) tracks.
6. Press the 3 button to play.
3. To select one of the nine (9) segments, press the number key
(1 to 9) of the segment which you want to play.
Notes
• When you choose a highlight it will start from five (5) seconds before
the shown time below each segment.
• The highlights show the proceeding five (5) seconds up to the
displayed time on each highlight.
• The segments are each of nine (9) equal-time period divisions of the
track.
• Nine (9) different highlights are displayed for one (1) minute.
• If no highlight is choosen in the one (1) minute period in normal
mode or PBC OFF mode the next nine (9) segment highlights will
begin, in KARAOKE mode highlights will stop.
• While in VIDEO INTRO or HIGHLIGHT, sometimes image is
garbled partially. This symptom is caused by noise in the disc itself
or incorrect manufacturing, it is not caused by a malfunction of the
Player.
Page 13
XL-MV558GD
13
97.8.4, 9:39
English
VARIOUS UNIQUE FUNCTIONS
VARIOUS UNIQUE FUNCTIONS
Playback with the
Bookmark function
Selecting the surround mode
You can change the sound ambiance using the Surround function.
Operation
1. Choose from among the following three surround modes to
change the disc mood.
CLUB:
A more intimate sound with greater resonance and
bass.
HALL:
Enhances the mid-frequency range (which the human
voice occupies), imitating the effect achieved in a
concert hall.
STADIUM: Adds presence and spreads the sound, like in a stadium.
Marking a segment for later viewing with
the Bookmark function
The Bookmark function lets you mark a segment of a Video CD, so that
you can have almost instant playback of a desired scene later.
Even if you take the disc out of the player, its bookmark will stay
recorded for later use, until you erase them, or disconnect the power
cord.
Operation
While playing the disc, press the BOOKMARK button at the
segment you want to mark for later playing.
B.MARK
BOOKMARK
or
2. To select the surround mode, push the SURROUND button
until the name of the desired sound mode appears on the
television screen and in the display window.
SURROUND
SURROUND
or
(Remote control)
Each time you press the button, you toggle the mode as
follows:
CLUB
HALL
STADIUM
OFF
(Remote control)
Notes
• The Bookmark function works only with Video CDs.
• You can register one bookmark in a single disc and registration for
up to ten discs is possible.
• The Bookmark function is most easily used when the Player is in
PBC OFF mode.
• If you mark a segment when the Player is set for the Playback
Control (PBC) function, the mark is placed at the beginning of the
scene.
• The Bookmark function does not work in Random and Program
modes.
• When you disconnect the power cord, Bookmark registration is
erased.
(Television screen)
3. To cancel the effect, press the SURROUND button until the
word “OFF” appears on the television screen.
Playing the segment you marked
Press the BOOKMARK button when playback is stopped.
Note
• When the Player is in one of the three Surround modes, you cannot
use the key control, digital echo, vocal replace and MPX functions.
Canceling the bookmark
After pressing the BOOKMARK button to start playing the segment you marked, press CANCEL button.
CANCEL
(Remote control)
Page 14
XL-MV558GD
14
97.8.4, 9:39
Using a microphone
Using a wired microphone
Using a wireless microphone
Operation
1. Insert the connector cable to the end of the microphone.
2. Up to three (3) microphones can be connected to the MIC jacks
on the front panel.
Antenna preparations
You need to connect the FM antenna to the back of the player.
• Open the FM antenna wire connectors by pushing them to the side,
insert the FM antenna wires, and close them by pushing them back
into their original position.
• Attach the FM feeder antenna to the wall behind the player so that
the wire forms a “T” as illustrated.
MIC 1
MIN
MIC 2
MAX
MIN
MIC 3
MAX
MIN
MAX
FM feeder antenna
WIRELESS
MIC ANT.
(Rear panel)
3. Switch the microphone’s power on.
4. Turn the MIC 1 through MIC 3 knobs clockwise (level up) or
counterclockwise (level down) as desired.
MIC 1
MIC 2
MIC 3
Microphone operation
1. Insert the antenna cable into the end of the microphone as
illustrated and turn it clockwise to secure it.
WIRELESS
MIN
MAX
MIN
MAX
MIN
MAX
OFF
WIRED
FREQ. ADJUST screw
ATTENTION
When you are not using the microphone, to set the MIC switch to
OFF; otherwise the batteries will discharge even when not in use.
MIC SELECT switch
* Be sure to set
the switch to
OFF when
you insert the
antenna cable.
Battery compartment cap
Antenna cable
2. Press the WIRELESS MIC button on the front panel.
WIRELESS MIC
Page 15
XL-MV558GD
15
97.8.4, 9:39
English
VARIOUS UNIQUE FUNCTIONS
VARIOUS UNIQUE FUNCTIONS
3. Set the MIC SELECT switch to “WIRELESS”.
4. When the indicator turns green, the wireless microphone has
been accepted. If the tuning is not proper (noise or no voice
output from the speaker because of interference from TV
signals etc.), the indicator turns red.
You can use up to four (4) microphones (3 wired and 1 wireless) at
the same time.
5. The wireless microphone voice is mixed into MIC 3. Wireless
microphone volume adjustment is performed with the MIC 3
knob.
MAX
Operation
Insert the connector cable to the end of the microphone and set
the MIC SELECT switch to “WIRED”.
Adjusting music key
Note
The maximum operating distance of the wireless microphone is about
10m. (This may change depending on room conditions.)
If there is interference when using the
wireless microphone
If the indicator turns green in spite of the microphone switch being off,
or no voice is output from the speaker because of interference from TV
signals etc., continue with the next step.
Operation
1. Try to tune the microphone frequency. First, adjust the FREQ.
ADJUST screw in the rear panel using the provided screwdriver, until the interference is gone.
FREQ.
ADJUST
When the batteries are dead or interference is too strong, you can use
a wireless microphone as a wired microphone.
Note
• Normally, when not using the microphone as wireless, the WIRELESS MIC button should be off.
MIC 3
MIN
Using a wireless microphone as a wired
microphone
(Rear panel)
Press the KEY CONTROL buttons ( or #) to change the key in
which the music plays. To return the music to its original key,
press the NORMAL button.
You can adjust the music using the remote control unit also.
KEY CONTROL
DOWN
NORMAL
UP
Notes
• The degree the key has been sharpened or flattened is displayed
on the television screen.
• When the song ends the key control will return to NORMAL mode
automatically.
Adjusting echo effect
Turn the DIGITAL ECHO knob clockwise (level up) or counterclockwise (level down) to adjust the echo effect as desired.
2. Then set the MIC SELECT switch to “WIRELESS”.
3. While speaking into the microphone continuously turn the
microphone’s FREQ. ADJUST screw with the provided screwdriver until the indicator on the front panel button turns green.
DIGITAL ECHO
MIN
Note
When you adjust the frequency, be sure to use the provided screwdriver. Metal head screwdrivers may not adjust correctly or may
damage parts inside.
Page 16
XL-MV558GD
16
97.8.4, 9:39
MAX
Vocal replace
Preparation
This function is used for multiplex sound discs.
Operation
1. Press the VOCAL REPLACE button during play or stop. REPLACE will appear on the display window and VO.REPLACE
will appear on the television screen. When you start singing,
the disc vocal is removed and your voice is inserted into the
music.
VOCAL
REPLACE
V.REPLACE
or
(Remote control)
2. To cancel voice replacement, press the VOCAL REPLACE
button again.
Note
• You cannot use the Vocal Replace function with a disc that has
vocals recorded on the left channel.
ATTENTION
Be sure to remove the microphone
Note when connecting the sound output to the input of a TV or VCR:
If an excessively strong signal is given to a unit through a microphone, for example when using Karaoke, it may cause an adverse
effect such as distorted sound. Lower the sound volume using the
microphone control.
Karaoke etiquette
Think of your neighbors when you are enjoying karaoke music.
Particularly late at night, the sound you enjoy may reach your
neighbors more than you expect. Common sense and courtesy are
always appreciated.
Page 17
XL-MV558GD
17
97.8.4, 9:39
English
VARIOUS UNIQUE FUNCTIONS
OPERATION OF PLAYBACK CONTROL FUNCTION
Playing Video CDs with
Playback Control function
This Player provides a Playback Control function which utilizes a
procedure (menu selection) programmed in a video CD. The playback
operation procedure may differ depending on the disc you use.
The Playback Control function is described below and in the figure.
• High-resolution still image display - Super-fine reproduction of still
images with more than 4 times the resolution of video tape.
• Menu-driven playback - interactive menus for easy selection of
tracks
Operation
1. Verify that the Player is in NORMAL mode.
2. Press the DISC (1 through 3) or 3 SELECT button, and then the
Player starts up the PBC function. “Pb” is shown in the Display
window. The main menu, “PBC”, and disc/track number are
displayed on the television screen.
SELECT
or
Preparations
• A video CD with the Playback Control function is required for this
operation.
• Only the NORMAL mode can be used.
• The buttons available for use are the number keys, the 4/¢
PREV/NEXT buttons, 3 SELECT button, DISC (1 through 3)
RETURN button.
buttons, and
2-PBC
PBC
1
2
3
4
Button functions
Number keys ............................ Select a specific menu item from the
(Including +20 button and
television screen or monitor.
+10 button)
4/¢ PREV/NEXT buttons .. Move through menu.
3 SELECT button .................... Starts up a video CD with the PBC
function in DISC tray 1 to 3.
DISC (1 through 3) buttons ....... Start up a video CD with the PBC
function in the specified DISC tray.
(Television screen)
¢ PREV/NEXT
3. To move through the menus, press the 4/¢
buttons.
PREV
NEXT
RETURN button ................ Returns to the menu.
4. When the menu you want appears, select an item in the menu
by using the number keys. The numbers on the number keys
correspond to the menu item numbers.
5. To return to a menu and stop the track being played, press the
RETURN button.
RETURN
Notes
• Page numbers in the menu show that preceding pages exist. To
move from the current menu, press the 4/¢ PREV/NEXT
buttons.
• If you have no desire to use the PBC function when playing a disc
with the PBC function, switch the MODE switch to “PBC OFF”
before playing.
• When you change the mode switch except NORMAL mode during
play Playback Control disc, the play stops, so reset again from the
beginning.
• If you press number keys directly to select the track, you can’t enter
the Player into PBC mode.
Page 18
XL-MV558GD
18
97.8.4, 9:40
Video CD with Playback Control function
•
What is Playback Control function?
The Playback Control function, ushering a new video CD age, allows
you to enjoy menu-driven operation and high-resolution still images
having a resolution four times greater than moving pictures.
•
Menu-driven playback
You can interact with the screen using a menu display to select and
play an entry.
High-resolution still image display
You can display high-quality images four times clearer than moving
pictures.
Example of playback by the Playback Control function
1
2
3
Menu screen
1
2
3
1
2
3
1
2
Moving
picture
1
2
3
1
Moving
picture
Moving
picture
Moving
picture
Moving
picture
2
To next screen
Still
picture
Moving
picture
Still
picture
Moving
picture
Press
RETURN.
Press
RETURN.
To previous screen
Press
RETURN.
A selection menu is displayed when you start playing a video CD disc
with the Playback Control feature. The selection menu shows a list
of numbers for selection. Some discs may show moving pictures or
a divided screen.
1. When a list of numbers is displayed, selecting a number shows its
contents.
2. When a moving picture is displayed, pressing SELECT at the time
when a part of the movie you desire is shown plays the movie.
3. When the selection menu is redisplayed after you have played
your selection, selecting a number again can replay its contents.
(Some discs may show the menu screen several times.)
When “Next” and “Prev” are shown, pressing “NEXT” or “PREV”
can change the selection menu.
4. After playback, press RETURN to go back to the previous screen.
Note
When a menu is displayed for a long time, about 10 minutes, the
screen background automatically fades out to prevent screen burnin while the setting is suspended.
Page 19
XL-MV558GD
19
97.8.4, 9:40
English
OPERATION OF PLAYBACK CONTROL FUNCTION
GRAPHIC/DIGITAL AUDIO CDs
Playing CD Graphics/
digital audio CDs
Playing CD Graphics
Basic video CD-playing procedures apply although the pictures are
still. A CD Graphics is identified by “CD-G” shown on the display.
Notes
• The following operations may distort the image on the screen.
Searching for starting point of music
Fast forwarding/reversing
Stop/pause
• If paused, the screen changes to blue in a few minutes. This is to
prevent burn-in of the TV screen.
Playing digital audio CDs
Basic video CD-playing procedures apply to the reproduction of sound.
Note
No indicator will turn on to show the type of the disc on the display.
Page 20
XL-MV558GD
20
97.8.4, 9:40
English
SPECIFICATIONS
Main specifications
XL-MV558GD
Model
Video CD player
Playback disc
Video CD (with/without Playback Control function)
CD Graphics
Digital Audio CD
Total harmonic 0.01% (1kHz)
distortion
S/N ratio
93 dB
Frequency
response
20Hz – 20kHz
Input terminal
Microphone
Output
terminal
Accessories
AC power cord ............................................................................ 1
Audio video cord ......................................................................... 1
Remote control unit (RM-SXMV558U) ....................................... 1
Batteries (R6P(SUM-3)AA(15F)) ........................................... 2
Microphone ................................................................................. 1
FREQ.ADJUST screwdriver .................................................. 1
FM feeder antenna ................................................................ 1
Connector cable .................................................................... 1
Antenna cable ....................................................................... 1
Batteries (R6P(SUM-3)/AA(15F)) .......................................... 2
2 mV (9.1 k )
Line output
2.0 Vrms (full scale)
Image output
Video (composite)
1.0 Vp-p (75 )
Echoing
Digital echoing
Power
requirements
AC 115-127/220-240V , 50/60Hz
adjustable with the voltage selector
Power
consumption
22 watts
5 watts (in standby mode)
Mass
5.4 Kg (11.9 lbs)
Dimensions
447x 127 x 340.3 mm
17-11-16 x 5 x13-7/16 inches
Page 21
XL-MV558GD
21
97.8.4, 9:40
TROUBLESHOOTING
Troubleshooting
What appears to be a malfunction may not always be serious. Please go through the following list before requesting service.
Symptom
Remedy
Possible cause
Power plug is disconnected from AC outlet.
Firmly connect the plug to AC outlet.
Battery is exhausted.
Replace the battery with a new one.
Remote control does not work.
The tip of the remote controller is not pointed at the right
receiving part of the player.
Use the remote control correctly.
No image is displayed on the
monitor.
The video cable is not connected.
Firmly connect the cable.
The TV is not set in video mode.
Set the TV in video mode.
An incompatible disc is loaded.
Load a disc compatible with the player.
No disc is loaded.
Load a disc.
Disc is loaded upside down.
Reload the disc with the label up.
Audio cable is not connected.
Firmly connect the cable.
Operation of the external amplifier is wrong.
Operate the amplifier correctly.
Sound is distorted or noise is
generated.
Image is garbled.
Disc is dirty.
Wipe off the disc surface with a soft cloth.
Connection is wrong.
Correctly connect cables. (See page 2.)
Sound is intermittent.
Image is garbled.
Disc is dirty.
Wipe the disc surface with a soft cloth.
(See page 1)
Disc is scratched.
Replace the disc with a new one.
Power does not come on.
Playback does not start.
Speaker does not produce
sound.
Disc is warped.
Disc tray does not come out when
OPEN/CLOSE button is pressed.
Power plug is disconnected from the power outlet.
Firmly insert the plug into the outlet.
Operation is not possible.
Microcomputer malfunctions due to lightning or static
electricity.
Turn off the power, then on again.
The malfunction may be caused by a device other than the player. Check other devices connected to the player.
Page 22
XL-MV558GD
22
97.8.4, 9:40
English
We would like to thank you for purchasing one of our JVC products.
Before connecting this unit to the wall outlet, please read the instructions carefully to ensure that you obtain the best possible performance.
If you have any questions, please consult your JVC dealer.
Table of contents
GENERAL INFORMATION ................................................................... 1
Care and handling of compact discs ...................................................... 1
BEFORE USING FOR THE FIRST TIME .............................................. 2
Basic Connections ................................................................................. 2
Connecting player to a TV or amplifier
using the Audio Video cord ............................................................... 2
Video out select ................................................................................ 2
Connecting the power cord ............................................................... 2
Installing batteries .................................................................................. 3
Putting batteries in the remote control .............................................. 3
Putting batteries in the microphone .................................................. 3
OVERVIEW OF CONTROLS ................................................................. 4
Left front panel of the Player ............................................................. 4
Center front panel of the Player ........................................................ 4
Right front panel of the Player .......................................................... 4
On the remote control unit ................................................................ 5
BASIC OPERATIONS ........................................................................... 6
Now you can play a variety of video CDs!! ............................................. 6
Overview of the three modes ............................................................ 6
Triple disc tray usage ........................................................................ 6
Description of the display window ..................................................... 6
Preparation for playing ...................................................................... 7
Inserting/removing the disc(s) ........................................................... 7
Starting to play disc(s) ...................................................................... 7
Using number keys ........................................................................... 7
Stopping play .................................................................................... 8
Pausing play ..................................................................................... 8
Auto search/Manual search .............................................................. 8
Using stereo headphone ................................................................... 8
Using the remote control ........................................................................ 9
Presetting the remote control to operate your own TV ...................... 9
Using the SHIFT button on the remote control unit ........................... 9
Preset code table ............................................................................ 10
VARIOUS UNIQUE FUNCTIONS ........................................................ 11
Various functions can enhance your enjoyment ................................... 11
Display of operations status ............................................................ 11
Programming the track sequence you want .................................... 11
Canceling a programmed track ....................................................... 11
Clearing a program ......................................................................... 12
Repeating tracks ............................................................................. 12
Randomly playing tracks ................................................................. 12
Playing a multiplex sound CD ......................................................... 12
Viewing the VIDEO INTRO of a video CD ...................................... 13
Programming during VIDEO INTRO ............................................... 13
Viewing the highlights of a video CD .............................................. 13
Selecting the surround mode .......................................................... 14
Playback with the Bookmark function ................................................... 14
Marking a segment for later viewing with the Bookmark function ... 14
Playing the segment you marked .................................................... 14
Canceling the bookmark ................................................................. 14
Using a microphone ............................................................................. 15
Using a wired microphone .............................................................. 15
Using a wireless microphone .......................................................... 15
If there is interference when using the wireless microphone ........... 16
Using a wireless microphone as a wired microphone ..................... 16
Adjusting music key ........................................................................ 16
Adjusting echo effect ...................................................................... 16
Vocal replace .................................................................................. 17
OPERATION OF PLAYBACK CONTROL FUNCTION ....................... 18
Playing Video CDs with Playback Control function .............................. 18
Video CD with Playback Control function ........................................ 19
GRAPHIC/DIGITAL AUDIO CDs ......................................................... 20
Playing CD Graphics/digital audio CDs ................................................ 20
Playing CD Graphics ...................................................................... 20
Playing digital audio CDs ................................................................ 20
SPECIFICATIONS ............................................................................... 21
Main specifications ............................................................................... 21
TROUBLESHOOTING ......................................................................... 22
Troubleshooting ................................................................................... 22
Page 23
XL-MV558GD
23
97.8.4, 9:40
Main (AC) Line Instruction (not applicable for Europe, U.S.A., Canada,
Australia and U.K.)
LINE VOLTS
115V-127V
220V-240V
AC POWER CORD
IMPORTANT for main (AC) line
BEFORE PLUGGING IN, do check that your main (AC)
line voltage corresponds with the position of the voltage
selector switch provided on the outside of this equipment
and, if different, reset voltage selector switch, to prevent
damage or risk of fire/electric shock.
XL-MV558GD/Cover
V
J
VICTOR COMPANY OF JAPAN, LIMITED
EN, CH
2
97.8.4, 10:01
C
0797TTYUVNJSC