1
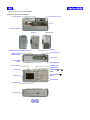
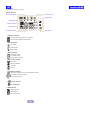
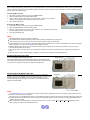
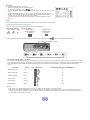
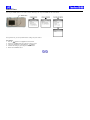
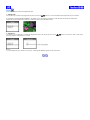
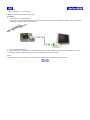
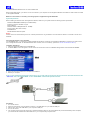
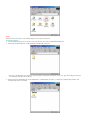
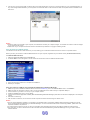
DIGITAL CAMERA
GC-A55
INSTRUCTIONS
Thank you for purchasing this JVC product. Before
beginning to operate this unit, please read the instruction
manual carefully in order to make sure that the best
possible performance is obtained. If you have any
question, consult your JVC dealer.
To HomePage of JVC
J5500-117A
[Back] [Next]
" SOME DO’S AND DON’TS ON THE SAFE USE OF EQUIPMENT "
This equipment has been designed and manufactured to meet international safety standards but,
like any electrical equipment, care must be taken if you are to obtain the best results and safety is
to be assured.
Do
read the operating instructions before you attempt to use the equipment.
Do
ensure that all electrical connections (including the mains plug, extension leads and interconnections between pieces of equipment) are properly made and in accordance with the
manufacturer’s instructions. Switch off and withdraw the mains plug when making or changing
connections.
Do
consult your dealer if you are ever in doubt about the installation, operation or safety of your
equipment.
Do
be careful with glass panels or doors on equipment.
DON'T
continue to operate the equipment if you are in any doubt about it working normally, or if it is
damaged in any way—switch off—withdraw the mains plug and consult your dealer.
DON'T
remove any fixed cover as this may expose dangerous voltages.
DON'T
leave equipment switched on when it is unattended unless it is specifically stated that it is designed
for unattended operation or has a standby mode.
Switch off using the switch on the equipment and make sure that your family know how to do this.
Special arrangements may need to be made for infirm or handicapped people.
DON'T
use equipment such as personal stereos or radios so that you are distracted from the requirements
of road safety. It is illegal to watch television when driving.
DON'T
listen to headphones at high volume as such use can permanently damage your hearing.
DON'T
obstruct the ventilation of the equipment, for example with curtains or on soft furnishings.
Overheating will cause damage and shorten the life of the equipment.
DON'T
use makeshift stands and NEVER fix legs with wood screws. To ensure complete safety always fit
the manufacturer’s approved stand or legs with the fixing screws supplied according to the
instructions.
DON'T
allow electrical equipment to be exposed to rain or moisture.
ABOVE ALL
NEVER let anyone especially children push anything into holes, slots or any other opening in the
case. This could result in a fatal electrical shock.
NEVER guess or make changes with electrical equipment of any kind. It is better to be safe than
sorry!
[Back] [Next]
FCC INFORMATION
This device complies with Part 15 of the FCC Rules. Operation is subject to the following two
conditions:
1. This device may not cause harmful interference.
2. This device must accept any interference received, including interference that may cause
undesired operation.
Note :
This equipment has been tested and found to comply with the limits for a Class B digital device,
pursuant to Part 15 of the FCC rules. These limits are designed to provide reasonable
protection against harmful interference in a residential installation. This equipment generates,
uses and can radiate radio frequency energy and, if not installed and used in accordance with
the instructions, it may cause harmful interference to radio communications. However, there is
no guarantee that interference will not occur in a particular installation. If this equipment does
cause harmful interference to radio or television reception, which can be determined by turning
the equipment off and on, the user is encouraged to try to correct the interference by one or
more of the following measures:
l
l
l
l
Reorient or relocate the receiving antenna.
Increase the separation between the equipment and receiver.
Connect the equipment into an outlet on a circuit different from that to which the
receiver is connected.
Consult the dealer or an experienced radio/TV technician for help.
CAUTION
Changes or modifications not approved by JVC could void user’s authority to operate the
equipment.
Contact
Address: JVC AMERICAS CORP.,
1700 Valley Road, Wayne, New Jersey 07470
Telephone: (973) 317-5000
INFORMATION (for CANADA)
This Class B digital apparatus complies with Canadian ICES-003.
RENSEIGNEMENT (Pour le CANADA)
Cet appareil numérique de la classe B est conforme à la norme NMB-003 du Canada.
[Back] [Next]
WARNING:
TO REDUCE THE RISK OF FIRE OR ELECTRIC SHOCK, DO NOT EXPOSE THIS
APPLIANCE TO RAIN OR MOISTURE.
SAFETY PRECAUTIONS
The lightning flash with arrowhead symbol, within an equilateral triangle, is intended to alert the user
to the presence of uninsulated “dangerous voltage” within the product’s enclosure that may be of
sufficient magnitude to constitute a risk of electric shock to persons.
The exclamation point within an equilateral triangle is intended to alert the user to the presence of
important operating and maintenance (servicing) instructions in the literature accompanying the
appliance.
CAUTIONS
About moisture condensation . . .
You may have observed that pouring a cold liquid into a glass will cause drops of water to form on
the glass’ outer surface. This same phenomenon occurs on the lens of the camera when it is
moved from a cool place to a warm place, after heating a cold room, under extremely humid
conditions or in a place directly subjected to the cool air from an air conditioner.
Serious malfunctioning
If malfunctioning occurs, immediately stop using the unit and remove the battery, then consult your
local JVC dealer.
MAIN UNIT
1. For safe use, please do NOT . . .
l open the camera’s chassis due to high voltage inside.
l disassemble or modify the unit.
l allow inflammables, water or metallic objects to enter the unit.
l
l
l
l
l
remove the batteries while the power is on.
look through the viewfinder directly at the sun or extremely bright light.
point the lens directly into the sun. This can lead to malfunctioning of the internal circuitry. There
is also a risk of fire or electric shock.
subject it to shock or excessive vibration.
connect any USB cable to this unit except the one provided.
2. Avoid using the unit in the following places :
l Where the camera will be subject to dust, soot, steam, or excessive heat.
l Where the camera will be subject to excessive shock or vibration.
l Where the camera will be subject to extremely low (under 0°C or 32°F) or extremely high (over
40°C or 104°F) temperatures.
l In direct sunlight.
l In a closed car in summer.
l Near a heater.
l Near a television set.
l Near appliances generating strong magnetic or electric fields (speakers, broadcasting
antennas, etc.).
MEMORY CARDS
1. To properly use and store your memory cards, be sure to read the following cautions
l Make sure the memory card bears the SD or Multimedia Card mark.
l Make sure the memory card is positioned properly when inserting.
l While the memory card is being accessed (during recording, playback, deletion, formatting etc.),
never unload the memory card or turn off the digital camera.
l Store memory cards
¡ away from heaters or other heat sources.
¡ out of direct sunlight.
¡ where they will not be subject to unnecessary shock or vibration.
¡ where they will not be exposed to strong magnetic fields ( such as those generated by
motors, transformers or magnets).
LCD MONITOR
l
l
To prevent damage to the LCD monitor, do NOT subject it to undue force or shocks.
To prolong its service life, avoid rubbing it with a coarse cloth.
ALKALINE BATTERIES
1. For safe use, do NOT . . .
l attempt to charge the alkaline batteries.
l use rechargeable batteries.
l reverse the polarities of the batteries.
l carry or store a battery together with objects such as metal pens, necklaces, coins or hairpins.
This could short-circuit the positive and negative poles of the battery.
l heat or attempt to disassemble a battery.
l expose the battery to water or fire.
l subject a battery to strong impacts, such as hitting it with a hammer, stepping on it or dropping
it.
l forget to remove the batteries from the unit if the camera is not to be used for an extended
period of time, so as to prevent leakage
2. Use only the specified batteries with this camera. The use of other power sources may
cause a fire.
3. When discarding batteries, environmental problems must be considered and the local
3. When discarding batteries, environmental problems must be considered and the local
rules or laws governing the disposal of these batteries must be followed strictly.
HOW TO HANDLE A CD-ROM
l
l
l
l
Take care not to soil or scratch the mirror surface (opposite to the printed surface). Do not write
anything or put a sticker on either the front or back surface. If the CD-ROM gets dirty, gently
wipe it with a soft cloth outward from the center hole using a circular motion.
Do not use conventional disc cleaners or cleaning spray.
Do not bend the CD-ROM or touch its mirror surface.
Do not store your CD-ROM in a dusty, hot or humid environment. Keep it away from direct
sunlight.
FLASH
l
l
Do not fire the flash at a person, particularly an infant, at short range for this may cause
impairment of eyesight.
Do not touch light-emitting portion after flash. This may cause burn.
BEFORE USING THE CAMERA
l
l
l
l
l
l
We recommend that you take some test shots before you actually start, to accustom yourself to
the camera.
We cannot bear any responsibility for an inability to shoot, record, or play back material
normally in the event of a problem with this camera.
We shall not be liable for any incidental, consequential or exemplary damage, loss of profits or
any demand made by any third party due to your use of this product or the provided software.
Store backups of important photos on a personal computer, etc. We cannot bear any
responsibility for pictures stored in memory that are lost or altered.
It is prohibited to use pictures taken with this camera for commercial purposes without the
consent of the copyright owner.
Please be aware that the shooting subject could appear whitish or halation could occur in
following conditions:
¡ When a very bright subject is taken in a short distance.
¡ When a subject which has a very bright part is taken in strong sunlight.
Notes:
l
l
Microsoft and Windows are either registered trademarks or trademarks of Microsoft Corporation
in the United States and/or other countries.
Other trademarks are the properties of their respective owners.
[Back] [Next]
FUN THINGS YOU CAN DO
This camera is an all-in-one compact size digital and USB PC-camera. With it, you can:
l
l
l
Take digital pictures/video clips in an instant.
Easily capture digital images and download them to your computer.
Videoconference on the Internet.
Keep in touch with distant family and friends. See and talk with people on the Internet face-toface.
Send captured images with your e-mail messages.
[Back] [Next]
WHAT'S INCLUDED?
Please check to see that the following items are included in the package. If any item is missing,
please enquire at your nearest authorized dealer.
Digital Camera
X1
CD-ROM with Driver, Application & Instructions
X1
USB Cable
X1
Video Cable
X1
Hand Strap
X1
Alkaline Battery (AA Size)
X2
Pouch
X1
Quick Start Guide
X1
Caution Sheet
X1
Notes:
l
l
Microsoft and Windows are either registered trademarks or trademarks of Microsoft Corporation
in the United States and/or other countries.
Other trademarks are the properties of their respective owners.
[Back] [Next]
SYSTEM REQUIREMENTS (PC)
l
l
l
l
l
l
l
Microsoft® Windows® 98/98SE/Me/ 2000/XP (Pre-installed Model)
Intel® Pentium® Processor 166 MHz or higher
Free USB Port
Minimum RAM: 32 MB (Windows XP: 128 MB)
250 MB of available hard disk space
Color display: 800 x 600 or better
CD-ROM drive
Notes:
l
l
Microsoft and Windows are either registered trademarks or trademarks of Microsoft Corporation
in the United States and/or other countries.
Other trademarks are the properties of their respective owners.
[Back] [Next]
FEATURES
Capturing high-quality digital images is fast and easy with this state-of-the-art smart camera.
Equipped with a 1.3 Mega pixel CMOS, this camera is capable of capturing images with a resolution
of up to 1280 X 1024 pixels.
Other cool features provided by the camera include the following:
LCD Monitor
The 1.5" full-color LCD at the back of the camera makes it easy to
frame your subject. It also displays a preview of the still images/ video
clips you have recorded.
Digital Zoom
Zoom in 2X and get a larger, closer view of the subject.
(available at the resolution of 640 X 480 pixels).
Flexible Flash Settings
Change the flash setting according to the lighting conditions.
Menu Settings
Have more control over image quality by adjusting settings such as
“White Balance”, “EV compensation” and more.
Thumbnail View
Display in sets of nine pictures on the LCD for easier and quicker
selection.
Video cable
Browse through the images you have captured, on a television
Connection[Composite monitor in place of the LCD monitor for a better view.
Video out (NTSC/PAL)]
Built-in Digital Memory
With a built-in digital memory of 8MB capacity, shooting can be done
even in the absence of an external memory card. For enhanced
storage, you can insert either an SD or a multimedia card.
Automatic Power Off
Reduce undue energy consumption with this feature.
USB connection
USB connection allows simple, high speed transfer of image data to
your PC (Std. Mass Storage compatible). Further, this camera can be
used as a PC camera, allowing you to hold videoconferences over the
internet or corporate intranets.
[Back] [Next]
GETTING TO KNOW THE CAMERA
Controls, Connectors and Indicators
Built-in Flash
Viewfinder window
Lens
Self timer indicator
Video out
Battery/Memory Card compartment door
RESOLUTION &
QUALITY button
Terminal cover
USB port
Status LCD panel
Strap holder
FLASH MODE
button
Status indicator
SHUTTER button
POWER button
MENU button
Viewfinder
LCD monitor
SELF-TIMER
button
2X ZOOM/DOWN
button
LCD /OK button
MODE button
Tripod socket
/ UP
[Back] [Next]
Getting to Know the Camera
Status LCD panel
Built-in Flash Indicator
Self-timer Indicator
Battery Indicator
Quality Indicator
Resolution Indicator
SD card Indicator
Time/Number Indicator
1. Resolution Indicator
Full resolution (SXGA 1280 X 1024 Pixels)
Half resolution (VGA 640 X 480 Pixels)
2. Quality Indicator
Fine quality
Normal quality
Basic quality
3. Battery Indicator
Full battery power
Low battery power
Empty battery (blinking)
4. Built-in Flash Indicator
Auto-Flash
Red-eye reduction
Fill-in flash
Flash off
5. Time/Number Indicator
Number of images that can be stored (Camera mode)
Time Display (Video Clip mode)
PC Connection Mode
6.
Self-timer Indicator
7.
SD card Indicator
8. Mode Indicator
Video Clip mode
Camera mode
Play/ Delete mode
Mode Indicator
[Back] [Next]
GETTING STARTED
Be sure to insert the (AA-size Alkaline) batteries before trying to capture images with your camera.
Inserting the Batteries
1. Slide the Battery/Memory card compartment door (located on the right side of the camera) in the
direction indicated by the arrow to open it.
2. Insert the AA-size batteries as indicated on the inner side of the door.
3. Close back the door and turn on the camera.
Checking Batteries(
:Full battery power)
The battery indicator will be displayed on the status LCD panel while the camera is on. Depending
on the durability and usage of the batteries, the number of pictures that can be recorded varies.
Note that power is consumed by the following operations even when not recording, reducing the
number of images that can be recorded :
l
l
Extensive use of the LCD monitor in the Play/Delete mode.
Performing settings.
Notes :
l
l
l
l
l
l
l
l
l
l
Please ensure that the batteries are inserted in the correct way. Do not reverse the +/ - polarities.
The recommended battery type is AA size ALKALINE.
Never use manganese batteries.
Low temperatures (under 0°C or 32°F) will reduce the output efficiency of the batteries, thereby shortening the operation time of the
camera.
The use of Flash is not recommended when the battery level is low.
Never mix old and new batteries.
Remove the batteries if the camera is not to be used for an extended period of time, to prevent leaks or corrosion.
Before discarding batteries, cover the positive
and negative terminals with adhesive tape.
The Battery Indicator reflects the level of remaining battery power. When the indicator appears as shown above, the batteries are
weak and need to be replaced.
When you use your camera as a video camera for your PC, batteries in the camera are necessary even though power is supplied
through the USB cable.
Attaching the Hand Strap
Always use the provided hand strap when carrying the camera. Please note that the company cannot be held responsible for any
accidental drop of the camera due to improper use of the hand strap.
To attach the strap to your camera:
1. Thread the thinner looped end of the strap through the strap holder.
2. Insert the other end of the strap through the thin loop and pull it all the way out. Ensure that the strap is securely tightened unto the
camera.
Note :
Be careful not to bump the camera or entangle the strap.
Inserting and Removing the SD / Multimedia Card
This camera can be used with either an SD card or a Multimedia card (MMC).
When traveling and capturing a lot of images, it is convenient to make use of an SD or a Multimedia card. When a card is inserted into the
camera, still images/video clips captured will be stored in the card’s memory. When the card is removed, the camera’s internal memory
will be used as the storage media.
Inserting the Memory Card
1. Turn off the camera's power by pressing the POWER button.
2. Open the Battery/Memory card compartment door.
3. Firmly insert the memory card into the memory card slot as far as it can go, with the
memory card electrodes (metal contacts) end facing the camera.
4. Close back the door firmly.
Removing the Memory Card
1. Turn off the camera's power by pressing the POWER button.
2. Open the Battery/Memory card compartment door.
3. Push the memory card in as far as it can go and release. The card will spring back and
protrude slightly. Pull it out with your fingers.
4. Close back the door firmly
Notes :
SD and Multimedia cards are purchased separately.
Pay attention to the card direction when inserting. Wrong direction and forced insert can break it.
When the memory card is inserted, access to the camera's internal memory is not possible.
Cards available in the market, and those already formatted for PC and other devices may not be identified by this camera. Therefore,
before using them, it is necessary to format them first with this camera.
While the power of the camera is on, do not open the battery cover to replace the memory card or batteries as this may cause
irrecoverable corruption of card data.
The memory card is a sensitive device so it should not be subject to any shock. Do not touch the metal part of the card with your
hand.
When the memory card is write-protected, it cannot be used. You have to disable the write-protection first.
Switching the Power ON / OFF
Press the POWER button to toggle ON / OFF.
The Status Indicator will lit up immediately upon power on. The light will go off
after a while (the length of time varies with the capacity of the memory card that
is inserted in the camera) and the camera will then be ready for use.
Switching the LCD Monitor ON / OFF
The LCD monitor is automatically activated when the power is switched on.
However, since the LCD monitor consumes battery power fast, we recommend
that you turn off the LCD monitor and use the optical viewfinder as far as
possible when capturing still images. To switch the LCD monitor ON or OFF,
toggle the LCD/OK button.
Notes :
The DATE/TIME setting screen will appear on the LCD monitor upon its activation in the case of a newly purchased camera or if the
camera has not been used for a long time.
When the camera is in the Play/Delete mode, the LCD monitor cannot be turned off. The still image/ video clip taken most recently will
be shown on the LCD monitor. Further, in the case that no image/video clip exists in the memory, the message "NO IMAGE" will be
shown on the LCD monitor.
When no operation is performed within a certain time interval (user set value : [1min] [3min] [5min] [10min] [CANCEL]); Default
value : [3min]), the camera will automatically turn off.
[Back] [Next]
OPERATIONS
CAMERA MODE
Shooting Basics
Customized Shooting
l Zooming
l Using Flash
l Using Self-Timer
l Setting the Image Quality & Resolution
PLAY /DELETE MODE
VIDEO CLIP MODE
Shooting Basics
Play Basics
Customized Shooting is not applicable to the Video Clip and Play/Delete Modes.
Menu Settings
l
l
l
l
SETUP MENU
QUICKVIEW
WHITE BALANCE
EV COMPENSATION
l
l
l
SETUP MENU
WHITE BALANCE
EV COMPENSATION
l
l
l
l
l
Setting the various modes:
1. Press the POWER button.
2. Press the MODE button until the desired mode is displayed.
SETUP MENU
SLIDE SHOW
ERASE
COPY TO CARD
DPOF
/
[Back] [Next]
CAMERA MODE
This mode is used for capturing still images. The pictures taken will be stored in the camera’s internal memory or the memory-card in JPEG file
format.
Shooting Basics
When the card is inserted into the camera, your captured still images/video clips will be stored in the
card’s memory. When the card is removed, the internal memory of the camera will be used as the storage
media.
Procedures:
1. Get the camera ready. (Refer to ‘Getting Started’)
2. Toggle on the MODE button to select the Camera mode [ ].
3. Frame your subject. You may use either the viewfinder or the 1.5” full color TFT LCD monitor (Toggle the LCD/OK button to activate or
deactivate it).
* We recommend, however, that the viewfinder be used as far as possible to extend battery time since the LCD is highly power consumptive.
4. Press the shutter button fully down.
If the ”QUICK VIEW” function has been set to ON, the image captured will appear on the LCD monitor for a few seconds.
5. To continue capturing, repeat the above steps 3 & 4.
Notes:
l
l
l
l
l
l
l
l
l
l
l
l
l
To adjust the Image Quality and Resolution, please refer to ‘Setting the Image Quality and Resolution’.
When the storage memory is full, you may either delete the images that are no more required, or insert a new memory card.
The number of remaining shots shown on the LCD panel is an approximate value based on the currently set resolution, picture quality and
memory size.
The actual number of remaining shots also differ depending on the shooting conditions. Hence, a single shot may reduce the value by two or
not change the value at all. This is not a malfunction of the LCD panel. Also, upon the camera being turned on, memory adjustments are made
and the indicated remaining value may actually be higher than when the camera was last turned off.
When you take pictures in bright locations or in clear fine weather, lines may appear on the monitor. This is not a malfunction.
Press the shutter button down steadily.
When the status indicator is lit, shooting/replay is not possible. Wait until the light goes off.
Never open the Battery/Memory card compartment door when the Status Indicator is lit for this may cause malfunction.
Please format new SD cards with this camera before using them.
We recommend that you take some test shots to get accustomed to the camera before you actually start.
We cannot bear any responsibility for an inability to record or replay material normally, in the event of a problem with this camera.
Store backups of important photographs/video clips in eg. your personal computer. We cannot bear any responsibility for any loss or alteration
to the images stored in the camera’s internal or external memory.
It is prohibited to use pictures taken with this camera for commercial purposes without the consent of the copyright owner.
[Back] [Next]
Customized Shooting (CAMERA MODE)
(1) Zooming
This mode allows you to zoom up on your subject, making it appear larger (maximum 2X) and closer. Note that the digital zoom function is only
available when the LCD monitor is ON. The resolution is automatically set at VGA (640 x 480 pixels) upon activating the zoom function.
Procedures:
1. Ensure that the camera is turned on.
2. Select the Camera mode with the MODE button.
3. Ensure that the LCD monitor is activated. (Toggle the LCD/OK button to activate/deactivate it).
4. Press the 2x/ button to activate the digital zoom function. The image on the LCD monitor will be enlarged.
5. To deactivate the digital zoom function, press the same button again.
6. Frame your subject. Then, press the shutter button fully down. (For details, see ‘Shooting Basics’)
(2) Using Flash
The flash is designed to fire automatically when required. (Default setting : AUTO). To suit the different conditions, however, you can change the
flash mode. Press the flash button until the desired flash mode (AUTO, RED-EYE REDUCTION, FILL-IN, OFF) is indicated by the cursor.
Procedures
1. Ensure that the camera is turned on.
2. Select the Camera mode with the MODE button.
3. Press the flash button until the desired flash mode (AUTO, RED-EYE REDUCTION, FILL-IN, OFF) is indicated by the
4. Frame your subject. Then press the shutter button fully down. (For details, see ‘Shooting Basics’)
cursor.
AUTO Flash
The flash fires automatically according to the photography conditions. It is suitable for general photography.
Red-Eye
Reduction (RER)
Use this mode to avoid the red-eye effect when photographing people or animals in low light conditions.
Fill-In Flash
The flash fires regardless of the surrounding brightness. It is suitable for photographing in artificial light (backlighting,
fluorescent lighting, etc.).
Flash Off
Used where the use of flash is prohibited or when utilizing the night view/indoor lighting for shooting. The flash can also be
turned off when the distance to the subject is too far away for the flash to have any effect.
Note:
The red-eye reduction function may have little effect if the subject is not directly facing the pre flash or main flash, or when the distance between
the camera and the subject is too far.
(3) Using Self-Timer
With the Self Timer (10 seconds delayed shutter) function, the photographer too, can get
into the frame when taking group pictures.
Procedure:
1. Ensure that the camera is turned on.
2. Select the Camera mode with the MODE button.
3. To activate the self timer, press the / button.
A cursor will appear below the self timer icon on the Status LCD panel as shown on the
right:
4. Frame your subject and press the shutter button. The Self-timer Indicator will start
blinking for 10 seconds (slowly in the first 7 seconds and rapidly in the remaining 3). At
the end of the 10 seconds, the shutter will be released.
5. To cancel the self-timer function before the shutter is released, press the shutter
button.
Note:
When capturing images using the self-timer, do stabilize your camera with eg. a camera stand.
(4) Setting the Image Quality and Resolution
Users can choose from three image quality and 2 resolution settings, viz:
Image quality setting :
Fine
Normal Basic
Resolution Setting:
Full Resolution
(SXGA:1280Pixels x
1024Pixels)
Half Resolution
(VGA:640Pixels x
480Pixels)
To set the Image quality and resolution, press the RESOLUTION & QUALITY button(
)until the desired setting is indicated.
The number of images that can be stored
The number of images (approximate) that can be stored in the memory card at the current image quality and resolution is reflected on the LCD
panel. Varying the image quality and resolution settings will affect the number of storable images. The following shows the approximate number
of storable images based on 8MB of available internal memory (when the camera is first turned on), as the image quality and resolution is
varied.
Resolution
Quality
Icon on Status LCD
Initial Estimated Storage with 8MB Memory
SXGA:1280*1024
Fine
16
SXGA:1280*1024
Normal
30
SXGA:1280*1024
Basic
46
VGA:640*480
Fine
50
VGA:640*480
Normal
96
VGA:640*480
Basic
128
Notes:
l
l
The number of recordable images also varies with the subject and the capacity of the memory card.
The number of remaining images that can be recorded, shown on the Status LCD, will decrease by 1 every time you take a new shot. If,
however, the file size is too minimal, the number will remain the same after the shot is taken. By the same token, the number will decrease
by more than 1 if the file size is too large.
[Back] [Next]
VIDEO CLIP MODE
This mode is used for shooting video clips. The video clips will be stored in the camera’s internal memory or the memory card in AVI File Format.
Total available recording time
The total available recording time (approximate) is reflected on the LCD panel. For video clips, the Resolution is fixed at VGA:320*240 and the
Image Quality is set at Normal. The following shows the approx. length of recording time based on 8MB of available internal memory (when the
camera is first turned on):
Resolution
Quality
VGA:320*240
Normal
Icon on Status LCD
Initial Estimated available
recording time
44 sec
Shooting Basics
1. Get the camera ready. (Refer to ‘Getting Started’)
2. Toggle on the MODE button to select the Video Clip Mode [ ].
3. Ensure that the LCD monitor is activated. (Toggle the LCD/OK button to activate/deactivate it). The viewfinder cannot be used for video clip
recording.
4. Press the shutter button to start recording.
5. Press the shutter button again to stop recording.
6. To continue shooting, repeat the above steps 4 to 5.
Notes:
l
l
l
l
l
l
l
l
l
l
l
l
l
When the storage memory is full, you may either delete the video clips that are no more required, or insert a new memory card.
The remaining shooting time shown on the Status LCD is an approximate value based on the currently accessed memory size.
The actual number of seconds available for shooting also depends on the shooting conditions. The value does not necessarily decrease by the
second. Also, upon turning on the camera, memory adjustment is made and the available time may actually be more than when the camera
was last turned off.
When you take pictures in bright locations or in clear fine weather, lines may appear on the monitor. This is not a malfunction.
Press the shutter button down steadily.
When the status indicator is lit, shooting/replay is not possible. Wait until the light goes off. (After shooting a video clip, you would have to wait a
little while for the pictures to be stored into memory. A few seconds is also required to load the images from the memory to the LCD monitor for
replay).
Never open the Battery/Memory Card compartment door when the status indicator is lit for this may cause damage.
Please format new Memory cards with this camera before using them.
In the Video Clip mode, the following are not possible.
* Voice/sound recording.
* Use of flash.
* Self-timer.
* Zoom.
* Image quality setting. (The Video Clip mode resolution is fixed at 320*240 24fps.)
We recommend that you take some test shots to get accustomed to the camera before you actually start.
We cannot bear any responsibility for an inability to record or replay material normally, in the event of a problem with this camera
Store backups of important photographs/video clips in eg. your personal computer. We cannot bear any responsibility for any loss or alteration
to the images stored in the camera’s internal or external memory.
It is prohibited to use video clips taken with this camera for commercial purposes without the consent of the copyright owner.
/
[Back] [Next]
PLAY / DELETE MODE
This mode allows you to replay/ delete video clips stored in the camera’s internal or card memory on the LCD monitor. You can also connect the
camera to the TV monitor or computer in this mode to replay the still images/video clips on the TV or computer monitors.
Play Basics:
1. Turn on the camera.
2. Select the Play/Delete mode with the MODE button.
3. The latest captured image (or the starting scene of the latest captured video clip) will be displayed on the LCD monitor (or the TV monitor if
connected). As you press the LCD/OK button, the LCD screen changes as follows :
Still Image:
Image Info. OFF
LCD/OK button pressed once
Image Info. ON
LCD/OK button pressed twice
Thumbnail display
LCD/OK button pressed thrice
Video Clip:
Image Info. ON
Thumbnail display
LCD/OK button pressed thrice
4. Press the /
buttons to go to the next or previous image/video clip.
5. For video clips only: press the shutter button to play. Press the same button to pause / resume.
Thumbnail display function.
During the Play/Delete mode, the captured still images/video clips will be displayed on the LCD
monitor (or the TV monitor if connected). Toggle the LCD/OK button until the thumbnail screen
appears. The user can select a thumbnail image using the /
buttons. Upon pressing the
LCD/OK button, the chosen image/video clip will be displayed on the LCD screen in full size.
[Back] [Next]
MENU SETTINGS
Pressing the MENU button in the various modes will display the respective MENU on the LCD monitor:
Using the menus, you can perform various settings for your camera
Procedures:
1. Use the / buttons to highlight the desired item.
2. Press the LCD/OK button to go into the setting screen.
3. Select the appropriate setting with the / buttons.
4. Confirm the setting by pressing the LCD/OK button.
5. Return to the MENU screen
[Back] [Next]
SETUP MENU (
,
,
)
LCD BRIGHTNESS
Adjusts the brightness of the LCD monitor.
Setting value: [-5] to [+5] (Interval = 1)
DATE/TIME
Sets the Date and Time information. When a shot is taken, the date and time of the shot will be recorded on the image file.
To set the date and time:
1. Go into the “SETUP” menu and select the “DATE/TIME” item.
2. The screen shown below will appear on the LCD monitor.
3. Use the LCD/OK button to select the desired item and then use the
/
buttons to correct the setting.
4. When all settings are complete, return to the MENU screen by pressing the LCD/OK button.
Note:
Please be sure to correct the date and time setting after battery replacement. To accurately display the date and time information on the LCD
monitor, you may need to correct the setting each time you turn on the camera.
LANGUAGE
Sets the display language on the LCD monitor
: Sets English as the OSD language
: Sets French as the OSD language
: Sets Spanish as the OSD language
: Sets Traditional Chinese as the OSD language
SOUND
Enables or disables the sound function.
ON : Sounds each time the camera is operated.
OFF : Does not sound when the camera is operated.
FORMAT MEDIA
This function prepares the memory (internal/ external) for use by the camera. When a memory card is inserted, the card will be formatted; In the
absence of the memory card, the internal memory will be formatted.
Caution: Formatting will erase all images currently recorded in the memory card.
YES : Formats the memory card, erasing all images in the process.
NO : Cancels the format action.
VIDEO MODE
Sets the video output format for displaying recorded images on a TV monitor.
NTSC : NTSC video format is used in US, CANADA, JAPAN, etc...
PAL : PAL video format is used in EUROPE, etc...
USB CONFIG
Sets the USB Configuration type.
DISK DRIVE : To transfer image data to the PC. (The camera will be shown as a ‘removable disk’ in the PC’s ‘My Computer’ folder.)
PC CAMERA : To use the camera as a PC Camera (WebCam).
AUTO POWER OFF
This will automatically turn off the camera after the lapse of a certain time interval (set by the user) during which no operation is performed.
1 min : Power will be turned off after 1 minute
3 min : Power will be turned off after 3 minutes
5 min : Power will be turned off after 5 minutes
10 min : Power will be turned off after 10 minutes
CANCEL : Disables the “Auto Power Off” function.
Note:
The settings for “DATE/TIME”, “USB CONFIG”, “AUTO POWER OFF”, “LANGUAGE”, “SOUND” and “VIDEO MODE” are retained even after the
camera is turned off.
/
[Back] [Next]
QUICKVIEW (
)
This feature allows you to view your images on the LCD monitor as soon as they have been taken. After the preview, this camera will return to the
Camera mode.
ON : Enable “QUICKVIEW”
OFF : Disable “QUICKVIEW”
The “QUICKVIEW” setting will be retained even after the camera is turned off.
/
[Back] [Next]
WHITE BALANCE (
,
)
As the intensity of the light changes, our eyes adapt such that white objects will remain white. Digital cameras can also see the white objects as
being white by averaging out the light around the object.
You may select from the following settings:
AUTO
:
TUNGSTEN
:
FLUORESCENT :
SHADE
:
DAYLIGHT
:
Automatically adjusts the “white balance”
Tungsten lighting
Fluorescent lighting
Recording for overcast, shaded, twilight or evening skies
Outdoors on a bright day
[Back] [Next]
EV COMPENSATION (
,
)
When the object is too dark or too bright, the camera adjusts the brightness to make the object look brighter or darker. This is called EV
compensation. The range of the exposure compensation that the user can set is from -2.0 EV to +2.0 EV at 0.5 EV steps.
[Back] [Next]
SLIDE SHOW (
)
After selecting “SLIDE SHOW” and pressing the LCD/OK button, a screen where the user can set the delay time (with the /
buttons) appears.
Thereafter, pressing the LCD/OK button again will start the slide show. Images hitherto captured will be displayed in sequence, at intervals of the
user-set delay time. [1, 3, 5, 7, 9 sec]
The “delay time” setting will be retained even after the camera is turned off.
[Back] [Next]
ERASE (
)
There are two ways to erase still images/video clips:
1. “ERASE ONE”:
This will allow you to delete one image/video clip at a time. Use the
/
buttons to choose the desired still image/video clip to be erased.
A confirmation message “ERASE CURRENT?” will appear on the LCD monitor. Pressing the LCD/ OK button will cause the selected still
image/video clip to be erased from memory. To abort this action, press the MENU button.
2. “ERASE ALL”
This will allow you to delete ALL recorded still images/video clips in the memory at once. Use the
and then press the LCD/OK button to confirm.
/
buttons to choose the “YES” or “NO” option
Notes:
If no still image/video clip is stored in the memory, a message “NO IMAGE” appears on the LCD monitor.
[Back] [Next]
COPY TO CARD (
)
This function allows you to copy all captured still images/video clips from the internal memory to the external memory card.
[Back] [Next]
DPOF (Digital Print Order Format) (
)
DPOF enables you to print the images directly from DPOF compatible printers by simply inserting the memory card into the printer and doing the
necessary settings.
PRINT QUANTITY :
Set the print quantity [1~10].
PRINT SIZE :
Select the image print size [standard, 3x5, 4x6, 5x7, 8x10]
PRINT INDEX :
If you select “ON” and confirm by pressing the LCD/OK button, you can print a photo with index
and the return to the “DPOF” menu. If “OFF” is selected and confirmed, the camera will return to
the “DPOF menu”.
PRINT ENABLE :
If you select “ENABLE” and confirm by pressing the LCD/OK button, the camera will save the
DPOF settings and return to the “PLAY” menu. If “DISABLE” is selected and confirmed, all settings
will be erased.
The “DPOF” settings are retained even after the camera is turned off.
[Back] [Next]
Viewing Images on a TV Monitor
Television monitors can be used for image replay.
Procedures:
1. Connect the TV to your digital camera.
* Connect one end of the video cable (Sub-mini plug) to the VIDEO OUT terminal of the digital camera and the other end of the cable
(PIN plug) to the VIDEO IN port of the television.
2. Turn on the camera and the TV.
3. Select the appropriate “VIDEO MODE” setting (NTSC/PAL) from the “SETUP MENU” according to the TV standard you are using.
4. Replay the recorded images the same way as you would replay them on the LCD monitor.
Note:
The VIDEO OUT function is highly power consumptive. Hence, batteries may be depleted sooner than normal.
[Back] [Next]
TRANSFERRING IMAGE DATA TO THE COMPUTER
Before image data transfer, you need to connect the camera to your computer with the supplied USB cable and install the camera drivers included
in the supplied CD-ROM.
Batteries in the camera are necessary even though power is supplied through the USB cable.
System Requirements
Before installing the Camera Driver and Application software, make sure your system meets the following system requirements.
l
l
l
l
l
l
l
Windows 98/98SE/Me/ 2000/XP (Pre-installed Model)
Pentium Processor 166 MHz or higher
Free USB Port
Minimum RAM: 32 MB (Windows XP: 128 MB)
Color monitor (800 x 600 or better)
CD-ROM drive
80 MB available hard disk space
Notes:
Please connect the camera directly to the PC. Camera performance is not guaranteed in the case that the camera is connected to the PC via a
USB Hub.
Connecting the Camera to Your Computer
For Win98/98SE users, it is necessary to install the Mass Storage Driver contained in the supplied CD-ROM before connecting the camera to the
PC for image data download. For Win ME/2000/XP users however, this is not necessary. (Proceed to connect the camera to the PC)
Installation Procedures:
1. Place the supplied CD-ROM into the CD-ROM drive.
2. A ‘SETUP MENU’ screen will appear on the PC monitor as shown below. Click on ‘USB Mass Storage Driver install for Windows 98/98SE’.
3. Follow the on-screen instructions to complete the installation.
4. Reboot your computer.
Once you have installed the appropriate Camera Driver, you are now ready to connect the camera to the PC for download. Ensure that the
“USB config” item in the “SETUP MENU” is set to “DISK DRIVE” and follow the procedures below:
Procedures:
1. Turn off the camera.
2. Open the Terminal door. Plug the smaller connector of the USB cable into your camera’s USB port.
3. Plug the other end of the USB cable to your computer's USB port.
4. Turn on the camera.
5. Your computer will recognize the camera as a newfound hardware. Setup for this new hardware will proceed automatically. When complete,
your camera will be indicated as a ‘Removable disk’ in your computer’s ‘My computer’ folder.
Note:
When the connection is done, a “PC” indicator appears on the camera’s LCD panel.
Downloading Pictures
1. Click on the ‘My Computer’ icon on your PC screen. You will then see a drive icon labeled ‘Removable disk’.
2. Double click on ‘Removable Disk’. A new window with a ‘DCIM folder’ icon opens.
* If this icon is not displayed, your camera has not been properly connected to the computer. In this case, go to ‘Connecting the Camera to
Your Computer’ and repeat the procedures.
3. Double click on the ‘DCIM folder’ icon. A new window with a ‘***JVCGC folder’ icon opens (***represents a random 3-digit number). Your
recorded images will be in this folder.
4. You can then copy the whole folder or specific files in the folder (double click on the icon to reveal the files) into your computer’s hard drive, or
any other storage media available in your PC system. Just select the folder or files and use the usual cut and paste functions available in the
‘Edit menu’.
Notes:
l
l
While the camera is connected to your computer, the camera will not allow you to capture images. You will also not be able to view the images
on the camera’s LCD monitor.
Please refer to your computer’s instruction manual to ascertain the procedures for copying and shifting of files.
Using the Camera as a USB PC Camera
This camera can also act as a video camera for your PC, allowing you to hold videoconferences over the internet or corporate intranet.
Before you start, you will have to install the WebCam Driver into your computer, regardless of your PC’s OS version (Win98/98SE/ME/2000/XP).
To install the Web Cam Driver:
1. Place the supplied CD-ROM into the CD-ROM drive.
2. A ‘SETUP MENU’ screen will appear on the PC monitor as shown below. Click on ‘Webcam Camera Install’.
3. Follow the on-screen instructions to complete the installation.
4. Reboot your computer.
Using your camera as a USB PC camera with Microsoft Netmeeting or Windows Messenger:
1. Make sure you have installed the WebCam Driver and that the “USB Config” item in the “SETUP MENU” is set to “PC CAMERA”.
2. Make sure that your camera is turned off. Then, connect the USB cable to the camera and your computer’s USB port.
3. Put the camera on your table or on the top of your computer monitor.
4. Press the POWER button to turn on the camera.
5. Launch the PC Camera Application software (Microsoft Netmeeting/Windows Messenger) and follow the instructions displayed on the computer
monitor.
6. Start video conferencing.
7. After the video conference, be sure to switch off the computer first before disconnecting the camera from it.
Notes:
l
l
l
The PC camera Application software is not included in the CD-ROM. Use a commercially available videoconferencing software such as the
above mentioned Microsoft Netmeeting or Windows Messenger. For more information about video conferencing software, please refer to the
respective software’s help functions.
To videoconference over the Internet or LAN, you would also need networking devices such as modems, speakers and microphones.
The other party you wish to videoconference with must also have Microsoft Netmeeting / Windows Messenger running in order to start the
videoconference.
[Back] [Next]
When the camera does not work:
Possible cause
Rectifications
Power unintentionally cut off.
Press the POWER button to turn the camera on.
Power cut off due to camera's Automatic Power Off
feature.
Press the POWER button to turn the camera on.
Battery direction is wrong.
Rearrange the batteries in the correct position.
The batteries are weak.
Replace batteries.
Battery performance deterioration due to low
temperature.
Warm up the batteries to some extent by, for example, rubbing them against a soft
surface before use.
Camera is connected to PC. (When connected to PC, the Detach the camera from the PC after image-data download.
camera will not be able to shoot).
Condensation inside camera.
Dry the camera before turning on the power.
When the flash does not work:
Possible cause
Rectifications
The object is bright enough.
You may use the FILL-IN flash mode.
Camera is set at the Video Clip or Play mode.
Set camera to Camera mode.
When the LCD Monitor does not show well:
Possible Cause
Rectifications
The camera is held under bright sunlight.
Use your hand to cover the monitor from sunlight. Alternatively, use the viewfinder.
The LCD monitor is not activated
Press the LCD/OK button to activate the monitor.
When you are unable to shoot:
Possible Cause
Rectifications
Power is low or off.
Check battery level. Replace if necessary.
Flash re-charge after shooting is not yet complete.
Release the shutter button, wait till the Status Indicator is unlit, then shoot again.
Internal or card memory full.
Delete the images no longer required, transfer them to your PC or insert a new memory
card.
The card is write protected.
Use a new card or disable the write protection(only for SD cards)
When you are unable to replay the images:
Possible Cause
Rectifications
Power is low or off.
Check battery level. Replace if necessary.
Camera is set to the wrong mode
Set camera to Play mode.
The pictures have not been saved in memory.
Follow the instructions in this manual, shoot again and replay.
When you are unable to Format or Delete:
Possible Cause
The card is write protected.
When photographs turn out too bright.
Possible Cause
Rectifications
Disable the write protection (only for SD card)
Rectifications
The flash was set at FILL-IN flash mode.
Set the flash mode to AUTO or OFF.
The subject was too bright
Adjust the exposure or change the angle of shot.
When photographs turn out too dark:
Possible Cause
Rectifications
The flash was obstructed by fingers or other objects.
Adjust the angle of shot and remove obstructive objects.
The subject was too far from the camera for the flash to
be effective.
Move closer to the subject. Alternatively, turn off the flash and use a tripod stand.
The subject was either too small or too light reflective.
Set the flash to FILL-IN flash mode and shoot again.
When the color of the Images appear odd:
Possible Cause
Rectifications
Artificial lighting condition.
Set the flash to FILL-IN flash mode and shoot again.
No white area on the subject.
Introduce a white item or set the White Balance according to the lighting condition.
White Balance setting incorrect.
Set the White Balance according to the lighting condition.
When parts of the images are missing:
Possible Cause
Rectifications
The lens is partially covered by fingers or the strap.
Remove obstructing fingers or strap from lens.
Shooting distance too close.
Use the LCD monitor and the zoom function.
When the image is out of focus:
Possible Cause
Rectifications
Camera movement during still image capture.
Press the shutter button down steadily.
The lens is dirty.
Use a lens blower (sold in the market) to rid the lens of dust. Then wipe with lens
cleaning paper.
Photographer was standing in front of the camera when
pressing the shutter button (self-timer shots).
Do not stand in front of the camera. Press the shutter button while looking through the
viewfinder.
Flash is off even when the lighting condition is poor. As
Either use a tripod stand, or use the flash.
exposure time is prolonged, camera movement will cause
the image to be off focus.
The subject is too near.
Shoot at a distance of more than 1.2m.
[Back]
CAMERA SPECIFICATIONS
Image Sensor
1.3 Megapixels CMOS
Color
10-bit Color (RGB)
Image Quality
Fine/Normal/Basic
Image Resolution
Full: 1280 x 1024 pixels
Memory
Internal: 8MB
External: SD or multimedia Card (Type 1 Slot)
File Format
JPEG (EXIF 2.1), DPOF, AVI (Motion-JPEG)
Recording Medium
SD or Multimedia card
Lens
Fixed focus (2X digital zoom)
Focal length
9.0mm
Focal Range
Normal: 1.2 ~ infinity
Shutter Speed
1/15 ~ 1/2000 seconds
Exposure Control
Auto
Manual: 0.5 EV step, -2.0 ~ +2.0
White Balance
Auto / Sun / Shade / Fluorescent / Tungsten
Flash
Built-In: Auto, Fill-in, Flash Off, Red-eye reduction
Self-timer
10 seconds delay
Software
MGI Photo Suite IV SE and Photo Vista
Language
English, French, Spanish, Traditional Chinese
LCD monitor
1.5" color TFT LCD
Connectors
USB port, Video Output (NTSC/PAL)
Weight
About 130g (with battery and SD card)
Dimension
Approx. 108mm x 59mm x 36mm
*Design and Specifications are subject to change without notice.
Half: 640 x 480 pixels


![Overview cPR67 and cPR84 [v00]](http://vs1.manualzilla.com/store/data/005648847_1-d158a5d3d4b92d14c7a3179652b88ffd-150x150.png)