1
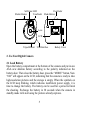
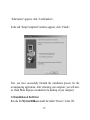
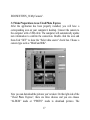
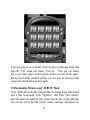
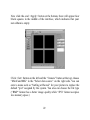
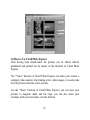
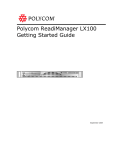
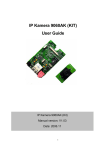
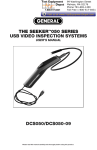
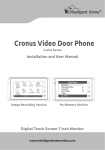
User’
s Manual
For Dual Mode PalmClix Digital Camera
You are welcome to use our digital cameras. Before your operation,
please read this manual with care, so you can make full use of the various
functions of our camera and avoid inconveniences due to improper
manipulations.
1. Get to Know Your Digital Camera: Our digital camera will bring you
a fresh new experience. You will not need films and your worry over the
aging, discoloring and damaging of your precious pictures does not exist.
You can store your photos in your computer or disks. In addition, through
the after tailoring of your photos, you can make compensations for the
shortcomings caused by unsatisfactory conditions or the innate flaws or
defects. Through the interesting applications, you can send pictures over
the Internet, or have a chat “
face to face”with your distant friends. It is
sure that you will soon become an expert at the operating of digital
cameras and until then, you will find yourself in a fantastic digital world.
1.1
Functions & Features
Camera Function: Without any film, you can capture various interesting
pictures. These pictures will be stored in the camera memory.
1
Computer display and Processing: It is not necessary to develop the
negative. Pictures can be transmitted to your personal computer through
the USB cable and you can appreciate them right away. You can furnish
and tailor these pictures. They can be printed out from a printer. Via the
Internet, you can also send them to your friend’
s afar.
PC Video Camera Function: Connected to a computer, the digital
camera changes into a PC Video Camera. It can be used as a monitor, and
through the Internet, it can achieve distance “
face to face”talk.
Self-Timer: The camera has Self-Timer function with 10-second delay
accompanied by buzzer and LED indication. When the time countdown
ends, the camera will automatically take a picture.
Continuous Capture: Sometimes it is very interesting to record a group
of consecutive pictures. Your camera cans continuous capture at approx.8
frames per second (only QVGA size without compression).
Auto Exposure Control: The camera will automatically control the
exposure in a situation with a moderate light condition. Therefore, you
don’
t need to worry about the suitability of the shutter and the aperture.
Auto Power Saving: When there are no user actions for 20 seconds, the
camera will automatically enter the “
standby”mode, which will reduce
the power consuming to a minimum. The one AAA alkaline battery will
2
enable you to take more than 200 pictures.
Accompanying Application: The camera is accompanied with the
powerful image processing application, which enables you to save,
display, edit, modulate, process, send and print your self-shot pictures in
any way you like. It can also help you change your camera into an
interesting PC Video Camera. What most impresses you is that you can
enter your PC Camera into a broader application area by relate it with lots
of other commonly used image processing software, networking software
and video software.
1.2 Technical Specification
Resolution:
300K Pixels (640*480) VGA
Color:
24 bits
Lenz:
Non-spherical Lens
Aperture 1: 2.5
Focus f = 2.45mm
Capture Range: 0.5m -- ∞
Illumination:
100 -- 16000 (lux)
Storage Capacity: 64 Mbits
26 high-resolution (VGA 640*480pixels) pictures
3
52 compression high-resolution pictures
104 low-resolution (QVGA 320*240pixels) pictures
208 compression low-resolution pictures
Power: 1 AAA Battery for camera, and when connected to computer,
power will be supplied by the computer.
Battery exchange protects:
Exchange battery in 30 seconds wills not losing the pictures
already captured.
Interface: USB Port
1.3 System Requirements:
Pentium II and above Personal Computers
Windows 98/2000/ME/XP Operating System
32 MB or above Memory (64 MB or above Recommended)
60 MB Hard Disk Capacity
CD-ROM Drive
Color Monitor (Not Lower than 800*600, 24 Bit)
USB Interface
1.4 Functional Parts of the Camera
4
Self-timer LED
Shutter Button
Viewfinder
Viewfinder
Mode Button
Lens
LCD
Tripod Mount
USB Interface
Battery Cover
2. Use Your Digital Camera
2.1 Load Battery
Open the battery compartment at the bottom of the camera and put in one
AAA new alkaline battery according to the polarity indicated on the
battery door. Then close the battery door, press the “
MODE”button, Now
“
026”will appear on the LCD, indicating that the camera is ready to take
high-resolution pictures and the storage is empty. When the symbols on
the LCD keep blinking, which indicates insufficient power supply, it is
time to change the battery. The battery can be used for a period to finish
the shooting. Exchange the battery in 30 seconds when the camera in
standby mode wills not losing the pictures already captures.
5
Important Note: We strongly recommend that you don’
t use
rechargeable batteries, as this will affect the performance of your camera.
2.2 Change the Setting Mode
The LCD display will show the following symbols if the round “
MODE”
button is pressed consecutively, and the interpretations are as follows:
Ready to take hiresolution pictures
Turn into stand by
mode
Self-timer
Mode
Continuous
capture
Mode
Clear all pictures
Clear the last
picture
Change to lowresolution
Change to hiresolution
Change the antiflicker frequence
to 50 Hz
Change the antiflicker frequence
to 60 Hz
Change to
compression mode
Change to noncompression mode
2.3 Take Pictures
6
This is the default mode on wake-up or tethered to the PC. You just press
down the shutter button and with a distinct beeping sound, a snapshot is
finished. At the same time, the number on the LCD display will decrease
by one. If the target is too dark, will hear two fast beeps indicate cannot
capture the picture.
ATTENTION: when the light is not sufficient, the Auto exposure and
Gain control need more time to settle, the beep will little delay indicate
the snapshot finished, so you need hold the camera don’
t move until the
beeping sound.
2.4 Stand by (Automatic Energy Saving)
The camera enters “
stand by”mod automatically after 20 seconds of
inactivity if not tethered to USB or press the “
Mode”button until the
LCD display shows “
of”then press the shutter button into “
stand by”
mode, the indicator and the LCD display will shut off with a beeping
sound at the same time. In “
stand by”mode, power consumption is very
low and battery life is greatly prolonged. Your camera will have a stand
by time of 100 hours. Press “
Mode”button and the camera will resume to
the normal condition.
2.5 Self-Timer
Press the “
Mode”button until the LCD display shows “
self timer”
. Press
the shutter button and the camera counts down 10 seconds accompanied
by a distinct beeping sound and LED blink every second, and then
7
capture a picture.
2.6 Continuous Capture
Press the “
Mode”button until the LCD display shows “
continuous
capture”
, press down the shutter button and the camera cans continuous
capture at approx 8 frames per second (only QVGA size without
compression) until you release the button, the number on the LCD
display will decrease from 104 if the camera haven’
t capture picture.
2.7 Clear all Pictures Stored in the Memory
Press the “
Mode”button until the LCD display shows the symbol of
“
clear all”
, and then twice press the shutter button to confirm. Now the
pictures stored in the camera are cleared and the resolution mode
originally set remains unchanged.
2.8 Clear the last Picture Stored in the Memory
Press the “
Mode”button until the LCD display shows the symbol of
“
clear the last”
, and then twice press the shutter button to confirm. Now
the last pictures stored in the camera are cleared, if last pictures are taken
by “
Continuous capture”mode it will be clear one section not only one
picture.
2.9 Change Resolution
When you need to take many pictures at one time, you can choose the
Low Resolution Mode. You just press the button until the LCD display
8
shows the symbol of “
★”and then press the shutter release button. The
camera enters into a low-resolution mode. If you want to change back
into high-resolution mode from low-resolution mode, you are to press
“
Mode”button to make the LCD display show the symbol of “
★★★”
,
and then to press the shutter button.
2.10 Change Frequency
Change the anti-flicker frequency if you use fluorescent light. The LCD
displays the frequency of which the camera can be changed to.
2.11 Change Compression rate
Presses the “
Mode”button until the LCD displays “
Hd”
, then press the
shutter button to confirm. The camera into compression mode and can
storage 52 pictures of VGA and 208 pictures of CIF.
3. How to Install and Use the Accompanying Application
3.1 Installation of the Application
Insert the accompanying CD into the CD-ROM drive and the application
starts to install automatically.
A color interface with a little girl’
s face will appear. On the left side of the
interface, there are six buttons with English notes. Click “
Install”button
9
“
Language select”dialogue box will appear and then click “
English”
,
then click <OK>
“
Welcome”English interface appears. Click <Next> button;
10
“
Software License Agreement”dialogue box appears, asking whether you
accept this agreement. Click <Yes> to accept it.
11
“
User Information interface”appears. Type in the Product Serial Number
and then click <Next>,
“
Choose Destination Location”interface appears and according to the
language instruction, choose installation route (Optional). Click <Next>,
“
Select Components”interface appears and usually choose <Typical>,
12
The interface changes into “
Select Program Folder”
, click <Next>,
13
“
Start to Copy Files”appears; click <Next> to start copying files and at
the same time, the copying progress bar appears on the screen,
The “
Setup Completed”interface appears; clicks <Finish>;
“
Ulead Systems Registration Wizard”interface appears. If your computer
is on the Internet, click <Next> (Finish registration according to the
instructions provided by “
Registration Wizard”
). If not on the Internet,
click <Cancel> to end registration.
“
Ulead Photo Express Remade Help” follows; click <Close> after
reading.
14
“
Information”appears; click <Confirmation>;
In the end “
Setup Completed”interface appears; click <Finish>.
Now you have successfully finished the installation process for the
accompanying application. After rebooting your computer, you will have
an Ulead Photo Express icon added to the desktop of your computer.
3.2 Installation of the Driver
Run the file MyCam300K.exe under the folder “
Drivers”in the CD,
15
When the computer restart then connects the camera, the computer will
find a new device, install the driver program from the folder “
C:\W
16
INDOWS\TWIN_32\My Camera”
.
3.3 Make Preparations to use Ulead Photo Express
After the application has been properly installed, you will have a
corresponding icon on your computer’
s desktop. Connect the camera to
the computer with a USB cable. The computer will automatically update
new information to confirm the connection. Double click the icon and
then click “
GET”to show the “
Select data source”check box. Choose a
camera type such as “
MiniCam300K”
.
Now you can download the pictures you’
ve taken. On the right side of the
“
Ulead Photo Express”
, there are three choices and you can choose
“
ALBUM” mode or “
PHOTO” mode to download pictures. The
17
difference is that when using “
ALBUM”mode, all the pictures in the
memory will be automatically saved under the “
PHOTO”directory with
the file name of “
pict”
. When using “
PHOTO”mode, you can name your
own directory and save the pictures one by one.
3.4 Download Pictures using the PHOTO Mode
Click “
PHOTO”on the left of the interface to change it into white letters
with a blue background. Then click “
Get”on the left and “
Digital
Camera”on the upper part. Click the small arrow in the “
Select data
source”menu to extend it. Choose “
MiniCam300K”and click “
Acquire”
button on the lower right part.
18
The downloading interface will be ejected out from the screen.
Clicking the download button and the pictures thumbnail you’
ve taken
will be consecutively displayed on the interface.
19
Clicking any thumbnail with right button of mouse will zoom in it.
Clicking a thumbnail to select it or clicking the select all button to select
all thumbnails, then clicking the transfer button transfer the pictures to
Ulead photo express.
20
If you are going to save a picture, click it to put it on the large frame, then
open the “
File”menu and choose “
Save as…”Now you can choose
you’
re save route, type to save the picture before you enter the file name.
Having saved all the intended pictures, you can clear the memory of the
camera and started taking pictures again.
3.5 Downloading Pictures using “
ALBUM”Mode
Click “
ALBUM”on the left of the interface to change it into white letters
with a blue background. Click “
Organize”
, then click “
New Album”
;
enter the name you made for your picture into the box on the right side.
You can also put in the title, subject, author catalogue, description etc.
21
Now click the oval <Apply> button at the bottom, there will appear four
black squares in the middle of the interface, which indicates that your
new album is empty.
Click <Get> button on the left and the “
Camera”button at the top; choose
“
MiniCam300K”in the “
Select data source”on the right side. You can
enter a name such as “
Surfing at Hawaii”for your picture to replace the
default “
pict”assigned by the system. You also can choose the file type
(“
BMP”format has a better image quality while “
JPG”format occupies
less memory space.)
22
3.6 How to Use Ulead Photo Express
After having been downloaded, the pictures can be edited, altered,
modulated and printed out by means of the function of Ulead Photo
Express.
The “
Video”function of Ulead Photo Express can make your camera a
computer video camera: when taking active video images, it can also take
the still pictures from the active pictures.
Use the “
Share”function of Ulead Photo Express, you can store your
pictures to magnetic disks and file clips; you can also share your
creations with your loved ones over the Internet.
23
The “
Express”function of Ulead Photo Express will enable you to make
beautiful calendars, computer desktops, or animations.
In the “
Web Studio”
, you can also make fantastic web pages or web
slides with your own pictures.
Your Ulead Photo Express is easy to learn. With the help of noted buttons,
prompts and menus, you will master various skills and functions for
manipulating your diversified pictures.
4. Expand Your Field of Application
Having installed Ulead Photo Express application, you will find many
interesting image processing applications, network and video software
KNOW your digital camera. For example, with the help of windows
“
NetMeeting”application, you can achieve face-to-face chat or, have
videoconferences over the Internet. Such kind of expanded applications
are limitless. You can learn more and more of this by accumulated
exploration.
5 Problem Solving
For your assistance, we have listed below a few common problems.
5.1 When press the mode button, the camera can’
t turn on
The battery is very low; you need change a new battery.
24
5.2 When used in video mode like pc camera
5.2.1 the video image is split or display color stripe
Turn the preview function of the video program off, and then turn it on.
5.2.2 cannot run preview graph or cannot add vidcap to filler graph
Restart the computer and connect the camera again, or reinstall the driver
program.
5.3 Cannot download picture, said no picture in camera
Restart the computer and connect the camera again.
-
END
-
Contents
1.
Get to Know Your Digital Camera……………………………..1
25
1.1 Functions & Features………………………………………………1
1.2 Technical Specification ……………………… ...…………… .…..3
1.3 System Requirements………………………………………………...4
1.4 Functional Parts of the Camera…………………………………….5
2. Use Your Digital Camera…………………… ...……………… .…...5
2.1 Load Batteries ……………………………… ...…………………….5
2.2 Change the Setting Mode…………………………………………….6
2.3 Take Pictures…………………………………………………………7
2.4 Stand by (Automatic Energy Saving)………………… ...… ...…… 7
2.5 Self-Time ………………… ...………… ...………… ...……....…… 7
2.6 Continuous Capture…………………………………………………..8
2.7 Clear all Pictures Stored in the Memory… …………… ..……….….8
2.8 Clear the last Picture Stored in the Memory …… ...…… ...……….8
2.9 Change Resolution ….…………………......………………………9
2.10 Change Frequency……………… …………… ...………………..9
2.11 Change Compression rate …………… ...…… ………… ... ...…..9
3. How to Install and Use the Accompanying Application…….. ….9
3.1 Installation of the Application…………………… ...…...……… 9
26
3.2 Installation of the Driver………………………………………… 15
3.3 Make Preparations to use Ulead Photo Express……… … ……….17
3.4 Download Pictures using the PHOTO mode…………………..18
3.5 Downloading Pictures using“ALBUM”Mode……………………21
3.6 How to Use Ulead Photo Express..………….. …………………… 23
4. Expand Your Field of Application……………… ………………24
5. Problem Solving …… ...…………… ...…………… ...……… ...….24
5.1 ………………………………………………………………………25
5.2 ………………………………………………………………………25
5.21 ……………………………………………………………………..25
5.22 ……………………………………………………………………..25
5.3 ………………………………………………………………………25
27
User’
s Manual
For Dual Mode Digital Camera
PalmClix
28