1
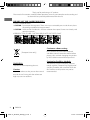
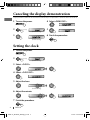
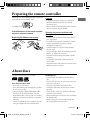
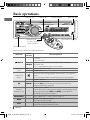
ENGLISH
KD-R326/KD-R325
CD RECEIVER /
Having TROUBLE with operation?
Please reset your unit
Refer to page of How to reset your unit
For canceling the display demonstration, see page 4. /
For installation and connections, refer to the separate manual.
INSTRUCTIONS
EN, TH
© 2010 Victor Company of Japan, Limited
CoverRear_KD-R326_R325[U]_1.indd 1-2
GET0675-001A
0910DTSMDTJEIN
[U/UH]
7/9/10 11:12:43 AM
Thank you for purchasing a JVC product.
Please read all instructions carefully before operation, to ensure your complete understanding and
to obtain the best possible performance from the unit.
IMPORTANT FOR LASER PRODUCTS
1. CLASS 1 LASER PRODUCT
2. CAUTION: Do not open the top cover. There are no user serviceable parts inside the unit; leave
all servicing to qualified service personnel.
3. CAUTION: Visible and/or invisible class 1M laser radiation when open. Do not view directly with
optical instruments.
4. REPRODUCTION OF LABEL: CAUTION LABEL, PLACED OUTSIDE THE UNIT.
Caution on volume setting:
[European Union only]
Discs produce very little noise compared
with other sources. Lower the volume before
playing a disc to avoid damaging the speakers
by the sudden increase of the output level.
Caution for DualDisc playback:
WARNING:
Stop the car before operating the unit.
Caution:
Adjust the volume so that you can hear sounds
outside the car. Driving with the volume too
high may cause an accident.
2
The Non-DVD side of a “DualDisc” does not
comply with the “Compact Disc Digital Audio”
standard. Therefore, the use of Non-DVD side
of a DualDisc on this product may not be
recommended.
ENGLISH
EN02-15_KD-R326_R325[U]_4.indd 2
8/3/10 4:03:32 PM
How to attach/detach the control
panel
CONTENTS
3 How to attach/detach the control
panel
3 How to reset your unit
3 How to forcibly eject a disc
3 Maintenance
4
How to reset your unit
Your preset adjustments will
also be erased.
How to forcibly eject a disc
4
5
5
6
7
8
9
[Hold]
• Be careful not to drop the disc when it ejects.
• If this does not work, reset your unit.
Maintenance
Cleaning the unit
Wipe off the dirt on the panel with a dry silicon
or soft cloth. Failure to observe this precaution
may result in damage to the monitor or unit.
Cleaning the connector
Wipe off dirt on the connector of the unit and
panel. Use a cotton swab or cloth.
9
10
10
13
14
15
Canceling the display
demonstration
Setting the clock
Preparing the remote controller
About discs
Basic operations
Listening to the radio
Listening to a disc
Connecting the other external
components
Listening to the other external
components
Selecting a preset sound mode
Menu operations
Troubleshooting
Using Bluetooth ® devices
Specifications
Condensation : When the car is airconditioned, moisture may collect on the
laser lens. This may cause disc read errors. In
this case, remove the disc and wait for the
moisture to evaporate.
Temperature inside the car : If you have
parked the car for a long time in hot or cold
weather, wait until the temperature in the car
becomes normal before operating the unit.
ENGLISH
EN02-15_KD-R326_R325[U]_f.indd 3
3
8/25/10 11:39:41 AM
Canceling the display demonstration
Display demonstration will be activated automatically if no operation is done for about 20 seconds.
1 Turn on the power.
4 Select <DEMO OFF>.
2
5
[Hold]
(Initial setting)
3
6 Finish the procedure.
(Initial setting)
Setting the clock
1 Turn on the power.
2
[Hold]
(Initial setting)
3 Select <CLOCK>.
4 Select <CLOCK SET>.
5 Adjust the hour.
(Initial setting)
6 Adjust the minute.
7 Finish the procedure.
4
ENGLISH
EN02-15_KD-R326_R325[U]_4.indd 4
8/3/10 4:03:33 PM
Preparing the remote controller
When you use the remote controller for the first
time, pull out the insulation sheet.
Insulation sheet
If the effectiveness of the remote controller
decreases, replace the battery.
Replacing the lithium coin battery
CR2025
Caution:
• Danger of explosion if battery is incorrectly
replaced. Replace only with the same or
equivalent type.
• Battery shall not be exposed to excessive heat
such as sunshine, fire, or the like.
Warning (to prevent accidents and
damage):
• Do not install any battery other than CR2025
or its equivalent.
• Do not leave the remote controller in a place
(such as dashboards) exposed to direct
sunlight for a long time.
• Store the battery in a place where children
cannot reach.
• Do not recharge, short, disassemble, heat the
battery, or dispose of it in a fire.
• Do not leave the battery with other metallic
materials.
• Do not poke the battery with tweezers or
similar tools.
• Wrap the battery with tape and insulate when
throwing away or saving it.
About discs
This unit can only play the CDs with:
Discs that cannot be used:
• Discs that are not round.
• Discs with coloring on the recording surface
or discs that are dirty.
• You cannot play a Recordable/ReWritable
disc that has not been finalized. (For the
finalization process refer to your disc writing
software, and your disc recorder instruction
manual.)
• 3-inch CD cannot be used. Attempt to insert
using an adapter can cause malfunction.
Handling discs:
• Do not touch the recording surface of the
disc.
• Do not stick tape etc. on the disc, or use a disc
with tape stuck on it.
• Do not use any accessories for the disc.
• Clean from the center of the disc and move
outward.
• Clean the disc with a dry silicon or soft cloth.
Do not use any solvents.
• When removing discs from this unit, pull them
out horizontally.
• Remove the rims from the center hole and
disc edge before inserting a disc.
ENGLISH
EN02-15_KD-R326_R325[U]_4.indd 5
5
8/3/10 4:03:33 PM
Basic operations
Loading slot
Control dial
Remote sensor
• DO NOT expose to
bright sunlight.
Display window
Ejects the disc
Front auxiliary input jack
Detaches the panel
When you press or hold the following button(s)...
Main unit
Remote
controller
General operation
• Turns on.
• Turns off [Hold].
Selects the sources (FM, CD, F-AUX, BT AUDIO or R-AUX or
SOURCE BT PHONE, AM).
• “CD” is selectable only when a disc is loaded.
VOL – / + • Adjusts the volume level.
• Selects items.
—
Mutes the sound during playback. If the source is “CD,” playback
pauses.
• Press the button again to cancel muting or resume playback.
—
Confirms selection.
Selects the sound mode.
SOUND • Hold the EQ button on the main unit to enter tone level
adjustment directly. (page 10)
• Selects preset stations.
• Stores the current station into the selected number button [Hold].
—
• Press number button 1 (RPT) or 2 (RND) to enter REPEAT/
RANDOM setting directly. (page 8)
—
Enters <BRIGHTNESS> menu directly. (page 11)
• Returns to the previous menu.
—
• Exit from the menu [Hold].
• Changes the display information.
—
• Scrolls the display information [Hold].
—
/ SOURCE
Control dial
(turn)
Control dial
(press)
EQ
Number
buttons (1 – 6)
BRIGHTNESS
BACK
DISP
6
ENGLISH
EN02-15_KD-R326_R325[U]_4.indd 6
8/3/10 4:03:34 PM
Listening to the radio
• Auto search [Press].
• Manual search [Hold].
“M” flashes, then press the button
] “FM” or “AM”
repeatedly.
“ST” lights up when receiving an FM stereo broadcast with sufficient signal strength.
~
Ÿ
Improving the FM reception
1
[Hold]
Manual presetting (FM/AM)
You can preset up to 18 stations for FM and 6
stations for AM.
1
2
] <TUNER> ] <MONO> ] <MONO ON>
Reception improves, but stereo effect
will be lost.
To restore the stereo effect, repeat the same
procedure to select <MONO OFF>.
] Tune in to a station you want to
preset.
2
[Hold]
“PRESET MODE” flashes.
3
Automatic presetting (FM)—
SSM (Strong-station Sequential Memory)
You can preset up to 18 stations for FM.
While listening to a station...
1
[Hold]
2
] Selects preset number.
Preset number flashes and “MEMORY”
appears.
• Pressing and holding the number buttons
(1 – 6) can also store the current station to the
selected number buttons (1 – 6).
Selecting a preset station
] <TUNER> ] <SSM> ]
<SSM 01 – 06 / 07 – 12 / 13 – 18>
“SSM” flashes and local stations with the
strongest signal are searched and stored
automatically.
To preset another 6 stations, repeat the
above procedure by selecting one of the other
6 SSM setting ranges.
Changing the display information
1
or
2
• Pressing the number buttons (1 – 6) can also
select the preset stations (1 – 6).
Using the remote controller
5 / ∞ : Changes the preset stations.
2 / 3 : Searches for stations.
Frequency j Clock
ENGLISH
EN02-15_KD-R326_R325[U]_4.indd 7
7
8/3/10 4:03:34 PM
Listening to a disc
~
Ÿ
Playback starts
automatically.
] “CD”
All tracks will be played repeatedly until you change the source
or eject the disc.
Stopping playback and ejecting
the disc
If the ejected disc is not
removed within 15 seconds, it is
automatically inserted into the
loading slot.
Selecting a track/folder
Selects folder of the MP3/WMA
Selecting a track/folder from the
list
• If the MP3/WMA disc contains many tracks,
you can fast search (±10, ±100) through the
disc by turning the control dial quickly.
• To return to the previous menu, press BACK.
Selecting the playback modes
You can use only one of the following playback
modes at a time.
[Press] Selects track.
[Hold] Fast-forwards or
reverses the track.
Using the remote controller
5 / ∞ : Selects folder of the MP3/WMA.
2 / 3 : [Press] Selects track.
[Hold] Fast-forwards or reverses the
track.
Changing the display information
Disc title/Album name/performer (folder
name)* = Track title (file name)* = Current
track number with the elapsed playing time =
Current track number with the clock time =
(back to the beginning)
* “NO NAME” appears for conventional CDs or if
not recorded.
1
[Hold]
• Pressing number button 1 (RPT) or
2 (RND) can enter REPEAT/RANDOM
setting directly. Then, perform step 3.
2
] “REPEAT” j “RANDOM”
3
REPEAT
TRACK RPT : Repeats current track
FOLDER RPT : Repeats current folder
RANDOM
FOLDER RND : Randomly plays all tracks
of current folder, then
tracks of next folders
ALL RND
: Randomly plays all tracks
To cancel repeat play or random play, select
“RPT OFF” or “RND OFF.”
8
ENGLISH
EN02-15_KD-R326_R325[U]_7.indd 8
8/20/10 4:47:25 PM
Connecting the other external components
You can connect an external component to the auxiliary input jack on the control panel (F-AUX)
and/or on the rear side of the unit (R-AUX).
Summary of using the external components through the auxiliary input jacks:
External component
Portable audio
player
Bluetooth device
Preparation
Connecting
Auxiliary
Source
cable/device
Menu setting Subinput jack
name
Setting
(not supplied)
item
item
Front
SRC SELECT F-AUX ON
F-AUX
See below.
Rear
SRC SELECT R-AUX ON
R-AUX
Rear
SRC SELECT R-AUX BT ADAPTER BT AUDIO/ KS-BTA100
BT PHONE * (page 14)
* ”BT PHONE” appears when a Bluetooth phone is in use.
On the control panel (F-AUX):
On the rear panel (R-AUX):
3.5 mm stereo mini
plug (not supplied)
Portable audio player,
etc.
3.5 mm stereo mini plug
(with “L” shaped connector)
(not supplied)
Portable audio player,
etc.
Recommended to use a 3-terminal plug head stereo mini plug for
optimum audio output.
Listening to the other external components
For details, refer also to the instructions supplied with the external components.
~
Ÿ
] “F-AUX” or “R-AUX”
Turn on the connected component and
start playing the source.
ENGLISH
EN02-15_KD-R326_5_001A_f.indd 9
9
8/30/10 2:01:38 PM
Selecting a preset sound mode
You can select a preset sound mode suitable
for the music genre.
FLAT = NATURAL =
DYNAMIC = VOCAL BOOST =
BASS BOOST = USER = (back
to the beginning)
While listening, you can adjust the tone level of
the selected sound mode.
1
2
] <PRO EQ> ] <BASS/ MIDDLE/
TREBLE>
3
Adjust the sound elements of the
selected tone.
[Hold]
2
Adjust the level (–06 to +06) of the
selected tone (BASS/ MID/ TRE).
The sound mode is automatically stored
and changed to “USER.”
Storing your own sound mode
You can store your own adjustments in
memory.
4
1
[Hold]
BASS [Initial: 80 Hz, 00, Q1.0]
Frequency: 60/ 80/ 100/ 200 Hz
Level:
–06 to +06
Q:
Q1.0/ 1.25/ 1.5/ 2.0
MIDDLE [Initial: 1.0 kHz, 00, Q1.25]
Frequency: 0.5/ 1.0/ 1.5/ 2.5 kHz
Level:
–06 to +06
Q:
Q0.75/ 1.0/ 1.25
TREBLE [Initial: 10.0 kHz, 00, Q FIX]
Frequency: 10.0/ 12.5/ 15.0/ 17.5 kHz
Level:
–06 to +06
Q:
Q FIX
Repeat steps 2 and 3 to adjust other
tones.
The adjustments made is automatically
stored and changed to “USER.”
Menu operations
1
2
[Hold]
3
If no operation is done
for about 60 seconds, the
operation will be canceled.
Menu item
DEMO
CLOCK
10
Repeat step 2 if necessary.
• To return to the previous
menu, press BACK.
• To exit from the menu, press
DISP or MENU.
Selectable setting, [Initial: Underlined]
For settings, see page 4.
ENGLISH
EN02-15_KD-R326_R325[U]_4.indd 10
8/18/10 3:54:27 PM
DISPLAY
DIMMER
Menu item
AUTO : Dims the display to the previous setting when you turn on the car
headlights. *1 / ON : Dims the display and button illumination (50% of the selected
brightness level). / OFF : Cancels (100% of the selected brightness level).
BRIGHTNESS
DAY [ 31 ] / NIGHT [ 15 ] : Selects the display and button illumination brightness
level [00 — 31] for day and night.
SCROLL *2
ONCE : Scrolls the displayed information once. / AUTO : Repeats scrolling (at 5-second
intervals). / OFF : Cancels.
(Pressing DISP for more than one second can scroll the display regardless of the setting.)
TAG DISPLAY
ON : Shows the Tag information while playing MP3/WMA tracks. / OFF : Cancels.
PRO EQ
AUDIO
Selectable setting, [Initial: Underlined]
DIMMER SET
See page 10.
FADER *3, *4
R06 — F06 [ 00 ] : Adjusts the front and rear speaker output balance.
BALANCE *4
L06 — R06 [ 00 ] : Adjusts the left and right speaker output balance.
LOUD
ON : Boost low and high frequencies to produce a well-balanced sound at a low volume
level. / OFF : Cancels.
VOL ADJUST
–05 — +05 [ 00 ] : Presets the volume adjustment level of each source (except
“FM”), compared to the FM volume level. The volume level will automatically increase or
decrease when you change the source. Before adjustment, select the source you want to
adjust. (“VOL ADJ FIX” appears on the display if “FM” is selected as the source.)
L/O MODE
SUB.W : Selects if the REAR/SW terminals are used for connecting a subwoofer (through
an external amplifier). / REAR : Selects if the REAR/SW terminals are used for connecting
the speakers (through an external amplifier).
SUB.W LPF *5
LOW 55Hz / LOW 85Hz / LOW 120Hz : Frequencies lower than
55 Hz/85 Hz/120 Hz are sent to the subwoofer.
SUB.W LEVEL *5
00 — 08 [ 04 ] : Adjusts the subwoofer output level.
HPF
ON : Activates the High Pass Filter. The unit selects the cutoff frequency to the rear
speakers. / OFF : Deactivates (all signals are sent to the rear speakers).
BEEP
ON / OFF : Activates or deactivates the keypress tone.
TEL MUTING *6
ON : Mutes the sounds while using the cellular phone (not connected through
KS-BTA100). / OFF : Cancels.
*1 The illumination control lead connection is required. (See “Installation/Connection Manual.”) This setting may not work
correctly on some vehicles (particularly on those having a control dial for dimming). In this case, change the setting to
any other than <DIMMER AUTO>.
*2 Some characters or symbols will not be shown correctly (or will be blanked) on the display.
*3 If you are using a two-speaker system, set the fader level to “00.”
*4 This adjustment will not affect the subwoofer output.
*5 Displayed only when <L/O MODE> is set to <SUB.W>.
*6 This setting does not work if <BT ADAPTER> is selected for <R-AUX> of the <SRC SELECT>.
Continued...
ENGLISH
11
EN02-15_KD-R326_R325[U]_7.indd 11
8/20/10 3:11:00 PM
Menu item
SSM *8
See page 7.
TUNER
MONO *8
See page 7.
IF BAND
AUTO : Increases the tuner selectivity to reduce interference noises between adjacent
stations. (Stereo effect may be lost.) / WIDE : Subject to interference noises from adjacent
stations, but sound quality will not be degraded and the stereo effect will remain.
AM *9
ON / OFF : Enable or disable “AM” in source selection.
F-AUX *9
ON / OFF : Enable or disable “F-AUX” in source selection.
R-AUX *9
ON / OFF : Enable or disable “R-AUX” in source selection. / BT ADAPTER *10 : Selects if
the rear auxiliary input jack is connected to the Bluetooth adapter, KS-BTA100. (page 9)
AUDIO
LOW POWER : VOLUME 00 – VOLUME 30 (Selects if the maximum power
of each speaker is less than 50 W to prevent damaging the speakers.) /
HIGH POWER : VOLUME 00 – VOLUME 50
SRC SELECT
Selectable setting, [Initial: Underlined]
AMP
GAIN *7
*7 The volume level automatically changes to “VOLUME 30” if you change to <LOW POWER> with the volume level set
higher than “VOLUME 30.”
*8 Displayed only when the source is “FM.”
*9 Displayed only when any source other than “AM/ F-AUX/ R-AUX/ BT AUDIO” is selected separately.
*10 When <BT ADAPTER> is selected, source name is changed to “BT AUDIO” from “R-AUX.”
Additional information
• This unit can play back multi-session discs; however,
unclosed sessions will be skipped while playing.
• This unit can play back files with the extension code
<.mp3> or <.wma> (regardless of the letter
case—upper/lower).
• This unit can play back the files meeting the conditions
below:
– Bit rate: MP3/WMA: 8 kbps — 320 kbps
– Sampling frequency:
MP3: 48 kHz, 44.1 kHz, 32 kHz
24 kHz, 22.05 kHz, 16 kHz
WMA: 48 kHz, 44.1 kHz, 32 kHz, 22.05 kHz
• This unit can show WMA Tag and ID3 Tag Version
1.0/1.1/2.2/2.3/2.4 (for MP3).
• The search function works but search speed is not
constant.
12
• The maximum number of characters for file/folder
names vary depending on the disc format used (includes
4 extension characters—<.mp3> or <.wma>).
ISO 9660 Level 1 and 2, Romeo: 64 characters, Joliet: 32
characters, Windows long file name: 64 characters
• This unit can play back files recorded in VBR (variable
bit rate). (Files recorded in VBR have a discrepancy in
elapsed time indication.)
• This unit cannot play back the following files:
– MP3 files: encoded in MP3i and MP3 PRO format; an
inappropriate format; layer 1/2.
– WMA files: encoded in lossless, professional, and
voice format; not based upon Windows Media®
Audio; copy-protected with DRM.
– Files which have data such as AIFF, ATRAC3, etc.
ENGLISH
EN02-15_KD-R326_5_001A_f.indd 12
9/1/10 4:37:37 PM
Disc playback
FM/AM
General
Troubleshooting
Symptom
Remedy/Cause
Sound cannot be heard from the speakers.
• Adjust the volume to the optimum level.
• Make sure the unit is not muted/paused. (page 6)
• Check the cords and connections.
Check to be sure the terminals of the speaker leads are covered
with insulating tape properly, then reset the unit. (page 3)
If the message does not disappear, consult your JVC car audio
dealer or a company supplying kits.
Reset the unit. (page 3)
Check the <SRC SELECT> = <F-AUX / R-AUX> setting.
(page 12)
Check to be sure the recommended stereo mini plug is used for
connection. (page 9)
“MISWIRING CHK WIRING THEN RESET
UNIT” appears on the display and no
operations can be done.
The unit does not work at all.
“F-AUX” or “R-AUX” cannot be selected.
Sound is sometimes interrupted while
listening to an external component
connected to the auxiliary input jack.
SSM automatic presetting does not work.
Static noise while listening to the radio.
“AM” cannot be selected.
Disc cannot be played back.
CD-R/CD-RW cannot be played back and
track cannot be skipped.
Disc sound is sometimes interrupted.
“NO DISC” appears on the display.
“PLEASE” and “EJECT“ appear alternately
on the display.
“IN DISC” appears on the display.
MP3/WMA playback
Disc cannot be played back.
Noise is generated.
“READING” keeps flashing on the display.
Tracks do not play back in the order you
have intended them to play.
The elapsed playing time is not correct.
The correct characters are not displayed
(e.g. album name).
Store stations manually.
Connect the antenna firmly.
Check the <SRC SELECT> = <AM> setting. (page 12)
Insert the disc correctly.
Insert a finalized CD-R/CD-RW (finalize with the component
which you used for recording).
Stop playback while driving on rough roads. / Change the
disc. / Check the cords and connections.
Insert a playable disc into the loading slot.
Press 0, then insert a disc correctly.
The disc cannot be ejected properly. Make sure nothing is
blocking the loading slot.
• Use a disc with MP3/WMA tracks recorded in a format
compliant with ISO 9660 Level 1, Level 2, Romeo, or Joliet.
• Add the extension code <.mp3> or <.wma> to the file
names.
Skip to another track or change the disc.
A longer readout time is required. Do not use too many
hierarchical levels and folders.
The playback order is determined when the files are recorded.
This sometimes occurs during playback. This is caused by how
the tracks are recorded on the disc.
This unit can only display letters (upper case), numbers, and a
limited number of symbols.
ENGLISH
EN02-15_KD-R326_R325[U]_7.indd 13
13
8/20/10 3:13:17 PM
Using Bluetooth ® devices
For Bluetooth operations, it is required to connect the Bluetooth adapter, KS-BTA100 (not supplied)
to the auxiliary input jack (R-AUX/BT ADAPTER) on the rear of the unit. (page 9)
• For details, refer also to the instructions supplied with the Bluetooth adapter and the Bluetooth
device.
Preparation
1 Register (pair) a Bluetooth device with KS-BTA100.
Refer to the instructions manual supplied with KS-BTA100.
2 Change the <SRC SELECT> settings of this unit.
] <SRC SELECT> ] <R-AUX> ]
<BT ADAPTER>
[Hold]
Using the Bluetooth mobile phone
(Low)
(High)
Adjusting the microphone volume
Volume level: High/ Normal (initial)/ Low
• Receiving a call
When a call comes in...
• Making a call
Making a call to the last connected number from
your phone.
• Switching between handsfree and phone
While talking...
KS-BTA100
Microphone
• Ends/rejects call
• Voice dialing
Voice dialing is available only when the connected
[Hold]
(< 5 seconds) mobile phone has the voice recognition system. To
use this, speak the name you want to call clearly.
Using the Bluetooth audio device
1
(CD receiver)
] “BT AUDIO”
2
If playback does not start, operate the Bluetooth
audio player to start playback.
[Press] Selects track.
[Hold] Fast-forwards or reverses the track.
About microphone volume:
• When you turn off the power of the CD receiver, the volume level changes to Normal.
14
ENGLISH
EN02-15_KD-R326_5_001A_f.indd 14
9/1/10 4:48:22 PM
Specifications
AUDIO AMPLIFIER SECTION
CD PLAYER SECTION
Maximum Power Output : 50 W per channel
Continuous Power Output (RMS) : 20 W per
channel into 4 Ω, 40 Hz to 20 000 Hz at no
more than 1% total harmonic distortion.
Signal-to-Noise Ratio : 70 dB
Load Impedance : 4 Ω (4 Ω to 8 Ω allowance)
Frequency Response : 40 Hz to 20 000 Hz
Line-Out or Subwoofer-Out Level/
Impedance : 2.5 V/20 kΩ load (full scale)
Output Impedance : 1 kΩ
Other Terminal : Antenna input, Front auxiliary
input jack, Rear auxiliary/Bluetooth adapter
input jack
Type : Compact disc player
Signal Detection System : Non-contact optical
pickup (semiconductor laser)
Number of Channels : 2 channels (stereo)
Frequency Response : 5 Hz to 20 000 Hz
Signal-to-Noise Ratio : 98 dB
Wow and Flutter : Less than measurable limit
MP3 Decoding Format (MPEG1/2 Audio Layer
3) : Max. Bit Rate: 320 kbps
WMA (Windows Media® Audio) Decoding
Format : Max. Bit Rate: 192 kbps
TUNER SECTION
Frequency Range :
FM : 87.5 MHz to 108.0 MHz
AM : 531 kHz to 1 611 kHz
FM Tuner :
Usable Sensitivity : 9.3 dBf (0.8 μV/75 Ω)
50 dB Quieting Sensitivity : 16.3 dBf
(1.8 μV/75 Ω)
Alternate Channel Selectivity (400 kHz) :
65 dB
Frequency Response : 40 Hz to 15 000 Hz
Stereo Separation: 40 dB
AM Tuner :
Sensitivity/Selectivity : 20 μV/40 dB
GENERAL
Power Requirement : Operating Voltage :
DC 14.4 V (11 V to 16 V allowance)
Grounding System : Negative ground
Allowable Operating Temperature :
0°C to +40°C
Dimensions (W × H × D) : (approx.)
– Installation Size :
182 mm × 52 mm × 159 mm
– Panel Size :
188 mm × 59 mm × 9 mm
Mass : 1.2 kg (excluding accessories)
Subject to change without notice.
Microsoft and Windows Media are either
registered trademarks or trademarks of
Microsoft Corporation in the United States
and/or other countries.
ENGLISH
EN02-15_KD-R326_R325[U]_f.indd 15
15
8/27/10 2:18:23 PM
KD-R326/KD-R325
Installation/Connection Manual
การติดตั้ง/คู่มือการติดตั้ง
GET0675-006A
0910DTSMDTJEIN
[U/UH]
EN, TH
© 2010 Victor Company of Japan, Limited
ENGLISH /
ไทย
WARNINGS / คำเตือน
• ต้องใช้ชุดติดตั้งที่เหมาะสมกับรถของท่าน
• หากท่านมีคำถามหรือต้องการข้อมูลเกีย่ วกับชุดติดตั้ง
• You need the installation kits which corresponds to your car.
• If you have any questions or require information regarding installation kits, consult your JVC car audio
dealer or a company supplying kits.
• The unit can only be installed in a car with a 12 V DC power supply, negative ground.
• Disconnect the battery’s negative terminal and make all electrical connections before installing the unit.
• Connect speakers with a maximum power of more than 50 W (impedance of 4 Ω to 8 Ω). Otherwise,
change the <AMP GAIN> setting. (See page 12 of the INSTRUCTIONS.)
• Insulate unconnected wires with vinyl tape or other similar material. To prevent a short circuit, do not
remove the caps on the ends of the unconnected wires or the terminals.
• If the fuse blows, first make sure the wires are not touching to cause a short circuit, then replace the old
fuse with one that has the same rating.
• Install this unit in the console of your vehicle.
• Mount the unit so that the mounting angle is 30° or less.
• Be sure to ground this unit to the car's chassis again after installation.
• After the unit is installed, check whether the brake lamps, blinkers, wipers, etc. on the car are working
properly.
• Do not touch the metal part of this unit during and shortly after the use of the unit. Metal part such as the
heat sink and enclosure become hot.
โปรดปรึกษาตัวแทนจำหน่ายเครือ่ งเสียงติดรถยนต์ JVC
ของท่านหรือบริษัทที่จัดหาชุดอุปกรณ์ ให้้
• เครือ่ งสามารถติดตั้งในรถยนต์ที่มีแหล่งจ่ายไฟ DC 12 V และต่อกราวน์ลบเท่านั้น
• ถอดขั้วลบของแบตเตอรีอ่ อก และเชื่อมต่อไฟฟ้ าทั้งหมดก่อนติดตั้งเครือ่ ง
• ต่อลำโพงเข้ากับแหล่งจ่ายไฟฟ้ าไม่เกิน 50 W (ค่าความต้านทาน 4 Ω ถึง 8 Ω) หรือเปลี่ยนการตั้งค่า <AMP GAIN> (ดูหน้า
12 คำแนะนำ)
• หุ้มสายไฟที่ ไม่ ได้เชื่อมต่อด้วยเทปไวนิลหรือวัสดุอื่นที่ ใกล้เคียงกันนี้ เพื่อป้ องกันไม่ ให้เกิดไฟลัดวงจร
อย่าถอดฝาครอบที่ปลายสายไฟหรือขั้วต่อที่ยังไม่ ได้เชื่อมต่อออก
• หากฟิ วส์ขาด ก่อนอื่นตรวจดูว่าสายไฟไม่ ได้สัมผัสกันจนเป็ นเหตุให้เกิดการลัดวงจร
แล้วเปลี่ยนฟิ วส์เก่าด้วยฟิ วส์ ใหม่ท่ีกำลังไฟเดียวกัน
• ติดตั้งเครือ่ งนี้ ในแผงหน้าปัดของรถยนต์
• ติดตั้งเครือ่ งโดยให้เครือ่ งทำมุม 30° หรือน้อยกว่า
• ตรวจสอบให้แน่ ใจว่าติดตั้งเครือ่ งกับโครงรถก่อนการติดตั้ง
• หลังจากติดตั้งเครือ่ งแล้ว ให้ตรวจดูว่าไฟเบรก ไฟกะพริบ ที่ปัดน้ำฝน ฯลฯ ในรถยนต์ทำงานอย่างเหมาะสม
• ไม่สัมผัสกับส่วนที่เป็ นโลหะของตัวเครือ่ งในระหว่างการใช้งานและหลังจากที่ปิดเครือ่ งได้ ไม่นาน
ชิ้นส่วนโลหะอย่างเช่นแผ่นระบายความร้อนและตัวเครือ่ ง อาจร้อนจัด
ข้อควรระวังเกี่ยวกับการเชือ่ มต่อแหล่งจ่ายไฟและลำโพง
PRECAUTIONS on power supply and speaker connections
• อย่าต่อสายลำโพงที่เป็ นสายไฟกับแบตเตอรีร่ ถยนต์ ไม่เช่นนั้นเครือ่ งอาจได้รบ
ั ความเสียหายร้ายแรง
• ก่อนต่อสายลำโพงที่เป็ นสายไฟกับลำโพง ควรตรวจสอบการเดินสายลำโพงในรถของท่าน
• DO NOT connect the speaker leads of the power cord to the car battery; otherwise, the unit will be
seriously damaged.
• BEFORE connecting the speaker leads of the power cord to the speakers, check the speaker wiring in
your car.
INSTALLATION / การติดตั้ง
In-dash mounting / การติดตั้งจอแบบ In-dash
Do the required electrical connections. /
เชื่อมต่อไฟฟ้ าที่จำเป็ น
Install the unit at an angle
of less than 30˚. /
ติดตั้งเครือ่ งในมุมน้อยกว่า 30˚
Part list / รายการอุปกรณ์
A Hard case / โครงแบบหนา (×1)
B Control panel / แผงควบคุม (×1)
C Sleeve / ปลอกหุ้ม (×1)
D Trim plate / ทริมเพลท (×1)
E Power cord / สายไฟ (×1)
F Handles / ที่จับ (×2)
Bend the appropriate tabs to hold the sleeve
firmly in place. /
บิดแถบล็อคเพื่อรองรับปลอกหุ้มให้เข้าที่อย่างแน่นหนา
When installing the unit without using the sleeve / เมื่อติดตั้งเครือ่ งโดยไม่ ใช้ปลอกหุ้ม
Flat head screws (M5 × 8 mm) / ตะปูควงหัวแบน (M5 × 8 mm) *
Pocket / กระเป๋ า
Bracket / ขาแขวน *
Removing the unit / การถอดเครือ่ ง
Release the rear section first... / ปล่อยส่วนหลังก่อน...
* Not supplied for this unit.
* ไมได้จัดส่งให้สำหรับเครือ่ งนี้
TROUBLESHOOTING / การแก้ ไขปัญหาเบื้องต้น
• The fuse blows. ] Are the red and black leads connected correctly?
• Power cannot be turned on. ] Is the yellow lead connected?
• No sound from the speakers. ] Is the speaker output lead short-circuited?
• “MISWIRING CHK WIRING THEN RESET UNIT” appears on the display and no operation can be done.
] Is the speaker output lead short-circuited or touches the chassis of the car/head unit? ; Have you reset
your unit?
• Sound is distorted. ] Is the speaker output lead grounded? ; Are the “–” terminals of L and R speakers
grounded in common?
• Noise interfere with sounds. ] Is the rear ground terminal connected to the car’s chassis using shorter
and thicker cords?
• This unit becomes hot. ] Is the speaker output lead grounded? ; Are the “–” terminals of L and R
speakers grounded in common?
• This unit does not work at all. ] Have you reset your unit?
1
Install_KD-R326_006A_f.indd 1
• ฟิ วส์ขาด ] ต่อสายสีแดงและสีดำถูกต้องหรือไม่?
่ งได้ ] ต่อสายสีเหลืองแล้วหรือไม่?
• ไม่สามารถเปิ ดเครือ
• ไม่ ได้ยินเสียงจากลำโพง ] สายสัญญาณออกของลำโพงลัดวงจรหรือไม่?
่ งไม่สามารถทำงานได้ ]
• ข้อความ “MISWIRING CHK WIRING THEN RESET UNIT” ปรากฏขึ้นบนหน้าจอและเครือ
สายสัญญาณออกของลำโพงลัดวงจรหรือสัมผัสกับโครงรถ/ตัวเครือ่ งหลักหรือไม่? ; ท่านตั้งเครือ่ งใหม่ ใช่หรือไม่?
• เสียงผิดเพี้ยน ] สายสัญญาณออกของลำโพงต่อกับสายดินหรือไม่? ; ขั้วต่อ “–” ของลำโพง L (ซ้าย) และ R (ขวา)
ต่อสายดินไว้ด้วยกันหรือไม่?
• มีเสียงรบกวน ] ขัว้ ต่อสายดินด้านหลังที่ต่อกับโครงรถใช้สายที่สั้นและหนากว่าหรือไม่?
่ งร้อน ] สายสัญญาณออกของลำโพงต่อกับสายดินหรือไม่? ; ขั้วต่อ “–” ของลำโพง L (ซ้าย) และ R (ขวา)
• เครือ
ต่อสายดินไว้ด้วยกันหรือไม่?
่ งใช้งานไม่ ได้เลย ] ท่านตั้งเครือ่ งใหม่ ใช่หรือไม่?
• เครือ
9/2/10 1:37:06 AM
ELECTRICAL CONNECTIONS / การเชือ่ มต่อไฟฟ้ า
Signal cord / สายสัญญาณ*1
JVC Amplifier /
แอมพลิฟลายเออร์ของ JVC
Rear speakers
or subwoofer /
ลำโพงหลังหรือซับวูฟเฟอร *3
Rear ground terminal /
ขั้วต่อสายดินด้านหลัง
Reset the unit. / ตั้งค่าเครือ่ งใหม่
10 A fuse / ฟิ วส์ 10 A
Remote lead /
สายรี โมท
Factory wiring harness (vehicle) /
ชุดสายไฟจากโรงงาน (รถยนต์)
Antenna terminal / ขัว้ ต่อสายอากาศ
Extension lead /
สายต่อขยาย *1
Caution / ข้อควรระวัง
Join the same color leads together. / ต่อสายสีเดียวกันเข้าด้วยกัน
E Power cord / สายไฟ
To join the open-ends of the leads: / ในการต่อปลายเปิ ดของสาย:
Strip lead ends / ปลอกปลายสาย
Twist ends together / บิดปลายทั้งสองเข้าด้วยกัน
Solder / บัดกรี
Tape / เทป
Recommended connection /
การเชือ่ มต่อที่แนะนำ
Vehicle-specific Wiring Harness
(separately purchased) /
ชุดสายไฟเฉพาะในรถยนต์
้ ต่างหาก)
(แยกซือ
Blue / สีนำเงิน
Automatic antenna (250 mA max.) /
เสาอากาศอัตโนมัติ (สูงสุด 250 mA)
Blue (white stripe) / สีน้ำเงิน (แถบสีขาว)
Amp Turn-on (200 mA max.) / เปิ ดแอมป์
(สูงสุด 200 mA)
Illumination /
Orange (white stripe) /
สีส้ม (แถบสีขาว)
ไฟส่องสว่าง
Power cannot be turned on? /
ไม่สามารถเปิ ดเครือ่ งได้?
Brown / สีน้ำตาล
Telephone Muting / ตัดเสียงโทรศัพท์
Ignition switch / สวิตช์จุดระเบิด
Yellow / สีเหลือง
12 V Battery / แบตเตอรี่ 12 V
For your reference / สำหรับอ้างอิง
Metra Electronics:
www.metraonline.com
Scosche Industries:
www.scosche.com
Red / สีแดง
12 V Ignition Switch / สวิตช์จุดระเบิด 12 V
Fuse block / กล่องฟิ วส์
Black / สีดำ
Ground / สายดิน
Separate red lead /
สายสีแดงแยกต่างหาก
White / สีขาว
If your vehicle factory wiring harness does not
have “12 V ignition switch” lead, connect the
red lead of the supplied power cord, E, to the
vehicle fuse block (through a separate red lead
provided with the fuse tap). /
หากชุดสายไฟรถยนต์ของคุณไม่มสาย
ี “สวิตช์จุดระเบิด
12 V” ให้เชื่อมต่อสายสีแดงของสายไฟที่จัดส่งให้ E
กับกล่องฟิ วส์ของรถยนต์ (ผ่านทางสายสีแดงแยกต่าง
หากที่จัดส่งให้พร้อมกับแถบฟิ วส์)
White (black stripe) / สีขาว (แถบสีดำ)
Front speaker (left) / ลำโพงหน้า (ซ้าย)
Gray / สีเทา
Gray (black stripe) / สีเทา (แถบสีดำ)
Front speaker (right) / ลำโพงหน้า (ขวา)
Green / สีเขียว
Green (black stripe) / สีเขียว (แถบสีดำ)
Rear speaker (left) / ลำโพงหลัง (ซ้าย)
Purple / สีม่วง
Rear speaker (right) / ลำโพงหลัง (ขวา)
Purple (black stripe) / สีม่วง (แถบสีดำ)
Connecting the Bluetooth adapter or portable audio player / การเชือ่ มต่ออะแดปเตอร์ Bluetooth หรือเครือ่ งเล่นเพลงขนาดพกพา
Blue (white stripe) /
สีน้ำเงิน (แถบสีขาว)
KS-BTA100
(separately purchased /
ซื้อแยกต่างหาก)
Make the <SRC SELECT> setting accordingly, see
pages 9, 12, and 14 of the INSTRUCTIONS. /
ทำการตั้งค่า <SRC SELECT> ตามนั้น ดูหน้า 9, 12 และ 14
ในคำแนะนำ
Black / สีดำ
Brown / สีน้ำตาล
– – – – – – – – – – – – – – – – – – – – – – – – – – – – – – – – – – – – – – – – or / หรือ
3.5 mm stereo mini plug / ขั้วต่อแบบ stereo mini
ขนาด 3.5 มม. *1
To the blue (white stripe) lead of the supplied power cord E /
สำหรับสายสีน้ำเงิน (แถบสีขาว) ของสายไฟที่จัดส่งให้ E
Ground / สายดิน
To the brown lead of the supplied power cord E /
สำหรับสายสีน้ำตาลของสายไฟที่จัดส่งให้ E
–––––– ––––– ––––– ––––– ––––– ––––– ––––– ––––
Portable audio player, etc. /
เครือ่ งเล่นวิทยุแบบพกพาและอื่นๆ *1
ไมได้จัดส่งให้สำหรับเครือ่ งนี้
ติดสายดินกับตัวเครือ่ งที่เป็ นโลหะหรือโครงรถให้แน่นหนา—ในส่วนที่ ไม่ ได้พ่นสีทับ
*3 ตั้งค่า <L/O MODE> ให้สอดคล้อง ดูหน้า 11 ในคำแนะนำ
*1 Not supplied for this unit.
*2 Firmly attach the ground wire to the metallic body or to the chassis of the car—to the place uncoated
with paint.
*3 Make the <L/O MODE> setting accordingly, see page 11 of the INSTRUCTIONS.
*1
*2
2
Install_KD-R326_006A_f.indd 2
8/30/10 4:54:41 PM
ENGLISH
KD-R326/KD-R325
CD RECEIVER /
Having TROUBLE with operation?
Please reset your unit
Refer to page of How to reset your unit
For canceling the display demonstration, see page 4. /
For installation and connections, refer to the separate manual.
INSTRUCTIONS
EN, TH
© 2010 Victor Company of Japan, Limited
CoverRear_KD-R326_R325[U]_1.indd 1-2
GET0675-001A
0910DTSMDTJEIN
[U/UH]
7/9/10 11:12:43 AM