1
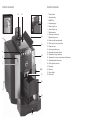
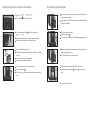
Art. 65478 – XF70 GB – 12/2005
IMPRESSA XF70
Short operating instructions
Control elements
Control elements
11
1. Rotary Switch
22
2. Illuminated ring
3. ON/OFF key
13
4. Programming key
5. Draw-off key 1 cup
6. Draw-off key 2 cups
7. Maintenance key
Rotary Switch
12
10
8. Steam pre-selection key
9. Display dialog system
10. Water tank with carrying handle
13
11. Filler funnel for pre-ground coffee
12. Bean tank cover
9
3
4
5
6
7
13. Aroma preservation cover
8
14. Steam/hot water draw-off valve
14
2
15. Replaceable 2-stage frothing jet
16. Replaceable hot water nozzle mounted in illustration
17. Height-adjustable coffee spout
1
18. Coffee grounds container
19. Drip grate
15/16
20. Drip tray
21. Power Switch
17
18
21
19
20
22. Metal shelf
First use
Insert filter (first use)
Press power switch (I) (on rear)
Remove water tank and empty it
(1)
Fill bean tank
Flip up cartridge (1) holder
Touch symbol
(2)
Insert filter cartridge (2) into water tank, applying slight
pressure
Close cartridge holder (1) (engages audibly)
Fill water tank and insert
Display text: SPRACHE - DEUTSCH
Turn the Rotary Switch until the required language is displayed
Confirm selected language by pressing the Rotary Switch
Hold Rotary Switch down until the display shows FILTER
Confirm setting by pressing the Rotary Switch
Lift out water tank
Fill water tank and place back into the machine
Display text: OPEN TAP
Place a receptacle (ca. 1 litre) under the hot water nozzle
Turn tap to position
Turn Rotary Switch until the display shows YES
Confirm setting by pressing the Rotary Switch
Turn it back to the initial position when display prompts you to
do so
Display text: PRESS - MAINT.
Place receptacle under height-adjustable coffee spout
Touch symbol
when display prompts you to do so
Place a receptacle (ca. 1 litre) under the hot water nozzle
Turn tap to position
Turn it back to the initial position when display prompts you to
do so
The machine is ready for use
The machine is ready for use
Cleaning (duration: approx. 15 minutes)
Display text: READY - CLEAN
Touch the maintenance symbol
Changing the filter
Display text: READY - FILTER
NOTE:
until the display shows
EMPTY - TRAY
After having used 50 litres of water or after two months at the
Empty drip and grounds tray and place back into the machine
latest, the filter cartridge will be used up.
Remove drip tray
Touch symbol
Place a receptacle (ca. 1 litre) under the coffee spout
Touch maintenance symbol
Touch the maintenance symbol
CHG FILTER - OPEN TAP
Drop an original JURA cleaning tablet into the filler funnel for
to switch machine off
until the display shows
Remove and empty water tank
(1)
ground coffee when display prompts you to do so
Flip up cartridge holder (1)
Close lid
Remove old CLARIS plus filter cartridge from the tank
Touch the maintenance symbol
(2)
Place new filter cartridge (2) into water tank, applying slight
pressure
Close cartridge holder (1) (engages audibly)
Empty drip and grounds tray and place back into machine when
display prompts you to do so
Fill water tank and place back into machine
Wipe out filler funnel for ground coffee with a dry cloth after
Place a receptacle (ca. 1 litre) under the hot water nozzle
the cleaning program has finished.
Turn tap to position
Turn it back to the initial position when display prompts you to
do so
The machine is ready for use
The machine is ready for use
Decalcifying (duration: approx. 40 minutes)
Display text: READY - DECALCIFY
Touch symbol
to switch machine off
Decalcifying (continuation)
Empty drip and grounds tray and place back into machine when
display prompts you to do so
Rinse water tank well, fill with cold, fresh tap water and place it
back into the machine
Touch maintenance symbol
until the display shows
EMPTY - TRAY
Place receptacle under spout
Turn tap to position
Empty drip and grounds tray and place back into machine
Turn it back to the initial position when display prompts you to do
Remove 2-stage frothing jet or hot water nozzle
so
Remove water tank and empty it
Empty drip and grounds tray and place back into machine when
Completely dissolve contents of a blister (3 tablets) in 0.6 litres
display prompts you to do so
of water
Fit 2-stage frothing jet or hot water nozzle
Pour solution into the empty water tank
Place water tank back into machine
Place a receptacle (ca. 1 litre) under the spout
Shift receptacle under height-adjustable coffee spout
Turn tap to position
Touch maintenance symbol
Turn it back to the initial position when display prompts you to
do so
do so
The machine is ready for use
when display prompts you to
Cleaning the 2-stage frothing jet
TIP:
To ensure perfect operation of the 2-stage frothing jet, we
recommend you clean it regularly.
Hold the nozzle at the top and at the bottom end or use a 7 mm
open-ended spanner
Screw the nozzle apart
Thoroughly rinse the 3 parts under running water
NOTE:
The display will not prompt you to clean the 2-stage frothing jet
Notes