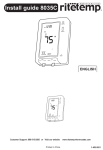
1
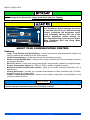
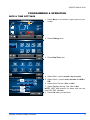
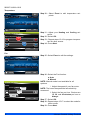
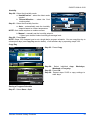
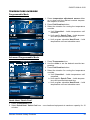
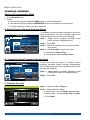
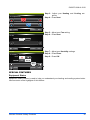
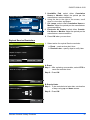
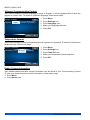
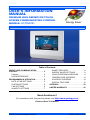
USER’S INFORMATION
MANUAL
PREMIUM HIGH DEFINITION TOUCH
SCREEN COMMUNICATING CONTROL
MODELS: S1-TTSCC01
Energy Saver
Table of Contents
ABOUT YOUR COMMUNICATING
CONTROL . . . . . . . . . . . . . . . . . . . . . . . . . . 2
Features . . . . . . . . . . . . . . . . . . . . . . . . . 2
QUICK REFERENCE . . . . . . . . . . . . . . . 3
PROGRAMMING & OPERATION . . . . . . . .
DATE & TIME SETTINGS . . . . . . . . . . .
SYSTEM SETTINGS . . . . . . . . . . . . . . .
FAN SETTINGS . . . . . . . . . . . . . . . . . . .
HUMIDITY SETTINGS . . . . . . . . . . . . . .
5
5
6
6
7
SMART RECOVERY . . . . . . . . . . . . . . . 8
ENERGY SAVER SETTINGS . . . . . . . . 8
USING PROGRAM SCHEDULES . . . . . 8
TEMPERATURE OVERRIDE . . . . . . . . 13
SCHEDULE OVERRIDE . . . . . . . . . . . . 14
SPECIAL FEATURES . . . . . . . . . . . . . . 15
APPENDIX . . . . . . . . . . . . . . . . . . . . . . . . . 20
LIMITED WARRANTY . . . . . . . . . . . . . . . . 20
Need Assistance?
For assistance with this product please visit http://www.yorkupg.com
Read and Save This Manual
Johnson Controls Unitary Products
542937-UUM-A-1010
542937-UUM-A-1010
Never use sharp instruments, such as a pencil or pen, to press touch screen keys. To prevent damage to the thermostat, always press keys with your fingertip.
Settings / Backlight
Your brightness default settings are preset
to maximize the life of your Communicating
Control. Increasing the brightness levels
could potentially decrease the life of the
product. Brightness default settings for
your Communicating Control are set: Active
Mode Brightness 80% and Sleep Mode
Brightness 25%.
Active Brightness:
80%
50%
100%
Sleep Brightness:
1%
25%
80%
Cancel
OK
ABOUT YOUR COMMUNICATING CONTROL
Features
•
Large, Clear Display with Backlighting – current temperature and temperature setpoint are
easy-to-read and are displayed on the home screen.
Intuitive Programming – guides you through the scheduling process .
Ability to Copy Multiple Days – allows you to easily customize the Communicating Control for
your unique schedule.
Real-Time Clock – keeps time during power failure; automatically updates for daylight savings.
Precise Temperature Control (+/- 1°F) (+/- .5°C) – reliable, consistent comfort.
Multiple Schedule Hold/Override options – allow you to modify schedule indefinitely or for a
specific time.
Change Reminders – reminds you to replace and maintain air filters, humidifier pad, UV bulbs,
and/or Electronic Air Cleaner filters.
Outdoor Temperature Indication – shows current outdoor temperature on the display to help
you plan outdoor activities.
•
•
•
•
•
•
•
NOTICE
The Home and Menu screen may differ slightly, depending on your heating and/or cooling
system and the Communicating Control’s display settings.
2
Johnson Controls Unitary Products
542937-UUM-A-1010
QUICK REFERENCE
Your new Communicating Control is preset to Non-Programmable View/Mode.
To change the View Mode:
1. Press Menu in the bottom right corner of your
screen.
2. Press Settings icon.
3. Press View/Mode icon.
4. Select Non-Programmable, Programmable or
Advanced Programmable.
Settings / View Mode
Select a mode for the Thermostat:
NonProgrammable
Programmable
Advanced
Programmable
Select a sleep screen:
Home
Temp Only
Cancel
OK
The quick reference guide for each View/Mode is detailed in Figures 1-3.
Current Outdoor Temperature
(if communicating outdoor
equipment is installed)
Current Indoor
Temperature
Current
Date & Time
11:07AM Thu 21 Jul
Temperature
Setpoint
55°
72
71°
Temperature
Adjustment
ON
Auto
Humidity
tyy 330%
0%
Fan Setting
(if display setting
is enabled)
72°
Menu
Me
Alert: Change Filter
Quick
Help
Screen
Lock
Cool
Mode
Humidity Setting
(if display
setting is enabled)
System
Popup Alerts
Heat
Mode
Current Indoor
Humidity (if display
setting is enabled)
Menu
FIGURE 1: Non-Programmable Mode
Johnson Controls Unitary Products
3
542937-UUM-A-1010
Current Outdoor Temperature
(if communicating outdoor
equipment is installed)
Current Indoor
Temperature
Current
Date & Time
11:07AM Thu 21 Jul
Temperature
Setpoint
74°
72°
Temperature
Adjustment
CANCEL
74° to
10:00pm
Humidity
tyy 330%
0%
78°
Cool
Mode
ON
Auto
Humidity Setting
(if display
setting is enabled)
Fan Setting
(if display setting
is enabled)
72°
Menu
M
Alert: Cha
Change
hang
ngee Fi
Fil
Filter
lt er
Quick
Help
Screen
Lock
Program Override
Timer (if an override
is active)
55°
System
Popup Alerts
Heat
Mode
Current Indoor
Humidity (if display
setting is enabled)
Menu
FIGURE 2: Programmable Mode
Current Outdoor Temperature
(if communicating outdoor
equipment is installed)
Current Indoor
Temperature
Current
Date & Time
11:07AM Thu 21 Jul
70°
Temperature
Override
CANCEL
75° to
10:0
10
:00pm
10:00pm
Humidi
Humidity
ityy 330%
0%
Schedule
Override
78°
Cool
Mode
System
Popup Alerts
ON
Auto
Humidity Setting
(if display
setting is enabled)
Fan Setting
(if display setting
is enabled)
72°
Menu
M
Alert: Change
Cha
hang
ngee Filter
Fili lt er
Fi
Quick
Help
Screen
Lock
Program Override
Timer (if an override
is active)
62°
Return to
Home Screen
Heat
Mode
Current Indoor
Humidity (if display
setting is enabled)
Menu
FIGURE 3: Advanced Programmable
4
Johnson Controls Unitary Products
542937-UUM-A-1010
PROGRAMMING & OPERATION
DATE & TIME SETTINGS
1. Press Menu in the bottom right corner of your
screen.
11:07AM Thu 21 Jul
55°
72°
71°
ON
Auto
Humidity3
dityy 330%
0%
72°
Menu
Alert: Change Filter
2. Press Settings icon.
Emergency
Heat
Humidity Status Settings
Fan
Tools
Dealer
Clean Schedule
Close
Alert: Change Filter
3. Press Date/Time icon.
Settings
¿ ;ç
Date/Time
Security
Backlight
Language
Sound
Maintenance
View/Mode Temp °F/°C
OK
Settings / Date/Time
Date 08
May
2009
Clock 12 : 00
Clock Format 12 hr
Observe Daylight Yes
Savings Time
AM
24 hr
No
Cancel
Johnson Controls Unitary Products
OK
4. Select Date - current month, day and year.
5. Select Clock - current hour, minutes and AM or
PM.
6. Select Clock Format (12hr or 24hr).
7. Select Daylight Saving Time (Yes or No).
NOTE: 2007 and beyond, for areas that use the
new 2007 DST calendar.
8. Press OK when you are done.
5
542937-UUM-A-1010
SYSTEM SETTINGS
Your Communicating Control is preset to OFF mode (neither heating or cooling modes are
selected).
In Non-Programmable mode, Auto mode cannot be activated. If Auto mode is desired, change the
View/Mode to either Programmable or Advanced Programmable (see page 5 for details).
•
11:07AM Thu 21 Jul
•
55°
72°
71°
ON
Auto
Humidity3
dityy 330%
0%
•
72°
•
Alert: Change Filter
Menu
•
Emergency
Heat
Fan
Off mode: Neither Heating or Cooling icons are
illuminated.
Heat mode: Heating icon is illuminated
(red glow ring indicates heat equipment operation).
Cool mode: Cooling icon is illuminated
(blue glow ring indicates cool equipment operation).
Auto mode: Both Heating and Cooling icons
are illuminated (red/blue glow ring indicates
heat/cool equipment operation).
Emergency Heat: Emergency Heat button is
selected via the Menu screen
(only for heat pumps with electric heat strips).
Humidity Status Settings
Dealer
Tools
Alert: Change Filter
Clean Schedule
Close
FAN SETTINGS
In non-programmable mode, the fan setting defaults to the schedule currently active in the calendar.
In programmable mode, the fan setting defaults to schedule mode.
1. Press Menu at the bottom right side of your screen.
NOTICE
Or press the quick access Fan icon on the right side of your screen.
6
Johnson Controls Unitary Products
542937-UUM-A-1010
Emergency
Heat
Fan
Dealer
Humidity Status Settings
Tools
Clean Schedule
Close
Alert: Change Filter
Fan Adjust
Show Fan on
Home
Function:
xx%
Run fan
30 minutes
Auto
Manual Schedule
45%
100%
Per Hour
Cancel
OK
2. Press Fan icon.
3. Select the Fan function.
a. Auto – runs only with equipment.
b. Manual – runs intermittently to circulate air.
NOTE: Manual mode is not available for all systems.
i. Adjust the speed of your fan motor.
NOTE: The lower the speed the less electricity consumed.
ii. Select the fan run time. Choices are 15,
30, and 45 minutes per hour or Always.
c. Schedule – follows program schedule fan
settings (see Page 9 for more information).
NOTE: Schedule option is only available in programmable modes.
4. Select check box to display fan icon on home
screen.
5. Press OK when you are done.
HUMIDITY SETTINGS
In non-programmable mode, your Communicating Control humidity setting defaults to auto mode.
In programmable mode, the humidity setting defaults to schedule mode.
1. Press Menu.
Humidity Adjust
NOTE: Or press the quick access Humidity icon on
Show Humidity
Level on Home
22%
When Heating...
the right side of your screen.
Mode:
2. Press Humidity icon.
Manual Schedule
Function: Auto
3. Select the Humidity mode.
a. Humidification – Select the Heat mode symbol.
b. Dehumidification – Select the Cool mode
Cancel
OK
symbol.
4. Select Humidity function.
Humidity Adjust
a. Auto – Automatically sets the humidity setShow Humidity
Level on Home
22%
When Heating...
point based on indoor temperature.
Mode:
NOTE: Auto mode requires an outdoor sensor.
Manual Schedule
Function: Auto
b. Manual – Manually set the humidity setpoint.
i. Select your desired indoor humidity
45%
35%
100%
percentage level.
NOTE: If you start seeing condensation building up
OK
Cancel
on your windows, lower the humidity setpoint or
switch to auto mode.
c. Schedule – Follows program schedule humidity settings (See Page 9 for more information).
NOTE: Schedule option is only available in programmable modes.
5. Select check box to display humidity information on home screen.
6. Press OK when you are done.
Johnson Controls Unitary Products
7
542937-UUM-A-1010
SMART RECOVERY
Your Communicating Control comes with a feature called Smart Recovery, which eliminates all
guesswork when setting your program schedule.
How long does it take the furnace to warm your house in the morning before you get out of bed or
how long does it take the air conditioner to cool your house in the afternoon before you return from
work? The Communicating Control determines the equipment start time to satisfy your desired temperature setpoint.
Simply set your program schedule to the time you want the house to be at your comfort temperature. The Communicating Control then turns on the heating or cooling at just the right time to have
your home reach your comfort temperature at your scheduled time.
For example: you get out of bed at 6:00 AM and want the temperature to be 70°F. Set the Awake
period for 6:00 AM and 70°F. The Communicating Control will turn on the heat before 6:00 AM to
raise the temperature to 70°F by 6:00 AM.
ENERGY SAVER SETTINGS
Energy Saver feature allows you to program your system for maximum energy savings. You can
chose from two, three or four time periods each day, with different settings for each day.
This Communicating Control is preset to use Energy Saver program settings. These settings would
help reduce your heating/cooling expenses.
Setpoints
Setpoints
Fan Setting
Heat
Cool
Awake (6:00 AM)
70°
78°
Day (8:00 AM)
62°
85°
Auto
Return (5:00 PM)
70°
78°
Auto
Sleep (10:00 PM)
62°
82°
Auto
Hum
Dehum
Auto
Auto
Auto
USING PROGRAM SCHEDULES
In a Non-Programmable mode, adjusting program schedule cannot be done.
NOTICE
In order to edit or run a program schedule, change the View/Mode to either Programmable
or Advanced Programmable (see page 3 for details).
Schedule
Create or edit schedules
Energy Saver
New
Schedule 1
Edit
Schedule 2
Schedule 3
Copy
Delete
1. Press Menu.
2. Press Schedule icon.
Viewer
Import/
Export
Cancel
8
Assign to
Calendar
Save
Johnson Controls Unitary Products
542937-UUM-A-1010
Program Schedule Options
3. Press:
a. The New, Edit or Copy icons to create a new or edit an existing schedule. Refer Page 9.
b. The Delete icon to delete an existing schedule. Refer Page 12.
c. The Viewer icon to view existing schedule summaries. Refer Page 12.
d. The import/export icon to import or export a program schedule. Refer to Page 12.
e. The Assign to Calendar icon to assign an existing schedule to the calendar. Refer Page 12.
A. Creating New or Editing/Copying an Existing Schedule
Name
Schedule
NAME
DAY
TIME
TEMPERATURE
FAN
HUMIDITY
Please name this schedule...
Step 1 - Press Edit icon.
a. Use the keyboard to name the schedule.
b. Press OK.
Step 2 - Press Next.
Edit
Schedule 3
Cancel
Next
Day
Schedule
NAME
DAY
Schedule 3
Select day
to edit:
TIME
Mo
TEMPERATURE
Tu
FAN
We Th
Fr
HUMIDITY
Sa
Su
Step 3 - Select Day to set schedule.
Step 4 - Press Next.
NOTE: Each program schedule is identified by a
color. Color shades represent unique program schedule settings.
Default settings based on Energy Saver
Cancel Save + Quit
Previous
Next
Time
Schedule
NAME
DAY
TIME
Wed
Number
of Events:
2
Select Event Awake
to edit: 6:00 am
+ 15 min
TEMPERATURE
HUMIDITY
3
4
Day
Return
Sleep
9:00 am
6:00 pm
10:00 pm
6:00 am
Cancel Save + Quit
FAN
- 15 min
Previous
Johnson Controls Unitary Products
Step 5 - Select Number of Events (2, 3 or 4 events
per day).
Step 6 - Select Event to set start time.
Step 7 - Adjust time that corresponds to the event.
Step 8 - Repeat steps 6-7 to select start time for
other events.
Step 9 - Press Next.
Next
9
542937-UUM-A-1010
Temperature
Step 10 - Select Event to edit temperature setpoints.
Schedule
NAME
DAY
TIME
TEMPERATURE
FAN
HUMIDITY
Wed
Select Event Awake
to edit: 73° 70°
Day
Return
Sleep
73° 70°
73° 70°
73° 70°
Previous
Next
Cancel Save + Quit
Step 11 - Adjust your Heating and Cooling setpoints.
Step 12 - Select OK.
Step 13 - Repeat steps 10-12 to program temperature for other events.
Step 14 - Press Next.
Schedule / Temperature Adjust
Adjust temperatures for Return
65°
50%
100%
75°
50°
85°
Cancel
OK
Fan
Step 15 - Select Event to edit fan settings.
Schedule
NAME
DAY
TIME
TEMPERATURE
FAN
HUMIDITY
Wed
Select Event Awake
to edit: Auto
Day
Return
Sleep
85%
Auto
75%
Previous
Next
Cancel
Schedule / Fan Adjust
Awake:
Function
Manual
45%
xx%
Run fan
Auto
100%
Always
Cancel
10
OK
Step 16 - Select the Fan function.
a. Auto
b. Manual
NOTE: Manual mode is not available for all
systems.
i. Adjust the speed of your fan motor.
NOTE: The lower the speed the less electricity
consumed.
ii. Select the fan run time. Choices are
15, 30, and 45 minutes per hour or
Always.
Step 17 - Select OK.
Step 18 - Repeat steps 15-17 to select fan mode for
other events.
Step 19 - Press Next.
Johnson Controls Unitary Products
542937-UUM-A-1010
Humidity
Step 20 - Select the Humidity mode.
Schedule
a. Humidification – select the Heat mode
NAME
DAY
TIME
TEMPERATURE
FAN
HUMIDITY
symbol.
Mode:
Wed
%RH When Heating...
b. Dehumidification – select the Cool
mode symbol.
Function: Auto
Manual
Step 21 - Select the Humidity function.
45%
xx%
100%
a. Auto – automatically sets the humidity
setpoint based on indoor temperature.
Cancel
Previous Next
NOTE: Auto mode requires an outdoor sensor.
b. Manual – manually set the humidity setpoint.
i. Select your desired indoor humidity percentage level.
Step 22 - Press Next.
NOTE: Steps 3-22 illustrate how to set a single day’s program schedule. You can copy this day to
subsequent days (see Copy Day section below), or set another day by repeating steps 3-22.
Copy Day
Step 23 - Press Copy.
Schedule
NAME
DAY
Schedule 3
Select day
to edit:
TIME
Mo
Tu
TEMPERATURE
FAN
We Th
Copy...
Fr
HUMIDITY
Sa
Su
Use Energy Saver
Cancel Save + Quit
Edit
Step 24 -
Copy Day to...
Select Day or Group to Apply Copied Day (We)
Mo
Tu
We Th
Fr
Sa
Su
Everyday
Weekdays
Select individual days, Weekdays,
Weekend or Everyday.
Step 25 - Press OK.
Step 26 - Repeat steps 23-25 to copy settings to
other days.
Weekends
Cancel
OK
Saving a Program Schedule
Step 27 - Select Save + Quit.
Johnson Controls Unitary Products
11
542937-UUM-A-1010
B. Deleting an Existing Program Schedule
Step 1 - Press Yes.
Delete?
Delete this schedule?
No
Yes
C. Viewing an Existing Program Schedule
Schedule Viewer
View
(Active in Calendar)
Schedule 3
Mo
Tu
We Th
Fr
Sa
Su
Awake
Day
Return
Sleep
73° 70°
6:00am
73° 70°
8:00am
70° 65°
5:00pm
73° 70°
10:00pm
Step 1 - Select Schedule to view by pressing left or
right arrows.
Step 2 - Select Day to view.
Step 3 - Press Close.
Close
D. Importing / Exporting Program Schedules
Step 1 - Select Import or Export functionality.
For Import
Step 2 - Insert the USB into the bottom of the thermostat when prompted.
Step 3 - When prompted that import is complete, remove USB from drive.
Step 4 - Select OK after import is complete.
For Export
Step 1 -
Step 2 - Insert the USB into the bottom of the thermostat when prompted.
Step 3 - When prompted that export is complete, remove USB from drive.
Step 4 - Select OK after export is complete.
E. Assigning Program Schedules to Calendar
Assign to Calendar
Winter
Spring
All Year
Schedule
Select Schedule:
Energy Saver
Schedule 1
Schedule 2
Schedule 3
Dec Jan Feb Mar Apr May
June July Aug Sep Oct Nov
Summer
Fall
Cancel
12
Done
Step 1 - Select Schedule to assign to calendar by
pressing up or down arrows.
Step 2 - Select individual months, Seasons, or All
Year.
Step 3 - Repeat steps 1-2 for each schedule's calendar assignment.
Step 4 - Press Done.
NOTE: In order to run a program schedule, it must
be assigned to the calendar.
Johnson Controls Unitary Products
542937-UUM-A-1010
TEMPERATURE OVERRIDE
Programmable Mode
11:07AM Thu 21 Jul
45°
72°
72°
Auto
Pick
Duration
Auto
Humidity 30%
65°
Menu
Set Duration
Hold until...
08 : 01
Cancelled
1. Press temperature adjustment arrows either
up or down until the desired override temperature setpoint is shown.
2. Press Pick Duration button.
3. Select the duration for running the temperature
override.
a. Until Cancelled – holds temperature until
cancelled.
b. Until specific Date & Time – holds temperature until specified date and time.
c. Until program schedule Next Event – hold
temperature until next schedule event.
PM
Next Event
8:00 am
OK
Cancel
Advanced Programmable Mode
11:07AM Thu 21 Jul
75°
50°
Pick
Duration
Quick
Quick
70°
85°
Menu
Alert: Change Filter
Set Duration
Hold until...
Cancelled
08 : 01
1. Press Thermometer icon.
2. Use the slider to set the desired override temperature.
3. Press Pick Duration button.
4. Select the duration for running the temperature
override.
a. Until Cancelled – holds temperature until
cancelled.
b. Until specific Date & Time – holds temperature until specified date and time.
c. Until program schedule Next Event – hold
temperature until next schedule event.
PM
Next Event
8:00 am
Cancel
OK
Quick Heat / Quick Cool
1. Press Thermometer icon.
2. Select Quick Heat / Quick Cool icon – runs heat/cool equipment at maximum capacity for 10
minutes.
Johnson Controls Unitary Products
13
542937-UUM-A-1010
SCHEDULE OVERRIDE
Advanced Programmable Mode
1. Press Schedule icon.
2. Select:
a. The current program schedule (NOW) event to extend the duration.
b. The desired program schedule (OVERRIDE) event to override with a future event.
c. The Set Vacation to setup a Vacation Override.
A. Extend Current Program Schedule Event
5:37PM Thu 21 Jul
Set Vacation...
NOW
Day
View Schedule...
Extend NOW or change to...
78° 70°
8:00am
Sleep
Awake
Day
82° 62°
10:00 pm
78° 70°
6:00 am
85° 62°
8:00 am
OK
Menu
To extend the current program schedule event's settings (temperature, fan, and humidity) beyond the
scheduled event time, perform the following:
Step 1 - Select current program schedule event
(NOW shown in highlighted box).
Step 2 - Press OK.
Step 3 - Select the duration for running the schedule override.
Step 4 - Until Cancelled – permanent hold.
a. Until specific Date & Time.
b. Until program schedule Next Event.
B . Change to Future Program Schedule Event
9:07AM Thu 21 Jul
Set Vacation...
View Schedule...
NOW
Awake
Day
Return
Sleep
73° 70°
9:00am
73° 70°
10:00 am
78° 64°
6:00 pm
70° 67°
11:30 pm
OK
Menu
OVERRIDE
Arrive home from work early? To initiate a future
program schedule event's settings (temperature,
fan, and humidity) prior to the scheduled event time,
perform the following:
Step 1 - Select desired program schedule event
(OVERRIDE shown in highlighted box).
Step 2 - Press OK.
C. Vacation Override
Vacation
For how long?
Leave 08
May
2009
10
AM
Return 10
May
2009
10
AM
Step 1 - Select number of Days or
Step 2 - Select Vacation Dates:
a. Leave Date - current month, day and year.
b. Return Date - current month, day and year.
c. Press Next.
Days 2
Cancel
14
Next
Johnson Controls Unitary Products
542937-UUM-A-1010
Step 3 - Adjust your Heating and Cooling setpoints.
Step 4 - Press Next.
Vacation
Set Temperatures
50%
65°
100%
76°
50°
Cancel
85°
Previous
Next
Step 5 - Adjust your Fan setting.
Step 6 - Press Next.
Vacation
Set Fan
Function:
Auto
Manual
Cancel
Previous
Next
Step 7 - Adjust your Humidity settings.
Step 8 - Press Done.
Step 9 - Press OK.
Vacation
Set Humidity
Mode:
Function:
When Heating...
Auto
Manual
45% 50%
15%
Cancel
Previous
Done
SPECIAL FEATURES
Equipment Status
Equipment Status feature is used to help you understand your heating and cooling system better.
Here are some of the highlights of this feature.
Johnson Controls Unitary Products
15
542937-UUM-A-1010
Equipment Conditions
Status
11:07AM Thu 21 Jul
Exit Service Mode
Touch
Touch ICON
ICON for
for aa detailed
detailed view
view
Heat Pump
OFF
Refresh
resh
1. Press Menu.
2. Press Status icon.
Thermostat
ON
Humidifier
ON
UV La
Lamps
ON
EAC
Installed
Not In
Furnace
Furna
ON
Accessories
Log
Back
Menu
Using the system map, you can determine your equipment conditions. The color GREEN means
your equipment is performing as expected without any concerns. YELLOW, that particular piece of
equipment requires some attention but not urgently. When equipment status is highlighted in RED, it
needs immediate attention. Equipment marked in a GRAY color is not installed and is offered to
maximize your comfort and indoor air quality. For more information on equipment highlighted in
GRAY color, contact your installing dealer for more details.
Equipment Operational State
For detailed information on the current operational state of your heating or cooling equipment, you
can refer to the Equipment Status screen. It displays status information about your indoor unit (air
handler or furnace) and your outdoor unit (heat pump or air conditioner) at any given time.
NOTICE
Not all equipment information is shown for all systems.
Equipment Service Reminders
This feature displays an alert to remind you to change the air filter, humidifier pad, UV lamps or service your electronic air cleaner. To activate, follow these steps.
1.
2.
3.
4.
Settings / Maintenance
Air Filter:
Cumulative Hours
Months
6 Months
Humidifier Pad:
Cumulative Hours
Months
Press Menu.
Press Settings icon.
Press Maintenance icon.
Air Filter, select either Cumulative Hours or
Months. Adjust the period per the manufacturer
recommendation.
15,000 Hours
Cancel
16
OK
Johnson Controls Unitary Products
542937-UUM-A-1010
Settings / Maintenance
Cumulative Hours
UV Lamps:
Months
6 Months
Electronic Air
Cleaner:
Cumulative Hours
Months
15,000 Hours
Cancel
OK
5. Humidifier Pad, select either Cumulative
Hours or Months. Adjust the period per the
manufacturer recommendation.
6. Using the bar to the right of the screen, scroll
down to view other equipment.
7. UV Lamps, select either Cumulative Hours or
Months. Adjust the period per the manufacturer
recommendation.
8. Electronic Air Cleaner, select either Cumulative Hours or Months. Adjust the period per the
manufacturer recommendation.
9. Press OK when you are done.
Expired Service Reminders
12:32 AM Thu 9/17
Event
Call Your Dealer:
1. Select action for expired Service reminder.
a. Reset – reset service alert timer.
b. Remind Later – specify days to notify later.
Replace UV lamps in 1 month
Model 1138
Log
Dealer
Remind Later
Reset
A. Reset
Step 1 - After replacing consumable, select YES to
reset the reminder timer.
Step 2 - Press OK.
Reset
Were the UV lamps replaced?
Cancel
Yes
B. Remind Later
Step 1 - To be reminded at a later date, set duration
of days using up and down arrows.
Step 2 - Press OK.
Alert
Remind me again in...
Days 08
Cancel
Johnson Controls Unitary Products
OK
17
542937-UUM-A-1010
Trilingual Communicating Control
Your Communicating Control’s language is preset to English. It comes equipped with 2 other languages to choose from. To switch to a different language, follow these steps.
1.
2.
3.
4.
5.
Settings / Language
Language
English
Español
Français
Cancel
Press Menu.
Press Settings icon.
Press Language icon.
Make your language selection.
Press OK.
OK
Temperature Format
Your Communicating Control’s temperature format is preset to Fahrenheit. To switch to Celsius temperature format, follow these steps.
1.
2.
3.
4.
5.
Settings / Temperature
Temperature °F/°C
Fahrenheit
Celsius
Cancel
Press Menu.
Press Settings icon.
Press Temp F/C icon.
Make your temperature format selection.
Press OK.
Done
Dealer Contact Information
Your installer dealer/contractor contact information can be stored in your Communicating Control.
To view your dealer/contractor contact information, follow these steps.
1. Press Menu.
2. Press Dealer icon.
18
Johnson Controls Unitary Products
542937-UUM-A-1010
Screen Lock
To prevent tampering with your Communicating
Control, the screen can be fully locked. To activate
the screen security setting, follow these steps:
Emergency
Heat
Humidity Status Settings
Fan
Tools
Dealer
Clean Schedule
Close
Alert: Change Filter
1. Press Screen Lock button on the Home screen
or
2. Press Menu, Press Settings icon, and Press
Security icon.
Settings
¿ ;ç
Date/Time
Security
View/Mode Temp °F/°C
Backlight
Language
Sound
Maintenance
OK
Settings / Security
Security
OFF
ON
Change PIN
Cancel
OK
5. Press OK.
Your screen security is now activated. Make sure
you remember your pin number.
Locked
Please enter PIN
8888
1
4
7
2
5
8
3
6
9
Bksp
0
Cancel
Johnson Controls Unitary Products
3. Press ON icon to activate screen lock settings.
4. Press OK.
a. You will be prompted to enter your new PIN
number if you have not already done so.
OK
19
Screen Cleaning
1. Press Menu.
Emergency
Heat
Fan
Dealer
Humidity Status Settings
Tools
Clean Schedule
Close
Alert: Change Filter
2. Press Clean icon to lock the screen for cleaning.
The screen will remain locked for 15 seconds to
allow you to clean the screen without changing
any settings. After 15 seconds, normal screen
operation will resume. If more time is needed for
cleaning, repeat steps 1 and 2 above.
TOUCH SCREEN DISABLED
OK to clean screen now.
:15
Press and Hold to Exit
NOTICE
Do not spray any liquid directly on the thermostat. Spray liquids onto a cloth, and then use
the damp cloth to clean the screen. Use water or household glass cleaner. Do not use
abrasive cleansers.
APPENDIX
Frequently Asked Questions and Answers.
Q: Next to Fan on the Home screen, Auto or On is shown. What does this mean?
A: The Fan is set for Auto (to run with equipment) or On (to circulate air in your home). See “Fan
Settings” on page 9 for more information.
Q: Why doesn’t the Communicating Control respond when I touch the keys?
A: Check to determine if the screen is in the Locked or Clean mode. See “Screen Lock” on page 28
or “Screen Cleaning” on page 29.
Subject to change without notice. Published in U.S.A.
Copyright © 2010 by Johnson Controls, Inc. All rights reserved.
Johnson Controls Unitary Products
5005 York Drive
Norman, OK 73069
542937-UUM-A-1010
Supersedes: Nothing