1
DIGITAL AUDIO PLAYER
USER
MANUAL
SMP-1GBEB
PLEASE READ THIS OPERATING MANUAL COMPLETELY BEFORE OPERATING
THIS UNIT AND RETAIN THIS BOOKLET FOR FUTURE REFERENCE.
100mm x 80mm
DEAR JENSEN
CUSTOMER
Selecting fine audio equipment such as the unit you've just purchased is only the start of your musical
enjoyment. Now it's time to consider how you can maximize the fun and excitement your equipment offers.
This manufacturer and the Electronic Industries Association's Consumer Electronics Group want you to get
the most out of your equipment by playing it at a safe level. One that lets the sound come through loud and
clear without annoying blaring or distortion and, most importantly, without affecting your sensitive hearing.
Sound can be deceiving. Over time your hearing "comfort level" adapts to higher volumes of sound. So what
sounds "normal" can actually be loud and harmful to your hearing. Guard against this by setting your
equipment at a safe level BEFORE your hearing adapts.
To establish a safe level:
! Start your volume control at a low setting.
! Slowly increase the sound until you can hear it comfortably and clearly and without distortion.
Once you have established a comfortable sound level:
! Set the dial and leave it there.
Taking a minute to do this now will help to prevent hearing damage or loss in the future. After all, we want you
listening for a lifetime.
We Want You Listening For a Lifetime
Used wisely, your new sound equipment will provide a lifetime of fun and enjoyment. Since hearing damage
from loud noise is often undetectable until it is too late, this manufacturer and the Electronic Industries
Association's Consumer Electronics Group recommend you avoid prolonged exposure to excessive noise.
Customer's Record:
The serial number of this product is found on the unit. You should note the serial number of this unit in the
space provided as a permanent record of your purchase to aid in identification in the event of theft of loss.
Model Number: SMP-1GBEB
Serial Number:
E1
100mm x 80mm
SAFETY INFORMATION
Read this user guide carefully to ensure proper use of the product and to avoid any danger or physical damage.
6
6
6
6
6
6
6
6
6
6
Do not use the Player in extremely hot, cold, dusty and moist environment.
Do not drop the Player, this could cause external damage or damage to internal components.
Do not repair the player by yourself, or it will cause damage.
Do avoid getting the MP3 player wet or drop it in water.
We don't suggest you to use the Player when driving or doing other things that you must fully concentrate in. It may
cause distraction.
When using your MP3 player, pay attention to your health, especially the power of hearing.
To avoid static electricity, do not operate the Player in extremely dry environment.
Always use the accessories provided by or approved by our company, also do not spray water on the player.
Please follow the right way to upload/download data, we won't be responsible for the lost of date due to wrong
operation.
Please backup important data onto your personal computer as repair or other causes may result in data loss.
COMPLIANCE WITH FCC REGULATIONS
This equipment has been tested and found to comply with the limits for a Class B digital device, pursuant to Part 15 of the FCC
Rules. These limits are designed to provide reasonable protection against harmful Interference in a residential installation.
This equipment generates, uses and can radiate radio frequency energy and, if not installed and used in accordance with
the instructions, may cause harmful interference to radio communications. However, there is no guarantee that interference
will not occur in a particular installation. If this equipment does cause harmful interference to radio or television reception,
which can be determined by turning the equipment off and on, the user is encouraged to try to correct the interference by
one or more of the following measures :
# Reorientate or relocate the receiving antenna.
# Increase the separation between the equipment and receiver.
# Connect the equipment into an outlet on a circuit different from that to which the receiver is connected.
# Consult the dealer or an experienced radio technician
for help.
NOTE: THE MANUFACTURER IS NOT RESPONSIBLE FOR ANY RADIO OR TV INTERFERENCE CAUSED BY
UNAUTHORIZED MODIFICATIONS TO THIS EQUIPMENT. SUCH MODIFICATIONS COULD VOID THE USER'S
AUTHORITY TO OPERATE THE EQUIPMENT.
E2
100mm x 80mm
WARNING
6
6
6
6
6
6
6
6
6
6
6
6
If the unit is not to be used for an extended period of time, remove the batteries.
Old or leaking batteries can cause damage to the unit and may void the warranty.
Only adults should replace batteries.
Replace the batteries when the unit stops operating properly.
Use only fresh batteries of the required size and recommended type.
Dispose of old batteries promptly and properly. Do not burn or bury them.
Non-rechargeable batteries are to be recharged under adult supervision.
Only batteries of the same or equivalent type as recommended are to be used.
Remove exhausted battery from the unit.
The supply terminals are not to be short-circuited.
Battery must be inserted with the correct polarity.
Do not dispose of batteries in fire, batteries may explode or leak.
INTRODUCTION
This device incorporates a portable WMA/MP3 Player, Voice Recorder and USB 2.0 Mass Storage Device.
Player Features:
6
Playback of MP3 (MPEG-1 Audio Layer-3) and WMA (Windows' Media Audio)
6
DRM (Digital Rights Management) for Content/Copy Protection
6
USB V2.0 Interface for Full Speed Downloads
6
1G MB Built-in Flash Memory
6
Support ID3 Tag
6
Backlit display
6
Digital Preset EQ: Natural, Rock, Pop, Classic, Soft, Jazz and DBB.
6
Voice Recording
6
Stereo FM Tuner with 20 Presets
System support:
- Supports Windows ME/2000/XP/VISTA.
- Supports Mac OS X (version 10.2.6 or above) without driver.
Note: To minimize damage from static electricity, avoid operating the player in an extremely dry household environment.
The product may malfunction and require user to reset the product.
E3
100mm x 80mm
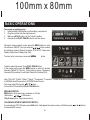
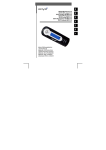
LOCATIONS OF CONTROLS
2
3
4
1
5
6
7
8
9
1. Headphone jack
2. HOLD button
3.
/ MENU (Confirm) /
button
4. Micro USB port
5 REC button
10
6. LCD display
7. A-B repeat / VOLUME adjust button
8. PLAY / PAUSE button
9. MIC (Microphone)
10. Battery Compartment ("AAA")
11. Neck strap hole
ACCESSORIES
IMPORTANT: Make sure you can locate the following items after opening the package.
- USB cable for PC connection and music synchronization
- Ear buds with neck strap
- Armband
- Heaphones adaptor
- User Manual
- "AAA "(UM-4) battery
E4
11
100mm x 80mm
BASIC OPERATIONS
Turn power on and play music
1. Install an AAA (UM-4) battery into the battery compartment.
2. Plug the ear buds into the earphone jack.
3. Make sure HOLD button is in the "Unlock" position
4. Press and hold PLAY / PAUSE button to turn the unit on.
During the music playback mode, press the MENU button to enter
into submenu (MENU 1) and you can press
/
button to select
the following choices: Repeat, Equalizer, SRS WOW, Tempo rate,
Replay, Replay times, Replay Gap, Exit).
To return to the main menu: press and hold
the
MENU
button.
To start or pause the music: Press PLAY / PAUSE button.
In the pause mode, press the MENU button to enter into another
submenu (MENU 2): Play List, Artists, Album, Genre, Composers,
License Inf (Information), Local folder, Delete file, Delete all, Exit.
Note: "Play List", "Artists", "Album", "Genre", "Composers", "License Inf." modes are effective in Media Device and no use
in USB Disk state (Please refer to SYSTEM/Online Device)
To change tracks: Short press
/
button.
To turn unit off: Press and hold PLAY / PAUSE button.
MENU NAVIGATION
MENU button: Enter main menu, submenu or Confirm.
Skip button (
/
): Shift menus.
Play / Pause button: Play, pause or return
VOLUME ADJUSTMENT (IMPORTANT NOTE!!!)
In music playing, RPL, FM mode, press A-B button, it will appear the volume column, at this time press
turn down/up the volume.
E5
/
button to
100mm x 80mm
BASIC OPERATIONS
(i)
REPEAT (MUSIC/MENU 1): Let you enjoy your music playback with repetition.
1. Select REPEAT mode and short press the MENU button to enter.
2. Short press
/
button to select your desired option (e.g. Normal, Repeat One, Folder, Repeat Folder,
Repeat All, Random and Intro.)
3. Short press the MENU button to confirm your selection.
(ii)
EQUALIZER (MUSIC/MENU 1): Let you select different music effect.
1. Select EQUALIZER mode and short press the MENU button to enter.
2. Short press
/
button to select your desired option (e.g. Natural, Rock, Pop, Classic, Soft, Jazz and
DBB)
3. Short press the MENU button to confirm your selection.
Note: EQ (EQUALIZER) mode is not obvious while playing WMA format music files.
(iii) SRS WOW MODE (MUSIC/MENU 1): To enhance your music playback with better spacious sense of
ambience.
1. Select "SRS WOW mode" and press the MENU button to enter.
2. Press
/
button and MENU button to select SRS WOW, Adjust WOW and Exit.
3. If you choose Adjust WOW, you can select: SRS 3D, TruBass, FOCUS and Exit.
(iv) TEMPO RATE (MUSIC/MENU 1): You can adjust you music playback tempo rate.
1. Select "TEMPO RATE" mode and press the MENU button to enter.
2. Press
/
button to adjust the playback rate: from -8 to 8.
3. Press the MENU button to confirm your setup.
Note: Only the MP3 format music supports "Tempo rate" function.
(v)
REPLAY (A-B) (MUSIC/MENU 1): You can define the certain music playback period to repeat.
1. Select "REPLAY" mode and press the MENU button to select "A" point.
2. Press the A-B button again to select "B" point, and press the A-B button again to start "REPLAY" mode.
3. Press the MENU button to cancel "REPLAY" mode.
(vi) REPLAY TIMES (MUSIC/MENU 1): You can select the A-B replay times.
1. Select "REPLAY TIMES" mode and press the MENU button to enter.
2. Short press
/
button to select the A-B REPEAT TIMES (from 1 to 10).
E6
100mm x 80mm
BASIC OPERATIONS
(vii) REPLAY GAP (MUSIC/MENU 1): You can select the time interval (in second) between each A-B replay.
1. Select "REPLAY GAP" mode and press the MENU button to enter.
2. Short press
/
button to select the A-B REPEAT GAP (from 1 to 10 seconds).
(viii) PLAYLIST, ARTISTS, ALBUMS, GENRE, COMPOSERS LICENSE INFO AND LOCAL FOLDER (MUSIC/MENU
2): You can select your favorite music by these divisions.
1. Select the division by pressing the MENU button.
2. Press the
/
button and MENU button to browse through the music you have by the selected division.
(ix) DELETE FILE AND DELETE ALL (MUSIC/MENU 2): You can delete file or all files by the operation of this unit.
1. During your music playback in pause mode, you can get in this option to delete unwanted file.
2. Press the
/
button and MENU button to confirm YES or NO
VOICE RECORD AND REPLAY OPERATIONS
There are two ways to enter REC (RECORD) mode.
(A) Press and hold the REC button to start recording in any function mode.
(B) Press and hold the MENU button to enter main menu.
1. Press
/
button to select "REC" menu.
2. Press the MENU button to enter.
3. Short press the MENU button to enter into sub menu (Local folder, Track mode, REC type and Exit.)
NOTE: Please refer to the "Record type" in "SYS" mode about the "Voice record"or "MP3 Music Record/WAV Music
Record". Different Record type has different Record submenu.
4. Short press the REC or PLAY / PAUSE button to start Recording.
5. Press PLAY / PAUSE button to pause or resume the recording.
6. To stop record and saving file, you have topress and hold the REC button.
RPL (PLAYBACK THE RECORDED FILES)
Select RPL mode in main menu and press the MENU button to enter. Then you can play the previously recorded files by
pressing the PLAY/ PAUSE button. Short press the MENU button can enter the submenu (Repeat, Tempo rate, Replay
and exit.) They have the similar operations to the Music playback.
E7
100mm x 80mm
FM RADIO OPERATIONS
1. Press and hold the MENU button to enter the main menu.
2. Select FM mode by pressing
/
button, and press the MENU button to confirm.
3. Short press the MENU button to enter the submenu (Save, Record, Delete, Delete all, Auto Search and Exit).
Note: There are 20 preset memory stations.
MANUALLY SEARCH THE FM STATIONS
1. Press
/
button to tune your favorite FM radio station by 0.1 Mhz steps.
2. Short press the MENU button to enter submenu.
3. Short press the
/
button and MENU button to select "save" menu and store the tuned FM station.
AUTOMATICALLY SEARCH THE FM STATIONS
1. Short press the MENU button to enter submenu.
2. Short press the
/
button and MENU button to select "Auto Search". You may need to wait several minutes to
let all detectable stations be found and saved.
RECORD THE FM RADIO
1. Select "Record" mode and short press the MENU button to enter.
2. Short press the REC button to start FM record.
3. Press and hold the MENU or PLAY / PAUSE button to save the FM record.
FOR OTHER SUBMENU OPTIONS:
Delete - delete the saved memory station.
6
Delete all - delete all saved memory stations.
6
E8
100mm x 80mm
SETTINGS
1.
2.
3.
4.
5.
Press and hold the MENU button to enter main menu.
Short press
/
button to select "SYS" mode.
Short press the MENU button to enter.
Press
/
button to choose individual settings (System Time, Record type, Backlight, Language, Power off,
Replay mode, Contrast, Online Device, Online Mode, Memory info., DRM Time, Protect setting and Exit).
Short press the MENU button to confirm any selected setting.
(i) SYSTEM TIME:
1. Press / button to select SYSTEM TIME mode.
2. Short press the MENU button to enter the System Time interface.
3. Press the A-B button to switch different time variable. (Year>Month>Day>Hour>Minute>Second)
4. Press
/
button to decrease / increase the number.
5. Then press the MENU button to save your setup.
Note: The system time of this unit will be displayed in Military Time (24-hr) format. For example, 1:00pm to 11:00pm will
appear as 13:00 to 23:00.
(ii) RECORD TYPE:
1. Select Record type and short press the MENU button to enter.
2. Short press
/
button to select the record type: Voice Record, WAV Music Record, MP3 Music Record.
Note: If you select "Voice Record", the recorded files will be played in RPL mode; Select "WAV Music Record" or
"MP3 Music Record" the recorded files will be played in music mode.
(iii) BACKLIGHT:
1. Select "Backlight" mode and press the MENU button to enter.
2. Press
/
button to adjust the screen backlight: from 0 to 30.
(iv) LANGUAGE:
1. Select language mode and short press the MENU button to confirm.
2. Short press
/
button to select the system languages: Simplified Chinese, English, Traditional Chinese,
Japanese and Korean.
3. Short press the MENU button to confirm.
E9
100mm x 80mm
SETTINGS
(v) POWER OFF:
Short Press
/
button to select: Off time/Sleep time (Off time: 0-60 Sec; Sleep time: 0-120 Min).
(vi) REPLAY MODE:
Short press
/
to select "Manual replay" or "Auto replay".
(vii) CONTRAST:
Press
/
button to adjust the screen contrast: from 1 to 16.
(viii) ONLINE DEVICE:
Press
/
button to select "Media Device" or "USB Disk".
NOTE: This is an important option. For the Synchronization of DRM WMA music, Media Device must be selected.
(ix) ONLINE MODE:
Press
/
button to select "Multi Drive", "Normal Only" or "Encrypted Only".
FOR OTHER SETTING MENU OPTIONS:
6
Memory info - It shows the internal memory status.
6
DRM Time - You can set your own DRM time for the DRM music playback.
6
Protect setting - It has Ear Protection, Earprotect level , Mode and Auto switch off.
E10
100mm x 80mm
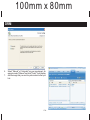
ADDING / REMOVING FILES / FOLDERS
You can use the player as a removable USB storage. (The Online Device in Setting menu must be USB Disk)
1. Connect the PC USB port and the MP3 USB port with the provided USB cable, your player will display:
2.
Add files/folders to the USB storage's folder. Your player will display:
3.
4.
5.
Open files/folders to transfer from your computer.
Open My Computer -> Removable Disk from the desktop.
Select the files/folders to transfer from your computer and draw and put them to a folder of your choice in the
Removable Disk (you also can transfer files on your PC to the player using the "Copy" and "Paste" functions).
6.
Delete MP3 files from the removable USB storage (use the "Delete" command). Your player will display:
E11
100mm x 80mm
ADDING / REMOVING FILES / FOLDERS
Remove the player from PC Note: Please follow the steps in case of damaging the player or data loss.
1.
2.
3.
Click the left mouse button on the icon
that is on the taskbar at the bottom right corner of the desktop.
Click the "Safely remove USB Mass Storage Device Drive (X:)" column.
Disconnect the player from your computer.
CAUTION:
Do not remove the player while files within the USB Mass Storage are being played on your computer.
6
Do not disconnect the player from your computer while transferring file, or it will cause damage to the player or data
6
loss.
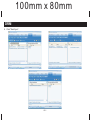
DRM
What is DRM?
It stands for digital rights management, a technology used to protect digital products from copyright infringement. When
a customer buys a DRM-protected music download, the download is encrypted specifically for that customer. To allow the
customer to use the file on a separate MP3 player they must link the DRM enabled player to Windows Media Player 10 and
link both applications. This allows the downloaded music file to then be used on a separate digital music player.
How to synchronize the DRM songs into your MP3 player?
1. Purchase DRM songs from the internet, and download them
into your computer.
2. Playback the songs that you downloaded, if it could be
played, the download is successful, or you need to
download again.
3. To make DRM function, the computer OS must be
Windows XP system SP2 or higher version, installed
with Windows Media player 10 or above, and have a
valid internet connection.
4. Connect the DRM MP3 player with your PC, your PC will
display:
E12
100mm x 80mm
DRM
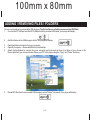
How to set your MP3 player into MTP mode?
In "SYS" menu select "Online Device" submenu and enter by pressing the MENU button, then press
select "Media Device" for DRM function.
5.
Click "OK" to start synchronization, your PC will display:
E13
/
button to
100mm x 80mm
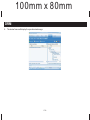
DRM
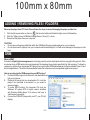
6.
7.
Select "Manual" or "Automatic" as your requirement, for
example, select "Manual" and click "Finish", it will display:
Add the songs that you want to synchronize into the sync
List.
E14
100mm x 80mm
DRM
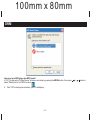
8. Click "Start Sync".
E15
100mm x 80mm
DRM
9. The dexter frame will display the synchronized songs.
E16
100mm x 80mm
SPECIFICATION
Compatible Operation System
Music Format
Equalizer
USB Interface
Internal Memory Size
LCD Display
Signal-to-noise Ratio
Audio Frequency Range
FM
File System
Battery
Operating Temperature
Windows VISTA/XP/2000/ME
Macintosh OS 10.2.6 or above
MP3 (MPEG 1.0/2.0/2.5, Layer 1/2/3, ID3 display
supported) and WMA (8Kbps340Kbps)
Natural, Rock, Pop, Classic, Soft, Jazz and DBB.
USB2.0(High speed), Mini 4-pin USB
1GB
132x32 Dot Matrix LCD with Blue LED Backlight
>85dB
20Hz-20KHz
87.50 ---- 108.00MHz
Support 20 preset stations
FAT16 and FAT32
One 1.5V (AAA/LR03) battery
O
O
O
O
5 C ----35 C (41 F---95 F)
SERVICE
Please refer to the instructions on the enclosed warranty card for returning your unit for service. When returning the unit,
please remove batteries to prevent damage to the unit in transit and/or from possible battery leakage. We are not
responsible for batteries returned with the product or for the cost of replacement.
Distributed by:
Spectra Merchandising International, Inc.
Chicago Industry Tech Park
4230 North Normandy Avenue
Chicago, IL60634, U.S.A.
Please have model number ready, for Customer Service, call 1-800-777-5331
Printed in China
E17