1
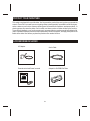
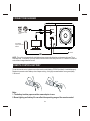
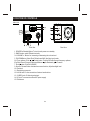
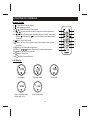
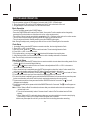
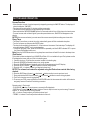
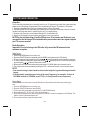
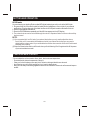
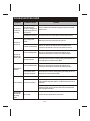
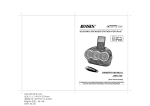
138 mm x 138 mm
DOCKING DIGITAL MUSIC SYSTEM WITH
SUB-WOOFER FOR iPod
OWNER'S MANUAL
JiMS-225
(iPod® Not Included)
PLEASE READ THIS OPERATING MANUAL COMPLETELY BEFORE OPERATING THIS
UNIT AND RETAIN THIS BOOKLET FOR FUTURE REFERENCE.
DEAR JENSEN® CUSTOMER
Selecting fine audio equipment such as the unit you've just purchased is only the start of your musical
enjoyment. Now it's time to consider how you can maximize the fun and excitement your equipment offers.
This manufacturer and the Electronic Industries Association's Consumer Electronics Group want you to get
the most out of your equipment by playing it at a safe level. One that lets the sound come through loud and
clear without annoying blaring or distortion and, most importantly, without affecting your sensitive hearing.
Sound can be deceiving. Over time your hearing "comfort level" adapts to higher volumes of sound. So what
sounds "normal" can actually be loud and harmful to your hearing. Guard against this by setting your
equipment at a safe level BEFORE your hearing adapts.
To establish a safe level:
Start your volume control at a low setting.
Slowly increase the sound until you can hear it comfortably and clearly, and without distortion.
Once you have established a comfortable sound level:
Set the dial and leave it there.
Taking a minute to do this now will help to prevent hearing damage or loss in the future. After all, we want you
listening for a lifetime.
We Want You Listening For a Lifetime
Used wisely, your new sound equipment will provide a lifetime of fun and enjoyment. Since hearing damage
from loud noise is often undetectable until it is too late, this manufacturer and the Electronic Industries
Association's Consumer Electronics Group recommend you avoid prolonged exposure to excessive noise.
Customer's Record:
The serial number of this product is found on its bottom cover. You should note the serial number of this unit in
the space provided as a permanent record of your purchase to aid in identification in the event of theft of loss.
Model Number: JiMS-225
Serial Number: ____________________
E1
IMPORTANT SAFETY INSTRUCTIONS
THE IMPORTANT SAFETY INSTRUCTIONS SHALL INCLUDE, AS APPLICABLE TO THE
APPLIANCE, STATEMENTS THAT CONVEY TO THE USER THE INFORMATION ITEMIZED
IN THIS PARAGRAPH:
1.Read these instructions - All the safety and operating instructions should be read before the appliance is
operated
2.Keep these instructions - The safety and operating instructions should be kept for future reference.
3.Heed all warnings - All warnings on the appliance and in the operating instructions should be adhered to.
4.Follow all instructions - All operation and use instructions should be followed.
5.Do not use this apparatus near water - The appliance should not be used near water; for example, near a
bathtub, washbowl, kitchen sink, laundry tub, in a wet basement, or near a swimming pool, and the like.
6.Clean only with dry cloth - The appliance should be cleaned only as recommended by the manufacturer.
7.Do not block any ventilation openings. Install in accordance with the manufacturer's instructions. - The
appliance should be situated so that its location or position does not interfere with its proper ventilation. For
example, the appliance should not be situated on a bed, sofa, rug, or similar surface that may block the
ventilation openings; or placed in a built-in installation, such as a bookcase or cabinet that may impede the
flow of air through the ventilation openings.
8.Do not install near any heat sources such as radiators, heat registers, stoves or other apparatus (including
amplifiers) that produce heat.
9.Do not defeat the safety purpose of the polarized or grounding-type plug. A polarized plug has two blades
with one wider than the other. A grounding type has two blades and a third grounding prong. The wide blade or
the third prong are provided for your safety. If the provided plug does not fit into your outlet, consult an
electrician for replacement of the obsolete outlet.
10.Only use attachments / accessories specified by the manufacturer
11.Use only with the cart, stand, tripod, bracket, or table specified by the manufacturer, or sold with the
apparatus. When a cart is used, use caution when moving the cart/apparatus
combination to avoid injury from tip-over.
12.Unplug this apparatus during lightning storms or when unused for a long
periods of time.
13.Power Sources - The appliance should be connected to a power supply
only of the type described in the operating instructions or as marked on the
appliance. Do not overload wall outlet.
14.Wall and Ceiling Mounting - The appliance should be mounted to a wall
or ceiling only as recommended by the manufacturer.
15.Power Lines - An outdoor antenna should be located away from power lines.
16.Object and Liquid Entry - Care should be taken so that objects do not
fall and liquids are not spilled into the Enclosure through openings.
17.Refer all servicing to qualified service personnel. Servicing is required when the apparatus has been damaged
in any way, such as power-supply cord or plug is damaged, liquid has been spilled or objects have fallen into the
apparatus, the apparatus has been exposed to rain or moisture, does not operate normally, or has been dropped.
18.Servicing - The user should not attempt to service the appliance beyond that described in the operating
instructions. All other servicing should be referred to qualified service personnel.
E2
COMPLIANCE WITH FCC REGULATIONS
This device complies with Part 15 of the FCC Rules. Operation is subject to the following two conditions:
(1)this device may not cause harmful interference, and
(2)this device must accept any interference received, including interference that may cause undesired
operation.
NOTE : This equipment has been tested and found to comply with the limits for a Class B digital device, pursuant
to Part 15 of the FCC Rules. These limits are designed to provide reasonable protection against harmful
interference in a residential installation. This equipment generates, uses and can radiate radio frequency
energy and, if not installed and used in accordance with the instructions, may cause harmful interference to
radio communications. However, there is no guarantee that interference will not occur in a particular installation.
If this equipment does cause harmful interference to radio or television reception, which can be determined by
turning the equipment off and on, the user is encouraged to try to correct the interference by one or more of the
following measures:
- Reorient or relocate the receiving antenna.
- Increase the separation between the equipment and receiver.
- Connect the equipment into an outlet on a circuit different from that to which the receiver is connected.
- Consult the dealer or an experienced radio/TV technician for help.
CAUTION:Changes or modifications not expressly approved by the party responsible for
compliance could void the user's authority to operate the equipment.
E3
PROTECT YOUR FURNITURE
This model is equipped with non-skid rubber 'feet' to prevent the product from moving when you operate the
controls. These 'feet ' are made from non-migrating rubber material specially formulated to avoid leaving any
marks or stains on your furniture. However certain types of oil based furniture polishes, wood preservatives , or
cleaning sprays may cause the rubber 'feet' to soften, and leave marks or a rubber residue on the furniture.
To prevent any damage t o your furniture we strongly recommend that you purchase small self-adhesive felt
pads, available at hardware stores and home improvement centers everywhere, and apply these pads to the
bottom of the rubber 'feet' before you place the product on fine wooden furniture.
ACCESSORIES INCLUDED
AC Adaptor
Aux In Cable
Remote control and Owner's manual
Adaptor for 40/60GB iPod Photo
DO CK IN G DI GI TAL MUS IC S YS TE M WI TH
SU B- WO OF ER F OR i Po d
OWN ER' S MAN UAL
JiM S-2 25
(iP od® N ot In clu ded )
PLE ASE R EAD T HIS O PER ATIN G MAN UAL C OMP LET ELY BEF ORE O PER ATIN G THI S
UNI T AND R ETAI N THI S BOO KLE T FOR F UTU RE RE FER ENC E.
TR
LE
EB
T
TR
SE
LE
EB
P1
/M
P2
N
TIO
ST
NC
FU
O
P4
P3
SL
EE
P
E4
CONNECTION DIAGRAM
CD/MP3/other audio
device
Power adaptor
Input:AC 100V-240V
50/60Hz
TV S-video jack
FM ANT
NOTE: This unit is not magnetically shielded and may cause color distortion on the screen of some TVs or
video monitors. To avoid this, you may need to move the unit further away from the TV or monitor if unnatural
color shifts or image distortion occurs
REMOTE CONTROL BATTERY
To use the remote control, please ensure the remote control battery CR2025 (included) is installed properly.
Replace the remote control battery when it stops working. It is highly recommended to use a good quality
Lithium cell.
Note:
1. The battery isolator paper must be removed prior to use.
2. Room lighting and battery life can affect the operating range of the remote control.
E5
LOCATION OF CONTROLS
Main Unit
RA DI O
VO L-
VO L+
FUNC TION
Sn
ooz e/ i mmer
D
Front View
Rear View
1. POWER On/Standby Button: To turn the unit power on or standby.
2. RADIO button: select FM radio instantly.
3/4. VOLUME +/- Button: for increasing or decreasing the volume level.
5. FUNTION Button: Select iPod, FM radio and AUX (Auxiliary input) mode.
6/8. Tune up/down; iPod
/
Control button: Tune the FM radio channel frequency up/down;
iPod Skip/ Search Forward / Backward Buttons.
for Backward,
for Forward.
7. IPod
button: iPod PALY/PAUSE.
9. Snooze / Dimmer Button: Activate the snooze function; Adjust backlight level.
10. IPod dock
11. iPod docking connector
12. AUX IN Jack: For the connection of external audio device.
13. S-VIDEO Jack: S-Video signal output.
14. DC Jack: To connect to external DC power supply.
15. FM Antenna
E6
LOCATION OF CONTROLS
Remote Control
1)
POWER On/ Standby button.
2)
Mute Speakers button.
3/4)
/
TREBLE level Up/Down button.
5/11)
/
Volume Up/Down button;Clock hour/minute adjustment.
6/7)
/
Radio Tune up/down; iPod skip/search forward / backward
button.
for Backward,
for Forward;Clock hour/minute setting
selection.
8)
button: iPod Play/Pause.
9) SET button: Set the clock and alarm time; alarm/wake to alarm mode
selection.
10) ST/MO button: FM Stereo/Mono selection.
12)13)14)17) P1 P2 P3 P4 button: Save the FM radio preset stations.
15)
button: Select Function mode.
16)
button: Sleep timer
18)
button: Snooze/Dimmer
TREBLE
TREBLE
FUNCTION
SLEEP
SNOOZE/DIMMER
LCD Display
RADIO
iPod
PM
AUX
PM
PM
FM
MHz
VOLUME
VOLUME
VOLUME
iPod Mode
FM radio mode
AUX mode
PM
Clock / Standby mode
(Back light is off)
PM
Alarm clock mode
E7
2
5
1
TREBLE
TREBLE
SET
ST/MO
3
7
11
6
9
12
15
18
4
8
P1
P2
P3
FUCTION
P4
SLEEP
SNOOZE/DIMMER
10
13
14
17
16
SETTING AND OPERATION
This unit operates using an AC-DC adaptor (included) with 12V DC / 1500mA output.
1. Firmly insert the DC plug of the AC-DC adaptor into the DC jack on the back of the unit.
2. Plug the adaptor into a convenient 120V AC/60Hz wall outlet.
Basic Operation
- Turn the unit ON by pressing the POWER button.
- Press the FUNCTION button to select iPod / Radio / Aux modes. Function modes can be changed by
pressing the Function button on either the main unit or on the remote control.
- The volume of the unit can be controlled by pressing the VOL +/- Buttons on the main unit or on the remote.
- The unit volume can be muted by pressing the MUTE button on the remote control.
- The unit can be switched to Standby mode by press the POWER button again.
Note: During Standby mode, pressing any button will turn on the LCD backlight for few seconds.
Clock Setup
1. In standby mode, press the SET button on remote controller, the hour digit starts to flash.
2. Press VOL+ or VOL- to set the hour;
3. After hour is set, press the
button to set the minutes. The minutes digit starts to flash.
4. Press VOL+ or VOL- to set the minutes;
5. During the setting, you may press
or
button to switch between hour and minutes;
6. After setting the time, it will automatically return to clock / standby mode within 5 seconds.
Note: The clock only can be set in standby mode.
Alarm Clock Setup
1. In standby mode, press the SET button twice on remote controller to enter alarm time setting mode.On the
display,
will turn on and will begin flashing.
2. Press and
button to select the hour or minutes to be adjusted and VOL+ or VOL- to increase or
decrease the respective value.
3. When alarm time set is completed,press the SET button again to select the “wake to” alarm mode.If the
unit returns to standby mode,press the SET button 3 times to get back to this setting.
4. Press
or
button to select any one among iPod / Radio / AUX
/ buzzer
as a “wake to ”alarm
5.The alarm will sound for one hour when alarm time reached unless it is turned off.
6.To cancel the alarm immidiatelly,press and hold the SNOOZE button for three seconds or press the power
button once,the alarm will shut off until the clock reaches the same alarm time on next day.
7.To permanent cancel the alarm,press and hold the SNOOZE button for 3 seconds.The
icon will
disappear on the display.
8.To activiate the daily alarm,press and hold the SNOOZE button for 3 seconds.The
icon will appear on
the display.
Note: 1. When “Wake to Radio” is selected, make sure that your desired radio station is tuned and proper
volume level is set.
2. The unit will automatically “wake to” buzzer alarm if “wake to iPod” is selected and no iPod is
docked.
3. When “Wake to AUX” is selected, please make sure your external device is turned on and playing
continuously in order for it to come on when the alarm time is reached.
4.Alarm may interrupted for a while if you dock the iPod into docking when alarm sounding.
E8
SETTING AND OPERATION
Snooze Function
- When the alarm sounds, it can be temporarily stopped by pressing the SNOOZE button. The display will
show the indicator “SNOOZE”.
- The alarm will be delayed for 10 minutes and then come again.
- This manual snooze operation can be repeated up to six times.
-Press and hold the SNOOZE/DIMMER button for 3 seconds andit will turn off the alarm clock and snooze.
-To cancel snooze,wait unit back light off, press the power button once, SNOOZE will disappear on the
display.
NOTE: When snoose activated,you must cancel the snooze manually before setting new alarm clock.
Sleep Timer
- The Sleep Timer allows you to set the unit to automatically power off after a selected sleep time.
- Turn the unit power on and press the SLEEP button.
- The sleep times available are between 10 ~ 90 minutes and increases 10 minute steps. The display will
show the indicator “SLEEP” and current sleep time.
- To switch off the Sleep Timer, press the SLEEP button repeatedly until the SLEEP indicates OFF or press
the Power ON/Standby button once.
Note: Press the SLEEP button twice during sleep timer count down will add 10 minutes to the sleep timer.
iPod Control
This model includes an adaptor for a 40/60GB iPod Photo. If it is not suitable for your iPod, please use the
iPod adaptor that came with your iPod in the docking area.
1. Carefully dock your iPod onto the connector located in the docking bay.
2. Press the POWER On/Standby button to turn on the system.
3. Press the FUNCTION button repeatedly until the iPod icon appears on the LCD display.
4. Press the PLAY/P/PAUSE
button to pause or resume iPod playback.
5. Press the VOL +/- buttons to adjust your desired volume level.
NOTE: The volume level cannot be adjusted using the iPod volume control after being
docked.
6. Press the SKIP/Search forward
or backward
buttons to skip to next or previous track.
7. Press and hold the SKIP/Search forward
or backward
buttons to search during playback.
8. The iPod is charging even during playback.
9. To remove your iPod, press and hold the PLAY/PAUSE button for three seconds to switch off the device
and gently remove it from the iPod docking connector.
Remote control - iPod control
- PLAY/PAUSE
button: Press to pause or resume the iPod playback.
- SKIP/Search Forward
/
backward buttons: Press to skip to the next or previous song; Press and
hold the or buttons to search during playback.
-VOL +/- buttons: Press to adjust your desired volume level.
- TREBLE +/- buttons: Press to adjust the treble level of the unit.
E9
SETTING AND OPERATION
Video Out
The S-video Out jack allows you to connect this unit to your TV and watch your video files or picture that are
loaded on your iPod photo, 5th generation iPod, 3rd generation iPod nano, iPod classic or iPod touch.
1. Dock the compatable iPod on the unit and make sure the unit is in iPod mode.
2. Connect one end of the S-video cable (not included) to the S-video jack on the back of the unit. Connect
the other end of the cable to the S-video IN jack of your TV or display device.
3. From the main iPod menu, select Videos>Settings>TV Out and select ON.
4. Switch your iPod back to the movie library and play the movie of your choice.
NOTE:For the initial docking of the iPod(3Gen) nano, iPod classic and iPod touch, you
may wait for the finishing of iPod authentication process then the video signal output to
your TV sceen or monitor.
Radio Operation
Important: Prior to listening to the FM radio, fully extend the FM antenna for the
maximum reception.
Radio Tuning
1. Press the POWER button to turn on the unit.
2. Press the FUNCTION button repeatedly until the RADIO icon appears on the LCD display.
3. To tune to a desired station manually, press the
or
buttons repeatedly until the station is reached.
4. To scan the station automatically, press and hold the
or
buttons on the unit. It can also be changed
by pressing the
or
buttons on the remote control.
5. Stereo and mono radio can be selected by pressing the ST / MONO button on the remote control.
6. The volume level can be adjusted by pressing the VOL+/- buttons on the unit or on the remote control.
NOTE:
- Use manual tuning to select weaker stations that might be bypassed during automatic
tuning.
- If the automatic search does not stop at the exact frequency, for example, it stops at
100.9MHz instead of 100.8MHz, press TUN +/- to finely tune the exact frequency.
Preset Station
The unit allows you to store up to 4 preset FM stations in the preset memories for easy recalling any
time.
1. Press the POWER button to turn on the unit.
2. Press the FUNCTION button to select RADIO.
3. Tune to your desire radio station by pressing Tune UP/DOWN buttons.
4. Select a button of P1, P2, P3 or P4 on the remote control.
5. Press and hold the button you want to program until PRESET number icon appears on LCD display. The
station is saved in the preset button now.
6. To store more stations, repeat the steps 4 and 5.
E10
SETTING AND OPERATION
AUX IN mode
You can also play non-docking iPods or other MP3/digital audio player on this unit via the AUX IN jack.
1. Plug one end of the 3.5mm audio cable (included) into the headphone or Line out jack of your external
audio device. Plug the other end of the cable into the unit AUX-IN jack located on the back of this unit
2. Switch on the external audio device.
3. Press the FUNTION button repeatedly until the AUX icon appears on the LCD display.
4. The volume level can now be controlled through the main unit. Operate all other functions on the auxiliary
device as usual.
NOTE:
(1) If you connected the Line Out Jack of your external device then you only need to adjust the volume
level of this unit. If connected to the Headphone Jack of your external device then you may need to
adjust both the volume control of your external device and the volume control of this unit to find the most
desirable volume setting.
(2) Press the Power button and turn off the unit when you finish listening. Don't forget to switch off the power
of your external device as well.
CARE AND MAINTENANCE
-
Do not subject the unit to excessive force, shock, dust or extreme temperature.
Do not tamper the internal components of the unit.
Clean your unit with a damp (never wet) cloth. Solvent or detergent should never be used.
Avoid leaving your unit in direct sunlight or in hot, humid or dusty places.
Keep your unit away from heating appliances and sources of electrical noise such as fluorescent lamps or
motors.
E11
TROUBLESHOOTING GUIDE
Symptom
The unit does
not respond
(no power)
iPod does not
dock properly
Possible Problem
Solution
AC Adaptor is not plugged
into a wall outlet or the
connector is not plugged into
the power supply jack on the
back of the unit.
Plug the AC adaptor into a wall outlet and plug the connector into the supply
jack on the unit.
Wall outlet is not functioning.
Plug another device into the same outlet to confirm the outlet is working.
Using no/wrong iPod
Adaptor.
Make sure the dock insert is the proper fit for your iPod.
iPod does not install properly.
Remove your iPod from the dock and check for obstruction on the
connectors in the dock and on your iPod. Then reseat it in the dock.
iPod is not installed properly.
Remove your iPod from the dock and check for obstruction on the
connectors in the dock and on your iPod. Then reseat it on the dock.
Your iPod is locked up.
Please make sure that your iPod is working properly before docking into the
unit. Please refer to your iPod manual for details.
iPod is not installed properly.
Remove your iPod from the dock and check for obstruction on the
connectors in the dock and on your iPod®. Then reseat it in the dock.
iPod is locked up/ frozen.
iPod battery has problem.
Please make sure your iPod is working properly before docking into the unit.
Please refer to your iPod manual for details.
Volume level is set too high.
Decrease the volume.
Sound source is distorted.
If the iPod original sound source is of poor quality, distortion and noise are
easily noticed with high-power speakers. Try a different audio source such as
a music CD.
iPod does not
respond to the
speaker system
iPod® does not
charge up
Sound is distorted
If you are using an external sound source like older generation of iPod, try
reducing the output volume on the device itself. Also try turning bass boost
OFF or change the EQ setting.
Unit gets warm
after extended
play at high
volume
This is normal.
Turn the unit off for a period of time or lower volume.
E12
SPECIFICATIONS
Power Requirement
Main Unit
DC input
DC 12V, 1500mA
Remote Control
1 X CR2025 Lithium Battery
Frequency Range
Radio
FM 87-108 MHz, 0.1 MHz tuning step
SERVICE
Please refer to the instructions on the enclosed warranty card for returning your unit for service. When
returning the unit, please remove batteries to prevent damage to the unit in transit and/or from possible
leakage. We are not responsible for batteries returned with the product or for the cost of replacement.
Distributed by:
SPECTRA Merchandising International, Inc.
Chicago Industry Tech Park
4230 North Normandy Avenue
Chicago, IL 60634, U.S.A.
Please have model number ready, for Customer Service, call 1-800-777-5331.
*The specification and external appearance of the set are subject to change without prior notice.*
Printed in China
E13