1
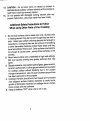
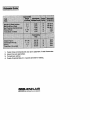
mJENN-AIR
Use and Care Manual
Rotiss-Kebab
Accessory
Model A0320
prLntedin U.S.A.
01995 Jenn-ArtCompany
Part No. 209483A
Cat. No. CRC320UC
3/95
Read before operating your
Rotiss-Kebab
All appliances - regardless of the manufacturer - have the potential
through improper or careless use to create safety problems,
Therefore the following safety precautions should be observed:
1. Never use your appliance for warming or heating the room,
2, Children should not be left alone or unattended in area where
3.
4.
5.
6.
7.
8.
9.
10.
11.
12.
appliance is in use, They should never be allowed to sit or
stand on any part of the appliance.
Wear proper apparel. Loose-fitting or hanging garments
should never be worn while using the appliance.
Do not repair or replace any part of the appliance unless
specifically recommended in this manual. All other servicing
should be referred to an authorized Jenn-Air Service Contractor.
Flammable materials should not be stored near surface units.
Do not use water on grease fires. Smother fire or flame or use
dry chemical or foam-type extinguisher.
Use only dry potholders. Moist or damp potholders on hot
surfaces may result in burns from steam. Do not let potholder
touch hot heating elements. Do not use a towel or other bulky
cloth.
Do not use the accessory for other than its intended use.
Caution should be used when inserting pointed spit or skewers
into food: protect your hand.
Keep cord of motor from touching the heating element.
Do not use aluminum foil to line surface unit drip pans or grill
basin. Installation of these liners may result in an electric
shock or fire hazard.
Do not soak or immerse removable heating elements in
water.
2
13. CAUTION - Do not store items of interest to children in
cabinets above cooktop - children climbingon the cooktop to
reach items could be seriously injured.
14. Do not operate with damaged cooking element after any
product malfunction until proper repair has been made.
Additional Safety Precautions to Follow
When using Other Parts of Your Cooktop
1. Do not touch surface units or areas near units. Surface units
or heating element may be hot even though they are dark in
color. Areas near surface units may become hot enough to
cause burns. During and after use, do not touch or let clothing
or other flammable materials contact these areas until they
have had sufficient time to cool. Other surfaces may become
hot enough to cause burns - among these surfaces is the
cooktop.
2. Never leave surface units unattended at high heat settings.
Boil over causes smoking and greasy spillovers that may
ignite,
3. Glazed cookware - only certaintypes of glass,glass-ceramic,
ceramic,earthenware,or otherglazed cookware are suitable
for cooktop surface without breaking due to the sudden
change in temperature. Useonly suchcookware as you know
has been approved for this purpose.
4. Cookware handles should be turned inward and not extend
over adjacent surface heating elements to avoid burns,
ignition of flammable materials and spillage due to unintentional contact with the cookware.
5. Keep all switches "OFF" when unit is not in use.
3
1. Before installinggrill components,be certain
surface controlsare in the OFF position.
2. Place the liner pan into an empty grill basin
with the openingnext to the terminal block.
The liner pan must be used since it supports
the grill element,
3. Position the grill element with the terminal
plug towards the terminal receptacle. Slide
the e_ementtowards the receptacle until the
terminal plug is completely engaged (See
Fig. A).
__
___
/l|_i_.ll/_/,,__
IYI//II__---_
_
Fig. A
,,_J_•
4. The grill element should rest flat on the side
ledges of the grill liner pan. Do not place
black grill grates over grill element,
5. Unfold front and rear supports of rotiss
accessory until each is standingvertically.
Next, lift the side paneland engagethetabs
at each end of side panel intothe slotsin the
front and rear supports (See Fig. B).
Fig. B
6, Set the accessorybase into the grill basin
withthe opensidenexttothe air grille. Thus,
the leg will fit intoa sloton the outsideedge
of the basin pan. (See Fig. C.)
7. Attachmotorto rear support byinsertingthe
two motor mounting studs into the two
keyhole-shaped slots in the support (See
Fig. D). The motor should be positioned
horizontally with the power cord pointed
upward. CAUTION: Position motor cord
aroundthe outside of the Rotiss-Kebabto
prevent motorcord from touching the grill
element. To turn on motor,plugcordintoan
outlet.
Fig, C
8. The accessory can now be assembledfor
use as a rotisserieor for preparingkebabs.
Fig. B
4
'
9. Attach the handle to the spit.
10. Kebab:
Use the spit, the two wire-wheels and the four double-prong skewers.
• Put the wire wheels on the spit by inserting the spit through the center hub of the
wheel. Align spokes of wheel with marks on spit before tightening the thumbscrew
(See Fig. E).
• Insert the completed spit into 1/4" square in motor; let the handle end rest in the
front support groove.
• Attach kebab skewers to the wheels by inserting the open ends into a loop on the
wheel near back of accessory (See Fig. F).
• The skewer handle is then snapped over the corresponding
near the spit handle. (See Fig. G).
Fig. E
Fig. F
loop on the whee_
Fig. G
11. Rotisserie; Use the spit and two of the four meat holders for supporting food.
(Note: Use the four meat holders for securing two cornish hens.)
• After spit has been inserted through meat and meat holders tightened, check the
balance (See Fig. H).
• Insert spit into 1/4" square in motor; let the handle end rest in the front support
groove. (See Fig. I) The handle of the spit is removable for easier storage.
Fig. H
Fig. I
12. Cleaning:
All parts (other than the motor) may be cleaned in the sink with
dishwashing detergent or in dishwasher. The motor may be wiped with a damp
dishcloth.
Kebabs make any meal festive. Lean lamb is the traditionalmeat for shisk kebabs, but
chunksof beef, pork, poultry,seafood and pre-cookedmeat are also good.
The followingare suggestionsfor creating kebabs:
• To allowcorrectspacingbetweenthe twoprongsonskewer,keepprongsas parallel
as possiblewhen puttingfood on skewers.
• Somefoods are easier to inserton skewersif first piercedwith a toothpick.
• Preheating the element is not necessary. Turn element on after food has been
placed on accessory.
• HI is the recommended settingfor cooking most kebabs. Skewer cooking is best
when done quickly as long cooking times tend to dry out kebabs.
• Cookingtimeswillalsovaryaccordingtothetypesoffoodsbeingcooked.
Thetime
range will be from 30 to 60 minutes on the HI setting. As an example pre-ceoked
polish sausage with canned fruit will cook in 30 minutes, whereas beef and raw
vegetables could take 60 minutes.
• Voltage differences may make cooking times slightly different at vadous times.
• Cut meat into one-inch cubes,
• Meat usually should be marinated to provide extra tenderness and flavor. Brush
marinade over the kebabs as they cook.
• For rare meat, cubes should be placed close together; for well-done, leave a space
between cubes.
• Avoid overcooking skewered meat; it is usually more tender and tasty when cooked
rare or medium.
• Raw or firm vegetables may need to be par[ially cooked so that they will be done
at the same time as the meat. Onions, potatoes and squash are best if parboiled
or partiallymicrowaved.
• Partially cooked bacon can be wrapped around vegetables such as squash or
mushrooms before placing on skewers to prevent drying out. While cooking, brush
kebabs with madnade, peanut or olive oil, herb butter or fruit juice to keep food
moist.
• Meat, vegetables or fruits can be alternated on the same skewer or skewered
separately due to differences in cooking time.
• There are numerous food combinations that can be used such as: beef cubes,
cherry tomatoes or tomato wedges, and green pepper squares; beef cubes,
zucchinislices, and mushrooms;ham and yam cubes and apple slices; polish
sausage, peaches, peers, and pineapples.
• The spit with skewerswill fit acrossthe sink while food is being added; making
preparationeasier.
6
Spit roastingis an excitingway to prepare meat and foodsthat need very littleattention
whilethey are cooking.
The followingare guidelinesfor usingthe rotisserie:
• Themeat mustbe well balancedand centeredonthe spit. Spearmeat, thenseoure
it with the two meat holders. Check the balance by holdingthe spit across your
palms. (See page 5, Fig. H). If the spitand meat do not rotate easily and evenly,
removethe meat holdersand meat on spit and try again.
• Poultryshouldbetrussedwiththelegsandwingsheldclosetothebody(nottucked
behindas onewouldusuallydo for oven roasting). Tie the birdat intervalsto make
sure it stays in a compactbundle.
• Rolled roasts and other large pieces of boneless meat should be tied firmly at
intervalswith heavy string.
• Don'tcrowdthe spit. There should be a few inchesfree at each end to allowroom
forthe meat holdersand also becausethe heatingelement does not runthe entire
lengthof the spit.
• The mostaccurateway to determinewhen the meat is cookedas desiredis to use
a meat thermometer. Turn off heat and the rotisseriemotor;insert thermometer
intothe thickestpart of the meat. Be certafnthat the thermometerbulb does not
touch bone, fat, or the spit itself.
• Sincethe meat willcontinueto cook after it has been removed from the heat, it is
advisableto take meat that is to be served rare or mediumoff the rotisseriewhen
the meat thermometerregisters5 degrees belowthe temperaturespecified.
• Letthe meat stand 10 to 15 minutesbefore carving. Meat will be easier to carve
and less juices will be lost if meat is alrowedto rest before being carved.
• Forbest results,buy top grademeat. There are many meat marinades whichwilt
help tenderizelass expensivecutsof meat.
• To help retainmeat juices,salt after cookingis completed.
• Differencesin voltagein differentareas may affectthe time needed to roast meat.
7
........
,_;,_
,_.__
-
....
_V
_,_ I
_i__I
......
_F
s_
1.
2.
3.
4.
Poultry times and temperatures vary due to placement of meat thermometer.
Above times are approximate.
Preheating is optional.
Roasts of approximately 3 to 4 pounds are best for rotissing.
JENN-AIR
3036 SHADELAND
• INDIANAPOLIS.
IN 46226-0901
I