1
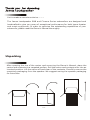
EMB / CINEMA SERIES SUBWOOFER
OWNER'S MANUAL
Contents
2 ..........Introduction and Unpacking
3 ..........A Word of Caution
4 ..........Features and Controls
6 ..........Connections and Installation
7 ..........Placement and Maintenance
8 ..........Trouble Shooting and Warranty
9 ..........Notes and Information
1
You've made a marvelous choice.........
The James Loudspeaker EMB and Cinema Series subwoofers are designed and
handcrafted to give you years of exceptional performance for both home theater
and music enjoyment. In order to optimize the outstanding capabilities of your
subwoofer, please read this Owner's Manual thoroughly.
Unpacking
After opening the top of the carton and removing the Owner's Manual, place the
carton and contents on a carpeted surface. Roll the carton and contents over into an
inverted position. Lift the carton off and clear of the contents. Carefully remove the
remaining packaging from the speaker. We suggest saving the speaker packaging
for future use.
FIGURE 1
2
CAUTION
RISK OF ELECTRICAL SHOCK
DO NOT OPEN
!
CAUTION: To reduce the risk of electric shock, do not remove cover (or back). No user-serviceable parts are
inside. Refer servicing to qualified service personnel.
The lightning flash with arrowhead symbol is intended to alert the user to the presence of uninsulated "dangerous
voltage" within the product's enclosure that may be of sufficient magnitude to constitute a risk of electric shock to
persons.
The exclamation point with arrowhead symbol is intended to alert the user to the presence of important operating
and maintenance (servicing) instructions in the literature 'accompanying the subwoofer.
1. Read Instructions - All safely and operating instructions should be read carefully before the subwoofer is
operated.
2. Retain Instructions - The safety and operating instructions should be retained for future reference.
3. Heed Warnings - All warnings on the subwoofer and in the operating instructions should be adhered to.
4. Follow Instructions - All operating and use instructions should be followed.
5. Water and Moisture - The subwoofer should not be used near water - for example, near a bathtub, washbowl,
sink, laundry tub, in a wet or damp basement, near a swimming pool, or the like.
6. Carts and Stands - The subwoofer should be used only with a cart or stand recommended by the manufacturer.
7. Wall or Ceiling Mounting - The subwoofer should be mounted to a wall or ceiling only as recommended by
the manufacturer.
8. Ventilation - The subwoofer should be situated so that its location or position does not interfere with its proper
ventilation. For example, the subwoofer should not be situated on a bed, sofa, rug, or similar surface that may block
the ventilation openings, or placed in a built-in installation such as a bookcase or cabinet that may impede the flow
of air through the ventilation openings.
9. Heat -The subwoofer should be situated away from heat sources such as heating radiators, heat registers,
stoves, or other subwoofers or components that produce heat.
10. Power Source - The subwoofer should be connected to a power supply only of the type described in the
operating instructions or as marked on the subwoofer itself.
11. Power Cord Protection - Power supply cords should be routed so that they are not likely to be walked on or
pinched by items placed upon them or against them, paying particular attention to cords at plugs, convenience
receptacles, and the point at which they exit from the subwoofer.
12. Caution - To prevent electrical shock, match wide blade of plug to wide slot, fully inserted.
13. Cleaning - The subwoofer should be cleaned only as recommended by the manufacturer.
14. Non-use Periods - The power cord of the subwoofer should be unplugged from the outlet when it is left
unused for extended periods of time.
15. Object and Liquid Entry - Care should be taken that objects will not fall and liquids will not be spilled on the
enclosure.
16. Damage Requiring Service - The subwoofer should be serviced by qualified personnel when:
a. the power supply cord or plug has been damaged.
b. objects have fallen or liquid spilled into the subwoofer.
c. the subwoofer has been exposed to rain.
d. the subwoofer does not appear to operate normally or exhibits a marked change in performance.
e. the subwoofer has been dropped or damaged.
17. Servicing - The user should not try to service the subwoofer beyond what is described in the operating
instructions.
18. Overloading - Do not overload wall outlets, extension cords, or integral convenience receptacles as this can
result in a risk of fire or electrical shock.
19. Replacement Parts - When replacement parts are required, be sure the service technician has used
replacement parts specified by the manufacturer or have the same characteristics as the original part.
Unauthorized substitutions may result in fire, electric shock or other hazards.
20. Safety Check - Upon completion of any service or repairs to this product, ask the service technician to
perform safety checks to determine that the product is in proper operating condition. All other servicing should be
referred to Qualified service personnel.
3
Features and Controls
• Inputs: Low-Level (Line-Level)
• Inputs: High-Level (Speaker-Level)
• Outputs: Low-Level (Line-Level)
• Switchable Phase Control 0 or 180
• Crossover Bypass Switch
• Variable Crossover Adjustment 40 - 150 Hz
• Gain Control
• Power Switch
• Signal-Sensing Auto Power On / Off
4
PHASE CONTROL - This switch pennits you to set or reverse the subwoofer
output to o (in phase) or 180 (out of phase). This will correct for possible
mismatch (boominess or lack of output) between the subwoofer and your main
speakers. The best way to make this adjustment is to listen and pay close
attention to the low frequency output. The correct position will produce clear and
even bass response. Most often the correct setting will be at "0".
CROSSOVER BYPASS SWITCH - If your A/V receiver or processor has an
internal 80 Hz or 100 Hz subwoofer crossover, we recommend setting this switch
to 'Bypass'.
VARIABLE CROSSOVER ADJUSTMENT - (set the Crossover Bypass Switch to
'Variable') The crossover adjustment control permits you to adjust the upper
limit of the subwoofer frequency response from 40 - 150 Hz. The subwoofer's
output response will roll off above the frequency limit you set. Set the crossover
frequency so that there is a smooth transition from the subwoofer to the main
speakers. Keep in mind that if your main speakers are smaller units with limited
low frequency output, you may want to select a higher frequency (i.e. 100-120
Hz) than you would with larger main speakers. If you have larger main speakers,
we suggest you start by setting the crossover adjustment at about 80 Hz, or
possibly lower.
GAIN CONTROL - To balance the output of your subwoofer to your main
speakers adjust the subwoofer Gain Control to the one-third (1/3) position and
then adjust accordingly.
POWER SWITCH - Master on/off power.
AUTOMATIC POWER ON / OFF - With the Power Switch on, the subwoofer will
automatically turn itself on (green light) when it senses an audio signal. After
about 10 minutes without a signal, the unit will automatically switch to a standby
mode (red light).
5
Connections and Installation
One of the features of James Loudspeaker subwoofers is that you have a number of
installation options. Please read the information in this section to determine which
installation option is best for your system.
!! TURN OFF THE POWER TO YOUR ENTIRE SYSTEM PRIOR TO INSTALLATION !!
LOW-LEVEL (LINE-LEVEL) CONNECTION - Install the supplied RCA type Yconnector to both Low Level Left and Right Inputs of the subwoofer. Use a single
RCA cable to connect your subwoofer directly to the Subwoofer Out on your A/V
receiver or processor. Note: You may utilize the subwoofer Low-Level Outputs to
hook up a second subwoofer.
HIGH-LEVEL (SPEAKER LEVEL) CONNECTIONS - You may choose to follow
Schematic A or B to connect your subwoofer using the High-Level Input terminals.
Use additional speaker wire as required for hook up. The schematic you select is a
matter of convenience as there will be no difference in performance between the
wiring options. Be sure to maintain correct polarity when making all connections:
Black (negative) to Black, Red (positive) to Red.
6
!! DO NOT USE BOTH THE LOW-LEVEL AND HIGH-LEVEL CONNECTIONS SIMULTANEOUSLY. !!
Placement
Subwoofers produce "non-directional" audio frequencies. Unlike other speakers,
they produce a sound that does not seem to come from any specific point but this
does not mean that you can place your subwoofer anywhere in the room - quite to
the contrary. Frequency response and output are influenced by placement.
As each room is acoustically unique it is recommended that you experiment with
the placement of your James subwoofer to optimize its' performance. Frequency
peaks and/or nulls (boominess or lack of bass response) can usually be corrected
with proper subwoofer placement. Often, finding the best subwoofer location for
a given room is to first temporarily place the subwoofer in the listening position
'sweet spot'. Walk around the room and listen at different locations for the best
'smooth' bass response. Place your subwoofer at or near that location.
When placing your subwoofer in its final position, make sure the speaker faces
forward, standing upright. Do not place the subwoofer near sources of heat
and/or moisture.
Care and Maintenance
Special care should be taken to not scratch or damage your subwoofer. Cloth grills
should be removed prior to cleaning and cleaned separately using a brush and low
lint collector. Avoid direct contact with the speaker drivers to prevent possible
damage. Never use paper products or anything abrasive to clean your speaker's
finish. Use a damp lint free cloth if necessary.
For high gloss finishes we recommend using a mild spray cleaner and soft flannel
cloth. Small surface scratches can often be buffed out with care by hand. Use only
liquid polish suitable for fine automotive finishes. CAUTION: The use of any
polishing product could cause the finish to rub through. Please contact James
Loudspeaker directly if you have any questions regarding the care and
maintenance of your speakers.
7
Trouble shooting
If a problem should occur, check the following:
•
•
•
•
•
Verify that your subwoofer is plugged in.
Is the Power Switch on?
Is the unit receiving an input signal?
Are all the subwoofer controls properly set?
If the power does not come on, unplug the unit and
then check the fuse.
If all the above has been checked and the unit still will not function, then you may
require a trained technician. Carefully pack your subwoofer in its original carton
and return it to your authorized James Loudspeaker dealer.
Warranty
Warranty information:
2 years electronics, 5 years speakers.
All specifications subject to change without notice.
8
Notes and Information
Product
Model No.
Serial No.
Finish
Purchase Price
Dealer's Name
Date of Purchase
Setup Notes
9
871 Cotting Court, Suite G, Vacaville, CA 95688
Ph. (707) 449-0880 | Fax (707) 449-0881
www.jamesloudspeaker.com