1
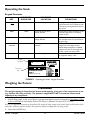
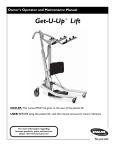
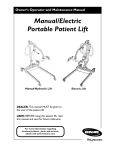
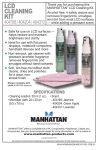
Jasmine™ Scale JLS5
Assembly, Installation and Operating Instructions
SAVE THESE INSTRUCTIONS
NOTE: Check all parts for shipping damage. In case of shipping damage, DO NOT use. Contact carrier/dealer for further instruction.
To ensure the safe installation, operation and use of the Jasmine Scale, these instructions MUST be followed:
WARNING
DO NOT use this equipment without first reading and understanding these instructions. If you are
unable to understand the Warnings, Cautions, and Instructions, contact distributor before
attempting to use this equipment, otherwise, injury or damage may result.
The weight capacity is limited to the lowest rated capacity of any one of the components in use (i.e.,
Patient Lift, Sling or Scale). The patient’s weight MUST NOT exceed the lowest rated capacity of any
component.
After ANY adjustments, repair or service and before use, make sure that all attaching component
parts are secure.
ACCESSORIES WARNING
Invacare products are specifically designed and manufactured for use in conjunction with Invacare
accessories. Accessories designed by other manufacturers have not been tested by Invacare and are
not recommended for use with Invacare products.
Kit Description
DESCRIPTION
Load Cell Assembly
Nylon Washers
Swivel Bar Pin
Locknut
Mounting Screw
Small Steel Washer
QUANTITY
1
2
1
1
1
1
Specifications
Weight Range:
Resolution:
Display:
Automatic Power Down:
Size:
Weight:
Power:
Battery Life:
Temperature Range:
Up to 500 lbs (226.7 Kg)
+/- 0.2 lbs (0.1 Kg)
Liquid Crystal Digital
Two minutes
5-3/4 L X 3-5/8 W X 4 H
.55 lbs
9-Volt Alkaline battery (included)
Approximately 1500 readings
50° To 104°F (10° To 40°C)
For more information regarding Invacare products, parts, and services, please visit www.invacare.com
Part No 1152408
1
Jasmine™ Scale JLS5
Removing the Swivel Bar/Cradle Attachment
NOTE: For this procedure, refer to FIGURE 1.
1. Remove the side rubber caps.
NOTE: Support the swivel bar or cradle attachment from underneath while removing the attaching hardware.
2. Remove the socket head screw, washer, bushings, top rubber cap, nylon spacers, washer and nut that attach the swivel bar or cradle attachment to the boom.
NOTE: When the attaching hardware is removed, the pin, washer and o‐ring will become loose.
NOTE: Save the socket screw, small steel washer and locknut to secure the Jasmine Scale to the boom.
NOTE: Save the remaining hardware for future use of the swivel bar or cradle attachment without the scale.
Top Rubber Cap
Washer
Nut
Bushing
Bushing
Washer
Socket Head Screw
Side Rubber Cap
Side Rubber Cap
Optional Cradle
Attachment
Nylon Spacer
Swivel Bar
Nylon Spacer
O-ring
Washer
Pin
Bottom Rubber Cap
FIGURE 1 Removing the Swivel Bar/Cradle Attachment
Jasmine™ Scale JLS5
2
Part No 1152408
Installing the Jasmine Scale
NOTE: For this procedure, refer to FIGURE 2.
WARNING
Patient and sling MUST be removed from the lift during ALL installation procedures.
1. Position the load cell assembly of the Jasmine Scale into the boom mounting bracket (Detail ʺAʺ of FIGURE 2).
2. Secure the Jasmine Scale to the boom mounting bracket with a bolt, washers, bushings, nylon washers, locknut and the top rubber cap. Securely tighten. Install the small rubber cap.
NOTE: Refer to Detail ʺAʺ of FIGURE 2 for washer and small rubber cap orientation.
NOTE: Ensure the shaft of the bolt passes through both sides of the boom mounting bracket.
3. Insert swivel bar pin with an o‐ring and a washer through the swivel bar (Detail ʺBʺ of FIGURE 2).
4. Align the mounting holes in the swivel bar pin with the mounting holes in the load cell assembly (Detail ʺBʺ of FIGURE 2).
5. Secure swivel bar pin to the load cell assembly with a screw and locknut. Tighten securely (Detail ʺBʺ of FIGURE 2).
WARNING
After ANY adjustments, repair or service and BEFORE use, make sure all attaching hardware is
tightened securely - otherwise injury or damage may occur.
6. Weigh the patient. Refer to Operating the Scale and Weighing the Patient in the Jasmine Patient Lift Owner’s Manual, Invacare P/N 1150704.
DETAIL “A”
Top Rubber
Cap
Locknut
Washer
Bushing
Nylon
Washers
Jasmine
Scale
Jasmine
Scale
Boom
Mounting
Bracket
Bushing
Washer
Bolt
DETAIL “B”
Screw
Locknut
Swivel Bar
Small
Rubber
Cap
O-Ring
Washer
Load Cell
Assembly
Swivel Bar Pin
FIGURE 2 Installing the Jasmine Scale
Part No 1152408
3
Jasmine™ Scale JLS5
Operating the Scale
Keypad Functions
INDICATOR
DISPLAYED
KEY
INDICATOR
LOCATION
DEFINITION
ON
OFF
OFF
Center of Display Window
Pressing this key will apply power to the
scale and turn the unit on. When the scale
is already on, pressing the button will turn
the unit off.
ZERO
ZERO
Lower Left Corner of the
Display Window
Pressing this key when the scale is on will
reset the weight shown in the display
window to zero.
UNITS
lb or kg
Upper Right Corner of the
Display Window
The function of this key is to change the
unit of measurement from pounds (lb) to
kilograms (kg).
LOCK
UNLOCK
LOCK
Lower Right Corner of the Display
Window
This key is used to LOCK or UNLOCK a
weight value in the display window.
NOTE: Weight displayed is a STORED
weight and not the current weight when
the key is used in the lock position.
N/A
LO BAT
Center of Display Window
Indicator is shown in the display window
to notify when battery is low.
Display
Window
Operation
Keys
Jasmine Scale
JLS5
CAPACITY 500 LB, 227 KG
FIGURE 3 Operating the Scale - Keypad Functions
Weighing the Patient
WARNING
The weight capacity is limited to the lowest rated capacity of any one of the components in use
(e.g. Patient Lift, Sling or Scale). The patient's weight MUST NOT exceed the lowest rated
capacity of any component.
1. Attach sling straps to the swivel bar. For proper attachment instructions refer to Attaching a Sling to the Swivel Bar in the Jasmine Patient Lift Owner’s Manual, Invacare P/N 1150704.
NOTE: For improved accuracy on the patient lift, attach all sling straps to the center hooks on both sides of the swivel bar. However, patient comfort may require a different configuration of sling straps.
2. Press the ON/OFF key.
Jasmine™ Scale JLS5
4
Part No 1152408
WARNING
DO NOT operate key strokes with pointed objects (e.g. pencils, pens, fingernails, etc.) Otherwise
damage to the key pad will result.
NOTE: The display will indicate the last weight that was measured. The word ʺLOCKʺ will be seen in the display box.
NOTE: The ZERO key is pressed in order to avoid capturing the weight of the sling and the hardware. If the ZERO key is not pressed the weight of the sling and the weight of the hardware will be included in the weight displayed. NOT ZERO‐ING OUT WILL GIVE A FALSE READING OF THE USERʹS TRUE WEIGHT.
3. Press the ZERO key. When the ZERO key is pushed the following will happen:
A. The scale will reset to zero and the word ʺZEROʺ will appear in the display.
B. The lock function will then be turned off and the word ʺLOCKʺ will disappear from the display.
NOTE: The scale is now active and continually updating the weight display.
4. Place the patient in the sling. For patient placement instructions refer to Operation in the Jasmine Patient Lift Owner’s Manual, Invacare P/N 1150704.
5. Activate the lift mechanism to raise the patient until they are completely supported by the lift. For patient lifting instructions, refer to Lifting the Patient in the Jasmine Patient Lift Owner’s Manual, Invacare P/N 1150704.
6. Note the weight display.
7. When the weight display becomes stable press the LOCK button to lock the weight display. This will be indicated by the word ʺLOCKʺ appearing in the display window. NOTE: Should it be necessary to unlock the weight while the patient is still supported by the lift, the UNLOCK button may be pressed. The weight will unlock and the word ʺLOCKʺ will disappear from the display window. The weight value will then be updated. Once the weight becomes stable the weight can be locked again by pressing the LOCK button.
NOTE: Stable being defined as the weight fluctuating ± two tenths of a pound. For example, a patient weighing one hundred lbs the scale will fluctuate between 99.8 and 100.2 until the LOCK key is pressed. Fluctuation of the weight displayed is normal as noted above. Press the LOCK button to lock the weight.
NOTE: The UNITS button can be pressed to toggle between units of pounds and kilograms. This is indicated by lb or kg appearing in the display window.
8. The lift may now be lowered and the sling removed from the patient.
NOTE: The patientʹs weight will continue to be seen in the display window. The display will turn off automatically after a two minute period of non‐use [no changes in weight exceeding five pounds (2 kilograms)]. You can NOT adjust the time delay for automatic shut off. After the display has turned off, the weight may be recalled by pressing the ON/OFF button. The unit can be turned off by pressing the ON/OFF button a second time. Part No 1152408
5
Jasmine™ Scale JLS5
Replacing the Battery
NOTE: For this procedure, refer to FIGURE 4.
NOTE: The scale is powered by a 9‐volt alkaline battery that should provide approximately 1500 readings before needing replacement.
When battery replacement is needed, LO BAT will appear on the display. Perform the following:
1. Slide the battery door open in the direction of the arrow.
2. Remove existing battery.
3. Install the NEW battery.
4. Reinstall the battery door.
Assembled
Scale
9V Battery
Battery
Door
Arrow
FIGURE 4 Replacing the Battery
Calibrate the Jasmine Scale
NOTE: For this procedure, refer to FIGURE 5 on page 7.
NOTE: The Jasmine Scale will be pre‐calibrated at the factory with the load cell. Should it be necessary to re‐calibrate the scale, follow the instructions outlined below.
1. The patient and the sling MUST be removed from the scale to properly calibrate the Jasmine Scale. Refer to Operation in the Jasmine Patient Lift Owner’s Manual, Invacare P/N 1150704, for further instructions.
2. For sling detachment instructions, refer to Lifting the Patient in the Jasmine Patient Lift Owner’s Manual, Invacare P/N 1150704.
3. Turn the scale display power on by pressing the ON/OFF key.
4. Rotate the Swivel Bar until the back of the scale display is visible.
5. Insert the tip of a paper clip or similar tool into the small hole on the back of the scale display and press the CAL button.
NOTE: Once the CAL button is pressed, “CAL1” will be seen in the display window.
6. Press the UNITS key. The display reads CAL2.
7. Press the LOCK/UNLOCK key. The display reads UNLD.
8. Press the ZERO key. The display reads LOAD.
9. Hang 200 pounds of calibrated weight from the scale and press the ZERO key.
10. Press the ZERO key. The display reads DONE.
Jasmine™ Scale JLS5
6
Part No 1152408
11. Remove the weight. Press the LOCK/UNLOCK key.
NOTE: The scale is now in test mode.
12. Press the ZERO key. The display reads 0.00 lb.
NOTE: The scale will now be in normal operation.
BACK VIEW OF SCALE DISPLAY
CAL button
FRONT VIEW OF SCALE DISPLAY
Display Window
MODEL JLS5
CAPACITY 500 lb, 227 kg
FIGURE 5 Calibrate the Jasmine Scale
Troubleshooting
SYMPTOM
Unit does NOT work properly.
PROBABLE CAUSE
Battery failure.
SOLUTION
Check battery. Replace if necessary.
Battery has been replaced and unit still does
NOT work properly.
Contact Invacare.
Display Codes
CAL
CALIBRATION REQUIRED ‐ Indicates improper stored calibration data, calibration is necessary.
OCAP
OVER CAPACITY ‐ Indicates a weight exceeding the capacity has been loaded on the scale.
Part No 1152408
7
Jasmine™ Scale JLS5
LIMITED WARRANTY
PLEASE NOTE: THE WARRANTY BELOW HAS BEEN DRAFTED TO COMPLY WITH FEDERAL LAW
APPLICABLE TO PRODUCTS MANUFACTURED AFTER JULY 4, 1975.
This warranty is extended only to the original purchaser/user of our products.
This warranty gives you specific legal rights and you may also have other legal rights which vary from state to
state.
Invacare warrants the products manufactured (excluding the 9V battery) to be free from defects in materials
and workmanship for a period of two years from the date of purchase. If within such warranty period any such
product shall be proven to be defective, such product shall be repaired or replaced, at Invacare’s option. This
warranty does not include any labor or shipping charges incurred in replacement part installation or repair of
any such product. Invacare’s sole obligation and your exclusive remedy under this warranty shall be limited to
such repair and/or replacement.
For warranty service, please contact the dealer from whom you purchased your Invacare product. In the event
you do not receive satisfactory warranty service, please write directly to Invacare at the address on the back
cover, provide dealer’s name, address, date of purchase, indicate nature of the defect.
Invacare Corporation will issue a serialized return authorization. The defective unit or parts MUST be
returned for warranty inspection using the serial number, when applicable as identification within 30 days of
return authorization date. DO NOT return products to our factory without our prior consent. C.O.D.
shipments will be refused; please prepay shipping charges.
LIMITATIONS AND EXCLUSIONS: THE FOREGOING WARRANTY SHALL NOT APPLY TO SERIAL
NUMBERED PRODUCTS IF THE SERIAL NUMBER HAS BEEN REMOVED OR DEFACED, PRODUCTS
SUBJECTED TO NEGLIGENCE, ACCIDENT, IMPROPER OPERATION, MAINTENANCE OR STORAGE,
PRODUCTS MODIFIED WITHOUT INVACARE’S EXPRESS WRITTEN CONSENT (INCLUDING, BUT
NOT LIMITED TO, MODIFICATION THROUGH THE USE OF UNAUTHORIZED PARTS OR
ATTACHMENTS; PRODUCTS DAMAGED BY REASON OF REPAIRS MADE TO ANY COMPONENT
WITHOUT THE SPECIFIC CONSENT OF INVACARE, OR TO A PRODUCT DAMAGED BY
CIRCUMSTANCES BEYOND INVACARE’S CONTROL, AND SUCH EVALUATION WILL BE SOLELY
DETERMINED BY INVACARE. THE WARRANTY SHALL NOT APPLY TO PROBLEMS ARISING FROM
NORMAL WEAR OR FAILURE TO ADHERE TO THE INSTRUCTIONS IN THIS MANUAL.
THE FOREGOING WARRANTY IS EXCLUSIVE AND IN LIEU OF ALL OTHER EXPRESS WARRANTIES.
IMPLIED WARRANTIES, IF ANY, INCLUDING THE IMPLIED WARRANTIES OF MERCHANTABILITY
AND FITNESS FOR A PARTICULAR PURPOSE, SHALL NOT EXTEND BEYOND THE DURATION OF THE
EXPRESSED WARRANTY PROVIDED HEREIN AND THE REMEDY FOR VIOLATIONS OF ANY IMPLIED
WARRANTY SHALL BE LIMITED TO REPAIR OR REPLACEMENT OF THE DEFECTIVE PRODUCT
PURSUANT TO THE TERMS CONTAINED HEREIN. INVACARE SHALL NOT BE LIABLE FOR ANY
CONSEQUENTIAL OR INCIDENTAL DAMAGES WHATSOEVER.
SOME STATES DO NOT ALLOW EXCLUSION OR LIMITATION OF INCIDENTAL OR CONSEQUENTIAL
DAMAGE, OR LIMITATION ON HOW LONG AN IMPLIED WARRANTY LASTS, SO THE ABOVE
EXCLUSIONS AND LIMITATIONS MAY NOT APPLY TO YOU.
THIS WARRANTY SHALL BE EXTENDED TO COMPLY WITH STATE OR PROVINCIAL LAWS AND
REQUIREMENTS.
Invacare Corporation
www.invacare.com
USA
One Invacare Way
Elyria, Ohio USA
44036-2125
800-333-6900
Canada
570 Matheson Blvd. E Unit 8
Mississauga Ontario
L4Z 4G4 Canada
800-668-5324
All rights reserved. Trademarks are identified
by ™ and ®. All trademarks are owned by or
licensed to Invacare Corporation unless
otherwise noted.
©2008 Invacare Corporation
Part No 1152408
Rev B - 10/08