1
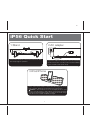
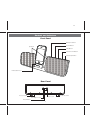
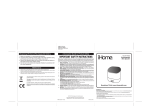
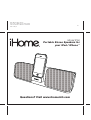
iP56 IB in English version
Print color : Black text on white paper
Size of manual: 178mmW x 178mmH
March 26,10
P1
Model iP56
Portable Stereo Speakers for
your iPod / iPhone ®
Questions? Visit www.ihomeintl.com
P3
Table
Tableof
of Contents
Contents
iP56 Quick Start
1
Controls and Indicators
2
Using the iP56
3-4
A Consumer Guide to Product Safety
5
Trouble Shooting
6
Warranty Information
7
This product bears the selective sorting symbol for waste electrical and electronic equipment
(WEEE).
This means that this product must be handled pursuant to European Directive 2002/96/EC in order
to be recycled or dismantled to minimize its impact on the environment.
For further information, please contact your local or regional authorities.
Electronic products not included in the selective sorting process are potentially dangerous for the
environment and human health due to the presence of hazardous substances.
and
are registered trademarks of SRS Labs, Inc.
TruBass and WOW technologies are incorporated under license from SRS Labs, Inc.
P4
Maintenance
• Place the unit on a level surface away from sources of direct sunlight or excessive heat.
• Protect your furniture when placing your unit on a natural wood and lacquered finish. A cloth or other protective material
should be placed between it and the furniture.
• Clean your unit with a soft cloth moistened only with mild soap and water. Stronger cleaning agents, such as Benzene,
thinner or similar materials can damage the surface of the unit.
P5
iP56 Quick Start
1:Stand
2:AC adapter
RESET
R ESET
TEST
T EST
Fold out the stand feet on the bottom of the iP56, then
turn unit up right for operation.
Plug the AC adapter into the DC jack on the rear of the iP56
and the other end into a working outlet. The internal battery
(and docked iPhone/iPod) will charge.
3:iPod/iPhone
Press on the iHome name to release the retracting dock on the
front of the unit. Gently dock your iPhone or iPod. Press the
Button to turn the iP56 on. Access iPod play mode on your
iPhone or iPod to listen to audio. When connected to AC power
or when the internal battery is fully charged, the dock will charge
your iPhone or iPod until completely charged.
1
P6
Controls and Indicators
Front Panel
Battery Indication
Power Button
Speakers
SRS Button
Volume Down Button
Volume Up Button
Retractable Dock
Rear Panel
Fold out stand
Line-in Jack
AC Adaptor Jack
Reset Button
2
Fold out stand
P7
Using the iP56
Charging & Playing iPhone and iPod
The iP56 has a retracting dock to play and charge your iPhone or iPod while connected
to AC power (it will ALSO charge when operating on the internal rechargeable battery
and iP56 is powered on). The dock will charge your iPhone or iPod until completely
charged then stop charging.
1. Make sure the unit is connected to a working power source (AC adaptor is connected
or internal battery is charged).
2. Press on the iHome name below the dock to release and access the dock (press
back into unit when not in use).
3. Gently press your iPhone or iPod onto the dock. Do not force or use undue pressure.
Make sure your iPhone or iPod is not in a case or “skin”.
4. Press the
Button located on top of the iP56 to turn the unit on. Place your
iPhone or iPod in play mode. Press the
or
Buttons located on top of the
unit to adjust the system volume. Press the SRS™ Button for enhanced bass
response.
Dock Release
Note: Docking an already playing iPhone or iPod will also turn the iP56 on.
RESET
R ESET
TEST
T EST
aux-in
Charging the Internal Battery
The iP56 has an internal rechargeable lithium ion battery. The battery condition indicator
is located on top of the unit. When fully charged, the indictor will glow steadily. When
the battery needs charging, the indicator will flash. To charge, connect the iP56 to a working AC outlet.
End-Of-Life Battery Disposal Instructions
The iP56 uses an internal Lithium-ion battery that may be recharged hundreds of times and should last the lifetime of the
device. The rechargeable battery is also recyclable. The battery is permanently sealed inside the unit and is not consumer
replaceable. If you find that the battery in your iP56 will no longer maintain a charge, please contact us at www.ihomeaudio.com
for repair information. DO NOT attempt to replace the battery yourself. If you decide that you do not want to have your unit
repaired, please do not dispose of the unit with your normal household trash. Contact your local recycling center for information
on the proper disposal of products containing rechargeable batteries. In addition, many electronics stores, possibly including
the store where you purchased your unit, are now accepting used electronics products containing recyclable batteries and
other hazardous materials, for proper disposal and/or recycling.
Caution: The Battery used in this device may present a risk of fire, explosion or chemical burn if mistreated
Battery shall not be exposed to excessive heat such as fire, or the like. Do not use or charge the battery if it appears to be
leaking, discolored, deformed, or in any way abnormal. Do not leave your battery discharged or unused for extended periods
of time. When batteries are misused, they may explode or leak, causing burns and personal injury. If your battery leaks, use
normal precaution and cease using the product right away.
3
P8
Using the iP56
Using the Aux Line-in Jack
The iP56 has an aux line-in jack located on the back of the unit to play other audio devices.
1. Connect one end of a standard 3.5mm audio cable (available at www.ihomeaudio.com) to the aux line-in jack and the
other end into the headphone or line-out jack on your audio device.
2. Press the
Button on the iP56 to turn it on. Make sure your device is turned on, too.
3. Put your device into play mode. Press the
or
Buttons to adjust the system volume. You may need to adjust the
volume on your device, too.
4.Press the
Button to turn the iP56 off. Remember to turn your device off, too.
Note: Do not play an audio device through the aux line-in jack while an iPhone or iPod is playing in the dock or you will hear
both at once.
Resetting the iP56
Your iP56 was designed with a special surge protection circuit to prevent permanent damage to the
unit in the event of an unexpected power surge. If your unit appears to be ‘locked up’ and is not
operating normally, and you know that the battery is properly charged, use a straightened paper clip,
toothpick, or similar object to press the RESET button, located on the back panel next to the AC
jack. This will unlock the unit and restore the original factory default settings.
Reset button located
on back of unit
4
P9
A Consumer Guide to Product Safety
When used in the directed manner, this unit has been designed and manufactured to ensure your personal safety. However,
improper use can result in potential electrical shock or fire hazards. Please read all safety and operating instructions carefully
before installation and use, and keep these instructions handy for future reference. Take special note of all warnings listed in
these instructions and on the unit.
1. Water and Moisture – The unit should not be used near water. For example: near a bathtub, washbowl, kitchen sink,
laundry tub, swimming pool or in a wet basement.
2. Ventilation – The unit should be situated so that its location or position does not interfere with its proper ventilation. For
example, it should not be situated on a bed, sofa, rug or similar surface that may block ventilation openings. Also, it
should not be placed in a built-in installation, such as a bookcase or cabinet, which may impede the flow of air through
the ventilation openings.
3. Heat – The unit should be situated away from heat sources such as radiators, heat registers, stoves or other appliances
(including amplifiers) that produce heat.
4. Power Sources – The unit should be connected to a power supply only of the type described in the operating instructions
or as marked on the appliance.
5. Power-Cable Protection – Power supply cables should be routed so that they are not likely to be walked on or pinched
by items placed upon or against them. It is always best to have a clear area from where the cable exits the unit to where
it is plugged into an AC socket.
6. Cleaning – The unit should be cleaned only as recommended. See the Maintenance section of this manual for cleaning
instructions.
7. Objects and Liquid Entry – Care should be taken so that objects do not fall and liquids are not spilled into any openings
or vents located on the product.
8. Attachments – Do not use attachments not recommended by the product manufacturer.
9. Lightning and Power Surge Protection – Unplug the unit from the wall socket and disconnect the antenna or cable
system during a lightning storm or when it is left unattended and unused for long periods of time. This will prevent damage
to the product due to lightning and power-line surges.
10. Overloading – Do not overload wall sockets, extension cords, or integral convenience receptacles as this can result in
a risk of fire or electric shock.
11. Damage Requiring Service – The unit should be serviced by qualified service personnel when:
A. the power supply cable or plug has been damaged.
B. objects have fallen into or liquid has been spilled into the enclosure.
C. the unit has been exposed to rain.
D. the unit has been dropped or the enclosure damaged.
E. the unit exhibits a marked change in performance or does not operate normally.
12. Periods of Nonuse – If the unit is to be left unused for an extended period of time, such as a month or longer, the power
cable should be unplugged from the unit to prevent damage or corrosion.
13. Servicing – The user should not attempt to service the unit beyond those methods described in the user’s operating
instructions. Service methods not covered in the operating instructions should be referred to qualified service personnel.
Questions? Visit www.ihomeintl.com
5
P10
Trouble Shooting
Symptom
Unit doesn’t respond
(no power)
Possible Problem
Solution
AC adaptor isn’t plugged into a wall outlet
or the connector is not plugged into the
power supply jack on the back of the dock
Plug the AC adaptor into a wall outlet and plug the
connector into the supply jack on the unit
Wall outlet is not functioning or switched off
Plug another device into the same outlet to confirm the outlet
is working. Make sure any associated power switch is ON
Charge internal battery by connecting AC adaptor to
working outlet until battery indicator glows steadily.
Battery is weak/ dead
iPod/iPhone does not
dock properly
iPod/iPhone not docked properly
Remove your iPod/iPhone from the dock and check for
obstruction on the connectors in the dock and on your
iPod/iPhone. Make sure there is no “skin” or case on the
iPod/iPhone. Then reseat it in the dock.
iPod/iPhone does
not respond to the
unit
iPod/iPhone is not docked properly
Remove your iPod/iPhone from the dock and check for
obstruction on the connectors in the dock and on your
iPod. Then reseat it in the dock.
Your iPod/iPhone software is too old
Upgrade software on your iPod/iPhone via iTunes
iPod/iPhone is locked up
Please make sure your iPod/iPhone is working properly
before docking into the unit. Please refer to your
iPod/iPhone manual for details.
Using 1st or 2nd generation iPod, iPod
shuffle or other devices.
Unit cannot control those iPod models or other devices.
Use the Line-in jack to play these devices.
If your iPod/iPhone is not used for some
time, it may enter deep sleep mode
Press the Menu button on your iPod/iPhone
iPod/iPhone battery is run down or is too
weak
Charge your iPod/iPhone for about 5 minutes
iPod/iPhone does not
come on immediately
Insert the end of a paperclip or similiar into the Reset port
located next to the AC jack and press in for a few seconds
to restore the unit to factory default settings. Doing so will
overwrite any current settings.
Unit operation is erratic Unit requires reset
6
P12
iP56-032610-A
Printed in China