1
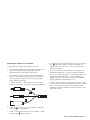
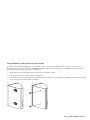
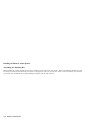
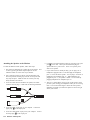
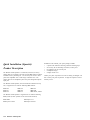
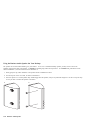
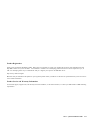
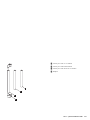
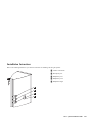
Business Audio Speaker User's Guide OPTIONS by IBM Note: If you are using this product in the United States, Canada, or Puerto Rico, be sure to read the information under Appendix B, “Product Warranty” on page 2-3 before using this information and the product it supports. For all other countries, the warranty terms and conditions applicable in the country of purchase are available from IBM or your reseller. First Edition (May 1998) The following paragraph does not apply to the United Kingdom or any country where such provisions are inconsistent with local law: INTERNATIONAL BUSINESS MACHINES CORPORATION PROVIDES THIS PUBLICATION “AS IS” WITHOUT WARRANTY OF ANY KIND, EITHER EXPRESS OR IMPLIED, INCLUDING, BUT NOT LIMITED TO, THE IMPLIED WARRANTIES OF MERCHANTABILITY OR FITNESS FOR A PARTICULAR PURPOSE. Some states do not allow disclaimer of express or implied warranties in certain transactions, therefore, this statement may not apply to you. This publication could include technical inaccuracies or typographical errors. Changes are periodically made to the information herein; these changes will be incorporated in new editions of the publication. IBM may make improvements and/or changes in the product(s) and/or the program(s) described in this publication at any time. This publication was developed for products and services offered in the United States of America. IBM may not offer the products, services, or features discussed in this document in other countries, and the information is subject to change without notice. Consult your local IBM representative for information on the products, services, and features available in your area. Requests for technical information about IBM products should be made to your IBM reseller or IBM marketing representative. Copyright International Business Machines Corporation 1998. All rights reserved. Note to U.S. Government Users — Documentation related to restricted rights — Use, duplication or disclosure is subject to restrictions set forth in GSA ADP Schedule Contract with IBM Corp. Contents Product Registration About This Book . . . . . . . . . . . . . . . . . . . . . . iv . . . . . . . . . . . . . . . . . . . . . . . . Part 1: Quick Installation Guide Part 2: Appendixes v . . . . . . . . . . . . . . . . . . . . . . . . . . . . . . . . . . . . . . . . . . . . . . . . 1-1 . . . . . . . . . . . . . . . . . . . . . . . . . . . . . . . . . . . . . . . . . . . . . . . . . . . . . . . . . 2-1 Appendix A. Help and Service Information Step 1: Problem Solving . . . . . . . . . . Step 2: Preparing for the Call . . . . . . . . Step 3: Placing the Call to IBM . . . . . . . . . . . . . . . . . . . . . . . . . . . . . . . . . . . . . . . . . . . 2-2 2-2 2-2 2-2 Appendix B. Product Warranty Appendix C. Notices . . . . . . . . . . . . . . . 2-3 . . . . . . . . . . . . . . . . . . . . . 2-6 Appendix D. Trademarks Copyright IBM Corp. 1998 . . . . . . . . . . . . . . . . . . 2-6 iii Product Registration Thank you for purchasing OPTIONS by IBM. Please take a few moments to register your product and provide us with information that will help IBM to better serve you in the future. Your feedback is valuable to us in developing products and services that are important to you, as well as in developing better ways to communicate with you. Register your option on the IBM Web site at: http://www.pc.ibm.com/register IBM will send you information and updates on your registered product unless you indicate on the Web site questionnaire that you do not want to receive further information. iv Business Audio Speaker About This Book This book contains installation and usage instructions for the Business Audio Speaker, and includes the following parts: Part one contains installation instructions in the following languages: English German French Spanish Japanese Italian Brazilian Portuguese Part two contains help and service information, the product warranty, notices, and trademarks. Note: The illustrations in this manual might be slightly different from your hardware. v vi Business Audio Speaker Part 1: Quick Installation Guide In addition to this manual, your option package includes: Product Description The Business Audio Speaker is a monaural (non-stereo) accessory speaker that you can attach to the side of some IBM monitors with the included accessory mounting bar. The accessory bar comes in three parts and is adjustable to fit a wide range of monitor sizes. The speaker also has two headphone jacks and a pass-through microphone input jack. The Business Audio Speaker, when used with the included accessory bar, is supported for use with the following IBM monitors: IBM G42 IBM G51 IBM G52 IBM G72 IBM G94 IBM P72 a speaker with attached connecting cable and mounting clips an accessory bar for mounting on monitor, in three parts two endpieces for the accessory bar a headphone hanger a hanger mount cover Contact your place of purchase if an item is missing or damaged. Be sure to retain your proof of purchase. It might be required to receive warranty service. IBM P92 IBM P202 IBM 300XL, 300GL The Business Audio Speaker is supported for use with the following IBM systems (if those systems use the above listed monitors): IBM 300PL IBM Aptiva E-Series Copyright IBM Corp. 1998 IBM Aptiva C-77 IBM Aptiva S-Series 1-1 Installation Instructions Refer to the following illustration as you read the instructions for installing and using the speaker. .1/ Volume control knob .2/ Microphone jack .3/ Headphone jack 1 .4/ Headphone jack 2 .5/ Headphone hanger 1-2 Business Audio Speaker Installing the Business Audio Speaker Assembling the Mounting Bar Before installing the speaker, assemble the accessory mounting bar which will fit onto your monitor. Refer to the following illustration in order to locate the accessory bar and determine which pieces to put together in order to fit your monitor. When you have located the piece which fits your monitor size, assemble the bar by firmly pushing the endpieces into the ends of the bar. Part 1: Quick Installation Guide 1-3 1 2 3 4 5 Piece used with 17 inch monitors Piece used with G52S monitors Piece used with 14 and 15 inch monitors End piece End piece Attaching the Speaker to the Monitor To install the Business Audio Speaker, follow these steps. 1. First, attach the mounting bar to either side of the monitor. This is done by pressing the elbow-shaped endpieces into the indentions which are on the sides of your monitor. 2. Next, mount the speaker on the bar using the mounting clips. Press the speaker's mounting clips onto the accessory bar until they snap into place. Make sure that the accessory bar stays firmly attached to the monitor. 3. Locate the cable which is attached to the speaker, and which terminates in three plugs. It looks like the following illustration. 6. Locate the Universal Serial Bus (USB) port, and plug in the green part .3/ of the cable. When you attach this final plug, the speaker will have a power source. There is no separate power cable for the speaker. 7. If you want to listen to sounds privately, you can plug a set of headphones equipped with a 3.5 mm mini-plug into headphone jack “1” on the side of the speaker. You can plug a second set of headphones into headphone jack “2”. When headphones are plugged into jack “1”, the speaker is muted. It is not muted by plugging headphones into headphone jack “2”. 8. There is a T-shaped hanger at the top-rear of the speaker, which provides a place to hang your headphones when you are not using them. You can attach this hanger at either end of the speaker, depending on whether you mount the speaker on the left or right side of your monitor. 4. Locate the “Line” output jack on your computer. Connect the purple plug .1/ to this output jack. 5. Locate the “Microphone” input jack on your computer. Connect the orange plug .2/ to this input jack. Part 1: Quick Installation Guide 1-5 Using the Business Audio Speaker You can mount the accessory bar and speaker on either the left or right side of your monitor. The volume control for the speaker is always on the outside of the speaker, whether you mount the speaker on the left or right. Refer to the illustration on page 1-2 in order to locate the features described in this section. Listening to Audio Output There are two headphone jacks on the speaker .3/, .4/. Plug headphones into headphone jack “1” .3/ to mute the speaker. Recording Audio Signals If you want to record sounds for digital manipulation or playback, you must plug a microphone into the microphone jack on the speaker. For further instructions on recording audio signals, refer to the documentation provided with your system and the multimedia software you are using. Adjusting the Volume There are two ways you can adjust the speaker's volume. One way is to use the volume control knob on the speaker itself .1/. The second way to adjust the volume is by using the volume control in the software you are using for audio playback. 1-6 Business Audio Speaker Note: If the software volume control is set too high, it can cause the speaker output to sound distorted. To avoid this distortion, follow these instructions. 1. Turn the volume control knob on the speaker to the middle of its range. 2. Using your audio playback software, test the volume by using an audio CD or long audio file. 3. If the audio file or CD track sounds distorted, adjust the volume using the controls within your audio playback software, until there is no more distortion. 4. Once you have eliminated the distortion, you can use the speaker's volume control knob to set the audio to a comfortable listening level. Note: One performance of this procedure should eliminate any distortion problems with a particular application. However, different software applications sometimes require different output settings, so you may need to adjust the output for each individual application you use. Using the Business Audio Speaker On Your Desktop The speaker can be used without attaching it to your monitor. To use it as a stand-alone desktop speaker, you may want to remove the mounting clips from the side of the speaker. To detach the mounting clips, follow the steps below. To re-attach them, perform the actions shown in illustration 1, then the actions shown in illustration 2. 1. Firmly grasp the clip, which should be in the position shown in illustration 2 below. 2. Turn the clip 90° until it is vertical, as shown in illustration 1. 3. Once the clips are in a vertical position they will disengage from the speaker, and you can pull them straight out. Be sure to keep the clips in case you want to remount the speaker in the future. A B Part 1: Quick Installation Guide 1-7 Quick Installation (German) Product Description The Business Audio Speaker is a monaural (non-stereo) accessory speaker that you can attach to the side of some IBM monitors with the included accessory mounting bar. The accessory bar comes in three parts and is adjustable to fit a wide range of monitor sizes. The speaker also has two headphone jacks and a pass-through microphone input jack. The Business Audio Speaker, when used with the included accessory bar, is supported for use with the following IBM monitors: IBM G42 IBM G51 IBM G52 IBM G72 IBM G94 IBM P72 IBM P92 IBM P202 IBM 300XL, 300GL The Business Audio Speaker is supported for use with the following IBM systems (if those systems use the above listed monitors): IBM 300PL IBM Aptiva E-Series 1-8 Business Audio Speaker IBM Aptiva C-77 IBM Aptiva S-Series In addition to this manual, your option package includes: a speaker with attached connecting cable and mounting clips an accessory bar for mounting on monitor, in three parts two endpieces for the accessory bar a headphone hanger a hanger mount cover Contact your place of purchase if an item is missing or damaged. Be sure to retain your proof of purchase. It might be required to receive warranty service. Installation Instructions Refer to the following illustration as you read the instructions for installing and using the speaker. .1/ Volume control knob .2/ Microphone jack .3/ Headphone jack 1 .4/ Headphone jack 2 .5/ Headphone hanger Part 1: Quick Installation Guide 1-9 Installing the Business Audio Speaker Assembling the Mounting Bar Before installing the speaker, assemble the accessory mounting bar which will fit onto your monitor. Refer to the following illustration in order to locate the accessory bar and determine which pieces to put together in order to fit your monitor. When you have located the piece which fits your monitor size, assemble the bar by firmly pushing the endpieces into the ends of the bar. 1-10 Business Audio Speaker .1/ Use this piece with 17 in. monitors .2/ Use this piece with G52S monitors .3/ Use this piece with 14 and 15 in. monitors .4/ Endpiece Part 1: Quick Installation Guide 1-11 Attaching the Speaker to the Monitor To install the Business Audio Speaker, follow these steps. 1. First, attach the mounting bar to either side of the monitor. This is done by pressing the elbow-shaped endpieces into the indentions which are on the sides of your monitor. 2. Next, mount the speaker on the bar using the mounting clips. Press the speaker's mounting clips onto the accessory bar until they snap into place. Make sure that the accessory bar stays firmly attached to the monitor. 3. Locate the cable which is attached to the speaker, and which terminates in three plugs. It looks like the following illustration. 4. Locate the “Line” output jack on your computer. Connect the purple plug .1/ to this output jack. 5. Locate the “Microphone” input jack on your computer. Connect the orange plug .2/ to this input jack. 1-12 Business Audio Speaker 6. Locate the Universal Serial Bus (USB) port, and plug in the green part .3/ of the cable. When you attach this final plug, the speaker will have a power source. There is no separate power cable for the speaker. 7. If you want to listen to sounds privately, you can plug a set of headphones equipped with a 3.5 mm mini-plug into headphone jack “1” on the side of the speaker. You can plug a second set of headphones into headphone jack “2”. When headphones are plugged into jack “1”, the speaker is muted. It is not muted by plugging headphones into headphone jack “2”. 8. There is a T-shaped hanger at the top-rear of the speaker, which provides a place to hang your headphones when you are not using them. You can attach this hanger at either end of the speaker, depending on whether you mount the speaker on the left or right side of your monitor. Using the Business Audio Speaker You can mount the accessory bar and speaker on either the left or right side of your monitor. The volume control for the speaker is always on the outside of the speaker, whether you mount the speaker on the left or right. Refer to the illustration on page 1-9 in order to locate the features described in this section. Listening to Audio Output There are two headphone jacks on the speaker .3/, .4/. Plug headphones into headphone jack “1” .3/ to mute the speaker. Recording Audio Signals If you want to record sounds for digital manipulation or playback, you must plug a microphone into the microphone jack on the speaker. For further instructions on recording audio signals, refer to the documentation provided with your system and the multimedia software you are using. Adjusting the Volume There are two ways you can adjust the speaker's volume. One way is to use the volume control knob on the speaker itself .1/. The second way to adjust the volume is by using the volume control in the software you are using for audio playback. Note: If the software volume control is set too high, it can cause the speaker output to sound distorted. To avoid this distortion, follow these instructions. 1. Turn the volume control knob on the speaker to the middle of its range. 2. Using your audio playback software, test the volume by using an audio CD or long audio file. 3. If the audio file or CD track sounds distorted, adjust the volume using the controls within your audio playback software, until there is no more distortion. 4. Once you have eliminated the distortion, you can use the speaker's volume control knob to set the audio to a comfortable listening level. Note: One performance of this procedure should eliminate any distortion problems with a particular application. However, different software applications sometimes require different output settings, so you may need to adjust the output for each individual application you use. Part 1: Quick Installation Guide 1-13 Using the Business Audio Speaker On Your Desktop The speaker can be used without attaching it to your monitor. To use it as a stand-alone desktop speaker, you may want to remove the mounting clips from the side of the speaker. To detach the mounting clips, follow the steps below. To re-attach them, perform the actions shown in illustration 1, then the actions shown in illustration 2. 1. Firmly grasp the clip, which should be in the position shown in illustration 2 below. 2. Turn the clip 90° until it is vertical, as shown in illustration 1. 3. Once the clips are in a vertical position they will disengage from the speaker, and you can pull them straight out. Be sure to keep the clips in case you want to remount the speaker in the future. A 1-14 B Business Audio Speaker Product Registration Thank you for purchasing OPTIONS by IBM. Please take a few moments to register your product and provide us with information that will help IBM to better serve you in the future. Your feedback is valuable to us in developing products and services that are important to you, as well as in developing better ways to communicate with you. Register your option on the IBM Web site at: http://www.pc.ibm.com/register IBM will send you information and updates on your registered product unless you indicate on the Web site questionnaire that you do not want to receive further information. Product Service and Warranty Information For technical support, support hours, and warranty terms and conditions, see the enclosed inserts, or contact your IBM reseller or IBM marketing representative. Part 1: Quick Installation Guide 1-15 Quick Installation (French) Product Description The Business Audio Speaker is a monaural (non-stereo) accessory speaker that you can attach to the side of some IBM monitors with the included accessory mounting bar. The accessory bar comes in three parts and is adjustable to fit a wide range of monitor sizes. The speaker also has two headphone jacks and a pass-through microphone input jack. The Business Audio Speaker, when used with the included accessory bar, is supported for use with the following IBM monitors: IBM G42 IBM G51 IBM G52 IBM G72 IBM G94 IBM P72 IBM P92 IBM P202 IBM 300XL, 300GL The Business Audio Speaker is supported for use with the following IBM systems (if those systems use the above listed monitors): IBM 300PL IBM Aptiva E-Series 1-16 Business Audio Speaker IBM Aptiva C-77 IBM Aptiva S-Series In addition to this manual, your option package includes: a speaker with attached connecting cable and mounting clips an accessory bar for mounting on monitor, in three parts two endpieces for the accessory bar a headphone hanger a hanger mount cover Contact your place of purchase if an item is missing or damaged. Be sure to retain your proof of purchase. It might be required to receive warranty service. Installation Instructions Refer to the following illustration as you read the instructions for installing and using the speaker. .1/ Volume control knob .2/ Microphone jack .3/ Headphone jack 1 .4/ Headphone jack 2 .5/ Headphone hanger Part 1: Quick Installation Guide 1-17 Installing the Business Audio Speaker Assembling the Mounting Bar Before installing the speaker, assemble the accessory mounting bar which will fit onto your monitor. Refer to the following illustration in order to locate the accessory bar and determine which pieces to put together in order to fit your monitor. When you have located the piece which fits your monitor size, assemble the bar by firmly pushing the endpieces into the ends of the bar. 1-18 Business Audio Speaker .1/ Use this piece with 17 in. monitors .2/ Use this piece with G52S monitors .3/ Use this piece with 14 and 15 in. monitors .4/ Endpiece Part 1: Quick Installation Guide 1-19 Attaching the Speaker to the Monitor To install the Business Audio Speaker, follow these steps. 1. First, attach the mounting bar to either side of the monitor. This is done by pressing the elbow-shaped endpieces into the indentions which are on the sides of your monitor. 2. Next, mount the speaker on the bar using the mounting clips. Press the speaker's mounting clips onto the accessory bar until they snap into place. Make sure that the accessory bar stays firmly attached to the monitor. 3. Locate the cable which is attached to the speaker, and which terminates in three plugs. It looks like the following illustration. 4. Locate the “Line” output jack on your computer. Connect the purple plug .1/ to this output jack. 5. Locate the “Microphone” input jack on your computer. Connect the orange plug .2/ to this input jack. 1-20 Business Audio Speaker 6. Locate the Universal Serial Bus (USB) port, and plug in the green part .3/ of the cable. When you attach this final plug, the speaker will have a power source. There is no separate power cable for the speaker. 7. If you want to listen to sounds privately, you can plug a set of headphones equipped with a 3.5 mm mini-plug into headphone jack “1” on the side of the speaker. You can plug a second set of headphones into headphone jack “2”. When headphones are plugged into jack “1”, the speaker is muted. It is not muted by plugging headphones into headphone jack “2”. 8. There is a T-shaped hanger at the top-rear of the speaker, which provides a place to hang your headphones when you are not using them. You can attach this hanger at either end of the speaker, depending on whether you mount the speaker on the left or right side of your monitor. Using the Business Audio Speaker You can mount the accessory bar and speaker on either the left or right side of your monitor. The volume control for the speaker is always on the outside of the speaker, whether you mount the speaker on the left or right. Refer to the illustration on page 1-17 in order to locate the features described in this section. Listening to Audio Output There are two headphone jacks on the speaker .3/, .4/. Plug headphones into headphone jack “1” .3/ to mute the speaker. Recording Audio Signals If you want to record sounds for digital manipulation or playback, you must plug a microphone into the microphone jack on the speaker. For further instructions on recording audio signals, refer to the documentation provided with your system and the multimedia software you are using. Adjusting the Volume There are two ways you can adjust the speaker's volume. One way is to use the volume control knob on the speaker itself .1/. The second way to adjust the volume is by using the volume control in the software you are using for audio playback. Note: If the software volume control is set too high, it can cause the speaker output to sound distorted. To avoid this distortion, follow these instructions. 1. Turn the volume control knob on the speaker to the middle of its range. 2. Using your audio playback software, test the volume by using an audio CD or long audio file. 3. If the audio file or CD track sounds distorted, adjust the volume using the controls within your audio playback software, until there is no more distortion. 4. Once you have eliminated the distortion, you can use the speaker's volume control knob to set the audio to a comfortable listening level. Note: One performance of this procedure should eliminate any distortion problems with a particular application. However, different software applications sometimes require different output settings, so you may need to adjust the output for each individual application you use. Part 1: Quick Installation Guide 1-21 Using the Business Audio Speaker On Your Desktop The speaker can be used without attaching it to your monitor. To use it as a stand-alone desktop speaker, you may want to remove the mounting clips from the side of the speaker. To detach the mounting clips, follow the steps below. To re-attach them, perform the actions shown in illustration 1, then the actions shown in illustration 2. 1. Firmly grasp the clip, which should be in the position shown in illustration 2 below. 2. Turn the clip 90° until it is vertical, as shown in illustration 1. 3. Once the clips are in a vertical position they will disengage from the speaker, and you can pull them straight out. Be sure to keep the clips in case you want to remount the speaker in the future. A 1-22 B Business Audio Speaker Product Registration Thank you for purchasing OPTIONS by IBM. Please take a few moments to register your product and provide us with information that will help IBM to better serve you in the future. Your feedback is valuable to us in developing products and services that are important to you, as well as in developing better ways to communicate with you. Register your option on the IBM Web site at: http://www.pc.ibm.com/register IBM will send you information and updates on your registered product unless you indicate on the Web site questionnaire that you do not want to receive further information. Product Service and Warranty Information For technical support, support hours, and warranty terms and conditions, see the enclosed inserts, or contact your IBM reseller or IBM marketing representative. Part 1: Quick Installation Guide 1-23 Quick Installation (Spanish) Product Description The Business Audio Speaker is a monaural (non-stereo) accessory speaker that you can attach to the side of some IBM monitors with the included accessory mounting bar. The accessory bar comes in three parts and is adjustable to fit a wide range of monitor sizes. The speaker also has two headphone jacks and a pass-through microphone input jack. The Business Audio Speaker, when used with the included accessory bar, is supported for use with the following IBM monitors: IBM G42 IBM G51 IBM G52 IBM G72 IBM G94 IBM P72 IBM P92 IBM P202 IBM 300XL, 300GL The Business Audio Speaker is supported for use with the following IBM systems (if those systems use the above listed monitors): IBM 300PL IBM Aptiva E-Series 1-24 Business Audio Speaker IBM Aptiva C-77 IBM Aptiva S-Series In addition to this manual, your option package includes: a speaker with attached connecting cable and mounting clips an accessory bar for mounting on monitor, in three parts two endpieces for the accessory bar a headphone hanger a hanger mount cover Contact your place of purchase if an item is missing or damaged. Be sure to retain your proof of purchase. It might be required to receive warranty service. Installation Instructions Refer to the following illustration as you read the instructions for installing and using the speaker. .1/ Volume control knob .2/ Microphone jack .3/ Headphone jack 1 .4/ Headphone jack 2 .5/ Headphone hanger Part 1: Quick Installation Guide 1-25 Installing the Business Audio Speaker Assembling the Mounting Bar Before installing the speaker, assemble the accessory mounting bar which will fit onto your monitor. Refer to the following illustration in order to locate the accessory bar and determine which pieces to put together in order to fit your monitor. When you have located the piece which fits your monitor size, assemble the bar by firmly pushing the endpieces into the ends of the bar. 1-26 Business Audio Speaker .1/ Use this piece with 17 in. monitors .2/ Use this piece with G52S monitors .3/ Use this piece with 14 and 15 in. monitors .4/ Endpiece Part 1: Quick Installation Guide 1-27 Attaching the Speaker to the Monitor To install the Business Audio Speaker, follow these steps. 1. First, attach the mounting bar to either side of the monitor. This is done by pressing the elbow-shaped endpieces into the indentions which are on the sides of your monitor. 2. Next, mount the speaker on the bar using the mounting clips. Press the speaker's mounting clips onto the accessory bar until they snap into place. Make sure that the accessory bar stays firmly attached to the monitor. 3. Locate the cable which is attached to the speaker, and which terminates in three plugs. It looks like the following illustration. 4. Locate the “Line” output jack on your computer. Connect the purple plug .1/ to this output jack. 5. Locate the “Microphone” input jack on your computer. Connect the orange plug .2/ to this input jack. 1-28 Business Audio Speaker 6. Locate the Universal Serial Bus (USB) port, and plug in the green part .3/ of the cable. When you attach this final plug, the speaker will have a power source. There is no separate power cable for the speaker. 7. If you want to listen to sounds privately, you can plug a set of headphones equipped with a 3.5 mm mini-plug into headphone jack “1” on the side of the speaker. You can plug a second set of headphones into headphone jack “2”. When headphones are plugged into jack “1”, the speaker is muted. It is not muted by plugging headphones into headphone jack “2”. 8. There is a T-shaped hanger at the top-rear of the speaker, which provides a place to hang your headphones when you are not using them. You can attach this hanger at either end of the speaker, depending on whether you mount the speaker on the left or right side of your monitor. Using the Business Audio Speaker You can mount the accessory bar and speaker on either the left or right side of your monitor. The volume control for the speaker is always on the outside of the speaker, whether you mount the speaker on the left or right. Refer to the illustration on page 1-25 in order to locate the features described in this section. Listening to Audio Output There are two headphone jacks on the speaker .3/, .4/. Plug headphones into headphone jack “1” .3/ to mute the speaker. Recording Audio Signals If you want to record sounds for digital manipulation or playback, you must plug a microphone into the microphone jack on the speaker. For further instructions on recording audio signals, refer to the documentation provided with your system and the multimedia software you are using. Adjusting the Volume There are two ways you can adjust the speaker's volume. One way is to use the volume control knob on the speaker itself .1/. The second way to adjust the volume is by using the volume control in the software you are using for audio playback. Note: If the software volume control is set too high, it can cause the speaker output to sound distorted. To avoid this distortion, follow these instructions. 1. Turn the volume control knob on the speaker to the middle of its range. 2. Using your audio playback software, test the volume by using an audio CD or long audio file. 3. If the audio file or CD track sounds distorted, adjust the volume using the controls within your audio playback software, until there is no more distortion. 4. Once you have eliminated the distortion, you can use the speaker's volume control knob to set the audio to a comfortable listening level. Note: One performance of this procedure should eliminate any distortion problems with a particular application. However, different software applications sometimes require different output settings, so you may need to adjust the output for each individual application you use. Part 1: Quick Installation Guide 1-29 Using the Business Audio Speaker On Your Desktop The speaker can be used without attaching it to your monitor. To use it as a stand-alone desktop speaker, you may want to remove the mounting clips from the side of the speaker. To detach the mounting clips, follow the steps below. To re-attach them, perform the actions shown in illustration 1, then the actions shown in illustration 2. 1. Firmly grasp the clip, which should be in the position shown in illustration 2 below. 2. Turn the clip 90° until it is vertical, as shown in illustration 1. 3. Once the clips are in a vertical position they will disengage from the speaker, and you can pull them straight out. Be sure to keep the clips in case you want to remount the speaker in the future. A 1-30 B Business Audio Speaker Product Registration Thank you for purchasing OPTIONS by IBM. Please take a few moments to register your product and provide us with information that will help IBM to better serve you in the future. Your feedback is valuable to us in developing products and services that are important to you, as well as in developing better ways to communicate with you. Register your option on the IBM Web site at: http://www.pc.ibm.com/register IBM will send you information and updates on your registered product unless you indicate on the Web site questionnaire that you do not want to receive further information. Product Service and Warranty Information For technical support, support hours, and warranty terms and conditions, see the enclosed inserts, or contact your IBM reseller or IBM marketing representative. Part 1: Quick Installation Guide 1-31 Quick Installation (Japanese) Product Description The Business Audio Speaker is a monaural (non-stereo) accessory speaker that you can attach to the side of some IBM monitors with the included accessory mounting bar. The accessory bar comes in three parts and is adjustable to fit a wide range of monitor sizes. The speaker also has two headphone jacks and a pass-through microphone input jack. The Business Audio Speaker, when used with the included accessory bar, is supported for use with the following IBM monitors: IBM G42 IBM G51 IBM G52 IBM G72 IBM G94 IBM P72 IBM P92 IBM P202 IBM 300XL, 300GL The Business Audio Speaker is supported for use with the following IBM systems (if those systems use the above listed monitors): IBM 300PL IBM Aptiva E-Series 1-32 Business Audio Speaker IBM Aptiva C-77 IBM Aptiva S-Series In addition to this manual, your option package includes: a speaker with attached connecting cable and mounting clips an accessory bar for mounting on monitor, in three parts two endpieces for the accessory bar a headphone hanger a hanger mount cover Contact your place of purchase if an item is missing or damaged. Be sure to retain your proof of purchase. It might be required to receive warranty service. Installation Instructions Refer to the following illustration as you read the instructions for installing and using the speaker. .1/ Volume control knob .2/ Microphone jack .3/ Headphone jack 1 .4/ Headphone jack 2 .5/ Headphone hanger Part 1: Quick Installation Guide 1-33 Installing the Business Audio Speaker Assembling the Mounting Bar Before installing the speaker, assemble the accessory mounting bar which will fit onto your monitor. Refer to the following illustration in order to locate the accessory bar and determine which pieces to put together in order to fit your monitor. When you have located the piece which fits your monitor size, assemble the bar by firmly pushing the endpieces into the ends of the bar. 1-34 Business Audio Speaker .1/ Use this piece with 17 in. monitors .2/ Use this piece with G52S monitors .3/ Use this piece with 14 and 15 in. monitors .4/ Endpiece Part 1: Quick Installation Guide 1-35 Attaching the Speaker to the Monitor To install the Business Audio Speaker, follow these steps. 1. First, attach the mounting bar to either side of the monitor. This is done by pressing the elbow-shaped endpieces into the indentions which are on the sides of your monitor. 2. Next, mount the speaker on the bar using the mounting clips. Press the speaker's mounting clips onto the accessory bar until they snap into place. Make sure that the accessory bar stays firmly attached to the monitor. 3. Locate the cable which is attached to the speaker, and which terminates in three plugs. It looks like the following illustration. 4. Locate the “Line” output jack on your computer. Connect the purple plug .1/ to this output jack. 5. Locate the “Microphone” input jack on your computer. Connect the orange plug .2/ to this input jack. 1-36 Business Audio Speaker 6. Locate the Universal Serial Bus (USB) port, and plug in the green part .3/ of the cable. When you attach this final plug, the speaker will have a power source. There is no separate power cable for the speaker. 7. If you want to listen to sounds privately, you can plug a set of headphones equipped with a 3.5 mm mini-plug into headphone jack “1” on the side of the speaker. You can plug a second set of headphones into headphone jack “2”. When headphones are plugged into jack “1”, the speaker is muted. It is not muted by plugging headphones into headphone jack “2”. 8. There is a T-shaped hanger at the top-rear of the speaker, which provides a place to hang your headphones when you are not using them. You can attach this hanger at either end of the speaker, depending on whether you mount the speaker on the left or right side of your monitor. Using the Business Audio Speaker You can mount the accessory bar and speaker on either the left or right side of your monitor. The volume control for the speaker is always on the outside of the speaker, whether you mount the speaker on the left or right. Refer to the illustration on page 1-33 in order to locate the features described in this section. Listening to Audio Output There are two headphone jacks on the speaker .3/, .4/. Plug headphones into headphone jack “1” .3/ to mute the speaker. Recording Audio Signals If you want to record sounds for digital manipulation or playback, you must plug a microphone into the microphone jack on the speaker. For further instructions on recording audio signals, refer to the documentation provided with your system and the multimedia software you are using. Adjusting the Volume There are two ways you can adjust the speaker's volume. One way is to use the volume control knob on the speaker itself .1/. The second way to adjust the volume is by using the volume control in the software you are using for audio playback. Note: If the software volume control is set too high, it can cause the speaker output to sound distorted. To avoid this distortion, follow these instructions. 1. Turn the volume control knob on the speaker to the middle of its range. 2. Using your audio playback software, test the volume by using an audio CD or long audio file. 3. If the audio file or CD track sounds distorted, adjust the volume using the controls within your audio playback software, until there is no more distortion. 4. Once you have eliminated the distortion, you can use the speaker's volume control knob to set the audio to a comfortable listening level. Note: One performance of this procedure should eliminate any distortion problems with a particular application. However, different software applications sometimes require different output settings, so you may need to adjust the output for each individual application you use. Part 1: Quick Installation Guide 1-37 Using the Business Audio Speaker On Your Desktop The speaker can be used without attaching it to your monitor. To use it as a stand-alone desktop speaker, you may want to remove the mounting clips from the side of the speaker. To detach the mounting clips, follow the steps below. To re-attach them, perform the actions shown in illustration 1, then the actions shown in illustration 2. 1. Firmly grasp the clip, which should be in the position shown in illustration 2 below. 2. Turn the clip 90° until it is vertical, as shown in illustration 1. 3. Once the clips are in a vertical position they will disengage from the speaker, and you can pull them straight out. Be sure to keep the clips in case you want to remount the speaker in the future. A 1-38 B Business Audio Speaker Product Registration Thank you for purchasing OPTIONS by IBM. Please take a few moments to register your product and provide us with information that will help IBM to better serve you in the future. Your feedback is valuable to us in developing products and services that are important to you, as well as in developing better ways to communicate with you. Register your option on the IBM Web site at: http://www.pc.ibm.com/register IBM will send you information and updates on your registered product unless you indicate on the Web site questionnaire that you do not want to receive further information. Product Service and Warranty Information For technical support, support hours, and warranty terms and conditions, see the enclosed inserts, or contact your IBM reseller or IBM marketing representative. Part 1: Quick Installation Guide 1-39 In addition to this manual, your option package includes: Quick Installation (Italian) Product Description The Business Audio Speaker is a monaural (non-stereo) accessory speaker that you can attach to the side of some IBM monitors with the included accessory mounting bar. The accessory bar comes in three parts and is adjustable to fit a wide range of monitor sizes. The speaker also has two headphone jacks and a pass-through microphone input jack. The Business Audio Speaker, when used with the included accessory bar, is supported for use with the following IBM monitors: IBM G42 IBM G51 IBM G52 IBM G72 IBM G94 IBM P72 IBM P92 IBM P202 IBM 300XL, 300GL The Business Audio Speaker is supported for use with the following IBM systems (if those systems use the above listed monitors): IBM 300PL IBM Aptiva E-Series 1-40 Business Audio Speaker IBM Aptiva C-77 IBM Aptiva S-Series a speaker with attached connecting cable and mounting clips an accessory bar for mounting on monitor, in three parts two endpieces for the accessory bar a headphone hanger a hanger mount cover Contact your place of purchase if an item is missing or damaged. Be sure to retain your proof of purchase. It might be required to receive warranty service. Installation Instructions Refer to the following illustration as you read the instructions for installing and using the speaker. .1/ Volume control knob .2/ Microphone jack .3/ Headphone jack 1 .4/ Headphone jack 2 .5/ Headphone hanger Part 1: Quick Installation Guide 1-41 Installing the Business Audio Speaker Assembling the Mounting Bar Before installing the speaker, assemble the accessory mounting bar which will fit onto your monitor. Refer to the following illustration in order to locate the accessory bar and determine which pieces to put together in order to fit your monitor. When you have located the piece which fits your monitor size, assemble the bar by firmly pushing the endpieces into the ends of the bar. 1-42 Business Audio Speaker .1/ Use this piece with 17 in. monitors .2/ Use this piece with G52S monitors .3/ Use this piece with 14 and 15 in. monitors .4/ Endpiece Part 1: Quick Installation Guide 1-43 Attaching the Speaker to the Monitor To install the Business Audio Speaker, follow these steps. 1. First, attach the mounting bar to either side of the monitor. This is done by pressing the elbow-shaped endpieces into the indentions which are on the sides of your monitor. 2. Next, mount the speaker on the bar using the mounting clips. Press the speaker's mounting clips onto the accessory bar until they snap into place. Make sure that the accessory bar stays firmly attached to the monitor. 3. Locate the cable which is attached to the speaker, and which terminates in three plugs. It looks like the following illustration. 4. Locate the “Line” output jack on your computer. Connect the purple plug .1/ to this output jack. 5. Locate the “Microphone” input jack on your computer. Connect the orange plug .2/ to this input jack. 1-44 Business Audio Speaker 6. Locate the Universal Serial Bus (USB) port, and plug in the green part .3/ of the cable. When you attach this final plug, the speaker will have a power source. There is no separate power cable for the speaker. 7. If you want to listen to sounds privately, you can plug a set of headphones equipped with a 3.5 mm mini-plug into headphone jack “1” on the side of the speaker. You can plug a second set of headphones into headphone jack “2”. When headphones are plugged into jack “1”, the speaker is muted. It is not muted by plugging headphones into headphone jack “2”. 8. There is a T-shaped hanger at the top-rear of the speaker, which provides a place to hang your headphones when you are not using them. You can attach this hanger at either end of the speaker, depending on whether you mount the speaker on the left or right side of your monitor. Using the Business Audio Speaker You can mount the accessory bar and speaker on either the left or right side of your monitor. The volume control for the speaker is always on the outside of the speaker, whether you mount the speaker on the left or right. Refer to the illustration on page 1-41 in order to locate the features described in this section. Listening to Audio Output There are two headphone jacks on the speaker .3/, .4/. Plug headphones into headphone jack “1” .3/ to mute the speaker. Recording Audio Signals If you want to record sounds for digital manipulation or playback, you must plug a microphone into the microphone jack on the speaker. For further instructions on recording audio signals, refer to the documentation provided with your system and the multimedia software you are using. Adjusting the Volume There are two ways you can adjust the speaker's volume. One way is to use the volume control knob on the speaker itself .1/. The second way to adjust the volume is by using the volume control in the software you are using for audio playback. Note: If the software volume control is set too high, it can cause the speaker output to sound distorted. To avoid this distortion, follow these instructions. 1. Turn the volume control knob on the speaker to the middle of its range. 2. Using your audio playback software, test the volume by using an audio CD or long audio file. 3. If the audio file or CD track sounds distorted, adjust the volume using the controls within your audio playback software, until there is no more distortion. 4. Once you have eliminated the distortion, you can use the speaker's volume control knob to set the audio to a comfortable listening level. Note: One performance of this procedure should eliminate any distortion problems with a particular application. However, different software applications sometimes require different output settings, so you may need to adjust the output for each individual application you use. Part 1: Quick Installation Guide 1-45 Using the Business Audio Speaker On Your Desktop The speaker can be used without attaching it to your monitor. To use it as a stand-alone desktop speaker, you may want to remove the mounting clips from the side of the speaker. To detach the mounting clips, follow the steps below. To re-attach them, perform the actions shown in illustration 1, then the actions shown in illustration 2. 1. Firmly grasp the clip, which should be in the position shown in illustration 2 below. 2. Turn the clip 90° until it is vertical, as shown in illustration 1. 3. Once the clips are in a vertical position they will disengage from the speaker, and you can pull them straight out. Be sure to keep the clips in case you want to remount the speaker in the future. A 1-46 B Business Audio Speaker Product Registration Thank you for purchasing OPTIONS by IBM. Please take a few moments to register your product and provide us with information that will help IBM to better serve you in the future. Your feedback is valuable to us in developing products and services that are important to you, as well as in developing better ways to communicate with you. Register your option on the IBM Web site at: http://www.pc.ibm.com/register IBM will send you information and updates on your registered product unless you indicate on the Web site questionnaire that you do not want to receive further information. Product Service and Warranty Information For technical support, support hours, and warranty terms and conditions, see the enclosed inserts, or contact your IBM reseller or IBM marketing representative. Part 1: Quick Installation Guide 1-47 Quick Installation (B.Port.) Product Description The Business Audio Speaker is a monaural (non-stereo) accessory speaker that you can attach to the side of some IBM monitors with the included accessory mounting bar. The accessory bar comes in three parts and is adjustable to fit a wide range of monitor sizes. The speaker also has two headphone jacks and a pass-through microphone input jack. The Business Audio Speaker, when used with the included accessory bar, is supported for use with the following IBM monitors: IBM G42 IBM G51 IBM G52 IBM G72 IBM G94 IBM P72 IBM P92 IBM P202 IBM 300XL, 300GL The Business Audio Speaker is supported for use with the following IBM systems (if those systems use the above listed monitors): IBM 300PL IBM Aptiva E-Series 1-48 Business Audio Speaker IBM Aptiva C-77 IBM Aptiva S-Series In addition to this manual, your option package includes: a speaker with attached connecting cable and mounting clips an accessory bar for mounting on monitor, in three parts two endpieces for the accessory bar a headphone hanger a hanger mount cover Contact your place of purchase if an item is missing or damaged. Be sure to retain your proof of purchase. It might be required to receive warranty service. Installation Instructions Refer to the following illustration as you read the instructions for installing and using the speaker. .1/ Volume control knob .2/ Microphone jack .3/ Headphone jack 1 .4/ Headphone jack 2 .5/ Headphone hanger Part 1: Quick Installation Guide 1-49 Installing the Business Audio Speaker Assembling the Mounting Bar Before installing the speaker, assemble the accessory mounting bar which will fit onto your monitor. Refer to the following illustration in order to locate the accessory bar and determine which pieces to put together in order to fit your monitor. When you have located the piece which fits your monitor size, assemble the bar by firmly pushing the endpieces into the ends of the bar. 1-50 Business Audio Speaker .1/ Use this piece with 17 in. monitors .2/ Use this piece with G52S monitors .3/ Use this piece with 14 and 15 in. monitors .4/ Endpiece Part 1: Quick Installation Guide 1-51 Attaching the Speaker to the Monitor To install the Business Audio Speaker, follow these steps. 1. First, attach the mounting bar to either side of the monitor. This is done by pressing the elbow-shaped endpieces into the indentions which are on the sides of your monitor. 2. Next, mount the speaker on the bar using the mounting clips. Press the speaker's mounting clips onto the accessory bar until they snap into place. Make sure that the accessory bar stays firmly attached to the monitor. 3. Locate the cable which is attached to the speaker, and which terminates in three plugs. It looks like the following illustration. 4. Locate the “Line” output jack on your computer. Connect the purple plug .1/ to this output jack. 5. Locate the “Microphone” input jack on your computer. Connect the orange plug .2/ to this input jack. 1-52 Business Audio Speaker 6. Locate the Universal Serial Bus (USB) port, and plug in the green part .3/ of the cable. When you attach this final plug, the speaker will have a power source. There is no separate power cable for the speaker. 7. If you want to listen to sounds privately, you can plug a set of headphones equipped with a 3.5 mm mini-plug into headphone jack “1” on the side of the speaker. You can plug a second set of headphones into headphone jack “2”. When headphones are plugged into jack “1”, the speaker is muted. It is not muted by plugging headphones into headphone jack “2”. 8. There is a T-shaped hanger at the top-rear of the speaker, which provides a place to hang your headphones when you are not using them. You can attach this hanger at either end of the speaker, depending on whether you mount the speaker on the left or right side of your monitor. Using the Business Audio Speaker You can mount the accessory bar and speaker on either the left or right side of your monitor. The volume control for the speaker is always on the outside of the speaker, whether you mount the speaker on the left or right. Refer to the illustration on page 1-49 in order to locate the features described in this section. Listening to Audio Output There are two headphone jacks on the speaker .3/, .4/. Plug headphones into headphone jack “1” .3/ to mute the speaker. Recording Audio Signals If you want to record sounds for digital manipulation or playback, you must plug a microphone into the microphone jack on the speaker. For further instructions on recording audio signals, refer to the documentation provided with your system and the multimedia software you are using. Adjusting the Volume There are two ways you can adjust the speaker's volume. One way is to use the volume control knob on the speaker itself .1/. The second way to adjust the volume is by using the volume control in the software you are using for audio playback. Note: If the software volume control is set too high, it can cause the speaker output to sound distorted. To avoid this distortion, follow these instructions. 1. Turn the volume control knob on the speaker to the middle of its range. 2. Using your audio playback software, test the volume by using an audio CD or long audio file. 3. If the audio file or CD track sounds distorted, adjust the volume using the controls within your audio playback software, until there is no more distortion. 4. Once you have eliminated the distortion, you can use the speaker's volume control knob to set the audio to a comfortable listening level. Note: One performance of this procedure should eliminate any distortion problems with a particular application. However, different software applications sometimes require different output settings, so you may need to adjust the output for each individual application you use. Part 1: Quick Installation Guide 1-53 Using the Business Audio Speaker On Your Desktop The speaker can be used without attaching it to your monitor. To use it as a stand-alone desktop speaker, you may want to remove the mounting clips from the side of the speaker. To detach the mounting clips, follow the steps below. To re-attach them, perform the actions shown in illustration 1, then the actions shown in illustration 2. 1. Firmly grasp the clip, which should be in the position shown in illustration 2 below. 2. Turn the clip 90° until it is vertical, as shown in illustration 1. 3. Once the clips are in a vertical position they will disengage from the speaker, and you can pull them straight out. Be sure to keep the clips in case you want to remount the speaker in the future. A 1-54 B Business Audio Speaker Product Registration Thank you for purchasing OPTIONS by IBM. Please take a few moments to register your product and provide us with information that will help IBM to better serve you in the future. Your feedback is valuable to us in developing products and services that are important to you, as well as in developing better ways to communicate with you. Register your option on the IBM Web site at: http://www.pc.ibm.com/register IBM will send you information and updates on your registered product unless you indicate on the Web site questionnaire that you do not want to receive further information. Product Service and Warranty Information For technical support, support hours, and warranty terms and conditions, see the enclosed inserts, or contact your IBM reseller or IBM marketing representative. Part 1: Quick Installation Guide 1-55 56 Business Audio Speaker Part 2: Appendixes Copyright IBM Corp. 1998 2-1 Appendix A. Help and Service Information During the warranty period, you can get toll-free technical support 24 hours a day, 7 days a week, to answer any questions about your new IBM option. If you need warranty service, return or exchange is available. In addition, if your IBM option is installed in an IBM computer, you might be entitled to service at your location. Your technical support representative can help you determine the best alternative. Before calling, please prepare for your call by following these steps: Step 2: Preparing for the Call To assist the technical support representative, have available as much of the following information as possible: 1. 2. 3. 4. Option name Option number Proof of purchase Computer manufacturer, model, serial number (if IBM), and manual 5. Exact wording of the error message (if any) 6. Description of the problem 7. Hardware and software configuration information for your system Step 1: Problem Solving If possible, be at your computer. Your technical support representative might want to walk you through the problem during the call. You might be able to solve the problem yourself. Before calling IBM, you might want to try some or all of the following troubleshooting procedures. Step 3: Placing the Call to IBM 1. Remove and reattach all option cables. 2. Remove and reseat the option. 3. Reread any software instructions; be sure software settings are correct. 4. Inspect the option for damage. 5. Check the computer manual for instructions about the installation of accessories. Look for a section about system setup or system configuration. Follow all procedures. Technical support is available during the warranty period to answer any questions about your new IBM option. Response time will vary depending on the number and nature of calls received. Marketing, installation, and configuration support will be withdrawn from the PSG HelpCenter 90 days after the option has been withdrawn from marketing. If you call 90 days or more after the date of withdrawal or after your warranty has expired, you might be charged a fee. For the support telephone number and support hours by country, refer to the following table or to the enclosed technical support insert. If 2-2 Business Audio Speaker the number is not provided, contact your IBM reseller or IBM marketing representative. Appendix B. Product Warranty Support 24 hours a day, 7 days a week Canada 1-800-565-3344 U.S.A. / Puerto Rico 1-800-772-2227 Additional Technical Support Resources Online technical support is available during the life of your product. Online assistance can be obtained through the IBM PSG Automated Fax System, the PSG Web page, and the PSG Electronic Bulletin Board System. Online Technical Support IBM PSG Web Page www.us.pc.ibm.com IBM PSG BBS 1-919-517-0001 IBM PSG Automated Fax System 1-800-426-3395 The following warranty information applies to products purchased in the United States, Canada, and Puerto Rico. For warranty terms and conditions for products purchased in other countries, see the enclosed Warranty insert, or contact your IBM reseller or IBM marketing representative. International Business Machines Corporation Armonk, New York, 10504 Statement of Limited Warranty The warranties provided by IBM in this Statement of Limited Warranty apply only to Machines you originally purchase for your use, and not for resale, from IBM or your reseller. The term “Machine” means an IBM machine, its features, conversions, upgrades, elements, or accessories, or any combination of them. Unless IBM specifies otherwise, the following warranties apply only in the country where you acquire the Machine. If you have any questions, contact IBM or your reseller. Machine: Business Audio Speaker Warranty Period*: One Year *Contact your place of purchase for warranty service information. Production Status Each Machine is manufactured from new parts, or new and used parts. In some cases, the Machine may not be new and may have been previously Part 2: Appendixes 2-3 installed. Regardless of the Machine's production status, IBM's warranty terms apply. The IBM Warranty for Machines IBM warrants that each Machine 1) is free from defects in materials and workmanship and 2) conforms to IBM's Official Published Specifications. The warranty period for a Machine is a specified, fixed period commencing on its Date of Installation. The date on your receipt is the Date of Installation, unless IBM or your reseller informs you otherwise. During the warranty period IBM or your reseller, if authorized by IBM, will provide warranty service under the type of service designated for the Machine and will manage and install engineering changes that apply to the Machine. For IBM or your reseller to provide warranty service for a feature, conversion, or upgrade, IBM or your reseller may require that the Machine on which it is installed be 1) for certain Machines, the designated, serial-numbered Machine and 2) at an engineering-change level compatible with the feature, conversion, or upgrade. Many of these transactions involve the removal of parts and their return to IBM. You represent that all removed parts are genuine and unaltered. A part that replaces a removed part will assume the warranty service status of the replaced part. If a Machine does not function as warranted during the warranty period, IBM or your reseller will repair it or replace it with one that is at least functionally equivalent, without charge. The replacement may not be new, but will be in good working order. If IBM or your reseller is unable to repair or replace the Machine, you may return it to your place of purchase and your money will be refunded. If you transfer a Machine to another user, warranty service is available to that user for the remainder of the warranty period. You should give your proof of purchase and this Statement to that user. However, for Machines which have a life-time warranty, this warranty is not transferable. 2-4 Business Audio Speaker Warranty Service To obtain warranty service for the Machine, you should contact your reseller or call IBM. In the United States, call IBM at 1-800-772-2227. In Canada, call IBM at 1-800-565-3344. You may be required to present proof of purchase. IBM or your reseller will provide certain types of repair and exchange service, either at your location or at IBM's or your reseller's service center, to restore a Machine to good working order. When a type of service involves the exchange of a Machine or part, the item IBM or your reseller replaces becomes its property and the replacement becomes yours. You represent that all removed items are genuine and unaltered. The replacement may not be new, but will be in good working order and at least functionally equivalent to the item replaced. The replacement assumes the warranty service status of the replaced item. Before IBM or your reseller exchanges a Machine or part, you agree to remove all features, parts, options, alterations, and attachments not under warranty service. You also agree to ensure that the Machine is free of any legal obligations or restrictions that prevent its exchange. You agree to: 1. obtain authorization from the owner to have IBM or your reseller service a Machine that you do not own; and 2. where applicable, before service is provided — a. follow the problem determination, problem analysis, and service request procedures that IBM or your reseller provide, b. secure all programs, data, and funds contained in a Machine, and c. inform IBM or your reseller of changes in a Machine's location. IBM is responsible for loss of, or damage to, your Machine while it is 1) in IBM's possession or 2) in transit in those cases where IBM is responsible for the transportation charges. Extent of Warranty IBM does not warrant uninterrupted or error-free operation of a Machine. The warranties may be voided by misuse, accident, modification, unsuitable physical or operating environment, improper maintenance by you, removal or alteration of Machine or parts identification labels, or failure caused by a product for which IBM is not responsible. THESE WARRANTIES REPLACE ALL OTHER WARRANTIES OR CONDITIONS, EXPRESS OR IMPLIED, INCLUDING, BUT NOT LIMITED TO, THE IMPLIED WARRANTIES OR CONDITIONS OF MERCHANTABILITY AND FITNESS FOR A PARTICULAR PURPOSE. THESE WARRANTIES GIVE YOU SPECIFIC LEGAL RIGHTS AND YOU MAY ALSO HAVE OTHER RIGHTS WHICH VARY FROM JURISDICTION TO JURISDICTION. SOME JURISDICTIONS DO NOT ALLOW THE EXCLUSION OR LIMITATION OF EXPRESS OR IMPLIED WARRANTIES, SO THE ABOVE EXCLUSION OR LIMITATION MAY NOT APPLY TO YOU. IN THAT EVENT SUCH WARRANTIES ARE LIMITED IN DURATION TO THE WARRANTY PERIOD. NO WARRANTIES APPLY AFTER THAT PERIOD. UNDER NO CIRCUMSTANCES IS IBM LIABLE FOR ANY OF THE FOLLOWING: 1) THIRD-PARTY CLAIMS AGAINST YOU FOR LOSSES OR DAMAGES (OTHER THAN THOSE UNDER THE FIRST ITEM LISTED ABOVE); 2) LOSS OF, OR DAMAGE TO, YOUR RECORDS OR DATA; OR 3) SPECIAL, INCIDENTAL, OR INDIRECT DAMAGES OR FOR ANY ECONOMIC CONSEQUENTIAL DAMAGES (INCLUDING LOST PROFITS OR SAVINGS), EVEN IF IBM OR YOUR RESELLER IS INFORMED OF THEIR POSSIBILITY. SOME JURISDICTIONS DO NOT ALLOW THE EXCLUSION OR LIMITATION OF INCIDENTAL OR CONSEQUENTIAL DAMAGES, SO THE ABOVE EXCLUSION OR LIMITATION MAY NOT APPLY TO YOU. Limitation of Liability Circumstances may arise where, because of a default on IBM's part or other liability you are entitled to recover damages from IBM. In each such instance, regardless of the basis on which you are entitled to claim damages from IBM (including fundamental breach, negligence, misrepresentation, or other contract or tort claim), IBM is liable only for: 1. damages for bodily injury (including death) and damage to real property and tangible personal property; and 2. the amount of any other actual direct damages or loss, up to the greater of U.S. $100,000 or the charges (if recurring, 12 months' charges apply) for the Machine that is the subject of the claim. Part 2: Appendixes 2-5 Appendix C. Notices Appendix D. Trademarks References in this publication to IBM products, programs, or services do not imply that IBM intends to make these available in all countries in which IBM operates. Any reference to an IBM product, program, or service is not intended to state or imply that only that IBM product, program, or service may be used. Subject to IBM’s valid intellectual property or other legally protectable rights, any functionally equivalent product, program, or service may be used instead of the IBM product, program, or service. The evaluation and verification of operation in conjunction with other products, except those expressly designated by IBM, are the responsibility of the user. HelpCenter, IBM, and Aptiva are trademarks of the IBM Corporation. IBM may have patents or pending patent applications covering subject matter in this document. The furnishing of this document does not give you any license to these patents. You can send license inquiries, in writing, to: IBM Director of Licensing IBM Corporation 500 Columbus Avenue Thornwood, NY 10594 U.S.A. 2-6 Business Audio Speaker Other company, product, and service names may be trademarks or service marks of others. IBM Part Number: 05L1596 Printed in U.S.A. ð5L1596