1
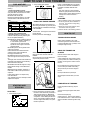
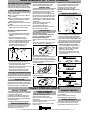
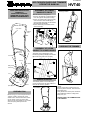
5118384-02
AIR CUSHION GASOLINE TRIMMER
OPERATOR MANUAL
READ THESE INSTRUCTIONS
CAREFULLY!
KNOW YOUR CONTROLS.
LEARN HOW TO STOP YOUR
TRIMMER IN AN EMERGENCY
ASSEMBLY OF LOWER
HANDLE TO DECK
HVT40
Trimming Position
With the trimmer on the ground:
1. Remove the bolts (1), washers (2) and
lock nuts (3) from the polythene bag.
2. Place one washer (2) on to the bolt (1)
and secure the lower handle (4) by
placing bolts (1) through deck brackets
(5) and lower handle (4).
3. Place washer (2) on bolt and secure
with lock nut (3).
Upper Handle
4
3
Start/Stop
Switch
2
2
1
5
CARRYING THE TRIMMER
Bolt, washer
and Lock nut
Tie
wraps
ASSEMBLY OF UPPER
HANDLE TO LOWER HANDLE
Assemble upper handle (6) to lower
handle (7) by fitting bolts (8) and washers
(9) and securing with lock nuts (10).
Lower Handle
Tank Cap
6
Air Cleaner
Starting Handle
Debris Guard
7
8
Bolt,
washer
and
Lock nut
9
Deck
10
HANDLE POSITION
Spark Plug/Lead
Primer
The handle position can be altered by
moving it forward for the park position or
back for the trimming position.
Park Position
PREPARATION
Before using your new Husqvarna Hover
Trimmer, make a careful note of the
details on the serial number label, which
can be found on the rear of the deck.
Always quote these details to your dealer
when enquiring about spares and
service.
NOTE:
Before carrying the machine from one
trimming area to another, disconnect the
spark plug lead.
Carry the trimmer at the point of balance
(see illustration) with the cutting head
away from you.
NEVER CARRY THE TRIMMER WHEN
IT IS RUNNING.
WARNING AND SAFETY INSTRUCTIONS
THE FOLLOWING WARNING IS ATTACHED TO THE TRIMMER AND MUST BE
ADHERED TO AT ALL TIMES.
Read Operator’s manual. * Remove objects that can be thrown by trimmer. * Do not
trim when children and others are around. * Wear safety glasses while operating
machine. * Do not use on slopes which are wet or too steep to maintain firm footing.
* Be sure trimmer has stopped before placing hands or feet near cutting head.
* Do not fit a metal/bar blade as a cutting mechanism on this machine. * Use only the
cutting head device approved by the Manufacturer. * Cutting head continues to
rotate after machine is switched off. * Disconnect spark plug lead before cleaning or
adjusting the machine.
OPERATORS SAFETY
1. Always wear eye protection or safety goggles
to protect against objects thrown out by the
cutting line.
2. Always wear long trousers, gloves and heavy
shoes.
3. Only use the trimmer in the manner and for
the functions described in these instructions.
4. Never operate the trimmer when you are
tired, ill or under the influence of alcohol,
drugs or medicine.
5. Only allow persons over the age of 16 and
who have read and understood these
instructions to use this trimmer.
6. Wear hearing protection if you use this
trimmer for more than 11/4 hours per day.
7. Start the engine carefully following the
‘Starting Instructions’, never start or run the
engine inside a closed room or building.
Breathing exhaust fumes can kill.
8. Keep handles free from oil and fuel.
FUEL SAFETY
1. Use a container approved for the storage of
gasoline.
2. Mix and fill fuel tank outdoors where there are
no sparks or flames.
3. Do not remove tank cap or fill the tank while the
engine is running.
4. Do not smoke or allow smoking while you are
filling the tank near stored fuel, the trimmer, or
while using the trimmer.
5. Avoid spilling fuel, wipe up any spillage
immediately.
6. Move at least 10 feet away from the fuelling site
before starting the engine.
7. Empty the fuel tank before storing the trimmer.
8. Store machine and fuel in an area where fuel
vapours cannot reach sparks or open flames
from water heaters, electric motors or switches,
furnaces etc.
WARNING
WARNING
WARNING
The engine exhaust from
this product contains
chemicals known to the
State of California to cause
cancer, birth defects or
other reproductive harm.
IF NOT USED PROPERLY, THIS
TRIMMER CAN BE DANGEROUS
This trimmer can cause serious injury or death to
the the operator and others. The warnings and
safety instructions must be followed. The
operator is responsible for following the warnings
and instructions in this manual and on the trimmer. Read the entire Operator’s manual before
assembling and using this trimmer. Restrict the
use of this trimmer to persons who have read, or
been instructed in the use of, understand and will
follow all warnings and instructions issued with
this trimmer.
CUTTING SAFETY
1. Inspect the area to be cut before each use.
Remove all objects such as stones, broken
glass, nails, wire, string etc., which can be
thrown or become entangled in the trimmer
line.
2. Keep others including children, animals and
bystanders, a safe distance away from the
trimmer. Stop the trimmer immediately if you
are approached.
WARNING
TOOL SAFETY
1. Always be sure the trimmer is in a safe
operating condition. Use only genuine
Husqvarna parts and accessories specified
for the product.
2. Only use Husqvarna replacement cutting
line, do not use wire, string or rope etc.
3. Inspect the trimmer each time before use,
especially the cutting line and mounting
disc.
4. Do not use if any parts appear or are
damaged or broken, or if any screws are
loose. Have it repaired.
5. Never use, or attempt to fit, a metal/bar
blade with this product.
6. If the trimmer starts to vibrate abnormally,
stop the engine immediately and
investigate the cause, (If in doubt, contact
your service dealer).
7. Never allow grass to collect around
the engine, especially the cooling air inlet
and outlet. Overheating will damage the
engine.
8. Do not overspeed the engine or alter the
governor settings. Excessive speed is
dangerous and can shorten engine life.
3. Hold the trimmer firmly with both hands.
4. Only trim in daylight or good artificial light.
5. Keep a firm footing and balance, especially
on wet or damp grass.
6. Keep the trimmer flat on the grass when in
use.
MAINTENANCE SAFETY
8. Do not walk backwards.
1. Always switch off and disconnect the spark
plug lead before performing any
maintenance or cleaning.
9. Exercise extreme caution on slopes.
Carefully follow the instructions.
“USING THE TRIMMER ON SLOPES”.
2. Have all servicing, other than cutting line
replacement, carried out by a qualified
service engineer.
10. Stop the engine before taking the trimmer
across any surface other than grass.
3. Use only genuine Husqvarna replacement
parts. Failure to do so could create a hazard
and may invalidate your warranty.
7. Do not overreach.
11. Never pick up or carry the trimmer while the
engine is running.
12. Never leave the trimmer unattended while the
engine is running.
4. Clean after use. Never clean your trimmer
with water, just use a dry cloth or soft brush,
never use cleaning fluids or solvents.
13. Keep hands and feet away from the underside of the deck, the fast rotating cutting line
cannot be seen.
5. Allow the engine to cool before storing the
trimmer. Store the trimmer in a dry, dampproof, secure area, out of reach of children.
14. The cutting line continues to rotate after the
engine has been switched off.
Use only for jobs explained in this manual. If
situations occur which are not covered in this
manual, use care and good judgement. Contact
your dealer if you need assistance.
HOW TO USE YOUR TRIMMER
FUEL MIXTURE
To operate the engine, you will need the
following:1.A clean, high quality 2 cycle oil.
Tecumseh specially formulated oil is available
at any Authorised Tecumseh Service Outlet.
Order as part number 730227.
Do not use multi-viscosity oils.
Disregard mix ratio instructions on oil containers if instructions conflict with fuel mix chart
below.
Fuel Mix Chart
Mixture 24:1
U.S.
S.1. (Metric)
Gas Oil to be added Petrol Oil to be added
167 ml
4 Liters
1 Gal.
5 oz.
333 ml
2 Gal.
8 Liters
11 oz.
833 ml
27 oz.
20 Liters
5 Gal.
2. A fresh, clean, unleaded regular
automotive gasoline. (Leaded regular and
unleaded or leaded premium grades of gasoline are acceptable substitutes.)
Note:Do not use gasoline containing methanol
(wood alcohol). Gasoline containing up
to 10% ethanol or grain alcohol
(“Gasohol”) may be used but requires
special care when engine is unused for
extended periods.
Do not attempt to mix oil and gasoline in the
engines own fuel tank.
Ensure that the fuel in both the fuel mixture
container and the engines fuel tank are
thoroughly mixed before use.
Do not fill the fuel tank in an enclosed area,
when the engine is hot or while you are smoking.
Thoroughly clean around the fuel tank filler cap
before filling, this will help to prevent dirt being
introduced into the fuel system.
Do not fill the tank while the engine is running.
Fill the fuel tank through a funnel fitted with a
fine filter.
2. Move switch to ‘start’ position.
STOP -
STOP
START -
NOTE: IF THE ENGINE FAILS TO START
AFTER 3 PULLS, PRESS THE PRIMER A
FURTHER 3-5 TIMES AND FOLLOW
STEP 3.
Only when engine is running should the
trimmer be gently lowered to the horizontal
floating position. Always allow the engine to
warm up for a minute or two before
trimming.
STOPPING
USING THE ENGINE PRIMER
When starting the trimmer for the first time or
after running the fuel tank dry, press the primer
15-20 times (fig 1), to establish the fuel supply
to the carburettor.
COLD START - if the engine is cold and there
is fuel in the tank.
Press the primer 8 to 10 times (fig 1).
1. Move start/stop switch to 'stop' position.
2. As the engine dies, tilt the trimmer to
one side. This prevents a ring being
cut in your lawn.
3. When the engine has stopped, lower
the trimmer onto the ground.
4. Put the handle in the Parking position.
HOW TO CUT
TOUGH AND HIGH GRASS
Fig. 1
WARM START - if the engine is warm and
there is fuel in tank - DO NOT USE THE
PRIMER.
If the engine has run out of fuel, refill the tank
and press the primer 8-10 times
Fig. 2
Before cutting, particularly in long grass,
examine the ground and remove stones etc.
If grass is particularly tough, go slowly in order
to keep the engine revs up.
USING THE TRIMMER ON
SLOPES
Exercise extreme caution while using this
trimmer on slopes.
A slope is defined as uneven terrain on which
you, the operator, are unable to maintain your
feet firmly on level ground in order to use the
trimmer.
Do not use this trimmer on slopes which are
wet or too steep to maintain a firm footing
Always use heavy shoes when using this
trimmer.
Never fill fuel tank completely. Fill tank to 1/ 2”
below bottom of filler neck to provide for fuel
expansion.
Fuel should be stored in a cool place away
from naked flames.
Your carburettor is pre-set. Normally no further
adjustment is required.
Never push the trimmer up the slope.
Always keep the trimmer below you on the
slope.
COMPLETION OF TRIMMING
STARTING AND
STOPPING
STARTING
1. Connect spark plug lead.
Having completed the trimming, stop the
engine.
3. Place your left foot on the deck and grasp
the far arm of the handle with your left hand.
Tilt the trimmer towards you. (See Fig 2)
Pull the starting handle gently until you feel
compression. Let the starting handle return
slowly. Firmly pull the handle the full length,
when the engine should start; if not, repeat
the above procedure.
As soon as the engine begins to fade, tilt the
trimmer.
Disconnect the spark plug.
Cleaning Trimmer:- Remove grass adhering
to the underside of deck. A clean machine will
always work better and last longer than a dirty
one.
MAINTENANCE OF YOUR TRIMMER
ON COMPLETION OF TRIMMING
Clean grass from under deck. Remove any
leaves or grass cuttings from around the engine
cooling fins, carburettor and impeller air openings.
AIR FILTER MAINTENANCE
● Your Tecumseh engine is equipped with a dry
paper cartridge air filter.
● Every 10 operating hours check condition of
paper cartridge.
● Every 50 operating hours (or more regularly)
replace the paper cartridge. (see Air Filter
Cleaning Instructions number 1).
● Do not attempt to wash, clean or oil the paper
cartridge.
● If engine is operating in dusty or dirty areas, the
air filter system will require more frequent
Do not remove spark plug when engine is hot.
Do not sand blast the spark plug to clean it.
Remove spark plug lead and spark plug.
WINTER CARE
For trouble-free trimming next season, make
sure that your trimmer is serviced immediately
after the last cut of the year, as follows:When the engine is cold, drain all fuel from the
tank and then run the engine until it stops. (Fuel
left in the machine becomes stale and causes
difficult starting). Thoroughly cleanallexternal
partsofthetrimmer. Clean air filter (see air filter
maintenance).
Inspect, clean and replace spark plug.
Do not replace spark plug lead.
Check and replace cutting lines.
Store the trimmer in a dry, damp-proof secure
area out of the reach of children.
CUTTING LINE
Air Filter Cleaning Instructions
(see illustration)
1. Turn cover (3) (anti-clockwise) and remove it
and filter (2) from flange (1). Discard paper
cartridge.
2. Clean cover and flange thoroughly.
3. Insert new cartridge (2) onto flange (1).
4. Position cover (3) against flange (1) with tab (4)
on cover inserted into slot (5) in flange (1).
5. Push cover firmly against flange and turn it
(clockwise) as far as it will go. Be sure
retainers are locked around flange.
5
2
The cutting line is sharp, wear gloves and
take care when handling it.
Check the cutting line frequently during
use and on completion of trimming.
Removing the Cutting Line
Switch machine off and disconnect spark plug
lead.
Push the line towards the centre of the cutting
disc and carefully remove. See Fig 3.
Fig. 3
3
At all times the amount of line extending beyond
the edge of disc should be of an even length. If
there is a variation of more than half an inch
between the four lengths of line replace
immediately with four full new lengths.
Important:- Only fit four cutting lines at any
one time
HEIGHT ADJUSTMENT
6
5
4
3
Fig A
2
1
1. Loosen bolt (A1), using a 13mm socket.
Remove bolt (A1), spring washer (A2), washer
(A3), cutting disc (A4) and spacer (A5) (if fitted).
2. Carefully remove impeller (A6) from engine shaft.
3. Select required height of cut, (See Figs B, C, D &
E) and replace any cutting lines required, ensuring
that cutting line is fitted on correct side of cutting disc.
● Important:- Cutting line must be on the side
of the disc facing the grass when fitted.
4. Replace impeller (A6) on to engine shaft ensuring that it is correctly located. Replace spacer
(A5) (if fitted), cutting disc (A4), washer (A3),
spring washer (A2) and bolt (A1).
5. Secure assembly with bolt (A1), making sure
complete assembly is tight, (if in doubt, contact
your service dealer).
Renewing the Cutting Line
1
4
1. When cleaning the air cleaner, also check and
clean the debris guard using a soft brush.
2. If debris guard is very dirty, unscrew wing nut
and remove debris guard and filter.
3. Wash filter in clean soapy water, rinse, wrap in
a clean dry cloth and ‘squeeze dry’.
4. Re-assemble ensuring that the recoil rope
passes through the slot in the foam filter.
Holding the line with thumb and forefinger and
using other thumb as a guide, curve around
centre portion of the cutting disc (as illustrated
in Fig 4) and thread through the hole on the
rim of the cutting disc.
Fig B
Highest
height of cut
Fig. 4
Fig C
COOLING SYSTEM AIR INTAKE
Never operate the engine without the debris guard
and filter being fitted. Failure to fit the debris guard
and filter will cause premature engine failure.
Carefully pull the line into place as
illustrated in Fig. 5.
Fig D
Fig. 5
SPARK PLUG
An oily or carboned spark plug makes starting difficult and decreases the efficiency of the engine.
Periodically remove the spark plug and clean and
adjust when necessary. Gap setting 0.030”
Fig E
Lowest
height of cut
FAULT FINDING HINTS
DIFFICULT TO START
Check that the start/stop switch is in the ‘start’ position.
Ensure hole in tank cap is clean.
Fuel mixture may be stale (e.g. long time since
trimmer was used). Renew with fresh mixture.
Check that correct amount of 2 stroke oil is being
used in the fuel mixture.
Checkthatthecuttingdiscissecurelytightened.
ENGINE OVERHEATING
Check flow of air over cylinder. Remove all
grass and dirt. Check correct fuel mixture.
Thoroughly clean Debris Guard.
POOR FLOTATION OR
LACK OF POWER
Check correct fuel mixture is used.
Ensure underside of deck is clean.
Air filter may need cleaning (seeair filter
maintenance).
Ensure exhaust port on silencer does not have
excessive build-up of carbon.
Remove disc/impeller and clean thoroughly
between vanes.
EXCESSIVE VIBRATION
Check that the cutting disc is securely fastened
and undamaged.
Tighten all external bolts and screws.
Check crankshaft - it may have bent.
ENGINE WARRANTY
A full warranty statement is detailed on the
service literature, and with the Tecumseh
engine literature supplied with this product.
9006 Perimeter Woods Drive ● Charlotte, NC 28216 ● 1-800-GET-SAWS ● Dealer Locator 1-800-HUSKY 62 ● Web Site www.husqvarna.com ● Dealer Web Site www.husqvarna.service.com
The policy of continuous improvement means that specifications may be altered without prior notice. 1997 Husqvarna. HVT40 Operator Manual Part