1
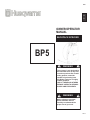
BP5
U
S
OWNER/OPERATOR
MANUAL
BACKPACK SPRAYER
BP5
WARNING
This sprayer is not designed to
be used with acids of any kind,
corrosive products like caustic
soda, gasoline, materials
capable of generating heat,
hot fluids, explosive or highly
volatile products.
USE OF THESE AND OTHERS
EXPOSE USERS TO SERIOUS
INJURY AND EVEN DEATH.
WARNING
Before using our products,
please read this manual carefully to understand the
proper use of your unit.
US-1
BP5
SAFETY FIRST
Instructions contained in warnings within this manual and warning seals marked
with a
symbol on the sprayer concern critical points which must be taken
into consideration to prevent possible serious bodily injury, and for this reason
you are requested to read all such instructions carefully and follow them without
fail.
Note that there may be times when warning seals peel off or become soiled and
impossible to read. If this happens, you should contact the dealer from which
you purchased the product to order new seals and affix the new seal(s) in the
required location(s).
NOTES ON TYPES OF WARNINGS
Instructions labeled as shown at left, concern critical steps or procedures
which must be followed in order to prevent accidents which could lead to
serious bodily injury or death.This mark is used to indicate instructions
which must be followed without exception.
Instructions labeled as shown at left concern steps or procedures which, if not
followed correctly, could lead to mechanical failure, breakdown, or damage.
Used to label supplementary instructions designed to provide hints or directions
useful in the use of the product.
Contents
1. Parts location....................................................................3
2. Specifications ...................................................................3
3. Warning labels on the machine ........................................3
4. For safe operation ............................................................3
5. Set up ...............................................................................6
6. Pre Operation ...................................................................7
7. Operation..........................................................................7
8. Maintenance .....................................................................8
9. Storage .............................................................................8
10.Disposal.............................................................................8
US-2
BP5
2. For safe operation
1. Parts location
2
6
7
4
3
1
5
1. Tank
2. Pump
3. Lid (cap)
4. Shoulder Strap
5. Hose
6. Wand
7. Nozzle,
Spray Tip Set
2. Specifications
Type ············································································Back Pack
Model Name··········································································BP5
Dimensions (LxWxH) ·························566x375x220 (22.3x14.8x8.7) mm (in)
Dry Weight································································6.05 (12.1) kg (lbs)
Tank Capacity···························································17.4 (4.6) litter (Gal)
Max. Pressure ···················································11.76 (168) kgf/cm 2 (psi)
Working Pressure·····································1.05 – 5.6 (15 – 80) kgf/cm 2 (psi)
Sealed/O rings····································································VITON/Nytril
Pump Type ··················································Internal Double-lipped Piston
Reparability···················································································YES
Tank Mouth ······················································································6”
Wand Type·············································································20” Brass
Standard Nozzle ··················································Adjustable Brass Nozzle
3. Warning labels on the machine
If warning label peel off or become soiled and impossible to read,
you should contact the dealer from which you purchased the
product to order new labels and affix them in the required
location(s).
Never modify your machine.
We will not warrant the machine, if you use the remodeled
machine or you don’t observe the proper usage written in
the manual.
1. Read this Sprayer Owner/Operator
Manual carefully. Be sure you
understand how to operate this unit
properly before you use it. Failure to
do so could result in serious injury.
2. Be sure to keep this manual handy
so that you may refer to it later
whenever any questions arise. Also
note that you are requested to
contact the dealer from whom you
purchased the product for
assistance in the event that you have any questions which cannot be
answered herein.
3. Always be sure to include this
manual when selling, lending, or
otherwise transferring the ownership
of this product.
4. Do not lend or rent your machine
without the owner’s manual.
5. Be sure that anyone using your unit
understands the information
contained in this manual.
6. Never let a child under 13 years old
use the machine.
7. DO NOT use flammables in the
sprayer. They can ignite or explode
causing serious injury.
8. Always wear splash goggles and
protective gear and clothing when
filling, using and/or cleaning the
sprayer.
9. Oil the rubber cap gasket prior to
first usage so the gasket will seal
properly.
10.Tighten all connections before using
the sprayer. Some may not be
properly secured and must be
tightened to prevent leakage.
U
S
BEFORE USING:
Oil cap gasket, oil check valve, and
keep breather hole clear of debris.
Your failure to oil and to clean check
valve, and to keep breather hole
opening to allow air into tank, can
cause tank to collapse and crack due
to vacuum created by the pump.
US-3
BP5
4. For safe operation
WORKING CONDITION
1. Refrain from operating the sprayer if you
are tired, ill, or upset, or if you are under
the influence of alcohol, drugs or
medication.
2. To reduce the risk of injury when filling,
using and/or cleaning the sprayer, always
wear eye protection. Eye protection should
meet the requirements of ANSI Z87.1.
3. Always wear a mask or respirator when
filling, using and cleaning sprayer, if
recommended by the spray material
manufacturer.
4. Wear protective gear and clothing when
filling, using and cleaning the sprayer.
5. Wear sturdy rubber-soled shoes or shoes
with some other form of anti-slip protection
to help protect you against falling when
filling, using and/or cleaning the sprayer.
6. Do not wear loose clothing, scarves, neck
chains, hair longer than shoulder length,
and the like when filling, using and/or
cleaning the sprayer.
Check and follow the local regulations.
WORKING PLAN
When planning your work schedule, allow
plenty of time to rest. Limit the amount of
time over which the product is to be used
continuously to somewhere around 30 ~ 40
minutes per session, and take 10 ~ 20
minutes of rest between work sessions.
Also try to keep the total amount of work
performed in a single day under 2 hours or
less.
USING THE PRODUCT
Hose clamps are not completely tight.
Please tighten hose clamps prior to using.
Hose clamps are left loose to extend life of
gaskets and fittings.
Oil cap gasket before using and lubricate
weekly so the gasket will seal properly
and prevent chemical leaks.
Oil check valve and keep breather
hole clear of debris. Your failure to oil may
cause the tank to collapse and crack
due to vacuum created by pump lubricate
with “3 and 1” oil.
US-4
1. Always inspect your sprayer thoroughly
before and after each use. Check to be
sure hose is securely attached and in good condition before pressurizing the tank.
2. Check the work area that the sprayer will
be used in and remove or cover all
valuables that may be damaged by using
sprayer.
3. To reduce the risk of injury,
• Watch out for children, pets, open windows or freshly washed cars, and
spray safely away.
• Do not allow bystanders in work area.
• Do not point the sprayer nozzle in the
direction of people or pets.
• Pay attention to the direction of the
wind, do not work against the wind.
• Never use the sprayer during windy
conditions.
• Never point a sprayer nozzle toward an
open flame to avoid the possibility of
igniting the unit, causing injury to
yourself or damage to surroundings.
• Always release pressure in the pump
prior to filling, cleaning, or servicing the
sprayer.
• Before opening a container of pesticide
or other spray material, carefully read,
understand, and follow all instructions
on the label.
• Do not use flammable materials in the sprayer: they can ignite and/or
explode, causing serious injury.
• Never use caustic or corrosive materials in the sprayer, which could result in damage to the unit.
• In case of personal contamination:
remove contaminated clothing, remain
upright, do not consume liquids or cause vomiting, and get professional help immediately.
• Never attempt to pressurize the unit by any other method than with the pump
module provided. Never over-pressurize the unit.
• Do not eat, drink, or smoke while spraying.
• Wash face and hands with soap and
water after spraying.
• Clean and rinse tank and spraying
assembly after each use to prevent
crystallizing, which would later cause
clogging and chemical damage to the
unit.
• Do not store sprayer under pressure, or with spray solution in tank.
• Do not transfer spray materials to other containers, especially, food and/or drink containers.
BP5
4. For safe operation
• Keep spray materials locked up and out of reach of children and animals.
• Use only original manufacturer’s
replacement parts.
• As a rule, mix your chemicals in a
separate container from which to fill the
sprayer. Do not mix formulas inside the
sprayer. Where an exception is made
(e.g. with liquid fertilizers), fill sprayer
with water BEFORE adding the active
ingredient.
• Always sift formula through the screen.
If there is no built-in strainer, use a
screened funnel.
• Never fill the sprayer with hot liquids.
Max. 30°C, or 85°F.
• Never use gasoline or other flammable
materials.
• Before cleaning or servicing the sprayer, allow all pressure to escape. Do not store or transport sprayer under
pressure.
• After each use, wash the sprayer—
including hose, lance and shut-off
valve—with plenty of fresh water. Unless spraying is to be continued within hours, drain chemical formula and thoroughly rinse the tank and all liquid ducts.
• Never store chemicals in your sprayer
for any length of time
• Do not leave the sprayer in reach of
children or persons not qualified to
handle it in proper fashion.
• When not in use—and especially
during prolonged storage—keep your sprayer in a protected place away from direct solar heat.
• Make sure the spray hose loops freely
without kinking or squeezing.
4. After using sprayers and other equipment,
CLEAN UP! Dispose of debris in trash
receptacles.
MAINTENANCE
1. In order to maintain your product in proper working order, perform the main
tenance and checking operations described in the manual at regular intervals.
2. Examine the sprayer at intervals for loose
fasteners and rusted or damaged parts.
Use special care for chemical leakage.
3 Clean and rinse tank and spraying
assembly after each use to prevent
crystallizing, which would later cause
clogging and chemical damage to the unit.
4. All service except for those described in
this manual should be performed by
competent service personnel.
5. When replacing any other part, or any
lubricant, always be sure to use only
Husqvarna products or products which have been certified by Husqvarna for use with the Husqvarna product.
6. In the event that any part must be
replaced or any maintenance or repair work not described in this manual must be performed, please contact a Husqvarna authorized
servicing dealer for assistance.
7. Do not use any accessory or attachment
other than those bearing the Husqvarna mark and recommended for the unit.
8. Under no circumstances should you ever
take apart the product or alter it in any
way. Doing so might result in the product
becoming damaged during operation or the product becoming unable to operate
properly.
•
•
•
•
TRANSPORTATION
Clean and rinse tank and spraying assembly after each use to prevent crystallizing, which would later cause
clogging and chemical damage to the unit.
Drain the content from the tank before
transporting or storing the sprayer.
Secure the unit carefully to prevent
movement when it is transported.
A unit that receives a strong shock during transport and unloading may malfunction.
•
•
•
STORAGE
Clean and rinse tank and spraying
assembly after each use to prevent
crystallizing, which would later cause
clogging and chemical damage to the unit.
Do not store sprayer under pressure, or with spray solution in tank.
When storing the sprayer, choose a space indoors free from moisture and out of the reach of children.
U
S
DISPOSAL
• When disposing of your machine, or chemical, be sure to follow your local regulations.
US-5
BP5
5. Set up
Hose clamps are not completely tight.
Please tighten hose clamps prior to using.
Hose clamps are left loose to extend life
of gaskets and fittings.
Fig. 2
Oil cap gasket before using and
lubricate weekly so the gasket will seal
properly and prevent chemical leaks.
Oil check valve and keep breather
hole clear of debris. Your failure to oil
may cause the tank to collapse
and crack due to vacuum created by
pump lubricate with “3 and 1” oil.
■ HOW TO ASSEMBLE
Included in the box, please find the
following:
1)PUMP HANDLE & PUMP LEVER.
2) SPRAYER (Pump Module installed).
3) HIP SUPPORT. (Packed in tank)
4) SPARE PARTS (bag with locking pins
& washer).
5) AGITATOR (Packed in tank)
PUMP HANDLE
The pump handle is made of a tubular
steel with a plastic grip on one end, and a
round tube welded to the opposite side at
right angle. The flat bar has a hole
12.5mm (1/2”) in diameter. This hole is
located 57mm (2 1/4”) from the round
tube. (See figure 1).
Fig. 1
(2)
(3)
(1)
(1) Pump Handle
(2) Pump Lever
(3) Pump Module
US-6
PUMP LEVER
The pump lever is made of a 15.2cm
(1/2’) solid round steel bar with two
bends, one on either side of the bar. (See
figure 1).
PUMP MODULE
Pump module is installed in the sprayer.
Now proceed to install pump handle and
lever.
Fig. 3
ASSEMBLY OF PUMP HANDLE PUMP
LEVER & PUMP MODULE
Pull sprayer, pump lever, pump handle,
spray wand, plastic bag (with washers
and pins), etc. out of box. Place parts in
front of you. Take the pump lever, there
are bends on either side. (See figure 2).
Place one Washer through the bar, then
push lever through opening on pump,
place washer on pump lever and then
place hairpin lock and push through.
On the same side where the pump is
located, place the round portion of the
pump handle through the hole on the
base of the sprayer. When it is almost
through, place the bent portion of the
pump lever through the hole on the flat
portion of the handle. Once through, place
on one washer and, then the locking pin.
(See figure 3). The round tube comes
through the base of the unit and extends
out 6.4mm (1/4”), exposing the hole
drilled through the tube. Place on the
other washer and the other holding pin.
The pump handle assembly is now
complete.
HIP SUPPORT
Take the black plastic hip portion and side
the two end sections into the two
receiving notches on the base, the
rounded side up.
STRAPS
Hook the plastic clip attached to the
shoulder straps into the appropriate
lateral opening on the hip support.
SPRAY WAND AND NOZZLE
Attach spray wand to spray gun and firmly
tighten. To adjust nozzle, tighten (turn
clockwise), cap for a fine atomized spray,
or loosen (turn counter clockwise), for a
coarser spray or solid stream.
THE SPRAYER IS NOW READY TO
USE.
BP5
6. Pre-operation
Hose clamps are not completely tight.
Please tighten hose clamps prior to using.
Hose clamps are left loose to extend life of gaskets and
fittings.
Oil cap gasket before using and lubricate weekly so the
gasket will seal properly and prevent chemical leaks.
Oil check valve and keep breather hole clear of debris.
Your failure to oil may cause the tank to collapse and
crack due to vacuum created by pump lubricate with “3
and 1” oil.
Before using, oil cap gasket, felt pump washer, and check
valve, and keep breather hole clear of debris. Your failure to
oil, clean check valve, and keep breather hole open to allow
air into the tank, can cause the tank to collapse and crack, due
to vacuum created by pump.
1. Before you remove cap, be sure there is no pressure in the
tank. in order to release pressure, invert unit upside down and squeeze spray pistol (aim away from you). Pressure will
escape; when hissing stops, all pressure has been released.
Remove pump assembly by turning counter-clockwise. The
pump handle has two locking positions, one turning clockwise and one counter-clockwise.
2. Remove cap.
3. A unit that has been used with herbicides should never be used to spray insecticides, unless the sprayer has been properly cleaned and all other chemicals neutralized. Failure to do this could cause you to kill plants that have been sprayed. Consult with the manufacturer of the chemicals in use to obtain proper instructions.
4. Always oil the gasket on the cap of the unit, as well as the
check valve. This will extend the life of the seal and is important for obtaining a proper seal with no leaks.
5. Mix solution in a separate container, following the
manufacturers’ directions.
6. Pour pre-mixed solution through strainer into tank. Reinstall cap tightly.
7. Place sprayer on back and pressurize tank by pumping
approximately 5 to 11 times.
8. You will need to pump occasionally to maintain the desired
spraying pressure.
9. For best results, the sprayer should be pumped every five
seconds on a continuous basis. This will maintain your spraying pressure. If you do not pump, you will not have pressure to spray.
7. Operation
• Always release pressure in the pump prior to filling, cleaning, or servicing the sprayer.
• Before opening a container of pesticide or other spray
material, carefully read, understand, and follow all
instructions on the label.
• Do not use flammable materials in the sprayer: they can
ignite and/or explode, causing serious injury.
• Never use caustic or corrosive materials in the sprayer, which could result in damage to the unit.
HOW TO ADJUST THE NOZZLE
• To adjust nozzle, tighten cap (turn clockwise) for fine
atomized spray, or loosen (turn counter-clockwise) for
coarser spray or solid stream.
U
S
HOW TO PREPARE YOUR UNIT FOR USE
• Normal working pressure should be from 25 psi to 40 psi. Too much pressure will waist chemical and over apply, as well as causing potential damage to pump tube.
• Pump occasionally to maintain the desired spraying
pressure.
RECOMMENDED APPLICATIONS FOR
“LAWN AND GARDEN” OR “AGRICULTURE” USAGE
Herbicide : Yes
Insecticides/Pesticides : Yes
Fertilizers : Yes
Chlorine based : Yes
Diesel : Yes
Wettable Powder : Yes
Stains & Sealers : Yes
Oil Based : Yes
Solvent-Based : Yes
Viscous : No
US-7
BP5
9. Storage
8. Maintenance
Before you remove cap, be sure there is no pressure in the
tank. in order to release pressure, invert unit upside down
and squeeze spray pistol (aim away from you). Pressure will
escape; when hissing stops, all pressure has been released.
Remove pump assembly by turning counter-clockwise. The
pump handle has two locking positions, one turning
clockwise and one counter-clockwise.
1. Remove cap and pour out remaining solution, then rinse all
parts thoroughly with clean water.
2. Add 1/2 gallon of fresh water in tank. Pressurize, and flush
pumping system by depressing trigger for at least two minutes; then drain all remaining water.
• Periodically re-grease lid gasket as well as lid vent and pump cylinder, where applicable.
• To ensure good performance, keep lid vent free of obstruction.
• Before and after each use, make sure all connections are well tightened. Service and replace worn parts as required.
Never store chemicals in your sprayer for any length of
time
1. Before you remove cap, be sure there is no pressure in the
tank. in order to release pressure, invert unit upside down and squeeze spray pistol (aim away from you). Pressure will
escape; when hissing stops, all pressure has been released.
Remove pump assembly by turning counter-clockwise. The
pump handle has two locking positions, one turning cloc
kwise and one counter-clockwise.
2. Remove cap and pour out remaining solution, then rinse all
parts thoroughly with clean water.
3. Add 1/2 gallon of fresh water in tank. Pressurize, and flush
pumping system by depressing trigger for at least two minu
tes; then drain all remaining water.
4. Always store tank clean and empty in a dry, shaded location.
10. Disposal
When disposing of your machine, or chemical, be sure to
follow your local regulations.
Failure to follow manufacturer’s recommendation of use and
care of unit will void any expressed or implied warranty. Do
not use chlorine or clorox. It will permanently damage pump
system.
In the event that any part must be replaced or any maintenance
or repair work not described in this manual must be performed,
please contact a Husqvarna authorized servicing dealer for
assistance.
SPRAYER MAINTENANCE TABLE
System/Component
Procedure
Daily
or
Before Use After Use
Lid Gasket
Grease
3
Lid Vent
Inspect/Clean
3
Pump
Grease
3
Connection
Inspect/Tight
3
Whole unit
Wash/inspect
US-8
3
BP5
LIMITED WARRANTY
FOR TWO (2) YEARS OF HOME USE, ONE (1) YEAR FOR COMMERCIAL USE AND NINETY (90) DAYS FOR RENTAL
USE FROM THE DATE OF ORIGINAL PURCHASE,THE COMPANY, THROUGH ANY Husqvarna DEALER, WILL REPAIR
OR REPLACE, FREE OF CHARGE, FOR THE ORIGINAL PURCHASER, ANY PART OF PARTS FOUND TO BE DEFECTIVE IN MATERIAL AND/OR WORKMANSHIP. THIS IS THE EXCLUSIVE REMEDY.
U
S
THE PURCHASER SHALL BEAR COSTS OF TRANSPORTING THE UNIT TO AND FROM THE Husqvarna DEALER.
THE PURCHASER SHALL NOT BE CHARGED FOR DIAGNOSTIC LABOR WHICH LEADS TO THE DETERMINATION
THAT A WARRANTED PART IS DEFECTIVE, IF THE DIAGNOSTIC WORK IS PERFORMED AT THE Husqvarna DEALER.
THE PURCHASER OR OWNER IS RESPONSIBLE FOR THE PERFORMANCE OF THE REQUIRED MAINTENANCE AS
DEFINED BY THE MANUFACTURER IN THE OWNER/OPERATOR MANUAL.
ANY WARRANTED PART WHICH IS NOT SCHEDULED FOR REPLACEMENT AS REQUIRED MAINTENANCE, OR
WHICH IS SCHEDULED ONLY FOR REGULAR INSPECTION TO THE EFFECT OF “REPAIR OR REPLACE AS
NECESSARY” SHALL BE WARRANTED FOR THE WARRANTY PERIOD. ANY WARRANTED PART WHICH IS
SCHEDULED FOR REPLACEMENT AS REQUIRED MAINTENANCE SHALL BE WARRANTED FOR THE PERIOD OF
TIME UP TO THE FIRST SCHEDULED REPLACEMENT POINT FOR THE PART.
ANY REPLACEMENT PART THAT IS EQUIVALENT IN PERFORMANCE AND DURABILITY MAY BE USED IN NONWARRANTY MAINTENANCE OR REPAIRS, AND SHALL NOT REDUCE THE WARRANTY OBLIGATION OF THE
COMPANY.
THE COMPANY IS LIABLE FOR DAMAGES TO OTHER COMPONENTS CAUSED BY THE FAILURE OF A
WARRANTED PART STILL UNDER WARRANTY.
THE WARRANTY DOES NOT APPLY TO THOSE UNITS WHICH HAVE BEEN DAMAGED BY NEGLIGENCE OF
INSTRUCTION LISTED IN THE OWNER/OPERATOR MANUAL FOR PROPER USE AND MAINTENANCE OF THE
UNITS, ACCIDENTAL MISHANDLING, ALTERATION, ABUSE, IMPROPER LUBRICATION, USE OF ANY PARTS OR
ACCESSORIES OTHER THAN THOSE SPECIFIED BY THE COMPANY, OR OTHER CAUSES BEYOND THE
COMPANY’S CONTROL.
THIS WARRANTY DOES NOT COVER THOSE PARTS REPLACED BY NORMAL WEAR OR HARMLESS CHANGES IN
THEIR APPEARANCE.
THERE ARE NO OTHER EXPRESS WARRANTIES.
IMPLIED WARRANTIES INCLUDING THOSE OF MERCHANTABILITY AND FITNESS FOR A PARTICULAR PURPOSE
ARE LIMITED TO TWO (2) YEARS OF HOME USE, ONE (1) YEAR FOR COMMERCIAL USE AND NINETY (90) DAYS
FOR RENTAL USE FROM THE ORIGINAL DELIVERY DATE.
LIABILITIES FOR INCIDENTAL OR CONSEQUENTIAL DAMAGE UNDER ANY AND ALL WARRANTIES ARE
EXCLUDED.
SOME STATES DO NOT ALLOW LIMITATION ON HOW LONG AN IMPLIED WARRANTY LASTS OR EXCLUSION OR
LIMITATION OF INCIDENTAL OR CONSEQUENTIAL DAMAGES, SO THE ABOVE LIMITATION OR EXCLUSION MAY
NOT APPLY TO YOU.
THIS WARRANTY GIVES YOU SPECIFIC LEGAL RIGHTS, AND YOU MAY ALSO HAVE OTHER RIGHTS WHICH
VARY FROM STATE TO STATE.
IF YOU NEED TO OBTAIN INFORMATION ABOUT THE NEAREST SERVICE CENTER, PLEASE CALL Husqvarna AT
1.800.487.5951.
DOCUMENTATION REQUIRED. YOU MUST MAINTAIN AND PRESENT PROOF OF PURCHASE (INCLUDING DATE,
PRODUCT MODEL AND, IF APPLICABLE, ENGINE SERIAL NUMBER) TO AN AUTHORIZED HUSQVARNA SERVICING
DEALER FOR WARRANTY SERVICE UNDER THIS LIMITED WARRANTY. PROOF OF PURCHASE RESTS SOLELY
WITH THE OWNER-CUSTOMER. HUSQVARNA ENCOURAGES YOU TO REGISTER YOUR PRODUCT ONLINE AT www.
usa.husqvarna.com TO HELP ENSURE, AMONG OTHER THINGS, THAT YOU CAN BE NOTIFIED OF IMPORTANT
PRODUCT INFORMATION. HOWEVER, REGISTERING YOUR PRODUCT IS NOT A CONDITION OF WARRANTY
SERVICE.
US-9