1
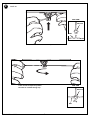
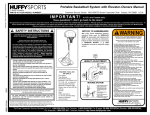
Smart Clip Installation Instructions
A Huffy Company
Customer Service Center • N53 W24700 South Corporate Circle • Sussex, WI 53089 • U.S.A.
QUICK CLIPS
SMART CLIPS
CORRECT
INCORRECT
* Discard Quick Clips and use the following instructions to install the new Smart Clips
1.
CLIP “ARM”
Install net clips.
WARNING: Use of this product without
proper installation of net clips, or when all net
clips are not present could result in bodily
harm. Be sure to follow directions carefully.
CLIP “BODY”
Insert one “arm” of clip (19) into ram (18) as shown. Twist “body” of clip slightly so that
second “arm” slides over the top of the first “arm” as shown.
Push in direction indicated by arrows.
A
Push second “arm” back and into ram as shown.
B
Twist “body” of clip slightly again to spread “arms” of clip.
Clip “arms” must be flat and touching edge to edge as shown, not overlapping.
C
1
08/02
P/N 211971
2.
Install net.
SIDE VIEW
NETCLIP
NET
Insert net into bottom of clip as shown.
SIDE VIEW
Twist net until it snaps into position.
Net must be centered through clip.
NETCLIP
NET
P/N 211971
08/02
2