1
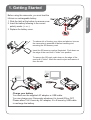
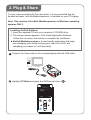
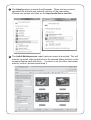
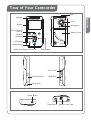
Tour of Your Camcorder LED Lens Display Microphone Tele/ Up Button/ Zoom In Battery Cover Record/ Ok Button Left Button Delete Button Wide/ Down Button/ Zoom Out Right Button AV out Port SD Card Cover HDMI Port Strap Hook Power Button Tripod Mount Battery Cover Latch ENGLISH Speaker 1. Getting Started To reduce risk of loosing your video and photos, be sure the camcorder is powered off before inserting and removing the SD memory card. Insert the SD memory card as illustrated. Push down on the edge of the card until it "clicks" into position. To remove the SD card, push down on the edge of the card until it "clicks". Allow the card to eject and remove it from the slot. Charge your battery You must use the supplied AC adapter or USB cable. You can charge your Camcorder whatever it is turned ON or OFF Please allow 3 to 5 hours by AC adapter, 5 to 9 hours by USB cable to recharge the battery. ENGLISH Before using the camcorder, you must load the Lithium-ion rechargeable battery. 1. Slide the latch at the bottom to remove cover. 2. Insert the battery following to the correct polarity marks ( + or -). 3. Replace the battery cover. 2. Plug & Share To view video recorded with this camcorder, it is recommended that the bundled software, ArcSoft®MediaImpression, is installed on your PC/Laptop. Note: This revision of ArcSoft® MediaImpression is Windows operating systems ONLY. Installing ArcSoft Software 1. Insert the supplied CD into your computer’s CD-ROM drive. 2. The autorun screen appears. Click Install Application Software. Follow the on-screen instructions to complete the installation. ArcSoft MediaImpression is a user-friendly application that helps you managing your media, burning your video onto DVD, and uploading your videos to YouTube easily. 1 Connect the Camcorder to the computer/laptop with the USB cable. 2 Highlight [PC Mode] and press the OK/Record button ( ). 3 The Autoplay option screens should appear. There are two screens represent the internal and external memory of the camcorder. Choose one screen and click on the Import media files to hard disk. 4 The ArcSoft MediaImpression import options screen is launched. This will transfer recorded video and photos to the desired folder location on the computer/laptop hard disk drive . If content is on the other camcorder memory source, please repeat step 3.