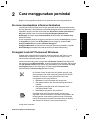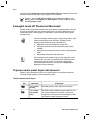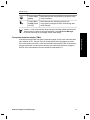
1
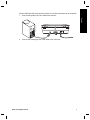
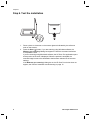
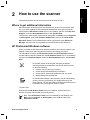
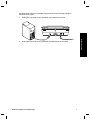
www.hp.com/support
Australia
Australia (out-of-warranty)
1300 721 147
1902 910 910
021-3881-4518
800-810-3888
3003
2802 4098
India
91-80-28526900
1-600-425-7737
Indonesia
+62 (21) 350 3408
0570-000511
03-3335-9800
1588-3003
Malaysia
1800 805 405
New Zealand
0800 441 147
Philippines
2 867 3551
Singapore
6 272 5300
02-8722-8000
+66 (2) 353 9000
Viêt Nam
+84 88234530
Setup and Support Guide
English
Copyright and license
© 2006 Copyright Hewlett-Packard
Development Company, L.P.
Reproduction, adaptation or
translation without prior written
permission is prohibited, except as
allowed under the copyright laws.
The information contained herein is
subject to change without notice.
The only warranties for HP products
and services are set forth in the
express warranty statements
accompanying such products and
services. Nothing herein should be
construed as constituting an
additional warranty. HP shall not be
liable for technical or editorial errors
or omissions contained herein.
Trademark credits
Microsoft and Windows are registered
trademarks of Microsoft Corporation.
Contents
2
3
4
5
6
Get started ............................................................................................................4
Step 1. Check the box contents .............................................................................4
Step 2. Install the software ....................................................................................5
Step 3. Connect the TMA cable .............................................................................5
Step 4. Connect the power supply .........................................................................6
Step 5. Connect the USB cable .............................................................................6
Step 6. Test the installation ...................................................................................8
How to use the scanner ......................................................................................9
Where to get additional information .......................................................................9
HP Photosmart Windows software ........................................................................9
HP Photosmart Macintosh software ....................................................................10
Front panel and accessories overview ................................................................. 10
Front-panel buttons ......................................................................................10
Transparent materials adapter (TMA) ...........................................................10
Scanner installation troubleshooting ..............................................................12
Uninstall and reinstall the software ......................................................................12
Check the cables .................................................................................................13
Regulatory information and product specifications .......................................14
Scanner specifications .........................................................................................14
Transparent materials adapter (TMA) specifications ...........................................15
Environmental specifications ...............................................................................15
Recycle and restricted material information .........................................................15
Disposal of Waste Equipment by Users in Private Households in the
European Union ...................................................................................................16
Product support .................................................................................................17
Accessibility .........................................................................................................17
HP Scanjet Web site ............................................................................................17
Getting assistance ...............................................................................................18
Hewlett-Packard limited warranty statement ..................................................19
Setup and Support Guide
3
English
1
1
Get started
Follow these steps to set up the scanner:
Step 1. Check the box contents
Unpack the scanner hardware. Be sure to remove any shipping tape.
6
1
5
2
3
4
4
1
HP Scanjet G4010 or G4050 scanner
2
USB cable
3
Power supply
4
Setup and Support Guide (this book)
5
Scanning software CDs
6
TMA templates (HP Scanjet G4050 only)
HP Scanjet G4000 series
Step 2. Install the software
1.
2.
English
Caution If you are installing the software onto a Windows computer, do not
connect the USB cable to the computer yet. Install the scanning software
before connecting the USB cable. If you are installing the software into a
Macintosh computer, you can connect the USB cable either before or after
installing the software.
Insert the HP Photosmart CD that came with the scanner into the computer CD
drive.
For Windows installations: Wait for the installation dialog box to display. If the
installation dialog box does not display after a few moments, see Scanner
installation troubleshooting on page 12.
For Macintosh installations: Double-click on the CD icon that appears on the
desktop, and then double click on the HP Scanjet Scanner Install icon to start the
installation.
Click Install software to install the scanning software. Follow the onscreen
instructions to complete the scanning software installation.
Step 3. Connect the TMA cable
➔ Connect the TMA cable from the lid to the scanner base.
Setup and Support Guide
5
Chapter 1
Step 4. Connect the power supply
The power supply has an attached cable that plugs into the back of the scanner.
The power supply also has an AC cable that is connected to the power supply on one
end and plugged into a power outlet or surge protector on the other end.
1.
2.
Plug the AC cable into the back of the power supply.
Plug the other end of the AC cable into a power outlet or a surge protector.
Step 5. Connect the USB cable
Caution If you are installing in a Windows environment, be sure you install
the HP Photosmart software before connecting the scanner to your computer
with the USB cable. See Step 2. Install the software on page 5. If you are
installing in a Macintosh environment, you can connect the USB cable either
before or after installing the software.
6
HP Scanjet G4000 series
Use the USB cable that came with the scanner to connect the scanner to the computer.
Connect the square end of the cable to the scanner.
2.
Connect the rectangular end of the cable to the computer.
English
1.
Setup and Support Guide
7
Chapter 1
Step 6. Test the installation
1
1.
2.
8
2
Place a photo or document on the scanner glass as indicated by the reference
mark on the scanner.
Press the Scan ( ) button. If you are scanning using Windows software, the
What are you scanning? dialog box appears. Follow the onscreen instructions
to complete the scan.
If you are scanning using Macintosh software, the HP Scan Pro application opens
and a preview of the scan is displayed. When the preview is accepted, the
scanned image is sent to the destination that has been selected in the scanner
settings.
If the What are you scanning? dialog box or the HP Scan Pro window does not
appear, see Scanner installation troubleshooting on page 12.
HP Scanjet G4000 series
2
How to use the scanner
English
This section presents an overview of the scanner and how to use it.
Where to get additional information
More information about the scanner and software can be found in the scanner Help
file. If you have installed the HP Photosmart software that came with the scanner,
double-click the HP Solution Center icon on your desktop, and then click Help and
Support. Under the Documentation section, click Product Help.
To access an online version of the scanner user guide, click Start, point to Programs
or All Programs, point to HP, Scanjet, G4000 series, and then click User Guide.
Macintosh users: For information about scanning procedures, open HP Device
Manager, and then click on the question mark at the bottom of the dialog box.
HP Photosmart Windows software
When you install the HP Photosmart Windows software, two icons are added to your
desktop. These icons open programs for scanning and editing your scans.
For information on how to use HP Solution Center and HP Photosmart software,
see the scanner Help file. Double-click the HP Solution Center icon on your desktop,
and then click Help and Support. Under the Documentation section, click Product
Help.
HP Solution Center is the program that gets you started
scanning pictures and documents. Use the HP Solution Center
for all of the following:
●
●
●
●
Perform scanning and copy functions
Access help and troubleshooting information
Access the HP Photosmart software to edit your scans
Modify settings and preferences
HP Photosmart software is the program to use for manipulating,
printing, archiving, and sharing your images after they have
been scanned. You can get to the HP Photosmart software from
the desktop icon or through HP Solution Center.
To start a scan:
Double-click the HP Solution Center icon on the desktop, click the tab for the
scanner, and then click the task you want to perform.
Note If the HP Solution Center icon is not available on the desktop, click
Start, point to Programs or All Programs, point to HP, and then click
HP Solution Center.
Setup and Support Guide
9
Chapter 2
HP Photosmart Macintosh software
When you install the HP scanning software on a Macintosh, two software programs
are available in the Dock: HP Device Manager and HP Photosmart Studio. These
programs are used for scanning and editing your scans.
HP Device Manager is the program that gets you started
scanning pictures and documents. Use the Device Manager for
all of the following:
●
●
●
●
Perform scanning and copy functions
Access help and troubleshooting information
Access the HP Photosmart Studio to edit your scans
Modify settings and preferences
HP Photosmart Studio is the program to use for manipulating,
printing, archiving, and sharing your images after they have
been scanned. You can open HP Photosmart Studio from the
Dock, or from the HP Device Manager Applications menu.
Front panel and accessories overview
This section presents an overview of the scanner front panel and the transparent
materials adapter (TMA).
Front-panel buttons
Icon
Feature name
Description
Scan button
Scans pictures, graphics, documents, or objects.
Scan Film
button
Scans transparent positives (such as 35 mm slides)
and negatives. Scanning film requires that you use
the transparent materials adapter (TMA) located on
the underside of the scanner lid.
Copy button
Scans the item and sends it to the printer to make a
copy.
Scan to PDF
button
Scans one or more pages and saves them as a PDF
file for sharing or storing.
Note For more information on the default actions of these buttons in a
Macintosh environment, open HP Device Manager, and then click on the
question mark at the bottom of the dialog box.
Transparent materials adapter (TMA)
You can use the transparent materials adapter (TMA) to scan 35 mm slides or
negatives. With the HP Scanjet G4050 TMA you can also scan medium- and largeformat film. For more information about the TMA, see the scanner user guide. For
10
HP Scanjet G4000 series
information about how to find the user guide, see Where to get additional information
on page 9.
English
Setup and Support Guide
11
3
Scanner installation
troubleshooting
This section contains solutions for installation and setup problems.
Uninstall and reinstall the software
An incomplete software installation could cause the scanner not to be recognized or
the software not to launch correctly. Try uninstalling and then reinstalling the HP
Scanning software. To reinstall the HP Scanning software, you must have the HP
Photosmart software CD.
Windows environment:
1.
2.
3.
4.
5.
6.
7.
8.
Click Start, click Settings, and then click Control Panel (in Windows XP, click
Start, and then click Control Panel).
Click Add/Remove Programs (in Windows XP, this is called Add or Remove
Programs) and then select HP Scanjet G4000 series.
Click Remove.
Click Add/Remove Programs (in Windows XP, this is called Add or Remove
Programs) and then select the HP Photosmart software.
Click Remove.
Unplug the scanner USB cable from the computer.
Reinstall the software, using the HP Photosmart software CD that came with your
scanner. When you insert the CD, an installation interface launches
automatically. Choose the HP Photosmart software to install.
Reconnect the scanner USB cable after the software is installed. For more
information see Step 5. Connect the USB cable on page 6.
Macintosh environment:
1.
Go to Applications/Hewlett-Packard and open HP Uninstaller.
Note You must have administrative privileges in order to uninstall the
software.
2.
3.
4.
5.
12
When prompted, type your username and password. The HP Uninstaller window
opens and displays the products that are available to be uninstalled.
Select the G4000 series product and click Next.
Follow the onscreen instructions to complete the uninstall process.
Reinstall the software, using the HP software CD that came with your scanner.
After inserting the CD, click on the CD icon that appears on your desktop to begin
the installation.
HP Scanjet G4000 series
Check the cables
Action
Power cable
The power cable is connected between the scanner and a
power outlet.
●
●
●
USB cable
English
Cable type
Ensure that the power cable is securely connected
between the scanner and a live electrical outlet or surge
protector.
If the power cable is connected to a surge protector,
ensure that the surge protector is plugged into an outlet
and turned on.
Turn off the scanner power switch and turn off the
computer. After 60 seconds, turn the scanner back on
and then turn on the computer, in that order.
The USB cable is connected between the scanner and the
computer.
●
●
●
Use the cable that was included with the scanner.
Another USB cable might not be compatible with the
scanner.
Ensure that the USB cable is securely connected
between the scanner and the computer.
If the USB cable is connected to a USB port on the front
of the computer, move it to a USB port on the back of the
computer.
For additional USB troubleshooting information,
see www.hp.com/support, select your country/region, and
then use the search tool to find USB troubleshooting topics.
TMA cable
The TMA cable is connected between the TMA in the scanner
lid and the scanner base.
Ensure the cable is securely connected in the back of the
scanner.
Setup and Support Guide
13
4
Regulatory information and
product specifications
This section contains regulatory information and product specifications for the
HP Scanjet G4000 series Photo Scanner and accessories.
Scanner specifications
Name
Description
Scanner type
Flatbed with transparent materials adapter (TMA)
Size
G4010: 303 mm x 5088 mm x 98 mm (11.93 x 20.00 x 3.86
inches)
G4050: 303 mm x 5088 mm x 108 mm (11.93 x 20.00 x 4.25
inches)
Weight
G4010: 4.4 kg (9.6 lbs)
G4050: 5.3 kg (11.6 lbs)
Scanning element Charged-coupled device
Interface
USB 2.0 Hi-Speed
Hardware
resolution
4800 x 9600 dpi hardware resolution
Selectable
resolution
12 dpi to 999,999 enhanced dpi at 100 percent scaling
AC line voltage
100-120 V 60 Hz – North America
200-240 V 50 Hz – Continental Europe, United Kingdom,
Australia
100-240 V 50 Hz/60 Hz – Rest of the world
Regulatory
information
Regulatory model identification number: For regulatory
identification purposes, your product is assigned a Regulatory
Model Number. The Regulatory Model Number for your product
is FCLSD-0605. This regulatory number should not be
confused with the product name (HP Scanjet G4010 or G4050)
or product numbers (L1956A and L1957A).
Energy usage drops significantly while in ENERGY STAR®
mode, which saves natural resources, and saves money
without affecting the high performance of this product. This
product qualifies for ENERGY STAR (MOU v. 1.0), which is a
voluntary program established to encourage the development
of energy-efficient office products.
14
HP Scanjet G4000 series
Name
Description
English
ENERGY STAR is a U.S. registered service mark of the U.S.
EPA. As an ENERGY STAR partner, HP has determined that
this product meets ENERGY STAR guidelines for energy
efficiency. For more information on ENERGY STAR guidelines,
go to the following Web site: www.energystar.gov
Transparent materials adapter (TMA) specifications
Name
Description
Media types
G4010: Up to five 35 mm slides or six 35 mm negative
frames
G4050: Up to sixteen 35 mm slides, thirty 35 mm
negative frames, up to two medium format film frames
(120 roll film), or one large format film frame (220 roll
film).
Power requirements
12 Volts/400 mA max
Power consumption and
regulatory information
For power consumption data, information on power
supplies, and regulatory information, see the
regulatory_supplement.htm file on the HP Photosmart
software CD.
Environmental specifications
Name
Description
Temperature
Operating the scanner and TMA: 10° to 35°C (50° to
95°F)
Storage: -40° to 60°C (-40° to 140°F)
Relative humidity
Operating the scanner and TMA: 15% to 80%
noncondensing 10° to 35°C (50° to 95°F)
Storage: up to 90% noncondensing at 0° to 60°C (32°
to 140°F)
Recycle and restricted material information
Recycling
HP offers an increasing number of product return and recycling programs in many
countries/regions, and partners with some of the largest electronics recycling centers
throughout the world. HP conserves resources by reselling some of its most popular
Setup and Support Guide
15
Chapter 4
products. For more information regarding recycling of HP products, please
visit: www.hp.com/hpinfo/globalcitizenship/environment/recycle/
Product restricted material
This HP product contains the following material that might require special handling at
end-of-life: Mercury in the scanner fluorescent lamp and transparent materials adapter
(< 5 mg).
For recycling information, contact www.hp.com/go/recycle, your local authorities, or
the Electronic Industries Alliance at www.eiae.org.
Disposal of Waste Equipment by Users in Private
Households in the European Union
This symbol on the product or on its packaging indicates that this product must not be
disposed of with your other household waste. Instead, it is your responsibility to
dispose of your waste equipment by handing it over to a designated collection point
for the recycling of waste electrical and electronic equipment. The separate collection
and recycling of your waste equipment at the time of disposal will help to conserve
natural resources and ensure that it is recycled in a manner that protects human
health and the environment. For more information about where you can drop off your
waste equipment for recycling, please contact your local city office, your household
waste disposal service, or the shop where you purchased the product.
16
HP Scanjet G4000 series
5
Product support
English
This section describes the options for product support.
Accessibility
The following accessibility options are available on this scanner:
Windows environment:
●
●
To prevent buttons from being accidentally pushed, you can use the Button
Disable Utility to disable the buttons. You can use the same utility to re-enable
the buttons.
For more information about the Button Disable Utility, see the scanner User Guide.
The scanner User Guide is also available in a Help format that is readable by
most screen readers. To find this file, double-click the HP Solution Center icon
on your desktop, and then click Help and Support. Under the Documentation
section, click Product Help.
Macintosh environment:
●
●
To prevent buttons from being accidentally pushed, use the Button Disable Utility
to disable the buttons. You can use the same utility to re-enable the buttons.
For more information about the Button Disable Utility, see the HP Scanjet
Scanner Help.
The HP Scanjet Scanner Help is available in a format that is readable by most
screen readers. To find this file, open HP Device Manager, and then click on the
question mark at the bottom of the dialog box.
Customers with disabilities can get help by
visiting www.hp.com/hpinfo/community/accessibility/prodserv/ (English only).
HP Scanjet Web site
Visit www.hp.com and select your country/language at the top of the page. On the
country page, select scanners from the list of products. Use this site for a variety of
information:
●
●
●
●
●
●
Find solutions to technical issues.
Learn tips for scanning more effectively and creatively.
Update your HP drivers and software.
Register your product.
Subscribe to newsletters, driver and software updates, and support alerts.
Purchase HP supplies and accessories.
Setup and Support Guide
17
Chapter 5
Getting assistance
In order to get the best from your HP product, please consult the following standard
HP support offerings:
1.
2.
3.
4.
5.
6.
18
Please consult the product documentation that came with the product.
– Review the troubleshooting section or electronic Help of this manual/CD.
– Review the electronic Help section within the software.
Visit the HP online support at www.hp.com/support or contact your point of
purchase.
HP online support is available to all HP customers. It is the fastest source for upto-date product information and expert assistance, including the following features:
– Fast E-mail access to qualified online support specialists
– Software and driver updates for your product
– Valuable product and troubleshooting information for technical issues
– Proactive product updates, support alerts, and HP newsletters (available
when you register your product)
HP support by phone
– Support options and fees vary by product, country and language.
– Fees and policies are subject to change without notice. Please check the
Web site www.hp.com/support for the latest information.
Post-warranty period
After the limited warranty period, help is available online at www.hp.com/support.
Extending or upgrading your warranty
If you would like to extend or upgrade the product’s warranty, please contact your
point of purchase or check the HP Care Pack Services at www.hp.com/support.
If you already purchased an HP Care Pack Service, please check the support
conditions in your contract.
HP Scanjet G4000 series
6
English
Hewlett-Packard limited
warranty statement
The following information outlines the warranty information for this product.
Product
Duration of limited warranty
HP Scanjet G4000
series scanner
1 year
A. Extent of limited warranty
1. Hewlett-Packard (HP) warrants to the end-user customer (Customer) that each
HP product specified above (Product) shall be free from defects in material and
workmanship for the period specified above. The warranty period begins on the
date of purchase by Customer.
2. For each software product, HP’s limited warranty applies only to a failure to
execute programming instructions. HP does not warrant that the operation of any
Product will be uninterrupted or error free.
3. HP’s limited warranty covers only those defects that arise as a result of normal
use of a Product, and does not cover any other problems, including those that
arise as a result of:
a. Improper use, maintenance, storage, handling, or modification;
b. Software, media, parts, accessories, supplies, or power adapters or sources
not provided or supported by HP; or,
c. Operation or other conditions outside a Product’s specifications.
4. If HP receives, during the applicable warranty period, notice of a defect in a
Product, HP shall at its option either replace or repair the defective Product.
5. If HP cannot replace or repair a defective Product that is covered by HP’s limited
warranty, HP may, within a reasonable time after being notified of the defect,
provide either another product similar in performance or a refund of the purchase
price prorated based on usage and other appropriate factors.
6. HP shall have no obligation to replace, repair, or refund until Customer returns
the defective Product to HP and provides a valid proof of purchase.
7. Any replacement product may be either new or like-new, provided it has
functionality at least equal to that of the Product being replaced.
8. A Product may contain remanufactured parts, components, or materials
equivalent to new in performance.
9. HP’s limited warranty is valid in any country or locality where HP has a support
presence for the Product and has marketed the Product. The level of warranty
service may vary according to local standards. Upgraded warranty services, such
as next day exchange, on-site service, and accident protection, may be
purchased from HP.
B. Limitations of Warranty
TO THE EXTENT ALLOWED BY LOCAL LAW, NEITHER HP NOR ITS THIRD
PARTY SUPPLIERS MAKE ANY OTHER WARRANTY OR CONDITION OF ANY
Setup and Support Guide
19
Chapter 6
KIND, WHETHER EXPRESS OR IMPLIED, WITH RESPECT TO A PRODUCT, AND
SPECIFICALLY DISCLAIM THE IMPLIED WARRANTIES OR CONDITIONS OF
MERCHANTABILITY, SATISFACTORY QUALITY, AND FITNESS FOR A
PARTICULAR PURPOSE.
C. Limitations of Liability
1. To the extent allowed by local law, the remedies provided in this Limited Warranty
Statement (LWS) are Customer’s sole and exclusive remedies.
2. TO THE EXTENT ALLOWED BY LOCAL LAW, EXCEPT FOR THE
OBLIGATIONS SPECIFICALLY SET FORTH IN THIS LWS, IN NO EVENT
SHALL HP OR ITS THIRD PARTY SUPPLIERS BE LIABLE FOR DIRECT,
INDIRECT, SPECIAL, INCIDENTAL, OR CONSEQUENTIAL DAMAGES,
WHETHER BASED ON CONTRACT, TORT, OR ANY OTHER LEGAL THEORY
AND WHETHER ADVISED OF THE POSSIBILITY OF SUCH DAMAGES.
D. Local Law
1. This LWS gives Customer specific legal rights. Customer may also have other
rights that vary from state to state in the United States, from province to province
in Canada, and from country to country elsewhere in the world.
2. To the extent this LWS is inconsistent with local law, this LWS shall be deemed
modified to be consistent with local law. Under local law, certain disclaimers and
limitations of this LWS may not apply to Customer. For example, the federal
government of the United States, some states in the United States, and some
governments outside the United States (including provinces in Canada), may:
a. Grant Customer additional warranty rights;
b. Preclude the disclaimers and limitations in this LWS from limiting the
statutory rights of a consumer (e.g., the United Kingdom);
c. Otherwise restrict the ability of a manufacturer to enforce such disclaimers or
limitations;
d. Specify the duration of implied warranties that the manufacturer cannot
disclaim; or,
e. Disallow limitations on the duration of implied warranties
3. Customer may have additional statutory rights based on its purchase agreement.
Those rights are not in any way affected by this LWS.
4. For consumer transactions in the United States, any implied warranties imposed
by law are limited in duration to the express warranty period.
5. FOR CONSUMER TRANSACTIONS IN AUSTRALIA AND NEW ZEALAND, THE
TERMS IN THIS LWS, EXCEPT TO THE EXTENT LAWFULLY PERMITTED,
DO NOT EXCLUDE, RESTRICT, OR MODIFY, AND ARE IN ADDITION TO,
THE MANDATORY STATUTORY RIGHTS APPLICABLE TO THE SALE OF A
PRODUCT TO SUCH CUSTOMERS.
You may have additional statutory rights against the seller based on your purchase
agreement. Those rights are not in any way affected by this HP Limited Warranty.
You will find on the inside front cover of this book the names and address of the HP
entity responsible for the performance of the HP Limited Warranty in your country.
20
HP Scanjet G4000 series
Panduan Pengaturan dan Dukungan
Bahasa
Indonesia
Hak cipta dan lisensi
© 2006 Hak cipta Hewlett-Packard
Development Company, L.P.
Dilarang mereproduksi, mengadaptasi
atau menerjemahkan tanpa izin
tertulis terlebih dahulu, kecuali seperti
yang diperbolehkan di bawah undangundang hak cipta.
Informasi yang dimuat dalam
dokumen ini dapat berubah tanpa
pemberitahuan.
Satu-satunya jaminan untuk produk
dan layanan HP tercantum pada
pernyataan jaminan yang menyertai
produk dan layanan tersebut. Tidak
ada ketentuan apa pun dalam
dokumen ini yang dapat dianggap
sebagai jaminan tambahan. HP tidak
bertanggung jawab atas kesalahan
atau kelalaian teknis atau redaksional
dalam dokumen ini.
Pernyataan Merek Dagang
Microsoft dan Windows adalah merek
dagang terdaftar dari Microsoft
Corporation.
Isi
1
2
4
5
6
Panduan Pengaturan dan Dukungan
3
Bahasa Indonesia
3
Persiapan awal .....................................................................................................4
Langkah 1. Periksa isi kemasan. ...........................................................................4
Langkah 2. Instal perangkat lunak .........................................................................5
Langkah 3. Hubungkan kabel TMA .......................................................................5
Langkah 4. Hubungkan catu daya .........................................................................6
Langkah 5. Hubungkan kabel USB ........................................................................6
Langkah 6. Uji instalasi ..........................................................................................8
Cara menggunakan pemindai .............................................................................9
Ke mana mendapatkan informasi tambahan .........................................................9
Perangkat lunak HP Photosmart Windows ............................................................9
Perangkat lunak HP Photosmart Macintosh ........................................................10
Tinjauan umum panel depan dan aksesori ..........................................................10
Tombol-tombol panel depan .........................................................................10
Transparent materials adapter (TMA) ...........................................................11
Pemecahan masalah instalasi pemindai .........................................................12
Copot-instal dan menginstal ulang perangkat lunak ............................................12
Memeriksa kabel .................................................................................................13
Informasi kepengaturan dan spesifikasi produk ............................................14
Spesifikasi pemindai ............................................................................................14
Spesifikasi transparent materials adapter [adaptor materi transparan],
(TMA) ..................................................................................................................15
Spesifikasi lingkungan .........................................................................................15
Informasi mengenai daur ulang dan pemakaian bahan produk yang terbatas ....15
Pembuangan Peralatan Limbah oleh Pengguna di Rumah Pribadi di Uni
Eropa ...................................................................................................................16
Dukungan produk ..............................................................................................17
Aksesibilitas .........................................................................................................17
Situs Web HP Scanjet .........................................................................................17
Memperoleh bimbingan .......................................................................................18
Keterangan jaminan terbatas Hewlett-Packard ...............................................19
1
Persiapan awal
Ikutilah langkah berikut ini untuk mengatur pemindai:
Langkah 1. Periksa isi kemasan.
Keluarkan perangkat keras pemindai. Pastikan Anda melepaskan semua pita rekat
kemasan pengiriman.
6
1
5
2
3
4
4
1
Pemindai HP Scanjet G4010 atau G4050
2
Kabel USB
3
Catu daya
4
Panduan Pengaturan dan Dukungan (buku ini)
5
CD perangkat lunak pemindaian
6
Template TMA (hanya HP Scanjet G4050)
HP Scanjet G4000 series
Langkah 2. Instal perangkat lunak
Perhatian Jika Anda menginstal perangkat lunak pada komputer Windows,
jangan menghubungkan dulu kabel USB ke komputer. Instal perangkat lunak
pemindaian sebelum menghubungkan kabel USB. Jika Anda menginstal
perangkat lunak pada komputer Macintosh, Anda dapat menghubungkan
kabel USB, baik sebelum atau sesudah menginstal perangkat lunak.
1.
Masukkan HP Smart Document Scan Solution CD yang disertakan dengan
pemindai ke dalam drive CD komputer.
Bahasa Indonesia
2.
Untuk instalasi Windows : Tunggu sampai kotak dialog instalasi ditampilkan.
Jika kotak dialog instalasi tidak ditampilkan setelah beberapa saat, lihat
Pemecahan masalah instalasi pemindai pada halaman 12
Untuk penginstalan pada Macintosh : Klik dua kali ikon CD yang muncul pada
desktop, kemudian klik dua kali ikon HP Scanjet Scanner Install untuk memulai
penginstalan.
Klik Install software [instal perangkat lunak] untuk menginstal perangkat lunak
pemindaian. Ikuti petunjuk pada layar untuk menyelesaikan instalasi perangkat
lunak pemindaian.
Langkah 3. Hubungkan kabel TMA
➔ Hubungkan kabel TMA dari sungkup alas pemindai.
Panduan Pengaturan dan Dukungan
5
Bab 1
Langkah 4. Hubungkan catu daya
Catu daya dilengkapi kabel pasangan yang dicolokkan ke bagian belakang pemindai.
Catu daya ini pun dilengkapi kabel AC yang satu ujungnya dihubungkan ke catu daya
dan ujung satunya lagi dicolokkan ke stopkontak listrik atau pelindung arus lonjakan.
1.
2.
Colokkan kabel AC ke bagian belakang catu daya.
Colokkan satu ujung kabel AC ke dalam stopkontak listrik atau pelindung
lonjakan arus.
Langkah 5. Hubungkan kabel USB
Perhatian Jika Anda menginstal di lingkungan Windows, pastikan Anda
menginstal perangkat lunak HP Photosmart sebelum menghubungkan
pemindai ke komputer dengan kabel USB. Lihat Langkah 2. Instal perangkat
lunak pada halaman 5. Jika Anda menginstal di lingkungan Macintosh, Anda
dapat menghubungkan kabel USB, baik sebelum atau sesudah menginstal
perangkat lunak.
6
HP Scanjet G4000 series
Gunakan kabel USB yang disertakan dengan pemindai untuk menghubungkan
pemindai ke komputer.
Hubungkan ujung kabel yang berbentuk segi empat ke pemindai.
2.
Hubungkan ujung kabel yang berbentuk persegi panjang ke komputer.
Panduan Pengaturan dan Dukungan
Bahasa Indonesia
1.
7
Bab 1
Langkah 6. Uji instalasi
1
1.
2.
8
2
Taruh foto atau dokumen pada kaca pemindai seperti yang ditunjukkan tanda
pada pemindai.
Tekan tombol Pindai ( ). Jika Anda memindai dengan menggunakan perangkat
lunak Windows, kotak dialog What are you scanning? [Apa yang Anda pindai?],
muncul. Ikuti petunjuk pada layar untuk menyelesaikan pindaian.
Jika Anda memindai dengan menggunakan perangkat lunak Macintosh, aplikasi
HP Scan Pro akan terbuka dan pratinjau pindaian akan ditampilkan. Apabila
pratinjau diterima, gambar yang dipindai dikirim ke tujuannya yang sudah dipilih
dalam pengaturan pemindai.
Jika kotak dialog What are you scanning? [Apa yang Anda pindai?] atau jendela
HP Scan Pro tidak muncul, lihat Pemecahan masalah instalasi pemindai
pada halaman 12.
HP Scanjet G4000 series
2
Cara menggunakan pemindai
Bagian ini menyampaikan tinjauan umum pemindai dan cara menggunakannya.
Ke mana mendapatkan informasi tambahan
Informasi lebih lanjut tentang pemindai dan perangkat lunak dapat ditemukan dalam
file Help [Bantuan]. Jika Anda telah menginstal perangkat lunak HP Photosmart yang
disertakan dengan pemindai, klik dua kali ikon HP Solution Center [Pusat Solusi
HP] pada desktop Anda, kemudian klik Help and Support [Bantuan dan
Dukungan]. Di bawah bagian Documentation [Dokumentasi], klik Product Help
[Bantuan Produk].
Pengguna Macintosh: Untuk informasi mengenai prosedur pemindaian, buka HP
Device Manager, kemudian klik pada tanda tanya di bawah kotak dialog.
Perangkat lunak HP Photosmart Windows
Apabila Anda menginstal HP Photosmart Windows software, ada dua ikon yang
ditambahkan ke desktop Anda. Kedua ikon ini membuka dua program untuk
memindai dan mengedit pindaian Anda.
Untuk informasi tentang cara menggunakan HP Solution Center [Pusat Solusi HP]
dan perangkat lunak HP Photosmart , lihat file Help [Bantuan] pemindai. Klik dua kali
ikon HP Solution Center [Pusat Solusi HP] pada desktop Anda, kemudian klik Help
and Support [Bantuan dan Dukungan]. Di bawah bagian Documentation
[Dokumentasi], klik Product Help [Bantuan Produk].
HP Solution Center [Pusat Solusi HP] adalah program yang
Anda gunakan untuk mulai memindai gambar dan dokumen.
Gunakan HP Solution Center [Pusat Solusi HP] untuk
mengerjakan semua yang berikut ini:
●
●
●
●
Melakukan fungsi pemindaian dan fungsi salin
Mengakses bantuan dan informasi tentang pemecahan
masalah
Mengakses perangkat lunak HP Photosmart untuk
mengedit pindaian Anda
Memodifikasi pengaturan dan preferensi
Perangkat lunak HP Photosmart adalah program yang
digunakan untuk memanipulasi, mencetak, mengarsipkan dan
berbagi gambar Anda setelah gambar dipindai. Anda dapat
menuju ke perangkat lunak HP Photosmart dari ikon desktop
atau melalui HP Solution Center [Pusat Solusi HP].
Untuk mulai memindai:
Panduan Pengaturan dan Dukungan
9
Bahasa Indonesia
Untuk mengakses panduan pengguna pemindai versi online, klik Start [Mulai], tujukan
ke Programs [Program] atau All Programs [Semua Program], tujukan ke HP,
Scanjet, G4000 series, kemudian Panduan Pengguna.
Bab 2
Klik dua kali ikon HP Solution Center [Pusat Solusi HP] pada desktop, klik tab untuk
pemindai, kemudian klik pada tugas yang ingin Anda kerjakan.
Catatan Jika ikon HP Solution Center tidak tersedia pada desktop, klik
Start, arahkan ke Programs atau All Programs, arahkan ke HP, kemudian
klik HP Solution Center.
Perangkat lunak HP Photosmart Macintosh
Apabila Anda menginstal perangkat lunak pemindaian HP pada Macintosh, ada dua
program perangkat lunak yang tersedia dalam Dock: HP Device Manager dan HP
Photosmart Studio. Kedua program ini digunakan untuk memindai dan mengedit
pindaian Anda.
HP Device Manager adalah program yang Anda gunakan untuk
mulai memindai gambar dan dokumen. Gunakan Device
Manager untuk melakukan semua hal berikut ini:
●
●
●
●
Melakukan fungsi pemindaian dan fungsi salin
Mengakses bantuan dan informasi tentang pemecahan
masalah
Mengakses HP Photosmart Studio untuk mengedit pindaian
Anda
Memodifikasi pengaturan dan preferensi
HP Photosmart Studio adalah program yang digunakan untuk
memanipulasi, mencetak, mengarsipkan dan berbagi gambar
Anda setelah gambar dipindai. Anda dapat membuka HP
Photosmart Studio dari Dock, atau dari menu Applications
[Aplikasi] HP Device Manager.
Tinjauan umum panel depan dan aksesori
Bagian ini menyampaikan tinjauan umum panel depan pemindai dan transparent
materials adapter [adaptor materi transparan] (TMA).
Tombol-tombol panel depan
Ikon
10
Nama fitur
Keterangan
Tombol Scan
[Pindai]
Memindai gambar, grafik, dokumen atau objek.
Tombol Scan
Film [Pindai
Film]
Memindai positif transparansi (seperti slide 35 mm)
dan negatif. Apabila memindai film, Anda harus
menggunakan transparent materials adapter (TMA)
yang terletak di balik sungkup pemindai.
HP Scanjet G4000 series
(bersambung)
Ikon
Nama fitur
Keterangan
Tombol Copy
[Salin]
Memindai item dan mengirimkannya ke printer untuk
membuat salinan.
Tombol Scan
to PDF [Pindai
ke PDF]
Memindai satu atau beberapa halaman dan
menyimpannya sebagai file PDF untuk berbagi atau
untuk disimpan.
Catatan Untuk informasi lebih lanjut mengenai tindakan default [standar] dari
tombol-tombol ini dalam lingkungan Macintosh, buka HP Device Manager,
kemudian klik tanda tanya di bagian bawah kotak dialog.
Transparent materials adapter (TMA)
Panduan Pengaturan dan Dukungan
11
Bahasa Indonesia
Anda dapat menggunakan transparent materials adapter (TMA) untuk memindai slide
atau negative 35 mm. Dengan TMA HP Scanjet G4050 Anda juga dapat memindai
film format sedang dan besar. Untuk informasi lebih lanjut tentang TMA, lihat panduan
pengguna pemindai. Untuk informasi tentang cara menemukan panduan pengguna,
lihat Ke mana mendapatkan informasi tambahan pada halaman 9.
3
Pemecahan masalah instalasi
pemindai
Bagian ini memuat solusi untuk masalah penginstalasian dan pengaturan.
Copot-instal dan menginstal ulang perangkat lunak
Instalasi perangkat lunak yang tidak tuntas bisa menyebabkan pemindai tidak dapat
dikenali atau perangkat lunak tersebut tidak dapat diluncurkan dengan benar. Coba
mencopot-instal kemudian menginstal ulang perangkat lunak HP Scanning
[Pemindaian HP]. Untuk menginstal ulang perangkat lunak HP Scanning, Anda harus
memiliki CD perangkat lunak HP Photosmart.
Lingkungan Windows:
1.
2.
3.
4.
5.
6.
7.
8.
Klik Start [Mulai], klik Settings [Pengaturan], kemudian klik Control Panel
[Panel Kontrol] (pada Windows XP, klik Start [Mulai], kemudian klik Control
Panel [Panel Kontrol]).
Klik Add/Remove Programs [Tambah/Hapus Program] (pada Windows XP, ini
disebut Add or Remove Programs) kemudian pilih HP Scanjet G4000 series.
Klik Remove [Hapus].
Klik Add/Remove Programs [Tambah/Hapus Program] (pada Windows XP, ini
disebut Add or Remove Programs [Tambah atau Hapus Program]) kemudian
pilih perangkat lunak HP Photosmart.
Klik Remove [Hapus].
Cabut kabel USB pemindai dari komputer.
Instal ulang perangkat lunak dengan menggunakan CD perangkat lunak HP
Photosmart yang disertakan dengan pemindai Anda. Apabila Anda memasukkan
CD, antarmuka penginstalasian secara otomatis diluncurkan. Pilih perangkat
lunak HP Photosmart yang akan diinstal.
Hubungkan kembali kabel USB pemindai setelah perangkat lunak diinstal. Untuk
informasi lebih lanjut, lihat Langkah 5. Hubungkan kabel USB pada halaman 6
Lingkungan Macintosh:
1.
Ke Applications/Hewlett-Packard dan buka HP Uninstaller.
Catatan Anda harus memiliki hak istimewa administratif agar dapat
menginstal perangkat lunak.
2.
3.
4.
5.
12
Apabila diperintahkan, ketik nama pengguna dan sandi Anda. Jendela HP
Uninstaller terbuka dan menampilkan produk yang tersedia untuk dicopot-instal.
Pilih produk G4000 series dan klik Next [Berikutnya].
Ikuti petunjuk pada layar untuk menyelesaikan proses copot-instal.
Instal ulang perangkat lunak dengan menggunakan CD perangkat lunak HP yang
disertakan dengan pemindai Anda. Setelah memasukkan CD, klik ikon CD yang
muncul di desktop Anda untuk mulai menginstal.
HP Scanjet G4000 series
Memeriksa kabel
Jenis kabel
Tindakan
Kabel listrik
Kabel listrik dihubungkan antara pemindai dan stopkontak
listrik.
●
●
●
Kabel USB dihubungkan di antara pemindai dan komputer.
●
●
●
Gunakan kabel yang disertakan dengan pemindai.
Mungkin, ada kabel USB lain yang tidak kompatibel
dengan pemindai.
Pastikan, bahwa kabel USB terhubung secara kokoh di
antara pemindai dan komputer.
Jika kabel USB dihubungkan ke port USB di bagian
depan komputer, pindahkan ke port USB di bagian
belakang komputer.
Untuk informasi tambahan mengenai pemecahan masalah
USB, lihat www.hp.com/support, pilih negara/kawasan Anda
kemudian gunakan alat bantu pencarian untuk menemukan
topik tentang pemecahan masalah USB.
Kabel TMA
Kabel TMA terhubung antara TMA dalam sungkup pemindai
dan alas pemindai.
Pastikan kabel terhubung secara kokoh di bagian belakang
pemindai.
Panduan Pengaturan dan Dukungan
13
Bahasa Indonesia
Kabel USB
Pastikan kabel listrik terhubung kencang di antara
pemindai dan stopkontak listrik yang dialiri arus listrik
atau pelindung lonjakan arus.
Jika kabel listrik dihubungkan ke pelindung lonjakan arus,
pastikan bahwa pelindung lonjakan arus dicolokkan ke
dalam stopkontak dan dihidupkan.
Matikan saklar daya pemindai dan matikan juga
komputer. Setelah 60 detik, hidupkan kembali pemindai
kemudian hidupkan komputer dalam urutan seperti itu.
4
Informasi kepengaturan dan
spesifikasi produk
Bagian ini memuat informasi kepengaturan dan spesifikasi Pemindai Foto HP Scanjet
G4000 series dan aksesorinya.
Spesifikasi pemindai
Nama
Keterangan
Jenis pemindai
Alas rata dengan transparent materials adapter [adaptor materi
transparan](TMA)
Ukuran
G4010: 303 mm x 5088 mm x 98 mm (11,93 x 20,00 x 3,86 inci)
G4050: 303 mm x 5088 mm x 108 mm (11,93 x 20,00 x 4,25
inci)
Berat
G4010: 4,4 kg (9,6 lb)
G4050: 5,3 kg (11,6 lb)
Elemen
pemindaian
Perangkat charged-coupled
Antarmuka
USB 2.0 Hi-Speed [Kecepatan tinggi]
Resolusi
perangkat keras
Resolusi perangkat keras 4800 x 9600 dpi
Resolusi pilihan
12 dpi hingga dpi perbesaran 999.999 pada penskalaan 100
persen
Voltase aliran AC
100-120 V 60 Hz – Amerika Utara
200-240 V 50 Hz – Benua Eropa, Kerajaan Inggris, Australia
100-240 V 50 Hz/60 Hz – Di negara/kawasan lainnya di dunia
Informasi
Pengaturan
Nomor identifikasi model pengaturan: Untuk identifikasi
pengaturan, produk Anda diberi Regulatory Model Number
[Nomor Model Pengaturan]. Regulatory Model Number untuk
produk Anda adalah FCLSD-0605. Nomor pengaturan ini
jangan dikacaukan dengan nama produk (HP Scanjet G4010)
atau nomor produk (L1956A and L1957A). .
Pemakaian energi menurun secara signifikan sewaktu berada
dalam modus ENERGY STAR®, yang menghemat sumber
daya alam dan uang Anda tanpa mempengaruhi performa
produk ini. Produk ini memenuhi syarat ENERGY STAR (MOU
v. 1.0), yang merupakan program sukarela yang diluncurkan
14
HP Scanjet G4000 series
Nama
Keterangan
untuk mendorong pengembangan produk kantor energi-efisien.
ENERGY STAR adalah merek layanan terdaftar A.S. dari EPA
Amerika Serikat. Sebagai mitra ENERGY STAR, HP telah
menetapkan, bahwa produk ini memenuhi panduan ENERGY
STAR mengenai efisiensi energi. Untuk informasi lebih lanjut
mengenai panduan ENERGY STAR, kunjungilah situs web
berikut ini: www.energystar.gov
Nama
Keterangan
Jenis media
G4010: Hingga lima bingkai slide 35 mm atau enam
bingkai negatif 35 mm
Bahasa Indonesia
Spesifikasi transparent materials adapter [adaptor materi
transparan], (TMA)
G4050: Hingga 35 bingkai slide 35 mm, tiga puluh
bingkai negatif 35 mm, hingga dua bingkai film format
sedang (rol film 120), atau satu bingkai film format
besar (rol film 220).
Daya yang dibutuhkan
12 Volt/400 mA max
Pemakaian listrik dan
informasi kepengaturan
Untuk mendapatkan data pemakaian listrik, informasi
tentang catu daya dan informasi kepengaturan, lihat
file regulatory_supplement.htm pada CD perangkat
lunak HP Photosmart.
Spesifikasi lingkungan
Nama
Keterangan
Suhu
Mengoperasikan pemindai dan TMA: 10° s.d 35°C (50°
s.d 95°F)
Penyimpanan: -40° s.d 60°C (-40° s.d 140°F)
Kelembaban relatif
Mengoperasikan pemindai dan TMA: 15% s.d 80%
non-kondensasi 10° s.d 35°C (50° s.d 95°F)
Penyimpanan: hingga 90% non-kondensasi pada suhu
0° s.d.60°C (32° s.d.140°F)
Informasi mengenai daur ulang dan pemakaian bahan
produk yang terbatas
Panduan Pengaturan dan Dukungan
15
Bab 4
Mendaur ulang
HP menawarkan program pengembalian produk dan daur ulang yang jumlahnya
semakin bertambah di banyak negara/kawasan, dan bermitra dengan beberapa pusat
daur ulang elektronik terbesar di seluruh dunia. HP melestarikan sumber daya dengan
menjual kembali sejumlah produknya yang paling populer. Untuk informasi lebih lanjut
mengenai daur ulang produk HP, silakan
mengunjungi: www.hp.com/hpinfo/globalcitizenship/environment/recycle/
Bahan produk terbatas
Produk HP ini mengandung bahan berikut ini yang harus ditangani secara khusus
apabila produk ini sudah habis masa pakainya: Bahan merkuri dalam lampu pijar
pemindai dan pada adaptor materi transparan (< 5 mg).
Untuk informasi daur ulang, hubungi www.hp.com/go/recycle, pihak berwenang di
tempat Anda atau Electronic Industries Alliance di www.eiae.org.
Pembuangan Peralatan Limbah oleh Pengguna di Rumah
Pribadi di Uni Eropa
Simbol ini pada produk atau pada kemasannya menunjukkan, bahwa produk ini tidak
boleh dibuang dengan limbah rumah-tangga lainnya. Alih-alih, Andalah yang
bertanggung jawab untuk membuang peralatan limbah Anda dengan
menyerahkannya ke pusat pengumpulan limbah yang ditunjuk untuk mendaur ulang
peralatan listrik dan elektronik limbah. Pemisahan pengumpulan dan pendaur-ulangan
peralatan limbah Anda pada saat pembuangan akan membantu melestarikan sumber
daya alam dan menjamin, bahwa limbah tersebut didaur-ulang dengan cara yang
aman bagi kesehatan manusia dan lingkungan. Untuk informasi lebih lanjut mengenai
tempat di mana Anda dapat membuang peralatan limbah untuk pendaur-ulangan,
silakan menghubungi kantor dinas kota di tempat Anda, layanan pembuangan limbah
rumah-tangga atau toko tempat Anda membeli produk.
16
HP Scanjet G4000 series
5
Dukungan produk
Bagian ini menguraikan berbagai opsi untuk dukungan produk.
Aksesibilitas
Opsi aksesibilitas berikut tersedia pada pemindai ini:
Lingkungan Windows:
●
Lingkungan Macintosh:
●
●
Untuk mencegah agar tombol tidak sengaja ditekan, gunakanlah Button Disable
Utility [Kegunaan Pelumpuhan Tombol] untuk menonaktifkan tombol. Anda dapat
menggunakan kegunaan yang sama untuk mengaktifkan kembali tombol.
Untuk informasi lebih lanjut mengenai Button Disable Utility [Kegunaan
Pelumpuhan Tombol], lihat HP Scanjet Scanner Help [Bantuan Pemindai HP
Scanjet].
HP Scanjet Scanner Help [Bantuan Pemindai HP Scanjet] tersedia dalam format
yang dapat dibaca oleh sebagian besar alat pembaca layar. Untuk menemukan
file ini, buka HP Device Manager, kemudian klik pada tanda tanya di bawah
kotak dialog.
Pelanggan yang tidak mampu dapat memperoleh bantuan dengan
mengunjungi www.hp.com/hpinfo/community/accessibility/prodserv/ (hanya bhs
Inggris).
Situs Web HP Scanjet
Kunjungi www.hp.com dan pilih negara/kawasan Anda pada bgian atas halaman.
Pada halaman negara/kawasan, pilih pemindai dari daftar produk. Gunakan situs ini
untuk mendapatkan beragam informasi:
●
●
●
●
Menemukan solusi atas masalah teknis.
Mempelajari berbagai saran untuk memindai dengan cara yang lebih efektif dan
kreatif.
Memperbarui driver dan perangkat lunak HP Anda.
Daftarkan produk Anda.
Panduan Pengaturan dan Dukungan
17
Bahasa Indonesia
●
Untuk mencegah agar tombol tidak sengaja ditekan, Anda dapat menggunakan
Button Disable Utility [Kegunaan Pelumpuhan Tombol] untuk menonaktifkan
tombol. Anda dapat menggunakan kegunaan yang sama untuk mengaktifkan
kembali tombol.
Untuk informasi lebih lanjut mengenai Button Disable Utility [Kegunaan
Pelumpuhan Tombol], lihat Panduan Pengguna pemindai.
Panduan Pengguna pemindai juga tersedia dalam format Help [Bantuan] yang
dapat dibaca oleh sebagian besar alat pembaca layar. Untuk menemukan ini, klik
dua kali ikon HP Solution Center [Pusat Solusi HP] pada desktop Anda,
kemudian klik Help and Support [Bantuan dan Dukungan]. Di bawah bagian
Documentation [Dokumentasi], klik Product Help [Bantuan Produk].
Bab 5
●
●
Berlangganan newsletters, pembaruan driver dan perangkat lunak, dan petanda
dukungan.
Membeli persediaan dan aksesori HP.
Memperoleh bimbingan
Demi mendapatkan yang terbaik dari produk HP Anda, silakan memeriksa penawaran
dukungan HP standar berikut ini:
1.
2.
3.
4.
5.
6.
18
Silakan menyimak dokumentasi produk yang disertakan bersama produk.
– Meninjau ulang bagian pemecahan masalah atau Help [Bantuan] elektronik
dari buku petunjuk ini/CD.
– Meninjau ulang bagian Help [Bantuan] elektronik dalam perangkat lunak.
Kunjungi dukungan online HP di www.hp.com/support atau hubungi toko di
tempat Anda membeli.
Dukungan online HP tersedia bagi semua pelanggan HP. Ini adalah sumber
tercepat untuk mendapatkan informasi produk yang terkini dan bantuan tenaga
ahli, termasuk sejumlah fitur berikut:
– Akses E-mail cepat ke bagian spesialis dukungan online yang memenuhi
syarat
– Pembaruan perangkat lunak dan driver untuk produk Anda
– Informasi yang berharga tentang produk dan pemecahan masalah untuk
masalah teknis
– Pembaruan produk proaktif, petanda dukungan, dan HP newsletters
(tersedia apabila mendaftarkan produk Anda)
Dukungan HP melalui telepon
– Opsi dukungan dan biaya beragam menurut produk, negara/kawasan dan
bahasa.
– Biaya dan kebijakan dapat berubah tanpa pemberitahuan. Silakan cek situs
Web www.hp.com/support untuk mendapatkan informasi terbaru.
Periode pasca-jaminan
Setelah masa jaminan habis, tersedia bantuan online di www.hp.com/support.
Memperpanjang atau meningkatkan jaminan Anda
Jika Anda ingin memperpanjang atau meningkatkan jaminan produk, silakan
menghubungi toko di tempat Anda membeli, atau cek HP Care Pack Services
di www.hp.com/support.
Jika Anda sudah membeli HP Care Pack Service, silakan cek ketentuan
dukungan dalam kontrak Anda.
HP Scanjet G4000 series
6
Keterangan jaminan terbatas
Hewlett-Packard
Informasi berikut ini menjelaskan tentang jaminan untuk produk ini.
Jangka waktu
jaminan terbatas produk
HP Scanjet G4000
series
1 tahun
Panduan Pengaturan dan Dukungan
19
Bahasa Indonesia
A. Cakupan jaminan terbatas
1. Hewlett-Packard (HP) memberi jaminan kepada pelanggan pengguna akhir
(Pelanggan), bahwa setiap produk HP yang diuraikan di atas (Produk) akan
bebas dari kerusakan materi dan pengerjaan selama jangka yang dijelaskan di
atas. Jangka waktu jaminan dimulai pada tanggal pembelian yang dilakukan oleh
Pelanggan.
2. Untuk setiap produk perangkat lunak, jaminan terbatas HP hanya berlaku untuk
kegagalan menjalankan petunjuk pemograman. HP tidak menjamin, bahwa
pengoperasian Produk apa pun akan bebas gangguan atau kesalahan.
3. Jaminan terbatas HP hanya mencakup kecacatan yang muncul akibat
penggunaan Produk yang normal dan tidak mencakup masalah lain apa pun,
termasuk masalah yang timbul akibat:
a. Penggunaan, pemeliharaan, penyimpanan, penanganan yang tidak layak,
atau modifikasi;
b. Perangkat lunak, media, suku cadang, aksesori, persediaan, atau adaptor
daya atau sumber yang tidak disediakan atau didukung oleh HP; atau
c. Pengoperasian atau kondisi lain di luar spesifikasi Produk.
4. Jika HP menerima pemberitahuan atas kerusakan selama masa jaminan yang
berlaku, maka atas opsinya, HP akan mengganti atau memperbaiki Produk yang
rusak tersebut.
5. Jika HP tidak dapat mengganti atau memperbaiki Produk rusak yang tercakup
jaminan terbatas HP, dalam waktu yang wajar setelah menyampaikan
pemberitahuan tentang produk rusak, HP dapat menyediakan produk lain yang
kinerjanya sama atau mengganti uang pembelian secara pro-rata berdasarkan
lama penggunaan produk dan faktor lain yang wajar.
6. HP tidak berkewajiban untuk mengganti, memperbaiki atau mengganti uang
pembelian sampai Pelanggan mengembalikan Produk yang rusak kepada HP
dan menyertakan bukti pembelian yang sah.
7. Produk pengganti apa pun dapat berupa produk baru atau seperti baru, asalkan
memiliki performa yang setara dengan Produk yang digantikan.
Bab 6
8.
9.
Produk dapat berisi suku cadang, komponen atau materi yang difabrikasi ulang
yang performanya sama seperti baru.
Jaminan terbatas HP berlaku di negara/kawasan atau lokasi di mana terdapat
dukungan HP untuk Produk ini dan di mana HP telah memasarkan Produk ini.
Tingkat layanan jaminan yang Anda terima mungkin berbeda, tergantung pada
standar setempat. Peningkatan layanan jaminan, seperti penukaran di hari kerja
berikutnya, layanan di tempat, dan perlindungan terhadap kecelakaan, dapat
dibeli dari HP.
B. Batasan Jaminan
SEJAUH DIIZINKAN OLEH HUKUM SETEMPAT, BAIK HP MAUPUN PARA
PEMASOKNYA, PIHAK KETIGA, TIDAK MEMBUAT JAMINAN LAIN APA PUN ATAU
KETENTUAN MACAM APA PUN, APAKAH TERSURAT ATAU TERSIRAT, YANG
BERKENAAN DENGAN PRODUK, DAN HP SECARA SPESIFIK MENAFIKAN
ADANYA JAMINAN ATAU KETENTUAN TERSIRAT MENGENAI KEMAMPUAN
UNTUK DIPERDAGANGKAN (MERCHANTABILITY), KUALITAS YANG
MEMUASKAN, SERTA KESESUAIAN UNTUK TUJUAN TERTENTU.
C. Batasan Tanggung Jawab
1. Sepanjang diizinkan oleh hukum setempat, ganti rugi yang disediakan dalam
Limited Warranty Statement (LWS/Pernyataan Jaminan Terbatas) ini adalah satusatunya ganti rugi yang eksklusif bagi Pelanggan.
2. SEPANJANG DIIZINKAN OLEH HUKUM SETEMPAT, KECUALI UNTUK
KEWAJIBAN YANG SECARA SPESIFIK DIJELASKAN DALAM LWS INI, BAIK
HP MAUPUN PARA PEMASOKNYA, PIHAK KETIGA, TIDAK DIKENAKAN
TANGGUNG JAWAB ATAS KERUSAKAN LANGSUNG, TIDAK LANGSUNG,
KHUSUS, INSIDENTAL, ATAU KONSEKUENSIAL, APAKAH BERDASARKAN
KONTRAK, WANPRESTASI ATAU TEORI HUKUM LAINNYA DAN APAKAH
TELAH DIBERITAHUKAN MENGENAI KEMUNGKINAN KERUSAKAN
TERSEBUT.
20
HP Scanjet G4000 series
Anda mungkin memiliki hak hukum tambahan terhadap pihak penjual berdasarkan
perjanjian pembelian Anda. Bagaimanapun juga, hak-hak itu tidak mempengaruhi
Jaminan Terbatas HP ini.
Di bagian dalam sampul depan buku ini Anda akan menemukan nama-nama dan
alamat dari badan usaha HP yang bertanggung jawab atas pelaksanaan Jaminan
Terbatas HP di negara Anda.
Panduan Pengaturan dan Dukungan
21
Bahasa Indonesia
D. Hukum Setempat
1. LWS ini memberi hak hukum tertentu kepada Pelanggan. Pelanggan dapat juga
memiliki hak-hak lain yang berbeda dari negara bagian ke negara bagian di
Amerika Serikat, dari provinsi ke provinsi di Kanada dan dari negara/kawasan ke
negara/kawasan lainnya di dunia.
2. Sejauh LWS ini tidak konsisten dengan hukum setempat, LWS ini akan diubah
agar konsisten dengan hukum setempat. Di bawah hukum setempat, hak
penolakan dan pembatasan tertentu dari LWS ini mungkin tidak berlaku bagi
Pelanggan. Contohnya, pemerintah federal Amerika Serikat, beberapa negara
bagian di Amerika Serikat dan beberapa pemerintahan di luar Amerika Serikat
(termasuk pronvinsi di Kanada), dapat:
a. Memberikan hak-hak jaminan tambahan kepada Pelanggan;
b. Mengecualikan hak penolakan dan pembatasan dalam LWS ini dari hak-hak
hukum konsumen (misalnya, di Inggris);
c. Atau, membatasi kemampuan produsen untuk memberlakukan hak
penolakan atau pembatasan tersebut;
d. Menentukan jangka waktu jaminan tersirat yang mana produsen tidak dapat
menolak; atau
e. Melarang pembatasan pada jangka waktu jaminan tersirat
3. Pelanggan mungkin memiliki hak-hak hukum tambahan berdasarkan perjanjian
pembeliannya. Bagaimanapun juga, hak-hak itu tidak mempengaruhi LWS ini.
4. Untuk transaksi konsumen di Amerika Serikat, jaminan tersirat apa pun yang
diberlakukan secara hukum, jangka waktunya dibatasi sesuai masa jaminan yang
tersurat.
5. UNTUK TRANSAKSI KONSUMEN DI AUSTRALIA DAN SELANDIA BARU,
PERSYARATAN DALAM LWS INI, KECUALI SEJAUH YANG DIIZINKAN OLEH
HUKUM, TIDAK MENYERTAKAN, MEMBATASI ATAU MENGUBAH DAN
MERUPAKAN TAMBAHAN ATAS HAK-HAK HUKUM MANDATORI YANG
BERLAKU ATAS PENJUALAN PRODUK KEPADA PELANGGAN TERSEBUT.
ID