1
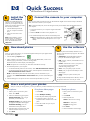
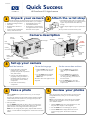
C8890-90001
Quick Success
HP PhotoSmart 215 digital camera
1 Unpack your camera 2 Attach the wrist strap
1. Thread the short loop of the wrist strap through
the wrist strap attachment. You might need to use
a paper clip to thread the end of the loop
through.
The HP PhotoSmart 215 digital camera comes with everything you
need to take digital photos and transfer them to your computer.
• CompactFlash memory card
• 4 AA alkaline batteries
• Documentation—HP PhotoSmart
215 digital camera User’s Guide
and Quick Success poster
• HP PhotoSmart digital camera
• USB cable
• PhotoImpression software on
CD-ROM
• Wrist strap with CompactFlash
memory card extractor tool
memory
card door
2. Pull the strap through the loop, then pull the knot
tight.
The clip is used to remove the memory card.
Camera description
flash
shutter
button
camera
icon
status LCD
self-timer light
viewfinder
mode
switch
USB
connection
playback
icon
memory
card slot
battery
compartment
cover
lens
menu
dial
wrist strap
attachment
3 Set up your camera
image
LCD
image LCD
on/off
switch
Install the batteries
Choose the language
Set the camera date and time
1. Unlock the battery compartment
(slide the lever to the unlock
position) and open the compartment
door (slide it down).
1. Slide the mode switch up to the
camera icon to turn the camera
on.
1. Turn the menu dial to choose the
date, then press the menu dial to
select.
2. Turn the menu dial to highlight
your language, then press the
menu dial.
2. Turn the menu dial to change the
month, then press the menu dial to
set. Change the day, year and time in
the same manner.
2. Insert the 4 AA alkaline batteries
(supplied), making sure that the +/electrodes match the indicators on
the inside of the camera’s battery
compartment.
The Date & Time menu appears on the
image LCD.
3. Close and relock the battery
compartment.
4 Take a photo
1. With the mode switch up at the camera icon, you are ready to
take a photo.
The status LCD displays the approximate number of photos available
and the battery level. Be sure to move your fingers away from the
camera lens before taking a photo.
2. Take your photo.
Press the shutter button half way down. When you see the green
light next to the viewfinder, press the button all the way down. The
photo will show on the image LCD while it is being saved.
Note: You can change the photo quality, adjust the flash and focus
settings, or use the self-timer and digital zoom. See the User’s Guide for
details.
3. Turn the menu dial to select Exit,
then press the menu dial to return to
Capture mode.
5 Review your photos
After you have taken some photos and they are stored on the
CompactFlash memory card, you can view them using the
image LCD.
Tip: To preserve battery life, connect the AC power adapter
while using the image LCD to review your photos. See the
User’s Guide for details.
1. Slide the mode switch down to the playback icon. The
last photo taken displays on the image LCD.
2. Use the menu dial to scroll through your photos.
3. Press the menu dial to display the Review menu for
more reviewing options. See the User’s Guide for
details.
Quick Success
HP PhotoSmart 215 digital camera
6
Install the
software
With the ArcSoft PhotoImpression
software, you can download your
photos to your computer, edit your
photos, then print the photos or email
them to family and friends.
1. Insert the PhotoImpression CD
into your computer’s CD-ROM
drive.
2. Follow the instructions on the
screen.
7
Once you have taken some photos with your HP PhotoSmart digital camera and are ready to download
them, connect the camera to your computer.
Tip: To preserve battery life, connect an HP approved AC power adapter while downloading photos to
your computer.
1. Connect the camera to your computer using the USB cable
provided.
2. Slide the mode switch down to the playback icon.
3. The ArcSoft PhotoImpression software automatically starts.
Note: If the installation window
doesn’t appear, use Windows
Explorer to locate your CD-ROM
drive, then double-click the file
setup.exe.
8
Connect the camera to your computer
Note: If the PhotoImpression software does not automatically
display, double-click the PhotoImpression icon on your
desktop.
9
Download photos
Once you connect the camera, you can download photos directly from your digital camera
to a photo album on your PC.
1. Click the blinking Acquire button.
2. Select an album to put your photos in. You can select the default album, create a new
album by typing a new name, or select an existing album.
Thumbnails from the camera display in the dialog box.
Note: The photos are not saved to your hard drive untill after the next step.
3. Download the photos to your computer:
Use the software
With your photos downloaded, double-click on a
photo to create fun and unique projects. The software
has options to:
• Get Photos - download additional photos
from your HP PhotoSmart digital camera.
• Edit - retouch, enhance, and add effects or text
to your photo.
• Create - add a frame or text to your photo or
use your photos to make fantasy shots,
calendars and greeting cards.
• To download all the photos from the camera, select Get All Photos from Camera.
• Save - save your photo projects to a disk.
• To download specific photos from the camera, select the photos to transfer then click
Get Selected Photos from Camera.
• Print - print your photos individually or create
album pages.
Note: To delete all the photos from the camera after you have saved them on your
computer, select Delete All Photos from Camera after you have downloaded your
photos.
• Email - email your photos to family and
friends.
4. Close the dialog box. Your photos are now stored in the photo album on your PC.
10
For help with the PhotoImpression software, click on
the question mark in the corner of your screen.
Share and print your photos
After you create your unique photos, you can print them for yourself or email them to your family and friends.
Print photos
Print photo album pages
Email your photos
1. Select a photo to print from a photo
album. Click Print.
1. Click Print.
1. Select a photo to email from a photo
album.
2. Select from the following print options:
Standard Printing prints a single
photo that you have selected.
Multiple Printing prints multiple photos
per page to make photo album pages.
Thumbnail Printing prints the
thumbnails from the photo album.
3. Adjust the photo size and position, and
select the number of copies to print.
4. Click Print.
Printed in Singapore
Printed on recycled paper
2. Select Multiple Printing.
3. Select the photo album page template.
4. To select the photos, click on the
template location and then click on the
photo.
5. Select the number of copies to print.
6. Click Print.
2. Click Email.
3. Select the photo size:
Small for fast onscreen viewing.
Medium for small prints.
Original for large prints.
4. Click Send.
5. Write and send the email message.