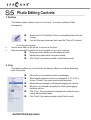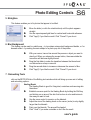
1
User Guide for the Spectare PhotoSaver: for Slides and Negatives Model: SP 02911 Discarded electric appliances are recyclable and should not be discarded n domestic waste. Please actively support us in conserving resources and protecting the environment by returning this appliance to the collection centers (if available). Please observe the local regulations regarding the disposal of exhausted batteries and old equipment. Spectare PhotoSaver Contents Read First ................................................................. Unpacking your product ........................................... Installation .............................................................. The PhotoSaver ...................................................... Loading Slides........................................................... Loading Negatives ................................................ Capturing images ...................................................... Transferring Images ................................................. Cleaning and Maintenance ........................................ Troubleshooting........................................................... Technical Specifications .............................................. 1 2 3 4 5 6 7 8 9 10 12 Warranty Please contact the original retail location where this product was purchased to obtain warranty information and service. Contact For questions and support on this product that can not be solved by your retailer please contact: Spectare Products 6081 Meridian Ave Suite 70-308 San Jose, CA 95120 http://spectareproducts.com [email protected] Copyright© 2008 SuMaWah LLC All rights reserved. The Spectare® name and logo are registered trademarks of SuMaWah LLC. ArcSoft PhotoImpression® is a registered trademark of ArcSoft Inc. Microsoft DirectX®,Windows XP and Vista are registered trademarks of Microsoft Inc. Adobe Acrobat® is a registered trademark of Adobe Inc. user's guide 1 Read First Thank you for purchasing the Spectare PhotoSaver. Please take some time to read through and follow these important safety and operation instructions. IMPORTANT: TO PRESERVE THE LIFE OF YOUR PRODUCT DO NOT EXPOSE THIS PRODUCT TO RAIN OR MOISTURE. CAUTION: RISK OF ELECTRIC SHOCK. DO NOT DISASSEMBLE THIS UNIT. TO PREVENT THE RISK OF ELECTRIC SHOCK, DO NOT REMOVE COVER. NO USER- SERVICEABLE PARTS INSIDE. REFER SERVICING TO QUALIFIED PERSONNEL. VENTILATION - The device should be situated so that its location or position does not interfere with its proper ventilation. For example, the unit should not be situated on a bed, sofa, rug or similar surface that may block the ventilation openings. HEAT - The device should be situated away from sources of high heat such as radiators or stoves. USB POWER SOURCE - The device should be connected to a USB power supply from a connected computer with USB 2.0 compliant connection. CLEANING - We strongly suggest using a clean, dry, non-alcohol cotton swab to insert into the film scanner and clean the glass surface periodically to produce a clear image NON USE PERIOD - The USB cord for the device should be unplugged from the computer when the unit is left unused for a long period of time. USB OVERLOADING - Do not overload the USB connections on your computer. If you have other devices connected to your computer such as a wireless mouse, MP3 Player, mobile phone or other USB powered devices. If too many devices are connected to the computer their may be inadequate power for the PhotoSaver to operate properly SERVICING - The user should not attempt to service the device beyond those means described in the operating instructions. All other servicing should be referred to qualified service personnel. Spectare PhotoSaver Unpacking your Product 2 The following items should be included: Please contact your retailer if you have not received any of these items a PhotoSaver with USB Cable Connected CD ROM Installer b Negative Holder c Slide Holder Rubber Feet d user's guide 3 Installation Unpack your PhotoSaver and remove it from the package. Find the small rubber feet stickers. Remove four of the rubber feet and place them in the marked spaces on the bottom of the PhotoSaver. a IMPORTANT: Before connecting to the computer for the first time insert the CD ROM and choose the following options on the CD: b RESTART COMPUTER c then PLEASE FOLLOW THIS ORDER: 1. Install the Driver. 2. Install the ArcSoft Software. 3. Install Directx 9.0: NOTE: if you are running Windows XP Service Pack 2 or higher or Windows Vista and XP professional this is not needed. 4. Install Acrobat Reader if you do not have this installed on your computer already. AFTER INSTALLATION PLEASE RESTART YOUR COMPUTER-- THIS IS IMPORTANT. After restart, connect the USB cable from the PhotoSaver into your computer. NOTE: If many USB devices are connected to your computer such as Mobile Phones, Media players or other USB powered devices there may be inadequate power for the PhotoSaver. Please unplug all unneeded USB devices before Saving images with the PhotoSaver. Upon the first connection of the PhotoSaver the Hardware Wizard will automatically launch. Choose the selection to search and automatically install the hardware drivers. d Spectare PhotoSaver The PhotoSaver 4 Slot for Slide and Negative Holder Insert the holder from the LEFT Side only. Save Button: Press this button to capture and save the image loaded in the Holder NOTE: This button will light up when connected to a USB Power source Ready Light: Will turn green when the slide or negative holder is in the correct position USB Cable This cable is permanently attached to The PhotoSaver. Connect this to your PC Computer for power and transfer of images to your computer. user's guide 5 Loading Slides a Hold up the slide toward the light. Face the trademark side of the slide away from you. Look through the slide and it should appear normally (not a mirror image). Now turn the slide so the image is upside down while looking at the same side. Open the slide holder at the marked spot on the top. With the slide holder laid open place the slide into recessed area in the holder-- the slide should fit perfectly. b NOTE: Handle slides with care. any dust, scratches or fingerprints will show up on your saved images. If possible use cotton gloves when handling slides. It is recommended to use compressed air to remove any dust on the negatives. These items are not included with the PhotoSaver but can be purchased from an office supply, camera or electronics retailer. c Close the slide holder and press the edges so that it locks in place. Hold it in the position as shown in the photo. The image(s) should be upside down. d Insert the Slide holder into the slot on the LEFT side of the PhotoSaver as shown. Spectare PhotoSaver Hold up the negative toward the light. As you look through the negative you should be able to read the small negative numbers normally (not a mirror image). Loading Negatives 6 a Now turn the negative so the image is upside down while looking at the same side. Open the negative holder at the marked spot on the top. With the negative holder laid open place the negative into holder so the notches line up with the notches on the holder. b NOTE: Handle negatives with care. Any dust, scratches or fingerprints will show up on your saved images. If possible use cotton gloves when handling negatives.It is recommended to use compressed air to remove any dust on the negatives. These items are not included with the PhotoSaver but can be purchased from an office supply, camera or electronics retailer. c Close the Negative holder and press the edges so that it locks in place. Hold it in the position as shown in the photo. The image(s) should be upside down. Insert the negative holder into the slot on the LEFT side of the PhotoSaver as shown. NOTE: in some cases the holes on the film will not match exactly to alignment of the holder. This is caused by a non-standard camera. In this case there will be a small black line on the edge of the frame that can easily be cropped out using the PhotoImpression Software. d user's guide 7 Capturing images NOTE: set up and installation of the driver and Acrsoft software needs to be done first. After installation and connection of the PhotoSaver to the computer as described in Step 1 click on the START menu of your Windows PC and launch ARCSOFT PHOTOIMPRESSION from the programs menu, wait for the application to launch. a “Arcsoft PhotoImpression” Window. Choose “GET PHOTOS” from the menu bar Then choose “ACQUIRE FROM SCANNER” from the pull down menu “Acquire From Scanner” Window b c Select the “OTV SCANNER” Choice Choose the file format of JPEG of TIF Choose the type of media you are scanning (slides or negatives) Choose the location on your hard drive to transfer the saved images into. Choose the color depth. NOTE: Only TIF files can be saved as 48 bit color depth Choose the resolution as 1800 or 3600 DPI After all settings have been made click the ACQUIRE button. “OTV” Scanner Window. This window will show you a preview of the image that is loaded the PhotoSaver holder. NOTE: When you are scanning negatives it will be converted to a positive image after you transfer them to your computer. d Spectare PhotoSaver SET THE FORMAT RESOLUTION Click on the “FORMAT” button to choose the final resolution size of the final captured images. 2592x1680 will be the highest quality and resolution, However these images will be the largest file size and will take longer to transfer. TO CAPTURE / SAVE THE IMAGE Transferring Images 8 NOTE: To get the best quality capture please wait a few seconds after the image has been put into place. The image darken and adjust to the best settings. Click “SNAP SHOT” on the application window or press on the PhotoSaver The saved images will appear as thumbnails on the film icon above. You may save up to 12 images before transferring to your computer e IMPORTANT: After you save your images you still need to transfer them to your computer-The images WILL NOT be saved on the PhotoSaver after you Exit the OVT Scanner Window. f TO TRANSFER IMAGES: Select the Image thumbnails your wish to transfer by clicking on them with your mouse. You can select multiple icons with the SHIFT or Ctrl Keys of your computer. Click on the “TRANSFER” button to transfer the Selected images to the designated directory on your computer. After transferring is complete click EXIT. The images will appear in PhotoImpression main window and can be edited. g USING PHOTO IMPRESSION: From the main window of PhotoImpression you may click on an image to see it in more detail and edit the image as desired. There are many editing features that can be accomplished using the software. Pease refer to the ArcSoft PhotoImpression Supplement Guide that is included in the User Manual on the CD ROM. or go to http://www.arcsoft.com/ for more details on using this software. h user's guide 9 Cleaning & Maintenance Periodically and after consistent use the PhotoSaver should be cleaned using a compressed air canister to clean the dust out of the inside chamber. Place the PhotoSaver on the side and insert the end of straw from the compressed air into door on the left side so that it opens. Gently blow out any dust on the inside of the PhotoSaver. a NOTE: Compressed air is not included with the PhotoSaver but can be purchased from an office supply or electronics retailer. For further cleaning you can use an ordinary cotton swab and a bottle of lens cleaning fluid. Wet the end of the cotton swab with Lens Cleaning fluid and insert into the left side of the PhotoSaver so the door opens. Then clean the entire surface of the glass on the inside of the PhotoSaver with the cotton swab. b NOTE: Cotton swabs and cleaning fluid are not included with the PhotoSaver but can be purchased from an office supply, photo supply or electronics retailer. c When not in use please disconnect the PhotoSaver from the computer and store in a clean, dry and dust-free environment. Spectare PhotoSaver Troubleshooting 10 PROBLEM: The most common problem is that the PhotoSaver will not connect to the computer and you will get an error message that says “Can not find camera. Please connect Omnivision Supercam”. SOLUTION: Check your operating system: At the time of release the PhotoSaver is only compatible with Windows XP and Windows Vista. To check your Windows operating system version go to the START Menu under windows, Highlight “My Computer” with the cursor and press the Right button of the mouse. In the Pull down menu select “PROPERTIES” this will give the operating system version and service pack number. If you are running Windows 2000, ME or 98 the PhotoSaver will not be compatible with these systems. 1. If you have Windows Vista64 Operating system please check the Spectare Web site at: http://www.spectareproducts.com/products/supportindex.html This software was unavailable at the time of the release of the CD ROM but may be posted on the site at this time. 2. If you have Windows XP Service Pack 1 please make sure to install the DirectX drivers that have been included on the CD ROM 3. If you have a Apple Mac computer we currently do not have software available for this. However, we plan to offer this in the future. Please check http://www.spectareproducts.com/products/supportindex.html to see if there is a new release for Mac. 4. Ensure that you are connecting to a USB 2.0 Compatible connection. Check the operating manual of your computer to get details on the connections of your particular computer. 5. Ensure you have at least 384 MB of RAM memory. On older computer with less system RAM their may be insufficient memory for the PhotoSaver to work. Also ensure there is sufficient hard disc space to save your images to your computer. 6. Check the other USB powered devices that are also connected to your computer such as Cell phones, Media Players, PDAs, BlueTooth Mice or other devices. Unplug any USB device you are not currently using. 7. Launch PhotoImpression-- choose GET PHOTOS and ACQUIRE FROM SCANNER and Ensure that 'OVT Scanner' is selected. user's guide 11 Troubleshooting Cont... IF you are still having troubles: 8. Quit the OVT Scanner window and PhotoImpression, Unplug the PhotoSaver from the USB port, wait a few seconds and plug into a different USB 2.0 port then relaunch the PhotoImpression Software and try again. IF you are still having troubles: 9. RESTART YOUR COMPUTER WITH YOUR PHOTOSAVER PLUGGED IN IF you are still having troubles: 10. Uninstall current software and download the latest version of PhotoImpression 6.1 and drivers from http://www.spectareproducts.com/products/supportindex.html. Make sure you install the Drivers, PhotoImpression software and Directx if needed. Restart your computer and try again. PROBLEM : I am using a different software other than PhotoImpression to capture and edit my images. SOLUTION: You can use any “Twain” compatible software to capture images and edit the images. Adobe PhotoShop®, PhotoShop Elements® or other party image editing software can be used if desired. If you are using software other than PhotoImpression you still must install the Drivers for the PhotoSaver that are included on the CD ROM. Please refer to the user manual and support for the software you are using. Spectare Products can not troubleshoot or support software related problems when using these other solutions. PROBLEM: Blurry images SOLUTION: Please ensure that the work space you are using is stable and does not have any moving objects on. Even the slightest vibrations can corrupt the scanners images. Also make sure there are no dust particles or hairs on your slides when putting them in your scanner. You can also clean the lens of the scanner using the cleaning brush provided. FOR THE MOST RECENT TROUBLESHOOTING TIPS AND SUPPORT GO TO http://spectareproducts.com then click on SUPPORT Spectare PhotoSaver Technical Specifications Lens: Sensor: Focus Range: Exposure : Color balance: Scan high resolution: Data conversion: Scan Method: Light source: Resolution: Power: Interface: Operating System: Software: Dimensions: Language: 12 F no. = 6.0 , 4 Glass elements , Half-field Angle=15 5.1 mega pixels CMOS sensor Fixed focus Auto Auto 3,600 dpi interpolation resolution 10 bits per color channel Single pass Backlight(3 white LED) 2592X1680, 1280X1024, 640X480 Powered from USB USB 2.0 Windows XP/VISTA Arcsoft PhotoImpression & Scanner driver 3.4” x 3.4” x 6.5” English,French,German,Italian,Spanish, Traditional Chinese,Simplified Chinese,Japanese MADE IN CHINA This device complies with part 15 of the FCC rules. Operation is subject to the following two conditions: (1) This device may not cause harmful interference and (2) this device must accept any interference received, including interference that may cause undesired operation. user's guide S1 PhotoImpression User Guide Supplement This software has been provided by ArcSoft Inc. go to http://www.arcsoft.com/ for more details and support for this software. ArcSoft PhotoImpression Using ArcSoft PhotoImpression 6 S2 Launch ArcSoft PhotoImpression from the Programs menu of Windows. Menu Bar After the application launches the Menu bar appears in the top of the application window that accesses the program's features. Included below is a description of some of the main editing features of the ArcSoft PhotoImpression software. For a more complete guide click on the HELP tab of the menu bar: File Menu View Choose Preferences Select the “MEDIA MONITOR” tab: This allows you to choose the folder or the location(s) of where you will put your image files. Whenever an image file is placed in the chosen location(s) it will always be available in the PhotoImpression main window. Use this to change the way the information is displayed on the Main window Change the view mode from Thumbnail to Detail readout. Select other viewing options for the types of media to display (Music, Photos, video, folders). Select Full Screen/Play (F4) to display or play the first selected file in full screen view. user's guide S3 The Main Window Photo Editing Tools To Access the Photo Editing Tools highlight the thumbnail of the photo in the main window you wish to edit and click on The “EDIT” Button --> then go to “PHOTO EDITING TOOLS” The Selected photo will be displayed in the Editing Window. This window gives an enlarged preview as well as a complete set photo enhancement, editing and retouching controls. The window can be stretched to provide a large size view of the active photo. Double click the module's tool bar to maximize the window to fill the computer screen. ArcSoft PhotoImpression Photo Editing Controls S4 The Photo Editing Tools window includes the following set of controls: 1. Enhance The Enhance function includes two types of controls: Click "AUTO ENHANCE" to improve the overall quality of your pictures with a single click. OR For Manual adjustment: move the slider bars for precise image enhancement control of the Brightness, Contrast, Saturation, Hue and Sharpen. After the slider bars are moved a preview of the photo with the adjustments applied is displayed. Click "Apply" if you like the result. Click "Cancel" if you do not. 2. Color This feature is designed to fix digital photos that have unnatural color or appear to dark. It's also great for fixing scanned versions of old prints that have faded or whose colors have changed after many years of neglect. Click on the COLOR tab in the Photo Editing tools window: u Drag the color balance sliders to make the photo color appear more natural. Add red or yellow to make the photo warmer. Add blue or green to make the photo cooler. Drag the Lighter/Darker slider to the left to reveal details hidden in a dark photo or to the right to make a faded photo look new again. Click "Apply" if you like the result. Click "Cancel" if you do not. user's guide S5 Photo Editing Controls 3. Red-Eye This feature makes it easy for you to fix “red eye” - a common problem in flash photography. u u Simply click the "Fix Red-Eye" button to automatically find and fix all red-eye. If not all of the eyes have been fixed, used the "Click to Fix" method: to fix red-eye manually: Use the zoom slider on the tool bar to zoom in on the photo. Drag the small white box inside the zoom navigator to move over a red eye. Place your cursor directly over the red eye and click. Repeat the process until all red eyes are fixed. Click "Undo" if you make a mistake or don't like the result. 4. Crop This feature enables you to trim photos for dramatic effect or cut off the distracting parts of a picture. Choose the crop orientation (portrait or landscape). Select a fixed proportion for the crop rectangle (4:6, 5:7, 8:10) or choose "Custom" if you want to use another proportion. Resize the crop rectangle by clicking and dragging the red lines. Move the crop rectangle into position by clicking and dragging inside the red box. Click "Crop". The area inside the rectangle will be kept, the area outside will be trimmed away. Click "Undo" if you make a mistake or don't like the result. ArcSoft PhotoImpression Photo Editing Controls S6 5. Straighten This feature enables you to fix photos that appear to be tilted. Move the slider (or click the rotate buttons) until the photo appears straight. Use the superimposed grid lines for vertical and horizontal reference. Click "Apply" if you like the result. Click "Cancel" if you do not. 6. Blur Background This feature can be used in a subtle way -- to tone down unimportant background details, or for dramatic effect -- by making the main subject of a photo pop out of the picture. With your cursor, trace a line around the person or object you want to stand out. When you release the mouse button, the area outside the traced line will become slightly blurred. Drag the first slider to make the transition between the blurred and non-blurred area sharp or smooth. Drag the second slider to increase or decrease the amount of blur. Click "Apply" if you like the result. Click "Cancel" if you do not. 7. Retouching Tools click on the RETOUCH tab of the Editing tools window which will bring up a new set of editing and retouching options: Healing Brush The Healing Brush is good for fixing dust, scratches and removing skin blemishes. Establish a source point for the Healing Brush by holding the Shift key and clicking on an area of the skin that is close in color and texture to the area you want to heal. Use the zoom control to zoom in on the blemish. Adjust the size of the healing brush so the cursor (circle) is only slightly larger than the blemish. Paint over the blemish. The area will be healed. Click "Undo" if you make a mistake or don't like the result. user's guide S7 Photo Editing Controls Clone The Clone tool is good for removing unwanted elements from a photo. It can also be used for fun effect, like moving a nose from one person to another. Lighten/Darken Smudge Sharpen Blur Establish a source point for the Clone tool by holding the Shift key For Example: you can remove a telephone pole from a photo by clicking on an area of the sky that you will use to use to paint over the telephone pole. Adjust the brush size so the cursor (circle) is only slightly larger than the widest part of the telephone pole. Click and hold your mouse button and carefully paint over the telephone pole. Do not release the mouse button until the job is done. The sky will be cloned into place. Click "Undo" if you make a mistake or don't like the result. The Lighten/Darken tool is good for adjusting specific areas of a photo. Simulate the smearing of wet paint. Click and drag the sliders to change the brush size and hardness. Sharpen blurry areas. Click and drag the sliders to change the brush size and transparency. Smooth out rough areas. Click and drag the sliders to change the brush size and intensity. ArcSoft PhotoImpression Photo Editing Controls Paint Brush S8 Allows you to "paint" on your image when you click and drag the mouse. Click and drag the sliders to change the brush size and transparency. Line Draw a straight line in the photo. Click and drag the sliders to change the line width and transparency. Eraser Use the eraser to remove the image by the paintbrush and line tools. Click and drag the sliders to change the eraser size and effect. 8. Saving Your Results When you're done editing a photo, click “Save As” to save your results as a new file. You can also choose to overwrite the original file if desired. Click "Close" to exit the Photo Editing module. Note: For more detailed information, please refer to the [Help] of the program or go to http://www.arcsoft.com/ for more details and support for this software. user's guide Spectare is a registered trademark of SuMaWah LLC. © 2008 www.spectareproducts.com