1
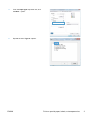
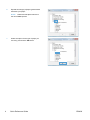
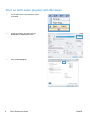
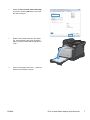
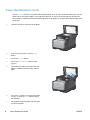
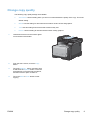
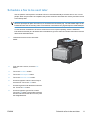
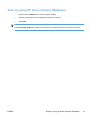
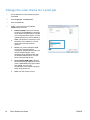
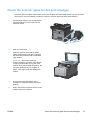
LASERJET PRO CM1410
COLOR MFP SERIES
Quick Reference Guide
Print on special paper, labels, or transparencies
2
1.
On the File menu in the software program,
click Print.
2.
Select the product, and then click the
Properties or Preferences button.
3.
Click the Paper/Quality tab.
Quick Reference Guide
ENWW
4.
From the Paper type drop-down list, click
the More... option.
5.
Expand the list of Type is: options.
ENWW
Print on special paper, labels, or transparencies
3
6.
Expand the category of paper types that best
describes your paper.
NOTE: Labels and transparencies are in
the list of Other options.
7.
4
Select the option for the type of paper you
are using, and click the OK button.
Quick Reference Guide
ENWW
Walk-up USB printing
This product features printing from a USB flash drive, so you can quickly print files without sending them
from a computer. The product accepts standard USB storage accessories in the USB port on the front of
the product. You can print the following types of files:
●
.PDF
●
.JPEG
1.
Insert the USB drive into the USB port on the
front of the product.
2.
The USB Flash Drive menu opens. Touch
the arrow buttons to scroll through the
options.
●
Print Documents
●
View and Print Photos
●
Scan to USB Drive
3.
To print a document, touch the Print
Documents screen, and then touch the
name of the folder on the USB drive where
the document is stored. When the summary
screen opens, you can touch it to adjust the
settings. Touch the Print button to print the
document.
4.
To print photos, touch the View and Print
Photos screen, and then touch the preview
image for each photo that you want to print.
Touch the Done button. When the summary
screen opens, you can touch it to adjust the
settings. Touch the Print button to print the
photos.
5.
Retrieve the printed job from the output bin,
and remove the USB drive.
ENWW
Walk-up USB printing
5
Print on both sides (duplex) with Windows
6
1.
On the File menu in the software program,
click Print.
2.
Select the product, and then click the
Properties or Preferences button.
3.
Click the Finishing tab.
Quick Reference Guide
ENWW
4.
Select the Print on both sides (manually)
check box. Click the OK button to print the
first side of the job.
5.
Retrieve the printed stack from the output
bin, and maintaining the same orientation,
place it with the printed-side facing down in
Tray 1.
6.
On the control panel, touch the OK button to
print the second side of the job.
ENWW
Print on both sides (duplex) with Windows
7
Copy identification cards
Use the ID Copy feature to copy both sides of identification cards, or other small-size documents, onto the
same side of one sheet of paper. The product prompts you to copy the first side and then to place the
second side on a different area of the scanner glass and copy again. The product prints both images at the
same time.
8
1.
Load the document onto the scanner glass.
2.
From the Home screen, touch the Copy
button.
3.
Touch the ID Copy button.
4.
Touch the Black or Color button to start
copying.
5.
The product prompts you to place the next
page on a different section of the scanner
glass.
6.
Touch the OK button if you have more pages
to copy, or touch the Done button if this is
the last page.
7.
The product copies all pages onto one side
of a sheet of paper.
Quick Reference Guide
ENWW
Change copy quality
The following copy-quality settings are available:
●
Auto Select: Use this setting when you are not concerned about the quality of the copy. This is the
default setting.
●
Mixed: Use this setting for documents that contain a mixture of text and graphics.
●
Text: Use this setting for documents that contain mostly text.
●
Picture: Use this setting for documents that contain mostly graphics.
1.
Load the document onto the scanner glass
or into the document feeder.
2.
From the Home screen, touch the Copy
button.
3.
Touch the Settings... button, and then scroll
to and touch the Optimize button. Touch the
arrow buttons to scroll through the options,
and then touch an option to select it.
4.
Touch the Black or Color button to start
copying.
ENWW
Change copy quality
9
Create and edit speed-dial entries
1.
From the Home screen, touch the Fax
button.
2.
Touch the Fax Menu button.
3.
Touch the Phone Book Setup button.
4.
Touch the Individual Setup button.
5.
Touch an unassigned number from the list.
6.
Use the keypad to enter a name for the
entry, and then touch the OK button.
7.
Use the keypad to enter the fax number for
the entry, and then touch the OK button.
10
Quick Reference Guide
ENWW
Schedule a fax to be sent later
Use the product control panel to schedule a fax to be sent automatically at a future time to one or more
people. When this procedure is completed, the product scans the document into memory and then returns
to the Ready state.
NOTE: If the product cannot transmit the fax at the scheduled time, that information is indicated on the
fax error report (if that option is turned on) or recorded in the fax activity log. The transmittal might not be
initiated because the fax-sending call is not answered, or because a busy signal stops the redial attempts.
If a fax has been scheduled to be sent at a future time but it requires updating, send the additional
information as another job. All faxes that are scheduled to go to the same fax number at the same time are
delivered as individual faxes.
1.
Load the document into the document
feeder.
2.
From the Home screen, touch the Fax
button.
3.
Touch the Fax Menu button.
4.
Touch the Send Options button.
5.
Touch the Send Fax Later button.
6.
Use the keypad to enter the time of day to
send the fax. Touch the OK button.
7.
Use the keypad to enter the date to send the
fax. Touch the OK button.
8.
Use the keypad to type the fax number.
Touch the OK button. The product scans the
document and saves the file in memory until
the designated time.
ENWW
Schedule a fax to be sent later
11
Delete faxes from memory
Use this procedure only if you are concerned that someone else has access to your product and might try
to reprint faxes from the memory.
CAUTION: In addition to clearing the reprint memory, this procedure clears any fax that is currently being
sent, unsent faxes that are pending redial, faxes that are scheduled to be sent at a future time, and faxes
that are not printed or forwarded.
1.
From the Home screen, touch the Setup
button.
2.
Touch the Service menu.
3.
Touch the Fax Service menu.
4.
Touch the Clear Saved Faxes button.
12
Quick Reference Guide
ENWW
Scan by using HP Scan software (Windows)
1.
Double-click the HP Scan icon on the computer desktop.
2.
Select a scanning shortcut, and adjust the settings if necessary.
3.
Click Scan.
NOTE: Click Advanced Settings to gain access to more options.
Click Create New Shortcut to create a customized set of settings and save it in the list of shortcuts.
ENWW
Scan by using HP Scan software (Windows)
13
Change the color theme for a print job
1.
On the File menu in the software program,
click Print.
2.
Click Properties or Preferences.
3.
Click the Color tab.
4.
Select a color theme from the Color
Themes drop-down list.
14
●
Default (sRGB): This theme sets the
product to print RGB data in raw device
mode. When using this theme, manage
color in the software program or in the
operating system for correct rendering.
●
Vivid: The product increases the color
saturation in the midtones. Use this
theme when printing business
graphics.
●
Photo: The product interprets RGB
color as if it were printed as a
photograph using a digital mini lab. The
product renders deeper, more
saturated colors differently than with
the Default (sRBG) theme. Use this
theme when printing photos.
●
Photo (Adobe RGB 1998): Use this
theme with printing digital photos that
use the AdobeRGB color space rather
than sRGB. Turn off color
management in the software program
when using this theme.
●
None: No color theme is used.
Quick Reference Guide
ENWW
Check the scanner glass for dirt and smudges
Over time, specks of debris might collect on the scanner glass and white plastic backing, which can affect
performance. Use the following procedure to clean the scanner glass and white plastic backing.
1.
Use the power switch to turn off the product,
and then unplug the power cord from the
electrical socket.
2.
Open the scanner lid.
3.
Clean the scanner glass and the white
plastic backing with a soft cloth or sponge
that has been moistened with nonabrasive
glass cleaner.
CAUTION: Do not use abrasives,
acetone, benzene, ammonia, ethyl alcohol,
or carbon tetrachloride on any part of the
product; these can damage the product. Do
not place liquids directly on the glass or
platen. They might seep and damage the
product.
4.
Dry the glass and white plastic with a
chamois or a cellulose sponge to prevent
spotting.
5.
Plug in the product, and then use the power
switch to turn on the product.
ENWW
Check the scanner glass for dirt and smudges
15
Clean the paper path from the product control panel
1.
From the Home screen, touch the Setup
button.
2.
Touch the Service menu.
3.
Touch the Cleaning Page button.
4.
Load plain letter or A4 paper when you are
prompted.
5.
Touch the OK button to begin the cleaning
process.
A page feeds through the product slowly.
Discard the page when the process is
completed.
16
Quick Reference Guide
ENWW
© 2010 Hewlett-Packard Development Company, L.P.
www.hp.com
Edition 1, 9/2010
Part number: CE861-90946
Windows ® is a U.S. registered trademark of Microsoft Corporation.
Reproduction, adaptation or translation without prior written permission is
prohibited, except as allowed under the copyright laws.
The information contained herein is subject to change without notice.
The only warranties for HP products and services are set forth in the express
warranty statements accompanying such products and services. Nothing herein
should be construed as constituting an additional warranty. HP shall not be liable
for technical or editorial errors or omissions contained herein.
*CE861-90946*
*CE861-90946*
CE861-90946