1
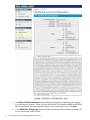
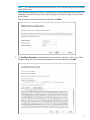
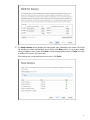
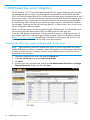
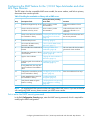
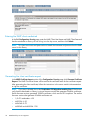
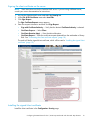
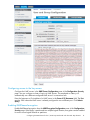
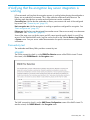
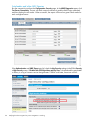
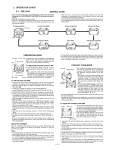
HP StoreEver MSL Tape Libraries
Encryption Key Server Configuration Guide
Abstract
This document includes information on configuring HP StoreEver 1/8 G2 Tape Autoloader and MSL Tape Libraries for supported
encryption key servers, including the HP Enterprise Secure Key Manager (ESKM) and KMIP-based key servers. This document
is intended for system administrators experienced with configuring tape libraries and encryption key servers.
You can always download the most up-to-date firmware files from http://www.hp.com/support. See the user and service guide
for your product for instructions on updating firmware
HP Part Number: QU625-96335
Published: September 2014
Edition: 2
© Copyright 2014 Hewlett-Packard Development Company, L.P.
The information contained herein is subject to change without notice. The only warranties for HP products and services are set forth in the express
warranty statements accompanying such products and services. Nothing herein should be construed as constituting an additional warranty. HP shall
not be liable for technical or editorial errors or omissions contained herein.
Warranty
WARRANTY STATEMENT: To obtain a copy of the warranty for this product, see the warranty information website:
http://www.hp.com/go/storagewarranty
Contents
1 Introduction...............................................................................................4
Using an encryption key server...................................................................................................4
Considerations for using an encryption key server.........................................................................5
Media compatibility for drives supporting encryption.....................................................................5
Licensing.................................................................................................................................5
Installing the encryption license..............................................................................................6
2 HP Enterprise Secure Key Manager (ESKM) integration....................................7
3 KMIP-based key server integration..............................................................12
Creating the client user name and password on the server...........................................................12
Configuring the KMIP feature for the MSL6480...........................................................................13
Using the KMIP Wizard......................................................................................................14
Configuring the KMIP feature for the 1/8 G2 Tape Autoloader and other MSL Tape Libraries...........17
Set or enter the KMIP security password................................................................................17
Entering the KMIP client credentials......................................................................................18
Generating the client certificate request.................................................................................18
Signing the client certificate on the server..............................................................................19
Installing the signed client certificate.....................................................................................19
Configuring access to the key servers....................................................................................21
Enabling KMIP-based encryption..........................................................................................21
4 Verifying that the encryption key server integration is working........................23
Connectivity test.....................................................................................................................23
Basic encryption test...............................................................................................................25
Failover test...........................................................................................................................25
5 Support and other resources......................................................................27
Contacting HP........................................................................................................................27
Typographic conventions.........................................................................................................27
6 Documentation feedback...........................................................................28
Contents
3
1 Introduction
This document includes information about configuring and using encryption key servers with the
1/8 G2 Tape Autoloader and MSL Tape Libraries with LTO-4 and later generation tape drives.
The LTO-4 and later generation tape drives include hardware capable of encrypting data while it
is being written, and decrypting data when reading. Hardware encryption can be used with or
without compression while maintaining the full speed and capacity of the tape drive and media.
NOTE: An LTO-4 or later generation tape drive will not write encrypted data to an LTO-3 or
earlier generation tape. For additional compatibility information, see Media compatibility (page 5).
Encryption is the process of changing data into a form that cannot be read until it is deciphered
with the key used to encrypt the data, protecting the data from unauthorized access and use. LTO-4
and later generation tape drives use the 256-bit version of the industry-standard AES encrypting
algorithm to protect your data.
Your company policy will determine when and how to use encryption. For example, encryption
may be mandatory for company confidential and financial data, but not for personal data. Company
policy will also define how encryption keys should be generated and managed, how frequently
they should be changed, and how passwords are managed.
Encryption is primarily designed to protect the media once it is offline and to prevent it from being
accessed by unauthorized users. You will be able to read and append the encrypted media as
long as a key server token containing the correct key is installed and the appropriate passwords
are available.
For more information about AES encryption, encryption keys, and using hardware encryption with
your HP Ultrium tape drive, see the White Papers at http://h18006.www1.hp.com/storage/
tapewhitepapers.html.
Using an encryption key server
When a key manager is enabled and properly configured, tape data will automatically be encrypted
with keys delivered from the key manager. Tapes are encrypted on a key-per-tape basis. Some
key managers support additional options, such as having a key per partition.
Write and append operations: The tape drive will request a key when data is written. The tape
library, acting as an intermediary, may request the key manager to create a key. The library then
obtains that key and delivers it to the tape drive. The key is identified by a name, which is associated
with the media identifier. The key is retained in the tape drive until the tape is unloaded.
Read operations: The tape drive will request a key. The tape library, acting as an intermediary,
obtains the key identifier, requests that key from the key manager, and delivers it to the tape drive.
The key is retained in the tape drive until the tape is unloaded and is used for any remaining read
and operations.
HP Enterprise Secure Key Manager (ESKM)
All ESKM versions support the ESKM encryption protocol, which can be used by the MSL6480
and requires an ESKM Encryption license for the library.
ESKM 4.0 and later versions also support the KMIP protocol, which can be used by the 1/8 G2
Tape Autoloader and the MSL2024, MSL4048, MSL6480, MSL8048, and MSL8096 Tape Libraries.
Accessing the ESKM 4.0 with the KMIP protocol requires a KMIP Encryption license for the library.
The same ESKM 4.0 server can serve libraries configured to use the ESKM protocol and libraries
configured to use the KMIP protocol at the same time. Use the protocol that corresponds with the
encryption license for your library.
For configuration information, see “HP Enterprise Secure Key Manager (ESKM) integration”
(page 7) or “KMIP-based key server integration” (page 12).
4
Introduction
KMIP-based key servers
The 1/8 G2 Tape Autoloader and the MSL2024, MSL4048, MSL6480, MSL8048, and MSL8096
Tape Libraries support integration with non-HP key servers through the KMIP protocol. This requires
a KMIP Encryption license for the library. For configuration information, see “KMIP-based key
server integration” (page 12).
Considerations for using an encryption key server
The libraries only support the configuration of one encryption key method at a time. For example,
if the library is configured to obtain encryption keys from an encryption key server, it will not also
be able to obtain encryption keys from the HP MSL Encryption Kit nor from a backup application.
Media compatibility for drives supporting encryption
Table 1 Media compatibility
LTO-4 drive
LTO-5 drive
LTO-6 drive
LTO-1 media
Incompatible
Incompatible
Incompatible
LTO-2 media
Read only
Incompatible
Incompatible
LTO-3 media
Read/Write (no encryption) Read only
Incompatible
LTO-4 media — unencrypted
Read/Write
Read/Write
Read only
LTO-4 media — encrypted
Read/Write with
encryption key
Read/Write with
encryption key
Read only with encryption
key
LTO-5 media — unencrypted
Incompatible
Read/Write
Read/Write
LTO-5 media — encrypted
Incompatible
Read/Write with
encryption key
Read/Write with encryption
key
LTO-5 media — unencrypted
Incompatible
Read/Write
Read/Write
LTO-5 media — encrypted
Incompatible
Read/Write with
encryption key
Read/Write with encryption
key
LTO-6 media — unencrypted
Incompatible
Incompatible
Read/Write
LTO-6 media — encrypted
Incompatible
Incompatible
Read/Write with encryption
key
Licensing
The KMIP and ESKM features require that the applicable license for the library be installed before
the feature can be enabled and configured.
Table 2 KMIP and ESKM encryption licenses
Libraries
Part number
License name
MSL6480
D4T76A
HP StoreEver MSL6480 KMIP 1.2 Key Manager License
D4T76AAE
HP StoreEver MSL6480 KMIP 1.2 Key Manager E-License
TC469A
HP StoreEver MSL6480 ESKM Encryption License
TC469AAE
HP StoreEver MSL6480 ESKM Encryption E-License
TC468A
HP StoreEver MSL2024/4048/8096 KMIP License
TC468AAE
HP StoreEver MSL2024/4048/8096 KMIP E-License
• 1/8 G2 Tape
Autoloader
• MSL2024
Considerations for using an encryption key server
5
Table 2 KMIP and ESKM encryption licenses (continued)
Libraries
Part number
License name
• MSL4048
• MSL8096
Installing the encryption license
The license is installed from the library RMI or with HP Command View for Tape Libraries version
3.7 or later.
MSL6480
Install the license from the Configuration > System > License Key Handling screen. Enter the License
Key and then click Add License
Autoloader and MSL2024, MSL4048, and MSL8096
Install the license from the RMI Configuration: License Key page. Enter the key and then press
Submit.
6
Introduction
2 HP Enterprise Secure Key Manager (ESKM) integration
The MSL6480 library supports integration of all versions of the ESKM using the ESKM protocol.
Integration with the ESKM allows encryption keys and encrypted tapes to be shared with the ESL
G3 and other tape libraries that support the ESKM.
NOTE: If you are using ESKM 4.0 with the KMIP protocol, see the configuration instructions in
“KMIP-based key server integration” (page 12).
With the ESKM Wizard you can configure use of the HP Enterprise Secure Key Management server
with the MSL6480. Access the wizard from the Encryption menu on the RMI, which is only available
to the security user and requires that the ESKM license has been added from the Configuration >
System > License Key Handling screen. For licensing information, see “Licensing” (page 5).
NOTE: The library only allows one encryption key manager type to be used at a time. For
example, if ESKM is enabled and in use, the MSL Encryption Kit cannot also be used for encryption
key generation and retrieval.
For additional information on configuring ESKM for use with the library, see the HP Enterprise
Secure Key Manager Configuration Guide for HP Tape Libraries.
Before running the wizard, verify that:
•
The library configuration is complete, including defining all library partitions.
•
A 2048-bit server certificate for each HP ESKM device in the cluster has been created.
•
The ESKM server certificate has been signed by the Certificate Authority (CA) you intend to
use and has been installed on the ESKM.
•
SSL is enabled on the ESKM KMS server.
•
The HP ESKM Management Console is open and ready for use. The ESKM Management
Console and library RMI are used together to configure the library for ESKM.
•
All tape drives are empty.
•
The necessary license has been installed in the library. For licensing information and instructions
on installing the license, see “Licensing” (page 5).
Using the ESKM Wizard
1.
2.
3.
4.
From the MSL6480 RMI, click Encryption→ESKM Wizard to start the wizard.
The Wizard Information screen displays information about the wizard. If the library
configuration is complete, click Next.
The Certificate Authority Information screen displays prerequisites for using the ESKM certificate.
When the prerequisites are met, click Next.
The Certificate Authority Certificate Entry screen displays instructions for obtaining the certificate
for the ESKM server. Follow the instructions to copy the certificate from the management
console. Paste the certificate into the wizard and then click Next.
7
5.
6.
8
The Library Certificate Information screen displays prerequisites for generating and signing
the certificate for the library. When you have verified that SSL has been enabled on the ESKM
device and that the ESKM management console is open and ready for use, click Next.
In the ESKM Client Configuration screen enter the username and password that the library will
use to communicate with the ESKM.
HP Enterprise Secure Key Manager (ESKM) integration
NOTE: This username and password must match the client username and password created
on the ESKM server.
If the username and password have not already been set up on the ESKM device, follow the
instructions in the HP Enterprise Secure Key Manager User Guide to create a client account
for the library.
Enter the client username and password, and then click Next.
7.
The Certificate Generation screen displays the current library certificate, if one exists. Select
whether to keep the current certificate or generate a new one and then click Next.
9
If you generated a new certificate, you must sign the new certificate in the Sign Library
Certificate screen. Follow the instructions on the screen to sign the certificate in the ESKM web
interface and then paste it into the ESKM Certificate pane. After pasting the signed certificate,
click Next.
8.
9.
The ESKM Information screen displays prerequisites for using the ESKM. When the pre-requisites
have been met, click Next.
In the ESKM Tier Selection screen you can group ESKM devices into tiers so the library will
attempt to connect with ESKM devices in the top tier first, and then failover to connect with
ESKM devices in a lower priority tier if necessary. For example, you might put ESKM devices
in the same data center as the library in Tier 1 with ESKM devices in remote data centers in
Tiers 2 and 3.
One tier is used by default. To add a tier, click Add Tier.
Enter the IP address or fully-qualified hostname and port number for up to six ESKM devices
in each tier. To verify access to the ESKM devices, click Connectivity Check.
When the tier configuration is complete, click Next.
10
HP Enterprise Secure Key Manager (ESKM) integration
10. The Setup Summary screen displays the settings that were collected by the wizard. Verify that
the settings are correct and that there are no errors in the Done column. If you need to modify
setting or address issues, either click Back to reach the applicable screen or Cancel out of the
wizard to fix the issues and return later.
If the settings are correct and there are no errors, click Finish.
11
3 KMIP-based key server integration
The HP StoreEver 1/8 G2 Tape Autoloader and tape libraries support integration with encryption
key management servers using the Key Management Interoperability Protocol (KMIP) standard.
KMIP is an industry standard protocol for communications between a key management server and
an encryption system. The KMIP specification is developed by the KMIP technical committee of the
OASIS standards body (Organization for the Advancement of Structured Information Standards).
The KMIP feature allows the tape device to obtain encryption keys from selected KMIP-compliant
key managers. These keys can be used to encrypt data as it is written to tape. Up to six key servers
can be configured for failover purposes.
ESKM 4.0 and later versions can be accessed through the KMIP protocol. The same ESKM server
can serve keys through both the native ESKM and KMIP protocols at the same time.
To use the KMIP feature, the autoloader or library must have access to a KMIP key manager. HP
only supports KMIP when used with a supported key manager, listed in the EBS Matrix, located
at http://www.hp.com/go/ebs. For additional information on configuring KMIP servers for use
with the autoloader and libraries, see the KMIP server documentation.
Creating the client user name and password on the server
NOTE: These instructions are for the SafeNet KMIP server. If you are using ESKM 4.0 or later
with the KMIP protocol, follow the instructions in the HP Enterprise Secure Key Manager User Guide
to create a client account for he library. If you are using a different server, consult your server
documentation for instructions.
1.
2.
3.
4.
12
Log into the SafeNet KMIP server and select the Security tab.
In the Users & Groups panel select Local Users & Groups.
Click Add.
Enter the user name and password, and set the User Administration Permission and Change
Password Permission settings and then click Save.
KMIP-based key server integration
Configuring the KMIP feature for the MSL6480
With the Key Management Interoperability Protocol (KMIP) Wizard you can configure use of KMIP
key management servers with the MSL6480 library. Access to the wizard from the Encryption menu
on the RMI is only available to the security user and requires that the KMIP license has been added
from the Configuration > System > License Key Handling screen.
NOTE: The MSL6480 library only allows one encryption key manager type to be used at a time.
For example, if KMIP is enabled and in use, the MSL Encryption Kit cannot also be used for
encryption key generation and retrieval.
Before running the wizard, verify that:
•
The library configuration is complete, including defining all library partitions.
•
The KMIP server is available on the network and has been configured for use with this library.
•
All tape drives in the library are empty.
•
The KMIP server management user interface is open and ready for use. The server user interface
and library RMI are used together to configure the library for KMIP.
•
The KMIP license has been installed in the library. For licensing information and instructions
on installing the license, see “Licensing” (page 5).
To configure the KMIP feature:
1. Install and configure the key servers. See the vendor’s product documentation for details.
Collect the IP address of each server.
2.
Create a local CA and server certificate on the key server. See the vendor’s product
documentation for details.
Collect the filename of the CA certificate (a file with a crt extension).
3.
Set up a new client user account for the library. See “Creating the client user name and
password on the server” (page 12).
Collect the account user name and password.
4.
5.
Use the KMIP Wizard to enroll the library with the KMIP server. See “Using the KMIP Wizard”
(page 14).
If using the ESKM 4.0 server with the KMIP protocol, in the ESKM 4.0 user interface, navigate
to the Properties tab for the user associated with the library and then check Enable KMIP.
Configuring the KMIP feature for the MSL6480
13
6.
Verify that the KMIP feature is working. See “Verifying that the encryption key server integration
is working” (page 23).
Using the KMIP Wizard
1.
2.
3.
4.
14
In the Configuration area, click KMIP Wizard in the Encryption menu to start the wizard.
The Wizard Information screen displays information about the wizard. If the library
configuration is complete and the KMIP server is available on the network, click Next.
The Certificate Authority Information screen displays prerequisites for using the KMIP certificate.
When the prerequisites are met, click Next.
The Certificate Authority Certificate Entry screen displays instructions for obtaining the certificate
for the KMIP server. Follow the instructions to copy the certificate from the management console.
For example, when using the ESKM 4.0 with KMIP protocol, you can find the certificate in
the ESKM 4.0 web interface CA Certificate Information screen.
KMIP-based key server integration
Paste the certificate into the wizard and then click Next.
5.
6.
The Library Certificate Information screen displays information about the next wizard steps.
Click Next.
In the KMIP Client Configuration screen, enter the username and password that the library will
use to communicate with the KMIP server and then click Next.
NOTE: This username and password must match the client username and password entered
on the KMIP server for this library.
7.
The Certificate Generation screen displays the current library certificate, if one exists.
To use the current certificate, select Keep Current Certificate and then click Next.
To generate a new certificate, select Generate New Certificate. The wizard will generate and
display a new library certificate. Click Select Certificate to copy the new certificate text and
then click Next.
8.
If you selected Generate New Certificate, the Sign Library Certificate screen displays the new
certificate for the library. Sign the new library certificate with the certificate authority as a
client certificate, paste the new KMIP certificate in the box, and then click Next.
If using ESKM 4.0, you must also paste the signed certificate in ESKM 4.0 client interface.
Navigate to Security > Local Users & Groups > Local Users for the user associated with the
library and then paste the certificate in the Import New KMIP Client Certificate pane. Click
Save.
Configuring the KMIP feature for the MSL6480
15
9.
In the KMIP Server Configuration screen, enter the IP address or fully-qualified hostname and
port number for up to ten KMIP servers. The default port for KMIP is 6596. HP recommends
using the default value.
To verify access to the KMIP servers, click Connectivity Check.
10. In the KMIP Partition Enablement screen, select KMIP Enabled to configure partitions for use
with KMIP, and then click Next.
11. The Setup Summary screen displays the settings that were collected by the wizard. Verify that
the settings are correct and that there are no errors in the Done column. If you need to modify
any settings or fix any issues, either click Back to reach the applicable screen or Cancel out
of the wizard to fix the issues and return later.
If the settings are correct and there are no errors, click Finish.
16
KMIP-based key server integration
Configuring the KMIP feature for the 1/8 G2 Tape Autoloader and other
MSL Tape Libraries
The EBS Matrix lists the compatible KMIP server models, the server vendors, and links to primary
documents those vendors provide.
Table 3 Enrolling the autoloader or library with a KMIP server
Primary documents providing
more detail
Step
Description of task
1
Install and configure the key servers. Server vendor’s product
documentation
Collect the IP address of each
server.
2
Create a local CA and server
certificate on the key server.
Collect the filename of the CA
certificate (a file with a crt
extension).
3
Set up a new client user account for “Creating the client user name
the autoloader or library.
and password on the server”
(page 12)
4
Install the library license.
“Licensing” (page 5)
5
Set or enter the KMIP security
password in the RMI.
“Set or enter the KMIP security
password” (page 17)
6
Enter the KMIP Client Credentials in “Entering the KMIP client
the RMI.
credentials” (page 18)
7
Generate the autoloader or library “Generating the client certificate
client certificate.
request” (page 18)
8
Sign the client certificate.
9
Install the signed client certificate in “Installing the signed client
the RMI.
certificate” (page 19)
Server vendor’s product
documentation
Comment
Collect the account username and
the account password.
The user name will also be used to
generate the client certificate.
“Signing the client certificate on
the server” (page 19)
If using ESKM 4.0, also copy the
signed certificate to the ESKM 4.0
client.
10
Configure the accessible key servers “Configuring access to the key
for the autoloader or library.
servers” (page 21)
11
Enable KMIP-based encryption for
the autoloader or library.
“Enabling KMIP-based
encryption” (page 21)
12
Verify that the KMIP encryption
feature is working.
“Verifying that the encryption key
server integration is working”
(page 23)
Enter the IP addresses from step 1.
NOTE: HP supplies the ESKM server but does not supply other KMIP servers. If you are not familiar
with configuring KMIP servers, please contact your KMIP server vendor.
Set or enter the KMIP security password
In the RMI Configuration: Security page, enter the KMIP security password, which is required for
modifying the KMIP configuration.
Configuring the KMIP feature for the 1/8 G2 Tape Autoloader and other MSL Tape Libraries
17
Entering the KMIP client credentials
In the RMI Configuration: Security page, enter the KMIP Client User Name and KMIP Client Password
that the autoloader or library will use to log in to the key server, and then click Submit.
NOTE: This client user name and password must match the username and password on the KMIP
server for this library.
Generating the client certificate request
In the KMIP Certificate Import section of the Configuration: Security page click Generate Certificate
Request. The KMIP Client User Name will be used as the certificate name for the certificate request.
After generating the client certificate, follow the instructions in the server vendor’s documentation
to sign the certificate.
NOTE: If you plan to disable the use the Disable Non-FIPS Algorithms and Key Sizes ESKM feature
verify that the autoloader or library is using a firmware version that generates 2048-bit certificates.
Earlier firmware versions generated 1028-bit certificates, which are not FIPS compliant. The earliest
firmware versions that generate 2048-bit certificates are:
18
•
1/8 G2 autoloader: 4.30
•
MSL2024: 6.20
•
MSL4048: 8.70
•
MSL8048 and MSL8096: 1130
KMIP-based key server integration
Signing the client certificate on the server
NOTE: These instructions are for the SafeNet KMIP server. If you are using a different server,
consult your server documentation for instructions.
1.
2.
3.
Log into the SafeNet KMIP server and select the Security tab.
In the CAs & SSL Certificates area select Local CAs.
Click Sign Request.
The Sign Certificate Request screen appears.
4.
Enter the request information and then click Sign Request.
•
Sign with Certificate Authority — Verify that the desired Certificate Authority is selected.
•
Certificate Purpose — Select Client.
•
Certificate Duration (days) — Enter the desired duration.
•
Certificate Request — Paste the certificate request obtained from the autoloader or library
RMI. See “Generating the client certificate request” (page 18).
The result will be the signed client certificate, which will be used in “Installing the signed client
certificate” (page 19).
Installing the signed client certificate
Install the client certificate in the Configuration: Security page.
Configuring the KMIP feature for the 1/8 G2 Tape Autoloader and other MSL Tape Libraries
19
1.
2.
Using a text editor, copy the contents of the signed certificate and paste it into the Signed
Certificate field. Include all of the certificate text, including the ---BEGIN CERTIFICATE--and ---END CERTIFICATE---.
Click Upload.
Once the autoloader or library has validated the signed certificate, it will display the Apply
New Certificate Settings button.
3. Click Apply New Certificate Settings to save the settings.
If using ESKM 4.0, you must also copy the client certificate to the ESKM 4.0 client interface.
1. In the ESKM 4.0 client interface, to Security > Local Users & Groups > Local Users for the user
associated with the library.
2. Paste the signed client certificate in the Import New KMIP Client Certificate pane and then click
Save.
20
KMIP-based key server integration
Configuring access to the key servers
Configure the KMIP servers in the KMIP Server Configuration pane of the Configuration: Security
page. You can configure a cluster of up to six KMIP servers. The autoloader or library will
automatically use a different configured KMIP server if a connection fails.
Enter the hostname or IPv4 address of a KMIP server in the Server X IP/Hostname field. The Port
must be 5696 unless the KMIP server is already configured to use a different port. Click Submit
Query.
Enabling KMIP-based encryption
Enable KMIP-based encryption from the KMIP Encryption Configuration pane of the Configuration:
Security page. If the library is partitioned into multiple logical libraries, encryption can be enabled
for one or more logical libraries or partitions.
Configuring the KMIP feature for the 1/8 G2 Tape Autoloader and other MSL Tape Libraries
21
22
KMIP-based key server integration
4 Verifying that the encryption key server integration is
working
HP recommends verifying that the encryption process is working before placing the autoloader or
library into a production environment. This is often called an end-to-end verification test. The
following steps describe how an end-to-end verification test can be conducted.
Connectivity test: Verifies that the autoloader or library can connect with each of the configured
key servers. See “Connectivity test” (page 23).
Basic encryption test: Verifies encryption is working on partitions configured for encryption. See
“Basic encryption test” (page 25).
Failover test: Verifies keys can be retrieved from another server if the server currently in use becomes
unavailable. See “Failover test” (page 25).
Some of the steps occur on the key server and HP cannot provide specific details for non-HP key
servers. For the SafeNet KMIP server, log files can be found on the SafeNet Device > Log Viewer
> System screen. See your server vendor documentation for specific instructions and additional
information.
Connectivity test
The autoloader and library RMIs provide a connectivity test.
MSL6480
The ESKM connectivity check is on the ESKM Tier Selection screen of the ESKM wizard. To start
the wizard, click ESKM Wizard in the Encryption menu.
The KMIP connectivity check is on the KMIP Server Configuration screen of the KMIP wizard. To
start the wizard, click KMIP Wizard in the Encryption menu.
Connectivity test
23
Autoloader and other MSL libraries
Run the connectivity test from the Configuration: Security page. In the KMIP Diagnostics pane, click
Test Server Connectivity. The test will check network connectivity and the KMIP login credentials
and then display the test results. When successful, the report will have four green check marks for
each configured server.
If the Authentication and KMIP Query tests fail, check the Key Security settings in the ESKM Security
> High Security screen. If Disable Non-FIPS Algorithms and Key Sizes is checked and the autoloader
or library is using a firmware version that generates 1028-bit certificates, these tests will fail.
24
Verifying that the encryption key server integration is working
To use 2048-bit certificates, update the autoloader or library to the current version and retry the
test. The earliest firmware versions that generate 2048-bit certificates are:
•
1/8 G2 autoloader: 4.30
•
MSL2024: 6.20
•
MSL4048: 8.70
•
MSL8048 and MSL8096: 1130
Basic encryption test
1.
2.
Using your backup application, load a scratch tape into a drive in a partition configured for
encryption with the key server.
Rewind and then initialize the tape. This will overwrite any previous contents with an encrypted
header. If all is configured correctly, the backup application will report successful media
initialization.
a. Log in to the key managers and confirm that a new key was created.
Refer to your server documentation for instructions.
b.
3.
4.
Log in to other key servers in the cluster and confirm that the key is replicated to each
server.
Using your backup application, unload the cartridge to a slot.
From the key server find the key that was created in step 2 and temporarily disable the key’s
ability to be exported.
See your server documentation for instructions.
5.
6.
7.
8.
9.
Using your backup application, load the same tape into any drive in the partition configured
for encryption with a key server. Read the header of the tape using a media identification or
similar command.
•
The backup application should report a failure because the key cannot be exported but
header is encrypted.
•
One of the key server logs should show a request for the key and that the request was
denied.
Using the backup application, unload the media to a slot.
From the key server, re-enable the ability to export the key that was disabled in step 4.
Repeat step 5. The command should succeed.
Unload the media to a slot.
This concludes the basic encryption test.
Failover test
1.
2.
From the basic encryption test, step 8, identify the key server that provided the key. This is the
server that logged the key export.
From the key server, temporarily disable that server’s ability to communicate with clients.
See the server documentation for instructions.
3.
Repeat step 5 of the basic encryption test.
The command should succeed, with the key provided by a different server. You can identify
the server that exported the key by inspecting each server’s log files.
4.
5.
Unload the media to a slot.
If there are more than two key servers, continue disabling server-client communications and
repeating this test until every server has successfully served the key.
Basic encryption test
25
6.
Re-enable the ability of each server to communicate with the clients.
This concludes the failover test.
26
Verifying that the encryption key server integration is working
5 Support and other resources
Contacting HP
For worldwide technical support information, see the HP support website:
http://www.hp.com/support
Before contacting HP, collect the following information:
•
Product model names and numbers
•
Technical support registration number (if applicable)
•
Product serial numbers
•
Error messages
•
Operating system type and revision level
•
Detailed questions
Typographic conventions
Table 4 Document conventions
Convention
Element
Blue text: Table 4 (page 27)
Cross-reference links and e-mail addresses
Blue, underlined text: http://www.hp.com
Website addresses
Bold text
• Keys that are pressed
• Text typed into a GUI element, such as a box
• GUI elements that are clicked or selected, such as menu
and list items, buttons, tabs, and check boxes
Italic text
Text emphasis
Monospace text
• File and directory names
• System output
• Code
• Commands, their arguments, and argument values
Monospace, italic text
• Code variables
• Command variables
Monospace, bold text
WARNING!
CAUTION:
IMPORTANT:
NOTE:
TIP:
Emphasized monospace text
Indicates that failure to follow directions could result in bodily harm or death.
Indicates that failure to follow directions could result in damage to equipment or data.
Provides clarifying information or specific instructions.
Provides additional information.
Provides helpful hints and shortcuts.
Contacting HP
27
6 Documentation feedback
HP is committed to providing documentation that meets your needs. To help us improve the
documentation, send any errors, suggestions, or comments to Documentation Feedback
([email protected]). Include the document title and part number, version number, or the URL
when submitting your feedback.
28
Documentation feedback