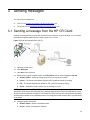
1
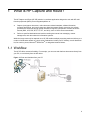
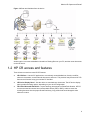
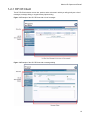
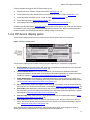
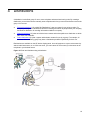
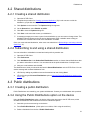
HP Capture and Route (HP CR)
User Guide
HP Capture and Route (HP CR)
User Guide
Reference number: 20120101
Edition: March 2012
2
Legal notices
(c) Copyright 2012 Hewlett-Packard Development Company, L.P.
Confidential computer software. Valid license from HEWLETT-PACKARD required for possession, use or copying. Consistent
with FAR 12.211 and 12.212, Commercial Computer Software, Computer Software Documentation, and Technical Data for
Commercial Items are licensed to the U.S. Government under vendor's standard commercial license.
The information contained herein is subject to change without notice. The only warranties for HEWLETT-PACKARD products
and services are set forth in the express warranty statements accompanying such products and services. Nothing herein should
be construed as constituting an additional warranty. HEWLETT-PACKARD shall not be liable for technical or editorial errors or
omissions contained herein.
Microsoft, Windows, and Windows NT are U.S. registered trademarks of Microsoft Corporation.
Printed in the US
3
Revision history
Table 1 Revisions
Date
Edition
Revision
March 2012
1
Version 1.1
4
Contents
Revision history ......................................................................................................................................................................4
Figures and Tables
Figures................................................................................................................................................................ 7
Tables................................................................................................................................................................. 7
1
What is HP Capture and Route?
1-1 Workflow....................................................................................................................................................... 8
1-2 HP CR access and features ......................................................................................................................... 9
1-2-1 HP CR Client .................................................................................................................................... 10
1-2-2 HP device display panel ................................................................................................................... 11
1-3 Microsoft SharePoint extensions................................................................................................................ 12
1-4 On-line help ................................................................................................................................................ 12
2
Organizing messages
2-1 Message lists.............................................................................................................................................. 13
2-2 Inbox........................................................................................................................................................... 13
2-3 Outbox........................................................................................................................................................ 14
2-4 Sent Items .................................................................................................................................................. 14
3
Sending messages
3-1 Sending a message from the HP CR Client ............................................................................................... 15
3-2 Sending a message from the HP device .................................................................................................... 16
4
Distributions
4-1 Personal distributions ................................................................................................................................. 19
4-1-1 Creating a personal distribution ........................................................................................................ 19
4-1-2 Using the Personal Distributions option on the device ..................................................................... 20
4-2 Shared distributions.................................................................................................................................... 21
4-2-1 Creating a shared distribution........................................................................................................... 21
4-2-2 Subscribing to and using a shared distribution ................................................................................. 21
4-3 Public distributions ..................................................................................................................................... 21
4-3-1 Creating a public distribution ............................................................................................................ 21
4-3-2 Using the Public Distributions option on the device.......................................................................... 21
5
Using a Routing Sheet
5-1 Creating a Routing Sheet ........................................................................................................................... 24
5-2 Using the Routing Sheet option on the device ........................................................................................... 24
6
Using My Files
6-1 Reviewing the My Files list ......................................................................................................................... 25
6-2 Using Scan to My Files on the device ........................................................................................................ 26
6-3 Opening and saving documents from My Files .......................................................................................... 26
6-4 Creating a My Files Routing Sheet............................................................................................................. 26
6-4-1 Using your Routing Sheet................................................................................................................. 27
7
Scanning to a fax or folder
7-1 Using the Fax Option on the device ........................................................................................................... 28
7-2 Using the Scan to Me option on the device................................................................................................ 29
7-3 Using the Scan to Folder option on the device........................................................................................... 30
8
More options and preferences
8-1 Using the More Options feature ................................................................................................................. 31
8-2 Setting preferences .................................................................................................................................... 32
5
Contents
9
Using extensions for Microsoft SharePoint
9-1 Using a Routing Sheet with Microsoft SharePoint...................................................................................... 33
9-2 Creating a Scan Reservation in Microsoft SharePoint ............................................................................... 34
9-3 Opening a document in the End User Interface ......................................................................................... 34
6
Figures and Tables
Figures
Figure 1-1 Scan and distribute from your PC .......................................................................................................... 8
Figure 1-2 Scan and distribute from the device ...................................................................................................... 9
Figure 1-3 Example of the HP CR Client with a list of messages ......................................................................... 10
Figure 1-4 Example of the HP CR Client with a message dialog .......................................................................... 10
Figure 1-5 Device display panel ............................................................................................................................ 11
Figure 3-1 Scan and distribute from your PC ........................................................................................................ 15
Figure 4-1 Scan and distribute using a distribution ............................................................................................... 18
Figure 5-1 Scan and route a document or multiple documents.............................................................................. 23
Figure 6-1 HP CR My Files process....................................................................................................................... 25
Figure 7-1 Using the Fax option ............................................................................................................................. 28
Figure 7-2 Using the Scan to Me option................................................................................................................. 29
Figure 7-3 Using the Scan to Folder option ........................................................................................................... 30
Figure 9-1 Using a Routing Sheet with Microsoft SharePoint ................................................................................ 33
Tables
Table 1 Revision history ........................................................................................................................................... 4
7
1
What is HP Capture and Route?
The HP Capture and Route (HP CR) solution is a software application designed to work with HP multifunction peripherals (MFPs) as an integrated platform to:
z
Capture (scan) paper documents, collect document-related metadata, validate information,
compress documents, and convert them into digital documents. During conversion, the system
processes the document through optical character recognition (OCR) and/or converts to various
formats (DOC, JPG, PDF, RTF, TIF, TXT, and XLS), some of which are text-searchable.
z
Deliver to specified destinations and archive resulting documents into messaging, content
management, and other electronic information systems.
While the image need only be captured once, HP CR enables multiple processing tasks and delivery to a
number of destinations based on a single scan. Destinations include your PC desktop, e-mail distribution
list, fax number, printer, Microsoft® SharePoint®, or designated network folders.
1-1 Workflow
The HP CR offers extensive flexibility. For example, you can scan and distribute documents directly from
your PC, or work directly from the HP device.
Figure 1-1 Scan and distribute from your PC
8
What is HP Capture and Route?
Figure 1-2 Scan and distribute from the device
Another option is to create a distribution list and/or a Routing Sheet on your PC, and then scan documents
on the HP device.
1-2 HP CR access and features
Three clients are used to access HP CR features:
z
HP CR Client – Use this PC application to conveniently create distributions, directly e-mail/fax
electronic documents, access inbound documents, and more. This provides easy access to HP CR
features and functions using your intuitive PC interface.
z
HP Device Display Panel – Use the device to scan hardcopy documents. The HP device display
panel provides scanning options, depending on your device configuration.
z
HP CR for Microsoft SharePoint – Import hardcopy documents into SharePoint libraries. HP CR
converts scanned documents into text-searchable format (PDF or DOC), and then saves the
resulting document into the proper SharePoint library, fully profiled and stored alongside other
electronic content.
9
What is HP Capture and Route?
1-2-1 HP CR Client
The HP CR Client includes a menu bar, options, and a main area in which you will typically see a list of
messages, message dialog, or supplementary options dialog.
Figure 1-3 Example of the HP CR Client with a list of messages
Figure 1-4 Example of the HP CR Client with a message dialog
10
What is HP Capture and Route?
Features available through the HP CR Client enable you to:
z
Review your Inbox, Outbox, and list of Sent Items (Message lists, 13)
z
Create personal or public distributions for scanning to a fax, e-mail, or folder (Distributions, 18)
z
Create and send messages to a fax, e-mail, or folder (Sending messages, 15)
z
Create Routing Sheets (Using a Routing Sheet, 23)
z
Set message options and general preferences (More options and preferences, 31)
In addition, the My Files feature (Using My Files, 25) provides unique options. You scan scan and convert
documents for your own purposes without distributing them to anyone else. My Files enables easy and
secure document use, Routing Sheet creation, editing, storage, and retrieval.
1-2-2 HP device display panel
The HP device display panel is a touch screen used to access options and enter information.
Figure 1-5 Device display panel
The HP device display panel provides scanning options, depending on your device configuration:
z
Routing Sheet uses a special page with a barcode and distribution instructions for your document.
(Using the Routing Sheet option on the device, 24)
z
Personal Distributions are for use by an individual. You can have one distribution defined for
sending information to people within your company and another distribution for sending information
outside the company. (Using the Personal Distributions option on the device, 20)
z
Public Distributions are created by a system administrator for use by members of a group. For
example, all members of the marketing group may have a distribution predefined specifically for their
use. (Using the Public Distributions option on the device, 21)
z
Fax provides simple send-to-fax capability. After entering a fax number at the device and scanning
the document, HP CR delivers it and issues a confirmation. (Using the Fax Option on the device, 28)
z
Scan to Me scans and delivers a document to your PC for further review and routing. HP CR sends
the document to your e-mail address (the default) or to a Windows home folder defined by a system
administrator. (Using the Scan to Me option on the device, 29)
z
Scan to Folder scans a document to a folder predetermined by your system administrator. (Using
the Scan to Folder option on the device, 30)
z
Scan to My Files quickly routes an electronic file directly to your “My Files” folder on the HP CR
Client. This is used to scan and convert documents for personal use without distributing to anyone
else. (Using Scan to My Files on the device, 26)
Some features require that you authenticate yourself at the device (such as by logging in), either for
security and tracking authorization or to access personal scanning features.
11
What is HP Capture and Route?
1-3 Microsoft SharePoint extensions
HP CR enables Microsoft SharePoint users to import hardcopy documents into SharePoint libraries. You
can:
z
Use a Routing Sheet
z
Create a Scan Reservation
z
Open a document in the End User Interface
Once imported, you can browse through libraries to locate documents and use SharePoint enterprise
search capabilities. (Using extensions for Microsoft SharePoint, 33)
1-4 On-line help
Click the Help button at any time to access HP CR on-line documentation.
12
2
Organizing messages
2-1 Message lists
Your Inbox, Outbox, and Sent Items are lists that display messages and applicable details (such as who
sent or received a message, the subject, date and time, status, and number of pages transmitted). To view
a list:
1. Open the HP CR Client.
2. Click Messages.
3. Click the option: Inbox, Outbox, or Sent Items.
4. Click a message to review details.
You can also perform actions based on a specific list, as described for Inbox, Outbox, and Sent Items.
2-2 Inbox
Your Inbox may contain:
z
Confirmations of fax or e-mail transmissions initiated and completed within HP CR
z
Inbound faxes and e-mails addressed to you that HP CR received
Actions you can take with a message(s) are:
z
Click New on the menu bar to create and send a new message.
z
Click
z
Select a message(s) from the list by checking the box to the left of the message(s). Alternatively,
check the box in the title bar to select all messages. Then, click a menu bar option to:
z
to open or save the PDF attached to the message.
z
Forward Attachments – Attach additional information and/or documents and then send the
message(s).
z
Delete – Delete the message(s).
z
Print Attachments – Print documents attached to the message(s).
z
Mark as Read – Indicate you read the message(s).
z
Mark as Unread – Indicate you have not read the message(s).
message.
denotes a read message.
denotes an unread
Click on the message in the Received From column to:
z
Display message details
z
Resend the message (click Resend)
z
Forward Attachments, Print Attachments, or Delete, as described above
13
Organizing messages
2-3 Outbox
Outbox presents a list of your jobs that are currently being processed by the HP CR server. You can:
z
Click New on the menu bar to create and send a new message.
z
Click Cancel on a selected job to stop processing.
2-4 Sent Items
Sent Items presents a list of completed jobs. You can:
z
Click New on the menu bar to create and send a new message.
z
Click
z
Select a message(s) from the list by checking the box to the left of the message(s). Alternatively,
check the box in the title bar to select all messages. Then, click a menu bar option to:
z
to open or save the PDF attached to the sent message.
z
Forward Attachments – Attach additional information and/or documents and then send the
message(s).
z
Delete – Delete the message(s).
z
Print Attachments – Print documents attached to the message(s).
Click on the message in the Sent To column to:
z
Display message details
z
Resend the message (click Resend)
z
Forward Attachments, Print Attachments, or Delete, as described above
14
3
Sending messages
You can send a message from:
z
Your PC, see Sending a message from the HP CR Client (15)
z
The HP device, see Sending a message from the HP device (16)
3-1 Sending a message from the HP CR Client
Sending a message directly from the HP CR Client is also referred to as direct sending. You can send a
message with optional attachments to a folder, printer, fax, or e-mail.
Figure 3-1 Scan and distribute from your PC
1. Open the HP CR Client.
2. Click Messages.
3. Click New on the menu bar.
4. Determine the type of recipient to add. In the Recipients section, select a Type and Format:
z
Network Folder – Select the format of the file you are sending to a folder.
z
Printer – The format automatically defaults to PDF (preferred format for printing).
z
Fax – The format automatically defaults to TIFF (preferred format for faxing).
z
E-mail – Select the format of the file you are sending by e-mail.
NOTE: If you select a DOC, RTF, or TXT format, HP CR converts any image files so they are editable and
searchable. (PDF formats are searchable only.) Options that display the letters OCR indicate the system
will perform optical character recognition. This means HP CR will read the scan and determine how letters
and characters translate to text. Handwritten text is not recognized but will remain a part of your document
as an image.
5. Add type-specific information:
z
Network Folder – Select a destination folder.
z
Printer – Select a destination IP address.
15
Sending messages
z
Fax – Enter the destination fax number in the Enter Fax Number field or click
(if
available) and select a fax destination from your Microsoft Outlook contacts and Global
Address Book.
Click
z
to add more information about the recipient, or click
to verify the address is valid.
E-mail – Enter the em-mail address in the Enter E-Mail Address field or click
(if
available) and select an address from your Microsoft Outlook contacts and Global Address
Book.
Click
6. Click
to add more information about the recipient, or click
to verify the address is valid.
to add the recipient to a list where the Type and Destination are displayed.
NOTE: To modify recipient information, click the recipient destination on the list and enter your changes.
To clear a recipient from the list, click
to the right of the recipient destination.
7. Repeat Steps 4 through 6 to add recipients to your distribution.
8. Optionally, select the E-mail copy to... checkbox to send a copy of your message to yourself.
9. In addition to scanning paper hardcopy documents, you can instruct HP CR to append electronic
files to your transmission:
a
Click
.
b
Click Browse, select a file, and click Open.
c
Click
d
Repeat for all files you want to send.
e
After the desired files are added, select OK.
to add the file to the list.
NOTE: To clear a file from the list, click
to the right of the file name.
10. In the Subject field, enter a subject for your distribution.
Fax recipients will see this text on the cover page they receive from HP CR. E-mail recipients will
see this text in the subject line of the e-mail they receive.
11. In the Messages field, enter any text to accompany your document.
Fax recipients will see this text on the cover page they receive from HP CR. E-mail recipients will
see this text in the body area of the e-mail message they receive.
12. Click Send on the menu bar.
A message directs you to your Outbox (under Messages), where you can see the real-time status of your
message.
When the message is complete, it is listed in Sent Items (under Messages). On this list, you can click on
a message to review details. (Also see Sent Items on 14.)
3-2 Sending a message from the HP device
For descriptions of how to use the message sending options available on the HP device, see:
z
Routing Sheet – Using the Routing Sheet option on the device (24)
z
Personal Distributions – Using the Personal Distributions option on the device (20)
z
Public Distributions – Using the Public Distributions option on the device (21)
z
Fax – Using the Fax Option on the device (28)
16
Sending messages
z
Scan to Me – Using the Scan to Me option on the device (29)
z
Scan to Folder – Using the Scan to Folder option on the device (30)
z
Scan to My Files – Using Scan to My Files on the device (26)
17
4
Distributions
A distribution is a defined group of one or more recipients and associated routing rules. By creating a
distribution, you avoid the need to manually enter recipients each time you want to send a document to the
group. You can use:
z
Personal distributions (19), called “My Distributions,” that you create for your unique needs. For
example, you may have a distribution defined for sending information to people within your company
and another distribution for sending information outside the company.
z
Shared distributions (21) that an individual user creates and makes public as a distribution to which
other users can subscribe.
z
Public distributions (21) that a system administrator creates for use by a group. For example, all
members of the marketing group may have a distribution predefined specifically for their use.
Distributions are available on the HP device display panel. Personal Distributions require authentication. By
default, Public Distributions do not. With one touch, you can instruct HP CR to send your document to the
recipients in your desired format.
Figure 4-1 Scan and distribute using a distribution
18
Distributions
4-1 Personal distributions
4-1-1 Creating a personal distribution
1. Open the HP CR Client.
2. Click Distributions. (My Distributions is selected by default.)
3. Click New on the menu bar.
4. Determine the type of recipient to add. In the Recipients section, select a Type and Format:
z
Network Folder – Select the format of the file you are sending to a folder.
z
Printer – The format automatically defaults to PDF (preferred format for printing).
z
Fax – The format automatically defaults to TIFF (preferred format for faxing).
z
E-mail – Select the format of the file you are sending by e-mail.
NOTE: If you select a DOC, RTF, or TXT format, HP CR converts any image files so they are editable and
searchable. (PDF formats are searchable only.) Options that display the letters OCR indicate the system
will perform optical character recognition. This means HP CR will read the scan and determine how letters
and characters translate to text. Handwritten text is not recognized but will remain a part of your document
as an image.
5. Add type-specific information:
z
Network Folder – Select a destination folder.
z
Printer – Select a destination IP address.
z
Fax – Enter the destination fax number in the Enter Fax Number field or click
(if
available) and select a fax destination from your Microsoft Outlook contacts and Global
Address Book.
Click
z
to add more information about the recipient, or click
to verify the address is valid.
E-mail – Enter the em-mail address in the Enter E-Mail Address field or click
(if
available) and select an address from your Microsoft Outlook contacts and Global Address
Book.
Click
6. Click
to add more information about the recipient, or click
to verify the address is valid.
to add the recipient to a list where the Type and Destination are displayed.
NOTE: To modify recipient information, click the recipient destination on the list and enter your changes.
To clear a recipient from the list, click
to the right of the recipient destination.
7. Repeat Steps 4 through 6 to add recipients to your distribution.
8. Optionally, select the E-mail copy to... checkbox to send a copy of your message to yourself.
9. In addition to scanning paper hardcopy documents, you can instruct HP CR to append electronic
files to your transmission.
a
Click
.
b
Click Browse, select a file, and click Open.
c
Click
d
Repeat for all files you want to send.
e
After the desired files are added, select OK.
to add the file to the list.
19
Distributions
NOTE: To clear a file from the list, click
to the right of the file name.
10. In the Subject field, enter a subject for your distribution.
Fax recipients will see this text on the cover page they receive from HP CR. E-mail recipients will
see this text in the subject line of the e-mail they receive.
11. In the Comments field, enter any text to accompany your document.
Fax recipients will see this text on the cover page they receive from HP CR. E-mail recipients will
see this text in the body area of the e-mail they receive.
12. Click Save on the menu bar to save your distribution.
13. A message prompts you to enter a name for the distribution so you can reuse or change it later. This
distribution title will appear on the HP device display panel. Enter a suitable name to help you
remember the contacts and formats of the distribution. Click OK.
You can send a message with a personal distribution from:
z
HP Client by adding any additional text and/or attachments, and clicking Send
z
HP device using the Personal Distributions option (Using the Personal Distributions option on the
device, 20)
4-1-2 Using the Personal Distributions option on the device
Using the Personal Distributions option, the device delivers the document to the HP CR server, which
decodes the distribution and sends the document to intended recipients.
1. Assemble your document and go to the device.
2. Press Personal Distributions. (If this option is not visible, find it using the scroll bar.)
3. If prompted, enter user login information to access your Personal Distributions.
4. Select a distribution from the list of Personal Distributions. Login credentials display at the bottom
of the display panel.
5. Load the document into the document feeder or place it on the exposure glass. (Use the exposure
glass only if scanning a single page.)
6. Optionally, press Options or More Options (Using the More Options feature, 31) to change scan
settings (such as parameters for control over document routing and formatting).
7. Press
, Start, or Scan to begin scanning. A progress indicator will display.
8. Wait for the job to finish. (Alternatively, press Cancel or Cancel Job to stop scanning.)
When transfer is complete, a message indicates the job status.
9. To scan another document using the same distribution, press Back.
If the Completed option is availabe, you can press it to return to the Personal Distributions screen.
To end the session and return to the main HP CR menu, press
, OK, or Exit.
20
Distributions
4-2 Shared distributions
4-2-1 Creating a shared distribution
1. Open the HP CR Client.
2. Complete the procedure for Creating a personal distribution (19), but do not save or title the
distribution yet (the last two steps in that procedure).
3. Click Options on the menu bar. The Options dialog box appears.
4. On the General tab, select Publish as public.
5. Click OK to close the Options dialog box.
6. Click Save on the menu bar to save your distribution.
7. A message prompts you to enter a name for the distribution so you can reuse or change it later. This
distribution title will appear on the HP device display panel. Enter a suitable name to help you
remember the contacts and formats of the distribution. Click OK.
Once you create a shared distribution, other users can subscribe to it (Subscribing to and using a shared
distribution, 21).
4-2-2 Subscribing to and using a shared distribution
You can subscribe to a distribution created and made public by another user.
1. Open the HP CR Client.
2. Click Preferences.
3. Click Add Subscriber in the Subscribed Distributions section to choose shared distributions that
you want to subscribe to and use. You can subscribe to the public distributions of multiple users.
4. Add your e-mail address and click OK.
The distributions to which you subscribe are listed in Shared Distributions on the HP CR Client. You can
send a message with a shared distribution from:
z
HP Client by adding any additional text and/or attachments and clicking Send
z
HP device using the Personal Distributions option (Using the Personal Distributions option on the
device, 20)
4-3 Public distributions
4-3-1 Creating a public distribution
Public Distributions are created by your system administrator. Contact your administrator with questions.
4-3-2 Using the Public Distributions option on the device
Using the Public Distributions option, the device delivers the document to the HP CR server, which
decodes the distribution and sends the document to intended recipients.
1. Assemble your document and go to the device.
2. Press Public Distributions. (If this option is not visible, find it using the scroll bar.)
3. Select a distribution from the list of Public Distributions.
21
Distributions
4. Load the document into the document feeder or place it on the exposure glass. (Use the exposure
glass only if scanning a single page.)
5. Optionally, press Options or More Options (Using the More Options feature, 31) to change scan
settings (such as parameters for control over document routing and formatting).
6. Press
, Start, or Scan to begin scanning. A progress indicator will display.
7. Wait for the job to finish. (Alternatively, press Cancel or Cancel Job to stop scanning.)
When transfer is complete, a message indicates the job status.
8. To scan another document using the same distribution, press Back.
If the Completed option is availabe, you can press it to return to the Public Distributions screen.
To end the session and return to the main HP CR menu, press
, OK, or Exit.
22
5
Using a Routing Sheet
An HP CR Routing Sheet is a special page with a barcode containing the distribution instructions for your
document. You can create the Routing Sheet using the HP CR Client interface and specify:
z
Who should receive your document
z
What communications channel to use (fax, e-mail, folder, or printer)
z
Any optional format conversions required for each recipient
A Routing Sheet makes it easy to identify the documents ready for scanning, much like a traditional fax
cover page. You can reuse Routing Sheets for standard, repeated tasks. Use a Routing Sheet to:
z
Scan and route multiple documents at the same time. Routing Sheets separate documents that are
put together in a feeder as a batch and each unique document set has distinct routing rules.
z
Send scanned hardcopy documents and electronic documents in multiple formats through one
transmission simultaneously. If you want to e-mail a hardcopy document to one recipient and fax it to
another, a single Routing Sheet with instructions for both destinations will suffice.
Figure 5-1 Scan and route a document or multiple documents
23
Using a Routing Sheet
5-1 Creating a Routing Sheet
1. Open the HP CR Client.
2. You create a Routing Sheet based on a distribution. Do one of the following:
z
Open an existing distribution:
Click Distributions.
Click to open a distribution on the list.
z
Create a new distribution. (Creating a personal distribution, 19)
3. Click View RS on the menu bar to launch your default PDF reader and display a copy of the Routing
Sheet associated with the distribution.
4. Print the Routing Sheet.
5. Click Close to return to the Distributions dialog box.
6. You can take your new Routing Sheet and document to the HP device. (Using the Routing Sheet
option on the device, 24)
5-2 Using the Routing Sheet option on the device
With the Routing Sheet option, the device delivers the scanned document with a Routing Sheet (Creating
a Routing Sheet, 24) to the HP CR server, which decodes the barcode and distributes the document to
intended recipients.
1. Assemble your document with the Routing Sheet at the front.
2. At the device, load the document into the feeder or place it on the exposure glass. (Use the
exposure glass only if scanning a single page.)
3. Press Routing Sheet. (If this option is not visible, find it using the scroll bar.)
z
If one touch scan is enabled, document scanning starts. Go to Step 6.
z
If one touch scan is NOT enabled (the default), the device shows the Ready message or
Routing Sheet screen. Continue with the next step.
4. Optionally, press Options or More Options (Using the More Options feature, 31) to change scan
settings (such as parameters for control over document routing and formatting).
5. Press
, Start, or Scan to begin scanning. A progress indicator will display.
6. Wait for the job to finish. (Alternatively, press Cancel or Cancel Job to stop scanning.)
When transfer is complete, a message indicates the job status. HP CR e-mails you a delivery
confirmation. If you do not have an e-mail address, the device prints a delivery confirmation.
7. To scan another document using the Routing Sheet option, press Back.
If the Completed option is availabe, you can press it to return to the Routing Sheet screen.
To end the session and return to the main HP CR menu, press
, OK, or Exit.
TIP: If you create a Routing Sheet for a distribution group to which you commonly send documents, file
and reuse it as needed.
24
6
Using My Files
You may want to scan and convert documents for your own purposes without distributing to anyone else.
However, you may have requirements for secure, auditable storage of such documents. The HP CR My
Files feature lets you quickly create a Routing Sheet or use a button on the HP device display panel to
route your scan directly to your personal HP CR folder.
NOTE: Your system administrator manages the storage in My Files and may set a storage time limit.
Consult your administrator for information on where and how long these documents are maintained before
disposal.
Figure 6-1 HP CR My Files process
6-1 Reviewing the My Files list
The My Files list indicates the file name, creation date, and size of each file stored in your personal HP CR
folder. From this list, you can:
z
Click
26)
or the file name to open or save the PDF. (Opening and saving documents from My Files,
z
Select a message from the list by checking the box to the left of the message. Alternatively, check
the box in the title bar to select all messages. Then, click a menu bar option to:
z
Delete – Delete the file(s).
z
My routing Sheet – Create a Routing Sheet. (Creating a My Files Routing Sheet, 26)
z
Forward Attachments – Attach additional information and/or documents and then send the
file(s) in a message. (Sending a message from the HP CR Client, 15)
25
Using My Files
6-2 Using Scan to My Files on the device
Using the Scan To My Files option, the device delivers the scanned document to the HP CR server, which
sends it as an electronic file to the “My Files” folder on the HP CR Client.
1. Assemble your document and go to the device.
2. Press Scan to My Files. (If this option is not visible, find it using the scroll bar.)
3. If prompted, enter user login information to access your My Files options.
4. Load the document into the document feeder or place it on the exposure glass. (Use the exposure
glass only if scanning a single page.)
5. Optionally, press Options or More Options (Using the More Options feature, 31) to change scan
settings (such as parameters for control over document routing and formatting).
6. Press
, Start, or Scan to begin scanning. A progress indicator will display.
7. Wait for the job to finish. (Alternatively, press Cancel or Cancel Job to stop scanning.)
When transfer is complete, a message indicates the job status.
8. To scan another document using the same option, press Back.
If the Completed option is availabe, you can press it to return to the Scan to My Files screen.
To end the session and return to the main HP CR menu, press
, OK, or Exit.
6-3 Opening and saving documents from My Files
After HP CR completes its scan and conversion of your document and sends it to your personal folder, that
folder is viewable through the HP CR Client. Scans sent to this folder are stored temporarily. Copy files
from My Files to another location for longer-term retrieval, usage, and storage.
1. Open the HP CR Client.
2. Click My Files.
3. Click Files.
4. Click the document file name in the HP CR list.
5. You can open or save the file.
z
To view the document, click Open. Your PDF reader launches and displays your My Files
document.
z
To save a copy of the document, click Save and enter a location and name.
6-4 Creating a My Files Routing Sheet
1. Open the HP CR Client.
2. Click My Files.
3. Click Files.
4. Click My Routing Sheet on the menu bar.
5. Select the final file format for your scanned document.
26
Using My Files
NOTE: If you select a DOC, RTF, or TXT format, HP CR converts any image files so they are editable and
searchable. (PDF formats are searchable only.) Options that display the letters OCR indicate the system
will perform optical character recognition. This means HP CR will read the scan and determine how letters
and characters translate to text. Handwritten text is not recognized but will remain a part of your document
as an image.
6. In the Attachment file name text box, enter the name of the file that includes your Routing Sheet.
7. Click View to launch the PDF reader, showing a copy of the Routing Sheet you just created.
8. Make any changes to the file, as necessary.
9. Click Save.
10. Print the Routing Sheet.
11. You can take your new Routing Sheet and document to the HP device.
6-4-1 Using your Routing Sheet
NOTE: All files scanned with the My Files Routing Sheet will appear in the My Files folder in the HP CR
Client.
You can send a message with a Routing Sheet from the HP device using the Routing Sheet option. (Using
the Routing Sheet option on the device, 24)
27
7
Scanning to a fax or folder
7-1 Using the Fax Option on the device
When you enter a fax number and scan your document using the Fax option, the device delivers the
document to the HP CR server, which sends the fax to intended recipients. By default, fax scans are
performed in black and white, since documents cannot be delivered via fax communication in color.
Figure 7-1 Using the Fax option
1. Assemble your document and go to the device.
2. Press Fax. (If you do not see this option, find it using the scroll bar.)
3. Press the Fax Number text box and enter the destination fax number using the keypad that opens.
Press OK to close the keypad.
NOTE: If you do not enter a fax number, you will get an error message.
4. To fax without adding a cover sheet, be sure the Add Cover Sheet option is NOT selected (if this
option appears). Then, press Next. Continue with Step 5.
To add a cover sheet using HP OXPd 1.4:
a
Press the Add Cover Sheet text box.
b
Select Yes and OK to return to the Fax screen.
c
Press Next to display the Cover Sheet screen.
d
Enter information in the Subject, Sender Name, and Recipient Name text boxes. To do so,
press the text box, use the keypad, and press OK to close the keypad.
e
Press Next to display the Fax screen.
To add a cover sheet using HP OXPd 1.6:
a
Press the Add Cover Sheet check box.
b
Enter information in the Sender Name, Recipient Name, and Subject text boxes.
c
Press Next.
5. Load the document into the document feeder or place it on the exposure glass. (Use the exposure
glass only if scanning a single page.)
28
Scanning to a fax or folder
6. Optionally, press Options or More Options (Using the More Options feature, 31) to change scan
settings (such as parameters for control over document routing and formatting).
7. Press
, Start, or Scan to begin scanning. A progress indicator will display.
8. Wait for the job to finish. (Alternatively, press Cancel or Cancel Job to stop scanning.)
When transfer is complete, a message indicates the job status.
9. To scan another document using the same Fax option, press Back.
If the Completed option is availabe, you can press it to return to the Fax screen.
To end the session and return to the main HP CR menu, press
, OK, or Exit.
7-2 Using the Scan to Me option on the device
The Scan to Me option scans a document and delivers it to your PC for further review and routing. Based
on a directive (rule), HP CR sends the document to your e-mail address (the default) or to a Windows home
folder. The directive is defined by your system administrator and specifies the destination (e-mail or folder)
as well as the final format in which to send the document.
Using the Scan to Me option, the device delivers the document to the HP CR server, which processes it
using your personal directive and sends the document to intended recipients.
Figure 7-2 Using the Scan to Me option
1. Assemble your document and go to the device.
2. Press Scan to Me. (If this option is not visible, find it using the scroll bar.)
3. If prompted, enter user login information to access the Scan To Me option.
4. Press Next, if necessary.
5. Load the document into the document feeder or place it on the exposure glass. (Use the exposure
glass only if scanning a single page.)
6. Optionally, press Options or More Options (Using the More Options feature, 31) to change scan
settings (such as parameters for control over document routing and formatting).
7. Press
, Start, or Scan to begin scanning. A progress indicator will display.
8. Wait for the job to finish. (Alternatively, press Cancel or Cancel Job to stop scanning.)
When transfer is complete, a message indicates the job status.
9. To scan another document using the Scan to Me option, press Back.
If the Completed option is availabe, you can press it to return to the Scan to Me screen.
To end the session and return to the main HP CR menu, press
, OK, or Exit.
29
Scanning to a fax or folder
7-3 Using the Scan to Folder option on the device
Using the Scan to Folder option, the HP CR server sends the document to a folder predetermined by your
system administrator.
Figure 7-3 Using the Scan to Folder option
1. Assemble your document and go to the device.
2. Load the document into the document feeder or place it on the exposure glass. (Use the exposure
glass only if scanning a single page.)
3. Press Scan to Folder. (If this option is not visible, find it using the scroll bar.)
z
If one touch scan is enabled, document scanning starts. Go to Step 6.
z
If one touch scan is NOT enabled (the default), the device shows the Ready to Scan
message or Scan To Folder screen. Continue with the next step.
4. Optionally, press Options or More Options (Using the More Options feature, 31) to change scan
settings (such as parameters for control over document routing and formatting).
5. Press
, Start, or Scan to begin scanning. A progress indicator will display.
6. Wait for the job to finish. (Alternatively, press Cancel or Cancel Job to stop scanning.)
When transfer is complete, a message indicates the job status.
7. To scan another document using the specified network folder, press Back.
If the Completed option is availabe, you can press it to return to the Scan to Folder screen.
To end the session and return to the main HP CR menu, press
, OK, or Exit.
30
8
More options and preferences
8-1 Using the More Options feature
When working with a new message or new/existing distribution, HP CR provides options to control
document formatting and routing. Click Options on the menu bar and the Options dialog box appears. It
may include the following tabs and options (not all options are available for every HP CR function):
z
z
z
General – Applies to distributions only.
z
Routing Sheet Style – Specify the style as Simple or Standard. For example, a standard
style may include company information and/or a disclaimer.
z
Publish as public – Publish the distribution as available to users who subscribe to a user’s
public distributions.
z
Retain Routing Sheet in delivered document – Deliver the Routing Sheet with the
document. Normally, it is not.
z
Single use – Indicate that the message or distribution is intended for one-time use only.
z
Expires after – Specify a date until which the server will process the message.
z
Sort at top of device listing – Places the distribution at the top of the device display panel.
Normally, lists are presented alphabetically.
z
Print w/Prompts – Allows you to enter the value for assigned prompts when the Routing
Sheet is printed from the HP CR Client.
E-mail
z
Address Type – Specify the address type as To, Cc, or Bcc.
z
Attachment – Enter the name of a specific file to attach to your transmission.
Fax
z
Use Cover Sheet – Choose to send/not send a cover page and select from a stored list of
styles.
z
Delivery – Enter an access code (such as “9” to reach an outside line for faxing), request a
preview of your transmission before sending, specify that a fax is sent only to a secure fax
destination, define a specific time/date for fax delivery, and/or define the send priority.
z
Folder – Enter the name of your document.
z
Prompts – Indicate that when you perform a task in HP CR, the system will request that you to enter
custom prompts such as a client number or, in certain legal departments or law firms, a matter
number.
z
Custom Options – Displays custom options that your administrator may have created and
configured for your organization's use of HP CR.
z
Scan Settings – Applies to distributions only. This provides settings for color, duplexing, job
building, orientation, and resolution.
After modifying options on each tab, select Save as preferences to save the settings for future messages
or distributions.
31
More options and preferences
8-2 Setting preferences
You can set general preferences for use with HP CR. All settings are optional.
1. Open the HP CR Client.
2. Click Preferences.
3. Review your user information. By default, this information is acquired from your domain login.
4. Click Add Subscriber to choose shared distributions that you want to subscribe to and use. You can
subscribe to multiple distributions.
NOTE: A user can create distributions to share with other users by designating them as Public. (Creating
a shared distribution, 21)
5. Click Add Delegate to enter the e-mail address of someone who is allowed to manage your
messages and/or send messages on your behalf. You can specify multiple delegates.
6. Select a Network Printer address. This can be referenced through a rule on a server which will
send inbound faxes to this printer.
7. In the Assistant(s) text box, enter the e-mail address of the person can also view your faxes.
32
9
Using extensions for Microsoft SharePoint
HP CR enables Microsoft SharePoint users to import hardcopy documents into SharePoint libraries. The
process is driven from the native SharePoint user interface screens and menus. Based on a user-selected
format, HP CR converts scanned documents into text-searchable format (PDF or DOC), and then saves
the resulting document into the proper SharePoint library, fully profiled and stored alongside other
electronic content. Once imported, you can browse through libraries to locate these documents, or use
SharePoint enterprise search capabilities.
9-1 Using a Routing Sheet with Microsoft SharePoint
The Create New Routing Sheet option creates a Routing Sheet from within your Microsoft SharePoint
document library. You can use the Routing Sheet to scan hardcopy documents from any scan enabled
device. The documents are submitted to the HP CR server for processing and routing to the Microsoft
SharePoint repository according to the Routing Sheet instructions.
Figure 9-1 Using a Routing Sheet with Microsoft SharePoint
1. Open Microsoft SharePoint and go to the document library into which you will route your inbound
documents.
2. Click Upload. Select the Upload Scan option.
3. On the Upload Scan page, enter the Name, Title, and document Format for your scan. This is the
destination information for the inbound document within the Microsoft SharePoint document library.
4. Click Save. The HP CR Client opens.
5. Select the Create New Routing Sheet option.
A Routing Sheet is generated with the destination information from Step 3, and opens in your default
PDF viewer.
33
Using extensions for Microsoft SharePoint
6. Print the Routing Sheet and use it for scanning hardcopy documents (Using the Routing Sheet
option on the device, 24). Optionally, save it for later use.
9-2 Creating a Scan Reservation in Microsoft
SharePoint
A Scan Reservation is the instruction to submit electronic or hardcopy documents to HP CR for uploading
to the Microsoft SharePoint repository where they are stored in the appropriate location. The Create Scan
Reservation option creates a SharePoint placeholder. When a Personal Distribution is selected from the
device, the document scans to that placeholder.
1. Open Microsoft SharePoint and go to the document library into which you will scan your inbound
documents.
2. Click Upload. Select the Upload Scan option.
3. On the Upload Scan page, enter the Name, Title, and document Format for your scan. This is the
destination information for the inbound document within the Microsoft SharePoint document library.
4. Click Save. The HP CR Client opens.
5. Select the Create Scan Reservation option.
HP CR creates instructions with destination information from Step 3, and displays this message:
Use the Personal Distributions option on the HP device display panel to scan your hardcopy
documents. Or, use the HP CR Client to scan electronic documents and send them to the Microsoft
SharePoint for storage.
Alternately, use the HP CR Client to scan electronic documents and send them to SharePoint for
storage.
9-3 Opening a document in the End User Interface
The Open in the End User Interface option submits an electronic document directly from the SharePoint
client to the server.
1. Open Microsoft SharePoint and go to the document library into which you will scan your inbound
documents.
2. Click Upload. Select the Upload Scan option.
3. On the Upload Scan page, enter the Name, Title, and document Format for your scan. This is the
destination information for the inbound document within the Microsoft SharePoint document library.
4. Click Save. The HP CR Client opens.
5. Select the Open in the End User Interface option.
The End User Interface opens with the New Message screen. The Destination section is filled with
recipient information from Step 3.
6. Create the message by attaching an electronic document(s). Select other recipients, as necessary.
7. Send the message to the HP CR server for processing.
34