1
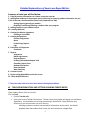
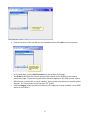
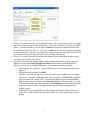
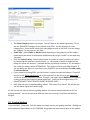
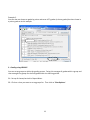
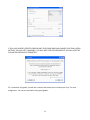
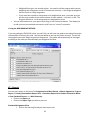
ReportWriter
User’s Manual
School Pathways welcomes you to ReportWriter. If you have any problems with this program,
email us at [email protected]. For computer specifications and download
information, see the last page of this document.
If your school is using School Pathways
of the work will be done for you!
Student Information System (SPSIS), some
Quick Start for Reportriter (each step is numbered to coincide with the detailed
explanation that follows).
The following information will be added once:
»Click on Tools
1. Add Teacher Information.
Learning Period dates are automatically added to your program. Change the school year
2004/2005 and back to the current year.
To Save – Click Done.»
The following information will be added once at the beginning of a semester:
»Click on File
2. Choose add a New Student
All fields except the 2nd phone number, the email, and the parent name must be filled in.
1
If Learning periods need to be changed per student, see # 2 below.
»Click on Course tab
3. You will be prompted to start a new Master Agreement by naming it (Fall 1).
Add Courses your student will be taking.
Save work.
4. You will be prompted to create a Master Agreement.
The following information will be used on a regular basis:
»Click on Assign.
5. This is where you make work assignments to students for the week or month.
Choose a Learning Period.
Choose a Course to work with.
Choose the Modules you want to assign.
Click on Assign.
Continue in this manner until all course assignments are added.
»Click on Eval.
6. You can grade and make comments about students work here.
Choose a Learning Period.
Choose a curriculum to grade.
Add a grade and weight for each course.
»Click on Reports.
7. Reports you can create include Assignments (graded or ungraded), Master Agreements,
Progress Reports, Primary/Intermediate or Secondary Report Cards, State Standards Report, or a
Work Summary Report.
Choose a Report.
Choose a Learning Period.
Print the Report.
Save reports to your hard drive by clicking on the Print button. When the PDF file of your
report comes up, click on the save icon that looks like a little Floppy A-Drive Disk. Rename
the report to your liking.
2
Detailed Explanations of how to use ReportWriter:
Summary of what you will find below.
1. Entering teacher information so it shows up on your records.
2. Adding new students to the program (your school may be entering student information for you.
If this is the case, the information can be easily imported into RW).
Setting Learning periods per student.
Disabling/Transferring/Deleting a student from your program.
3. Adding Courses to your student record.
3A. Grading Methods
4. Creating the Master Agreement.
Creating a second MA.
5. Creating Assignments.
Custom Assignments.
Notes
Carbon Copy Reports
Logs
6. Evaluation of Assignment
Comments
7. Reports
Assignment
Master Agreement
Progress Report
Primary/Intermediate Report Card
Secondary Report Card
Student Information
State Standards
Work Summary
8. Custom Courses
9. Synchronizing ReportWriter with the server.
10. Other Helpful features!
**Tasks that only need to be done once when initiating ReportWriter:
#1 - TEACHER INFORMATION AND SETTING LEARNING PERIOD DATES.
Close Student Roster (Click on Cancel).
Click on Tools
• Click on Teacher Info
• Enter your correct Teacher Information. Teacher name and number will appear on the Master
Agreement. You should be sure to enter something in these fields. Other fields are only
necessary if your school wants you to fill them in.
Learning periods are entered via the web for all teachers at the school. You should
probably leave these dates alone unless you are instructed to change them.
3
•
Click Done.
#2 - HOW DO I ADD STUDENTS TO THE PROGRAM? INFO Page
Click on File
• Click on New Student – the INFO page appears.
• Enter Student information for each student. If you are using SPSIS, we can populate all
student fields for you. Once a student is SAVED, the student’s name can only be changed by
the Disable/Transfer method described at the end of this section. The following student
information is required (because it shows up on the Master Agreement and is auditable
information):
o Last Name
o First Name
o Birth Date
o Street Address
o City
o State
o Zip
o Phone Number
o Program Placement (General Education, Special Education, Adult Education)
o Classroom Option (the school the student would be enrolled in if not enrolled in your
school)
• Enrollment Information.
o Student Number (shows up on Master Agreement)
o Enrollment Date (date you can start claiming ADA. This date does not need to change
from year to year.)
o Grade Level
o School Year
o Track (if your school has more than one calendar for all students)
• Learning Periods – To get the Learning Period dates to show, do the following:
o Change the school year from the current year to a previous year (2004/2005).
Change the school year back to the current year.
o If you have a mid-year enrolling or exiting student, you will want to change the
Learning Period dates for the month the student started or exited. The
remaining Learning Period dates should be the same as the dates originally set.
Some schools have rolling learning periods. For those teachers, do the
following:
o To set a new learning period date do the following:
1. Choose a learning period you want to change by using the down
arrow and then clicking on the learning period date you want to change.
2. If dates for the learning period that show up in the From and To
boxes are not correct, change them.
3. Click on the SET button.
4
•
o To add more Learning Periods:
1. Click on the down arrow by the word choose.
2. Click on the last learning period listed.
3. Click Add Learning Period
4. Insert dates in the From and To windows in the following fashion –
MM/DD/YYYY
5. Click on the SET button
6. Continue in this fashion until all your Learning Periods have been
SET.
**Always make Learning Period changes before making any
assignments so the dates on the Assignment and Work Record show
correctly!
Disable/Transfer – You can disable a student if the student is no longer active on your
roster or if you need to make corrections to his/her name. You can also transfer students
to another teacher within your school. To do any of these:
1. Open the student.
2. Go to the File tab.
3. Click on Disable/Transfer.
4. A window pops up asking if you are sure you want to do this. Click Yes.
5. Close the student and do a Synch (Tools > Synchronize). This will send the student
into inactive mode where he/she can stay indefinitely or your program
administrator can re-assign the student to another teacher. You can
disable/transfer one, a few, or all of your students during this operation.
6. If you are making corrections to a student name and want the student back on
your roster, contact your RW administrator for help.
**The following information needs to be added when first enrolling a student and may need to be
updated when course information changes or at the start of a new semester:
#3 - Adding Courses
Now you can start the process of entering the courses the student will be taking. Each time you want
to work with a student, choose the student from the roster. Student Information will appear on the
screen.
Click on the Course tab
• You will be prompted to Select a Master Agreement. If you haven’t created one yet, you will
click on New and name the master agreement. A suggestion might be Fall 2007-1. This will
allow you to continue to number them consecutively if you change an agreement within the
semester and want to keep a record of past agreements.
5
•
Click on the name of the new MA you just named and then click Load to start the process.
•
•
On the new page, click on Add Curriculum near the bottom of the page.
The Grade level will be the one you automatically entered for the student in the student
information page. (If you want a grade other than what appears in the field, you can select a
different one or choose ALL to see all courses). Some courses only show up in specific grades.
Example: U.S. Government only shows up in 12th grade).
Select a Category (unless you want all courses in all categories to show up which is over 2000
pieces of curriculum!).
•
6
•
•
•
Click on a Curriculum you wish to use with this student. You can pre-select courses by typing a
key word or letters in the “Containing Phrases.” If the book is called HS – Literature, Timeless
Voices – Prentice Hall (2001), you can type in Timeless and all courses with this word in the
title will show in the curriculum list. If you type in Time all curricula with this word will appear
in the curriculum list. Spacing is very important. What you type in must match the title of the
text exactly! If you type in Prentice Hall Timeless, nothing will show up!
Click on a Curriculum you wish to use with this student (click on drop-down arrow to see all
curriculum that matches your search).
If you don’t want this curriculum to appear with the selected book title, you can rename it.
Whatever shows in the Class Title (Alternate Title) field will show on your Report Card.
Typing in the new title in the Class Title space. Two examples of when to use this:
o You’ve chosen HS – Algebra 1 – Saxon (1999) but you want the course to show up as
Algebra 1.
o Using more than one texts in a CLASS.
Example: If you want to use two or more curricula for your English class. You might
choose HS – Literature – McDougal Littell (2002) and give it the Class Title of English 9
then you choose HS – Writer’s Inc – Great Source (2001) and give it the same Class
Title of English 9 by choosing the same Alternate Title from the drop-down list. Both
of these curricula will show up separately in the ASSIGN tab but in the report card and
transcript, they will show up as English 9 and the grade will be averaged for one
English 9 grade.
• If your school is also using SPSIS, you will be required to choose a State Transcript
Code. Your school may have forced course names. If so, your course name may be
limited.
7
•
•
•
•
•
The Course Category needs to be chosen. This will show on the Master Agreement. This is
also the TRANSCRIPT category for the schools using SPSIS. You can also type in a new
category here. Some schools create their own categories such as Life Skills. You can change
the “category” for any course in this field.
Credit Type – either Credits or Weeks default depending on the grade level of the student
(weeks would be chosen for elementary students who do not get “credits” for the work they
complete).
Enter the Value (Credits). Value (credits) relates to number of credits a student will receive
for completing the semester’s worth of work – or - the number of weeks a student will be
taking this course this semester. Standard number of weeks per semester is 18. Remember –
this is what the student will be ATTEMPTING. They might not finish everything assigned. If
you are adding two pieces of curriculum to, say English 10, you should enter the same credits
for each curriculum.
If your school is not using SPSIS, you can choose if a course has special attributes. These will
show up in the Master Agreement and in the comments for the course on the Report Card.
You do not need to choose any of these. Example: you might choose Modified if the student
is taking a course that is above or below grade level. Once you have assigned work, YOU
CANNOT REMOVE THE ATTRIBUTES FROM THE REPORT CARD!
SAVE when you have completed adding courses. Click either OK or Cancel. OK will take you
into the Master Agreement default page.
At this time you will need to choose a grading method. All courses are automatically set to “flat
grading method.” You can choose to set different texts you are using in one Class with different
weights.
3A. Grading Methods
If you click SAVE - jump to #4. You can always come back and set your grading methods. Grading has
been updated in ReportWriter as of 11/20/2008. Any grades that were entered prior to this update
8
will not be affected. The main change is the ability to grade classes by points. This is a
comprehensive manual on grading.
1.
2.
3.
4.
Grading by letter grades or percentages
Grading by points
Grading using GROUPS
Credit Computation
1. Grading by letter grades or percentages
This is the default method of grading in ReportWriter. You do not have to do any setup for this type
of grading. When you are ready to evaluate student work, click on the EVAL tab.
Make sure you choose the correct learning period and then choose each curriculum you want to
grade.
•
•
•
•
You can use letter grades or percents (the % symbol is not necessary).
You can grade by the module OR by the assignment within a module but not both. If you
enter a grade on the module line for one module you can enter grades for individual
assignments in the next module.
If you assign 3 modules, you do not have to enter a grade in each module. If you use the
Work Summary Report though, all modules will show and the ungraded modules will show a
blank in the grade area.
If you always grade by module, you can collapse the modules to show only the module lines
so you don't have to scroll through all the assignments to find the module line.
9
•
If you want to enter the same grade in each module line, enter the grade in the first module
and then click on the 'FILL' button to insert that same grade in all modules.
•
If you have assigned more than 13 modules in one learning period, the program may not be
able to list all assignments. Click the arrows forward or backward to get to the next set of
assignments.
10
•
Add personalized comments for a student in any class by clicking on the Comments button.
These comments will show on the Assignment and Work Record or the Work Summary
Report.
2. Grading by points
When grading by points, you are choosing to set the total number of points an assignment is worth.
You can enter the total number of points earned on the assignment without calculating the percent
or letter grade.
*If you want to grade all classes by points>
1. Click on Tools
2. Click on Teacher Info (have you entered your teacher name and number on this? )
3. Click the 'I like grading by points' button so it is blue.
4. Click Done to save choice.
*See examples 4 and 5 below for exceptions to grading by points.
11
2A. There are several ways to use grading by points. If you always use grading by points and don't
want to wonder if RW is set to points, you can go into Tools>Teacher Info and click the "I like grading
by points." This will default all your grading to points. If you grade some classes by points and others
by percentages, do not click this button.
2B. You can enter points in the Module line OR the individual assignments but not both. If you did
not default your RW program to grading by points, check the "Numbers are points" box at the bottom
of the page.
12
When you enter points, you can do it in several ways.
Example 1:
Here you have given assignments, each with different points possible. So this shows the points
earned in the first column (Grd) and the total possible points in the second column (Wgt). Your total
grade for THIS LEARNING PERIOD will show in a percentage at the bottom of the page.
Example 2:
You have the 'Number are points' button in use. This allows you to enter the number of points
earned in the first column (Grd) and the number of points possible in the second column (Wgt).
13
Notice in one set of grades there is a 12/10 to show extra credit earned on one module. Also, the
grade appears in the bottom as a percentage.
Example 3:
You can also enter the number of points earned and possible in this fashion. 4/5 is in the Grd column
and the Wgt is 1. You can also weight the assignments heavier than 1 if you choose.
Example 4:
If you are using points to grade but then have an assignment that you have a percentage in, you can
throw those in randomly as long as you mark it as a percent. Here, you are grading by points but
14
have one assignment with a percent. Rather than counting up all the points to enter it in the same
style, just enter the % sign after the grade and make sure you enter 100 as the weight. The % sign
tells the system to ignore the points designation for this one assignment.
Example 5:
Conversely from example 4, if you are not grading by points (numbers as points not checked), you can
be grading with % or letter grades and a grade in points by typing a 'P' after the number of points.
15
Example 6:
You can also not choose to grade by points and enter all % grades (or letter grades) but then throw in
a points grade as in this example
3. Grading using GROUPS
You can set up groups to within the grading system. Doing this averages all grades within a group and
then averages the groups for the final grade within the learning period.
3A. Set up all classes/curricula in ReportWriter.
3B. Click on a class you want to set up groups for. Then click on 'Class Options.'
16
3C. Choose the type of evaluation you want to you. You can use either type when grouping.
• Enter the title of the group
• Enter the 'key' as the symbol you will choose when assigning grades.
• Enter the percent of the whole for this group.
•
Make sure the total adds up to 100.00 then click DONE.
17
IF YOU HAVE ALREADY STARTED GRADING AND THEN COME BACK AND CHANGE YOUR EVALUATION
METHOD, YOU WILL GET A WARNING. YOU WILL NOT LOSE YOUR GRADES BUT YOU WILL LOSE THE
EVALUATION PREVIOUSLY FORMATTED.
3D. Now when you grade, you will see a column that allows you to choose your "key" for each
assignment. You can mix and match the type of grades.
18
4. Credit Computation
With credit computation, your school has chosen to use a new field in ReportWriter. This new field
shows as a separate row with the heading Cmp. We call it 'credit computation' because it will help
you tally your credits for the report card. You can enter assignment points or assignment credits in
the row according to your school's use.
You'll see in the following example that the school sets credits to each module completed in the
subject of health.
19
#4 – The Master Agreement
The program will automatically prompt you to create a Master Agreement when you assign
new courses to a student or change the courses already assigned. You can click OK to go to
the Master Agreement default page or click Cancel to get you out of the window.
When you click OK and the Master Agreement window appears:
20
1. You will get a Notice that tells you the school's calendar. Set your effective dates between
these dates.
2. Make sure you are using the correct Master Agreement - it’s listed on the upper right-hand
side of this page. If it is not the correct version of the Master Agreement, or if you’re not sure,
click on Switch MA to view other versions you may have created. Click on the version you
want to work with and click on Load.
3. Input the proper information for your student and school.
Contract Term (make sure you click on both buttons).
Assignments
Grades Covered: what grades does your school encompass? Ex. K - 12.
21
Grade Level: This information will automatically be taken off the student INFO page.
You do not need to set this field. The only time you would need to set this field is if
you are near the end of the year and you are creating a new master agreement for a
student for the next school year and need the grade to advance but you are not
finished working with the student for the current year. This will change the grade on
the new master agreement but not on all other records for the student.
Max Assn Days: How many days may an assignment cover? Ex. 20.
Max Missed Assn: How many assignments can a student miss in a learning period per
your board policy? Ex. 3 or 20%.
Duration: How long will this Master Agreement last? Never longer than One
Semester.
Methods of Evaluation: Check off the methods of evaluation you use with your
students.
Methods of Study: Check off the methods of study you expect your students to
engage in.
Effective Learning Periods: Check off the learning periods this master agreement is
being created for.
Meeting Information:
Check off the type of meeting. You may choose more than one type.
Type in the time you estimate you will meet with your student. Ex. 1:00 p.m.
Type in the day you estimate you will meet with your student. Ex. Tuesdays.
Type in the frequency you will meet with your student - Ex. At least once per 20
school days.
Effective Dates: Type in the dates this Master Agreement pertains to - usually the
dates the semester begins and ends.
Print Text Titles: You have the choice to print the text titles of the books you have
chosen for your student to work with. If you have not given an alternate course title
on the Course page, you will not need to check this button. Some schools want the
actual text to appear on the Master Agreement - not just the Class name you have
given the course. If you want both, check this button.
Print Responsibilities Ack: The Master Agreement recommended by the state does
not have a list of promises the student, parent/guardian, and teacher will adhere to.
Adding this to the official Master Agreement could open a school up to losing some
funding if all promises were not met. But we know schools like this feature because it
holds students and parents/guardians accountable. If you want to print this out, check
this button. Since it does not change from semester to semester, you only need to
print it out and get signatures once per school year.
Save: Save your work when you are finished creating your document.
SAVE AS DEFAULT: Clicking this button allows you to save what you have created and
use the same information from student to student. It becomes your default Master
Agreement. When you work with future students, you can just click on Load Default
MA to input all the fields again. Saves on typing!
Print: Clicking on Print allows you to preview the documents you just created. After
the document comes up as a PDF, you can click the print icon to actually print this
document.
22
Done: When you are finished working on the Master Agreement for this student, click
Done to quit this function.
Create a New Master Agreement for this student:
You have the ability to create as many master agreements as you choose for a student
throughout the year. This feature allows for changes without losing your original.
To create a new Master Agreement: Go to the student's Course tab. Click New to
name the new Master Agreement (Ex: Fall #2) and then Create it. Give your new
master agreement a new name (Fall #2). Your old courses will appear. Make sure you
choose the Effective Learning Periods this new Master Agreement reflects.
To copy a MA from one semester to another: Go to the student's Course tab.
Highlight the MA you want to copy by clicking on it. Click Copy. It will ask you what
you want to name it - Spring 2007. Click Create. All classes with the books being used
for those classes will be copied. If you want to add or remove any classes or books,
you can do it at this point. Make sure you choose the Effective Learning Periods this
new Master Agreement reflects.
To copy a MA from one student to another: Open the student who has the MA you
want to copy. Click on Course tab. Highlight the MA you want to copy. Click Copy.
Enter a name for the MA - such as Spring 2007. Click "Other Students". Click on the
student or students you want to copy this MA to. If you are copying to more than one
student, hold down the Ctrl key on your keyboard while clicking on student names.
Click Create. Make sure you choose the Effective Learning Periods this new Master
Agreement reflects.
**The Master Agreement can be accessed through the Reports tab too. Choose Reports, then
choose the Master Agreement. Every section of the agreement must be filled out to be State
compliant.
**The printed Master Agreement has been set up so you can change the first printed page without
having to get the second page (signature page) re-signed.
**At this point you are into the daily operation of the program. The following items will be used
over and over again for each student.
#5 - Creating Assignments
•
•
•
Choose the Assign tab
Choose a Learning Period you want to make assignments for.
Choose which Curriculum you want to add assignments for.
23
•
•
•
•
•
•
•
•
•
•
Choose whether you want the assignment to show up in Lesson Plan version or Objective
Plan version. Lesson Plan version shows all specific page numbers and verbiage for the text.
The Objective Plan takes the objectives from the assignment and call them
Objectives/Assignments.
If you choose the Lesson Plan version, you can also choose not to show the objectives to
lesson the amount of print on the page. Just click on Obj to remove them from your printout.
You can click on the Module and all assignments within that Module will be assigned.
OR you can click on the row of numbers below this box to assign a module.
You can un-assign a lesson within a Module by clicking on that particular assignment. The
lesson will not show up on your report if it is white. Only blue highlighted assignments show
on reports. If assigning in the Objective Plan mode, you can un-assign objectives/assignments
in this mode also.
Click on the Assign button to send your assignment to the report.
Notice that the assignments show up in the box below and it tells you which modules you
have assigned. (When you come back to assign work for another learning period, the work
that has already been assigned will be gray so you have a quick reference as to where you left
off last learning period.)
If you change your mind – and want to un-assign a whole course, some Modules, or
assignments within a Module you will want to click on the Module so that the text is not
highlighted in blue. Then click on the Assign button. This deletes the Modules. Now you can
re-assign the Module and un-check some of the assignments and click Assign.
You can delete an assignment entirely by highlighting the assignment in the box below and
clicking on Remove.
You can click on Print to view your Learning Record or to print it out.
Custom Assignments
• To add a CUSTOM ASSIGNMENT you must be in the module you want the custom assignment
to show up in. Click on Add Custom and add an assignment by just typing into the text box.
You must click on the Assign button again for the new assignment to be added. You can add
as many assignments as you wish by repeating these steps.
Evaluations
Once you have evaluated your assignments (see # 6 below) you might want to print an
Assignment and Work Record without the evaluations showing. Just unclick the EVAL button.
Objectives
You can print an Assignment and Work Record without showing student learning objectives by
un-clicking the OBJ button. NOTE: If you assigned a course in the objective format, and then
you choose to not show objectives, no “lessons” will show in the course that is just objectives.
Notes
• If you would like teacher notes to show up on the Assignment and Work Record, click on the
NOTES button and type in your notes.
CC Report
24
•
•
You can carbon copy one or more assignments of one student to another student. Students
must have the same courses on their master agreements meaning if you want to CC Algebra 1
– Saxon (2004) from student A to student B, they must both have Algebra 1 – Saxon (2004) on
their master agreements.
1. Click on the CC Report button on the Assign page (bottom right corner).
2. Click on the second button CC to student:
3. Hit the down arrow to find the student you want to CC to.
4. Click on the courses you want to CC. If the course is blue, it will be CC'd. You can click on one or
several. Click on the course again to remove it from the CC list.
5. Click OK.
You can also carbon copy an assignment forward to the next learning period. Say a student does not complete
their Language Arts assignment and you’ve entered many custom assignments that you don’t want to retype.
Carbon Copy it forward and then adjust in the next LP.
1. Click on CC Report button on the Assign page.
2. The CC to this student button is already depressed as the default.
3. Choose the learning period you would like to CC the assignment forward to.
4. Click on the courses you want to CC. If the course is blue, it will be CC’d. You can
click on one or several.
5. Click on OK
Log
•
•
•
•
For schools requiring a log of at least one assignment completed each day for ADA purposes,
you can click on Log. This will print out a list of dates that matches your specific Learning
Period where students can write in the assignment completed each day and places for parent
signatures.
You can also create Logs for other subjects such as Physical Education, Music, Teacher’s
Assistant, or any title you’d like to type in.
You can choose to show different signature lines on this form.
You can choose to print one or any number of logs that match the correct dates of your
learning periods. To print all of the logs, click on the first date button and click on the last
date button and then click on Press to Fill. Saves a few clicks!
#6 - EVALUATION OF ASSIGNMENTS
You can grade the assignments you gave your students.
•
•
•
•
Click on the Eval tab
Click on a Learning Period
Click on the Curriculum you wish to evaluate
When the Evaluation page pops up you can choose to evaluate the Module – or – each
assignment within the Module.
o You can grade by Letter Grade, Percentage Grade, or Descriptive Grade (O, S, N, P, F)
o Grades go in the first column
25
•
o Weighted Points go in the second column. You need to tell the program what you are
weighting each assignment so the GPA comes out correctly. A test might be weighted
twice as much as a daily assignment.
o If you want each module or assignment to be weighted the same, just make sure you
put the same number in the second column for each module. It can be 1 or 100. The
program defaults to 1 so all assignments are weighted the same.
You can add comments to your reports by clicking on the Comments button. This allows you
to add your own personalized comments or pick from our “canned” comments.
If using the NEW GRADING METHOD:
If you are grading by GROUPING, when you use EVAL you will enter the grade as you always have with
the exception of entering the code. See the view below to see how the codes are used. This will tell
the program how much weight to give each assignment. The grades will automatically be averaged
according to the codes you entered when you designated the texts
#7 – Reports
You can print reports in the form of an Assignment and Work Record, a Master Agreement, Progress
Report, a Primary/Intermediate Report Card, a Secondary Report Card, Student Information Notes,
a State Standards Report, or a Work Summary.
• Click on the Report tab
• Click on the Report Type you wish to print out.
Evaluated Assignment Sheet
• Click on the Learning Period you want to print out
26
•
•
•
•
•
Choose if you want the curriculum name to show.
Choose if you want the Class (Alternate) Title to show.
Choose if you want the Evaluations to show.
Choose whether you want the report to be printed in Objective Plan form.
Choose if you want a Grading Override Method (You want all grades to show in A-B,
OSN, PF, or percentages.
Master Agreement
• View, changed or print your Master Agreement here.
Pacing Guide
• A Pacing Guide can be printed on any course. The document name can be changed to
your liking.
Progress Report
• This will give you the grade for each Learning Period and the average of all Learning
Periods selected.
• Click on the Learning Period/s you want to print out.
• Click on the Grading Method you want to print out.
• Add Comments if desired.
• Click on Print.
Report Cards
Report Cards are the same for Primary or Secondary. The Secondary Report Cards just include credits.
•
•
•
•
Click on the time frame, called Report Title, you want to report on. For example:
Semester 1
Choose the Grading Method if you want all grades to print out in a uniform method (Ex:
all A, B, C mode).
Choose the learning periods you want this Report Card to reflect. (If you change
information in the ASSIGN page or the EVAL page, you will need to uncheck the LP's for
the Report and re-check them.)
You'll see all your CLASSES with the texts you used for assignments under the CLASS title.
27
•
Grades: Grades are automatically calculated if you have been keeping up with them in
the Eval page. At this time you have the option to override these grades.
o Change any grades in the open field box to the right of the grade shown.
o Change any credits attempted in the open field box to the right of the CA box.
o Add the credits earned in the open box to the right of CE.
•
Comments: You can add comments per CLASS or general comments to the bottom of the
report. An example might be “I enjoy working with Sarah. She is a conscientious student.”
•
Print: Click on Print to preview and/or print this report.
•
Save: Save the file. To Save any report to your hard drive begin by clicking on the Print
button. When the PDF file of your report comes up, click on the save icon that looks like a
little Floppy A-Drive Disk. Choose what file you want to save this report in and name it.
Other Report Card Features:
•
To change the name of a CLASS: Click on the box to the left of the CLASS name. Click on
the EDIT button (bottom of page). Rename the CLASS and click SET.
•
HIDE - To Hide a textbook: If you have created several Master Agreements for this student
throughout the semester, or if you designated some textbooks you don't want to use, click
the Hide button to the left of the text you don't want to be included in the grade
calculation. It will go light gray.
28
•
HIDE - To Hide a CLASS: If the program shows a CLASS you no longer want visible on the
Report Card, click the Hide button to the far right of the CLASS.
•
How many LP's did I assign this textbook?: To the right of the name of a textbook, you can
see how many LP's this curriculum was assigned - LPs: (5).
•
COMBINE - If you have two or more curricula (textbooks) you want to combine for one
CLASS: If you assigned two curricula with different CLASS TITLES but now want to
combine them for one grade, do the following:
o Click on the CLASS button you want the two curricula to be under.
o Find the other textbook you want to combine with the CLASS title.
o Click on the button to the left of this text title.
o Click Combine. This will combine the two texts under the CLASS name and make
the grades average from the two curricula.
•
SPLIT - If you want to split out two pieces of curricula: Let's use the following example you have two textbooks, text A and text B, under the CLASS title Basket Weaving.
o Click on the box to the left of the CLASS named Basket Weaving.
o Click on the EDIT button (bottom of page).
o Rename the CLASS Underwater Basket Weaving and click SET.
o Click on the box next to the curricula you want to slit off (say, Text B)
o Click SPLIT. Text A will stay with Basket Weaving and Text B will go under
Underwater Basket Weaving.
RESET - This will take the report card back to it’s original settings before you did any
changes or overrides.
FINALIZE - If you want to send the report card to the WEB (for SPSIS customers only)
o Finalize this Report: This button tells the WEB that you have finished working on
the report card and it is ready to print from the WEB. If you change any data on
the report card, you will have to FINALIZE it again to change it in the web. (**This
button is going through more updates. The name will be changed to SUBMIT when
completed.)
•
•
Secondary Report Card.
All work in the secondary report card is the same as the primary except for entering credits earned.
•
Credits: Assign credits earned (CE). You must assign credits to have a GPA calculate. The
credits earned can’t be more than the credits originally assigned. You can override the
credits assigned if you want to award more credits earned.
29
•
•
Reset: This will take the report card back to its original settings before you did any
changes or overrides.
If you want to send the report card to SPSIS :
o Finalize this Report: This button tells SPSIS that you have finished working on the
report card and it is ready to be uploaded into the transcript or ready to print from
the SPSIS. If you change any data on the report card, you will have to FINALIZE it
again to change it in the web. (This button is going through more updates.)
Student Information
This is another place you can print the NOTES feature from the INFO page.
State Standards Reports
Allows you to create a list of state standards for a curriculum the student is using with the
standards the student has attempted through course work noted. Do the following:
a. Choose the academic area.
b. Choose the learning periods (LP’s) your have assigned work in.
c. Click print.
d. SET MASTERY: You can set these by clicking on Set Mastery. This allows you
to set what you consider mastery. An example might be: "if a student has
attempted a State Standard 8 times, this is considered mastery." So you
would enter an 8 for each standard.
e. You can save these reports for future viewing.
30
The Printout:
1. The California Department of Education Blueprint of what standards will be tested
in State-wide standardized testing each Spring.
2. Attmp.: how many times a standard was attempted throughout the time period
you chose.
3. Mast: only shows if you set a number for mastery. See above.
4. Check in Blueprint Items shows if a standard will be tested on the Spring
standardized test.
5. Pct: Tells what percent of the Spring standardized test will be from this area of
State Standards.
Work Summary
Use the Work Summary as a simple way to show what Modules have been assigned, the grade
given for each module and the average of these grades, and the comments you’ve given per
subject. It also allows for a teacher signature and tally of days of ADA given.
#8 – CREATING A CUSTOM COURSE
This feature is going through an overhaul this school year. Watch for updates!
This feature allows you to add your own course to the program. This course will be on your computer
only unless you tell us you would like to share it with other teachers at your school. This feature is
best for “mini” courses. If you have full courses you would like add to ReportWriter, contact us for
help. We can make this easier than using the custom course feature.
•
•
•
•
•
•
•
•
•
•
•
•
•
•
Close any student you are working with by going into the File and clicking on Close Student.
Click on the Save and Close if you have changed anything in the student’s files.
Click on Tools
Click on Custom Course
Click on Begin/Edit
Input the Name of the course.
Click on the Range of the course.
o Personal (for your use only)
o School (if you’d like us to make it available to all teachers at your school)
Choose a Category for the course.
Choose the Grades this course will be for. You may pick multiple grades.
Input the name of the Text you will be using or type in “None” or “Various.” If you want your
course to look like all the other courses in ReportWriter, list your Text as follows:
Name of book - Publisher ( date). An example would look like this: HS – Paint by
Number – Glencoe (2001)
Click on Modules on the tree to the left (in the white box).
Click on Add Module (in the gray box to right).
Type the name or the title of the Module in the title field (in gray box to right)
Click on Objectives on the tree to the left
Click on Add new objective
31
•
Add your first objective in the Objective field – example:
Learn how to - - - - • Click on Add new objective.
Continue in this fashion until you’ve added all your objectives. You can easily
delete any objectives you’ve added by clicking on the Objective you’ve already
added and clicking on Delete this objective. If you have branches of the tree
extended for another objective to be added but decide not to add one, just click on
the empty tree branch and then click on Delete this objective.
•
•
Click on Assignments on the tree to the left (in the white box).
Click on Add new assignment then type the assignment into the empty field. Example:
Describe the tools you will need to care for a horse.
•
•
•
•
•
Each time you click on Add new assignment, fill in the field, and click on Add new
assignment, the assignment you add will appear on a new line.
Again, you can delete an empty branch of the tree by clicking on Delete an
Assignment.
If your course is in the category of Language Arts, Mathematics, Social Studies, Science, or
Visual and Performing Arts, there are standards for you to add to your course. Just click on
the ca and click on the modules you want to have listed after this module.
To add another Module, click on the actual name of the first Module you created. Do not
click on the word Modules. Then click on Add Another Module (in the gray box).
To add another Module, click on the actual name of the second module you created. Do not
click on the word Modules. Continue as above.
Continue adding Objectives, Assignments, and Standards for each Module.
Click on Save when you are finished with the course.
To Delete a custom course:
• Choose the course from your list of courses.
• Click on Edit
• Make sure the course is listed as a Personal Course – if it is not, change it to Personal.
• Go to the File button in the top tool bar of RW.
• Click on Disable/Transfer
• Click Yes, I am Sure.
• Close the course
• Do a synch and do not skip courses.
#9 To Save your work to the server – Synching!
It is very important to save your work to our server occasionally. This will ensure that your work is
not lost if you lose your computer or it crashes. All work will be saved and safe as of the last
synchronization (“synch”). It is also required to do a synch once a month for billing purposes. Any
student on your roster during a month will be billed for. To complete a synch:
1. Close out of all students
32
2. Click on TOOLS and SYNCRONIZE.
3. Click on “Do the Synch” – you may want to click on “skip courses.”
You do not have to include the courses with every synch. Usually it is a good idea to include the
courses once a month to get updates and new additions. So if it’s a mid-month synch, just click on
“skip courses.”
#10 Other features you may find helpful!
Student Roster – you can print a roster of all your students and the curriculum/courses they
are taking. When you open RW your student roster of names pops up. At the bottom of this roster
you will see the button “Print Roster.” Click on this and wait for the Adobe to populate.
Notes – On the student INFO page you can use the Notes feature to keep track of important
information on each student. These notes can be printed also. If you see >> by the Notes button,
you know you have notes saved.
School Calendar – On the student INFO page you can view and or print your schools calendar
by clicking on Calendar above the Learning Period dates.
Computer Specifications and Requirements to use ReportWriter
500 Mb of disk space
64 Mb of ram
400 Mhz processor
Windows 98 or newer
Internet Browser: It is recommended that you use Mozilla Firefox as your Internet browser. You
can get a free download at www.getfirefox.com
You may also use Internet Explorer 5.5 or newer but you will less functionality.
Download the Program
1. Go to www.schoolpathways.com and click on Downloads.
2. Click on ReportWriter 4.2.8 (or higher – we are continuously upgrading the program).
3. A window will pop up asking you if you want to SAVE to DISK. Click OK. (If you’re using Internet
Explorer you will be asked if you want to OPEN or SAVE. Click on SAVE and make sure it is saved to
the Desktop.)
5. The download will begin. If you are using a regular modem, this process could take over one hour.
6. When the download is complete, close the download window and minimize your internet
window. You will see a picture of a computer with the word ReportWriter under it on your desktop.
7. Double click on the ReportWriter icon and click yes to installing the program.
8. A Window pops up asking you if you want to install 3 different sets of files. If you already have
Acrobat Reader on your computer, uncheck the last box. Please call us if you are unsure if you have
Adobe installed on your computer. A double download of this program will prevent you from
printing record in ReportWriter.
9. When the download is done, close the window.
10. Now find an RW icon on your desktop. Double-click on this icon. Do not add your username of
password at this time.
11. Click on Add and type in the name of your school as required by School Pathways. Please call us
if you aren’t sure what your school code is.
12. Click Save and Done.
14. Now add your username and password and click OK
33
15. When the gray window pops up it will say the login in has failed. Ignore this and look for the two
button choices. Click on the Do the synch button. This will download all the courses to your program
(if you are on a modem, this could take 10 hours). When this is finished, you will be able to enter the
program. You will always have to use your username and password given you.
Last updated 06/28/2007
Please let us know if find this difficult to read or find errors. We want our program, and our manual to
be as user-friendly as possible.
School Pathways
866-200-6936
[email protected]
34