1
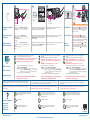
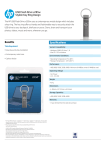
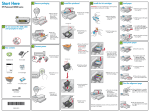
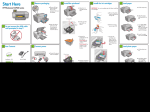
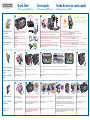
Quick Start
*Q7161-90002*
*Q7161-90002*
Q7161-90002
Guía rápida
HP Photosmart Pro B8800 series
HP Photosmart Pro B8800 series
8 ink cartridges
8 cartuchos de tinta
8 cartouches d’encre
1
Guide de mise en route rapide
HP Photosmart Pro série B8800
3
2
4 printheads
4 cabezales
de impresión
4 têtes
d’impression
!
b
Recommended
Recomendado
Recommandé
a
Unpack the printer and
insert the CD
Unpack and remove tape and packaging materials.
Important – Purchase a USB cable separately
if it is not included.
Windows users: Do not connect the USB cable until prompted by the
Desempaquete la
impresora e inserte el CD
Desempaquete y retire la cinta y el material
de embalaje.
Importante: Adquiera el cable USB por separado
si no está incluido.
Usuarios de Windows: No conecte el cable USB hasta que se lo solicite
Déballer l’imprimante
et insérer le CD
software install program (step 17). Connect the power cord to the printer (a),
and then to a power outlet (b). The printer turns on automatically.
el programa de instalación del software (paso 17). Conecte el cable de
alimentación a la impresora (a) y, a continuación, a la toma de corriente (b).
La impresora se encenderá automáticamente.
Utilisateurs Windows : ne branchez pas le câble USB avant d’y avoir
Ouvrez l’emballage et retirez les rubans adhésifs.
Important – Achetez un câble USB séparément si aucun
n’est inclus.
été invité par le logiciel d’installation (étape 17). Branchez le câble
HP Photosmart Pro B8800 Series
Quick Start
Tutorial included
d’alimentation sur l’imprimante (a), puis sur une prise secteur (b). L’imprimante
s’allume automatiquement.
Product in [country]
www.hp.com/support
*XXXXX-XXXXX*
*XXXXX-XXXXX*
*Q5734-90277*
XXXXX--XXXXX
*Q5734-90277*
Animated Quick Start Tutorial!
¡Tutorial animado de la guía rápida!
Series
rt Pro B8800
HP Photosma
Didacticiel de démarrage rapide !
[country]
Product in
pport
www.hp.com/su
Quick Start
Tutorial included
XX*
*XXXXX-XXXXX*
X-XXX 77*
*XXXX4-902
XXXXX--XXXXX
77*
*Q573
*Q5734-902
HPDC
2007
HPDC
2007
©©
The animated Quick Start Tutorial shows you how to set up the printer step by step.
Windows: Insert included CD and click View Quick Start Tutorial.
Mac: Insert included CD, double-click the HP Software icon, and then double-click the HP Installer icon.
Note: You will install the printer software in step 17.
El tutorial animado de la guía rápida le indica cómo instalar la impresora paso a paso.
Windows: Inserte el CD y haga clic en Ver tutorial de la guía rápida.
Mac: Inserte el CD, haga doble clic sobre el icono de HP Software y, a continuación, haga doble clic en el icono de HP Installer.
Nota: La instalación del software de la impresora se realizará en el paso 17.
Le Didacticiel de démarrage rapide animé vous montre pas à pas comment installer l’imprimante. Windows : insérez le CD inclus et cliquez sur Voir le Didacticiel de Démarrage Rapide.
Mac : insérez le CD, double-cliquez sur l’icône du logiciel HP, puis double-cliquez sur l’icône du programme d’installation HP.
Remarque : vous installerez le logiciel d’imprimante à l’étape 17.
2007
HPDC
©©
2007
HPDC
4
5
6
7
Insert the 8 ink cartridges
Shake each ink cartridge well (six times)
before unwrapping it.
Open the ink cartridge door.
Insert all eight ink cartridges into their color-coded stalls. Press firmly on each cartridge until it snaps into place.
Close the ink cartridge door.
Instale los 8 cartuchos
de tinta
Agite cada cartucho de tinta (al menos
6 veces) antes de quitarle el envoltorio.
Abra la puerta de los cartuchos de tinta.
Inserte los ocho cartuchos de tinta en los compartimentos marcados con códigos de colores. Presione firmemente cada cartucho hasta
que encaje en su sitio.
Cierre la puerta de los cartuchos de tinta.
Insérer les 8 cartouches
d’encre
Secouez bien chaque cartouche d’encre
(six fois) avant de la dépaqueter.
Ouvrez le panneau d’accès aux cartouches d’encre.
Insérez chacune des huit cartouches dans le logement de couleur indiqué. Appuyez fermement sur chaque cartouche jusqu’à
ce qu’elle s’emboîte.
Fermez le panneau d’accès aux
cartouches d’encre.
8
10
9
a
Insert the 4 printheads
Inserte los 4 cabezales
de impresión
Insérer les 4 têtes
d’impression
b
11
a
b
c
12
a
b
Shake each printhead well
(six times) before unwrapping it.
Open the top door (a). Remove orange plastic restraint
(b). Save the restraint for transporting the printer.
Pull the blue handle forward (a), then lift it up (b)
and move it back (c).
Open each printhead package, and remove and discard the orange caps (a).
Do not touch the gold-colored contacts. Insert each printhead into its
color-coded stall, pressing firmly until the printhead snaps into place (b).
Close the blue cover, and then close the
top door.
Agite cada cabezal de impresión
(al menos 6 veces) antes de quitarle
el envoltorio.
Abra la puerta superior (a). Retire la funda de plástico
rojo (b). Guarde la funda para usarla en caso de que
decida transportar la impresora.
Tire hacia afuera del asa azul (a), luego levántela (b)
y tire hacia atrás (c).
Abra todos los paquetes de los cabezales de impresión y retire las tapas
naranjas (a). No toque los contactos de color dorado. Inserte cada cabezal
en el compartimento de color correspondiente y presione firmemente hasta que
el cabezal encaje en su sitio (b).
Cierre la cubierta azul y, a continuación,
cierre la puerta superior.
Secouez bien chaque tête d’impression
(six fois) avant de la dépaqueter.
Ouvrez le couvercle supérieur (a). Retirez le dispositif de
blocage en plastique orange (b). Conservez le dispositif
de blocage afin de pouvoir le remettre en cas de
transport de l’imprimante.
Tirer la poignée bleue vers l’avant (a), puis soulevez-la (b)
et repoussez-la (c).
Dépaquetez chaque tête d’impression, retirez et mettez de côté les capuchons
de protection oranges (a). Ne touchez pas les contacts dorés. Insérez chaque
tête d’impression à l’emplacement correspondant à sa couleur, en appuyant
fermement pour qu’elle s’emboîte (b).
Fermez le couvercle bleu, puis le couvercle
supérieur.
13
15
14
16
Resume button
Botón reanudar
Bouton de reprise
Printhead light
Indicador
luminoso del
cabezal de
impresión
Voyant de tête
d’impression
Specialty media tray
Bandeja para soportes
especializados
Bac pour supports
spéciaux
Main tray
Bandeja
principal
Output tray
Bandeja
de salida
Bac principal
Bac de sortie
Paper for calibration
Papel de calibración
Papier pour
l’étalonnage
Paper guides
Guías del papel
!
Guides de papier
IMPORTANT
IMPORTANTE
IMPORTANT
Load paper and calibrate
the printer
Remove the output tray straight out, by pulling it firmly.
The output tray is the removable ‘lid’ on top of the main tray.
Note: Make sure the specialty media tray is closed.
Load all of the included HP Advanced Photo paper into
the main tray in portrait orientation, glossy side down.
Align the paper against the right side of the tray.
Adjust the paper guides. Check that the paper is lying flat.
Slide the output tray back into place.
Start calibration
Press the Resume button [ ] to start printer calibration.
Cargue papel y calibre
la impresora
Retire la bandeja de salida tirando firmemente.
La bandeja de salida es la “tapa” extraíble situada sobre
la bandeja principal.
Nota: Asegúrese de que la bandeja para soportes especializados
está cerrada.
Cargue todo el papel fotográfico avanzado de HP en la
bandeja principal con una orientación vertical y la cara
satinada hacia abajo. Alinee el papel contra el lado
derecho de la bandeja.
Ajuste las guías del papel. Compruebe que el papel está plano.
Ajuste la bandeja de salida de nuevo en su sitio.
Inicie la calibración
Presione el botón reanudar [ ] para iniciar la
calibración de la impresora. La calibración dura entre
Charger du papier et
étalonner l’imprimante
Retirez le bac de sortie en le tirant droit et fermement.
Le bac de sortie est le « couvercle » amovible au-dessus du bac
principal.
Remarque : assurez-vous que le bac pour supports spéciaux
est fermé.
Chargez tout le papier photo avancé HP dans le bac
principal orienté en portrait, face brillante vers le bas.
Placez le papier contre le côté droit du bac.
Réglez les guides de papier. Vérifiez que le papier est posé à plat.
Remettez le bac de sortie en place.
You need to install the printer software for the printer to work correctly.
You can install the software while the printer is calibrating.
Important – Windows users: Connect the printer to your computer with a USB
cable only when prompted by the software install program and not before.
Important – Purchase a USB cable separately if it is not included.
17
EN
1. Insert the included CD into your computer if you haven’t already.
Windows: Click Install Printer Software.
Macintosh: Double-click the HP Software icon (
) on the desktop, and then double-click the HP Photosmart Installer icon (
). If you’ve completed
all the hardware setup steps, skip ahead to the software install step.
2. Follow the onscreen instructions to install the software.
Install the software
Instale el software
Installation du logiciel
30 y 40 minutos. Aproveche este momento para instalar el
software (paso 17). El indicador luminoso del cabezal [ ]
se apaga cuando la calibración ha terminado.
Para un correcto funcionamiento de la impresora, necesita realizar la instalación
del software.
Puede instalar el software mientras la impresora se está calibrando.
Atención a los usuarios de Windows: Conecte la impresora al equipo con
un cable USB sólo cuando se lo indique el programa de instalación de software
y no antes.
Importante: Adquiera el cable USB por separado si no está incluido.
17
ES
When the printer finishes calibrating and software installation is
complete, your printer is ready to use.
Calibration takes 30–40 minutes. Use this time to install the
software (step 17). When the Printhead light [ ] goes off,
calibration is complete.
Démarrer
l’étalonnage
Appuyez sur le bouton Reprendre [ ] pour démarrer
l’étalonnage. L’étalonnage dure de 30 à 40 minutes.
Pendant ce temps, installez le logiciel (étape 17). Quand
le voyant de tête d’impression [ ] s’éteint, l’étalonnage est
terminé.
Vous devez installer le logiciel d’impression afin que l’imprimante fonctionne
correctement.
Vous pouvez installer le logiciel pendant l’étalonnage de l’imprimante.
Important – Utilisateurs Windows : ne branchez l’imprimante à votre
ordinateur à l’aide d’un câble USB que quand vous y serez invité par le logiciel
d’installation et pas avant.
Important – Achetez un câble USB séparément si aucun n’est inclus.
17
FR
1. Inserte el CD en su equipo si aún no lo ha hecho.
Windows: Haga clic en Instalar software de la impresora.
Macintosh: H
aga doble clic en el icono de HP Software (
) en el escritorio y,
a continuación, haga doble clic en el icono de HP Photosmart Installer
(
). Si ya ha completado la instalación del hardware, vaya al paso
de la instalación del software.
2. Siga las instrucciones que aparecen en pantalla para instalar el software.
1. Insérez le CD inclus dans votre ordinateur si vous ne l’avez pas déjà fait.
Windows : cliquez sur Installer le logiciel de l’imprimante.
Macintosh : double-cliquez sur l’icône du logiciel HP (
) sur le bureau, puis doublecliquez sur l’icône du programme d’installation de HP Photosmart (
).
Si vous avez terminé toutes les étapes d’installation du matériel, passez à
l’étape d’installation du logiciel.
2. Suivez les instructions à l’écran pour installer le logiciel.
La impresora estará preparada para su uso cuando haya terminado
la calibración de ésta y la instalación del software.
Quand l’étalonnage est terminé et l’installation du logiciel achevée,
votre imprimante est prête à l’utilisation.
Ink in the cartridges included in the printer box is used for printer initialization. Ink from these cartridges,
as well as from replacement cartridges, is also used to keep print nozzles clear and ink flowing smoothly.
La tinta de los cartuchos que se incluyen en la caja de la impresora se usa para la inicialización de la
impresora. Tanto la tinta de estos cartuchos como la de los cartuchos de sustitución, se usa para mantener
los inyectores de tinta limpios y hacer que la tinta se distribuya correctamente.
L’encre des cartouches livrées avec l’imprimante sert à l’initialisation de l’imprimante. L’encre de ces
cartouches, ou de celles de rechange, sert également au nettoyage des buses et au maintien du flux
d’encre homogène.
Always leave the printer plugged in so that it can perform self-servicing routines. For more information,
see the User Guide.
Se recomienda que deje siempre la impresora conectada para que pueda realizar las tareas automáticas
de mantenimiento. Para obtener más información consulte la Guía del usuario.
Laissez toujours l’imprimante branchée afin qu’elle puisse effectuer des opérations de maintenance.
Pour plus d’informations, reportez-vous au guide de l’utilisateur.
?
Need more information?
¿Necesita más
información?
Besoin de plus
d’informations ?
HP Photosmart Pro
B8800
series
HP Photosmart
Pro
B8800 Series
Quick
Quick Start
Start
Tutorial
included
Tutorial included
Product in [country]
Product
in [country]
www.hp.com/support
www.hp.com/support
*XXXXX-XXXXX*
*XXXXX-XXXXX*
*Q5734-90277*
XXXXX--XXXXX
*Q5734-90277*
2007
HPDC
©©
2007
HPDC
View the animated Quick Start Tutorial on the included CD
(see step 3). Click the Need help? link in the tutorial for help
on solving setup problems.
HP Photosmart Pro
B8800
series
HP Photosmart
Pro
B8800 Series
Quick
Quick Start
Start
Tutorial
included
Tutorial included
Product in [country]
Product
in [country]
www.hp.com/support
www.hp.com/support
*XXXXX-XXXXX*
*XXXXX-XXXXX*
*Q5734-90277*
XXXXX--XXXXX
*Q5734-90277*
2007
HPDC
©©
2007
HPDC
Vea el tutorial animado de la guía rápida que se incluye
en el CD (paso 3). Haga clic en el enlace ¿Necesita ayuda?
del tutorial para recibir ayuda acerca de cómo resolver
problemas de instalación.
HP Photosmart Pro
B8800
series
HP Photosmart
Pro
B8800 Series
Quick
Quick Start
Start
Tutorial
included
Tutorial included
Product in [country]
Product
in [country]
www.hp.com/support
www.hp.com/support
*XXXXX-XXXXX*
*XXXXX-XXXXX*
*Q5734-90277*
XXXXX--XXXXX
*Q5734-90277*
2007
HPDC
©©
2007
HPDC
Regardez le Didacticiel de Démarrage Rapide animé inclus
sur le CD (voir étape 3). Cliquez sur Besoin d’aide ? dans
le didacticiel pour résoudre des problèmes de configuration.
Read the User Guide.
Consulte la Guía del usuario.
Lisez le manuel d’utilisation.
Contact HP support at www.hp.com/support
or 1-800-HP invent (1-800-474-6836).
Póngase en contacto con la asistencia técnica de HP en
www.hp.com/support, o bien, llame a 1-800-HP invent
(1-800-474-6836).
Contactez le service d’assistance clientèle à l’adresse
www.hp.com/support ou appelez le 1-800-HP Invent
(1-800-474-6836).
www.hp.com
Printed in [country] - Enu
Printed in [country] - Fra
© 2007 Hewlett-Packard Development Company, L.P.