1
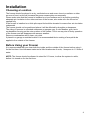
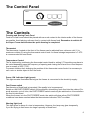
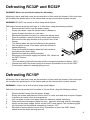
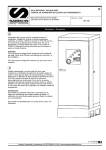
FREEZER
MODELS RC15P, RC32P, RC52P
HANDBOOK
81.20.255-01
Electrical Requirements
We recommend that this appliance is connected to the mains supply via a suitable
switched socket, in a readily accessible position.
All Hotpoint appliances come complete with a fitted plug. The plug on your freezer has a
13A fuse. If the plug does not fit your sockets, a new plug can be flitted. Cut off the old
plug and throw it away (DO NOT insert it into a socket elsewhere, as this could cause a
shock hazard).
WARNING: THIS APPLIANCE MUST BE EARTHED
IMPORTANT: Fitting a different plug The wires in the mains lead are coloured in accordance with the followiing code:
Green and Yellow
Blue
Brown
- Earth
- Neutral
- Live
If you fit your own plug, the colours of these wires may not correspond with the identity
markings on the plug terminals. This is what you have to do:
Connect the green and yellow (Earth) wire to the terminal coloured green and yellow or marked
‘E’ or with the symbol
Connect the blue (Neutral) wire to the terminal coloured black or marked ‘N’.
Connect the brown (Live) wire to the terminal coloured red or marked ‘L”.
In the event of replacing a fuse in the plug supplied, a 13A ASTA approved fuse to
BS1 362 must be fitted. With alternative plugs a 15A fuse must be fitted either in the plug
or adaptor or in the main fuse box.
If the plug is the moulded on type, the fuse cover must be refitted when changing the
fuse. In the event of losing the fuse cover, the plug must not be used until a replacement
fuse cover has been obtained and fitted. A new fuse cover is available from your nearest
Hotpoint parts centre or your Electricity Company. Identify a correct replacement by
comparing colour coding or markings on the base of the plug.
Mains Lead Replacement
If the mains lead on your freezer needs replacing at any time, a special lead is available
from your nearest Hotpoint Service Office (see Back Cover). A charge will be made if you
have damaged the existing lead or require a longer lead.
WARNING: HOW TO AVOID ACCIDENTS TO CHILDREN - DO NOT ALLOW CHILDREN TO
PLAY WITH THE FREEZER OR TAMPER WITH THE CONTROLS. WHEN DISCARDING AN
OLD FREEZER, BE CERTAIN TO MAKE THE LOCK UNUSABLE. IF POSSIBLE, REMOVE
THE DOORS AND DISCARD SEPERATELY. DO NOT ATTEMPT TO STAND ON TOP OF
YOUR FREEZER,IT IS NOT DESIGNED FOR SUCH USE AND YOU COULD INJURE YOURSELF OR DAMAGE THE FREEZER BY SUCH ABUSE.
2
Contents
Page
Electrical Requirements ................................................................................................................ 2
Installation ..................................................................................................................................... 4
Features ........................................................................................................................................ 5
The Controls ................................................................................................................................. 6
Loading the Freezer, Storage ....................................................................................................... 7
Defrosting ...................................................................................................................................... 8
Cleaning ........................................................................................................................................ 9
Power Failure, Interior Light .......................................................................................................... 9
Safety Information ....................................................................................................................... 10
Troubleshooting .......................................................................................................................... 10
Guide to Freezing ........................................................................................................................ 11
After Sales / Hotpoint Guarantee ........................................................................................... 12-13
Key Contacts ................................................................................................................. Back Cover
Disposal notes:
The packaging is designed to protect the appliance and individual components during transport
and is made of recyclable materials.
Corrugated board/board
Moulded polystyrene (foamed, CFC-free polystyrene).
Polythene bags and sheets
Wood
Polyproplene straps
Keep packaging materials away from children - polythene sheets and bags can suffocate.
Please return packaging material to your nearest official collection point so that the various
materials can be reused or recycled as far as possible.
Ensure that the refrigerant circuit is not damaged before the appliance that is no longer needed
is taken away for disposal. In this way the refrigerant will not escape into the environment.
Exact details of the refrigerant used can be found on the type plate. The heat insulator is
PU with Pentane.
Information on collection dates or collection points can be obtained from the waste disposal
authorities or local council.
Technical Safety
The refrigerant R600a is environmently friendly but flammable, take care not to damage the
refrigerant circuit pipes. If refrigerant does escape, immediately ensure that the area is well
ventilated.
Do not use electrical appliances; i.e ice makers, inside the appliance.
In the event that the appliance is damaged, contact the supplier immediately before connecting
to the mains.
To guarantee safe operation, ensure that the appliance is set up and connected as described in
these operating instructions, and that Hotpoint service dept. only carries out any repairs and
work on the appliance.
Retention of the Instruction Book
This Instruction Book must be kept handy for reference as it contains important details on the
safe and proper use of the appliance.
If you sell or pass the appliance to someone else, or move house and leave it behind, make sure
this Book is also provided so the new owner can become familiar with the appliance and safety
warnings.
3
Installation
Choosing a Location
The freezer should be placed in a dry, ventilated room and never close to a radiator or other
sources of heat, as this will increase the power consumption unnecessarily.
Please make sure that the freezer is installed on a level surface and in a position providing
adequate air circulation to the sides and rear of the freezer, also make sure the lid can be
opened fully.
If the freezer is installed on a thick pile carpet it should be elevated to ensure free air circulation
underneath.
The freezer should not be positioned where it will be affected by draughts or dampness.
The siting of freezers in unheated outhouses or garages may, in cold weather, give rise to
condensation forming on the outer surface of the freezer. This is no way due to faulty operation
of the freezer and will disappear with warmer weather.
Remove condensation with a clean, dry cloth.
If placed in a garage or outside location it is recommended that a coating of wax polish be
applied to the outside of the freezer.
Before Using your Freezer
It is recommended that you clean both the inside and the outside of the freezer before using it
for the first time. Use lukewarm water and a little bicarbonate of soda; 1 teaspoon to 1.2 litres of
water.
NOTE: The freezer should be allowed to stand for 2-3 hours, to allow the system to settle,
before it is turned on for the first time.
4
Features RC32P and RC52P
LID LIGHT
Illuminates when
the lid is opened.
LOCK
The freezer can be locked
for added security.
BASKET
The plastic
handles of the
basket are
moveable.
STORAGE CALENDAR
A quick guide to
recommended storage
times.
PARTITION
The partition is removable. When defrosting the
freezer it is used as a tray
for collecting defrost water.
FAST FREEZE
COMPARTMENT
For the freezing of fresh
food.
CONTROL PANEL
The functions of the
lamps are described in
detail on the next page.
Features RC15P
BASKET
LOCK
The freezer can be locked
for added security.
CONTROL PANEL
The functions of the
lamps are described in
detail on the next page.
5
The Control Panel
RC15
2
3
4
1
Min
5
Power
Fast Freeze
Alarm
The Controls
Freezing and Storing Fresh Food
Food to be fast frozen should be placed with as much contact to the interior walls of the freezer
as possible. Avoid placing unfrozen food in contact with frozen food. Remember to switch off
the Super Freeze switch when the quick freezing is completed.
Thermostat
The thermostat, located at the front of the freezer can be adjusted from minimum cold (1) to
maximum coldest (5) using the thermostat control knob. A normal storage temperature of -180C
is recommended for most foods.
Temperature Control
This is obtained by positioning the thermostat control knob to setting 2. This setting may have to
be varied depending upon the frequency of opening and closing the lid and for a room temperature in excess of 250C (770F).
To prevent children from changing the position of the thermostat control knob it is necessary to
use a coin or similar object to turn the knob.
Power ‘ON’ Indicator Light (green)
This light remains illuminated as long as the freezer is connected to the electricity supply.
Fast Freeze switch
Fast freezing of fresh food is important if the quality is to be preserved.
Switch on the FAST FREEZE switch 24 hours before introducing fresh food into the cabinet. For
small amounts, up to 4 kilos, the FAST FREEZE switch need only be switched on 4 hours before
the food is introduced.
When the freezer is in the FAST FREEZE mode, the switch will glow yellow. FAST FREEZE
conditions have been reached when the thermometer indicates -220C or colider.
Warning light (red)
This light glows to warn of a rise in temperature. However, the lamp may glow temporarily
if you are trying to fast freeze too large a quantity of fresh food.
6
Loading the Freezer
When loading your freezer with fresh food, place the food in contact with the walls of the
freezer. If necessary, the food may be placed between the already frozen food and the
cabinet walls.
Remember...
•
To prepare the food correctly before fast freezing.
•
Different foods need different preparation (see ‘Guide to Home Freezing’see page 11)
•
Squeeze all air out of freezer bags before closing/sealing.
•
Do not Fast Freeze too much food at any one time. If you need to Fast Freeze
a large quantity of food, store the food in your refrigerator and carry out the freezing
in batches.
•
Do not freeze hot food. By allowing food to cool before freezing the duration of fast
freezing will be reduced and the freezer will use less energy to obtain the correct storage
temperature.
Storage
Pre-packed commercially frozen food should be stored in accordance with the frozen food
manufacturer’s instructions. Place the packets of frozen food into the freezer as soon after
purchase as possible. Carefully follow any instructions on the packet referring to storage times.
The storage life of frozen foods vary and the recommended storage times should not be
exceeded. The instructions regarding the care of frozen foods should be followed when defrosting the freezer.
7
Defrosting RC32P and RC52P
WARNING! Never use electrical heaters for defrosting.
Moisture in the air and food cause an accumulation of frost inside the freezer. A thin frost layer
will not affect the performance of the freezer and can be removed with a plastic scraper.
WARNING! DO NOT use a knife or other sharp metal objects.
Defrost the freezer when the frost layer is 3-4mm thick, using the following method:
•
Disconnect the freezer from the power supply.
•
Empty the freezer, wrap the frozen food in a blanket or
layers of paper and store in a cool area.
•
Remove the partition and use it to collect the defrost water.
•
Place the partition under the defrost outlet (see illustration).
•
Remove the drain plug situated on the interior floor of the
freezer.
The defrost water will then be collected in the partition.
•
You can place a bowl of hot water inside the freezer to
speed defrosting.
•
Clean the freezer throughout when the frost has been
removed and dry thoroughly.
•
Replace the drain plug and the partition.
•
Reconnect to the power supply and switch ‘ON’. Switch on
the FAST Freeze
switch.
(The red warning light will illuminate until the internal temperature is below -18*C).
•
Unwrap and return the frozen food to the freezer. Remember to turn off the FAST
Freeze switch when the warning light goes out.
Defrosting RC15P
Moisture in the air and food cause an accumulation of frost inside the freezer. A thin frost layer
will not affect the performance of the freezer and can be removed with a plastic scraper.
WARNING!... Never use a knife or other sharp metal objects.
Defrost the freezer when the frost formation is 3-4 mm thick, using the following method:
1.
2.
3.
4.
5.
6.
Disconnect the freezer from the power supply.
Empty the freezer and place the frozen food in a cool area and wrap in layers of paper
to prevent an undue rise in the temperature.
You can place a bowl of hot water inside the freezer to speed defrosting.
Clean the freezer throughout when the frost has been removed, and dry thoroughly.
Switch on the power supply. Switch on the FAST freeze switch. The red warning light
will illuminate until the internal temperature is below -18°C.
Reload the freezer with the frozen food. Remember to return the FAST freeze
switch when the alarm warning goes off.
8
Cleaning
Disconnect the freezer from the power supply. Clean both the inside and the outside of your
freezer. Use lukewarm water containing a little bicarbonate of soda (1 teaspoon to 1.2 litres of
water).
Never use any household cleaner or detergent, abrasive powders or wax polish. These not only
damage the surfaces but also leave a smell within the freezer.
Dry thoroughly, reconnect to the power supply and switch “ON”. Make sure all switches are set
correctly.
If the freezer is to be left unused for long periods, switch off and disconnect from the power
supply. Remove all foods and follow the defrosting instructions.
NOTE: Leave the lid open to prevent the accumulation of odours.
Power Failure
A brief power failure will not affect your frozen food, although it is advisable to keep the lid
closed to prevent a rise in temperature.
In the event of the power failure lasting longer than 12 hours, the frozen food should be
checked before the power is reconnected to make sure it has not defrosted.
Interior Light does not come on
(Not fitted to all models)
The bulb has burnt out. To change the bulb, disconnect the freezer from the electricity
supply, remove the lamp cover and replace the bulb (15W, 220-240V, E 14 base).
Replace the cover, plug in and switch on.
9
Important Safety Information
The freezer must only be used for its intended purpose, which is for the freezing and
storage of domestic foodstuffs.
Please read the following information, it is provided in the interest of your safety:
•
If you are discarding an old freezer with a lock or catch fitted to the lid, ensure that the
freezer is left in a safe condition to prevent children getting trapped inside.
•
DO NOT place carbonated or fizzy drinks in the freezer, as the container may explode
when frozen.
•
DO NOT store explosive substances in the freezer eg. gas containers.
•
DO NOT refreeze food once it has thawed out.
•
DO NOT alter or modify the design specifications of the freezer in any way.
•
DO NOT attempt to carry out any repair on the freezer yourself; any servicing or maintenance must only be undertaken by a suitably qualified person.
•
DO NOT consume water ices directly from the freezer, allow to warm slightly before
consumption.
•
DO unplug the freezer at the mains before carrying out any cleaning or maintenance.
•
DO allow the freezer to stand for 2-3 hours before it is turned on for the first time, to
allow the system to settle.
•
DO take care when moving the freezer, as it is heavy.
•
DO follow the food manufacturer’s storage recommendations as indicated on the
packaging.
•
DO allow adequate ventilation to the freezer as failure to do so could result in reduced
performance or premature component failure.
•
ALWAYS lock the freezer and keep the key in a place inaccessible to children.
Troubleshooting
Please check the following before calling your service dealer.
•
•
•
•
•
•
Is the plug in the plug socket?
Has the fuse blown?
Is there a power failure?
Is the setting of the thermostat knob correct? (see ‘Controls’ page 6)
Is the freezer placed too close to a heat source? (see ‘Choose a Location’ page 4)
Is there a thick layer of frost on the internal walls? (see ‘Defrosting’ page 8)
If the compressor makes repeated attempts to start without result, then turn off the electricity
supply for about 20 minutes and then try again.
DO NOT try to repair the freezer yourself.
If after following these instructions, you are still having problems, contact your nearest Hotpoint
Service office (see Back Cover). You will need to have the following information on hand when
calling:
- Your name, address and postcode.
- Your telephone number.
- Clear and concise details of the fault.
- The model number and serial number.
- The date you purchased it and where from.
- Details of any Extended Warranty etc.
10
Guide to Home Freezing
Recommended duration of storage for various
foods.
Meat and Poultry
Meat can be frozen in various ways. Do not
freeze too large pieces as this will ruin the
quality of the meat.
Beef
Roastbeef
Beefsteak
Fillet
Goose
Hare
Chicken
Turkey
Rabbit
Lamb
Liver
Kidney
Cutlets
raw, joint
6-8 months
raw or roasted
10-12 months
raw
10-12 months
raw, joint or steak
6 months
raw, whole, cleaned
6 months
raw, skinned, cleaned 12 months
raw, cleaned
6 months
raw, cleaned
6 months
raw, skinned, cleaned 12 months
raw
6-12 months
raw or stewed
6-8 months
raw
4 months
raw pork
3 months
veal
10-12 months
venison
12 months
Fish and Seafood
Fish can be frozen in various ways.
Perch
Trout
Lobster
Salmon
Turbot
Herring
Cod
Eel
raw, cleaned, whole
or fillet
8 months
raw, cleaned, whole
or fillet
4-6 months
smoked
1 month
boiled
3 months
raw, cleaned, whole
or fillet
3 months
smoked
2 months
raw, cleaned
6 months
raw, cleaned
3 months
raw, cleaned, whole
or fillet
8-12 months
raw, cleaned
3 months
smoked
1 month
Ready Prepared Food
It is both practical and economical to freeze.
Remember that the duration of storage
depends on the fat contained in the food.
Bouillon
Fish, boiled
Fish dish or soup
Vegetable dish
Hamburger
Stew
Forcemeat dish
Pizza
6 months
10-12 months
4-6 months
6 months
3-6 months
6 months
3-4 months
3-4 months
Fruits and Berries
Orange
Apricot
Bilberry
Grape
Apple
Rhubarb
Plum
squeezed
washed, sliced
12 months
12 months
12 months
12 months
in bunch
peeled, pips removed,
cut into halves
12 months
12 months
stone removed,
cut into halves
12 months
Vegetables, Mushrooms and Spices
Most vegetables can be frozen.
Aubergine
Cauliflower
Broccoli
Beans
Dill
Kale
Corncob
Peppers
Horseradish
Parsley
Beetroot
Celery
Spinach
Peas
Mushrooms
12 months
10-12 months
10-12 months
12 months
10-12 months
12 months
12 months
12 months
12 months
12 months
12 months
12 months
12 months
12 months
10-12 months
Bread and Pastry
Bread can be frozen both whole and sliced.
Remember that the duration of storage
depends on the fat contained in the bread and
pastry.
Rye bread
White bread
Pastry
Biscuits
6 months
3-6 months
3 months
3 months
Food that should not be frozen
Avocado
Banana
Marmalade
Tomato
Egg
Radish
Lettuce
Sauerkraut
Omelette
11
Guarantee
“Satisfaction guaranteed or your money back”
We give you a unique ‘satisfaction guaranteed’ promise - valid for 90 days - after you have
purchased your Hotpoint appliance. If there is a technical problem simply call Hotpoint Repair
service or visit our web-site at www.theservicecentre.co.uk and where necessary, we will arrange
for an engineer to call. If the technical problem is not resolved under this guarantee, we will
replace your machine or, if you prefer, give you your money back.
All Hotpoint appliances carry a fully inclusive 12 month parts and labour guarantee as well as
free replacement parts for the first 5 years (except microwaves, selected integrated appliances
and cooker hoods, which have a one year guarantee) provided that they are
fitted by a Hotpoint engineer.
Guarantee terms and conditions
Your guarantee is only applicable in the United Kingdom or Republic of Ireland and is
subject to the following provisions that your appliance:
Has been installed and used correctly in accordance with this instruction booklet.
Has been used solely for domestic purposes and is located on domestic premises (ie. not
for commercial or trade use).
Has been properly connected to a suitable electrical supply voltage as stated on the
appliance rating plate.
Has not been subject to misuse, accident, modified or repaired by anyone other than one
of our own service engineers.
For pre purchase information on any other Hotpoint product call: 08701 50 60 70
or visit: www.hotpoint.co.uk
Recycling & Disposal Information
As part of Hotpoint’s continued commitment to helping the environment, Hotpoint reserves
the right to use quality recycled components to keep down customer costs and minimise
material wastage.
Please dispose of packaging and old appliances carefully. Old refrigerant and oil must be
disposed of in a safe and environmentally friendly manner, using suitably qualified personnel.
To minimise risk of injury to children, remove the door, plug and cut mains cable off flush with
the appliance. Dispose of these parts separately to ensure that the appliance can no longer
be plugged into a mains socket, and the door cannot be locked shut.
12
After Sales Service
“No company is better positioned to offer an after sales service on a
Hotpoint appliance than us - the manufacturer”
As part of our commitment to you, all Hotpoint appliances have the added benefit of a fully inclusive
parts and labour guarantee for the first 12 months. In addition to this you also have the advantage of
free replacement parts for the first 5 years when fitted by a Hotpoint
engineer. When the 12 months parts and labour guarantee expires we offer the following after sales
service options:
Repair Service and Information Help Desk
UK: 08709 066066
www.theservicecentre.co.uk
Republic of Ireland: 1850 302 200
Note: Our operators will require the Model number and the Serial number of your appliance
(see USEFUL ADVICE SECTION for rating plate position).
Available 364 days a year with a fast, effective and value for money service. We have the largest white
goods repair service in the UK with over 1200 of our own fully trained engineers. All repairs include a
parts and labour guarantee for 12 months from the date of the repair.
If you require any information or have any questions about your appliance, our operators are on hand
with help and advice.
All this ensures that you will receive the best available after sales service possible.
Extended Warranties
UK: 08709 088 088
www.theservicecentre.co.uk
Republic of Ireland: 1850 502 200
Whether you have just one or a number of Hotpoint appliances in your kitchen, we offer two service
cover plans to give you total peace of mind.
Repair Protection Plan
FREE service repairs for a single Hotpoint appliance during the
period of cover.
Kitchen Cover
FREE service repairs for all your Hotpoint appliances less than 8
years old.
Genuine Parts and Accessories
UK: 08709 077 077
www.theservicecentre.co.uk
Republic of Ireland: (01) 842 6836
A wide range of genuine parts and accessories are available from our hotline or through our web
site.
Genuine parts and accessories, extended warranties and service repairs are all
available on our web-site at:
www.theservicecentre.co.uk
13
14
15
Key Contacts
After Sales Service
Over 1200 trained specialists, directly employed by us, ensure that you can have complete confidence
in both the appliances and services we offer.
Repair Service and Information Desk
UK: 08709 066 066
(Open 8 to 8 Mon - Fri, 8 to 6 Sat, 10 to 4 Sun & Bank Holidays)
www.theservicecentre.co.uk
Republic of Ireland: 1850 302 200
Note: Our operators will require the following information:
Model number:
Serial number:
See USEFUL ADVICE SECTION for rating plate position
Extended Warranties
UK: 08709 088 088
(Open 8 to 8 Mon - Sun)
www.theservicecentre.co.uk
Republic of Ireland: 1850 502 200
Genuine Parts and Accessories
UK: 08709 077 077
(Open 8-30 to 5-30 Mon - Fri & 9 to 12 Sat)
www.theservicecentre.co.uk
Republic of Ireland: (01) 842 6836
General Domestic Appliances Limited, Morley Way, Peterborough, PE2 9JB.
FP114-01